TDF200 - Tumble dryer Caple - Free user manual and instructions
Find the device manual for free TDF200 Caple in PDF.


| Product Type | Tumble Dryer |
| Brand | Caple |
| Model | TDF200 |
| Capacity | 7 kg |
| Dimensions (H x W x D) | 85 x 60 x 60 cm |
| Net Weight | 35 kg |
| Energy Rating | Class B |
| Power Consumption | 2000 W |
| Voltage / Frequency | 230 V ~ 50 Hz |
| Drying Type | Condenser (Vented Kit Optional) |
| Programs | Cotton, Synthetics, Delicates, Timed Drying, etc. |
| Noise Level | 65 dB(A) |
| Door Reversibility | Yes, reversible |
| Filter Indicator | Yes |
| Water Tank Capacity | 3.5 L |
| Child Lock | Yes |
| Delay Start | Up to 24 hours |
| Cleaning | Clean lint filter after each cycle |
| Spare Parts Availability | Genuine Caple parts available |
| Repairability Index | 8.5 / 10 |
Frequently Asked Questions - TDF200 Caple
User questions about TDF200 Caple
0 question about this device. Answer the ones you know or ask your own.
Ask a new question about this device
Download the instructions for your Tumble dryer in PDF format for free! Find your manual TDF200 - Caple and take your electronic device back in hand. On this page are published all the documents necessary for the use of your device. TDF200 by Caple.
USER MANUAL TDF200 Caple
Instruction manual for condenser tumble dryer
Model code: TDF200
natural_image
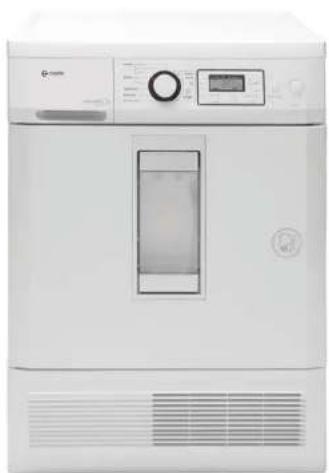
White industrial washing machine with control panel and digital display (no visible text or symbols)Contact Caple on 0844 800 3830 or for spare parts www.4caple.co.uk

caple
Dear Customer,
You have just acquired a Caple dryer and we would like to thank you.
We have invested all our dedication and know-how in this appliance to best meet your needs. With strong innovation and performance, this appliance is designed to be easy to use.
As part of our commitment to constantly improve our products, we reserve the right to make changes to the product's specifications and features in the pursuit of technological advances.


Warning :
Before installing and using your appliance, please read this Installation and Usage,
which will allow you to quickly familiarise yourself with its operation.

CONTENTS
1 / FOR THE USER'S ATTENTION
- Safety instructions 4
• Environmental protection—5
• Energy savings—5
2 / DESCRIPTION OF YOUR APPLIANCE
- General presentation of the tumble dryer ————6
- The "Steam" tank ____7
3 / INSTALLING YOUR TUMBLE DRYER
- The appliance's surroundings ———— 8
• Levelling—8 - Before using the steam program for the first time ————9
• Built-in installation 9 - Combined washer/dryer installation—9
- Electrical connection—10
4 / PREPARING YOUR ITEMS
- Checking the condition of your laundry ———— 11
- Loading laundry into the drum 11
5 / PROGRAMMING
- Presentation of the control panel ———— 12
• Drying programs — 12 - "Steam" programs 14
- Your dryer's programs ———— 17
• The options 18
6 / REGULAR MAINTENANCE
- Filling the steam tank—20
- Cleaning the steam tank 21
- Cleaning the filter 22
- Emptying the condenser tank 22
- Direct evacuation of water condenser—23
- Cleaning the condenser——24
- Cleaning the appliance 24
- Changing the bulb——25
7 / PERIODIC MAINTENANCE
- Cleaning the filter housing 26
- Cleaning the condenser housing——26
8 / TROUBLESHOOTING 28
9 / AFTER-SALES SERVICE 30
EN 1 / FOR THE USER'S ATTENTION
• SAFETY INSTRUCTIONS

Important :
Keep these operating instructions with your appliance. If you should sell your machine or give it to someone else, ensure that the operating instructions are provided. Please take note of these safety instructions before installing and using your appliance. They have been written for your safety and that of others.
• Installation
- When you receive the appliance, unpack it or have it unpacked immediately. Check that it has not suffered any damage during transport. Express any reservations in writing on the delivery slip and keep a copy.
Never connect a damaged appliance.
If your appliance is damaged, please contact your dealer.
- Before connecting your appliance, please refer to the installation instructions.
- Your tumble dryer must be kept disconnected from the mains supply throughout the whole installation process.
- The electrical connection details shown on your appliance's information plate must match those of the local mains supply.
- Once your appliance has been installed, the electrical plug must remain accessible.
- Do not alter or try to alter the appliance's characteristics. This could be dangerous.
- If your installation requires alteration, only entrust the electrical and plumbing work to qualified electricians and plumbers.
- The appliance must not be installed behind a locking door, a sliding door or a door with hinges on the opposite side to those on the dryer.
- Your appliance is designed for normal domestic use. Do not use it for commercial or industrial purposes or for any purpose other than the one for which it has been designed
• Children's safety
- This appliance must only be used by adults. Do not let children play with the appliance and keep pets away from it.
- Keep young children away from the appliance when it is operating.
- Keep the packaging materials out of children's reach (e.g.: plastic bags, polystyrene, etc.) because they can be dangerous for children: risk of suffocation.
- This appliance is not intended for use by persons (including children) with reduced physical, sensory or mental capabilities, or lack of experience and knowledge, unless they are supervised or instructed concerning use of the appliance by the person responsible for their safety.
• Use
Important :
Your tumble dryer is designed for domestic use only, for drying laundry suitable for tumble drying.
Important :
You must observe the following instructions. We decline any responsibility and rescind the guarantee if these recommendations are ignored: failure to observe them can result in material damage and physical injury.
- Use your appliance in accordance with its method of use, thereby avoiding injury to yourself and damage to your items. Do not use solvents in the appliance (risk of fire and explosion).
– Strictly comply with the care instructions on your laundry.
- If you have to open the door of the drum during the drying cycle, ensure that you do not touch the drum immediately, as it is very hot.
1 / FOR THE USER'S ATTENTION
- Substances contained in soiling such as oil, acetone, alcohol, petrol, kerosene, stain removers, turpentine or wax must be removed before drying in your machine (by using an adapted warm water washing programme with additional detergent for example).
- Precautions for using stain-removing products : any preliminary treatment by solvent, stain-remover, aerosol, such as acetone, alcohol, gasoline, kerosene, térébentine is prohibited because these products are very inflammable. If your laundry requires this type of treatment, this must be done before washing. Similarly, we recommend that you do not use these products near to your dryer or, in general, near any electrical appliance in a poorly ventilated room in order to avoid any risk of an explosion.
- If any incidents occur, which you cannot resolve using the troubleshooting advice we provide (see "TROUBLESHOOTING"), contact our Technical Service Center.
- Before disposing of your worn-out appliance, make it unusable. Unplug and cut off the power cable flush with the appliance and disengage the door lock.
- For your safety's sake, if you wish to change your appliance's power cable, contact a qualified electrician.
- If any operating anomalies occur, disconnect your appliance and call our Technical Service Center.
• ENVIRONMENTAL PROTECTION
The appliance's packaging material is recyclable. Help recycle it and protect the environment by dropping it off in the municipal receptacles provided for this purpose.

Your appliance also contains a great amount of recyclable material. It is marked with this label to indicate that in countries that are a members of the European Union the used appliances should not be mixed with other waste. This way, the appliance recycling organised by your manufacturer will be done under the best possible conditions, in compliance with European Directive 2002/96/EC on Waste Electrical and Electronic Equipment.
Contact your town hall or your retailer for the used appliance collection points closest to your home.
We thank you for doing your part to protect the environment.
• ENERGY SAVINGS
- Spin your textiles at high speeds; the residual dampness will be low, as will your energy consumption. Even synthetic textiles must be spun before drying.
- Place the maximum load in your machine; this will optimize the energy used. When doing so, comply with the indications on volume provided in this instruction manual.
- The drying time and the energy consumption are both increased by a high ambient temperature and too small a room.
– Clean the filter after each drying cycle.
– Clean the condenser twice a month.
- Switch off your tumble dryer at the cycle ends.
EN 2 / DESCRIPTION OF YOUR APPLIANCE
• GENERAL PRESENTATION OF THE TUMBLE DRYER
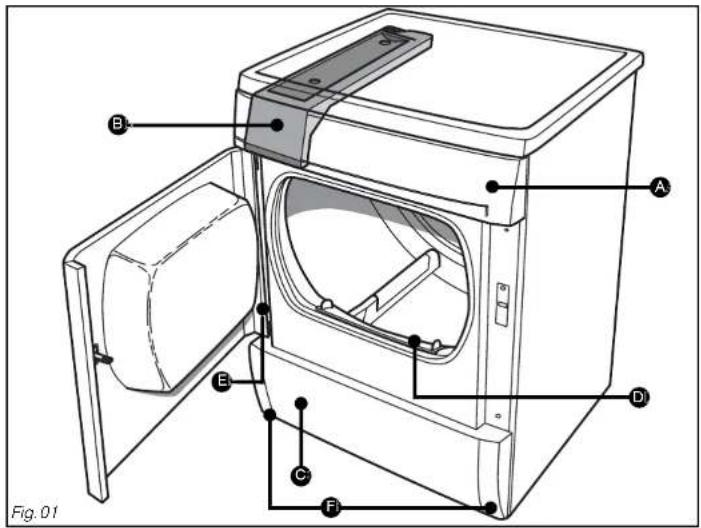
A Control panel
B Condenser tank
© Condenser grill
D Filter
E Rating plate (Reference for After-Sales)
F Adjustable feet
2 / DESCRIPTION OF YOUR APPLIANCE
• THE "STEAM" TANK
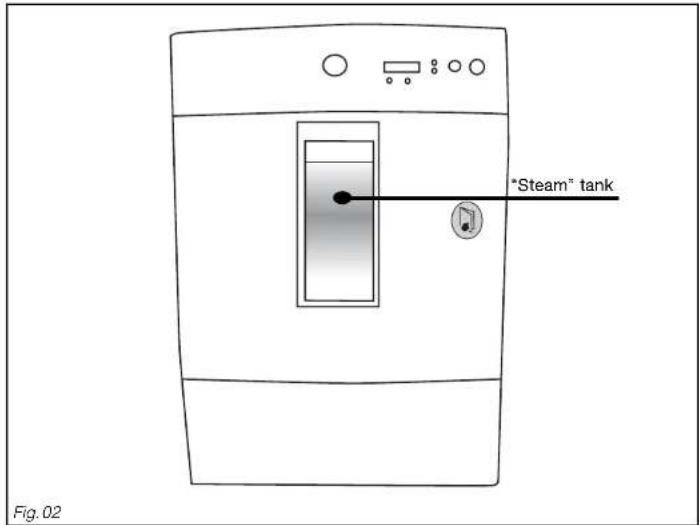
Important: The "Steam" tank must be filled only with demineralised water or with water from the recovery tank provided that it has been filtered using the filter provided for this purpose on the steam tank inlet.
EN 3 / INSTALLING YOUR TUMBLE DRYER
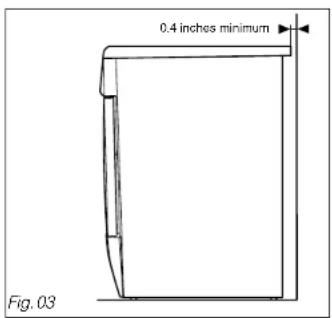
Your tumble dryer releases heat. If you place it next to another appliance or a unit, we advise you always to leave a space in-between for air circulation (Fig. 03).
Important :
We strongly advise against :
- Installing your appliance on a carpeted floor. If you cannot avoid this, take all possible measures not to obstruct the circulation of air at its base.
- Installing your dryer in a location where it can be subject to being splashed with water.
- Installing your dryer in a small closed room (if this is the case, open the door or the window during drying).
- Installing your dryer in a poorly ventilated room. The temperature in the room must remain below 30^ during drying.
• LEVELLING
Important :
Use a level to check that the appliance is horizontal :
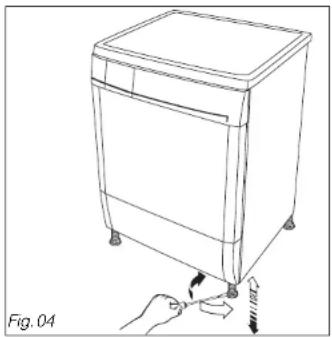
Your dryer is fitted with 4 adjustable feet (Fig.04). To adjust the stability and levelness :
– Tip it slightly backwards.
- Screw one or more of the feet in or out using a spanner or a screwdriver to adjust their height to suit the shape of the floor (Fig.04).
- Set your dryer back on its feet and check that it is stable.
natural_image
Line drawing of a hand pressing down on a washing machine component (no text or symbols)3 / INSTALLING YOUR TUMBLE DRYER
- BEFORE USING THE STEAM PROGRAM FOR THE FIRST TIME
The steam tank is empty when your appliance is delivered.
Important :
The Steam tank is empty when your appliance is delivered. Before using the Steam program for the first time, fill the tank with demineralised water or with water from the recovery tank (see how to proceed in the "EVERYDAY MAINTENANCE" chapter).
• BUILT-IN INSTALLATION
Important :
If you are fitting the appliance underneath a worktop, you must either keep the original laminated top, or replace it with a slimmer version using a kit available for this purpose from your dealer. For safety reasons, the appliance must never be operated without a top.
• COMBINED WASHER/DRYER INSTALLATION
An adaptation kit is available from your dealer. This is used to mount your tumble dryer above your washing machine.
Important :
Check with your dealer that the kit is compatible with your washing machine. For safety reasons, fitting must be performed by a qualified professional.

N 3 / INSTALLING YOUR TUMBLE DRYER
• ELECTRICAL CONNECTION

Danger :
To make the electrical connection to your appliance :
— Do not use an extension, an adapter, a multiple socket or a programmable timer.
— The plug must be easily accessible but be out of children's reach.
— If there's any doubt about the condition of your installation, contact your installer or a qualified
Brandt-approved professional.
— Never eliminate the electrical Earthing system.
The electrical installation must comply with the prevailing standards and the Electricity Board's regulations in the country concerned, particularly regarding Earthing and installation in shower rooms.
We cannot be held responsible for any incident caused by poor electrical installation.
• REPLACING THE ELECTRIC POWER CABLE

Important :
To ensure your safety, this must be carried out by the manufacturer's after-sales service team or a qualified professional.

Advice :
In order to easily find your appliance's reference numbers in the future, we recommend that you note them down on the "After-Sales Service and Consumer Relations" page (this page also explains where to find these on your appliance).
Your appliance complies with European Directives 2006/95/EEC (Low Voltage Directive) and 2004/108/EEC (Electromagnetic Compatibility).
4 / PREPARING YOUR ITEMS
- CHECKING THE CONDITION OF YOUR LAUNDRY

Advice :
If, before you insert your clothes in the tumble dryer, you notice any stains, even after washing, do not dry the items concerned. As a general rule, stains that have been ironed or tumble-dried can no longer be removed.
Please refer to the instructions for treating stubborn stains provided in most washing machine instruction manuals and, in particular, wash the stained items again.
• Preparing your laundry :
- Close all zippers and snap buttons.
- Remove any loose buttons, pins or hook fasteners.
- Knot any belts, apron strings, etc...
– Empty pockets, especially lighters and matches.
• Special notes on steam programs :
- Sort the laundry by fabric type - Do not mix new coloured fabrics with white fabrics.

Important :
Do not tumble-dry the following articles :
– Clothing including rubber like materials (for example: shower caps, waterproof clothing and textiles, linings, pillows etc.)
- Chlorofibres (Thermolactyl* for example) ^Registered trademark
- Items containing underwiring that could become detached
- Bulky items (duvets, eiderdowns, etc...)
– Laundry that has not been spun
– Laundry cleaned with inflammable chemicals.
— Always adhere to the manufacturer's instructions when using softening products.

Important :
Check the labels on your laundry
Normal drying

Gentle drying

Do not tumble dry
- LOADING LAUNDRY INTO THE DRUM
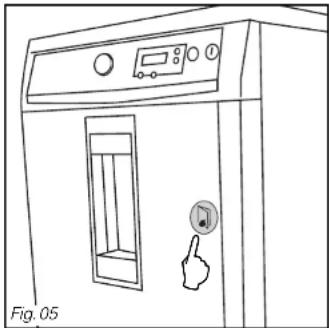
- Open the door by pushing (press where the label is) (Fig. 05).
– Check that the filter is in its housing - Insert washed and spun clothes loosely in the drum without folding it or piling it up.
- Take care not to let any fabrics get caught in the door.
- Close the door.
• Recommended loads :
The maximum capacity of the dryer is 8 kg.
- To reduce creasing and optimize drying times, we recommend you do not overload the machine.
- To optimise the performance of the wrinkle-removing cycles, we recommend that you limit the quantity of laundry at 2 kg.
natural_image
Line drawing of a kitchen appliance with a door, control panel, and hand icon (no text or symbols)
N5 / PROGRAMMING
• PRESENTATION OF THE CONTROL PANEL
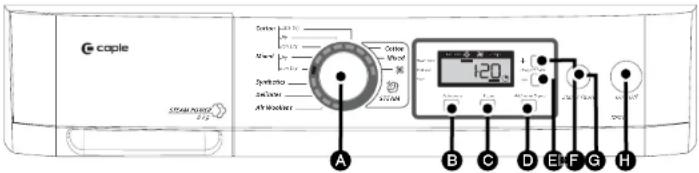
A Programs dial
B Tumbling
© Buzzer
D Additional drying
E Delayed start "-"
F Delayed start "+"
G Start/Pause
On/Off
Your appliance has two functions :
- a drying function that includes 8 programs
- a steam treatment function that includes 3 programs
• DRYING PROGRAMS
Your appliance is equipped with an automatic dryness detection system. The appliance will stop when the chosen level of dryness has been achieved (see the program chart on the following pages).
• Starting the appliance :
Check that the power cable is plugged in. The appliance will not start unless the door is properly closed.
- Press the "On/Off" button Ⓗ
- Select your program (see the table "Your dryer's programs" on the following pages) by turning the Programs dial (it turns in both directions). The indicator light shows you the program you have selected.
- Press "Start/Pause" G and the program will start. (The "In use" indicator ✦ lights up).
• Time remaining :
The time displayed at the start of a cycle corresponds to a full load. It is provided for informational purposes. The actual time adjusts during the cycle based on the load of laundry.
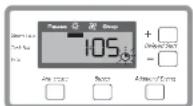
When the cycle begins, the "Time remaining" symbol ⚙ flashes. This symbol turns to a steady light when the remaining time has been calculated.
Program progress :


Time remaining
5 / PROGRAMMING
- Adding or removing an item during drying :
- Press "Start/Pause" G to interrupt and open the door.
- Insert or remove the item or items and close the door.
- Press the "Start/Pause" button Ⓖ to resume drying.
Advice :
To ensure the effectiveness of the Steam programs, you are discouraged from interrupting these programs mid-cycle.
- Altering programming or drying during operation :
If you have entered the wrong program, you can change your selection during the cycle.
- Press "Start/Pause" G interrupt drying. - Select another program using the program dial.
- Press the "Start/Pause" button Gb resume drying.
• Cooling cycle : ✉
All programs finish with a cooling cycle that lasts for a few minutes to allow the washing to cool gradually.

Important :
Do not stop your dryer before this cycle has finished.
• End of program and appliance stop :
At the end of program, the display shows "0:00". The "Filter" and "Tank Full" lights flash alternately to remind you that you must clean the filter and empty the water collection tank after every drying cycle:
- Press the "On/Off" button
- Empty your dryer.
- Clean the filter and empty the water collection tank (see the *REGULAR MAINTENANCE" section).

Advice :
Consult the Programs table on the next page to determine the program needed for the type of items.
Program stop
drying Time remaining
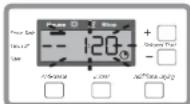
Cooling cycle
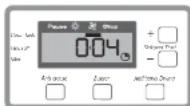
End of program
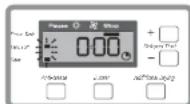
The "Filter" and "Tank Full" lights flash

N5 / PROGRAMMING
• "STEAM" PROGRAMS
Your appliance is equipped with 3 "STEAM" programs :
- Cotton
- Mixed
- Refresh - ✉
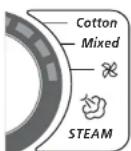
Thanks to their steam action, the "Cotton" and "Mixed" programs allow you to gently remove wrinkles from your laundry and soften creases, whether the fabric was air dried or put through the dryer.
As a result, your ironing becomes faster and easier and some items can even be put away without ironing.
The "Steam refresh" program lets you "air" and freshen laundry that has been shut away in a closet.

Important :
These programs can only be used for laundry that is already dry, just before ironing. We recommend that you do not exceed the recommended load (see chart on following pages).

Important :
The steam programs should not be used with the following textiles: knitted wool; leather; clothing with metal, wood or plastic notions; clothing made from metal that may rust; oilskin or other similarly coated garments.

Important :
The Steam tank is empty when your appliance is delivered. Before using the Steam program for the first time, fill the tank with demineralised water or with water from the recovery tank (see how to proceed in the "EVERYDAY MAINTENANCE" chapter).

Important :
Before starting a Steam program ensure that :
— The amount of water contained in the tank is above the "Min." level
— The drying filter has been cleaned
• Cotton program : Cotton
Thanks to the combined action of steam and laundry tumbling, this program allows you to rid "Cotton"-type textiles of wrinkles to facilitate their ironing.
This program lasts 18 minutes.
- Choose your program using the Programs dial. Are indicator lights up, displaying your choice.
- Validate by pressing the "Start/Pause"
• Mixed program : Mixed
Thanks to the combined action of steam, tumbling and laundry preheating, this program allows you to rid "Mixed"-type textiles (polyester, synthetics, etc.) of wrinkles to facilitate their ironing.
This program lasts 20 minutes.
- Choose your program using the the Programs dial. One indicator lights up, displaying your choice.
- Validate by pressing the "Start/Pause" G.
5 / PROGRAMMING
- Steam refresh :

Thanks to the steam action, this program allows you to eliminate odours from laundry that has been put away in a closet.
This program lasts 20 minutes.
- Choose your program using the Programs dial. Are indicator lights up, displaying your choice.
- Validate by pressing the "Start/Pause"
• End of program and automatic tumbling at the end of the "Steam Program" cycle :
At the end of the Steam programs and during the tumbling phase, the display indicates "End".
Tumbling is activated as soon as the selected program is completed. During the tumbling phase, the drum rotates constantly to prevent the laundry from settling and wrinkling. This phase lasts 30 minutes.
During the tumbling phase, you can remove the laundry from the drum after pressing the
"Start/Pause" LGton. This action terminates the tumbling phase and makes it possible to empty the drum with the light on.
The "Filter" and "Full tank" indicator lights blink alternately to remind you to clean the filter and empty the water recovery tank after each cycle.
End of program
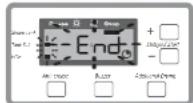
The "Filter" and "Full tank" indicator lights blink

Remarks :
During the tumbling phase, if you have selected the "Buzzer" option, it will sound every minute.

Advice :
To optimise the effectiveness of the steam programs, we advise you to: — Remove the entire load, one item at a time, as soon as the program ends or during the tumbling phase
— Place the clothing on hangers
— Promptly iron the garments, if necessary

Remarks :
It is normal for the garments to be slightly damp at the end of the Steam programs. This is to make ironing easier. Similarly, with small loads of laundry, it is possible to have damp spots after a steam program.

N5 / PROGRAMMING
- During the cycle :
1 - Tank full
Your tank is full during the drying cycle.
The appliance stops during the program
The "Tank Full" turns on, the time remaining flashes.
- Proceed to empty your water collection tank (see the "REGULAR MAINTENANCE" section).
- Press "Start/Pause" G to restart your program.
2 - Tank empty :
Your "Steam tank" becomes empty during a steam wrinkle rid cycle.
The appliance stops during the program.
The "Steam Tank" and "Pause" indicators lights up, an exclamation mark symbol is displayed on the screen, and the time remaining flashes.
- Proceed to fill up your "Steam tank" (see the "REGULAR MAINTENANCE" section).
- Press "Start/Pause" Ⓖ to restart your program.
Program stop
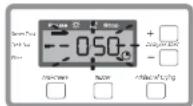
The "Tank Full" light illuminates.
Program stop
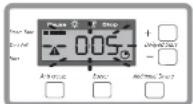
The "Steam Tank" and "Pause" indicators lights up, an exclamation mark symbol is displayed.

Important :
Only fill the Steam tank with distilled water or fully demineralised water. Do not use tap water or water containing any additives. The water from the recovery tank can also be used provided that it has been filtered using the filter provided for this purpose on the steam tank inlet.
5 / PROGRAMMING
• YOUR DRYER'S PROGRAMS
• Drying programs :
| Programs Type of laundry Drying results | ||
| COTTON | ||
| Extra Dry | Cotton Dry | |
| Dry | Cotton Dry | |
| Iron Dry | Cotton Damp | |
| MIXED | ||
| Dry | Regular laundry Dry | |
| Iron Dry | Regular laundry Slightly damp | |
| Other drying programs | ||
| Synthetics | Synthetic Dry | |
| Delicates | Synthetic, Delicates Dry | |
| Air wollens | Wollens Dry | |
- Steam programs :
| Programs | Load type | Maximum weight | Duration (min) | consumption | |
| water (litry) | energy (kWh) | ||||
| Cotton | Cotton shirts | 10 items | 18 | 0,4 | 0,20 |
| Cotton home linens | 2 kg | 18 | 0,4 | 0,20 | |
| Mixed | Synthetic shirts | 10 items | 20 | 0,4 | 0,35 |
| Synthetic home linens | 2 kg | 20 | 0,4 | 0,35 | |
| Refresh - ✉ | Cotton or synthetic | 2 kg | 20 | 0,1 | 0,06 |
RECOMMENDED PROGRAMS FOR TESTS TO EN 61121 - DIRECTIVE 95/13/EEC
| Load I | "Dry cotton | .... | 8 kg | .... select "Cotton" - Dry |
| Load II | "Ready to iron Cotton" | .... | 8 kg | .... select "Cotton" - Iron Dry |
| Load III | "Easy maintenance textiles | .... | 4 kg | ... select "Synthetics" |

N5 / PROGRAMMING
• THE OPTIONS
- Delaying a program's start: This option is not available for Steam programs
- Select your program using the Program dial A. The indicator light shows you the program you have selected.
- Press the "Delayed Start +" button F to delay the start of your program thirty minutes at a time until you reach the desired delay time (max 23 ½ hours). To decrease the differed starting time, press the "Delayed Start -" button B.
- Confirm by pressing the 'Start/Pause' button G.
Once the time delay has expired, the program starts. The screen tells you the time remaining, which becomes more precise as the drying cycle progresses.
- "Anti-crease" option :
The "Anti-crease" function fluffs the textiles every 10 minutes for up to 24 hours, until the door is opened or the machine is turned off. It begins as soon as the drying finishes and prevents the clothes from settling in the machine. To select this function, press the "Anti-crease" Button. An indicator lights up to show that this option has been activated.
• "Buzzer" option :
- Press the "Buzzer" button at the end of drying, three beeps will sound every 10 minutes for one hour until the door is opened or the appliance is stopped. The indicator light corresponding to this option lights up at the bottom of the screen, indicating that the buzzer is activated.

Remarks :
The "Anti-crease" and "Buzzer" options remains selected from one program to the next. You can simply press the button to deactivate these options, even during a program
Time remaining until drying cycle begins

Delayed start
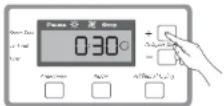
"Anti-crease" option
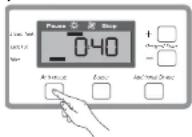
"Buzzer" option
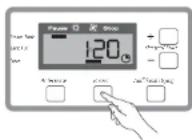
5 / PROGRAMMING
• THE OPTIONS (continued)
- "Additional Drying" option: This option is not available for Steam programs
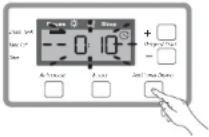
This function enables you to add drying time at the end of a program in units of 10 minutes by successively pressing the "Additional Drying" button.
- Press the "Start/Pause" button. The additional drying time is added at the end of the selected program.

Additional time
- "MEMO ACTIV" function :
Your dryer remembers the programs that you use most often.
After a few drying cycles, the program displayed when you switch on your machine is the one that you have used most often.

Important :
A power failure cancels the current program. In this case, therefore, you have to reset all programming operations.

Advice :
As a safety measure, you are advised to unplug the power cable when you are not using appliance.
• FILLING THE STEAM TANK
The 1.2 litre steam tank contains enough water to last approximately three cycles.
It is equipped with a filter that recovers the impurities found in the water. Properly filtered water is necessary for smooth functioning of the steam generator.
Important :
We remind you that the tank must be filled before the "Steam" program is used for the first time.
Important :
Only fill the Steam tank with distilled water or fully demineralised water. Do not use tap water or water containing any additives. The water from the recovery tank can also be used provided that it has been filtered using the filter provided for this purpose on the steam tank inlet.
To fill the tank, proceed as follows :
- Press on the upper part of the tank to free it from its housing (Fig. 06).
- Fill the tank (Fig. 07).
- Press on the upper part of the tank to re-seat it in its housing.
You can also use the water from the recovery tank : - Remove the water recovery tank (see fig. 20 on the next page).
- Extract the channelling tube from the water recovery tank (Fig. 08).
– Fill the tank (Fig. 09) - Press on the upper part of the tank to re-seat it in its housing.
Important :
If you use water from the recovery tank, regularly clean the tank filter by pulling pills away with your fingers (Fig. 10).
Fig. 06
Fig. 07
Fig. 08
Fig. 09
Fig. 10
• CLEANING THE STEAM TANK
Advice :
If you have not used the Steam program for several months, we recommend that you replace the water contained in the tank.
Fig. 11
To clean the inside of the tank, you should completely remove it from its housing. The tank lock is located inside the door (Fig. 11).
Fig. 12
To clean the tank, proceed as follows :
- Press on the tank to open it.
- Use the side of a coin to unlock the tank (Fig. 12).
- Remove it from its housing by pulling it from bottom to top (Fig. 13).
- Simultaneously push on both sides of the upper part of the tank and unclip the cover (Fig. 14).
- Clean the inside of the tank, as well as the filter, which can be immersed in water (Fig. 15).
- Clip the cover back onto the tank.
- Return the tank to its housing, seating the lower part first.
- Press on the upper part of the tank to re-seat it in its housing.
Fig. 13
Fig. 14
Fig. 15

N 6 / REGULAR MAINTENANCE
• CLEANING THE FILTER

Important :
The dryer must not operate without the

(1)

Important :
Please remember that the filter must be cleaned after every drying or steam cycle.
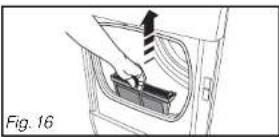
This is located in the lower part of your dryer. Clean it as follows:
- Remove it from its housing by pulling it upwards (Fig. 16).
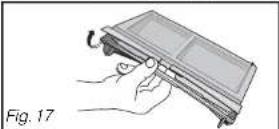
- Open the filter (Fig. 17).
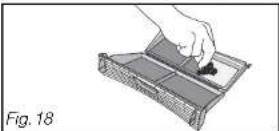
– Clean it by removing the thin coating of lint covering it (Fig. 18).
Ensure that there is no lint accumulating round the dryer.

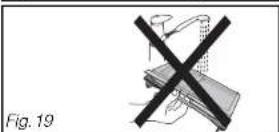
Important :
Do not wash filter with water. (Fig. 19).
- Re-insert it in its housing, pushing it well in.
• EMPTYING THE CONDENSER TANK
This is located at the top of your appliance. It collects the water extracted from your items as they are dried.
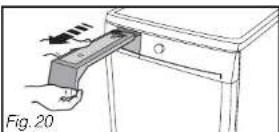
- To empty it, release it from its housing by pulling it towards you (Fig. 20).
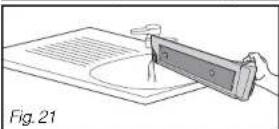
- Empty the tank or recover the condensation container (Fig. 21).

Important :
The condenser tank must be emptied each drying cycle.

Important :
Risk of frost : if there is a risk of frost, empty the condenser tank.

Important :
Empty the condenser tank if you wish to move or tilt your appliance.

Advice :
You can store the recovery tank water in a separate container. You can later use this water to fill the "Steam" tank.
6 / REGULAR MAINTENANCE
• DIRECT EVACUATION OF WATER CONDENSER
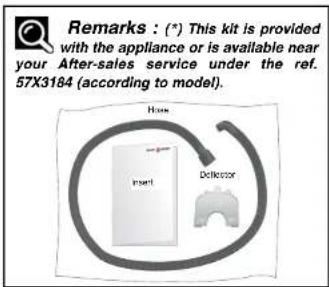
To avoid having to empty the collection tank every time you use the appliance, you have a kit (*) for removing the water from the condenser directly into the drain (hose and deflector). To fit this :
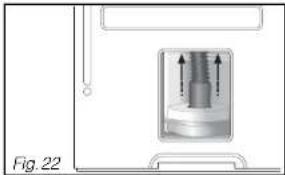
- Take off the existing pipe and push it inside the appliance (Fig. 22).
- Clip the deflector with the top of the pump (Fig. 23).
- Connect the hose from the kit to the end connector on the appliance (Fig. 24).
You can connect the other end of the hose either:
- To a ventilated trap (Fig. 25).
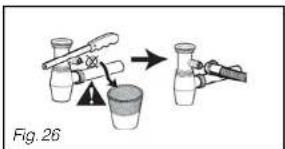
- Or a sink trap (Fig. 26).
When connecting to a trap, you must remove the filler plug. Then press home the rubber tip. If necessary, add a clamp connection (Fig. 26).

Important :
The deflector must necessarily be positioned before the drain hose connection to avoid any water splashes when taking off the hose.

Remarks :
Directly emptying the condenser water into the sewage system will prevent the reuse of the recovery water for steam programs.
natural_image
Technical diagram showing a mechanical component with arrows indicating direction, labeled Fig.22 (no text or symbols on the diagram itself)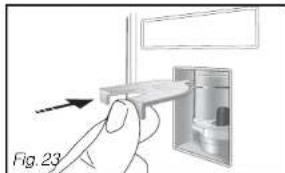
natural_image
Hand inserting a component into a refrigerator (no text or symbols visible)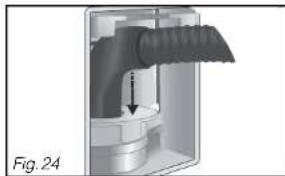
natural_image
Cross-sectional diagram of a mechanical device with internal components and a downward arrow indicating motion (no text or symbols)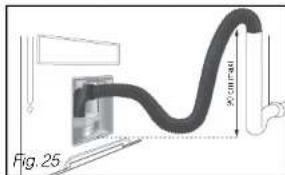
EN
N 6 / REGULAR MAINTENANCE
• CLEANING THE CONDENSER

Important :
The condenser must be cleaned twice a month.

Important :
Unplug the power cable from the socket before cleaning the condenser.
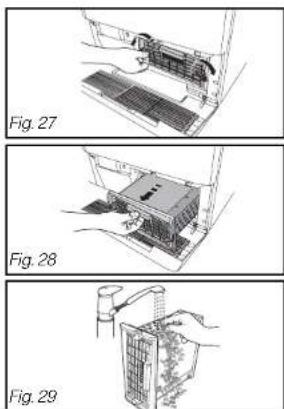
- Open the grill at the front of the appliance.
- Release the condenser (Fig. 27).
- Remove it carefully (Fig. 28)
- Remove any lint from the condenser.
- Clean it with water only under the tap (Fig. 29).
- After cleaning, ensure that none of the tubes are "blocked" and that the fins are clean.
- Re-insert the condenser and lock it in place. Close the grill.

Important :
When refitting the condenser, ensure that it is pushed in firmly right to the back of its housing when locking it in.
• CLEANING THE APPLIANCE

Advice :
To clean the control panel, the access to the drum and the casing, use only a sponge or a damp cloth and some soapy water.
- Ensure that there is no fluff accumulating round the dryer.
- Clean the door seal with a damp cloth. - Clean the filter housing with your vacuum cleaner once a year.
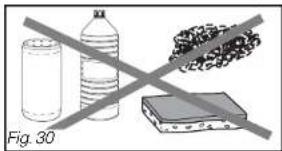
You should not use, under any circumstances (Fig. 30):
- Abrasive powders
- Metal or plastic sponges
- Alcohol-based products (alcohol, thinners, etc.)
6 / REGULAR MAINTENANCE
• CHANGING THE BULB
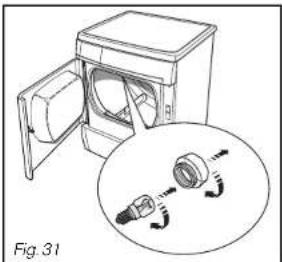
You can replace the light bulb (type E14-15W/230V) yourself (Fig. 31).

Important :
Unplug the power cord before changing the bulb.
To do this :
- Unscrew the glass cover located to the left inside the appliance.
- Unscrew the extinguished bulb and replace it. - Screw on the glass cover tightly.

Important :
The bulb must be replaced when the appliance is cooled down.
natural_image
Diagram of a washing machine with an inset showing internal components (no text or labels)EN
7 / PERIODIC MAINTENANCE
To optimise the performance of your dryer, we recommend that you carry out the following cleaning actions once or twice each year :
• CLEANING THE FILTER HOUSING
To clean the filter housing, proceed as follows:
- Remove the filter from its housing (see "Cleaning the filter" paragraph, previous pages)
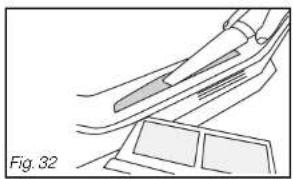
- Use a Hoover to remove all pills and lint (Fig. 32).
- Return the filter to its housing, pushing it firmly into place.
• CLEANING THE CONDENSER HOUSING
To clean the condenser housing, proceed as follows:
- Remove the condenser from its housing (see "Cleaning the condenser" paragraph, previous pages).
- Use a Hoover to remove all the pills and lint from the sides of the cavity (Fig. 33 & Fig. 34). - Return the condenser to its housing, locking it into place, and clip the grill back on.
natural_image
Technical line drawing of a mechanical assembly with no visible text or symbols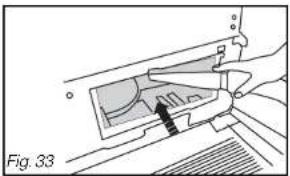
natural_image
Technical line drawing of a mechanical component with a highlighted section, labeled Fig. 33 (no text or symbols on the diagram itself)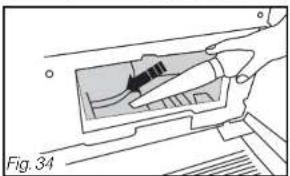
natural_image
Technical line drawing of a mechanical component with no visible text or symbolsEN
NOTES
EN
8 / TROUBLESHOOTING

Advice :
Some incidents may arise when you are using your dryer. Here are the points you should check, before contacting the After sales service.
| Fault : Check whether : | |
| The dryer does not start : | - The plug is in the socket- The On/Off button is pressed in- The door is properly closed- The condenser is correctly locked in place. |
| The drying times are too long : | - The filter in the drum is clogged with lint.- The condenser is not clogged.- The filter and condenser housings are not clogged or soiled.- The laundry has been spun enough beforehand (500rpm minimum, but spinning at 850rpm provides shorter drying times).- The room temperature is not too high, particularly if the room is small : if necessary, open the door or window.- The air inlets and outlets are unobstructed enough to ensure correct air circulation.- The selected drying program does indeed correspond to the type of laundry in the drum. |
| The laundry is too damp : | - The filter in the drum is clogged with lint- The type of drying has been selected correctly (too low) : switch to the next program up or increase the drying time.- The condenser is not blocked by lint. |
| The laundry is too dry, too creased : | - The selected drying program does indeed correspond to the type of laundry in the drum. |
EN
8 / TROUBLESHOOTING
| Fault : Check whether : | |
| The items are unevenly dried : | - The types of laundry in the load are too different (e.g. sheets together with jeans)- The laundry has been laid correctly ‘unfolded’ in the dryer- The drum is not overloaded. |
| The synthetic items are loaded with static electricity : | - The laundry has been dried too much- You have used softener during washing. By using this product, you can reduce most of the problems with static electricity. |
| The “Tank Full” indicator light is lit : | - The condenser tank is full : once you have emptied it, re-insert it correctly, pushing it completely into its housing |
| The “Tank Full” indicator light illuminates although the tank is empty : | - The container has been properly inserted : push it in completely.- The condenser is tightly locked on the two sides. |
| The "Empty tank" indicator is lit up : | - The steam tank is empty : after emptying it, put it back into position, pressing it firmly into the housing. The program picks up where it had stopped. |
| The laundry will be slightly damp after a steam cycle : | - You have used a steam programme : in this case, it is completely normal, and it will make ironing easier. |
EN
9 / AFTER-SALES SERVICE
EN
NOTES
• INTERVENTIONS
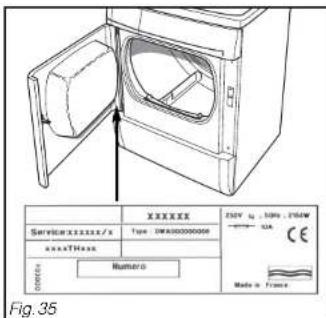
Any work on your appliance must be performed by a Brandt-approved qualified professional. When you call, mention your appliance's full reference (model, type, serial number). These details are shown on the manufacturer's information plate (Fig. 35).
ORIGINAL PARTS
During any maintenance work, ask that only certified original replacement parts be used.
- caple
- Warning :
- CONTENTS
- / FOR THE USER'S ATTENTION
- / DESCRIPTION OF YOUR APPLIANCE
- / INSTALLING YOUR TUMBLE DRYER
- / PREPARING YOUR ITEMS
- / PROGRAMMING
- / REGULAR MAINTENANCE
- / PERIODIC MAINTENANCE
- / TROUBLESHOOTING 28
- / AFTER-SALES SERVICE 30
- EN 1 / FOR THE USER'S ATTENTION
- • SAFETY INSTRUCTIONS
- Important :
- • Installation
- • Children's safety
- • Use
- • ENVIRONMENTAL PROTECTION
- • ENERGY SAVINGS
- EN 2 / DESCRIPTION OF YOUR APPLIANCE
- EN 3 / INSTALLING YOUR TUMBLE DRYER
- • LEVELLING
- - BEFORE USING THE STEAM PROGRAM FOR THE FIRST TIME
- • BUILT-IN INSTALLATION
- • COMBINED WASHER/DRYER INSTALLATION
- N 3 / INSTALLING YOUR TUMBLE DRYER
- • ELECTRICAL CONNECTION
- Danger :
- • REPLACING THE ELECTRIC POWER CABLE
- Advice :
- - CHECKING THE CONDITION OF YOUR LAUNDRY
- • Preparing your laundry :
- • Special notes on steam programs :
- Check the labels on your laundry
- - LOADING LAUNDRY INTO THE DRUM
- • Recommended loads :
- N5 / PROGRAMMING
- • PRESENTATION OF THE CONTROL PANEL
- • DRYING PROGRAMS
- • Starting the appliance :
- • Time remaining :
- Program progress :
- - Altering programming or drying during operation :
- • Cooling cycle : ✉
- • End of program and appliance stop :
- Program stop
- Cooling cycle
- End of program
- • "STEAM" PROGRAMS
- Remarks :
- - During the cycle :
- - Tank empty :
- • YOUR DRYER'S PROGRAMS
- • THE OPTIONS
- - "Anti-crease" option :
- • "Buzzer" option :
- • THE OPTIONS (continued)
- - "MEMO ACTIV" function :
- • FILLING THE STEAM TANK
- • CLEANING THE STEAM TANK
- N 6 / REGULAR MAINTENANCE
- • CLEANING THE FILTER
- • EMPTYING THE CONDENSER TANK
- • DIRECT EVACUATION OF WATER CONDENSER
- • CLEANING THE CONDENSER
- • CLEANING THE APPLIANCE
- • CHANGING THE BULB
- • CLEANING THE FILTER HOUSING
- • CLEANING THE CONDENSER HOUSING
- / TROUBLESHOOTING
- • INTERVENTIONS
- ORIGINAL PARTS
Brand : Caple
Model : TDF200
Category : Tumble dryer