
SK-8050 - Oven SANYO - Free user manual and instructions
Find the device manual for free SK-8050 SANYO in PDF.


| Product Type | Countertop Microwave Oven |
| Brand | Sanyo |
| Model | SK-8050 |
| Capacity | 0.8 cu ft (approx. 22 liters) |
| Dimensions (W x D x H) | 18.5 x 14.5 x 11.2 inches |
| Weight | 25.4 lbs (11.5 kg) |
| Power Supply | 120V, 60Hz, 1450W |
| Microwave Power | 1000W |
| Grill Power | 1200W |
| Display Type | Digital LED |
| Control Type | Touch keypad with dial |
| Cooking Modes | Microwave, Grill, Convection, Combination |
| Defrost Function | Yes, by weight and time |
| Auto Menus | 10 preset recipes |
| Timer | Up to 99 minutes 99 seconds |
| Child Lock | Yes |
| Interior Light | Yes |
| Turntable | Yes, glass plate |
| Cleaning | Wipe with damp cloth; avoid abrasive cleaners |
| Safety | Auto shut-off, door interlock |
| Spare Parts | Turntable, roller ring, fuse, bulb |
| Warranty | 1 year limited |
Frequently Asked Questions - SK-8050 SANYO
User questions about SK-8050 SANYO
0 question about this device. Answer the ones you know or ask your own.
Ask a new question about this device
Download the instructions for your Oven in PDF format for free! Find your manual SK-8050 - SANYO and take your electronic device back in hand. On this page are published all the documents necessary for the use of your device. SK-8050 by SANYO.
USER MANUAL SK-8050 SANYO
natural_image
Black-and-white illustration of a microwave oven with front and back panels (no text or symbols visible)Thank you for your purchase of the SANYO toaster oven. Please read these instructions carefully before using.
FEATURES
- Perfect for all kinds of bread, hotdog rolls, toast, cookies etc. Leave everything to your imagination and your SANYO toaster oven.
- Equipped with a 15 minute timer and chime. Simply set the timer and when the desired time has passed the oven automatically shuts off and the chime sounds.
- The toaster oven has a temperature control dial with a safety termostat. Merely adjust the dial in accordance with the food to be cooked.
-
1000 W glass ceramic heaters provide for extra speed and efficiency. Toasting is quick and even.
-
Full size see-through window. A glance will tell you how the toasting is coming along.
- Extra wide oven rack. Perfect for special types of bread and a large amount of cookies.
HOW TO USE
- Turn the timer dial to the OFF position. During operation, when the timer dial reaches the OFF position, a chime will sound.
- Plug the cord into a wall socket.
- Set the temperature control dial to the desired position. (See the cooking chart for suggested temperatures)
- Close the door. Adjust the timer dial to the proper oven warm-up time. (See the cooking chart for the suggested warm-up times) Once the oven has warmed-up you are ready to put in the food. Example:
When toasting hotdog rolls, the suggested warm-up time is 3 minutes on the cooking chart. Simply set the timer dial to 3 minutes to sufficiently warm-up the oven.
*Toasting without first warming up the oven, prevents the heat from being evenly circulated. This often results in unsatisfactory surface cooking or burning.
- After the oven has warmed up, put in the food.
* When the oven warm-up time is completed, the chime will sound. Wait until the chime sounds before opening the door.
- Set the timer dial. (Use the cooking chart for the correct time) The cooking chart suggests 7 to 9 minutes for hotdog rolls. Simply turn the timer dial to a position between 7 and 9.
*When setting the timer dial to a position less than 2 minutes, first turn it to above the 2 minute position and then turn it back to the desired time.
-
When the desired time has elapsed, the oven will automatically switch off and the chime will sound. You will note that the oven heaters quickly dim down.
-
For complete safety, pull out the plug when cooking is completed.
* Cooking and browning vary somewhat due to voltage fluctuation, the thickness of the food and and its water content. To control cooking and browning, adjust the timer dial.
Removing food during operation: Simply turn the timer dial to the OFF position. The chime will sound and the heaters will shut off. The food inside can then be safely removed.
COOKING CHART
| Food | Temperature control | Warm-up time | Time dial | Remarks | |
| Reheating | Hotdogs | 200 | About 3 min. | About 7–9 min. | Aluminum foil |
| Toast | 500 | About 3 min. | About 2–3 min. | ||
| Hamburger | 500 | About 3 min. | About 7–9 min. | ||
| Baking | Gratin | 400 | About 5 min. | About 6–8 min. | Aluminum foil |
| Cookies | 300 | About 5 min. | About 6–8 min. | ||
| Baked apples | 500 | About 5 min. | About 15 min. | Aluminum foil | |
| Cakes | 300 | About 5 min. | About 7–9 min. | Aluminum foil |
Note: Cooking time varies somewhat depending on voltage fluctuation, outside temperature and the type of food to be cooked. The times listed are only suggested standard times. Adjust the timer according to your own taste and preferences. If you are using a recipe for preparing food, judge the approximate time by referring to this chart.
NAME OF PARTS
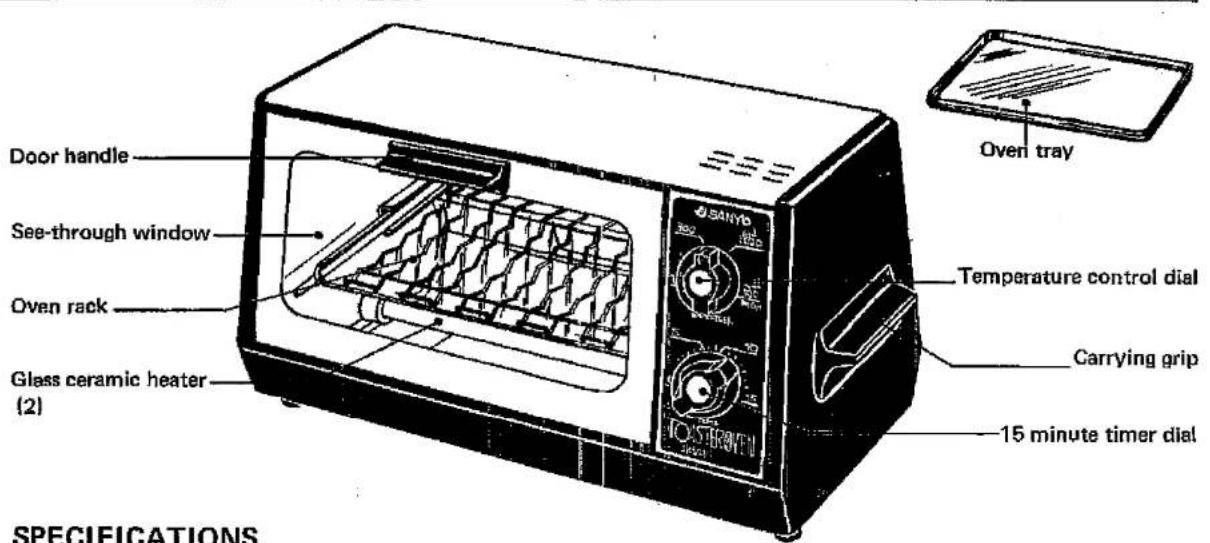
SPECIFICATIONS
| Power source | AC: local voltage |
| Power consumption | 1000 W |
| Dimensions | 8-3/8"(H) x 16"(W) x 8-1/4"(D) |
| (392 x 220 x 208 mm) | |
| Weight | 7 lbs. 5 ozs. (3.3 kg) |
| Temperature control | With control thermostat |
| Timer | 15 minute timer with chime |
| Heaters | Glass ceramic (2) |
THINGS TO REMEMBER
CARE AND MAINTENANCE
- During operation, both the inside and outside metal parts of the unit become quite hot. Avoid touching the oven, except at the handles and dials, during operation.
- Do not remove or place food in the oven while the heaters are in operation.
- Do not wash the heater in water. Keep it free from splashing water. Water could damage the mechanism.
- When cooking oily food, be sure to first wrap it in aluminum foil, etc., before placing it in the oven. Baking or broiling fish or meat in the oven leaves an unpleasant odor and should be avoided.
- Be sure to use a proper outlet when plugging in the oven
- After use, make sure that the timer dial is in the OFF position. Also remove the plug from the wall outlet.
-
Before using the oven for the first time, remove the cord that holds the oven rack in place.
-
After use, wipe the body of the oven and the oven rack with a soft dry cloth.
-
When bread crumbs collect in the bottom of the oven, pull out the crumb tray and clean it.

SANYO
SANYO ELECTRIC CO., LTD.
OSAKA, JAPAN

Printed in Japan
Brand : SANYO
Model : SK-8050
Category : Oven