
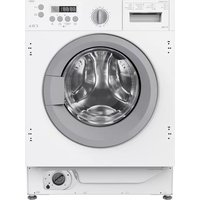
CI532 - Washing machine CDA - Free user manual and instructions
Find the device manual for free CI532 CDA in PDF.


| Product Type | Freestanding Washing Machine |
| Brand | CDA |
| Model | CI532 |
| Loading Type | Front Load |
| Capacity (kg) | 8 |
| Spin Speed (rpm) | 1400 |
| Energy Efficiency Class | B (typical for 8 kg models) |
| Voltage (V) | 220-240 |
| Power Consumption (W) | 2000 (approx.) |
| Dimensions (H x W x D cm) | 85 x 60 x 60 |
| Weight (kg) | 70 |
| Number of Programs | 15 |
| Display Type | LED |
| Delay Start Function | Yes, up to 24 hours |
| Child Lock | Yes |
| Water Supply | Cold only |
| Noise Level Washing (dB) | 56 |
| Noise Level Spin (dB) | 76 |
| Self-Cleaning Program | Yes (Drum Clean) |
| Drum Material | Stainless Steel |
Frequently Asked Questions - CI532 CDA
User questions about CI532 CDA
0 question about this device. Answer the ones you know or ask your own.
Ask a new question about this device
Download the instructions for your Washing machine in PDF format for free! Find your manual CI532 - CDA and take your electronic device back in hand. On this page are published all the documents necessary for the use of your device. CI532 by CDA.
USER MANUAL CI532 CDA
natural_image
Line drawing of a front-loading washing machine with control buttons and gasket (no text or symbols)Washing Machine
CE
THIS APPLIANCE COMPLIES WITH EUROPEAN DIRECTIVES
- EMC 89/336/ECC
- LOW VOLTAGE 73/23/ECC
- ECC-LABELLING 93/68/ECC

natural_image
Line drawing of a mechanical device with a circular aperture and two rectangular plates (no text or symbols)
natural_image
Line drawing of a hand holding a tool or tool, with no visible text or symbols
natural_image
Line drawing of a person using a cable to lift a rope, no text or symbols present
natural_image
Diagram of a hand using a cable to connect cables to a mechanical component, no text or symbols presentUNPACKING INSTRUCTIONS
WARNING: If a sack-truck is used to transport the machine, it should be lifted from its left side as shown on the packing label. Remove the heat-shrink plastic
- Open the door and remove the bag of accessories. Place the machine on its left side, supporting it at the corners. Remove the bottom packing
- Install the nuts on the levelling feet (you will find them in the plastic bag); screw the 4 feet on the machine, screwing the 2 rear feet and the front right one completely by means of the special key provided. Take the machine back to the standing position.
- Slacken the 3 screws holding the rear drum anchor in position (do not remove the screws).
- Remove the anchors (N° 3) and plug the holes with the plugs found in the accessories bag.
Keep the drum anchors for use next time the washing machine needs to be moved.
INSTALLATION DIRECTIONS

Positioning
After your washing machine has been placed in the desired location, level it by means of the front left foot, them the counternut must be blocked by means of the special key purposely provided. Warning: if the machine is not perfectly leveled, it will be unstable, noisy and may lead to malfunctions and broken parts. Do not place the machine on mats or carpets.
natural_image
Illustration of two hands holding a pipe, one with a valve and the other with a handle (no text or symbols)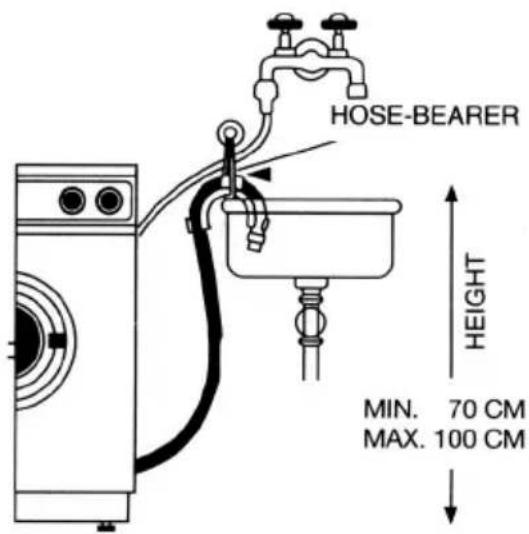
Water connection
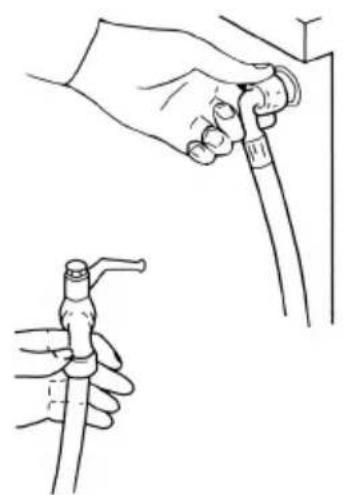
Loading: Connect the water supply hose to a cold water tap with a 3/4" (gas type) fitting, insert the rubber washer supplied with the machine and fully tighten the ring nut. If the water tap is new or has not been used for a long time it is recommended to let the water run for a while before completing the connection. Connect the other end of the water supply hose to the machine and again insert the rubber washer between the hose and the solenoid valve fitting.
Drain: Insert the drain hose into a drain pipe (with a minimum internal diameter of 4 cm.) or hook it on a sink or bathtub, without crimping or creating any sharp curves. The hose should be positioned at a height ranging from a minimum of 70 cm. to a maximum of 100 cm. as shown in the figure.
Electrical Connection
Make sure that the electrical system can support the maximum current load indicated on the rating plate on the rear side of the machine. The washing machine should be connected to an electrical grounded outlet, as prescribed by law. This outlet must be easily accessible after the installation of the washing machine.
If the supply card is damaged, it should be replaced by a special cable available at the manufacturers or at the technical service.
The company will not be responsible for any damage to persons or things due to non-compliance with these instructions.
CLEANING AND MAINTENANCE
This washing machine does not require any particular maintenance. All the end of each wash is recommended to leave the door open so that air will circulate and dry the interior of the machine. The external part of the machine should never be cleaned with abrasive detergents since this would ruin the enamel coating as well as the synthetic parts.
The models without base are provided with a self-cleaning drain pump.
TECHNICAL FEATURES
| Lenght: | mm. 595 | |
| Depth: | mm. 530 | |
| Height: | mm. 850 | |
| Capacity: | Cotton: | 5 kg max of dry linen |
| Synthetic and mixed fabrics: | 2.5 kg max of dry linen | |
| Wool: | 1 kg max of dry linen | |
| Voltage and frequency: | 230 V / 50 Hz | |
| Fuse: | 10 A | |
| Water pressure required in water mains: | min. 0,1 Mpa (1 bar) | |
| max. 1 Mpa (10 bar) | ||
BEFORE CALLING THE TECNICAL SERVICE CENTER:
- Check if plug is inserted
- Check that power is available in the apartment
- Check that the door is properly closed
- Check that the water tap is open
- Check that the water supply hose and water drain hose are not blocked
NOTE: If you have to call the service center, specify the model of your washing machine and if necessary the serial number which is indicated on the rating plate on the rear side of the machine.
Recom:mandation for the user - How to use your washing machine economically and ecologically.
Optimum load - Always try to use the washing machine at full load, as this will use less water, powder and energy than two smaller loads.
You want to use the pre-wash? - Only use the pre-wash for very dirty linen. If you don't use the pre-wash, you save from 5% to 15% in energy, washing powder, water and time.
Is a high temperature wash required? - To avoid high temperature washing, treat particularly dirty items with a stain remover of leave the worst stains to soak beforehand. You will save energy in this way.
FUNCTIONS AND PREPARATION FOR WASHING

Detergent dispenser
The detergent dispenser is divided into four compartments:
1) pour washing detergent in this compartment for the prewash cycle (MAX 45 gr).
2) washing detergent in this compartment for the wash cycle (MAX 130 gr).
3) ▲ pour bleaching liquid into this compartment following the advice on the packing (do not exceed in quantity over the filter grid)
4) pour softener into this compartment following the advice on the packing (max 60 ml - do not exceed in quantity over the filetr grid)
Close the dispenser after the detergent compartments have been filled. It is recommended to use non-foaming detergents and a softener in case of hard water.

natural_image
Diagram showing a curved object with an arrow pointing to it, surrounded by parallel lines (no text or symbols)Cleaning of the dispenser
It is advisable to clean the compartment regularly, as explained below:
- press lever (A) and slide the compartment out of its housing;
- remove the siphon cover of compartment 3-4;
- wash everything with running water;
- replace the siphon cover in the compartment making sure it fits perfectly in its housing;
- replace the compartment in its housing.
Door
Use the handle to open the door.
During the wash cycle, a special safety device keeps the door locked. To open the door, turn off the machine using the ON-OFF switch and wait 2 minutes before turning the handle to open the door.
ONLY FOR SL MODELS: Open the door by turning the knob on the top control panel (see the "control panel" section).

natural_image
Line drawing of a hand holding a folded object with motion arrows indicating movement (no text or symbols)Sorting clothes
Each of the following groups should be sorted and washed separately according to the cycle specified in the cycle table:
- white and resistant colored fabrics
- non-resistant colored fabrics
- delicate fabrics (silk, rayon, nylon, etc.)
- wool
Washing Operations
- sort the clothes
- place them uniformly inside the drum.
- select the most suitable cycle for the fabrics (see wash cycle table)
- set the cycle by following the instructions in the "control panel" section and turn on the machine by pushing the ON/OFF button.
WARNING: - Set the cycle only when the machine is off. - Always turn the control dial clockwise. If you pass the desired position, make a complete turn and reset the dial to the exact position.
CONTROL PANEL

flowchart
graph TD
    A["STANDARD MODEL"] --> B["DETERGENT DISPENSER CONTROL BUTTONS"]
    B --> C["INDICATOR LIGHTS"]
    C --> D["TIMER"]
    D --> E["STERMOSTAT"]
    F["SL MODEL"] --> G["DETERGENT DISPENSER"]
    G --> H["CONTROL BUTTONS"]
    H --> I["KNOB TO OPEN DOOR"]
    J["SLS MODEL"] --> K["INDICATOR LIGHT"]
    K --> L["TERMOSTAT"]
    L --> M["TIMER"]
    N["DL MODEL"] --> O["DETERGENT DISPENSER"]
    O --> P["CONTROL BUTTONS"]
    P --> Q["INDICATOR LIGHT"]
    Q --> R["TERMOSTAT"]
    S["DETERGENT DISPENSER CONTROL BUTTONS"] --> T["CONTROL BUTTONS"]
    U["DETERGENT DISPENSER"] --> V["CONTROL BUTTONS"]
To become familiar with your machine functions, compare the symbols on the control panel with those described below.

ON/OFF
By pressing this button the machine turns on and executes the set wash cycle. It is used to turn the washing machine on and off.

POWER INDICATOR LIGHT
When lit, it indicates that the washing machine is electrically energized.

HALF LOAD
Reduces the amount of water used in the wash and rinse cycles, thus greatly reducing water and electricity consumption as well as the amount of washing detergent. It is used to wash a reduced load of dry clothes (MAX 2.5 kg).

ENERGY SAVINGS
By pressing this button the washing temperature will remain at 60^ C thus greatly reducing the electricity consumption. It is used for slightly dirty clothes on white normal wash cycles with or without prewashing and in particular with detergents recommended for washing at 60^ C or liquid detergents.
SPIN BY-PASS BUTTON
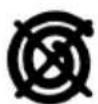
By pushing this button the washing machine will not spin during or at the end of the wash cycle. This function is used for no-spin fabrics.
CONTROL PANEL
650
850/1000 1200
SPIN SELECTION BUTTON
By pushing this button the machine will perform the final spin at the maximum spin speed setting (850-1000-1200). It is used for resistant fabrics so that there will be less water in the wash at the end of the spin cycle.
850/1000
1200
SPINNING INDICATOR LIGHT (Not included in certain models)
When lit it indicates that the final spin at the maximum rotation speed has been selected

natural_image
Simple circular diagram with a vertical line and arrow, no text or symbols presentTIMER DIAL
Used to select the wash cycles and to display them during operation. To select the cycles, turn the dial clockwise until the mark coincides with the selected cycle. WARNING: Do not turn the timer dial while the machine is energized. Do not turn the timer dial counterclockwise.

natural_image
Simple circular diagram with a vertical line and two curved lines inside, no text or symbols present.THERMOSTAT DIAL (Not included in certain models)
To set the temperature, turn the dial until the mark coincides with the selected temperature. It is used to regulate the washing temperature from 30°C to 90°C based on the selected wash cycle and the type of fabrics to be washed. It is recommended to follow the wash cycle table. By turning the dial to this symbol * the machine will perform a cold wash cycle, which is particularly indicated for delicate temperature-sensitive fabrics.
AUTOMATIC NO-WRINKLE
In the delicate and wool cycles, the washing machine will stop after the last rinse without draining the water. To drain water and perform a short spin cycle, set the timer dial to the delicate spin cycle (see wash cycle table). To drain only the water, set the timer dial to the drain cycle (see wash cycle table). In both cases the machine will complete the cycle automatically.

natural_image
Simple circular diagram with arrows indicating rotation and a key symbol at the bottom (no text or labels)DOOR OPENING KNOB (Not included in certain models)
On the models where this function is provided, the door can be opened simply by turning the knob either to the right or to the left.
WARNING!
If the washer-dryer is not used for a long period of time, the door may not open spontaneously the first time when the handle is turned. In this case, turn the handle and pull the door at the same time.
COTTON AND LINEN PROGRAMS
| Programs Description | Type of laundry | Trays to use | Wash temperatures | Thermostat position | Program description | |
| 1 | Very dirty | Strong fabrics (cotton, linen) that are very dirty, even organic stains. | 1-2(3-4) | 90° | 40°-90° | Tepid pre-wash.Wash at 40° to 90°C Rinse. Intermediate and final spin. |
| 2 | Very dirty | Strong items (sheets, shirts, table cloths) that are very dirty. | 2(3-4) | 90° | 40°-90° | Wash at 40° to 90°C Rinse. Intermediate and final spin. |
| 3 | Normally dirty | Strong items (sheets, shirts, table cloths) that are normally dirty. | 2(3-4) | 60°* | 40°-60°* | Wash at 40° to 60°C Rinse. Intermediate and final spin. |
| 4 | Slightly dirty | Strong items (sheets, shirts, table cloths) that are slightly dirty. | 2-(4) | 40° | *-40° | Wash at * to 40°C Rinse. Intermediate and final spin. |
| 5 | Rinse-Bleach | To rinse strong fabrics and garments (white). | (3) | Rinse. Intermediate and final spin. | ||
| 6 | Softener | To soften fabrics and garments. | 4 | Final rinse. Final spin. | ||
| 7 | Spin | Final spin. | ||||
* EN 60456 Prog. 3/60°C
NB.:
Use of the trays with reference numbers in brackets is optional.
SYNTHETIC AND MIXED PROGRAMS
| Programs Description | Type of laundry | Trays to use | Wash temperatures | Thermostat position | Program description | |
| 8 | Normally dirty | For normally dirty delicate and synthetic fabrics. | 2-(4) | 60° | 40°-60° | Wash at 40° to 60°C Rinse. Stop with water in drum. |
| 9 | Normally dirty | For normally dirty delicate and synthetic fabrics requiring a tepid pre-wash. | 2-(4) | 50° | * - 50° | Wash at * to 50°C Rinse. Stop with water in drum. |
| 10 | Slightly dirty | For slightly dirty delicate and synthetic fabrics requiring a tepid pre-wash. | 2-(4) | 40° | * - 40° | Wash at * to 40°C Rinse. Stop with water in drum. |
| 11 | Rinse | To rinse delicate and synthetic fabrics and garments. | (4) | Rinse. Stop with water in drum. | ||
| 12 | Softener | To soften delicate and synthetic fabrics and garments. | 4 | Last rinse. Stop with water in drum. | ||
| 13 | Delicate spin | Delicate spin | ||||
WOOL CYCLE
| 14 | Pure wool | Woollen items requiring very delicate wash in tepid water. | 2-(4) | 30° | * - 30° | Wash at * to 30°C Rinse. Stop with water in drum. |
| 15 | Wool, hand-wash | Woollen items requiring extremely delicate wash. | 2-(4) | 30° | * - 30° | Wash at * to 30°C Rinse. Stop with water in drum. |
| 16 | Rinse | To rinse delicate and synthetic fabrics and garments. | (4) | Rinse. Stop with water in drum. | ||
| 17 | Softener | To soften delicate and synthetic fabrics and garments. | 4 | Last rinse. Stop with water in drum. | ||
| 18 | Delicate spin | Wool spin | ||||
| 19 | Drain | To drain water without moving the drum. | Drain water without moving the drum. |
The label with the symbols you find applied on the fabrics are a valid help for the treatment and the care of your laundry.
 WASHING NORMAL WASHING NORMAL |  95° MAX 95° MAX |  60° MAX 60° MAX |  40° MAX 40° MAX |  NO-WASHING NO-WASHING | ||||
 WASHING DELICATE WASHING DELICATE |  95° MAX 95° MAX |  60° MAX 60° MAX | 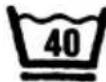 40° MAX 40° MAX | 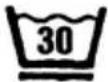 30° MAX 30° MAX | ||||
 IRONING IRONING |  VERY HOT VERY HOT |  NOT VERY HOT NOT VERY HOT | 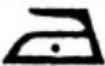 TEPID TEPID |  NO-IRON NO-IRON | ||||
 DRY CLEANING DRY CLEANING |  ANY SOLVENT ANY SOLVENT |  WITH PETROL WITH PETROL |  |  WITH PERCHLORINE WITH PERCHLORINE |  |  NO DRY CLEANING NO DRY CLEANING | ||
 BLEACHING BLEACHING |  POSSIBLE BLEACHING POSSIBLE BLEACHING |  NO BLEACHING NO BLEACHING | ||||||


- CE
- THIS APPLIANCE COMPLIES WITH EUROPEAN DIRECTIVES
- UNPACKING INSTRUCTIONS
- INSTALLATION DIRECTIONS
- Positioning
- Water connection
- Electrical Connection
- If the supply card is damaged, it should be replaced by a special cable available at the manufacturers or at the technical service.
- CLEANING AND MAINTENANCE
- BEFORE CALLING THE TECNICAL SERVICE CENTER:
- FUNCTIONS AND PREPARATION FOR WASHING
- Detergent dispenser
- Cleaning of the dispenser
- Door
- Sorting clothes
- Washing Operations
- CONTROL PANEL
- ON/OFF
- POWER INDICATOR LIGHT
- HALF LOAD
- ENERGY SAVINGS
- SPIN BY-PASS BUTTON
- SPIN SELECTION BUTTON
- SPINNING INDICATOR LIGHT (Not included in certain models)
- TIMER DIAL
- THERMOSTAT DIAL (Not included in certain models)
- AUTOMATIC NO-WRINKLE
- DOOR OPENING KNOB (Not included in certain models)
- WARNING!
- SYNTHETIC AND MIXED PROGRAMS
Brand : CDA
Model : CI532
Category : Washing machine