
99EX-BTSC-1 - Battery HONEYWELL - Free user manual and instructions
Find the device manual for free 99EX-BTSC-1 HONEYWELL in PDF.


| Product Type | Standard Battery Pack |
| Model Number | 99EX-BTSC |
| Battery Chemistry | Lithium Polymer (Li-poly) |
| Voltage | 3.7 V |
| Capacity | 11.3 Watt-hours (Wh) |
| Charging Time (Standard) | Approximately 4 hours |
| Initial Charge Recommendation | Charge for at least 24 hours before first use |
| Compatible Devices | Dolphin 99EX and 99GX series terminals |
| Charging Peripherals | 99EX-HB, 99EX-EHB, 99EX-MB, 99EX-NB, 99EX-CB, 99EX-DEX, 99EX-RS232, 99EX-USB, 99EX-MC, 99EX-USBH |
| Battery Removal Procedure | Place terminal in Suspend Mode, remove battery door, wait 3 seconds, then remove battery |
| Battery Error Indication | Battery error icon in title bar, red General Notification LED, notification on Tile bar |
| Safety Warnings | Do not disassemble, crush, puncture, or expose to fire or water; use only with qualified chargers |
| Disposal | Dispose according to local regulations; do not throw in trash |
| Replacement | Use only Honeywell qualified batteries per IEEE-Std-1725-2006 |
| Hazardous Location | Not designed for use in hazardous locations |
| Warranty | Refer to www.honeywellaidc.com/warranty_information |
Frequently Asked Questions - 99EX-BTSC-1 HONEYWELL
User questions about 99EX-BTSC-1 HONEYWELL
0 question about this device. Answer the ones you know or ask your own.
Ask a new question about this device
Download the instructions for your Battery in PDF format for free! Find your manual 99EX-BTSC-1 - HONEYWELL and take your electronic device back in hand. On this page are published all the documents necessary for the use of your device. 99EX-BTSC-1 by HONEYWELL.
USER MANUAL 99EX-BTSC-1 HONEYWELL
with Windows ^® Embedded Handheld 6.5
Quick Start Guide
Disclaimer
Honeywell International Inc. (“HII”) reserves the right to make changes in specifications and other information contained in this document without prior notice, and the reader should in all cases consult Honeywell to determine whether any such changes have been made. The information in this publication does not represent a commitment on the part of HII.
HII shall not be liable for technical or editorial errors or omissions contained herein; nor for incidental or consequential damages resulting from the furnishing, performance, or use of this material.
This document contains proprietary information that is protected by copyright. All rights are reserved. No part of this document may be photocopied, reproduced, or translated into another language without the prior written consent of HII.
Web Address: www.honeywellaidc.com
Trademarks
Dolphin and HomeBase are trademarks or registered trademarks of Hand Held Products, Inc. or Honeywell International Inc. Microsoft, Windows, Windows Mobile, Windows Embedded Handheld, Windows 7, Windows Vista, Windows XP, Windows Mobile Device Center, ActiveSync, and the Windows logo are trademarks or registered trademarks of Microsoft Corporation. TORX is a trademark or registered trademark of Textron Inc. Other product names or marks mentioned in this document may be trademarks or registered trademarks of other companies and are the property of their respective owners.
©2011 Honeywell International Inc. All rights reserved.
This documentation is relevant for the following Dolphin models: 99EXL0, 99EXLW, 99EXLG, 99GXL0, and 99GXLG.
Out of the Box
Verify that the carton contains the following items:
• Dolphin mobile computer (the terminal)
- Main battery pack
- Quick Start Guide
Note: If you ordered accessories for your terminals, verify that they are also included with the order.
Be sure to keep the original packaging in the event that the Dolphin terminal should need to be returned for service.
99EX/99GX Models
Dolphin 99EX and 99GX model terminals are designed for use with standard battery pack model 99EX-BTSC (Li-poly 3.7V, 11.3 watt hour) and extended battery pack 99EX-BTEC (Li-ion 3.7V, 18.5 watt hour) manufactured for Honeywell International Inc.

Dolphin 99EX and 99GX model terminals are not designed for use in hazardous locations.
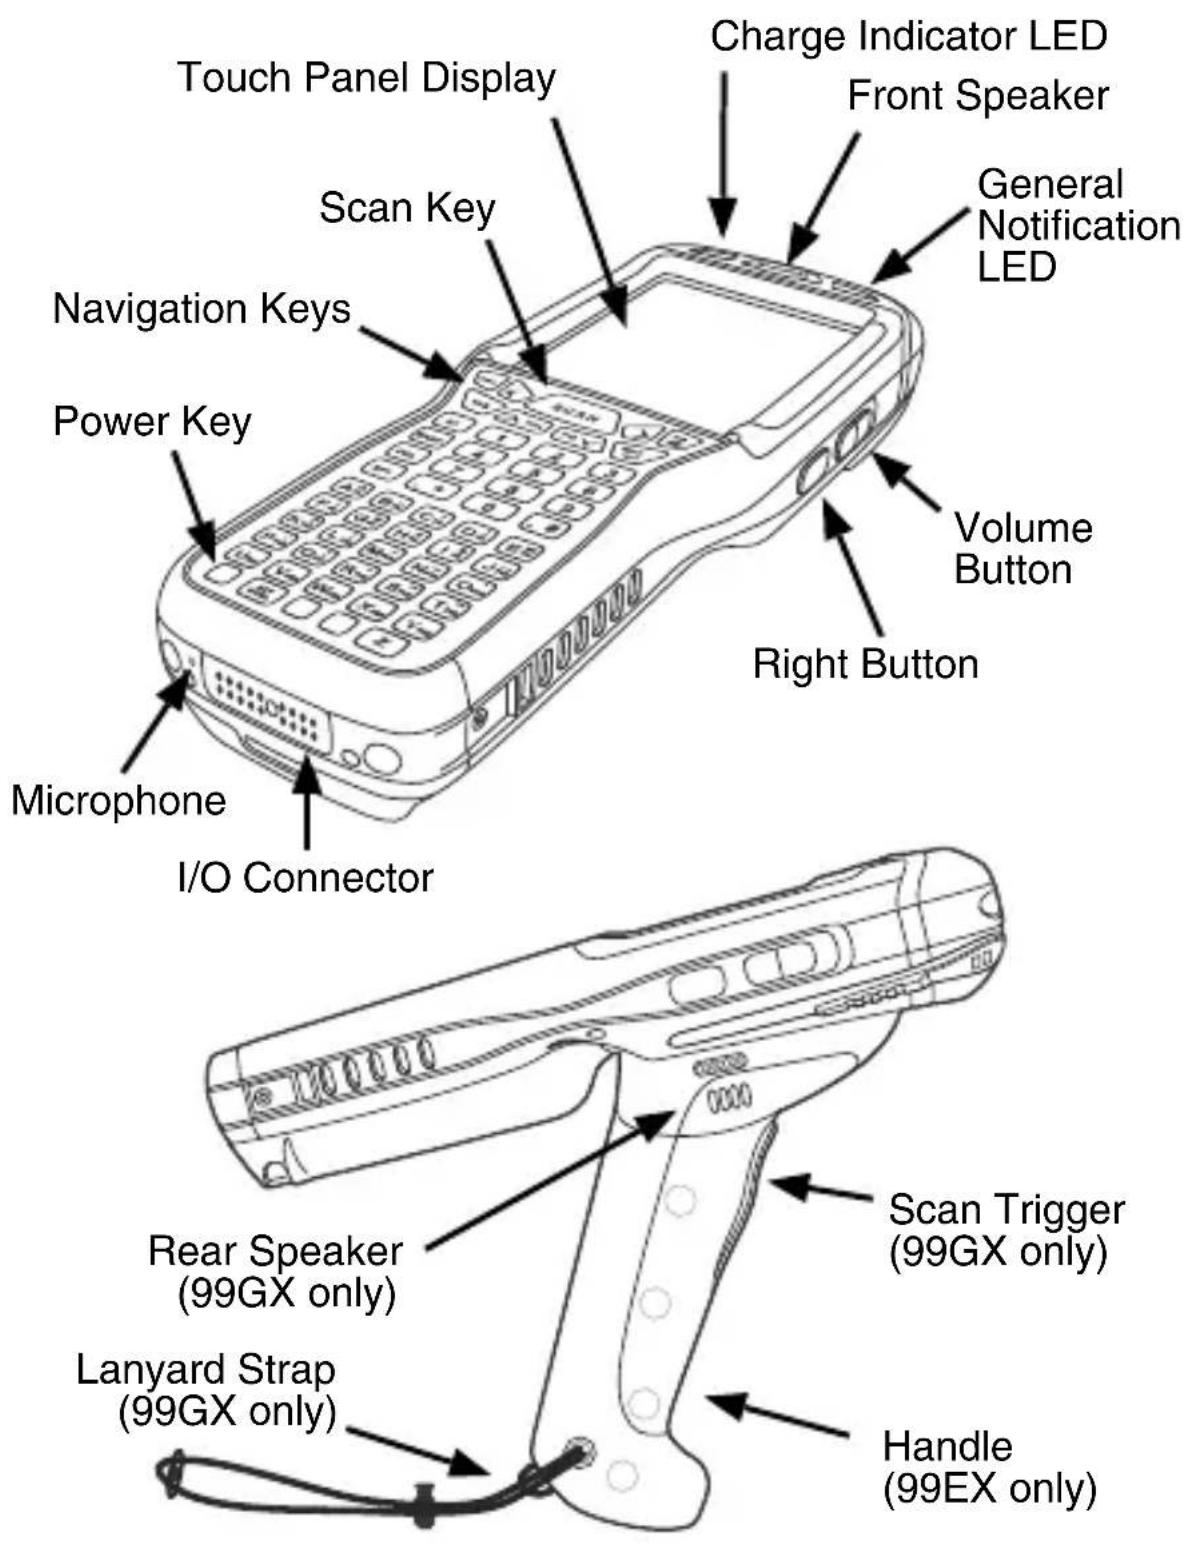
Front and Side Panel
Note: Your Dolphin model may differ from the models illustrated; however, the features are standard for all 99EX/99GX models unless otherwise noted.
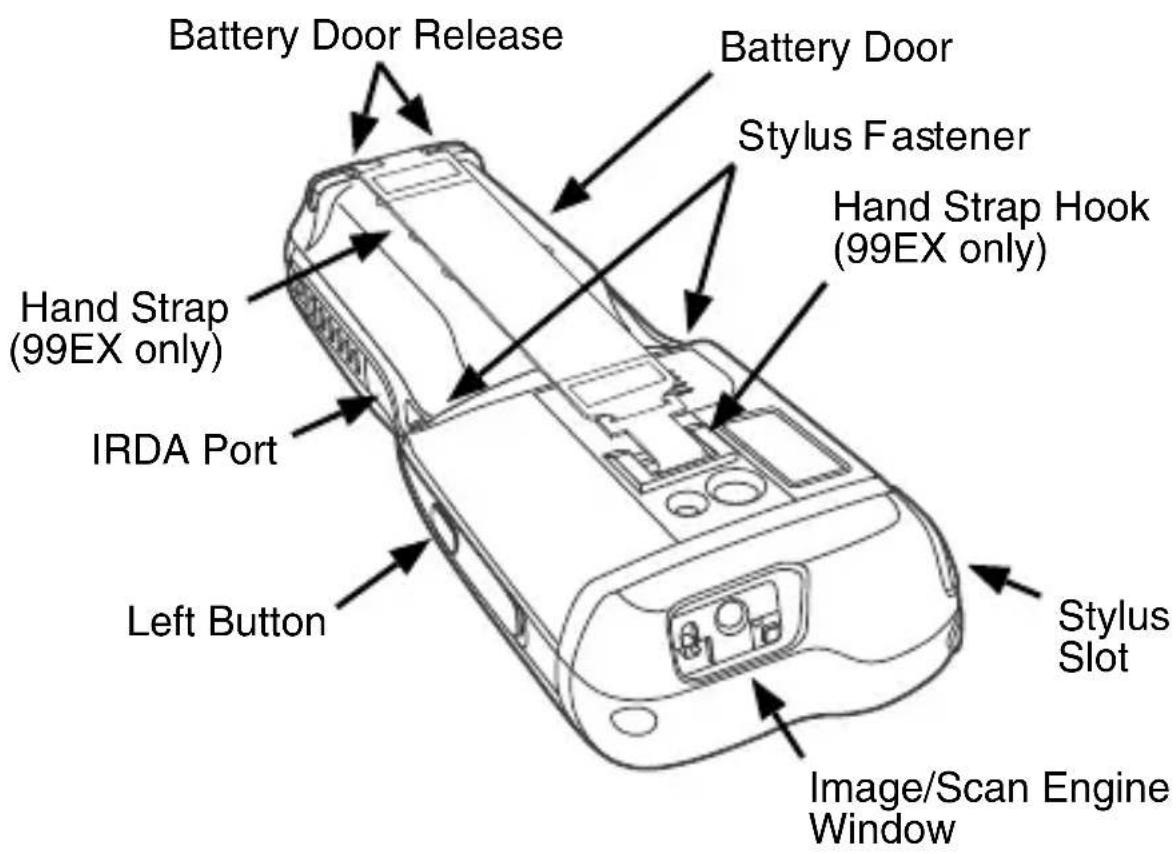
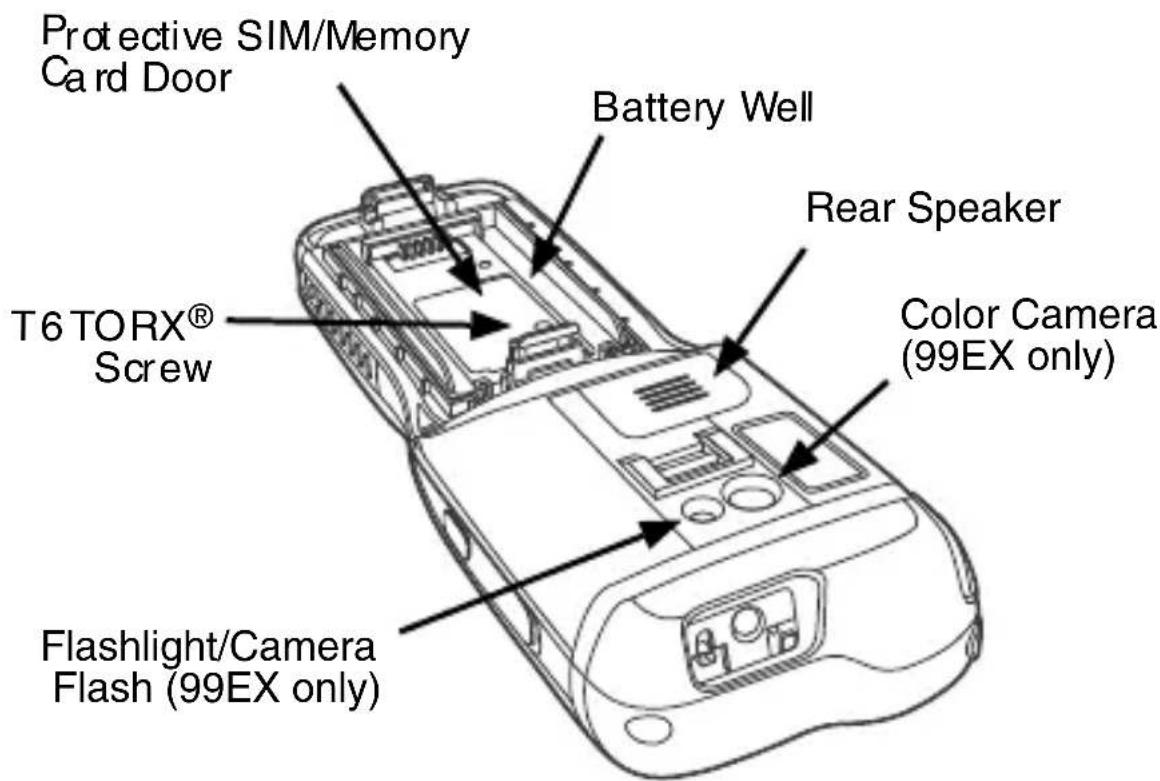
Back Panel
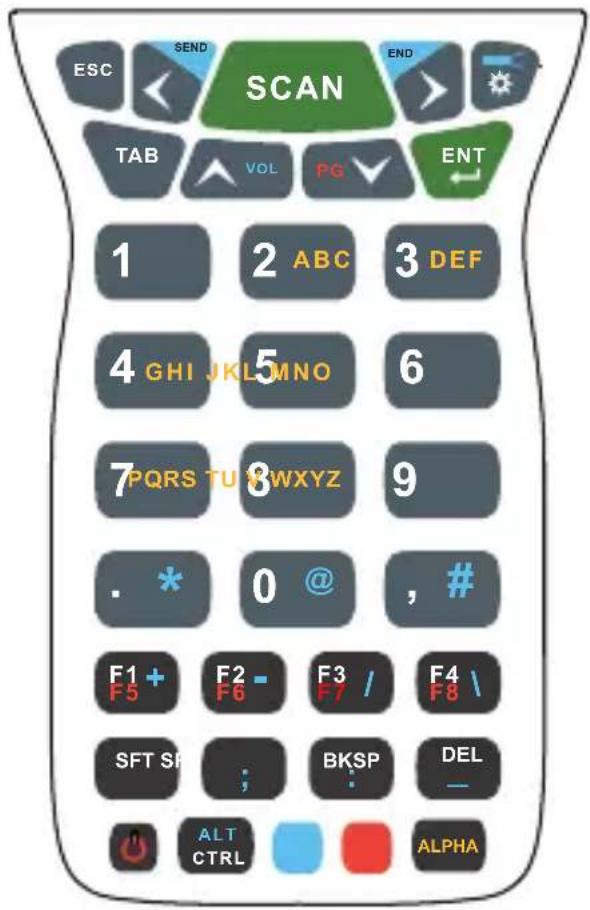
Available Keyboards
Note: The flashlight function () is disabled on all 99GX models.
34-Key Alpha/Numeric Keyboard
34-Key Numeric (Calculator) Keyboard
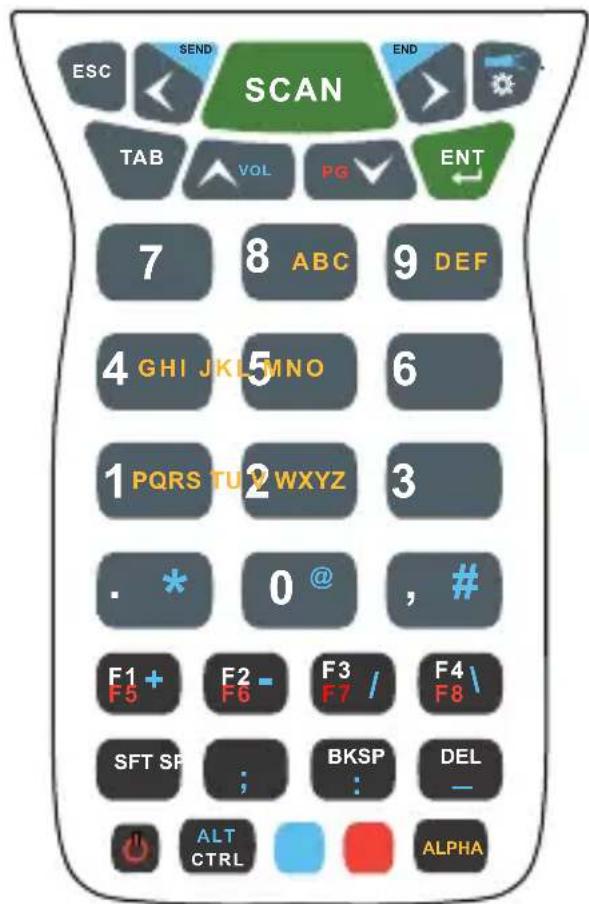
43-Key Alpha/Numeric
Keyboard
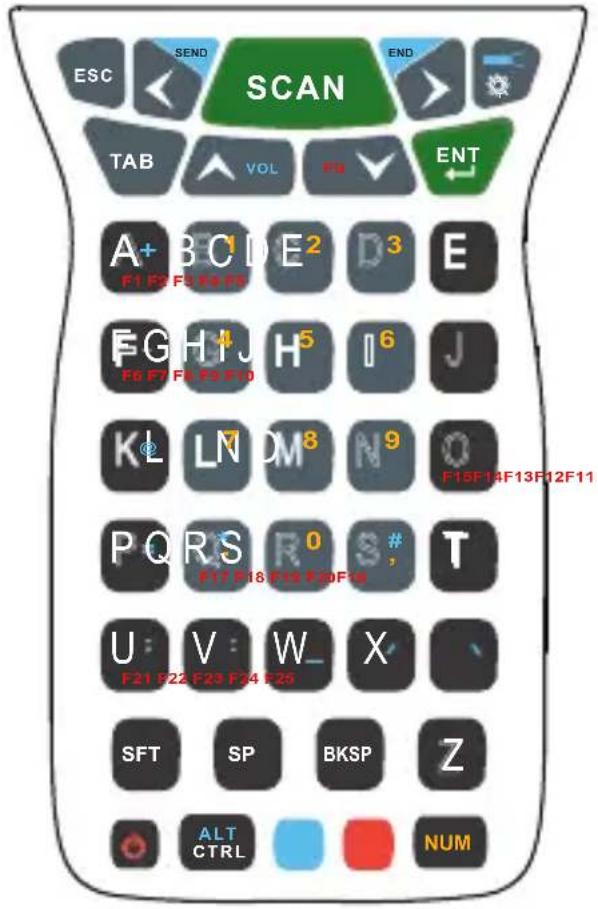
55-Key Full Alpha/
Numeric Keyboard
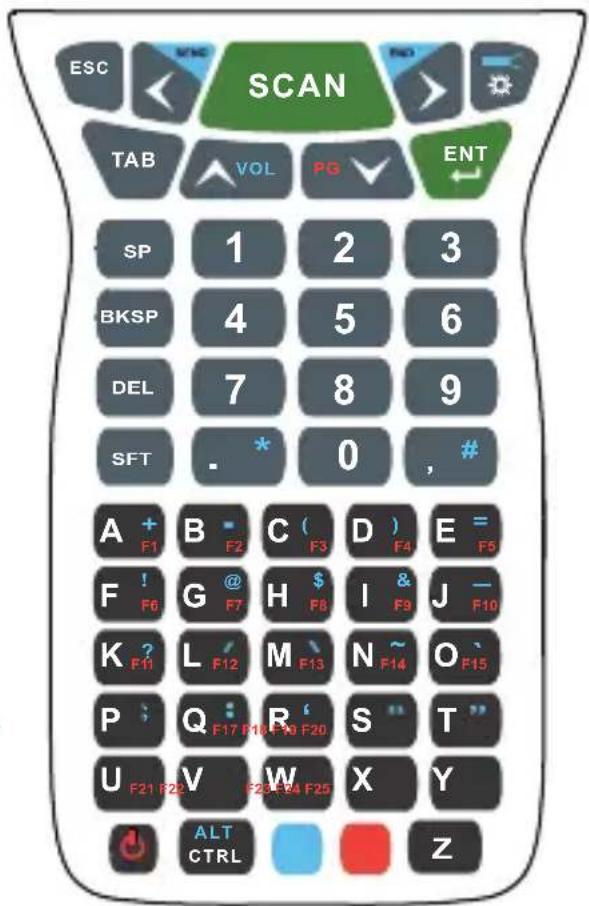
Install the Main Battery Pack
The 99EX/99GX is shipped with the battery packaged separate from the terminal. Follow the steps below to install the main battery. For information on how to remove the battery, see page 6.

Ensure all components are dry prior to placing the battery in the terminal. Mating wet components may cause damage not covered by the warranty.
- Release the hook securing the hand strap to the back panel of the terminal (99EX only).
- Remove the battery door by lifting up the latches near the base of the battery door.
- Insert the battery into the battery well.
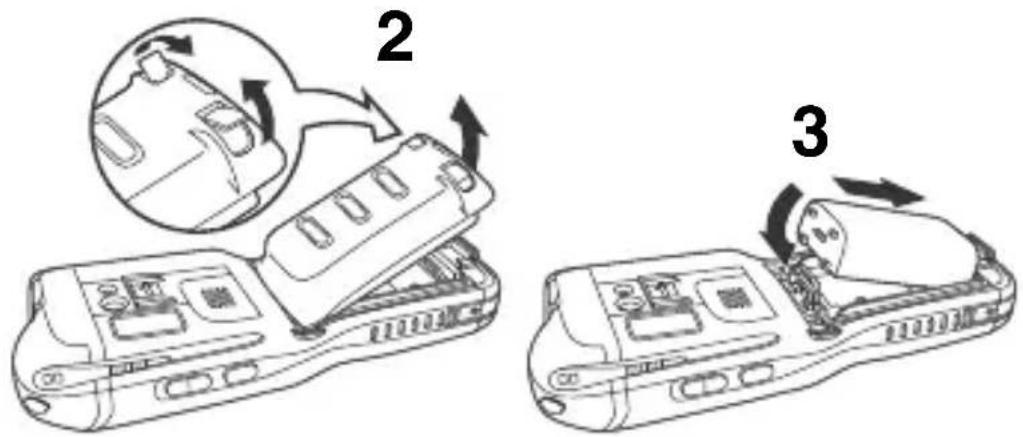
-
Replace the battery door. Apply pressure to engage the door latch. The battery door must be installed prior to powering the unit.
-
Reattach the hand strap (99EX only).
-
Connect the terminal to one of the 99EX series charging peripherals to charge the main battery pack.

We recommend use of Honeywell Li-poly or Li-ion battery packs. Use of any non-Honeywell battery may result in damage not covered by the warranty.
Removing the Main Battery Pack
When removing a battery from the terminal, put the device in Suspend Mode (see page 9) before removing the battery door. Once the battery door is removed, wait at least 3 seconds before removing the main battery. This process allows the device to shut down properly and to maintain memory during the battery swap.
Battery Error Notification
If your terminal displays the following indicators, replace the battery with a new Honeywell battery pack.
- appears in the Title bar at the top of the touch panel display.
- The General Notification LED flashes red.
- A notification appears on the Tile bar at the bottom of the touch panel display.
Battery Pack Use and Disposal
The following are general guidelines for the safe use and disposal of batteries:
- Do not disassemble or open, crush, bend or deform, puncture or shred.
- Do not modify or remanufacture, attempt to insert foreign objects into the battery, immerse or expose to water or other liquids, expose to fire, explosion or other hazard.
-
Improper battery use may result in a fire, explosion or other hazard.
-
We recommend use of Honeywell Li-ion or Li-poly battery packs. Use of any non-Honeywell battery may pose a personal hazard to the user.
- Only use the battery for the system for which it is specified. Do not use a battery in any other manner outside its intended use in Dolphin terminals and peripherals.
- Only use the battery with a charging system that has been qualified with the system per standard IEEE-Std-1725-2006. Use of an unqualified battery or charger may present a risk of fire, explosion, leakage, or other hazard.
- Replace the battery only with another battery that has been qualified with the system per this standard, IEEE-Std-1725-2006. Use of an unqualified battery may present a risk of fire, explosion, leakage or other hazard.
- Replace defective batteries immediately; using a defective battery could damage the Dolphin terminal.
- Never throw a used battery in the trash. Promptly dispose of used batteries in accordance with local regulations.
- Do not short-circuit a battery or throw it into a fire; it can explode and cause severe personal injury. Do not allow metallic conductive objects to contact battery terminals.
- If you observe that the Honeywell battery supplied is physically damaged, please send it to Honeywell International Inc. or an authorized service center for inspection. Refer to Technical Assistance on page 24.
- Avoid dropping the terminal or battery. If the terminal or battery is dropped, especially on a hard surface, and the user suspects damage, send it to a Honeywell
International Inc. or an authorized service center for inspection. Refer to Technical Assistance on page 24.
- If you are not sure the battery or charger is working properly, send it to Honeywell International Inc. or an authorized service center for inspection.
- Excessive discharge can degrade battery performance. Recharge the battery when your terminal indicates low battery power.
- Although your battery can be recharged many times, the battery life is limited. Replace it after the battery is unable to hold an adequate charge.
Suspend Mode
The terminal goes into Suspend Mode automatically when the terminal is inactive for a programmed period of time. You can program this time on the Advance tab of the Power System Setting. For additional information, refer to the Dolphin 99EX/99GX User's Guide located on the Web at www.honeywellaidc.com.
To put the terminal into Suspend Mode manually, press the Power key 📍 and the screen goes blank.
To wake the terminal from Suspend Mode, press the
Power key SCAN key . SCAN
Note: You should always put the terminal in Suspend Mode before removing the battery door. For information on how to remove the battery see page 6.
Charging the Dolphin
Dolphin 99EX and 99GX model terminals are designed for use with the following 99EX charging devices and cables: 99EX-HB, 99EX-EHB, 99EX-MB, 99EX-NB, 99EX-CB, 99EX-DEX, 99EX-RS232, 99EX-USB, 99EX-MC, and 99EX-USBH.

Warning! Dolphin charging peripherals are not designed for use in hazardous locations.

Ensure all components are dry prior to mating terminals/batteries with peripheral devices. Mating wet components may cause damage not covered by the warranty.
Connect the terminal to one of the 99EX series charging peripherals to charge the main battery.
The charging time for the main battery pack is 4 hours for the standard battery or 6 hours for the extended battery. Honeywell recommends charging the Dolphin terminal for at least 24 hours prior to initial use to ensure the internal backup battery is fully charged.
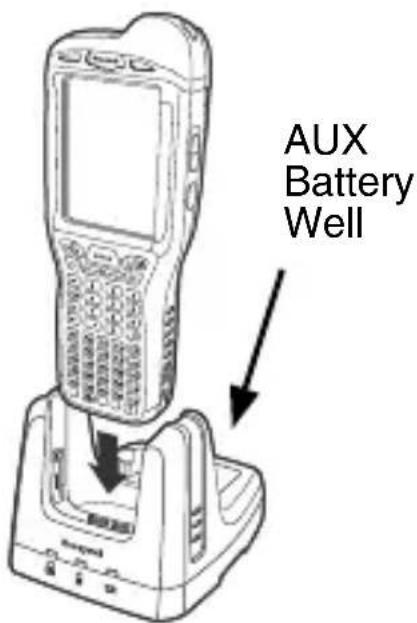
HomeBase (Model 99EX-HB)
The 99EX-HB charger is designed for use with standard battery pack model 99EX-BTSC (Li-poly 3.7V, 11.3 watt hour) and extended battery pack model 99EX-BTEC (Li-ion 3.7V, 18.5 watt hour) manufactured for Honeywell International Inc. and with Dolphin 99EX or 99GX model terminals. Use only UL Listed power supply, which has been qualified by Honeywell with output rated at 12VDC, and 3 amps with the device.

Warning! The HomeBase is not designed for use in hazardous locations.
Front Panel
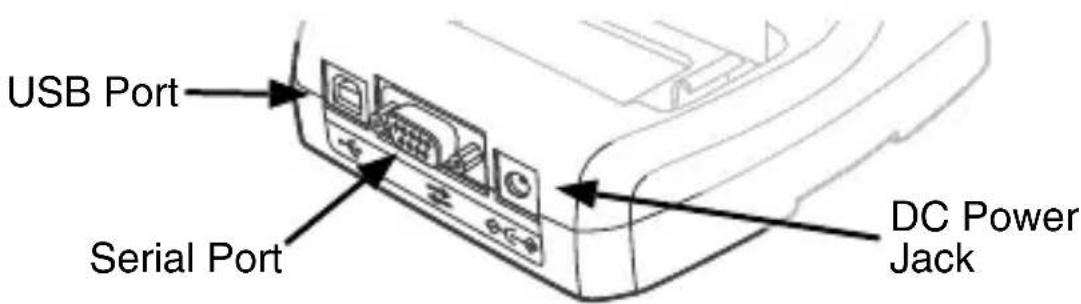
Back Panel
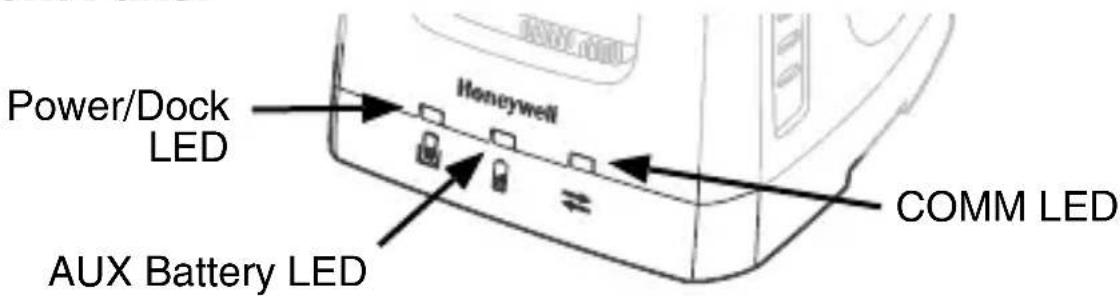
HomeBase LED Indicators

Red The HomeBase has power but no terminal is docked.
Green The HomeBase has power and the terminal is properly seated in the base.

Orange The auxiliary battery is charging.
Green The auxiliary battery has completed charging and is ready for use.
Red Flashing The internal temperature of the auxiliary battery is too hot or there is a battery error. Charge the auxiliary battery in a cooler environment or replace the battery with a new Honeywell Li-ion or Li-poly battery.

Serial Port Communication
Red Serial data is being sent from the host device to the base.
Green Serial data is being sent from the base to the host device.
Orange Serial data is being sent in both directions at the same time.

USB Port Communication
Green A USB connection is established with the host workstation.
Charging/Communication Cables

Warning! The Charging/Communication Cables are not designed for use in hazardous locations.
Use only UL Listed power supply, which has been qualified by Honeywell with output rated at 5VDC and 3 amps with the device.
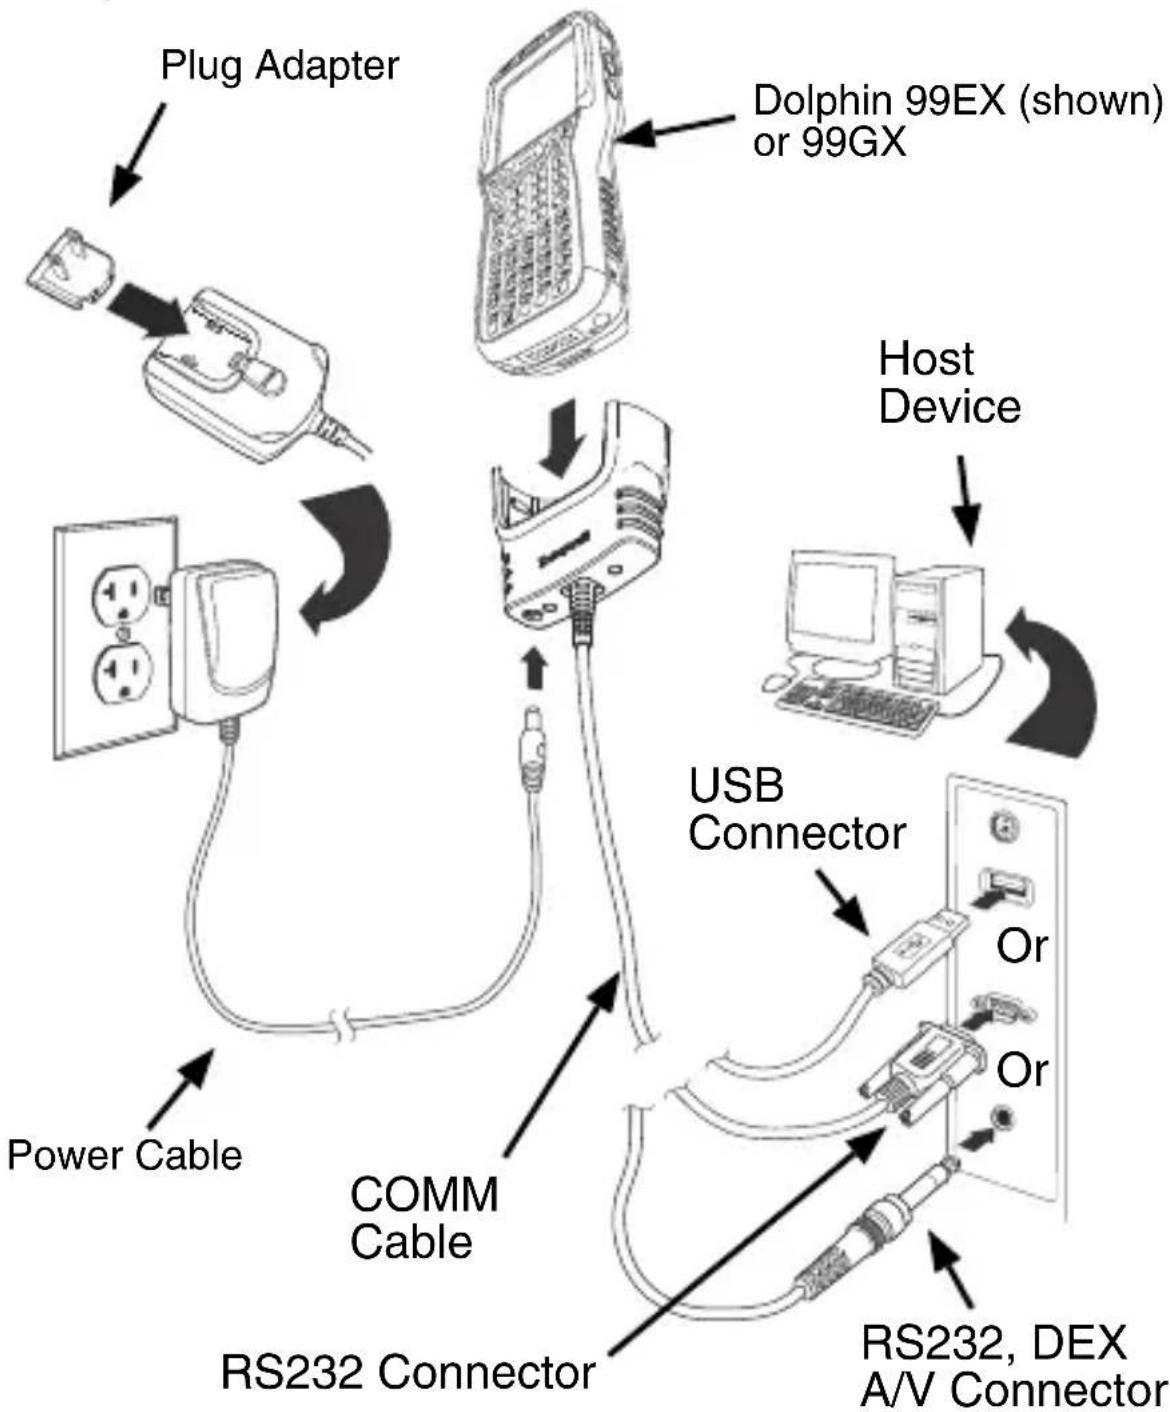
flowchart
graph TD
    A["Plug Adapter"] --> B["Dolphin 99EX (shown) or 99GX"]
    B --> C["Host Device"]
    C --> D["USB Connector"]
    D --> E["RS232 Connector"]
    E --> F["Power Cable"]
    E --> G["COMM Cable"]
    G --> H["RS232"]
    H --> I["RS232, DEX A/V Connector"]
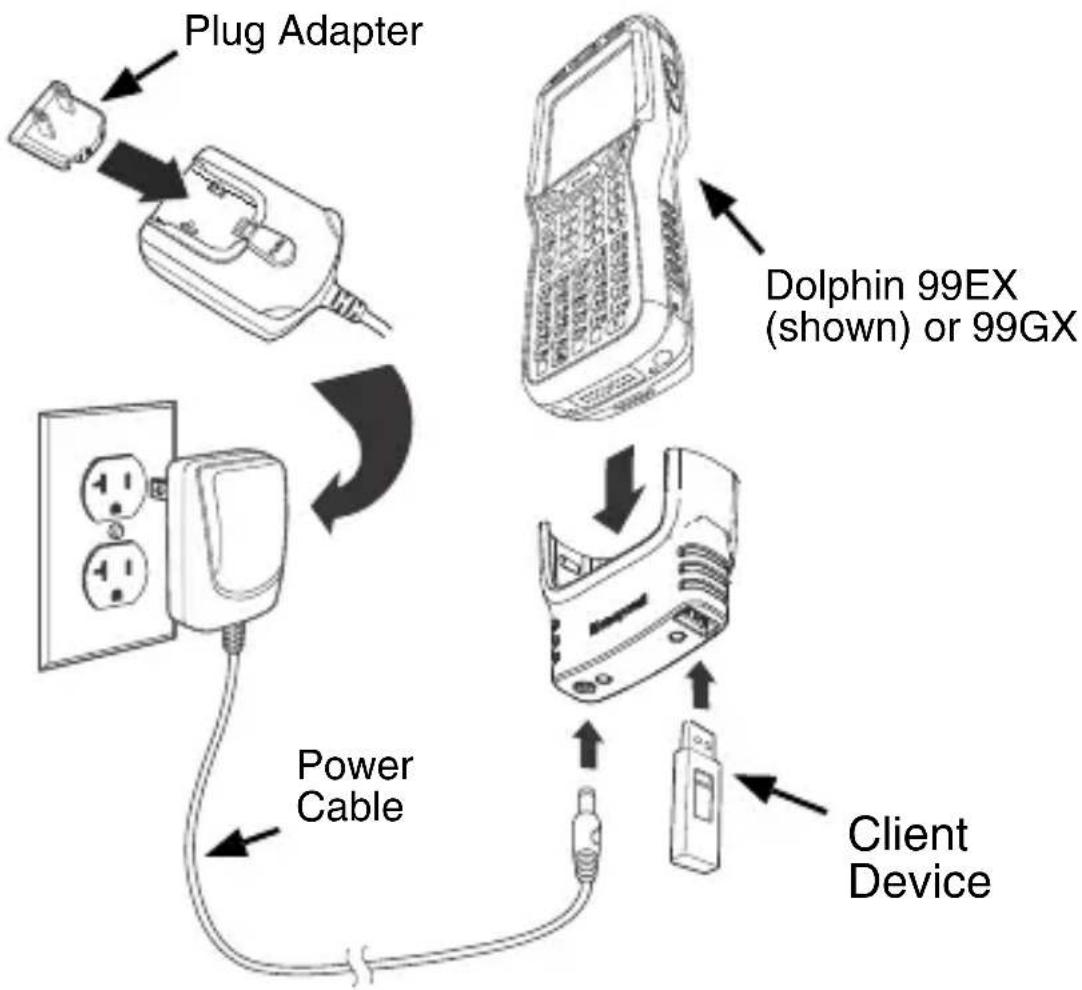
flowchart
graph TD
    A["Plug Adapter"] --> B["Dolphin 99EX (shown) or 99GX"]
    B --> C["Power Cable"]
    C --> D["Client Device"]
LED Indicators
There are two light emitting diodes (LEDs) located to the left and right of the Honeywell logo above the LCD display.
The General Notification LED (right) flashes and illuminates during resets, scanning/imaging and taking a picture. This LED can be programmed by various software applications.
The Charge Indicator LED (left) illuminates when the Power Tools BattMon application is enabled and the device is on AC charge. For more information, please consult the Dolphin Power Tools User's Guide for Windows Embedded Handheld 6.5.
Battery Status Indicator
The Dolphin's battery status is indicated at the top of the touch screen in the Title Bar.

The battery is charging. The terminal is using an external power source.

The battery has a full charge.

The battery has a high charge.

The battery has a medium charge.

The battery has a low charge.

The battery has a very low charge. Charge the battery.

A battery error has occurred. Replace the main battery pack with a new Honeywell Li-poly or Li-ion battery pack.
Communication
To synchronize data (e.g., e-mail, contacts, and calendar) between the terminal and the host workstation (PC):
- ActiveSync ^® (version 4.5 or higher) or Windows ^® Mobile Device Center (WDMC) must be installed on your PC. You can download the most current version of ActiveSync or WDMC from the Microsoft Web site (http://go.microsoft.com/fwlink/?LinkId=147001).
Note: Dolphin terminals ship with ActiveSync already installed. ActiveSync on your Dolphin terminal works with WDMC on PCs running Windows Vista or Windows 7 and with ActiveSync on PCs running Windows XP.
- The Dolphin terminal and PC must be configured for the same communication type.
- Connect the terminal to the PC (using a Dolphin peripheral) to initiate communication.
For additional information on ActiveSync or Windows Mobile Device Center visit www.microsoft.com.

We recommend use of Honeywell peripherals, power cables, and power adapters. Use of any non-Honeywell peripherals, cables, or power adapters may cause damage not covered by the warranty.
Software Upgrades
Contact a Honeywell technical support representative for information on available software upgrades for your Dolphin terminal. See Technical Assistance on page 24.
Installing a Memory Card
Note: Format all microSD/SDHC cards before initial use.
- Press the Power key to put the terminal in Suspend Mode.
- Release the hand strap hook near the speaker on the back panel of the terminal (99EX models only).
- Remove the battery door.
- Wait at least 3 seconds, then remove the battery.
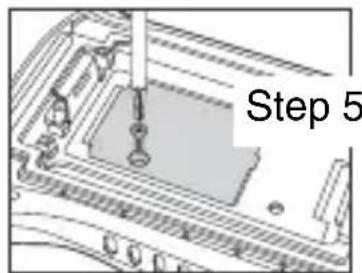
- Remove the T6 TORX screw securing the protective door closed.
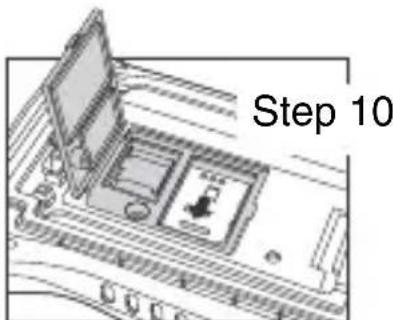
- Lift up the lower left corner of the door to access the memory socket.
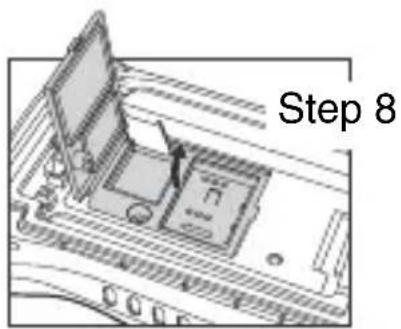
- Unlock the access door to the socket by sliding the door toward the IrDA port side of the terminal.
- Lift the door to expose the socket.
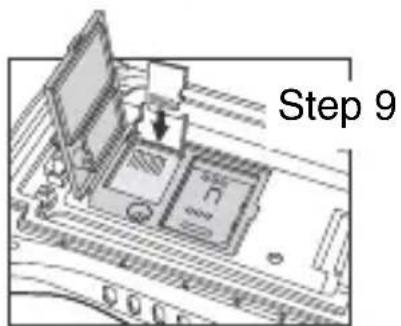
- Slide the microSD or microSDHC card into the door of the socket.
Note: Make sure the interface on the memory card is connected to the interface in the socket; align the notch on the card with the notch of the socket.
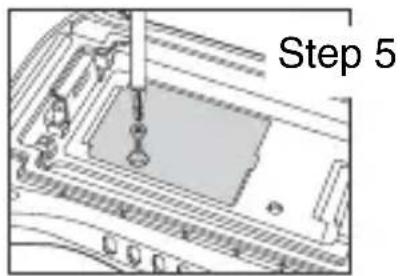
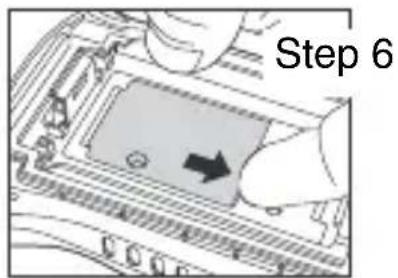
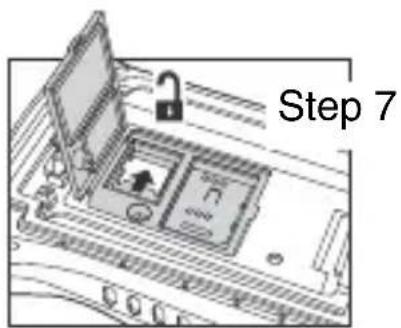
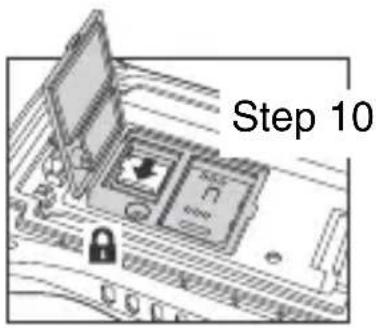
- Close and lock the access door.
- Close the protective door over the memory socket. Insert and tighten the T6 TORX screw to secure the door closed.
- Install the battery and the battery door. Reattach the hand strap to the terminal (99EX models only).
- Press the Power key or the SCAN key to wake the terminal.
Installing a SIM Card
- Press the Power key to put the terminal in Suspend Mode.
- Release the hand strap hook near the speaker on the back panel of the terminal (99EX models only).
- Remove the battery door.
- Wait at least 3 seconds, then remove the battery.
- Remove the T6 TORX screw securing the protective door closed.
- Lift up the lower left corner of the door to access the SIM card socket.
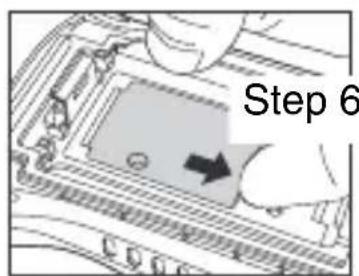
- Unlock the access door to the socket by sliding the door toward the IrDA port side of the terminal.
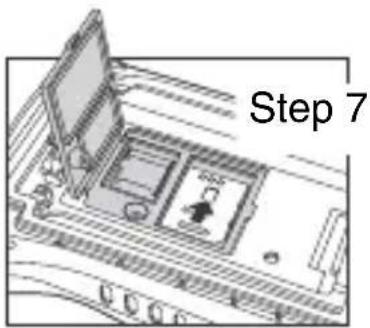
Note: Do not insert sharp objects into the SIM door slot. Inserting sharp objects may damage sensitive electronic components.
- Lift the door to expose the socket.
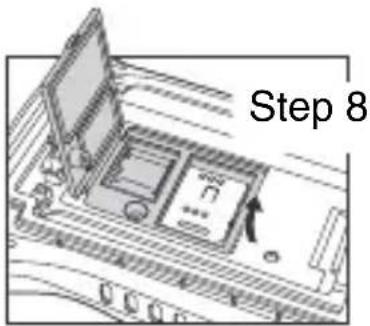
- Insert the SIM card into the socket.
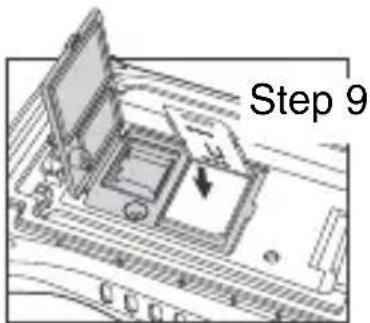
Note: Make sure the interface on the card is connected to the SIM Card interface in the socket; align the beveled corner of the card with the beveled corner of the socket.
- Close and lock the access door.
- Close the protective door over the memory socket. Insert and tighten the T6 TORX screw to secure the door closed.
- Install the battery and the battery door. Reattach the hand strap to the terminal (99EX models only).
- Press the Power key or the SCAN key to wake the terminal.
Using the Scan Image Engine
-
Tap > Demos > Scan Demo
-
Point the Dolphin's terminal at the bar code.
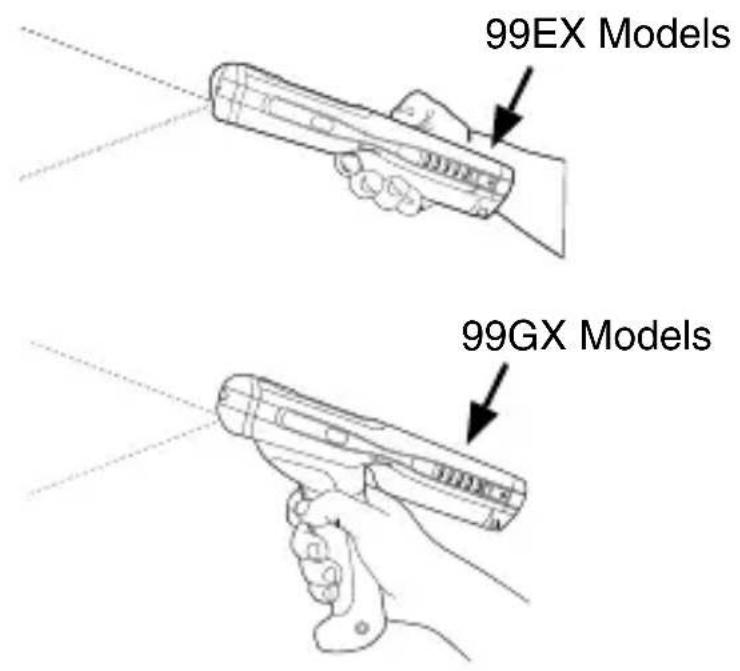
- Project the aiming beam or pattern by pressing and holding one of the following:
• the trigger (99GX models only),
• the SCAN key (all models) or
- one of the terminal's side buttons (all models).
-
The red LED lights.
-
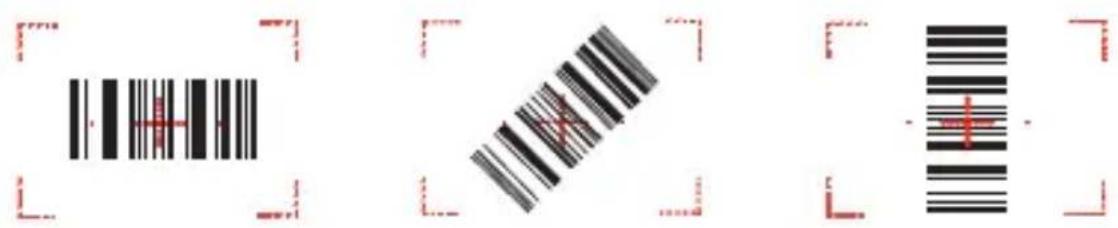
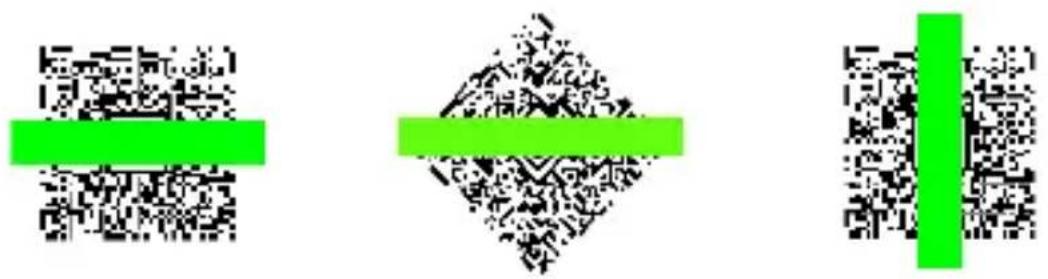
Center the aiming beam over the bar code; see Aiming Options on page 21.
-
When the bar code is successfully decoded, the LED changes to green and the terminal beeps.
-
The bar code information is entered into the application in use.
Aiming Options
N5603 Red High-Vis Aiming Pattern
N5600 Green Aiming Beam
Linear Bar Code

natural_image
Three abstract black-and-white bar patterns: a horizontal green bar, a crossed-out black bar, and a vertical striped bar (no text or symbols)2D Matrix Symbol
Using the Color Camera
Note: The following feature is not supported in 99GX models.
-
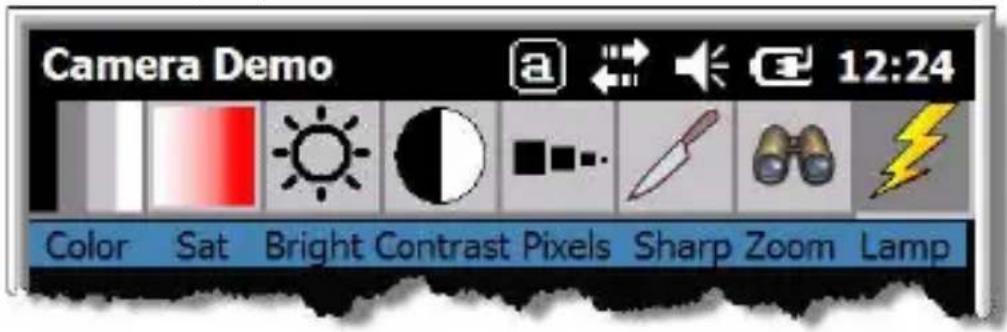
Tap >Demos >Camera Demo
-
Adjust the camera settings using the menu at the top of the display screen.
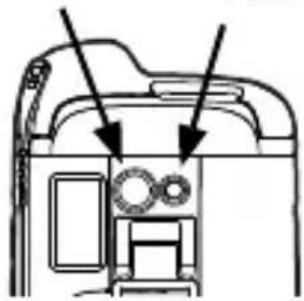
- Point the terminal's camera lens at the object you want to capture. The camera lens is located on the back panel of the terminal.
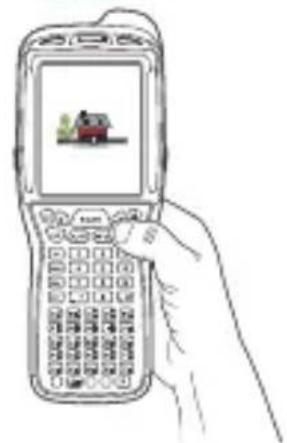
- Center the object in the touch screen display.
- Press the ENT key . The terminal's red LED illuminates during picture capture.
Note: Tap the green arrow to review or edit your pictures.
Tap the green box to exit the picture review/edit screen.
Camera Lens
Camera Flash
natural_image
Diagram of a camera interior showing top and front views with no text or symbols
natural_image
Line drawing of a hand holding a mobile phone with a small house icon on screen (no text or symbols)Soft Reset (Warm Boot)
A soft reset re-boots the device and preseves any objects created in RAM.
- Press and hold the CTRL - ALT ENTER keys for approximately 5 seconds.
- The decode and scan LEDs flash for approximately three seconds as the terminal resets.
- When the reset is complete, the Today screen displays.

Hard Reset (Cold Boot)
A hard reset re-boots the device and closes any open applications running in RAM at the time of the reset.
-
Press and hold the CTRL - ALT CTRL SC keys for approximately 5 seconds.
-
The decode and scan LEDs light for approximately 3 seconds.
-
The terminal re-initializes.
Factory Reset
Contact a Honeywell technical support representative for information on how to perform a factory reset. For contact information, see Technical Assistance on page 24.
Technical Assistance
Contact information for technical support, product service, and repair can be found at www.honeywellaidc.com.
User Documentation
Refer to www.honeywellaidc.com for detailed user documentation or for localized versions of this Quick Start.
Limited Warranty
Refer to www.honeywellaidc.com/warranty_information for your product's warranty information.
Patents
For patent information, please refer to www.honeywellaidc.com/patents.
Honeywell Scanning & Mobility
9680 Old Bailes Road
Fort Mill, SC 29707
www.honeywellaidc.com
- Quick Start Guide
- Disclaimer
- Trademarks
- Out of the Box
- 99EX/99GX Models
- Front and Side Panel
- Available Keyboards
- 34-Key Alpha/Numeric Keyboard
- Install the Main Battery Pack
- Removing the Main Battery Pack
- Battery Error Notification
- Battery Pack Use and Disposal
- Suspend Mode
- Charging the Dolphin
- HomeBase (Model 99EX-HB)
- Front Panel
- Back Panel
- HomeBase LED Indicators
- Serial Port Communication
- USB Port Communication
- Charging/Communication Cables
- LED Indicators
- Battery Status Indicator
- Communication
- Software Upgrades
- Installing a Memory Card
- Installing a SIM Card
- Using the Scan Image Engine
- Aiming Options
- Using the Color Camera
- Soft Reset (Warm Boot)
- Hard Reset (Cold Boot)
- Factory Reset
- Technical Assistance
- User Documentation
- Limited Warranty
- Patents
- Honeywell Scanning & Mobility
Brand : HONEYWELL
Model : 99EX-BTSC-1
Category : Battery