
iPAQ 316 - Browser HP - Free user manual and instructions
Find the device manual for free iPAQ 316 HP in PDF.


| Product Type | GPS Navigation Device (Travel Companion) |
| Brand | HP |
| Model | iPAQ 316 |
| Dimensions (W x H x D) | 4.3 x 3.4 x 0.7 in (110.2 x 86.8 x 18.2 mm) |
| Weight | 6.6 oz (187 g) |
| Display | 4.3" WVGA (800x480) TFT touch screen, anti-glare, 16-bit color |
| Processor | Titan 600 MHz ARM11 Dual-Core |
| Memory | 2.0 GB flash, 128 MB SDRAM |
| GPS | SiRF embedded GPS receiver with InstantFix |
| Bluetooth | Bluetooth 2.0 with EDR, range approx. 33 ft (10 m) |
| Battery | 1700 mAh Li-ion removable/rechargeable |
| Charging Time | 2-4 hours (device off), up to 8-10 hours (in use) |
| Power Supply | AC adapter: 100-240V, 50/60 Hz, output 5Vdc |
| Audio | Integrated microphone, speaker, 3.5 mm stereo headset jack |
| Storage Expansion | SD card slot (supports SD memory) |
| Operating System | Microsoft Windows CE 5.0 with Messaging and Security Feature Pack |
| Navigation Features | Address search, POI, multi-point routes, TMC traffic support, voice guidance, lane guidance |
| Entertainment | Video playback, music player, picture viewer, games |
| Connectivity | mini-USB for charging/data, Bluetooth for hands-free calling and file transfer |
| Cleaning | Use soft, damp (water only) cloth; avoid corrosive liquids or abrasives |
| Safety | Do not disassemble battery, avoid extreme temperatures, keep away from children |
| Spare Parts / Repairability | Replacement stylus and battery available via HP; screen repair service (non-warranty cost) |
Frequently Asked Questions - iPAQ 316 HP
User questions about iPAQ 316 HP
0 question about this device. Answer the ones you know or ask your own.
Ask a new question about this device
Download the instructions for your Browser in PDF format for free! Find your manual iPAQ 316 - HP and take your electronic device back in hand. On this page are published all the documents necessary for the use of your device. iPAQ 316 by HP.
USER MANUAL iPAQ 316 HP
© Copyright 2007 Hewlett-Packard Development Company, L.P.
HP iPAQ products are powered by Microsoft® Windows CE 5.0 with Messaging and Security Feature Pack.
Microsoft Windows and the Windows logo are trademarks of Microsoft Corporation in the U.S. and other countries.

SD Logo is a trademark of its proprietor.
Bluetooth® is a trademark owned by its proprietor and used by Hewlett-Packard Development Company, L.P. under license.
All other product names mentioned herein may be trademarks of their respective companies.
Hewlett-Packard Company shall not be liable for technical or editorial errors or omissions contained herein. The information is provided "as is" without warranty of any kind and is subject to change without notice. The warranties for Hewlett-Packard products are set forth in the express limited warranty statements accompanying such products. Nothing herein should be construed as an additional warranty.
This document contains proprietary information that is protected by copyright. No part of this document may be photocopied, reproduced, or translated to another language without the prior written consent of Hewlett-Packard Development Company, L.P.
Produced under license from, and contains copyrighted material of "The Sanborn Map Company, Inc". All Rights Reserved.
© 1984-2007 Tele Atlas. All rights reserved. This material is proprietary and the subject of copyright protection and other intellectual property rights owned by or licensed to Tele Atlas. The use of this material is subject to the terms of a license agreement. You will be held liable for any unauthorized copying or disclosure of this material.
Data Source © 2007 Tele Atlas N.V.
© BEV, GZ 1368/2003
© DAV, violation of these copyrights shall cause legal proceedings.
© IGN France
This product includes mapping data licensed from Ordnance Survey with the permission of the Controller of Her Majesty's Stationery
Office. © Crown copyright and/or database right 2004. All rights reserved. License number 100026920.
Ordnance Survey of Northern Ireland.
© Norwegian Mapping Authority, Public Roads Administration / © Mapsolutions
© Roskartographia
© Swisstopo
NOTICE: © 1984 – 2007 Tele Atlas. All rights reserved. This material is proprietary and the subject of copyright protection and other intellectual property rights owned or licensed to Tele Atlas Canada, Inc. Tele Atlas Canada, Inc. is an authorized distributor of selected Statistics Canada computer files under Agreement number 6776 and is an authorized distributor of selected Geomatics Canada computer files. The product includes information copied with permission from Canadian authorities, including © Canada Post Corporation. The use of this material is subject to the terms of a License Agreement. You will be held liable for any unauthorized copying or disclosure of this material.
Second Edition November 2007
Document Part Number: 461378-002
Table of contents
1 Welcome
2 Register the Travel Companion
3 Box contents
Box contents 3
4 Components
Front components 4
Left and right components 5
Top and bottom components .... 5
Back components 6
5 Power on and set up the Travel Companion
Set up the Travel Companion .... 7
Step 1: Remove the battery cover .... 7
Step 2: Install the battery and replace the battery cover .... 7
Step 3: Charge the battery 8
Power on Travel Companion 8
Car kit setup 8
6 Warnings and safety information
7 Learn the basics
Hardware buttons 12
Power on/off 12
Multifunction wheel 12
Zoom in and out 12
Adjust volume and brightness 12
Open the Quick Launch menu 13
Screen buttons 13
Buttons on the top and the bottom of the screen 13
Buttons on the map 16
Selectors 17
Direct selectors 17
List selectors 18
Sliders 18
Switches 18
Virtual keyboards 18
The QWERTY keyboard 18
The numeric keyboard 19
8 Discovering the Travel Companion through the Startup menu
Entertainment 20
Videos 20
Music 21
Games 22
Pictures 22
Contacts 23
Add contact 24
Edit contact 25
Navigate to a contact 25
Call contact 25
Extras 25
Clock 25
Phone 27
Calculator 27
Settings 27
System 28
Align screen 28
Time 28
Date 28
Language 28
Media directories 29
9 Operating navigation
Navigate to an address 30
Navigate to a POI 31
Create a route with multiple destinations 31
Create a route with a different start point 32
Save user data 33
10 Reference book – Navigation menu
Go to 34
Find an address, street, intersection, or city 35
Find in History 36
Find one of the Favorites 36
Find home or work 36
Find a POI 36
Search reference 36
POI groups 37
POI subgroups 37
Select a POI 37
Find co-ordinates 38
Coordinate display format 39
11 Bluetooth
Connect a Bluetooth-enabled phone to your Travel Companion 40
Make a call 41
Use phone dialer 41
Use contacts 42
Use POI 42
Answer or reject a call 42
Connect to a Bluetooth stereo headphones 42
12 Map
Map visualization 45
Daylight and night color schemes 45
Current position and Lock-on-Road 45
Selected map point, also known as the Cursor 46
Visible POIs (Points of Interest) 46
Road safety cameras 46
Contacts 46
Elements of the active Route 46
Start point, Via points, and destination 47
Active leg of the route 47
Inactive legs of the route 47
Turn preview 47
Cursor (the selected map point) 47
Track Log recording/playback indicator 47
Cursor menu 48
Current street 49
Distance to next turn 49
Next street/Next city 49
13 Route
Edit Route 50
Route Detail 50
Saved Routes 51
Route Info 51
Route data displayed (for destination and Via points) 51
Warning icons 53
Other functions 53
Manage Track Logs 54
14 Settings
Visual settings 56
3D settings 56
Landmarks 56
Elevated roads 56
Buildings 56
Terrain 56
Backlight settings 56
Brightness 56
Power management 56
Backlight always on 56
Smart Powersave 57
Map settings 57
Alternative Road Names 57
Show Street Labels 57
2D/3D map view 57
POI visibility 57
Night mode 58
Zoom settings 58
Auto zoom 58
Restore Lock-to-Position and Smart Zoom 59
Zoom in after find 59
Overview mode 59
Sound settings 59
Voice guidance 60
Key sounds 60
Dynamic Volume 60
Route settings 60
Vehicle 60
Route calculation method 61
Short 61
Fast 61
Economical 61
Off-route recalculation 61
Automatic 61
Off 61
Avoidances 61
Unpaved Roads 61
Motorways 61
Ferries 62
Cross-border planning 62
U-turns 62
Permit needed 62
Toll roads 62
Carpool lanes (for the USA map only) 62
Keep position on road 62
Regional settings 62
Language 63
Voice 63
Units 63
Time settings 63
Set time format 63
Warnings 63
Warn when speeding 63
Speeding tolerance 63
Alternative speed limit 63
Alternative speeding tolerance 64
Enable safety cameras 64
15 Navigation extras
Trip Planner 65
Traffic Message Channel (TMC) 65
List of traffic messages 65
TMC configuration 66
TMC radio settings 66
Selected FM radio station 66
Exclude selected station 66
Show excluded stations 66
16 GPS data screen
17 About screen
18 Outlook synchronization
19 Product specifications
System specifications 70
Physical specifications 70
Operating environment 71
20 Regulatory notices
Federal Communications Commission Notice 72
Modifications 72
Cables 72
Declaration of Conformity for Products Marked with the FCC Logo (United States Only) 72
Canadian Notice 73
Avis Canadien 73
European Union Notice 73
Products with 2.4–GHz Wireless LAN Devices 74
France 74
Italy 74
Battery Warning 74
Battery Recycling 74
Battery Disposal 74
Equipment Warning 75
Acoustics Warning 75
Airline Travel Notice 76
Medical Electronic Equipment 76
Wireless Notices 76
U.S. Regulatory Wireless Notice 76
Canadian Regulatory Wireless Notice 76
Brazilian Notice 76
Japanese Notice 76
Bluetooth Devices 77
Taiwan DGT Notice 77
Korean Notice 77
21 Guidelines for care and maintenance
Using the Travel Companion 78
Cleaning the Travel Companion 78
Carrying or storing the Travel Companion 78
Using accessories 78
Using the Travel Companion in public places 78
Obtain services for a cracked or damaged screen 78
Protect the Travel Companion screen from cracking or damage 79
1 Welcome
Thank you for purchasing the HP iPAQ 300 Travel Companion. Your Travel Companion is preloaded with many features that enhance your travel experience, which you can learn about in this guide. In addition, there are free Web resources and additional content available to enhance your travels. Here you can find new Web-based trip planning services that allow you to personalize your travel by creating custom itineraries for export to your Travel Companion. Visit http://www.ipaq.com to learn about the latest services and content available for the Travel Companion.
Use this guide to know more about how to:
• Get started with using your Travel Companion. - Manage your contacts and synchronize data. • Use Bluetooth for making calls using your Travel Companion.
2 Register the Travel Companion
You need to register the Travel Companion with Hewlett-Packard to be able to:
- Access support and services, and get the most out of your HP products.
- Manage your profile. • Sign up for free support alerts, driver notices, and personalized newsletters.
After registering the Travel Companion, you will receive an e-mail message regarding special offers and promotions. Visit http://www.register.hp.com and follow the on-screen instructions to register the Travel Companion or update your mail or e-mail address after registration. You are required to enter your user ID and registration password to edit your profile online.
3 Box contents
Box contents
This illustration depicts the items that come in the box with the Travel Companion. Use this illustration to become more familiar with the device.

NOTE: Box contents vary by model.
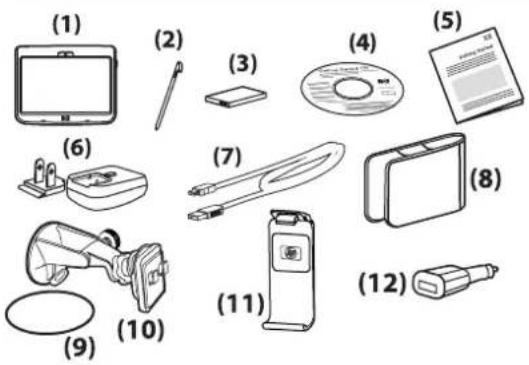
(1) Travel Companion (2) Stylus (3) 1700 mAH li-ion removable/rechargeable battery (4) Getting Started CD with additional software (5) Travel Companion Documentation (6) AC adapter with interchangeable plug (7) mini-USB cable/power cable (8) Case (9) Dash mount disk (10) Car kit – windshield mounting bracket (11) Car kit - holder (12) Car kit – Travel power adapter
4 Components
Front components
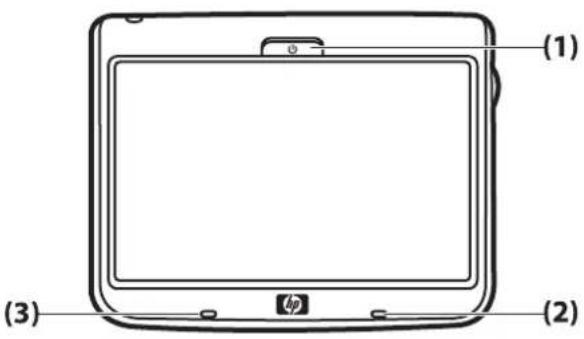
| Component Function | ||
| (1) | Power Key and LED | Press and hold to turn on the Travel Companion.Charge LEDSolid Amber – Battery chargingSolid Green – Battery fully charged |
| (2) Bluetooth LED Blue – Bluetooth ON | ||
| (3) Microphone For Bluetooth hands free audio. | ||
Left and right components
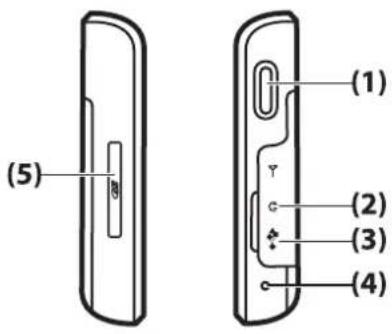
| Component Function | ||
| (1) | Multifunction Wheel | Long press to open the Shortcut menu. Scroll to use. |
| (2) 3.5 mm Audio Jack Use with 3.5 mm audio headphones. | ||
| (3) | Charging/Communications Port | Use to connect the mini-USB cable. |
| (4) Reset Use to reset the Travel Companion. | ||
| (5) | SD Card Slot | Insert a Secure Digital (SD) storage card with the label side up for data storage. |
Top and bottom components
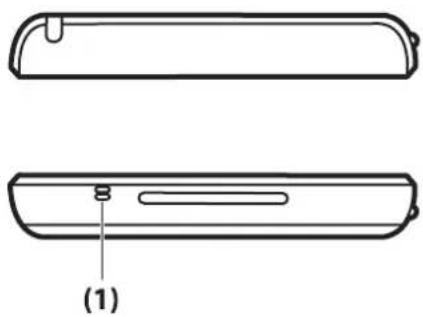
| Component Function | |
| (1) Microphone For Bluetooth hands free audio. |
Back components
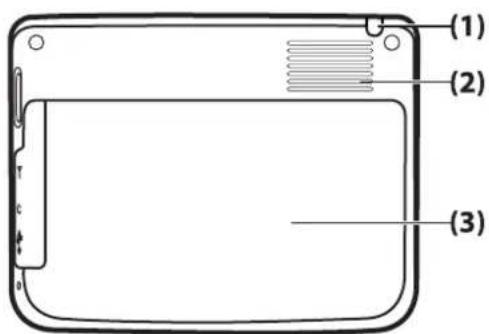
| Component Function | ||
| (1) | Stylus | Remove and use to select elements on the screen and to enter information. |
| (2) Back | Speaker Use the speaker to listen to audio. | |
| (3) | Back Cover | Slide the cover away from the Travel Companion to remove the battery. |
5 Power on and set up the Travel Companion
Set up the Travel Companion
Step 1: Remove the battery cover
Slide the back cover down and away from the Travel Companion.
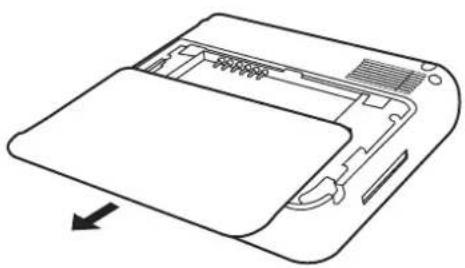
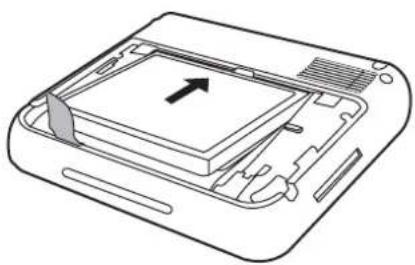
Step 2: Install the battery and replace the battery cover
- Align the battery connectors on the battery with the housing pins in the battery compartment and insert the battery.
- Slide the battery cover until it clicks into place.
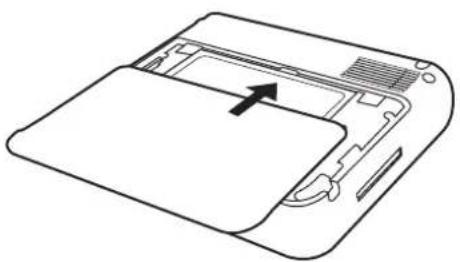
Step 3: Charge the battery
CAUTION: To avoid damaging the Travel Companion or the AC adapter, make sure all connectors are properly aligned before connecting.
The battery provides power for the Travel Companion to operate. The Travel Companion comes with a mini-USB cable, which must be used to charge the device.
It takes approximately 2-4 hours to fully charge the battery when the device is off. While the device is in use, it can take up to 8 to 10 hours to fully charge a battery that has been discharged.
To charge the battery:
- Insert the USB end of the mini-USB cable into the port on the AC adapter.
- Connect the AC adapter to an electrical outlet.
- Connect the mini-USB cable to the charging/communications port on the Travel Companion. The cable connector fits only one way. If the connector does not insert easily, turn it over.
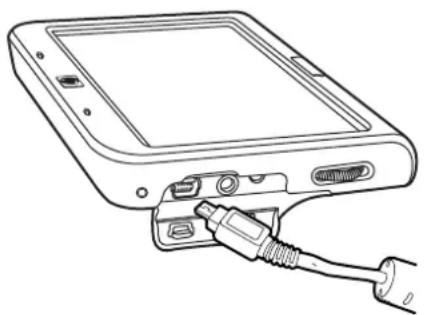
TIP: You can also charge the battery by connecting the Travel Companion to a USB port on your computer using the mini-USB cable. You can only transfer data when charging through USB. NOTE: Whenever a replacement battery is inserted into the Travel Companion, press the Power key for at least two seconds. In case the device does not turn on, attach the AC adapter to turn on the Travel Companion.
Power on Travel Companion
To power on the Travel Companion:
- Press and hold the Power key.
- Follow the on-screen instructions to set up the Travel Companion.
NOTE: The on-screen set up instructions appear only the first time you turn on the Travel Companion.
Car kit setup
The car kit allows you to mount the Travel Companion on a location in your car that provides an open view of the sky to get the best available GPS signal.
To install the car kit:
- Plug the power cable into the travel power adapter, and then plug the adapter into a vehicle power outlet.
- Attach the power cable to the clips on the back of the Travel Companion holder. Be sure to leave enough cable to plug into the Travel Companion, and that the connector is turned the correct way to plug into the unit.
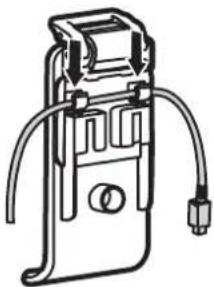
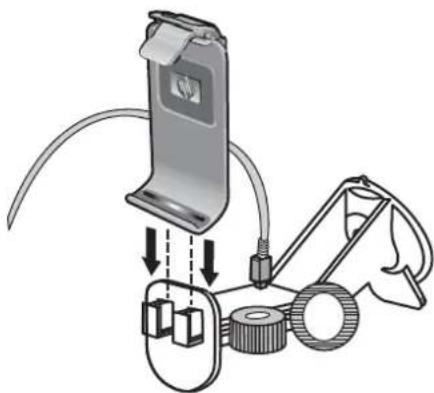
- Install the holder onto the windshield mounting bracket.
- Place the car kit assembly onto the windshield (1), and then press the locking lever (2) to securely mount the assembly into place.
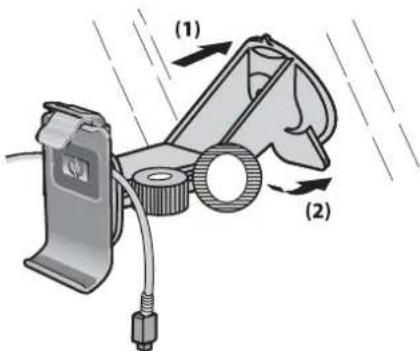
- To install the Travel Companion:
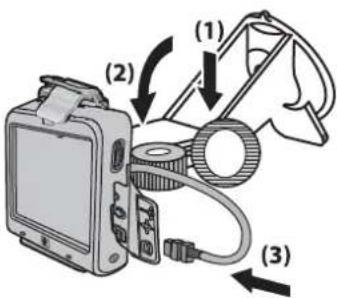
a. Insert the Travel Companion into the mounted car kit holder.
b. Insert the securing clip into the slot on the top of the Travel Companion.
c. Plug the power cable into the Travel Companion.
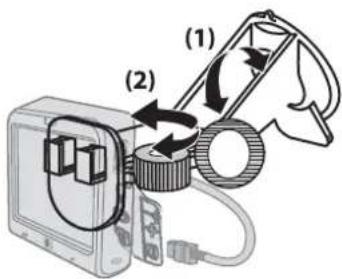
- Use the knobs to adjust the vertical and horizontal orientation of the Travel Companion.
6 Warnings and safety information
The Travel Companion is a navigation system that helps you find your way to your selected destination. It determines your exact location with the help of the built-in GPS device. The position information obtained from the GPS receiver is not transmitted elsewhere. Therefore, others cannot track you with the help of this application.
If you are the driver of the vehicle, we recommend that you operate the Travel Companion before beginning your journey. The driver's attention should always be on the road. Plan your route before departure, and pull over if you need to change route parameters.
It is also important that you look at the display only if it is absolutely safe to do so.
You should always observe traffic signs and road geometry before you obey any instruction from the Travel Companion. If you need to deviate from the recommended direction, the Travel Companion suggests a modified route according to the new situation.
Never place your Travel Companion where it can obstruct the view of the driver, is within the deployment zone of airbags, or where it can cause injuries in case of an accident.
7 Learn the basics
Your Travel Companion is a touch screen controlled device with limited hardware key functions. The device and the software are designed for easy operation. All controls are operable using your fingertips. Wherever possible, push buttons and lists are provided to make accessing functions or changing settings as easy as possible.
Hardware buttons
The majority of the Travel Companion functions can be accessed using the touch screen. Use the hardware buttons to perform the following functions:
Power on/off
Use the Power button to turn the power on or off. If the device is switched off, the GPS stops working. Consequently, your position is not calculated, the track log is not saved, and the navigation stops. When you turn the device on, your Travel Companion continues navigating as soon as the built-in GPS determines the location.
Multifunction wheel
The Multifunction wheel performs multiple functions.
Zoom in and out
When the map is visible on the screen, turn the wheel up to zoom in, and turn it down to zoom out.
Adjust volume and brightness
To adjust the volume and brightness:
- Press the button swiftly to open the Master volume slider below the speaker icon. You may also press the button to open the Master volume slider.

- Now, turn the wheel up or down to adjust the volume. The speaker and the position of the fader display the newly selected value.
- If you wait for a few seconds, the slider disappears. Before this happens, you can press the button
swiftly again, and the slider switches to the Display brightness setting. The icon replaces the speaker icon above the slider.
- The wheel now adjusts the backlight value of the current display mode. If you use the Travel Companion in daylight mode, the brightness for daylight is modified; if you use the night mode, the backlight for night use is adjusted.
- Now, press the button again, or wait for a few seconds, and the slider disappears.
Open the Quick Launch menu
To open the Quick Launch menu:
- Press and hold the Multifunction wheel to open the Quick Launch menu, a list of frequently used applications is displayed.
- Turn the wheel up or down to scroll through the list, and press it to jump to the highlighted subsystem. If you use the touch screen, you can directly select any of the list items, or tap the arrow below the list to turn the page.
- Press and hold the button again or wait a few seconds until the list disappears.
Screen buttons
Use the touch screen of your Travel Companion to learn about the different functions, display information, and launch various actions.
Some buttons on the screen are common to all or most screens, while others appear when you tap the map to place the cursor.
Buttons at the top and bottom of the screen
The blue bars at the top and bottom of all screens contain buttons that initiate functions or lead to different parts of the application. The symbols on the buttons may provide information about the current state of the Travel Companion.
The buttons are as follows:
| Button Function | ||
 | OpensBacklight settingsandPower management.Displays the current status of the battery. The thunderbolt image on the battery indicates the battery is being charged. | |
 | ||
 | ||
 | Exits navigation, and opens theBluetoothsettings screen.Displays the current status of the Bluetooth radio. When the icon is bright, it indicates the Bluetooth connection is enabled.When the icon is dark, it indicates that the radio is switched off. | |
 | ||
 | ||
 | ||
 | Opens theMaster sound levelslider below the icon to set the new master level. Tap the screen at the desired volume level, or use the wheel to adjust it. | |
| Displays the current master volume level. The more number of arcs, the louder is the sound. The crossed out speaker icon indicates that the sound output is mute. | ||
 | Opens the Brightness setting slider below the icon to set the new backlight level. Tap the screen at the desired backlight level, or use the wheel to adjust it. This icon is displayed only when you tap the speaker icon, or press the multifunction wheel twice. | |
 | Opens the Route progress list. | |
 | When displayed on the Main menu screen, tap this icon to exit navigation, and return to the Multimedia application. When displayed on list screens, tap this icon to delete the item it is displayed next to. | |
 | Opens a new screen where you can edit the item it is displayed next to. | |
 | Opens the GPS Data screen.Displays the current GPS reception quality status. The more vertical lines, the better is the reception. A cross means there is no GPS reception. | |
 | ||
 | Locks the touch screen against accidental tapping. The hardware buttons can be operated even if the screen is locked. | |
| [zxtw] | Reactivates the touch screen. | |
 | Returns to the Main menu screen. | |
 | Opens the Map screen. | |
 | Displayed on the top left corner, this button opens the Phone Dialer application.On Points of interest (POI) detail screens, tapping the button calls the number saved with the POI. | |
 | Exits navigation, and opens the Music player application. | |
 | Returns to the previous screen. | |
 | On screens with editable screen content, this icon saves the changes and exits the screen.On such screens, the icon returns to the previous screen without saving.On screens with non-editable point information, this icon leads to the Map screen with the selected point in the middle. | |
 | Deletes all list items. You are prompted for confirmation before items are deleted. | |
 | Opens the Cursor menu. | |
 | ||
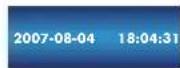 | Displayed on the top centre of the screen, this icon opens Time settings.Displays the current date and time. | |
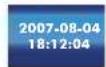 | Displayed on the bottom left corner, tap this icon to change its content.Displays the current date, current time, or both. | |
 | Displays the current speed at which you are traveling, or the distance of the next Via point and the destination.Toggles between the values. | |
 | Displays the time remaining to reach the final destination, or to reach the next Via point.Toggles between the values. | |
 | Opens Settings at the page related to the current screen's content. | |
Some screen-specific buttons:
| Button Function | |
 | On keyboard screens, this icon toggles between the alphabetic and numeric keyboards. |
 | On keyboard screens, this icon inserts a space character in the text (Space). |
 | On keyboard screens, this icon clears the last entered character (Backspace). |
 | On keyboard screens, tap this icon to finish entering a text or number (Enter). |
 | Fit to screen - this icon opens the map sized to fit the object to be displayed. The object can be a track log, the recommended route, or a road segment that a TMC message refers to. |
 | On theRoute Editscreen, this icon adds a new route point to the recommended route. |
  | On theRoute Editscreen, this icon deletes the selected route point.On the Route Edit screen, this icon reorders the route points to optimize the route length. |
 | On the Route Information screen, this icon starts a simulation of the recommended route. |
 | On the Route Detail (Itinerary) screen, this icon saves the route for later use. |
 | On the Track Log list screen, this icon starts recording a track log. |
 | On the Track Log list screen, this icon replaces the previous one if a track log is being recorded. Tap this icon to stop recording. |
 | On the Track Log information screen, this icon opens a new screen where you can edit the name of the track log. |
 | On the Track Log information screen, this icon exports the displayed track log to a file. |
 | This icon is displayed when you tap Add POI in the Cursor menu. First, select the POI group in which you wish to save the POI, and then tap this icon to start entering the details. |
 | When saving a user POI, this icon lets you create a new group for the new POI. Tap it, and enter the name of the new POI group. |
 | On the screen of current TMC messages, this icon opens the TMC radio settings. |
Buttons on the map
When you tap the map, you place the cursor and semi-transparent buttons appear on the map to help you modify the view. Tap the map again to make the buttons disappear.
The following buttons are displayed:
| Button Function | |
 | These icons change the scale of the map. Tap the magnifier with the + sign to zoom in. You can see a smaller part of the map in more detail. Tap the other icon to zoom out, and see a larger part of the map in less detail. |
 | |
 | On the 2D map screen (screen designed for map browsing) you can access fixed zoom levels using these icons. |
 | |
 | |
 | On the 3D map screen (screen designed for navigation) you can access fixed tilt (and zoom) levels using these icons. These icons appear only when GPS position is available. |
 | |
 | |
 | These icons rotate the map left and right. |
 | |
 | Only one of these icons is displayed. Tap 3D to switch from the 2D map (designed for map browsing) to the 3D map (Cockpit, designed for navigation). Tap 2D to return. |
 | |
 | This icon moves the map back to the current GPS position (to the position arrow), and re-enables Smart Zoom that automatically scales and tilts the map based on the distance of the next route event. When GPS position is not available, the map jumps to the position of the Cursor. |
 | This icon is displayed on the screen when a track log is being recorded. Tap it to jump to the list of track logs. |
 | This icon is displayed on the screen during route simulation and track log playback. Tap the screen anywhere to stop simulation. |
 | These icons help you to view the map in the full screen view and to return to the normal screen view. |
 | |
Selectors
In the following sections, you can find some of the controls frequently used in the Travel Companion.
Direct selectors
Some settings can be chosen from a list of possible values. If the values can be described graphically, icons are displayed on the screen.
Tap one of the icons to set/change the value.
Sometimes direct selectors appear as radio buttons. Tap either the button or the label to change the value.
List selectors
When the available values in the list need to be named, only the current value is displayed (sometimes with a short description) in a horizontal stripe with arrows at both ends.
The arrows are buttons. Tap to move left in the list or tap to move right. You need not confirm your selection. The selected value becomes effective immediately.
Sliders
When a feature has several different unnamed (numeric) values, the Travel Companion shows sliders to set the desired value. They look like analogue potentiometers.
If the value limits are not displayed at the ends of the slider, the leftmost or bottom position means the minimum value, while the rightmost or top position represents the maximum value.
With some sliders, you can check the current value at one end.
This control can be operated in two ways. Either drag the handle to move the slider to its new position, or tap the slider where you require the handle to appear (the thumb jumps there immediately). There is no need to confirm your selection. The selected value becomes effective immediately.
Switches
When a function can only have two values (mainly Enabled and Disabled), a switch is used. The horizontal line contains the name of the function and not the actual status. There is a check box on the left to show whether the function is active or not.
When the check mark is cleared or missing, it indicates that the function is not selected. When the check mark is selected or displayed, the function is selected or enabled. The entire strip performs as a button. Tap the strip to toggle between the enabled and disabled status.
Virtual keyboards
Your Travel Companion is designed to ensure that you only need to enter letters or numbers when it is inevitable. In these cases, a full screen keyboard pops up. It can be easily operated with your fingertips.
You can choose between a QWERTY keyboard that contains only letters, and a numeric keypad. There is a button reserved to switch between the two keyboard types.
The alphabetic keyboard in the Travel Companion does not contain special characters, because you do not need to enter accents when searching for a destination. Type only the base letters (the letter most similar to the accented one) and the Travel Companion searches for all the combinations in the database (for example, for the French street 'Cité Bergère' you only need to type 'Cite Bergere', and the application picks up the correct street name).
When you type in POI names or track log names, the Travel Companion automatically turns all initials into capitals to create names.
The QWERTY keyboard
The QWERTY keyboard has the same layout as the Standard English QWERTY keyboard. The only difference is that it contains no numbers and symbol keys. Only the alphabet and some special keys.
The special keys are as follows:
Button Function
 | Toggles between the alphabetic and numeric keyboards. |
 | Inserts a space character in the entered text. |
 | Clears the last entered character. |
 | Tap this icon to finish entering characters. |
The numeric keyboard
The numeric keyboard only contains numbers, on buttons. The special keys you find on the other keyboards (except Space) are available on this keyboard as well.
8 Discovering the Travel Companion through the Startup menu
The best way to discover your Travel Companion is to explore each screen in detail, and find out how to navigate from one screen to another. When you turn on the Travel Companion, the Startup menu is displayed.
You can choose from the following applications:
Entertainment - Contacts Navigation • Extras Settings
Entertainment
Tap to access the following applications:
Videos
To play your videos and organize your playlist:
- Tap to access the video function.
- Tap to view and organize your playlist.
- Tap to add videos to the playlist.
NOTE: You will need to add your video files to Media directories to play videos on your Travel Companion. For more information, see Media directories on page 29.
- Tap to delete videos from your playlist.
NOTE: Similar options are available with the music application.
5.
Confirm any changes by tapping

6.
You can organize your playlist by tapping after you finish organizing your playlist.

Tap to return to the main Video screen
You can play, stop, or jump to next and previous item by tapping the appropriate buttons. The volume level can be modified with the hardware jogwheel button. The scroll bar shows how much of the video file has been played and its total length.
Music
To work with music files:
1.

to enter the Music application.
2.

Tap to navigate to the songs on your device grouped as follows:
- Artist
- Artist/album
- Album
- Genre/artist • Genre/artist/album
- Genre/album
- The files can also be sorted by title, track, file name, and file size.
4.
Tap the corresponding

to select individual songs, or tap to select all of them.
5.

to add them to your playlist.

NOTE: You will need to add your music files to Media directories to play music on your Travel Companion. For more information, see Media directories on page 29.
Following are some additional features for your music playlist
•
To quickly insert a song to the beginning of your playlist and listen to it right away, tap

• You can open folders or categories by tapping their name, and you can move up by one level by
tapping

•

to view and organize your playlist.
•

to select all files.

Tap if you would like to remove songs from the playlist.

Tap to return to the main Music screen after you finish organizing your playlist.
• You can play, stop, or jump to next and previous item by tapping the appropriate buttons.
• The volume level can be modified with the hardware scroll button.
• The scroll bar shows how much of the song has been played.
To repeat a single song or the entire playlist, tap
To play the songs in a random order, tap
To follow the order of the playlist, disable this icon.
You can change your Music player settings by entering the
menu. If you tap the Remember you delete it
- You can listen to background music whenever you use your Travel Companion. Tap Always to enable this feature. Tap Ask to enable this feature for some time. Tap Never to turn this feature off.
Games
Tap to see the list of games. Tap the icon representing the game you wish to launch:
| Games Description | ||
| (1) |  | Contains four classic games, including Snake, Fireball, Jewel Master, and Cannons |
| (2) |  | Contains a 3D racing game |
Each game contains a description of the rules and game controls.
Pictures
To view pictures using picture viewer:

Tap to get a thumbnail view of the pictures on your Travel Companion.
- Tap the thumbnail of the picture you want to enlarge.
3.
Enlarge the picture to full screen view by tapping the expand icon. Tap it again to get a thumbnail view.
- Tap the center of the picture to switch back to normal view.
- Tap the left side of the screen to display the previous picture and the right side to display the next one.
- Tap Details to view the properties of the picture. If you need to see the data for several pictures in a folder, tap the left and right arrows to move freely among the data sheets of all the pictures.
You can arrange your pictures into virtual albums. Use the following steps to organize your picture albums:
1.
Tap

- Tap the pictures you wish to add to an album.
3.
Tap

and select the album where you wish to store the pictures.
4.
You can add and remove albums with

and


NOTE: You will need to add your picture files to Media directories to view pictures on your Travel Companion. For more information, see Media directories on page 29.
When you first enter the picture viewer, you can see the contents of the "Unfiled Pictures" album. To see another album, just tap the button on top of the screen and select the album from the list.
Tap

to configure the picture viewer.
- Slide Show Effect: The following slide show transition effects are available for selection:
- Slide Show Interval Time: The pictures follow each other at specified intervals. Tap the Slide Show option to start the slide show. Tap the screen anywhere to stop it.
Contacts
The icon displays the Contact list. You can add your contacts to this list and include their phone number, address, work place, and e-mail address. You can edit the contact details any time and search for your acquaintances. If your Travel Companion is connected to a Bluetooth-enabled phone, you can even dial your contacts directly from the contact list. You can also synchronize your Outlook contacts with your Travel Companion. For more information, see Outlook synchronization on page 69.

Add contact
To add a contact:
1.

Tap 📊 to add a new contact to your list.
- A data sheet is displayed. Tap the field and use the virtual keyboard to fill in the following information:
- name
- mobile phone • e-mail (1–3)
- home address • work phone (1–2) • work address (1–3) • home phone (1-2)
- fax
- birthday
- pager Web
- other address
- office location
- job
- spouse
- anniversary
- children
- home fax
- car phone
- assistant name
- assistant phone
- categories
- radio phone
- company
When you are ready, tap 📄, which brings you back to the data sheet. You can choose another field and follow the same process to fill in the required details. To save your changes and return to the contact
list, tap

Edit contact
To edit a contact:
1.

Tap a contact name, and then 📄 to modify the details.
- To add or change the picture associated with the contact, tap the picture icon. This takes you to the pictures stored on your Travel Companion. Tap on a picture to select it, and then drag the picture around to choose which part of the picture becomes the contact icon. You can even change
the size of the icon rectangle by tapping

3.
To delete a contact, tap 📁.
Navigate to a contact
The Navigation application can be launched directly from the Contacts menu. This enables you to navigate to one of your contacts without entering the navigation application and typing the address of the destination.
The addresses that can be navigated to are indicated by a sign. If an address has a sign next to it, it means that the application could not find the address on the map. Tap the contact you wish
to navigate to and tap


NOTE: If the contact does not have an address, an error message is displayed.
Call contact
Select the name of the contact you need to call, and then tap


NOTE: In order to use this function, you need to connect your Travel Companion to a Bluetooth-enabled phone first.
Extras
Extra features of the software include clock, phone, and calculator.
Clock
Tap

to display the clock, set the time, or set up alarms.
To configure the clock:
1.

Tap to configure the clock. You can choose between analog and digital modes, and set up a world clock that shows three time zones at the same time.
- To set up the world clock, tap the Main clock title and timezone tab and choose your local time zone from the list selector.
3.
To confirm your selection, tap


You can set the other two time zones in a similar way. To set the time, tap

to see a full screen view of the clock. Tap on the screen to display the menu buttons again.
To set an alarm:
1.

Tap to enter the Alarm menu.
2.

Tap to set an alarm.
- In the Description menu, enter the text to be displayed when the alarm rings.
- Set the time of the alarm by tapping Time.
NOTE:
You can snooze the alarm. To set the length of delay, select the required minutes from
5.

Tap to confirm your selection.
The following types of alarms are available:
• Once: The alarm is not recurrent.
• Regular: The alarm is recurrent. Here, you can choose the days of the week you require an alarm.
• Countdown: The alarm alerts after the specified delay.
- Call back: A link to the Contact list is displayed at the bottom of the screen. You can choose the contact you need to be reminded to call back.
#

to save your selections. If you do not need the alarm, tap
#
TIP: When setting the alarm time, you can change the time by dragging the minute hand of the analog clock.
To modify an alarm:
- Tap an alarm entry in the list to display the detailed settings of the alarm.
2.
To edit or delete a preset alarm, tap ....
#
NOTE: To delete all your alarms, tap from the Alarm list screen.


Phone
To make a phone call using the phone feature:
1.

Tap to enter the telephone function from the Extras menu.
- Enter a phone number directly, or select a phone number from your contact list by tapping

3.
After entering the phone number, tap 📋 to initiate the call.
NOTE: If you have not connected your phone via Bluetooth, your Travel Companion initiates the connection now.
4.

Tap to end the call.
The following features are also available:
•

Tap to display a list of previous calls. Each entry contains the phone number, and the date and time of the call.
•

Tap to add a number on the list to your contacts.
•

Tap to delete individual entries.
•

Tap to completely clear your call history.
Calculator
Tapping opens the calculator function.
Tap Mode to switch between the two calculator types:
basic
- exponential

NOTE: The currently used mode is displayed above the Enter button.
Settings
The Settings

button takes you to the settings of the device. The following options are available:
• Set the visual appearance
- Choose the language
- Set the time and date
- Read about the software and maps

The Settings button takes you to the settings of the device. You can, for example, set the visual appearance, choose the language to apply, set the time and date, and read about the software and maps. The available settings are discussed in detail below.
System
Tap the menu point to calibrate the screen alignment, set up the power saving, and display information about the software and the maps.
Align screen
To align screen:
1.

Enter the menu point to calibrate the orientation of your screen. This is necessary if your touch screen is not aligned and you have difficulty in activating the on-screen buttons.
NOTE: When this option is selected, a target cross with instructions is displayed on the screen.
- Tap the stylus on the center of the cross, and repeat this each time the cross moves around the screen.
- When the cross disappears, tap the screen within 30 seconds to save the new calibration, or wait for 30 seconds to retain the original calibration.
Time
To set the time:
1.
You can set hours and minutes by tapping and


2.
Tap 12/24 to choose between 12-hour or 24-hour display in digital mode. If the 12-hour display is selected, A.M. or P.M. is displayed next to the time.
3.
Tap to set the time zone.
Date
Tap +15 to set the date. Tap + and - to choose the year and the month, and tap the day in the calendar to select it.
Language
Tap to set the language of the screen messages. Select the language from the list using the appropriate letter group buttons to find the language you want to use.
Media directories
In this menu item, you can configure all your media directories. This saves time because the device searches for media files only in the directories listed here, rather than scanning all folders.
To use media directories:
1.
Tap

to add,

to remove a folder, and use

to remove all directories.
- When you delete a folder, the application displays "Directory won't be scanned after this. Are you sure?" to confirm whether you really require to remove the selected directory.
Choose Yes to confirm deletion. In this case, the particular directory is not removed from your Travel Companion, but is removed only from the list of media directories. If required, you can call back what you deleted at a later time.
9 Operating navigation
You can access various navigation features using the navigation feature of your Travel Companion.
△ CAUTION: Drive with due care and attention when using the Travel Companion for navigation.
Navigate to an address
To navigate to an address:
1.
If you are not on the Main menu screen, tap to return to the main menu.

- Tap Go to.
- Tap Address.
- The first two lines show the country and the city/town of the last search.
- If the address is in a different country, tap the icon with the name of the country, and select the desired country from a list.
- If the appropriate country is displayed, and you need to change the city/town to search for, either
a. tap History to select a recently used city/town; or b. tap the icon with the name of the settlement, and enter the desired city or town.
- With country and city/town selected, you have two options:
a. tap City Center to navigate to the centre of the city/town; or b. tap Enter Street Name and enter the street you are looking for.
- With country, city/town and street selected, there are three options to finish the address search:
a. tap Street Center to navigate to the midpoint of the street; b. tap Intersection and enter the name of the crossing street; or c. tap House Number and enter the house number to navigate to.
- If any of the above three is chosen, the map is displayed with the selected point in the middle, and the Cursor menu displays your available options.
- Tap Set as Destination.
- The route is automatically planned, and navigation starts.
- Start driving, and listen to the voice instructions of the Travel Companion.
Navigate to a POI
To navigate to a POI:
1.
If you are not on the Main menu screen, tap to return to the main menu.

- Tap Go to.
- Tap Point of Interest.
- After you reach the next screen, do the following:
a. Tap Quick Search if you have saved a search criteria that can be used now,
b. Tap Along Route to search for a POI near your current route, or
c. Tap any of the other icons to define a point around which you wish to search for the POI.
- The list of POI groups appears. Here:
a. Tap any of the group names to open the list of their subgroups,
b. Tap Save to save this search criteria for later use in Quick Search, or
c.

Tap to see all POI near the selected reference point or the route.
- Either you go deeper in POI subgroups or tap the list of available POIs that appear. Here:
a.
Tap ABC to see the POIs in alphabetical order,
b.
Tap Km/Mi to see the POIs ordered by their distance from the reference,
c. And finally, tap the desired POI to see its details.
7.
On the screen that shows the details of the selected POI, tap

- The map is displayed with the selected point in the middle, and the Cursor menu shows your options.
- Tap Set as Destination.
- The route is automatically planned, and navigation starts.
- Start driving, and listen to the voice instructions of the Travel Companion.
Create a route with multiple destinations
Multi-point routes are created from a single destination route. Create a single route with one of the destinations first as described in the previous sections then follow the procedure below:
To create route for multiple destinations:
1.
If you are not on the Main menu screen, tap to return to the main menu.
- Tap Go to, and select a new point just like you did before.
- When the map is displayed with the Cursor menu, you can extend your previous route:
- Tap Add Via to insert this new point before the final destination; or
- Tap Continue to append it as a new final destination after the original destination.
- The route is automatically recalculated, and navigation continues.
- Repeat the above steps to add more route points if necessary, then start driving.
Create a route with a different start point
If you wish to create a future route or to change the starting point to a different location, there are two different ways to do this.
To create a route with a different start point keeping the same destination:
1.

If you are not on the Main menu screen, tap to return to the main menu.
- Tap Go to, and select the start point just like you did before with destinations.
- When the map is displayed with the Cursor menu, tap Set as Start.
- The Travel Companion asks you to confirm that the route does not start from the current GPS position.
- If you confirm, the new starting point is set, and automatic route recalculation is disabled (otherwise the Travel Companion would recalculate the route from the current GPS position as soon as a new position data is received).
- The new route has the same destination and Via points as the previous one.
Alternatively, you can also create a route with a different starting point and a new destination:
1.

If you are not on the Main menu screen, tap to return to the main menu.

- Tap Go to, and select start point.
- When the map appears with the Cursor menu, tap Set as Start.
- The Travel Companion asks you to confirm that navigation does not start from the current GPS position.
- If you confirm, the new starting point is set, and automatic route recalculation is disabled (otherwise the Travel Companion would recalculate the route from the current GPS position as soon as a new position data is received).
- Tap to return to the Main menu screen.
- Tap Go to, and select the destination.
- When the map is displayed with the Cursor menu, tap Set as Destination.
- A new route is calculated with the desired end point.
Save user data
To save user data, first select a map point, and then do the following:
1.
Either tap a location on the map to place the cursor, then open the Cursor menu with the icon.

- In the Main menu, tap Go to, and select a point. The map with the Cursor menu is displayed.
From the Cursor menu:
- tap Save as Favorite, if you wish to place this point on the list of your favorite destinations;
- tap Add POI, if you wish to save a useful map point with icon, telephone number, and additional information; or
- tap Add Speedcam, to save the point as a location of a road safety camera.
10 Reference book – Navigation menu
The Main menu is displayed when navigation is started. This is the root of the screen hierarchy. Most parts of the Travel Companion are directly accessible from here by using the icons described below:

NOTE: To return to the Main menu from any screen, tap

Button Function
 | Opens the Go to menu, the subsystem that helps you find your destination. |
 | Opens the map screen (2D or 3D). |
 | Opens the Route menu, with options to fetch route information and modify the route if required. |
 | Opens Settings to configure and modify the behavior of the Travel Companion. |
 | Opens Navigation Extras, the screen for additional navigation features. |
Go to
The Go to menu is accessible from the Main menu. This screen offers various options for selecting a location.
When a selected location is found, the results are displayed on the map marked with the cursor (a red dot with radiating red circles). The Cursor menu appears with possible actions.
There are multiple menu options in the Go to menu. Use the 🎯 and Icons to navigate between the screens and see all available options. These options are described in detail in the following sections.
Buttons Function
 | Opens the address search screen. |
 | Opens the list of Favorites. |
 | Displays Home on the map. Home is the first in the list of Favorite destinations. |
| Buttons Function | |
 | Displays Work on the map. Work is the second in the list of Favorite destinations. |
 | Opens the POI search screen. |
 | Opens the list of recent destinations. |
 | Opens the list of Contacts saved with valid address(es). |
 | Opens the map to let you pick one point. |
 | Opens the co-ordinates search screen. |
 | Opens the list of saved routes. |
 | Opens the next screen to display more options. |
 | Returns to the first screen. |
Find an address, street, intersection, or city
Searching for a city, a street, an intersection, or an exact address can all be done in the Find Address module. If you know at least a part of the address, this is the quickest way to find the location.
The button names are as follows:
| Button names Function |
| Country Name Tap to select a different country. |
| History Tap to select a city/town from the list of recently used cities and towns. |
| City Name Tap to select a region/state in the displayed country. |
| City Center Tap this button to navigate to the centre of the selected region/ state if you have no street information. |
| Street Name Tap to select a street in the displayed region/state. |
| Intersection Tap to define a cross street to select the crossing as the destination. |
| Street Center Tap this button to navigate to the midpoint of the selected street if you do not have the house number information. |
| Tap to enter the house number to search for. |
Find in History
If you have already used Go to, or picked and used map points before, all of these appear in the History list.
You can pick any of your recent locations to be your destination. On this screen, the list cannot be reordered or filtered by name, but the scroll bar on the right lets you browse through the complete list to find your preferred point.

Find one of the Favorites
The list of your favorite destinations appears on this screen. Tap any option available in the list to select the point. Use the scroll bar to browse through the whole list, or select one of the following options:
| Buttons Function | |
 | Reorders the list by the distance of the Favorites. |
 | Reorders the list alphabetically. |
 | Deletes the favorite it appears next to. |
Find home or work
The first item in the list of favorite destinations is 📋 and the second one is 📋. These two points can be accessed directly from the Go to menu. Tap any of the two icons, and the map with the Cursor menu is displayed with the selected point in the middle.
Find a POI
You can select your destination from the thousands of POIs included with the Travel Companion or from the ones you have previously created. This screen helps you find the destination you are looking for. POI items are categorized to let you locate them more easily.
Search reference
The search is carried out around a certain reference. First, you need to set this reference, or choose Quick Search to filter the POIs based on a previously saved criteria.
| Buttons Function | |
 | The search is carried out around the current GPS position. |
 | Opens the list of previously saved search criteria (reference point, POI category, and POI subcategory). |
 | The search is carried out around a certain point on the map. The map opens to let you select the reference point by tapping the reference point. |
 | The search is carried out around the final destination of your current route. |
 | The reference is not a point but the whole route. The distance of the POI is calculated based on the extra distance you need to travel to reach the point then return to the route. |
Using Quick Search you need to choose one from the previously saved search criteria, and you instantly get a list of POIs matching that criteria and reference.
POI groups
The other icons lead to a list of POI groups. On this screen, you can see the first page of the top-level POI categories.
The options are as follows:
| Buttons Functions | |
 | The list of results is ordered by their distance from the reference. |
 | The list of results is ordered alphabetically. |
| Save Save the current search criteria to be accessed later from Quick Search. | |
 | Show the list of all POI items matching the current criteria. |
 | Narrow the list of matching items by giving a part of its name. |
POI subgroups
If you tap any of the POI groups, the list of its subgroups open, where you have the same options as POI groups.
Select a POI
Once you get a list of matching POIs, tap one item in the list to see its details. The options are as follows:
| Buttons Functions | |
 | Returns to the list of search results. |
Buttons Functions
 | Initiates a phone call to the displayed number. |
 | Opens the map with the selected POI in the centre. |
 | Opens the Cursor menu, and the map with the selected POI in the centre. |
Find co-ordinates
In the Travel Companion, select your destination by entering map co-ordinates. The co-ordinates need to be entered in Latitude/Longitude format, based on the WGS84 earth model (the model used by most GPS devices).
On accessing this screen, the co-ordinates of the current GPS position (or the selected map point, referred to as the Cursor, if the map has been moved) are displayed.
The coordinates are always displayed in the format previously configured here, but you can enter the coordinates in any of the three Latitude/Longitude formats (decimal degrees; degrees and decimal minutes; or degrees, minutes and decimal seconds). You can even enter the latitude and longitude in different formats.
To easily enter a Latitude/Longitude pair:
- The left field contains the latitude.
- Check the first character: an 'N' (North) or 'S' (South) letter. This specifies whether the point is in the Northern or the Southern hemisphere.
- Use N/S to change the hemisphere if necessary.
4.
Use to clear the figures not matching the desired latitude.
- Enter numbers for the latitude.
- Use the decimal point if the degrees, minutes, or seconds are not integers.
•

Use ____, ____, or ____ (the label depends on the current cursor position inside the latitude) to start entering minutes after degrees or seconds after minutes.
- When finished, tap the longitude on the right, and enter it as you did with the latitude. This time the E/W hemisphere-changing icon specifies whether the point is located East or West from the meridian crossing Greenwich, UK.
7.

To change the format the coordinate is displayed here and on other screens of the Travel Companion, tap Change Format. This leads to a new screen to change the format.
Coordinate display format
Positions are sometimes displayed with their addresses, and sometimes with their co-ordinates. This setting lets you choose whether to display co-ordinates in degrees (dd.dddddd); degrees and minutes (dd mm.mmm); or degrees, minutes and seconds (dd mm ss.s).
11 Bluetooth
The Bluetooth application lets you connect your mobile phone, stereo headphone, or car stereo to your Travel Companion. When the connection to a mobile phone is established and you receive a call, it is automatically transferred to your Travel Companion and the speaker turns on. This enables safer driving and you need not use a headset or press any buttons to activate the speaker.
To launch the Bluetooth application, choose one of the following options:
Tap on the top of the screen.

NOTE: The

icon is always available on every screen
- Go to the Settings menu and tap Bluetooth. Tap Extras/Phone/Key Pad menu point to dial the phone number.
Connect a Bluetooth-enabled phone to your Travel Companion
You can connect Bluetooth-capable mobile phones to your Travel Companion. Check the documentation of your phone for compatibility information.
To connect to a Bluetooth-enabled phone:
- Make sure that Bluetooth is enabled on the phone.
- Tap Settings >
- Tap Explore Bluetooth devices.
- Nearby Bluetooth devices are listed. Tap your phone's name when displayed in the list.
- Select the Bluetooth service to use:
• To use your device as a loudspeaker, choose Voice Gateway. - For transferring files between your phone and the Travel Companion, choose OBEX File Transfer.

NOTE: Other services may be listed as well depending on the phone.
- Both your phone and your Travel Companion will prompt for a 4-digit numeric password. Enter the same password on both devices.
The icons available on the screen are as listed below:
Buttons Function

Tap to launch the Bluetooth application
| Buttons Function | |
 | Tap to set your Bluetooth preferences |
 | Tap to enable automatic transfer of incoming calls |
 | Tap to view more information on Bluetooth |
 | Tap to dial a phone number |
 | Tap to view a list of previous connect attemptsNOTE: My Shortcuts menu contains devices you have previously paired with your Travel Companion for easy access. |
 | Tap to initiate pairing from your mobile phone |
 | Tap to initiate a call |
 | Tap to end a call |
Make a call
You can make calls using the phone feature, contacts, or POI.
Use phone dialer
To make calls using the phone dialer:
1.

2.
3.
to initiate a call.
Use contacts
To make calls using contacts:
1.
Tap Extras >

2.
Select a phone number from your contact list by tapping

3.
Tap

to initiate a call.
Use POI
To make calls using POI:
1.
After a list of POI is displayed on your screen, tap 📋 to initiate a call.
2.
to end a call.
Answer or reject a call
If the Voice Gateway service is enabled with your phone, you can answer or reject calls on your Travel Companion.
In case of a call, Incoming Call is displayed on the screen. Tap to answer the call and tap

to reject a call.
Connect to a Bluetooth stereo headphones
You can connect a Bluetooth-enabled stereo headphone to your Travel Companion.
To connect to a Bluetooth-enabled stereo headphone:
- Make sure that Bluetooth is enabled on the phone.
2.
Tap Settings >

- Tap Explore Bluetooth devices.
- Nearby Bluetooth devices are listed. Tap your headphone's name when displayed in the list.
12 Map
There are two map screens: the Map (2D) screen and the Cockpit (3D) screen. The manner in which they display the map is similar, but the look and controls are optimized for different purposes.
The Map (2D) screen is to be used for the following:
- browse the map, • create user POI items, • plan your route based on map points.
The Map screen is designed to show the maximum map area. This screen can only be used in 2D North-up mode. You can scale the map, but rotating and tilting is disabled.
The Cockpit (3D) screen is for driving purposes
• If you are just cruising data such as speed, GPS reception quality, current date, and time - If you are navigating, some more route data like the next street in your route, the distance to travel, type of the next route event.
There are several controls that function in a similar fashion on the two screens. They are described in the following sections.
| Button Function | |
 | Exits navigation, and opens the Phone dialer application |
 | OpensRoute Progressscreen |
 | Turn preview*Opens a large turn preview box in the corner of the map when you are on an active route. |
 | Next street (scrolled)*Shows the Current street for a few seconds. This option is displayed only on an active route. |
 | Turn distance*Shows the Current street for a few seconds. This option is displayed only on an active route. |
 | Exits navigation, and opens the Music player application |
 | Sound volume level or mutedOpens volume setting slider |
 | Zooms out map |
 | Zooms in map |
 | Initiates fixed zoom levels and re-enables Lock-to-Position (2D map only)**. This option is displayed only when GPS position is available. |
 | |
 | |
 | Initiates fixed tilt and zoom levels and re-enablesLock-to-Position (3D map only)**. This option is displayed only when GPS position is available. |
 | |
 | |
 | Re-enablesLock-to-PositionandSmart Zoom |
 | Toggles between 2D(Map) and 3D(Cockpit) screens |
 | |
| Selected map point (Cursor) | |
 | Rotates map left (3D map only) |
 | Rotates map right (3D map only) |
 | Date and TimeChanges content: Date, Time, or Date/Time |
 | This option enables you to switch to full screen map mode and back to normal map mode on the map screen. |
 | |
 | OpensCursormenu |
 | |
 | GPS reception qualityOpens GPS Data screen |
 | Time to destination and ETA at destinationTime and ETA to next Via point |
 | Current speedDistance to next Via point and destination |
 | Opens the Main menu (Go to, Map, Route, Nav Extras, Settings) |
Map visualization
The current version of the Travel Companion is primarily intended for land navigation. That is why maps in the Travel Companion look similar to paper roadmaps (when using daytime colors and 2D map mode). However, the Travel Companion provides much more than regular paper maps can. The look and the contents can be changed.
Daylight and night color schemes
The daylight and night color schemes let you adjust the Travel Companion to the brightness of the environment. Use the daylight and night color schemes accordingly. Daylight colors are similar to paper roadmaps, while the night color schemes use dark tints for large objects to keep the average brightness of the screen low, with carefully selected colors to still keep you informed about all the necessary information on the screen.
You can change between day and night views manually in Settings, or let the Travel Companion do it automatically for you.
NOTE: The automatic day/night mode is based upon the current date and GPS position by which the Travel Companion calculates the exact sunrise and sunset times on the particular day at the particular location. Using that information the Travel Companion can automatically switch between the color schemes a few minutes before sunrise, when the sky has already turned bright, and a few minutes after sunset before it gets dark.
TIP: To further enhance the effect of the night color scheme, you can instruct the Travel Companion to decrease the display backlight when the night colors are used. Set the desired backlight levels for both daylight and night modes.
Current position and Lock-on-Road
When your GPS position is available, a blue arrow (yellow when using night colors) shows your location on the map.
The direction of the arrow represents your heading. The arrow is sized and vertically rotated with the zoom and tilt levels to always look realistic.
Your Travel Companion has a built-in Lock-on-Road feature that always puts the position arrow on the road, on the axis of the street in case of one-way streets, or on the side of the road where you drive (e.g. on the right in Germany and on the left in the U.K.) on two-way roads.
You always see this corrected position on the map. The position given by the GPS is not displayed, but this is the information recorded in the track log. When recorded track logs are displayed on the map, the line is not corrected. You see the positions reported by the GPS.
When the GPS position is lost, the arrow turns grey, but the journey continues on the recommended route for a short period of time with the speed last detected before the GPS position was lost. When the next route event is reached, or after 40 seconds, the arrow stops, and remains grey until GPS reception returns. This way short tunnels can be crossed without losing the position.
Selected map point, also known as the Cursor
If you tap the map somewhere and tap again or select a specific item in Go to, it becomes the selected point on the map, marked with a small red dot and permanently radiating red circles to make it conspicuous at all zoom levels, even when it is in the background of a 3D map view. You can use this point as starting point, Via point, or destination of your route, you can search for a POI near to it, or save it as a POI, a Favorite or the location of a road safety camera. The cursor, when visible, is also the reference point for map scaling.
NOTE: When your GPS position is available, and Lock-to-Position is active, the cursor is the current GPS position, the blue arrow. When you select another point by tapping the map, or using the Go to menu, the new Cursor is displayed on the display with the red dot and the radiating red circles.
Visible POIs (Points of Interest)
Your Travel Companion comes with thousands of built-in POIs, and you can create your own POI database as well.
POIs are represented by icons on the map. For a built-in POI, it is the icon of the subcategory of the actual POI. For points you create, it is the icon you had chosen when you created the POI. POI icons can be changed later in Visual settings.
These icons are large enough to recognize the symbol, and semi-transparent so as not to cover the streets and junctions behind them.
When the map is zoomed out, the icons are not displayed. As you zoom in, icons appear based on their visibility settings.
Road safety cameras
Road safety cameras, such as speed cameras and red light cameras, are special POI types in the Travel Companion.
Contacts
A different type of special POIs is Contacts. When the Travel Companion is started, it attempts to recognize the addresses in your Travel Companion's Contact database. All contacts with the address recognized are displayed as POIs in a group named Contacts.
If they exist, the Home, Work, and Other addresses of a contact are imported. For example, if you have the home and office addresses of John Smith, you have two POIs, one called 'John Smith (Home)', and another one as 'John Smith (Work)'.
Elements of the active Route
Your Travel Companion uses a multi-destination routing system in which you have a start point (normally your current GPS position), a destination, the line of the active leg of the route, and optionally Via points and inactive legs. They are all displayed on the map.
Start point, Via points, and destination
You have the following features on any active route while you are at a start point, at Via points, or at the destination.
Active leg of the route
The active leg is the section of the route you are currently driving. If you have not added any Via points, the whole route is the active leg. When Via points are present, the active leg is the part leading from your location to the next Via point. The active section is displayed in light green (red when using night colors). It is always the most conspicuous part of the map even when in the background of a 3D map view. The line of the route is displayed on the driving side of the road for two-way and on the axis in case of one-way streets. When the map is zoomed in and the line is wide enough, small arrows show the direction of the route. This can be useful if you preview the route before starting the journey or when entering a complex junction.
Inactive legs of the route
Future sections of a route are inactive. They are also displayed on the map with the same color but a darker tint than the active one. An inactive route section becomes active as soon as you reach its starting Via point. Roads in the route can be excluded by setting required preferences. Although you can choose whether to include or avoid some road types in Route settings, sometimes they are impossible to avoid near the starting point, Via points, or the destination. If so, the Travel Companion displays those segments of the route with an alternate color.
Turn preview
On the Map screens this field shows a graphic illustration of the next maneuver. For example when you approach a turn, an arrow shows whether it is a slight, normal or sharp turn. When showing a roundabout, the number of the exit is also given.
This field also serves as a button. Tap it to display the turn preview in large in the top left corner of the map. Tap again to disable the large turn preview.
Cursor (the selected map point)
If you tap the map somewhere twice or select one specific item in Go to, it becomes the selected point on the map, marked with a small red dot and radiating red circles to make it conspicuous. You can use this point as starting point, Via point, or destination for your route, you can search for a POI near it, or save it as a POI, a Favorite, or a road safety camera.
Track Log recording/playback indicator
When a track log is being recorded, a 📄 icon is displayed on the map screens. This icon also functions as a button leading to the Track Log screen where you can stop the recording or make the track log visible on the map.
During track log playback a icon is displayed. Tapping this icon (in fact, tapping the screen anywhere) stops the simulation.
Cursor menu
The Cursor is the selected point on the map (marked by a red dot and radiating red circles around it), or the current GPS position when it is available and Lock-to-Position is enabled.

Tapping the 📄, or using the Go to menu, the map with the Cursor menu is displayed to give you the list of possible functions you can use the Cursor for.
The content of the Cursor menu is slightly different if there is an active route already planned, and if you are near to a route point. You have the following options:
| Button Function | |
| Set as Start Use the Cursor as the departure point for your route. This disables routing from the current GPS position and automatic off-route recalculation. If a route existed before, the Via points and the destination remains the same. | |
| Remove Start This button replaces “Set as Start”, if the Cursor is at or near to the start point of the route. Tap it to remove the start point of the route. | |
| Add Via By inserting the selected map point as a via, you instruct the Travel Companion to cross this location before the destination of the route. This is the way to build a multi-point route in reverse order (when you wish to insert a stopover ‘go to A but first get some fuel at B’ or you need to influence the direction of the route). This menu point works only if a route is already active. | |
| Remove Via This button replaces “Add Via”, if the Cursor is at or near to any of the Via points of the route. Tap it to remove that particular Via point from the route. | |
| Continue | This button adds a new final destination after the previous destination. The new destination replaces the old one, which is now demoted to a Via point. This is the way to build your multi-point route in straight order (when you wish to visit several destinations ‘go to A then to B’). This menu point is available only if a route is already active. |
| Set as Destination Use the Cursor as the destination of your route. This button is to start a new route. The previous route (if it exists) is deleted and replaced. If a multi-point route is active, the Travel Companion asks you whether you really need to delete it together with all its Via points. | |
| Remove Destination | This button replaces “Set as Destination”, if the Cursor is at or near to the destination of the route. Tap it to remove the destination of the route promoting the last Via point as the new destination. |
| Save as Favorite Save the cursor as one of your favorite destinations. Select one position in the Favorite list, and it is filled/replaced with the details of the cursor. | |
| Add POI Save the cursor as a user POI. Give a name, an icon, and select a POI group for the new POI. | |
| Add Speedcam Save the Cursor as the position of a road safety camera. Select the type, the direction of the camera, and the speed limit checked. | |
| Edit Speedcam | This button replaces Add Speedcam, if the Cursor is at or near to a position of a road safety camera. Tap it to edit the details of the camera. |
POI Info This button opens a list of POIs near the Cursor.
Current street
If you tap the Next street field on the map screens, the current street name is displayed for a few seconds.
Distance to next turn
This field shows the distance to go before reaching the next route event (turn, roundabout, exit, etc.). This field is only displayed when navigating a route.
Next street/Next city
This field shows the road or street that comes next in the route itinerary.
If you are not yet in the city or town where this next street is, the Travel Companion displays the name of the settlement instead of the name of the road or street. A bullet symbol appears next to the name of settlement to help you identify them apart from street names.
This field is only displayed when navigating a route.
13 Route
This menu contains options to manage your routes and track logs.
Edit Route
To edit a route, you need to be aware of all waypoints used in the route. The first item in the list is the departure point of the route without a valid GPS position. The list contains the last reached Via point or the point where the Travel Companion recalculated the route. This means the list is permanently updated, and Via points drop out during the journey. The last item in the list is your final destination.
Use the scroll bar to browse through the list and tap any list item to highlight it. You can perform the following actions:
| Buttons Function | |
 | Moves the highlighted route point up in the list. |
 | Moves the highlighted route point down in the list. |
 | Selects a new point to add to the list below the highlighted route point. |
 | Deletes the highlighted route point. |
 | Optimizes the route sequence. Optimization is for Via points only. Your starting point and destination remain in their positions. |
Route Detail
This function opens the itinerary (route event) list of the active route.
All significant junctions are displayed in the list, even ones to be passed.
The Itinerary is live and constantly updated when navigating a route. The list item coming next in navigation is the highlighted one until you tap another item in the list to highlight it. After that, the highlight remains on the item you have selected.
Tap any of the list items to have it displayed on the map. This helps you identify route events in the list. Other available functions on this screen are:
Buttons Function

Deletes all route events. The whole route is deleted.

Saves the route.
Saved Routes
This function opens the list of saved routes.
All significant junctions are displayed in the list, even the ones that have still to be passed. Tap any of the list items to change its name. Other available functions on this screen:
Buttons Function

Deletes the route it is displayed next to.

Deletes all saved routes.
Route Info
The Route Information screen has all the data and some functions that you might need while navigating. Without an active route some icons are inactive, and route data cannot be displayed.
Route data displayed (for destination and Via points)
The route data displays information about the current route. These fields are continuously updated while you keep this screen open.
When you open the screen, you will see all fields contain information on reaching your final destination. Tap any of the fields to see data on the Via points starting from the first one through the final destination again. You can see the following options on the screen:
- Route line
The upper part of this screen shows your planned route as a horizontal line. Its leftmost point is the start of the route, the rightmost one is the final destination, and you can see your Via point flags along the line, spaced in proportion to their distance.
The blue (yellow when using night colors) arrow representing your position travels from the left to the right, giving you visual feedback of your journey.
When you reach a Via point, it becomes the starting point of the route, the past is deleted. The line with all the other Via points are modified instantly, and the arrow jumps back to the left.
When the Travel Companion needs to recalculate the route, the arrow does not jump back to the left as when reaching a Via point. It might drift a bit as the length of the new route may be different from the previous one.
When the data corresponding to the entire route is displayed in the fields below, the line is colored the same way as the road type displayed on the map. When you see data that belongs to a Via point, the route is colored only up to that Via point. The rest of the line remains grey.
• Destination/Via point
This field shows the exact address (or its co-ordinates if the address is not available) of the final destination.
If Via points exist, tap and tap again any of the fields to see the address or co-ordinates of the first, second, etc. Via point.
• Estimated Arrival
This field shows the estimated arrival time at the final destination of the route based on information available for the remaining segments of the route. The calculation cannot take into account traffic jams and other possible delays.
If Via points exist, tap and tap again any of the fields to see the estimated arrival at the first, second, etc. Via point.
• Distance Left
This is the distance you need to travel on the route before reaching your final destination.
If Via points exist, tap and tap again any of the fields to see the distance to reach the first, second, or next Via point.
Time Left
This field shows the time needed to reach the final destination of the route based on information available for the remaining segments of the route. The calculation cannot take into account traffic jams and other possible delays.
If Via points exist, tap and tap again any of the fields to see the time needed to reach the first, second Via point.
Method
This field shows how the route was calculated. It either displays the 'Route' or the 'Vehicle' field from the Route settings. If you have chosen Car, Taxi, Bus, or Lorry, the type of the route (Fast, Short, or Economical) is displayed here; if you have selected Bicycle, this information is displayed here.
Warning icons
The following 5 squares are normally empty. Some of them show a graphical symbol in case warning (s) are attached to the planned route. These are warnings, so icons always show information for the whole route, even if the data fields display values from your current position to a Via point only.
Tap on any of the icons to show its description. A few samples of the available icons:
- This icon shows that you need to pay toll on the recommended route.
- This icon shows that the route contains motorways. Tap the icon to see the total length of motorways in the recommended route.
- This icon shows that toll motorways are included in the recommended route.
- This icon shows that you need to board a ferry along the recommended route.
- This icon shows that you need to pay for the ferry.
- This icon is displayed when the Travel Companion could not plan a route with all your stated road type preferences. Sometimes it is impossible to find a suitable route near the start destination.
- This icon warns you that the Travel Companion had to recommend a route that does not meet all your preferences given in the Route Parameters settings.
- The recommended route contains unpaved roads. – The recommended route contains roads that require a permit or permission to enter. – Information – any other piece of relevant but not categorized information. Tap the icon to see the content. – displayed when more than 5 warnings apply for the recommended route.











Other functions
You also have the following options on this screen:
Buttons Function

Fit to screen – opens the map with a 2D North-up view, and shows an overview of the whole recommended route.
| Buttons Function | |
 | Settings – Opens theRoute settingsscreen |
 | Simulation - this feature has no navigation function, it merely provides a quick view of the route. It presents a simulation of the route showing what you might see later when navigating.You can choose from two different kinds of simulations:Fly Over:The route is simulated with high speed.Simulate:The route is simulated with the speed identical to the speed limit on the streets and roads in the route. |
Manage Track Logs
Using the Travel Companion it is also possible to save the track logs of your journeys. This screen lets you manage all your track logs. When it comes up, it shows a list of all track logs already saved.
The original name of a track log is the date and time when it was recorded. You can change the name to something more meaningful if you wish.
Each track log has a color, displayed to the left of its name, when the track log is visible on the map. If the track is not visible, a horizontal line is displayed. Tapping the line of the highlighted track log toggles between showing and hiding that log. The track log is drawn on the map using the color next to its name.

TIP: When a track log is being recorded, a new line is displayed in this list with a horizontal line, as newly recorded track logs are not displayed on the map normally.
On this screen you have the following options:
| Button Function | |
 | Initiates track log recording. A new line is displayed in the list, and GPS position data is saved until you stop the recording or exit the Travel Companion. A icon is displayed on the map to let you know that a recording is in progress. Tapping that icon opens this Track Log screen. |
 | |
 | |
 | Stops track log recording. |
 | This icon displays the color of the track log line on the map. A horizontal line means the track log is not displayed on the map. Tap this box to toggle between showing and hiding the track log. |
 | |
 | |
 | |
 | |
 | Deletes the track log it is displayed next to. |
Tap any of the track log names in the list to open a new screen with the details of that track log. On this screen you have the following options:
Button Function
 | Changes the color of the track log. |
 | Opens a new screen where you can change the name of the track log. |
 | Exports the track log to an inserted SD card in GPX format. |
14 Settings
Your Travel Companion provides several settings to help you customize functions. The Settings screen can be accessed directly from the Main menu screen, while some of its sub-screens are accessible from other parts of the Travel Companion.
Visual settings
You can set a few parameters that determine the appearance of your Travel Companion.
3D settings
The Travel Companion is capable of displaying the map and several objects in 3D. It has an extremely fast graphic engine that is capable of moving detailed maps at high speed. The lesser the 3D details, the faster your Travel Companion can draw and move the map.
Landmarks
3D landmarks that come with the map can be displayed or hidden.
Elevated roads
Roads can be elevated to enhance visibility, and to better recognize complex junctions with flyovers. You can suppress elevation to view a road network that looks like a conventional map.
Buildings
3D buildings can slow down map visualization and can make the map dense. Turn this feature on or off to configure the Travel Companion to display only the closest buildings or buildings far ahead.
Terrain
Terrain can be displayed using rich 3D details, less detailed, or even turned off.
Backlight settings
You can set the behavior of the display backlight when using your Travel Companion.
These settings are independent of other applications in the device.
Brightness
You can set the backlight level separately for both daylight and night modes, thus enhancing the effect of the night color scheme.
Power management
You can set behavior of backlight when the screen has been untouched for a while.
Backlight always on
You can choose to have the backlight always on.
Smart Powersave
When running on battery, Smart Powersave lights up the screen only when you press a button or tap the screen. After a few seconds, the light level decreases, and after another few seconds, the backlight turns off. This helps you conserve the battery and achieve a longer battery life.
Map settings
These settings determine how maps are displayed on the Travel Companion.
Alternative Road Names
Some highways have an international name or number for foreign travelers. You can decide whether to show only the local name or both.
Show Street Labels
You can set whether or not to see the names of the streets and the POI icons on the map while driving. Based on the current zoom and tilt levels, street names are displayed either aligned with the street or on signposts on the streets (Streets and roads). If you switch these signs on, it is easier to recognize your location on the map. If you turn them off, it is easier to see the road geometry.

NOTE: You can only disable street names and POI icons if the Travel Companion follows your position. As soon as you move the map and Lock-to-Position is disabled, street names and icons become visible
again. Tap to re-enable Lock-to-Position and have the labels and icons disappear again.
2D/3D map view
In 2D map view mode, the map is displayed in a conventional top-down view with a fixed North-up orientation. You cannot tilt or rotate the map. The elevation of the map is displayed with colors and shading similar to a topographic map.
In 3D map view mode, the map shows a perspective view. You can change the vertical angle of the view, you can rotate the map, and turn 3D map elements on or off.
POI visibility
The maps in the Travel Companion come with a huge number of POIs. Displaying all of them would make the screen too crowded. In order to avoid this, you can decide which POI groups to show and which ones to hide on the map, and how close you need to zoom in to start seeing a particular POI group. Your Travel Companion has a multi-level POI category system. You can set the visibility of all levels. Subgroups can inherit the visibility settings of the group, but you can also assign different settings to any subgroup.
To view POIs:
- When you tap the button, you will see the list of the top-level POI groups is displayed:
- Tap any of the group names to see the list of its subgroups.
The two screens are similar. You have the following buttons on these screens:
Button Function

This POI group has subgroups. Tap this, or the name of the groups to see the list of its subgroups.
| Button Function | |
 | This POI group has no subgroups. Tapping it does not perform any action. |
 | The POI group is not displayed on the map. However, some of its subgroups might be displayed according to their individual settings. |
 | The POI group is displayed on the map starting from this zoom level. Some of its subgroups might be hidden, or displayed from different zoom levels according to their individual settings. |
 | Tap this button to edit the visibility of the POI group. |
- When you edit the visibility of a POI group or subgroup, a new screen is displayed:
You have the following options:
Button Function

All in Current Category: Check this box, and the visibility level of all the subgroups
of the edited POI category is overwritten with the value set here. This does not start any dependency between the group and its subgroups. If you wish to have uniform visibility for the whole group, tap the button again.
Night mode
Using the automatic night mode, your Travel Companion switches between the daylight and night color schemes a few minutes before sunrise and a few minutes after sunset based on the time and location information provided by your GPS. Set Night mode permanently on or off to display only the daylight or the night color scheme.
Zoom settings
The Auto zoom (or Smart zoom) feature offers a lot more than just the usual automatic zoom.
- While navigating a route: When approaching a turn, it zooms in and raises the view angle to let you easily recognize your manoeuvre at the next junction. If the next turn is at a distance, it zooms out and lowers the view angle to be flat to let you see the road in front of you. It can switch to an Overview mode to let you follow your position on the map.
- While cruising: If there is no active route and you are just cruising, Smart zoom can zoom in if you drive slowly and zoom out when you drive at a high speed.
Auto zoom
Turn Auto zoom on to configure your Travel Companion to perform the automatic map scaling and tilting. You can turn off this feature to navigate with a fixed zoom level and vertical view angle.
Restore Lock-to-Position and Smart Zoom
You can move, rotate, tilt, and zoom the map during navigation.
When you rotate, tilt, or zoom the map, the map follows your position but does not change the view
parameter you have modified. Tap to return to the full Smart Zoom mode.
If you move the map, all parts of Smart Zoom are deactivated, and the view freezes. Tap to configure your Travel Companion to follow your position (Lock-to-Position) and re-enable Smart Zoom.
Turning on Restore Lock-to-Position configures the Travel Companion to automatically lock to the position after a few seconds of inactivity.
You can also set the time-out. Shorter delays are best if you tend to accidentally change the map display, but you might prefer a longer delay if you often look for things around your position while driving.

WARNING! Remember to look at the display only if it is absolutely safe to do so.

NOTE: If you tap before this automatic feature comes into effect, Smart Zoom and Lock-to-Position is re-enabled instantly.
Zoom in after find
When the Zoom in after find feature is turned off, the Travel Companion centers the map to the location selected in Go to but does not change the zoom level. If you turn this feature on, the Travel Companion zooms in to the selected point.
The zoom level in this case depends on the type of object you have searched for. For example, in the case of a city search, the zoom level shows you the whole region/state or at least a significant part of it around its centre. Selecting a POI, a junction or an exact address gives you a closer look with only a few streets on the display.
Overview mode
Turn this feature on, and the Overview mode is triggered when the next turn is at a distance.
Turn distance determines when the Travel Companion switches to the Overview and back to the Navigation view. If the distance from the next route event is more than the value set here, the map view switches to Overview mode, a top-down, North-up oriented map view with a zoom level that enables you to see a larger part of the map around your position. As you approach the route event, normal navigation returns automatically.
The Overview zoom level determines the fixed zoom level of the map in the Overview mode. You can change the zoom level manually at any time, but when you enter the Overview mode again, the zoom level is reset to this value.
Sound settings
You can configure the parameters to determine the sounds and sound alerts on your Travel Companion on this screen.
Voice guidance
You can turn on the audible guidance (voice instructions and speed camera warning) by selecting the Voice check box. Move the voice slider to adjust the loudness of voice prompts.
- Moving the voice slider to the leftmost position suppresses the voice guidance.
- Moving the voice slider to the rightmost position applies the master volume.
Key sounds
You can turn on key sounds by selecting the Keys check box, which is placed below the Voice check box. Key sounds are audible confirmations of either pressing hardware buttons or tapping the touch screen.
NOTE: The sound effects on your Travel Companion are context sensitive. They are different if, for example you open or close a window, or enable or disable a setting. These effects indicate if you have entered enough letters of a street name to have a short list of matching street names displayed on the screen.
Dynamic Volume
When driving at a high speed, the noise in the car might be too loud to clearly understand the voice guidance messages and perceive the key sounds. Using Dynamic Volume, you can configure your Travel Companion to increase the volume when your speed exceeds a certain minimum, and reach its highest volume at the given maximum speed.
To change dynamic volume:
- Tap Dynamic Volume to turn on the feature.
- Move the slider to set the minimum and maximum speeds.
Route settings
You can use the Route settings screen to determine how routes are calculated.
This screen is also accessible from the Route Information screen.
Vehicle
You can set the type of vehicle that you might use to navigate the route. Based on this setting, certain road types are excluded from the route, or some restrictions might not be taken into account.
Additionally, when either Bus or Lorry is chosen, the Travel Companion assumes that high speeds cannot be achieved, and this information is taken into account when calculating the route, the estimated time en route (ETE), and the estimated time of arrival (ETA).
You can choose the type of vehicle from the available values:
Car • Taxi Bus Lorry Bicycle
Route calculation method
You can choose from three different route types.
Short
Choosing Short results in a route that has the smallest total distance of all possible routes between the given points. This is usually preferred by cyclists or slow vehicles.
Fast
Choosing Fast results in the quickest possible route, given that you can travel at or near the speed limits on all included roads. This is usually preferred for fast and normal cars.
Economical
This setting is a combination of the previous two. Although it is used to select the fastest solution, if there is another route taking a bit more time but a lot less distance compared to the fastest one, your Travel Companion chooses this one instead to save fuel.
Off-route recalculation
Once a route is planned, this setting offers options on what to do when you deviate from that route.
Automatic
The route is recalculated automatically a few seconds after you go astray.
Off
If you stick to the original route, and you wish to get back to it on your own, you can disable recalculation. Guidance stops until you return to the recommended route.
Avoidances
To select the route that fits your needs, you can also set which road types are to be considered for or to be excluded from the route if possible.
- On Check items to avoid screen, select the road type you require to avoid.
- Clear the check box to use the specific road type.
NOTE: Excluding a road type does not necessarily mean that the road type can be completely avoided on your routes. If your destination can only be accessed by using some of the excluded road types, your Travel Companion uses them minimally. In this case a warning icon is displayed on the Route Information screen, and the road that does not match your preference is displayed using an alternate color on the map.
Unpaved Roads
Unpaved roads are excluded by default, as they can be in a bad condition and you usually cannot reach the speed limit on them.
Motorways
When driving a slow car or towing another vehicle, you might prefer to avoid motorways.
Ferries
The accessibility of temporary ferries is not necessarily included in the map data. Additionally, since you might need to pay a fare, you could consider disabling them.
Cross-border planning
By default, your Travel Companion plans routes using border crossing points. However, if you live near the border, you can disable border crossing with this switch to remain within one country.
U-turns
Although displayed along with road types, this is a type of action. Most drivers prefer to replace them with a few normal left and/or right turns at the next junctions. This option is selected by default, as Avoid.
Turning back on dual carriageways is not considered as a U-turn.
NOTE: U-turns handle Via points as stopovers with regards to U-turns. It means disabling U-turns on this screen avoids U-turns during the entire route if possible, but when reaching a Via point, the subsequent part of the route might be planned starting in the opposite direction.
Permit needed
To access certain roads or areas, you might need a special permit or permission from the owners. These roads are excluded from your routes by default. Clear the check box if your vehicle is authorized to enter these roads.
Toll roads
You can select this option to disable toll roads and configure your Travel Companion to plan the best toll-free route. You may have to travel more to avoid paying a toll.
Carpool lanes (for the USA map only)
You can configure your Travel Companion to use carpool lanes when planning routes. These lanes are currently available in the USA only.
This option is displayed only if the USA map is available in the Travel Companion.
Keep position on road
Your Travel Companion is intended for use primarily for vehicle navigation. Therefore Lock-on-Road displays the position arrow precisely over roads and corrects small GPS errors.
NOTE: By turning off Lock-on-Road, you also turn off the GPS position error filtering. The position displayed on the map is subject to possible position errors and position fluctuations.
Regional settings
On the Regional settings screen, you can set the languages, measurement units, and date and time formats used by your Travel Companion.
Language
The display language currently selected is displayed. By tapping the left or right arrow, you can scroll through and select from the available languages. Your Travel Companion needs to be restarted if you change this setting. You are prompted for confirmation before it restarts.
Voice
The voice guidance profile currently selected is displayed. By tapping the left or right arrow, you can cycle through and select from the available languages and speakers.
Units
The unit of distance currently selected is displayed. By tapping the left or right arrow, you can cycle through and select from the available distance units.
Time settings
To set timezone properties:
- Use Auto Time Zone: You can select this option to configure your Travel Companion to automatically determine the time zone based on the current GPS position. To select a time zone manually, turn off the switch and tap Set Time Zone.
- Auto Correction: You can select this option to configure your Travel Companion to frequently check and correct the internal clock of the device with the always-accurate GPS time.
Set time format
You can set the date and time format displayed on the screen. Tap the left or right arrow to cycle through and select from the various international formats that are available.
Warnings
Tap Warnings to enable and fine-tune user alerts. A new window opens with the options.
Maps might contain information about the speed limits of the road segments. You can configure your Travel Companion to warn you when you exceed the current limit. This information is region-specific and might not be available for your region (ask your local dealer) or might not be fully correct for all roads in the map. Use this option to determine whether you need to receive the warnings or not.
Maps might contain information about the speed limits of the road segments. You can configure your Travel Companion to warn you when you exceed the current limit. This information is region-specific and might not be available for your region (ask your local dealer) or might not be fully correct for all roads in the map. Use this option to determine whether you need to receive the warnings or not.
You can set two different kinds of behavior for the warning: one is applied up to a certain speed limit, and another that is used at speeds above that limit.
You can configure the warning to prompt you when you exceed the speed limit percentage specified here.
You can configure the warning to prompt you when you exceed the speed limit percentage specified here.
Alternative speed limit
If the speed limit of the current road segment equals or is above this limit, the speed warning uses the Alternative speeding tolerance instead of the previous one.
If the speed limit of the current road segment equals or exceeds this limit, the speed warning uses the alternative speeding tolerance instead of the previous one.
Move the slider to its right-most position to turn off the alternative speed warning. This way the Speeding tolerance slider determines the warning for all roads.
If the speed limit of the current road reaches the value set at Alternative speed limit, this setting replaces Speeding tolerance. The slider works exactly as for Speeding tolerance.
If the speed limit of the current road reaches the value set at Alternative speed limit, this setting replaces Speeding tolerance. The slider works exactly as for Speeding tolerance.
Your Travel Companion can warn you when you approach known speed and red light cameras previously uploaded or copied into the device, or saved manually in the software. This can be done using the Cursor menu.
Your Travel Companion can warn you when you approach known speed and red light cameras previously uploaded or copied into the device, or saved manually in the software. This can be done using the Cursor menu.
On this screen you can enable or disable the visible and audible warning for known cameras.
⚠ WARNING! Detecting the location of speed cameras might be prohibited by law in certain countries or regions. Be sure to check if it is legal before you turn on this warning.
15 Navigation extras
You can use the additional features of the Travel Companion to enhance your travel experience.
Trip Planner
Your Travel Companion includes access to HP iPAQ trip planning services. Visit http://www.ipaq.com to learn about the latest services and content available. Here you will find the free Web-based trip planning service that allows you to personalize your travel by creating custom trip itineraries that you can transfer to your Travel Companion for use during your travels.
Traffic Message Channel (TMC)
Your Travel Companion can provide you with better routes if Traffic Message Channel (TMC) information is available. TMC is a specific application of the FM Radio Data System (RDS) used for broadcasting real-time traffic and weather information.
NOTE: TMC is not a global service. It might not be available in your country or region. Ask your local dealer for coverage details.
You need a TMC receiver attached to your Travel Companion to receive TMC information. To learn more about compatible TMC solutions for your area, visit http://www.hp.com/accessories/ipaq.
If public TMC data is broadcast at your location, the Travel Companion automatically takes into account the TMC information received. The receiver automatically searches the FM radio stations for TMC data, and the decoded information is immediately used in route planning. As soon as the Travel Companion receives traffic information that might affect your route, the Travel Companion warns you that it is recalculating the route. Navigation then continues with a new route that is optimal considering the most up-to-date traffic conditions.
List of traffic messages
Tap Traffic Messages in the Navigation Extras menu for a list of the nearest TMC events. The list is arranged by the distance from your current location.
Use the scroll bar to navigate through the screens, and see traffic difficulties farther away from your current position. You can alternately use one of the following options:
Button Function
 | Opens a new screen to configure the TMC subsystem. |
 | Shows the highlighted traffic difficulty on the map fit to the screen size. |
 | Opens a new screen to maintain the TMC receiver and radio stations. |
TMC configuration
You can configure TMC using the following features:
- Subscribe to TMC
To receive TMC data from a source that requires a subscription, you need to subscribe to it. Tap Subscribe TMC to subscribe. A new screen is displayed. Fill in the required details, tap the Web site and enter details when prompted. Tap Enter code, and enter the received TMC subscription code. Tap Done when finished.
NOTE: This button is displayed only if you are in a country where the subscribed TMC services can be used with the help of the Travel Companion.
• Recalculate to avoid traffic
You can enable or disable recalculation of the route during navigation based on TMC information. Disabling the route does not prevent the system from using TMC data for route planning, but does not trigger an automatic recalculation when the traffic conditions change during your journey.
- Sort events by distance/type
The list of traffic events can be ordered by their distance from the current position, or by their type.
Event list
You can choose to display certain TMC event types in the Event list or choose All events to show all types.
TMC radio settings
This screen shows the selected TMC source and allows you to change the radio settings.
Selected FM radio station
The name and frequency of the selected radio station is displayed. The signal strength information is indicated by a bar.
The radio can be tuned manually with the plus and minus buttons, or it can be automatic if auto tuner is selected. With auto tuner, the radio scans the frequency range, tests every radio station for TMC data, and stops when the first TMC source is found.
If there are no radio stations broadcasting TMC data in your area, and auto tuner is turned on, the receiver keeps searching for the radio station. You can see the frequency continuously sweeping across the FM CCIR radio band (87.5-108 MHz). When you move to an area with TMC information, the indicator shows the frequency, and detailed information for the TMC station.
Exclude selected station
If you wish to receive TMC data from a different radio station, tap this button. After the current radio station is added to the list of excluded stations, the Travel Companion searches for another TMC station, and skips the excluded station in future.
Show excluded stations
This button opens the list of excluded radio stations. Tap any of the stations in the list, then tap

to let the Travel Companion accept TMC information from this station.
16 GPS data screen
The GPS data screen is a collection of information received from the GPS device. The GPS data screen displays the visible part of the sky above you, with your position as the centre. The satellites are displayed at their current positions. The GPS receives data from both the green and yellow satellites. Signals from the yellow satellites are only received. The green ones are used by the GPS to calculate your current location. You can also view the satellite signal strength bars. The grey bars are for the yellow satellites and colored bars are for the green satellites. The more satellites your GPS tracks (the green ones), the more accurate your calculated position is.
The GPS data screen also includes information like current position in latitude/longitude format, elevation, speed, date, time, the GPS connection status, and calculated accuracy.

NOTE: Accuracy can be affected by several factors that Travel Companion cannot take into account. Use this accuracy information only as an estimation.
17 About screen
You can access this screen from the main page by tapping Settings > System > About. The screen provides information on the maps and licenses you have installed on your Travel Companion.
18 Outlook synchronization
The HP iPAQ Outlook Synchronizer can synchronize contact entries between your computer's Outlook database and the Travel Companion, as well as back up, and restoring the entire contacts database.
NOTE: You need to install the HP iPAQ Outlook Synchronizer that is available on the Getting Started CD or visit http://www.ipaq.com for downloading this application before you begin using it.
The synchronization tool can be launched from the Start menu through All programs > HP IPAQ Outlook Synchronizer.
You can select any of the following options:
- Data backup: launches the backup application, which lets you save the entire contact database to a file on your hard drive and restore the saved database to the Travel Companion.
- Settings: launches the Settings screen. • Start: launches the outlook synchronization tool.
If an entry has changed in either Outlook or on the device, or in both places, the synchronizing tool will either ask which version is to be retained, or resolve the conflict automatically, depending on the configuration. The Travel Companion can resolve conflicts automatically or prompts user.
The tool minimizes on the task bar and detects and synchronizes automatically when a device is connected.
You can select any of the following options:
- Synchronize automatically: When enabled, the tool synchronizes with the device immediately whenever it is connected. • Start with Windows: When enabled, the tool launches when Windows boots.
- Conflict handling: When enabled, the tool determines what to do if a contact has been changed both in Outlook and on the device after the last synchronization.
The main screen for Outlook synchronization offers the following options:
- Tap Settings to see the configuration options. Tap Minimize to minimize the window to the task bar. • Tap Close to exit the application.
The device status is indicated at the bottom of the window. When the device is connected, Sync! becomes active. When you click it, the progress bar shows the overall progress, and the device status is Synchronization is in progress. Also the window displays what is being synchronized.
19 Product specifications
System specifications
| System Feature Description | |
| Processor Titan 600 MHz ARM11 Dual-Core Processor | |
| Operating System Microsoft® Windows CE 5.0 | |
| Memory 2.0 GB flash memory, user available varies by model | 128 MB SDRAM for running applications |
| External Power AC Input: 100~240 Vac, 50/60 Hz, AC Input current: 0.2 A acmax Output Voltage: 5Vdc (typical) | |
| Display 4.3" WVGA 800x480 TFT with touch screen, antiglare, | landscape oriented, 16bit RGB depth |
| SD Slot Supports SD memory | |
| Antenna Internal Bluetooth antenna | |
| Audio Integrated microphone, speaker, and one 3.5-mm stereo | headset jack |
| Battery 1,700 mAh Li-ion removable/rechargeable battery | |
| Bluetooth Bluetooth 2.0 with Enhanced Data Rate, typical 10 meter | range (approximately 33 feet)-High-speed, low-power,short-range wireless communication with other Bluetooth devices |
| LED Indicators: | Solid Amber – Battery charging |
| Charge and Notification LED | Solid Green – Battery fully charged |
| Wireless LED | Blue indicates Bluetooth is onLED off indicates Bluetooth is off |
| GPS Receiver SiRF embedded GPS receiver with InstantFix(TM) time to first fix acceleration | |
| GPS Antenna Internal patch antenna | |
Physical specifications
| US | Metric | |
| Width | 4.3 in | 110.2 mm |
| Height | 3.4 in | 86.8 mm |
| Depth | 0.7 in | 18.2 mm |
| Weight | 6.6 oz | 187 g |
Operating environment
| US Metric | |||
| Temperature | Operating | 32° to 104° F | 0° to 40° C |
| Nonoperating | -9.6° to 140° F | -20° to 60° C | |
| Relative Humidity | Operating | up to 85 % | up to 85 % |
| Nonoperating up to 85 % up to 85 % | |||
| Maximum Altitude | Operating | 0 to 15,000 ft | 0 to 4572 m |
| Nonoperating 0 to 40,000 ft 0 to 12192 m | |||
20 Regulatory notices
Federal Communications Commission Notice
This equipment has been tested and found to comply with the limits for a Class B digital device, pursuant to Part 15 of the FCC Rules. These limits are designed to provide reasonable protection against harmful interference in a residential installation. This equipment generates, uses, and can radiate radio frequency energy and, if not installed and used in accordance with the instructions, may cause harmful interference to radio communications. However, there is no guarantee that interference will not occur in a particular installation.
If this equipment does cause harmful interference to radio or television reception, which can be determined by turning the equipment off and on, the user is encouraged to try to correct the interference by one or more of the following measures:
• Reorient or relocate the receiving antenna. • Increase the separation between the equipment and receiver. • Connect the equipment to an outlet on a circuit different from that to which the receiver is connected. • Consult the dealer or an experienced radio or television technician for help.
Modifications
The FCC requires the user to be notified that any changes or modifications made to this device that are not expressly approved by HP may void the user's authority to operate the equipment.
Cables
To maintain compliance with FCC Rules and Regulations, connections to this device must be made with shielded cables having metallic RFI/EMI connector hoods.
Declaration of Conformity for Products Marked with the FCC Logo (United States Only)
This device complies with Part 15 of the FCC Rules. Operation is subject to the following 2 conditions:
- This device may not cause harmful interference.
- This device must accept any interference received, including interference that may cause undesired operation.
If you have questions about the product that are not related to this declaration, write to
Hewlett-Packard Company
P. O. Box 692000, Mail Stop 530113
Houston, TX 77269–2000
or call 1-800-HP-INVENT (1-800-474-6836)
For questions regarding this FCC declaration, write to
Hewlett-Packard Company
P. O. Box 692000, Mail Stop 510101
Houston, TX 77269–2000
or call HP at 281-514-3333
To identify your product, refer to the part, series, or model number located on the product.
Canadian Notice
This Class B digital apparatus meets all requirements of the Canadian Interference-Causing Equipment Regulations.
Avis Canadien
Products bearing the CE marking comply with the following EU Directives:
• Low Voltage Directive 2006/95/EC • EMC Directive 2004/108/EC
CE compliance of this product is valid only if powered with the correct CE-marked AC adapter provided by HP.
If this product has telecommunications functionality, it also complies with the essential requirements of the following EU Directive:
• R&TTE Directive 1999/5/EC
Compliance with these directives implies conformity to harmonized European standards (European Norms) that are listed in the EU Declaration of Conformity issued by HP for this product or product family. This compliance is indicated by one of the following conformity markings placed on the product.
- This CE marking is valid for non-telecommunications products and for EU harmonized telecommunications products, such as Bluetooth®.

• This CE marking is valid for EU non-harmonized telecommunications products.

*If applicable, a notified body number is used. Refer to the regulatory label provided on this product.
Hewlett-Packard GmbH, HQ-TRE, Herrenberger Strasse 140, D-71034 Böblingen, Germany
The telecommunications functionality of this product may be used in the following EU and EFTA countries:
Austria, Belgium, Bulgaria, Cyprus, Czech Republic, Denmark, Estonia, Finland, France, Germany, Greece, Hungary, Iceland, Ireland, Italy, Latvia, Liechtenstein, Lithuania, Luxembourg, Malta, Netherlands, Norway, Poland, Portugal, Slovak Republic, Romania, Slovenia, Spain, Sweden, Switzerland, and United Kingdom.
Products with 2.4–GHz Wireless LAN Devices
France
For 2.4 GHz Wireless LAN operation of this product certain restrictions apply: This product may be used indoors for the entire 2400–2483.5 MHz frequency band (channels 1–13). For outdoor use, only 2400–2454 MHz frequency band (channels 1–9) may be used. For the latest requirements, see http://www.arcep.fr.
Italy
License required for use. Verify with your dealer or directly with the General Direction for Frequency Planning and Management (Direzione Generale Pianificazione e Gestione Frequenze).
Battery Warning
⚠ WARNING! This HP iPAQ contains a lithium ion rechargeable battery. To reduce the risk of fire or burns, do not disassemble, crush, puncture, short external contacts, or dispose of in fire or water. Replace only with the HP spare. △ CAUTION: Risk of explosion if battery is replaced by an incorrect type. Dispose of used batteries according to the instructions.
Battery Recycling
HP encourages customers to recycle used electronic hardware, HP original print cartridges, and rechargeable batteries. For more information about recycling programs, visit http://www.hp.com/recycle.
Battery Disposal
⚠ WARNING! When a battery has reached the end of its useful life, do not dispose of the battery in general household waste. Follow the local laws and regulations in your area for computer battery disposal.

Equipment Warning
⚠ WARNING! To reduce the risk of personal injury, electrical shock, fire or damage to the equipment:
Plug the AC adapter into an AC outlet that is easily accessible at all times.
Disconnect power from the equipment by unplugging the AC adapter from the AC outlet or unplugging the synchronization cable from the host computer.
Do not place anything on the power cord or any of the other cables. Arrange them so that no one may accidentally step on or trip over them.
Do not pull on a cord or cable. When unplugging from the electrical outlet, grasp the cord by the plug or, in the case of the AC adapter, grasp the AC adapter and pull out from the electrical outlet.
Do not use converter kits sold for appliances to power your HP iPAQ.
Acoustics Warning
⚠ WARNING! Listening to this device at high volume levels and for extended durations may damage one's hearing. In order to reduce the risk of damage to hearing, one should lower the volume to a safe, comfortable level, and reduce the amount of time listening at high levels.

- For your own safety, before using headsets or earphones, always reset the volume. Some headphones are louder than other headphones, even if the volume control setting is the same.
- Changing the default audio or equalizer settings might lead to higher volume and should only be done with caution.
- Headsets or earphones used with this device should comply with the headphone limits in EN 50332-2.
Airline Travel Notice
Use of electronic equipment aboard commercial aircraft is at the discretion of the airline.
Medical Electronic Equipment
If you have a medical condition that requires you to use a pacemaker, hearing aid, or any type of medical electronic equipment, consult the manufacturer of the equipment to determine if the medical equipment is shielded from RF energy. Turn off your HP iPAQ in health care facilities or hospitals when there are posted restrictions requiring you to do so.
Wireless Notices
In some environments, the use of wireless devices may be restricted. Such restrictions may apply aboard airplanes, in hospitals, near explosives, in hazardous locations, etc. If you are uncertain of the policy that applies to the use of this device, please ask for authorization to use it prior to turning it on.
U.S. Regulatory Wireless Notice
⚠ WARNING! Exposure to Radio Frequency (RF) Radiation The radiated output power of this device is below the FCC radio frequency exposure limits. Nevertheless, the device should be used in such a manner that the potential for human contact during normal operation is minimized.
To avoid the possibility of exceeding the FCC radio frequency exposure limits, human proximity to the antenna should be minimized. No metallic body accessories are allowed and 1.5 cm spacing between PDA and the body must be maintained to satisfy RF Exposure.
This PDA must not be co-located or operating in conjunction with any other antenna or transmitter.
Canadian Regulatory Wireless Notice
Operation is subject to the following two conditions: (1) this device may not cause interference, and (2) this device must accept any interference, including interference that may cause undesired operation of the device.
Brazilian Notice
21 Guidelines for care and maintenance
It is recommended that you follow certain guidelines to prevent possible damage to the Travel Companion and to keep it in a good condition.
Using the Travel Companion
- Avoid using the Travel Companion in dusty and extremely high or low temperature environments.
- Do not spill water on the Travel Companion or expose it to the rain.
- Avoid removing the battery without turning off the Travel Companion.
- Do not apply strong force or shocks to the Travel Companion.
- Keep the Travel Companion and its accessories away from children.
- Do not insert metal objects into the charging/communications port of the Travel Companion. This can short-circuit the battery and result in danger.
Cleaning the Travel Companion
- Use a soft, clean, and slightly moistened cloth to clean the Travel Companion. Do not let water come into contact with the earpiece, microphone, or the metal surface.
- Do not wipe the Travel Companion with any corrosive liquid or coarse objects. This can damage the outer surface of the Travel Companion.
Carrying or storing the Travel Companion
- Do not leave the Travel Companion in extremely high or low temperature environments.
- Remove the battery from the Travel Companion if it is not going to be used for a long period of time. Store the Travel Companion and its battery in a cool, dark, and dry place.
Using accessories
• Use original HP batteries and chargers to charge the Travel Companion. - Do not use the Travel Companion battery and charger for other purposes.
Using the Travel Companion in public places
Turn off the Travel Companion or switch it to silent mode when you are asked to in public places.
Obtain services for a cracked or damaged screen

NOTE: HP is not responsible for damage that occurs as a result of failure to follow the instructions that came with the HP branded product. Refer to the warranty document included with the Travel Companion for more information.
If a nonwarranty event occurs such as a damaged or cracked screen and want your device repaired, contact HP Customer Support at http://www.hp.com/support for service. However, contacting HP customer service on a nonwarranty event results in a charge for the repair.
Protect the Travel Companion screen from cracking or damage
△ CAUTION: The screen of the Travel Companion is made of glass and can be damaged or broken by drops, impacts, or pressure.
To reduce the risk of damage to the internal components, do not spray liquid directly on the screen, or allow excess liquid to drip inside the Travel Companion. Using soap or other cleaning products on the screen might discolor the finish and damage it.
- Observe the following practices to protect the screen of the Travel Companion from damage: Do not sit on the Travel Companion. When transporting the Travel Companion in a purse, pocket, briefcase, etc., ensure the device does not get compressed, bent, dropped, or hit. When not in use, use the protective screen cover (if one is available) on the Travel Companion and store it in a case. • Do not place anything on top of the Travel Companion. • Do not bang the Travel Companion against hard objects.
- Never use any device other than the stylus that comes with the Travel Companion or an approved replacement to tap or write on the screen. If you lose or break your stylus, order extras at http://www.hp.com/accessories/ipaq.
- Clean the Travel Companion by wiping the screen and the exterior with a soft, damp cloth lightly moistened only with water.
- TABLE OF CONTENTS
- WELCOME
- REGISTER THE TRAVEL COMPANION
- BOX CONTENTS
- COMPONENTS
- POWER ON AND SET UP THE TRAVEL COMPANION
- WARNINGS AND SAFETY INFORMATION
- LEARN THE BASICS
- DISCOVERING THE TRAVEL COMPANION THROUGH THE STARTUP MENU
- OPERATING NAVIGATION
- REFERENCE BOOK – NAVIGATION MENU
- BLUETOOTH
- MAP
- ROUTE
- SETTINGS
- NAVIGATION EXTRAS
- GPS DATA SCREEN
- ABOUT SCREEN
- OUTLOOK SYNCHRONIZATION
- PRODUCT SPECIFICATIONS
- REGULATORY NOTICES
- GUIDELINES FOR CARE AND MAINTENANCE
- FRONT COMPONENTS
- LEFT AND RIGHT COMPONENTS
- TOP AND BOTTOM COMPONENTS
- BACK COMPONENTS
- SET UP THE TRAVEL COMPANION
- STEP 1: REMOVE THE BATTERY COVER
- STEP 2: INSTALL THE BATTERY AND REPLACE THE BATTERY COVER
- STEP 3: CHARGE THE BATTERY
- POWER ON TRAVEL COMPANION
- CAR KIT SETUP
- HARDWARE BUTTONS
- POWER ON/OFF
- MULTIFUNCTION WHEEL
- ZOOM IN AND OUT
- ADJUST VOLUME AND BRIGHTNESS
- OPEN THE QUICK LAUNCH MENU
- SCREEN BUTTONS
- BUTTONS AT THE TOP AND BOTTOM OF THE SCREEN
- BUTTONS ON THE MAP
- SELECTORS
- DIRECT SELECTORS
- LIST SELECTORS
- SLIDERS
- SWITCHES
- VIRTUAL KEYBOARDS
- THE QWERTY KEYBOARD
- THE NUMERIC KEYBOARD
- ENTERTAINMENT
- VIDEOS
- MUSIC
- GAMES
- PICTURES
- CONTACTS
- ADD CONTACT
- EDIT CONTACT
- NAVIGATE TO A CONTACT
- CALL CONTACT
- EXTRAS
- CLOCK
- PHONE
- CALCULATOR
- SYSTEM
- ALIGN SCREEN
- TIME
- DATE
- LANGUAGE
- MEDIA DIRECTORIES
- NAVIGATE TO AN ADDRESS
- NAVIGATE TO A POI
- CREATE A ROUTE WITH MULTIPLE DESTINATIONS
- CREATE A ROUTE WITH A DIFFERENT START POINT
- SAVE USER DATA
- GO TO
- FIND AN ADDRESS, STREET, INTERSECTION, OR CITY
- FIND IN HISTORY
- FIND ONE OF THE FAVORITES
- FIND HOME OR WORK
- FIND A POI
- SEARCH REFERENCE
- POI GROUPS
- POI SUBGROUPS
- SELECT A POI
- FIND CO-ORDINATES
- COORDINATE DISPLAY FORMAT
- CONNECT A BLUETOOTH-ENABLED PHONE TO YOUR TRAVEL COMPANION
- MAKE A CALL
- USE PHONE DIALER
- USE CONTACTS
- USE POI
- ANSWER OR REJECT A CALL
- CONNECT TO A BLUETOOTH STEREO HEADPHONES
- MAP VISUALIZATION
- DAYLIGHT AND NIGHT COLOR SCHEMES
- CURRENT POSITION AND LOCK-ON-ROAD
- SELECTED MAP POINT, ALSO KNOWN AS THE CURSOR
- VISIBLE POIS (POINTS OF INTEREST)
- ROAD SAFETY CAMERAS
- ELEMENTS OF THE ACTIVE ROUTE
- START POINT, VIA POINTS, AND DESTINATION
- ACTIVE LEG OF THE ROUTE
- INACTIVE LEGS OF THE ROUTE
- TURN PREVIEW
- CURSOR (THE SELECTED MAP POINT)
- TRACK LOG RECORDING/PLAYBACK INDICATOR
- CURSOR MENU
- CURRENT STREET
- DISTANCE TO NEXT TURN
- NEXT STREET/NEXT CITY
- EDIT ROUTE
- ROUTE DETAIL
- BUTTONS FUNCTION
- SAVED ROUTES
- ROUTE INFO
- ROUTE DATA DISPLAYED (FOR DESTINATION AND VIA POINTS)
- ROUTE LINE
- DESTINATION/VIA POINT
- ESTIMATED ARRIVAL
- DISTANCE LEFT
- TIME LEFT
- METHOD
- WARNING ICONS
- OTHER FUNCTIONS
- MANAGE TRACK LOGS
- VISUAL SETTINGS
- D SETTINGS
- LANDMARKS
- ELEVATED ROADS
- BUILDINGS
- TERRAIN
- BACKLIGHT SETTINGS
- BRIGHTNESS
- POWER MANAGEMENT
- BACKLIGHT ALWAYS ON
- SMART POWERSAVE
- MAP SETTINGS
- ALTERNATIVE ROAD NAMES
- SHOW STREET LABELS
- D/3D MAP VIEW
- POI VISIBILITY
- NIGHT MODE
- ZOOM SETTINGS
- AUTO ZOOM
- RESTORE LOCK-TO-POSITION AND SMART ZOOM
- ZOOM IN AFTER FIND
- OVERVIEW MODE
- SOUND SETTINGS
- VOICE GUIDANCE
- KEY SOUNDS
- DYNAMIC VOLUME
- ROUTE SETTINGS
- VEHICLE
- ROUTE CALCULATION METHOD
- SHORT
- FAST
- ECONOMICAL
- OFF-ROUTE RECALCULATION
- AUTOMATIC
- OFF
- AVOIDANCES
- UNPAVED ROADS
- MOTORWAYS
- FERRIES
- CROSS-BORDER PLANNING
- U-TURNS
- PERMIT NEEDED
- TOLL ROADS
- CARPOOL LANES (FOR THE USA MAP ONLY)
- KEEP POSITION ON ROAD
- REGIONAL SETTINGS
- VOICE
- UNITS
- TIME SETTINGS
- SET TIME FORMAT
- WARNINGS
- MAPS MIGHT CONTAIN INFORMATION ABOUT THE SPEED LIMITS OF THE ROAD SEGMENTS. YOU CAN CONFIGURE YOUR TRAVEL COMPANION TO WARN YOU WHEN YOU EXCEED THE CURRENT LIMIT. THIS INFORMATION IS REGION-SPECIFIC AND MIGHT NOT BE AVAILABLE FOR YOUR REGION (ASK YOUR LOCAL DEALER) OR MIGHT NOT BE FULLY CORRECT FOR ALL ROADS IN THE MAP. USE THIS OPTION TO DETERMINE WHETHER YOU NEED TO RECEIVE THE WARNINGS OR NOT
- YOU CAN CONFIGURE THE WARNING TO PROMPT YOU WHEN YOU EXCEED THE SPEED LIMIT PERCENTAGE SPECIFIED HERE
- IF THE SPEED LIMIT OF THE CURRENT ROAD SEGMENT EQUALS OR IS ABOVE THIS LIMIT, THE SPEED WARNING USES THE ALTERNATIVE SPEEDING TOLERANCE INSTEAD OF THE PREVIOUS ONE
- IF THE SPEED LIMIT OF THE CURRENT ROAD REACHES THE VALUE SET AT ALTERNATIVE SPEED LIMIT, THIS SETTING REPLACES SPEEDING TOLERANCE. THE SLIDER WORKS EXACTLY AS FOR SPEEDING TOLERANCE
- YOUR TRAVEL COMPANION CAN WARN YOU WHEN YOU APPROACH KNOWN SPEED AND RED LIGHT CAMERAS PREVIOUSLY UPLOADED OR COPIED INTO THE DEVICE, OR SAVED MANUALLY IN THE SOFTWARE. THIS CAN BE DONE USING THE CURSOR MENU
- TRIP PLANNER
- TRAFFIC MESSAGE CHANNEL (TMC)
- LIST OF TRAFFIC MESSAGES
- TMC CONFIGURATION
- TMC RADIO SETTINGS
- SELECTED FM RADIO STATION
- EXCLUDE SELECTED STATION
- SHOW EXCLUDED STATIONS
- OPERATING ENVIRONMENT
- FEDERAL COMMUNICATIONS COMMISSION NOTICE
- MODIFICATIONS
- CABLES
- DECLARATION OF CONFORMITY FOR PRODUCTS MARKED WITH THE FCC LOGO (UNITED STATES ONLY)
- CANADIAN NOTICE
- AVIS CANADIEN
- PRODUCTS WITH 2.4–GHZ WIRELESS LAN DEVICES
- FRANCE
- ITALY
- BATTERY WARNING
- BATTERY RECYCLING
- BATTERY DISPOSAL
- EQUIPMENT WARNING
- ACOUSTICS WARNING
- AIRLINE TRAVEL NOTICE
- MEDICAL ELECTRONIC EQUIPMENT
- WIRELESS NOTICES
- U.S. REGULATORY WIRELESS NOTICE
- CANADIAN REGULATORY WIRELESS NOTICE
- BRAZILIAN NOTICE
- USING THE TRAVEL COMPANION
- CLEANING THE TRAVEL COMPANION
- CARRYING OR STORING THE TRAVEL COMPANION
- USING ACCESSORIES
- USING THE TRAVEL COMPANION IN PUBLIC PLACES
- OBTAIN SERVICES FOR A CRACKED OR DAMAGED SCREEN
- PROTECT THE TRAVEL COMPANION SCREEN FROM CRACKING OR DAMAGE
Brand : HP
Model : iPAQ 316
Category : Browser