
MKB01 - Karaoke system Marquant - Free user manual and instructions
Find the device manual for free MKB01 Marquant in PDF.


| Product Type | Portable CD Karaoke Stereo Radio with Microphone |
| Brand | Marquant |
| Model | MKB01 |
| Dimensions (W x D x H) | 415 x 307 x 95 mm |
| Power Source | DC 12V 800mA AC adaptor (included) or 8 x C (UM-2) batteries |
| Battery Type | 8 x UM-2 / C size (alkaline recommended) |
| Audio Output Power | 1.5 Watts RMS per channel |
| Speaker System | 3.5" x 2 full range |
| Disc Playback | CD, CD-R/RW (performance not guaranteed for CD-R/RW) |
| Radio Bands | FM (88–108 MHz), AM (530–1600 kHz) |
| Microphone Input | 1 x 1/4" (6.35 mm) external mic jack, microphone included |
| Echo Effect | Yes, adjustable via ECHO VOLUME control |
| Auxiliary Input | Yes, RCA left/right (AUX IN) |
| Headphone Jack | Yes, 3.5 mm stereo (disables built-in speakers) |
| CD Functions | Play/Pause, Skip/Search, Repeat (1/all), Program (up to 16 tracks) |
| FM Stereo Indicator | Yes, LED indicates stereo reception |
| Antenna | Telescoping FM rod antenna; built-in AM ferrite bar antenna |
| Laser Class | Class 1 laser product (invisible radiation when open) |
| Safety Precautions | Do not expose to rain/moisture; avoid heat sources; use only specified power |
| Cleaning | Clean with dry cloth; do not use chemical solvents |
| Repair | No user-serviceable parts; refer to qualified personnel |
| Included Accessories | Microphone, AC adaptor, instruction manual |
Frequently Asked Questions - MKB01 Marquant
User questions about MKB01 Marquant
0 question about this device. Answer the ones you know or ask your own.
Ask a new question about this device
Download the instructions for your Karaoke system in PDF format for free! Find your manual MKB01 - Marquant and take your electronic device back in hand. On this page are published all the documents necessary for the use of your device. MKB01 by Marquant.
USER MANUAL MKB01 Marquant
natural_image
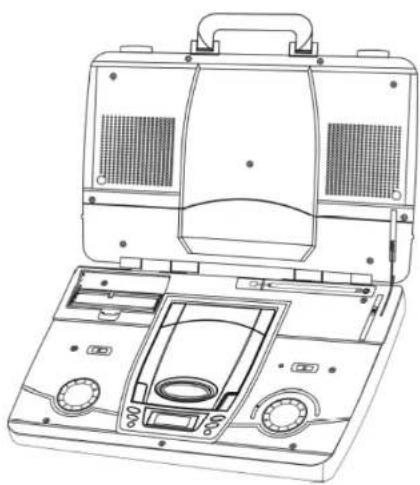
Line drawing of a portable electronic device with front panel, buttons, and ventilation slots (no text or symbols)Portable CD-Karaoke Stereo Radio With Microphone Model No: MKB-01 Instruction Manual
CE
Please read and follow this instruction manual carefully before using the unit and retain it for future reference.
CLASS 1 LASER PRODUCT
CLASS 1 LASER PRODUCT APPAREIL Á LASER DE CLASSE1 PRODUCTO LASER DE CLASE 1
CAUTION INVISIBLE LASER RADIATION WHEN OPEN AND INTERLOCKS DEFEATED. AVOID EXPOSURE TO BEAM

This porduct contains a low power Laser Device.

CAUTION
RISK OF ELECTRIC SHOCK DO NOT OPEN

CAUTION: TO REDUCE THE RISK OF ELECTRIC SHOCK, DO NOT REMOVE COVER (OR BACK). NO USER SERVICEABLE PARTS INSIDE. REFER SERVICING TO QUALIFIED SERVICE PERSONNEL.

DANGEROUS VOLTAGE
Uninsulated Dangerous Voltage that may be of sufficient magnitude to constitute a risk of electric shock to persons is present within this product's enclosure.

ATTENTION
The Instruction Manual contains important operating and maintenance instructions.
For your safety, it is necessary to refer to the manual.
IMPORTANT NOTES
- Avoid installing this unit in places exposed to direct sunlight or close to heat radiating appliances such as electric heaters, on top of other stereo equipment that radiates too much heat, places lacking ventilation or dusty areas, places subject to constant vibration and/or humid or moist areas.
- Do not attempt to clean this unit with chemical solvents as this might damage the finish. Use a clean dry cloth.
- Operate controls and switches as described in the manual.
- Store your CDs in a cool area to avoid damage from heat.
WARNING: TO PREVENT FIRE OR SHOCK HAZARD, DO NOT EXPOSE THIS UNIT TO RAIN OR MOISTURE.
PREPARATION FOR USE
UNPACKING AND SET-UP
- Carefully remove the unit from the carton and remove all packing material from the unit.
- We suggest that you retain the original carton and packing materials in case it ever becomes necessary to return your unit for service. This is the only sure way to protect the unit from damage in transit.
• If you do dispose of the carton and packing materials, please do so properly.
POWER SOURCE
This system is designed to operate on ☑—☐—+ DC 12V 800mA AC adaptor or 8 UM2 / "C" size batteries. Connecting this system to any other power supply could result in damage to the unit, which is not covered by your warranty.
NOTE: The configuration of the AC adaptor differs depending on the area.
BATTERY OPERATION
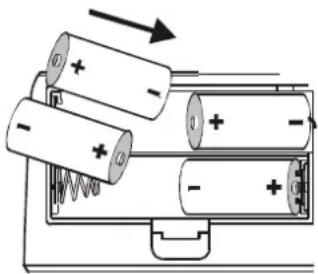
- Remove the Battery Compartment Cover by pressing the hook and sliding the cover upwards.
- Insert 8 UM2 / "C" size fresh batteries into the battery compartment. Be sure to follow the polarity (+ / -) markings inside the compartment. If the batteries are inserted incorrectly the unit will not work.
- Close the Battery Compartment Cover.
natural_image
Diagram of batteries and a battery pack with an arrow indicating direction (no text or symbols)IMPORTANT INFORMATION
- Playing CD's at higher volume levels increases the battery drain and shortens the battery life. Try to use AC adaptor whenever it is available.
• We recommend using alkaline batteries for the longest possible life. - Change the batteries when the output of the unit becomes weak or the sound becomes distorted. Always change all eight (8) batteries at the same time.
- If the unit will be stored and not used for 30 days or more it is recommended to remove the batteries from the battery compartment to reduce the possibility of damage from battery leakage or corrosion.
BATTERY PRECAUTIONS
Follow these precautions when using batteries in this device:
- Use only the size and type of batteries specified.
- Be sure to follow the correct polarity when installing the batteries as indicated in the battery compartment. Reversed batteries may cause damage to the device.
-
Do not mix different types of batteries together (e.g. Alkaline and Carbon-Zinc) or old batteries with fresh ones.
-
If the device is not to be used for a long period of time, remove the batteries to prevent damage or injury from possible battery leakage.
-
Do not try to recharge batteries not intended to be recharge; they can overheat and rupture. (Follow battery manufacturer's directions.)
STEREO HEADPHONE JACK
For private listening without disturbing others, connect a set of stereo headphones (not included) to the HEADPHONE Jack. The built-in speakers automatically shut off when stereo headphones are connected to the HEADPHONE Jack. When using stereo headphones always start with the volume control set to a low level and gradually increase until you find the desired level.
EXTERNAL MIC JACK
Plug in an external microphone, set the FUNCTION SELECTOR to 'CD' or 'AUX'. The sound is amplified by the built-in amplifier. Set the desired volume by MIC VOLUME control. Set the echo effect by ECHO VOLUME control. (external microphone is included).
NOTES:
* Unplug microphone not in use to avoid noise.
* In case of microphone not howling, operate as follows.
1) Put the microphone away from the speakers.
2) Lower the microphone volume
3) Change the microphone direction so as not face the speakers.
4) Reduce the echo level.

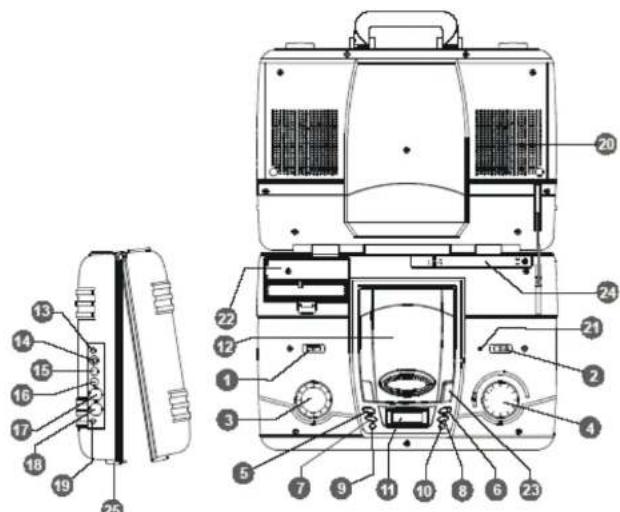
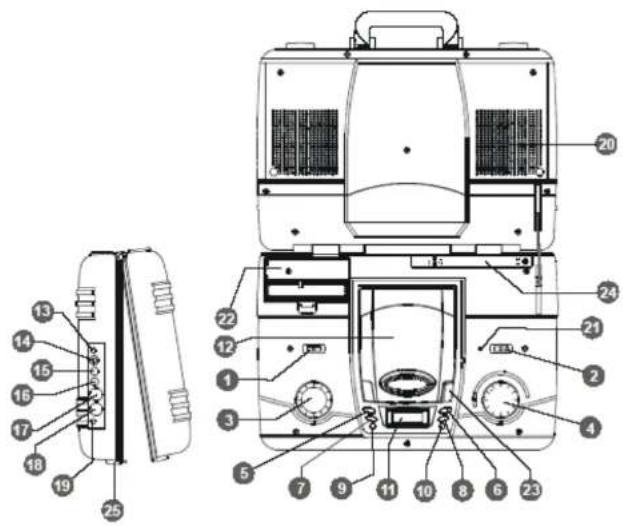
- FUNCTION Selector (AUX / CD / OFF / RADIO)
- BAND Selector (FM STEREO / FM / AM)
- VOLUME Control
- TUNING Control
- CD PLAY / PAUSE ▶ Button
- CD STOR Button
- CD Skip / Search REV ◀ Button
- CD Skip / Search FWD ▶▶ Button
- CD REPEAT Button
- CD PROGRAM Button
- CD LCD Display
-
CD Compartment Door
-
DC Input Jack
- PHONES Jack (Stereo Headphone)
- AUX-Left Channel
- AUX-Right Channel
- ECHO Volume
- MIC Volume
- EXTERNAL MIC Jack
- Speaker
- FM STEREO LED Indicator
- Battery Compartment
- CD Door Open Button
- FM Rod Antenna
- Case Lock
LISTENING TO AUXILIARY INPUT
To receive audio signals from other devices, such as TV, VCR, DVD, MD player.
- Connect one end of the RCA Plug signal wire (not included) into AUX IN socket.
- Connect the other end of wire to your home equipment.
- Set the FUNCTION selector to AUX position.
- Play your home equipment.
- Adjust the sound level by rotating the volume control.
- Stop listening auxiliary input. Set the FUNCTION selector to the "OFF" position.
LISTENING TO RADIO
- Extend the telescoping FM ANTENNA to its full length.
- Set the FUNCTION selector to RADIO position.
- Use the TUNING control to locate the desired station. If the BAND selector is set to "FM ST" and the FM station is broadcasting in stereo, the FM STEREO LED indicator will light up.
- Use the VOLUME control to adjust the sound to the desired level.
- When you are finished listening, set the FUNCTION selector to the "OFF" position.
Hints for Better Reception

natural_image
Line drawing of a FM electronic device with a rotary switch and internal components (no text or symbols)
natural_image
Line drawing of a portable electronic device with open case and internal components, showing rotational motion (no text or symbols)AM
AM - The AM ANTENNA is located inside the cabinet. If AM reception is weak, try turning the entire unit until the AM ANTENNA is pointing in the direction of the broadcast transmitter.
FM - Change the direction of the telescoping FM ANTENNA until you find the best reception.
LISTENING TO COMPACT DISC
NORMAL PLAYBACK
- Set the FUNCTION selector to CD position.
- Open the CD COMPARTMENT DOOR and place a CD on the center spindle with the printed label side facing up.
- Close the CD door. The disc will spin momentarily and “_ _” will appear in the display. Then the disc will stop spinning and the display will show the total tracks on the disc.
- Press the PLAY / PAUSE ▶ button to begin playback. The PLAY indicator will appear in display and playback begins from track 1.
- Adjust the volume controls as desired.
- Playback continues until all tracks have been played, then the disc stops and the display again shows the total number of tracks on the disc. You may also stop the disc at any time by pressing the STOP ■ button.
- Open the CD door, remove your disc from the player, and set the FUNCTION selector to the "OFF" position.
PAUSE CONTROL
The PAUSE control allows you to pause playback of a disc temporarily, and then resume playback from the same point. Press the PLAY / PAUSE ▶ button during playback to activate the PAUSE control. Press the PLAY / PAUSE ▶ button again to cancel PAUSE and resume normal playback. The PLAY indicator stops flashing.
NOTE: Remember that the disc continues to spin in the pause mode even though no sound is heard. Don't forget to release the pause mode to prevent excessive wear on the motor, and to save your batteries.
SKIP / SEARCH ↔ / ▶ BUTTONS
Press the SKIP / SEARCH ▶ FWD button once during playback to skip to the beginning of the next track. Continue to press this button to skip forward to choose next available tracks until you reach the desired track.
Press the SKIP / SEARCH ▶ REV button once during playback to skip to the beginning of the current track. Press twice to skip back to the beginning of the previous track. Continue to press this button to skip backward to choose previous available tracks until you reach the desired track.
Hold the SKIP / SEARCH ▶ FWD or ◀ REV buttons during playback to rapidly search forward or backward through the disc to locate a specific passage within a track that you wish to bypass or to hear again.
High speed search continues as long as the SKIP / SEARCH ▶/◀ buttons are pressed. Normal playback resumes when the SKIP / SEARCH ▶/◀ buttons are released.
NOTE: During high speed music search the playback volume is automatically reduced.
To begin playback of a disc on a specific track, wait until the player reads the disc and displays the total track number, the desired track number is on the display. Press the PLAY / PAUSE ▶ button to begin playback on that track.
REPEAT PLAYBACK
This function allows you to repeat either a single track or the entire disc continuously. To repeat a single track, select the track you wish to repeat and begin playback on that track. Then press the REPEAT button once. The REPEAT indicator start flashing and the selected track will be repeated continuously until
you cancel the repeat function by pressing the REPEAT button until the REPEAT indicator goes "OFF" or press the STOP ■ button twice.
To repeat the entire disc, press the REPEAT button twice. The REPEAT indicator will light up. Then press the PLAY / PAUSE ▶ button to begin playback if necessary. The entire disc will be repeated continuously.
To cancel Repeat Playback press the REPEAT button until the REPEAT indicator goes "OFF". Opening the CD door or switching the FUNCTION selector to "OFF" also can cancel repeat.
PROGRAMMED PLAYBACK
You can program up to 16 tracks to play in any order you choose. To program tracks for playback the player must be in the Stop mode. If the disc is playing, press the STOP ■ button to stop playback and then proceed as follows:
-
Press the PROG button once. The "PROGRAM" indicator and "PR" will start flashing.
-
Use the SKIP / SEARCH ▶ FWD or ◀ REV buttons to select the first track to be programmed.
Example: Track 7
The "PROGRAM" indicator keeps flashing.
-
Press the PROG button again. This will store track 7 into program memory. The "PROGRAM" indicator and "PR" flashing again.
-
Repeat steps 2 and 3 until you have programmed up to a maximum of 16 tracks into the program memory.
-
To begin Programmed Playback press the PLAY / PAUSE ▶ button. The "PROGRAM" indicator stop flashing and remains on. The player will begin to play the tracks in the order that you selected.
NOTES:
- Pressing the STOP ■ button during Programmed Playback will stop playback but the Programmed tracks are still in memory.
- Press PLAY / PAUSE 📂 button to continue Programmed Playback.
- To cancel Programmed Playback, press the STOP ■ button while in Stop mode.
- Programmed Playback can also be canceled by opening the CD door, setting the FUNCTION selector to the "OFF" position or by disconnecting the AC POWER cord.
- When 16 tracks have been entered, the CD memory is full. If you try to select other tracks, the "PROGRAM" indicators continue flashing but no other track numbers appear in the display.
• To check the program order, press the PROG button once more. The display will show each track number in the order that they were programmed.
NOTE ON CD-R / RW DISCS
• Because of non-standardized format definition / production of CD-R / RW, playback quality & performance are not guaranteed.
- Do not attach a seal or label to either side (the record able side or the labeled side) of a CD-R / RW disc. It may cause malfunction.
- Do not load an un-recorded CD-R / RW disc. It will take over 30 seconds to read the disc. The disc may be damaged if you try to open the CD Door while reading the disc.
COMPACT DISC CARE


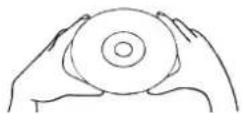
• To Remove a disc from its storage case, press down on the center of the case and lift the disc out, holding it carefully by the edges.
- Treat the disc carefully. Handle the disc only by its edges. Never allow your fingers to come in contact with the shiny, unprinted side of the disc.
• Do not attach any tape, stickers, etc. to the disc label.
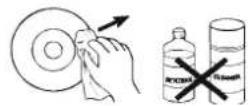
- Clean the disc periodically with a soft, lint-free, dry cloth. Never use detergents or abrasive cleaners to clean the disc. If necessary, use a CD cleaning kit.
- If a disc skips or gets stuck on a section of the disc, it is probably dirty or damaged (scratched).
- When cleaning the disc, wipe in straight lines from the center of the disc to the outer edge of the disc. Never wipe in circular motions.
CAUTION:
Never allow any water or other liquids to get inside the unit while cleaning.
TROUBLESHOOTING GUIDE
Should this unit exhibit a problem, check the following before seeking service.
| Symptom | Possible Cause | Soluti |
| Radio | ||
| Noise or sound distorted on AM or FM broadcasting. | Station not tuned properly for AM or FM. | Retune AM or FM broadcast station. |
| FM: The FM Rod Antenna was not extended. | Extend FM Rod Antenna. | |
| AM: The built-in ferrite bar antenna was not position correctly. | Reposition the unit until best reception is obtained. | |
| FM STEREO indicator does not light up. | BAND at FM position. Slide | BAND selector to FM STEREO position. |
| You have tuned to a mono station. | Select another FM station. | |
| The station too weak. Select another FM station. | ||
| AM or FM no sound. | Unit not at RADIO mode. Slide | FUNCTION selector to RADIO position. |
| Volume at minimum position. | Adjust Volume level. | |
| Compact Disc Player | ||
| CD Player does not play. | Unit not at CD mode. Slide | FUNCTION selector to CD position. |
| CD is not installed or installed incorrectly. | Load disc with unlabeled side face to the unit. | |
| CD skips while playing. | Disc is dirty or scratched. Wipe disc with cloth or use another disc. | |
SPECIFICATION
Power Source U M2 / "C' size x 8, DC 12V
AC ADAPTOR 12V DC, 800mA
Unit Dimension 415 (W) x 307 (D) x 95 (H) mm
Tuning Range AM 530 - 1600kHz
FM 88 - 108MHz
Playback System ---- Top Load CD mechanism
Frequency Response 100 - 18,000Hz
Power Output 1.5 Watts RMS per channel
Speaker System 3 1/2" x 2 Full range
Headphone Impedance 8 – 32 ohms
ACCESSORIES INCLUDED:
Instruction Manual 1 set
Microphone
AC adaptor 1 piece
Design and specification subject to change are without notice.
Printed in China
172-4010801N0-MQ
MARQUANT
KARAOKE RADIO MET CD
MODEL: MKB-01
natural_image
Line drawing of a portable electronic device with front panel, buttons, and ventilation slots (no text or symbols)GEBRUIKSAANWIJZING
CE
BEDIENTOETSEN

natural_image
Diagram of batteries with positive and negative charge movement, no text or symbols presentEXTERNE MICROFOON:
natural_image
Illustration of a FM radio receiver with a coiled spring (no text or symbols)
natural_image
Line drawing of a portable electronic device with labeled components and rotation arrows (no text or symbols)CD AFSPELEN:
AFSPELEN VAN EEN CD
natural_image
Line drawing of a portable electronic device with front panel and control buttons (no text or symbols)MODE D' EMPLOI
CE
TOUCHES DE COMMANDES
natural_image
Diagram of batteries and charging cells with an arrow indicating direction (no text or symbols)MICRO EXTERNE:
natural_image
Line drawing of an open FM radio with a dial and control panel (no text or symbols)
natural_image
Line drawing of a portable electronic device with control panels and buttons, showing rotational motion (no text or symbols)FR-3
LECTURE D'UNE CD
natural_image
Line drawing of a portable electronic device with front panel and control knobs (no text or symbols)GEBRAUCHSANWEISUNG
CE
Bedienungselemente
natural_image
Diagram of batteries and a battery pack with an arrow indicating direction (no text or symbols)Externes Mikrofon:
natural_image
Line drawing of an FM radio station with a device and control panel (no text or symbols)
natural_image
Illustration of a portable electronic device with labeled components and rotation arrow (no text or symbols on the device itself)GR-3
CD-Wiedergabe:
Abspielen einer CD
natural_image
Line drawing of a portable electronic device with front panel, buttons, and ventilation slots (no text or symbols)natural_image
Diagram of batteries and a battery pack with an arrow indicating direction (no text or symbols)MICROFONE EXTERNO:
natural_image
Line drawing of a portable electronic device with labeled components and an arrow indicating rotation (no text or symbols on the device itself)
natural_image
Line drawing of a portable electronic device with open case and internal components (no text or symbols)PR-3
REPRODUÇÃO DE CDs
REPRODUZIR UM CD
natural_image
Line drawing of a portable electronic device with front panel, buttons, and ventilation slots (no text or symbols)natural_image
Diagram of batteries moving in a row with an arrow indicating direction (no text or symbols)MICRÓFONO EXTERNO:
natural_image
Technical line drawing of a portable electronic device with labeled components (no readable text or symbols)
natural_image
Line drawing of a portable electronic device with labeled components and rotation arrow (no text or symbols on the device itself)SP-3
REPRODUCCIÓN DE CD:
REPRODUCIR UN CD
- CE
- CLASS 1 LASER PRODUCT
- CAUTION
- DANGEROUS VOLTAGE
- ATTENTION
- IMPORTANT NOTES
- PREPARATION FOR USE
- UNPACKING AND SET-UP
- POWER SOURCE
- BATTERY OPERATION
- IMPORTANT INFORMATION
- BATTERY PRECAUTIONS
- STEREO HEADPHONE JACK
- EXTERNAL MIC JACK
- NOTES:
- LISTENING TO AUXILIARY INPUT
- LISTENING TO RADIO
- LISTENING TO COMPACT DISC
- NORMAL PLAYBACK
- PAUSE CONTROL
- SKIP / SEARCH ↔ / ▶ BUTTONS
- REPEAT PLAYBACK
- PROGRAMMED PLAYBACK
- NOTE ON CD-R / RW DISCS
- COMPACT DISC CARE
- CAUTION:
- TROUBLESHOOTING GUIDE
- SPECIFICATION
- ACCESSORIES INCLUDED:
- MARQUANT
- EXTERNE MICROFOON:
- CD AFSPELEN:
- AFSPELEN VAN EEN CD
- MICRO EXTERNE:
- LECTURE D'UNE CD
- Externes Mikrofon:
- CD-Wiedergabe:
- Abspielen einer CD
- MICROFONE EXTERNO:
- REPRODUÇÃO DE CDs
- REPRODUZIR UM CD
- MICRÓFONO EXTERNO:
- REPRODUCCIÓN DE CD:
- REPRODUCIR UN CD
Brand : Marquant
Model : MKB01
Category : Karaoke system