
SC-HDX3 - Hi-Fi System TECHNICS - Free user manual and instructions
Find the device manual for free SC-HDX3 TECHNICS in PDF.


| Product Type | Hi-Fi System |
| Brand | Technics |
| Model | SC-HDX3 |
| Dimensions (W x H x D) | 180 mm x 250 mm x 300 mm (approx.) |
| Weight | 3.5 kg (approx.) |
| Power Consumption | 40 W (typical) |
| Power Output (RMS) | 2 x 20 W (6 ohms) |
| Frequency Response | 40 Hz - 20 kHz |
| Supported Media | CD, CD-R/RW, MP3 CD |
| Tuner Bands | FM, AM |
| Connectivity | AUX input, headphones output |
| Speaker Configuration | 2-way bass-reflex (detachable speakers) |
| Playback Functions | Program, repeat, random playback |
| Equalizer Presets | Rock, Pop, Jazz, Classic, Flat |
| Remote Control | Included |
| Power Supply | AC 120 V / 230 V, 50/60 Hz |
| Cleaning Instructions | Wipe with soft dry cloth; avoid solvents |
| Safety Features | Overload protection, ventilation slots |
| Repairability | Refer to service manual; spare parts available |
Frequently Asked Questions - SC-HDX3 TECHNICS
User questions about SC-HDX3 TECHNICS
0 question about this device. Answer the ones you know or ask your own.
Ask a new question about this device
Download the instructions for your Hi-Fi System in PDF format for free! Find your manual SC-HDX3 - TECHNICS and take your electronic device back in hand. On this page are published all the documents necessary for the use of your device. SC-HDX3 by TECHNICS.
USER MANUAL SC-HDX3 TECHNICS
Amplifier/Speaker System
Operating Instructions
Model No. SC-HDX3

natural_image
Illustration of various household appliances including a speaker, front panel, and air conditioner unit (no text or symbols)Technics®

natural_image
Illustration of a cozy room with a large screen, bar stools, and two birds perched on pedestals, surrounded by trees (no text or symbols)Note:
"EB" on the packaging indicates the United Kingdom.
Before connecting, operating or adjusting this product, please read these instructions completely. Please keep this manual for future reference.
RQT5579-B
Dear Customer
Thank you for purchasing this product.
For optimum performance and safety, please read these instructions carefully.
| 3 channel amplifier | SE-HDX3 |
| Speakers | SB-HDX3 · 3 |
Table of contents
Safety precautions 2
Caution for AC Mains Lead 3
Speaker set-up 4
Connection 5
Operation 6
Maintenance 6
Troubleshooting guide 7
Specifications 7
Supplied accessories

Please check and identify the supplied accessories.
Use numbers indicated in parentheses when asking for replacement parts.
SE-HDX3
□ AC mains lead (RJA0053-2X)....1
☐ Speaker cables (Long, for surround speakers) (REE0499A) ....2
☐ Speaker cable (Short, for center speaker) (REE1057) ....1
Flat cable (REX1048)....1
□ Stereo phono cable (RJL2P004B08A)....1
Monaural phono cable (RJL1P021B08)....1


SB-HDX3
☐ Speaker feet (RFA0631A-K) ....12 feet

* Replacements sold in 1-sheet lots (4 feet per sheet).
Metal wall mounts (RMQ0987) 6

Screws (XTB3+16AFZ) 12

Safety precautions
Placement
Set the system up on an even surface away from direct sunlight, high temperatures, high humidity, and excessive vibration. These conditions can damage the cabinet and other components, thereby shortening the unit's service life.
Place it at least 15 cm away from wall surfaces to avoid distortion and unwanted acoustical effects.
Do not place heavy items on the unit.
Voltage
Do not use high voltage power sources. This can overload the unit and cause a fire.
Do not use a DC power source. Check the source carefully when setting the unit up on a ship or other place where DC is used.
AC mains lead protection
Ensure the AC mains lead is connected correctly and not damaged. Poor connection and lead damage can cause fire or electric shock. Do not pull, bend, or place heavy items on the lead.
Grasp the plug firmly when unplugging the lead. Pulling the AC mains lead can cause electric shock.
Do not handle the plug with wet hands. This can cause electric shock.
Foreign matter
Do not let metal objects fall inside the unit. This can cause electric shock or malfunction.
Do not let liquids get into the unit. This can cause electric shock or malfunction. If this occurs, immediately disconnect the unit from the power supply and contact your dealer.
Do not spray insecticides onto or into the unit. They contain flammable gases which can ignite if sprayed into the unit.
Service
Do not attempt to repair this unit by yourself. If sound is interrupted, indicators fail to light, smoke appears, or any other problem that is not covered in these instructions occurs, disconnect the AC mains lead and contact your dealer or an authorized service center. Electric shock or damage to the unit can occur if the unit is repaired, disassembled or reconstructed by unqualified persons.
Extend operating life by disconnecting the unit from the power source if it is not to be used for a long time.
CAUTION!
DO NOT INSTALL OR PLACE THIS UNIT IN A BOOKCASE, BUILT IN CABINET OR IN ANOTHER CONFINED SPACE. ENSURE THE UNIT IS WELL VENTILATED. ENSURE THAT CURTAINS AND ANY OTHER MATERIALS DO NOT OBSTRUCT THE VENTILATION TO PREVENT RISK OF ELECTRIC SHOCK OR FIRE HAZARD DUE TO OVERHEATING.
WARNING:
TO REDUCE THE RISK OF FIRE, ELECTRIC SHOCK OR PRODUCT DAMAGE, DO NOT EXPOSE THIS APPLIANCE TO RAIN, SPLASHING, DRIPPING OR MOISTURE.
(For United Kingdom)
("EB" area code model only)
For your safety, please read the following text carefully.
This appliance is supplied with a moulded three pin mains plug for your safety and convenience.
A 5-ampere fuse is fitted in this plug.
Should the fuse need to be replaced please ensure that the replacement fuse has a rating of 5-ampere and that it is approved by ASTA or BSI to BS 1362.
Check for the ASTA mark on the BSI mark on the body of the fuse.
If the plug contains a removable fuse cover you must ensure that it is refitted when the fuse is replaced.
If you lose the fuse cover the plug must not be used until a replacement cover is obtained.
A replacement fuse cover can be purchased from your local dealer.
CAUTION!
IF THE FITTED MOULDED PLUG IS UNSUITABLE FOR THE SOCKET OUTLET IN YOUR HOME THEN THE FUSE SHOULD BE REMOVED AND THE PLUG CUT OFF AND DISPOSED OF SAFELY.
THERE IS A DANGER OF SEVERE ELECTRICAL SHOCK IF THE CUT OFF PLUG IS INSERTED INTO ANY 13-AMPERE SOCKET.
If a new plug is to be fitted please observe the wiring code as stated below.
If in any doubt please consult a qualified electrician.
IMPORTANT
The wires in this mains lead are coloured in accordance with the following code:
Blue: Neutral, Brown: Live.
As these colours may not correspond with the coloured markings identifying the terminals in your plug, proceed as follows:
The wire which is coloured Blue must be connected to the terminal which is marked with the letter N or coloured Black or Blue.
The wire which is coloured Brown must be connected to the terminal which is marked with the letter L or coloured Brown or Red.
WARNING: DO NOT CONNECT EITHER WIRE TO THE EARTH TERMINAL WHICH IS MARKED WITH THE LETTER E, BY THE EARTH SYMBOL OR COLOURED GREEN OR GREEN/YELLOW.
THIS PLUG IS NOT WATERPROOF-KEEP DRY.
Before use
Remove the connector cover.
How to replace the fuse
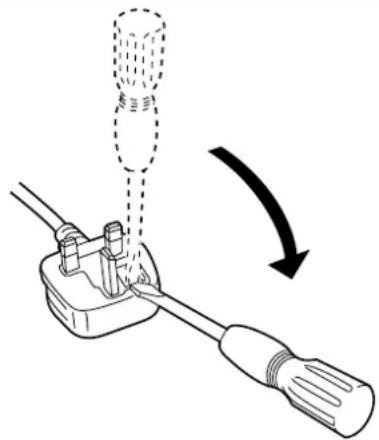
The location of the fuse differ according to the type of AC mains plug (figures A and B). Confirm the AC mains plug fitted and follow the instructions below. Illustrations may differ from actual AC mains plug.
- Open the fuse cover with a screwdriver.
Figure A
natural_image
Diagram of a screwdriver being inserted into a plug, showing the tool's tip and head (no text or symbols present)Figure B

- Replace the fuse and close or attach the fuse cover.
Figure A

Figure B

The three speakers are the same. How you connect and place them determines whether they are center or surround speakers
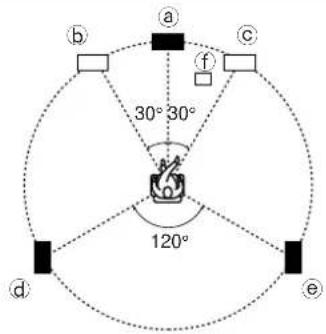
Position the speakers
Note
- Set the speakers up on an even surface to prevent them from falling. Take proper precautions to prevent the speakers from falling if you cannot set them up on an even surface.
- Keep your speakers at least 10 mm away from the system for proper ventilation.
- Vibration may cause distortion in the picture if the speaker is placed directly on the television. Use a rack or shelf for the center speaker.
a Center speaker (included)
b Front speaker (left) (not included)
© Front speaker (right) (not included)
d Surround speaker (left) (included)
(e) Surround speaker (right) (included)
f Subwoofer (not included)
The front, center, and surround speakers should be placed at approximately the same distance from the listening position.

Caution
- Use the speakers only with the recommended system. Failure to do so may lead to damage to the amplifier and/or the speakers, and may result in the risk of fire. Consult a qualified service person if damage has occurred or if you experience a sudden change in performance.
- Do not attempt to attach these speakers to walls using methods other than those described in this manual.
If irregular colouring occurs on your television
These speakers are designed to be used close to a television, but the picture may be affected with some televisions and set-up combinations.
If this occur, turn the television off for about 30 minutes.
The television's demagnetizing function should correct the problem. If it persists, move the speakers further away from the television.
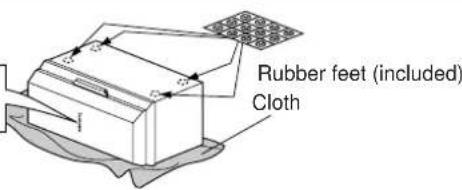
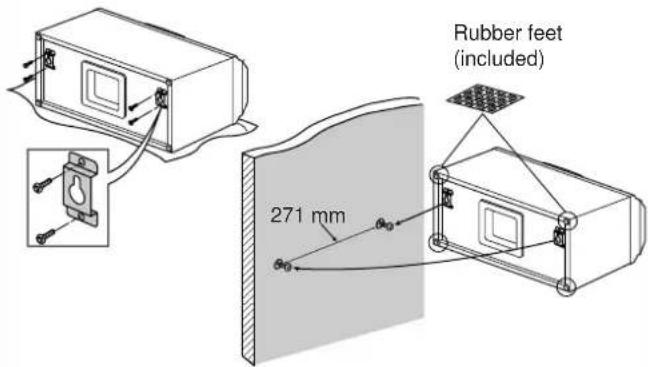
Attach the rubber feet to the speaker
Attach these rubber feet to prevent vibration causing the speakers to move or fall over. (See below if you would prefer to hang the speakers on the wall.)
Standing Lying down
Rubber feet (4 per speaker, included)

Turn the logo so it is horizontal.
Attaching the surround speakers to the wall
Screws
(4 per speaker, included)
Metal wall mounts
(2 sper speaker, included)
Screws
(not included)
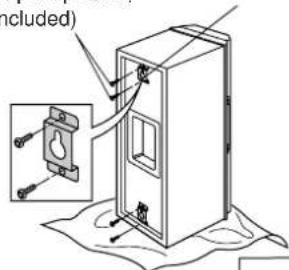

To attach horizontally To attach vertically
Note
The surface you attach the speakers to must be able to support over 13 kg.
Speaker connection
Note
Confirm the colours of the cords to ensure correct connection. Incorrect connection can damage the unit.
Before
connection:
To prepare the speaker cables, twist the vinyl tip and pull off.
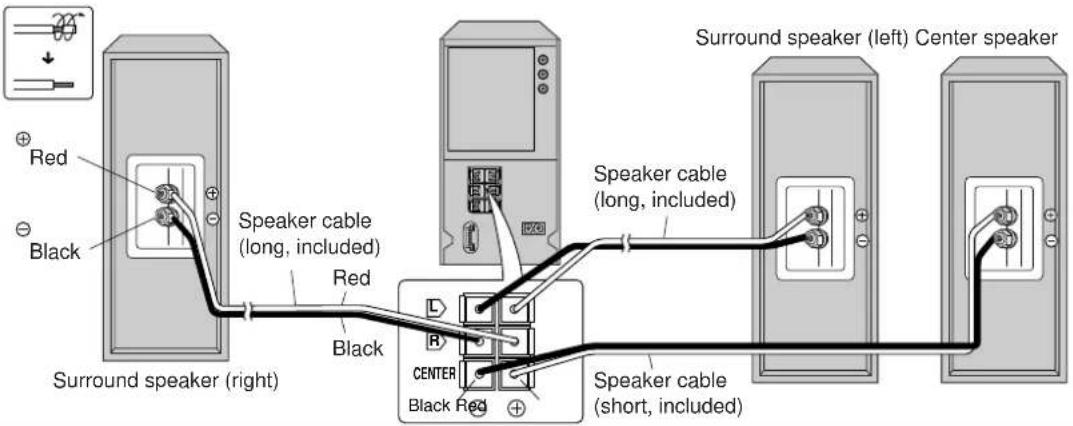
Connecting the cables
(Connection to the amplifier)

(Connection to the speakers)

Connection to a system

Note
- The included AC mains lead is for use with this unit only. Do not use it with other equipment.
- A subwoofer cannot be connected to this unit. Connect it to SC-HDA710.
Insertion of connector:
Even when the connector is perfectly inserted, depending on the type of inlet used, the front part of the connector may jut out as shown in the drawing.
However there is no problem using the unit.

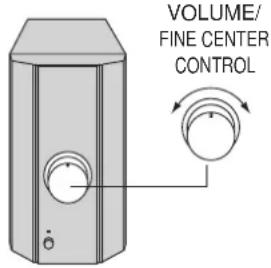
1 Turn [VOLUME/FINE CENTER CONTROL] to the center position.
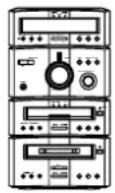
2 Press [ ■ ⏻ -1 ] to turn on the unit.
3 Start play on SC-HDA710.
4 Adjust the volume of the center speaker.


Standby/on switch (■ ⊙ ■ I)
Press to switch the unit from on to standby mode or vice versa. In standby mode, the unit is still consuming a small amount of power.
Operation/standby indicator
The indicator lights green when the unit is turned on.
When connected to SC-HDA710
When this unit is switched on ( ) and SC-HDA710 is switched to standby, the indicator lights red to indicate this unit is in standby mode.
When connected to SC-HDA710
- This unit switches to standby mode when you switch SC-HDA710 to standby mode.
- [VOLUME/FINE CENTER CONTROL] allows you to make fine adjustments to the volume of the center speaker to suit the type of audio you are playing.
- Use SC-HDA710 to adjust the volume and delay time for the speakers.
- Set the speaker mode to "Small".
When connected to equipment other than SC-HDA710.
- [VOLUME/FINE CENTER CONTROL] is used to adjust the volume of all three speakers.
- Change the 5.1-channel surround sound speaker settings on the other unit so the speaker mode for these speakers is "Small".
Maintenance
If the surfaces are dirty
To clean this unit, wipe with a soft, dry cloth.
If the surfaces are extremely dirty, use a soft cloth dipped in a soap-and-water solution or a weak detergent solution.
- Never use alcohol, paint thinner or benzine to clean this unit.
- Before using chemically treated cloth, read the instructions that came with the cloth carefully.
Troubleshooting guide
Before requesting service for this unit, check the chart below for a possible cause of the problem you are experiencing. Some simple checks or a minor adjustment on your part may eliminate the problem and restore proper operation.
If you are in doubt about some of the check points, or if the remedies indicated in the chart do not solve the problem, refer to the directory of Authorized Service Centers (enclosed with this unit) to locate a convenient service center, or consult your dealer for instructions.
| No power. | Ensure the mains lead is connected. | 5 |
| No sound. | Turn the volume up.Check the volume on SC-HDA710.Check speaker connections. | 665 |
| Sounds are unfixed or left and right are reversed. | Check speaker connections. | 5 |
| Humming heard during play | A mains lead or fluorescent light is near the cables. Keep other appliances and cords away from this unit's cables. | — |
| Sound stops suddenly during play. | The speaker cords may have shorted. Turn the unit off and reconnect the cords. | 5 |
| Headphones are connected but sound still comes from the speakers. | Sound will come from the speakers even if you have connected headphones to SC-HDA710 if the soundtrack on the disc cannot be down-mixed. Change the soundtrack on the disc to stereo when you want to listen through headphones. | — |
| There is interference on the television. | Position the amplifier away from the television. | — |
Specifications
■ AMPLIFIER SECTION (Low Frequency Side)
Power Output
DIN 1 kHz, THD 1 %, 6 Ω, both channel driven 3 x 7 W
RMS 1 kHz, THD 10 %, 6 Ω, both channel driven 3 x 12 W
Total Harmonic Distortion
Half Power, 1 kHz, 6 Ω 0.3 %
Frequency Response
60–50000 Hz (+1 dB, -6 dB)
S/N 100 dB
Load Impedance 6 Ω
■GENERAL
Power supply AC 230 - 240 V 50 Hz
Power consumption 37 W
Dimensions (W x H x D) 95 x 179.5 x 265.5 mm
Mass 3.1 kg
Power consumption in standby mode: 0.7 W
■ SPEAKER SECTION
Type 2 way 2 speaker Bass-reflex
Speaker unit
Woofer 10 cm cone type
Tweeter 2.5 cm semi-dome type
Impedance 6 Ω
Input power
MUSIC 30 W
DIN 15 W
Sound pressure level 83 dB/W (1.0 m)
Crossover frequency 3 kHz
Frequency response 60 Hz–50 kHz (−16 dB)
70 Hz–45 kHz (−10 dB)
Dimensions (W x H x D) 129 x 324 x 180 mm
Mass 2.45 kg
Note:
Specifications are subject to change without notice.
Mass and dimensions are approximate.
- Amplifier/Speaker System
- Technics®
- Note:
- Dear Customer
- Table of contents
- Supplied accessories
- SE-HDX3
- SB-HDX3
- Safety precautions
- Placement
- Voltage
- AC mains lead protection
- Foreign matter
- Service
- CAUTION!
- WARNING:
- (For United Kingdom)
- IMPORTANT
- Before use
- How to replace the fuse
- Position the speakers
- Note
- Caution
- If irregular colouring occurs on your television
- Attach the rubber feet to the speaker
- Attaching the surround speakers to the wall
- Screws
- Metal wall mounts
- Speaker connection
- Before
- connection:
- Connecting the cables
- Connection to a system
- Insertion of connector:
- Standby/on switch (■ ⊙ ■ I)
- Operation/standby indicator
- When connected to SC-HDA710
- When connected to equipment other than SC-HDA710.
- Maintenance
- If the surfaces are dirty
- Troubleshooting guide
- Specifications
- ■ AMPLIFIER SECTION (Low Frequency Side)
- ■GENERAL
- ■ SPEAKER SECTION
Brand : TECHNICS
Model : SC-HDX3
Category : Hi-Fi System