VM - Laptop Flybook - Free user manual and instructions
Find the device manual for free VM Flybook in PDF.


| Product Type | Laptop |
| Brand | Flybook |
| Model | VM |
| Processor | Intel Centrino Duo LV / ULV |
| Memory | DDR2 SO-DIMM, up to 4GB |
| Display | 12.1-inch WXGA (1280x768), 16:10 |
| Hard Disk | 1.8-inch, 40/60/80GB |
| Optical Drive | DVD Combo or Super-Multi (optional) |
| Wireless LAN | 802.11a/b/g (Intel 3945) |
| Bluetooth | Bluetooth V2.0 |
| Wireless WAN | Optional 3.5G (HSDPA/UMTS/EDGE/GPRS/GSM) |
| Camera | 1.3 Megapixel webcam |
| Fingerprint Reader | Built-in |
| Audio | Array microphone, stereo speakers |
| Ports | 2x USB 2.0, RJ-45, headphone, microphone, ExpressCard (54mm), VGA |
| Battery | Li-ion rechargeable, 11.1V, 2600mAh, up to 3 hours |
| Dimensions (WxDxH) | 292 x 222 x 25.8 mm |
| Weight | 1.7 kg (with standard battery) |
| Power Adapter | Input 100-240V AC, output 19V/3.42A, 65W |
| Operating System | Windows Vista / XP |
| Color Options | Red, Yellow, Black, Silver |
| Maintenance | Clean with soft cloth; avoid moisture; do not block vents |
| Safety Certifications | FCC Class A, CE |
| Spare Parts & Repairability | Battery replaceable; contact dealer for service |
| General Information | Designed for mobility; supports fingerprint authentication and webcam |
Frequently Asked Questions - VM Flybook
User questions about VM Flybook
0 question about this device. Answer the ones you know or ask your own.
Ask a new question about this device
Download the instructions for your Laptop in PDF format for free! Find your manual VM - Flybook and take your electronic device back in hand. On this page are published all the documents necessary for the use of your device. VM by Flybook.
USER MANUAL VM Flybook
Flybook VM User's Guide V1.0.book Page i Thursday, February 8, 2007 5:46 PM


Flybook®
The Ultimate in Mobility
Flybook VM User's Manual
VMW1BB (without 3G)
VMW1BBHA (with 3G)

Dialogue Technology Corporation
Version 2.0, Jan.. 2007
DIALOGUE





Flybook VM User's Guide V1.0.book Page ii Thursday, February 8, 2007 5:46 PM





Flybook VM User's Guide V1.0.book Page i Thursday, February 8, 2007 5:46 PM

Preface
Copyright and Safety Notices
Please read this section before using your computer. Retain this manual for future reference.
Copyright
This publication, including all photographs, illustrations and software, is protected under international copyright laws, with all rights reserved. Neither this manual, nor any of the material contained herein, may be reproduced without written consent of the manufacturer.
Disclaimer
The information in this document is subject to change without notice. The manufacturer makes no representations or warranties with respect to the contents hereof and specifically disclaims any implied warranties of merchantability or fitness for any particular purpose. The manufacturer reserves the right to revise this publication and to make changes from time to time in the content hereof without obligation of the manufacturer to notify any person of such revision or changes.





Preface

natural_image
Pure geometric crosshair symbol with no text or labelsTrademark Recognition
Bluetooth is a trademark of the Bluetooth SIG, Inc. (Special Interest Group). The Bluetooth trademark is owned by Bluetooth SIG, Inc. USA. BlueSoleil is a trademark of IVT Corporation. Dialogue Technology Corporation is a registered trademark. FlyBook is a trademark of the Dialogue Technology Corporation. Windows is a registered trademark or trademark of Microsoft Corporation in the United States and/or other countries. All other product names used in this manual are the properties of their respective owners and are acknowledged.
Federal Communications Commission (FCC)
This equipment has been tested and found to comply with the limits for a Class A digital device, pursuant to Part 15 of the FCC Rules. These limits are designed to provide reasonable protection against harmful interference in a residential installation. This equipment generates, uses, and can radiate radio frequency energy and, if not installed and used in accordance with the instructions, may cause harmful interference to radio communications. However, there is no guarantee that interference will not occur in a particular installation. If this equipment does cause harmful interference to radio or television reception, which can be determined by turning the equipment off and on, the user is encouraged to try to correct the interference by one or more of the following measures:
• Reorient or relocate the receiving antenna.
- Increase the separation between the equipment and the receiver.
- Connect the equipment onto an outlet on a circuit different from that to which the receiver is connected.
- Consult the dealer or an experienced radio/TV technician for help.
natural_image
Pure geometric diagram with intersecting lines and circles, no text or symbols present
natural_image
Pure geometric crosshair symbol with concentric circles and intersecting lines (no text or labels)Shielded interconnect cables and a shielded AC power cable must be employed with this equipment to ensure compliance with the pertinent RF emission limits governing this device. Changes or modifications not expressly approved by the system's manufacturer could void the user's authority to operate the equipment.
Declaration of Conformity
This device complies with part 15 of the FCC rules. Operation is subject to the following conditions:
• This device may not cause harmful interference, and
- This device must accept any interference received, including interference that may cause undesired operation.
FCC Caution
Any changes or modifications not expressly approved by the party responsible for compliance could void the user's authority to operate this equipment.
The antenna(s) used for this transmitter must not be co-located or operating in conjunction with any other antenna or transmitter.
Enabling wireless LAN and wireless WAN simultaneously in one computer is not allowed. While one is in use, the other will be turned off.
Running wireless devices in the aircraft is prohibited. Make sure all wireless devices in your computer are turned off during the flight.

natural_image
Pure geometric diagram with crosshair and circular target (no text or symbols)

natural_image
Pure geometric diagram with intersecting lines and circles, no text or symbols presentPreface
natural_image
Pure geometric crosshair symbol with no text or labelsFCC Radiation Exposure Statement
This equipment complies with FCC radiation exposure limits set forth for an uncontrolled environment. This equipment should be installed and operated with a minimum distance of 20 cm (8 inches) between the radiator and your body.
Class 1 Laser Product Caution
Visible and invisible laser radiation when open. Avoid direct exposure to the beam.
FCC Wireless Regulation
Due to the FCC regulations, wireless LAN and wireless WAN modules shall not work in a machine simultaneously. If these two modules are installed in the V5, while one is in use, the other will be off automatically by the system.
Battery Caution
Danger of explosion if battery is incorrectly replaced. Replace only with same or equivalent type recommended by the manufacturer. Discard used batteries according to the manufacturer's instructions.
About This Manual
This User's Manual provides information to help you operate and get the most from your Flybook VM. Read the Quick Start Guide to quickly set up and begin using your computer.
Please read "Copyright and Safety Notices" on page i before using your computer.

natural_image
Pure geometric diagram with intersecting lines and circles, no text or symbols present

natural_image
Pure geometric diagram with crosshair and circular target-like shapes (no text or symbols)Taking Care of the Flybook VM
After you unpack your computer, store the packing materials in case you want to ship the computer or if you have to return it for servicing.
Your notebook computer is a precision instrument that should be handled with care. Use common sense and follow the guidelines below, and your computer will last you for many years.
Do's and Don'ts with the Flybook VM
- Do not place heavy objects such as books on the computer.
- Do not use the Flybook VM near water or a heat source such as a radiator.
- Do not expose the computer to temperatures above 50^ C or below 0^ C.
- Keep the computer away from direct sunlight or heat sources.
- Do not expose the computer to rain or moisture.
• Do not spill water or any other liquid on the computer. - Do not place the computer near magnetic fields.
- Avoid subjecting your computer to heavy shocks or vibrations.
- Do not expose the computer to dusty or dirty environments.
- Do not place the computer on uneven surfaces.
- Do not cover the air vents around the computer.
- Only use the AC adapter that is provided with your computer.


natural_image
Pure geometric diagram with intersecting lines and a central circle, no text or symbols present

natural_image
Pure geometric diagram with intersecting lines and circles, no text or symbols presentPreface
Safety Information
The Flybook VM has been designed and tested to meet the most recent standards of safety in notebook technology equipment. To ensure safe use of the Flybook VM, refer to the following safety instructions and any caution or warning messages on the equipment or in the user manual.
- Read and follow all instructions marked on the Flybook VM and in the user manual before operating the VM. Store all safety information in a secure place for future reference.
• Always set the Flybook VM on a stable surface. - Only operate the Flybook VM from the type of power source indicated on the rating label on the AC adapter.
- Ensure all ventilation openings are not blocked or covered. Keep an adequate space (around 6 inches or 15 cm) around the Flybook VM. Never insert objects of any kind into the ventilation openings.
- When using an extension cord with the Flybook VM, ensure that the total ampere rating on the equipment connected to the cord does not exceed the extension cord ampere rating maximum value.
- Only use the supplied power cord. Do not place anything on the power cord. Place the power cord where it will not be in the way of foot traffic.
• Always unplug any modem, LAN, or power cables from the Flybook VM before you clean it.
natural_image
Pure geometric diagram with intersecting lines and a circle, no text or symbols present

natural_image
Pure geometric crosshair symbol with concentric circles and intersecting lines (no text or labels)Contacting Service
Disconnect the Flybook VM from power and contact qualified service personnel if any of the following occurs:
• The power cord or adapter is damaged.
• Liquid has been spilled on the Flybook VM
- The Flybook VM does not operate correctly when operating instructions are followed.
- The Flybook VM has been dropped, or the case is broken open.
• Flybook VM performance is seriously degraded.
If service is required, contact a sales representative or a local service center, or go to http://www.dialogue.com.tw for service information.

Warning! Before cleaning the computer, turn it off, unplug the ac adapter, and then remove the battery.
Caution: Do not wipe the keyboard pointing device, pointing device buttons, or fingerprint reader with a damp cloth.
Cleaning the Flybook VM
Follow these instructions when cleaning the Flybook VM.
- Wipe the display with a clean soft cloth.
- If you use a mild glass cleaner to clean the display, spray a little on the cloth and then wipe the display. Do not spray cleaner directly onto the display.
- Clean the outside of the computer case with a soft cloth. You can moisten the cloth with a non-alkaline detergent.
• Use a vacuum cleaner to clean dust from the keyboard.

natural_image
Pure geometric diagram with intersecting lines and a circular pattern (no text or symbols)

natural_image
Pure geometric diagram with crosshair and circular shapes, no text or symbols present

Flybook VM User's Guide V1.0.book Page viii Thursday, February 8, 2007 5:46 PM







Table of Contents
Preface......i
Copyright and Safety Notices ....i
About This Manual iv
Taking Care of the Flybook VM....v
Introducing the Flybook VM....1
About the VM 1
Taking a Tour of Flybook VM 3
Front-left View 3
Right View....6
Rear View 7
Adjusting the Display 9
Getting Started with Flybook VM 11
Battery Installation 11
Connecting the AC Adapter 14
Powering on the VM for the First Time 14
LED Descriptions 15
Using the Fingerprint Reader....17
Using the Keyboard and Touchpad....19
Using the Touchpad....19
Using Function (Fn) Keys 20
Using the Numeric Keypad 22
Windows Keys and Other Keys 22
Using Flybook Control
Center 23
Connecting Devices 25
Connecting Audio Devices 25
Connecting USB Devices 27
Connecting an External Display 28
Using an ExpressCard 29
Securing Your System....31
Before You Go Online 31
Installing a Firewall 31
Installing Spyware Blocker 32
Connecting Local Area
Networks 33
Connecting a LAN 33
Connecting a Wireless LAN (WLAN) 34
Using the Built-in
WWAN Module 35
About Wireless WAN Networks 35
Installing the SIM Card 35
Connecting the VM to a Wireless WAN 36
Using the WWAN Utility 36
Using the Built-in
Bluetooth Module 37
Using the Built-in
Webcam 39
Enabling the Webcam 39
Ergonomics 41
Power Management 43
The BIOS Setup Utility 45
Accessing the BIOS Setup 45
Updating the BIOS Firmware....46
natural_image
Pure geometric diagram with crosshair and circle shapes, no text or symbols present

natural_image
Pure geometric diagram with intersecting lines and circles, no text or symbols presentTroubleshooting 47
Tips for Troubleshooting....47
Identifying Problems 47
General Hardware Problems 48
Having the VM Serviced....51
Specifications 53
Index 57


Flybook VM User's Guide V1.0.book Page xii Thursday, February 8, 2007 5:46 PM







1
Introducing the Flybook VM
About the VM
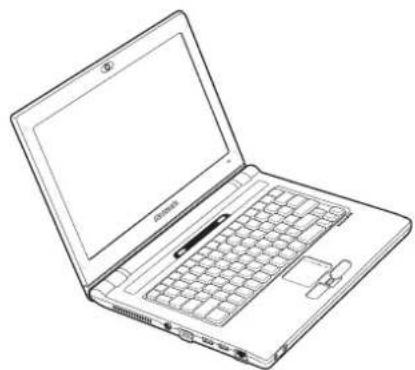
Congratulations on purchasing the Flybook VM! The Flybook VM supports both Windows XP and the newest member of the Windows operating system family, Windows Vista.
The VM is a powerful mobile computer with a versatile display for
natural_image
Line drawing of a laptop with open screen and keyboard (no text or symbols)convenient viewing. Advanced networking features include WLAN, WWAN, and Bluetooth.
The Flybook VM uses a pointing device with mouse buttons to emulate a standard PC mouse. The LCD monitor can be extended above the VM for optimum viewing.
The built-in webcam enables you to be seen by contacts using Windows MSN or other messaging software. The powerful Li-ion rechargeable battery provides more than 3 hours of mobility, making the Flybook VM the best choice for people on the go.





Flybook VM User's Guide V1.0.book Page 2 Thursday, February 8, 2007 5:46 PM











Flybook VM User's Guide V1.0.book Page 3 Thursday, February 8, 2007 5:46 PM


2
Taking a Tour of Flybook VM
This section describes the major components of your new Flybook VM.
Front-left View






2 Taking a Tour of Flybook VM

natural_image
Pure geometric crosshair symbol with no text or labels1. Stereo microphone
- Use the built-in stereo microphone for recording sound, and videoconferencing with friends.
2. Power button
- Press and hold the power button for two seconds to turn on the computer.
3. Touchpad and touchpad buttons
- Use the touchpad to move the pointer on the screen. The touchpad and the touchpad buttons have functions similar to a mouse.
4. Fingerprint reader
- When you set up fingerprint authentication, you can use the fingerprint reader to turn on the computer. In addition to turning on the computer, the fingerprint can control access to some applications.
5. Headphone jack
- Connect headphones or external speakers to the headphone jack.
6. Microphone jack
- Connect a microphone to the microphone jack.
7. Ethernet connector
- Connect the computer to your home or office network (LAN) with the Ethernet connector.
8. USB connectors
- Connect USB devices such as printers or flash drives to the USB connectors.

natural_image
Pure geometric diagram with intersecting lines and a circle, no text or symbols present
natural_image
Pure geometric diagram with intersecting lines and circles, no text or symbols presentTaking a Tour of Flybook VM
9. Monitor (VGA) connector
- Connect an external display or projector to the monitor connector.
10. AC power connector
- Connect the AC adapter to this connector.
11. Air vent
- Air vents help to prevent the interior of the computer from overheating. Do not block the air vents.
12. Speakers
- Stereo speakers are built in to the computer.
13. Wireless off
- Wireless transmission uses power. Use this button to disable the wireless feature of your computer to save power or when instructed to do so, for example on an aircraft.
14. Webcam
- Use the built-in Webcam for videoconferencing with friends.

natural_image
Pure geometric diagram with crosshair and circular target (no text or symbols)

natural_image
Pure geometric diagram with intersecting lines and circles, no text or symbols present2 Taking a Tour of Flybook VM

natural_image
Pure geometric crosshair symbol with no text or labelsRight View

5
- DVD/CD-RW drive
- Playback or burn DVDs/CDs.
- DVD/CD-RW drive LED
- Flash when the drive is accessed.
- DVD/CD-RW drive eject button
- Press to eject the drive tray.
- DVD/CD-RW drive emergency eject hole
- Insert a straightened paper clip to eject the drive tray when the computer is turned off.
- ExpressCard slot
- Install an ExpressCard in the ExpressCard slot.

natural_image
Pure geometric diagram with intersecting lines and circles, no text or symbols present

natural_image
Pure geometric diagram with intersecting lines and circles, no text or symbols presentRear View

1. Battery connector
- Install the battery into battery bay and connect it to the battery connector.
2. SIM slot
- Insert a SIM card in this slot to enable wireless WAN communications. Refer to "Using the Built-in WWAN Module" on page 35.
natural_image
Pure geometric crosshair symbols without any text or labels
natural_image
Pure geometric diagram with crosshair and circular shapes, no text or symbols present

Flybook VM User's Guide V1.0.book Page 8 Thursday, February 8, 2007 5:46 PM








Flybook VM User's Guide V1.0.book Page 9 Thursday, February 8, 2007 5:46 PM


3
Adjusting the Display
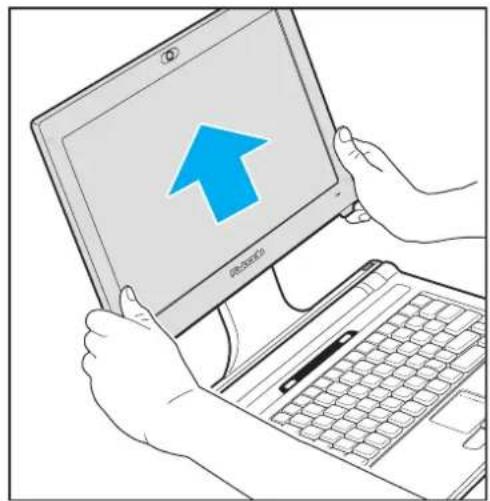
Your computer's display can be adjusted vertically on the rear support and can be tilted away from the support to a horizontal position.
Take care when adjusting the display not to twist or force the display to an extreme angle.
- Open the display.

natural_image
Illustration of a gray laptop with a blue upward arrow pointing to the cover (no text or symbols)


3 Adjusting the Display
- Slide the display upwards on the rear support.
natural_image
Illustration of hands using a laptop with a blue upward arrow on screen (no text or symbols)- Move the display away from the rear support to the position and angle you want.

natural_image
Illustration of hands holding a laptop with a blue arrow icon on screen (no text or symbols)


Flybook VM User's Guide V1.0.book Page 11 Thursday, February 8, 2007 5:46 PM


4
Getting Started with Flybook VM
This chapter explains how to install and charge the battery, how to connect the AC adapter, and how to power up the VM for the first time.
Battery Installation
When your Flybook VM ships, the battery is not installed. This section explains how to install the battery
Using the battery lock
There are two latches for securing the battery in place: the battery lock (A) and the battery release (B).





4 Getting Started with Flybook VM
Caution: Always close the battery lock after inserting the battery. If the battery lock is not closed, the battery could fall out when carrying the computer and cause injury or damage the battery.
The battery lock must be manually closed. The battery release is spring loaded and closes automatically when you insert the battery
Installing the battery
- Slide the battery lock to the open position .
- Align the guides on the sides of the battery with the guides in the bay and then install the battery.

natural_image
Diagram of a laptop chassis showing internal components and a separate battery pack, with no visible text or symbols.- Slide the battery lock to the locked position .





Removing the battery
- Slide the battery lock to the open position .

- While holding the battery release in the open position ☐, remove the battery.
Charging the battery
The first time you charge the battery, you should charge it for eight hours. Thereafter, the standard charging time is about three hours. To charge the battery, install it in the computer (see "Installing the battery" on page 12) and then connect the AC adapter (see "Connecting the AC Adapter" on page 14).

natural_image
Pure geometric diagram with intersecting lines and a circular pattern (no text or symbols)
natural_image
Pure geometric diagram with crosshair and circular shapes, no text or symbols present4 Getting Started with Flybook VM

natural_image
Pure geometric crosshair symbol with no text or labelsConnecting the AC Adapter
- Connect the AC cable (A) to the AC adapter.
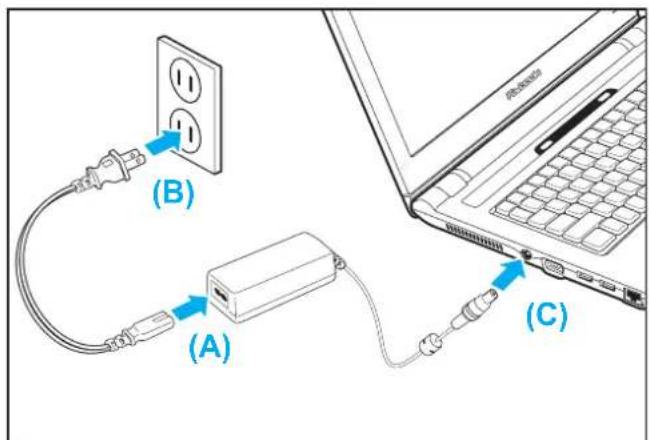
- Connect the other end of the AC cable (B) to an electrical outlet.
- Connect the AC adapter (C) to the AC jack on the computer.
The battery charge LED lights.
Powering on the VM for the First Time
For information on turning on the Flybook VM for the first time, refer to the bundled booklet entitled Windows Start Here.
natural_image
Pure geometric diagram with intersecting lines and a circle, no text or symbols present

natural_image
Pure geometric diagram with intersecting lines and circles, no text or symbols present5
LED Descriptions


Note: If no battery is installed, then the battery LED is always off.
1. Battery
(No AC adapter connected)
- Green: The battery is in use and has more than 10% capacity.
- Blinking red: The battery has less than 10% capacity.
(AC adapter connected)
- Blinking green: The battery is charging.
- Green: The battery is charged.
- Red: The battery has a problem and cannot be charged. Return the battery to your reseller for servicing.
2.

Hard
drive
- Red: The hard drive is being accessed.



5 LED Descriptions
W
3. Wireless LAN
- Off: The wireless LAN module is turned off.
- On: The wireless LAN module is turned on.
- Blinking: Data is being transmitted or received.
- Off: The wireless LAN module is turned off.
- On: The wireless LAN module is turned on.
- Blinking: Data is being transmitted or received.
V
4. Wireless WAN
Note: The wireless WAN module is available only on some VM models.
- Off: The wireless WAN module is turned off.
- On: The wireless WAN module is turned on.
- Blinking: Data is being transmitted or received.

[NO TEXT]
Bluetooth
- Slow blinking: The Bluetooth module is on standby.
- Fast blinking: Data is being transmitted or received.

Num
lock
- Lights when the numeric keypad is enabled.

Caps
lock
- Lights when Caps Lock mode is enabled. When enabled you can type alphabetic characters without holding the Shift key.
Webcam
- Lights when the built-in Webcam is turned on.

natural_image
Pure geometric diagram with intersecting lines and circular shapes, no text or symbols present

natural_image
Pure geometric crosshair symbol with no text or labels

natural_image
Pure geometric diagram with intersecting lines and circles, no text or symbols present

Flybook VM User's Guide V1.0.book Page 17 Thursday, February 8, 2007 5:46 PM


6
Using the Fingerprint Reader
The fingerprint reader allows you to control access to your computer system and applications.
To enroll your finger and use the fingerprint applications, see the bundled Quick Start Guide and Fingerprint Reader Utility Guide or the online help for the fingerprint reader utility.


Flybook VM User's Guide V1.0.book Page 18 Thursday, February 8, 2007 5:46 PM









Flybook VM User's Guide V1.0.book Page 19 Thursday, February 8, 2007 5:46 PM

7
Using the Keyboard and Touchpad
Your computer's keyboard and touchpad provide functionality similar to a standard keyboard and mouse.
Using the Touchpad
The touchpad consists of a pad and two click-buttons. The left and right buttons correspond to the left and right buttons on a mouse. Slide your finger over the pad in the direction you want the pointer to move on the screen.

Slide your finger up and down in the scroll area to scroll up and down on the screen. To customize the touchpad, click Start | Control Panel. In Control Panel double-click the Mouse icon to open the touchpad configuration utility. The configuration utility lets you customize touchpad settings to your preference. Click Help in the touchpad utility for instructions on changing touchpad settings.




7 Using the Keyboard and Touchpad

natural_image
Pure geometric crosshair symbol with no text or labelsUsing Function (Fn) Keys
Using function keys is a quick way to carry out commands or enable features on your computer. Function keys have a blue icon or have blue text (such as on the Home and PgDn keys). To use this function, press and hold the Fn key (1) and then press a function key (2).
The Fn key functions are described below.



natural_image
Pure geometric diagram with intersecting lines and a circle, no text or symbols present
natural_image
Pure geometric diagram with intersecting lines and a central circular pattern (no text or symbols)Using the Keyboard and Touchpad

natural_image
Pure geometric diagram with intersecting lines and circles, no text or symbols present- Fn + F1: Changes video output to an external display.
- Fn + F2: Decreases the display brightness.
- Fn + F3: Increases the display brightness.
- Fn + F4: Puts the computer in suspend mode.
- Fn + F5: Puts the computer in hibernation mode.
- Fn + F6: Decreases the volume.
- Fn + F7: Increases the volume.
- Fn + F8: Mutes/enables the volume.
- Fn + F9: Enables or disables the built-in wireless networking feature.
- Fn + F10: Enables or disables the built-in WWAN module.
- Fn + F11: Enables or disables the built-in Bluetooth feature.
- Fn + F12: Turns on or off the built-in Webcam.
- Fn + ScrLk: Enables or disables scroll lock. When enabled, press the up or down arrow keys to scroll up or down one line respectively.
- Fn + PrtSc: Print screen captures the on-screen image to the clipboard. You can then copy the contents to an image editing program.
- Fn + SysRq: Terminal request. This key is rarely used.
- Fn + Home: Moves the pointer to the beginning of a line in text.
- Fn + End: Moves the pointer to the end of a line in text.
- Fn + PgUp: Moves text up one screen at a time.
- Fn + PgDn: Moves text down one screen at a time.
- Fn + Esc: Enables or disables the Touch Pad.





7 Using the Keyboard and Touchpad
natural_image
Pure geometric crosshair symbol with no text or labelsUsing the Numeric Keypad
The keyboard has an embedded numeric keyboard. When you enable it, the Num Lock LED lights. To enable or disable the numeric keypad, press Num Lk.
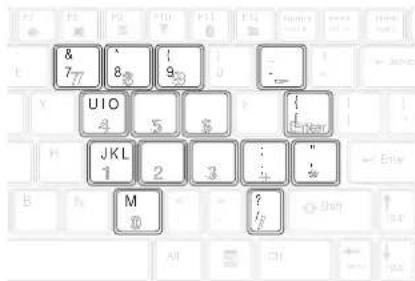
The numpad numbers are printed larger in the illustration for your convenience. On the VM, the numbers are much smaller and on the front edge of the keys.
Windows®Keys and Other Keys
Note: Refer to the Windows®start here booklet for additional keyboard shortcuts.
Keys such as the Windows Start and application keys, and the Caps Lock key function the same as on a standard keyboard in the Windows environment.
- Opens the Start menu. Use in combination with other keys to perform Windows shortcuts.
The application key has the same function as the right-mouse button. - Caps Lock: Toggles uppercase on and off.

natural_image
Pure geometric diagram with intersecting lines and a circle, no text or symbols present

natural_image
Pure geometric diagram with intersecting lines and a central circle, no text or symbols present

Flybook VM User's Guide V1.0.book Page 23 Thursday, February 8, 2007 5:46 PM


Using Flybook Control Center
The Flybook Control Center lets you quickly enable or disable wireless options and change settings such as volume and display mode. You can also check system health with this utility.
To open the Control Center, click the Flybook icon in the System Tray and select Restore.

(1)
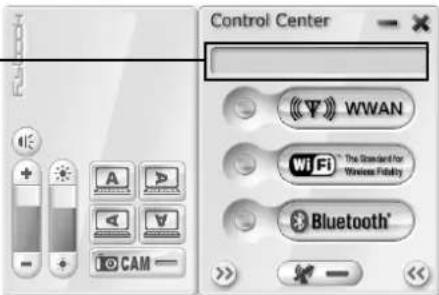
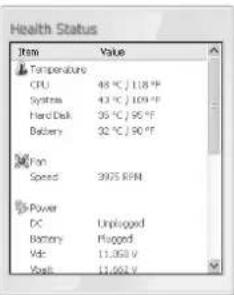
Move the pointer over the buttons on the Control Center panel; the function of the button is described in the Function pane (1). For example, if you move the pointer over the WiFi button in the center of the panel, the message Turn on/off the Wi-Fi module appears in the Function pane. The following table briefly describes each available function.


8 Using Flybook Control Center
Icon Description

Turns the volume on and off.
Click to increase the volume. Click to decrease the volume.

Click to decrease the display brightness. Click to decrease the display brightness.

Click the buttons to orient the screen in the direction indicated.

Click to enable or disable the webcam.

Click to enable or disable the wireless WAN.

Click to enable or disable the wireless LAN (WiFi).

Click to enable or disable the Bluetooth.

Click to disable all wireless communications devices.


Flybook VM User's Guide V1.0.book Page 25 Thursday, February 8, 2007 5:46 PM


9
Connecting Devices
This section covers peripheral devices that you can use with the VM.
Connecting Audio Devices
Your computer has a built-in microphone and speaker. You can also connect an external microphone and headset.
- Connect speakers or headphones to the headphone jack.





9 Connecting Devices
Note: The built-in speakers and microphone are automatically disabled when you connect external speakers or a microphone.
- Connect a microphone to the microphone jack.

The Realtek Sound Manager automatically opens allowing you to configure audio devices.
natural_image
Pure geometric crosshair symbol with no text or labels
natural_image
Pure geometric diagram with intersecting lines and a circle, no text or symbols present

natural_image
Pure geometric diagram with intersecting lines and circles, no text or symbols presentConnecting USB Devices
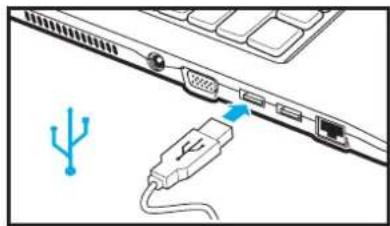
There are two Universal Serial Bus (USB) connectors on the computer. You can connect USB devices such as printers or flash drives to either connector.
- Connect the USB device to one of the USB connectors on the computer.
Caution: Be sure the USB icon on the connector is facing upwards as shown below. Connecting a USB cable incorrectly can damage the connector on the computer.
natural_image
Diagram showing a USB port connection with a blue USB symbol and cable (no text or labels)- Install drivers for the device as prompted.
natural_image
Pure geometric diagram with intersecting lines and a circular pattern (no text or symbols)
natural_image
Pure geometric diagram with intersecting lines and circles, no text or symbols present9 Connecting Devices

natural_image
Pure geometric crosshair symbol with no text or labelsConnecting an External Display
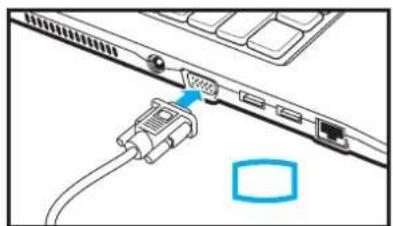
You can connect an external monitor, projector or LCD to your computer with a resolution up to 1800 x 1440. Check the user manual of the display to be sure it supports this resolution.
- Connect the external display to the monitor connector on the computer.
Caution: You can permanently damage a display if it does not support the resolution that your computer is set to. Match the resolution of the VM to the external display before you attach it to the computer.
natural_image
Diagram showing a USB port connection with a blue indicator light, no text or symbols present- Connect the display to an electrical outlet and then turn on the display.
- Press Fn + F1 repeatedly to switch among three display modes: computer display only, external display, and both (computer display and external display).


natural_image
Pure geometric diagram with intersecting lines and circular shapes, no text or symbols present
natural_image
Pure geometric diagram with intersecting lines and circles, no text or symbols presentUsing an ExpressCard
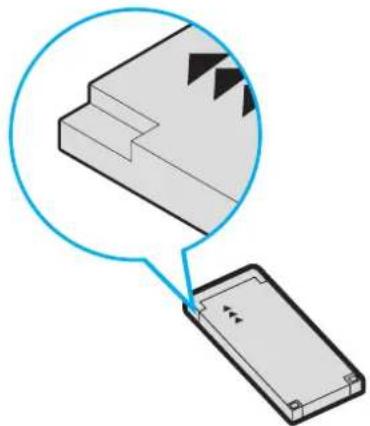
You can use 34 mm-wide and 54 mm-wide ExpressCards with your computer.
To install an ExpressCard (34-mm):
- Find the notched edge on the card as shown in the following illustration.
Caution: Do not install or remove an ExpressCard when the computer is in standby or hibernate mode. If you do, when you try to resume the computer it may not respond.
Static electricity in your body can damage ExpressCards. To reduce the static electricity in your body, touch a bare metal table or a grounded metal object before installing an ExpressCard.
natural_image
Diagram showing a 3D object with an arrow pointing to its top view, and a separate rectangular device below (no text or symbols present)34 mm-wide ExpressCard


Flybook VM User's Guide V1.0.book Page 30 Thursday, February 8, 2007 5:46 PM
9 Connecting Devices
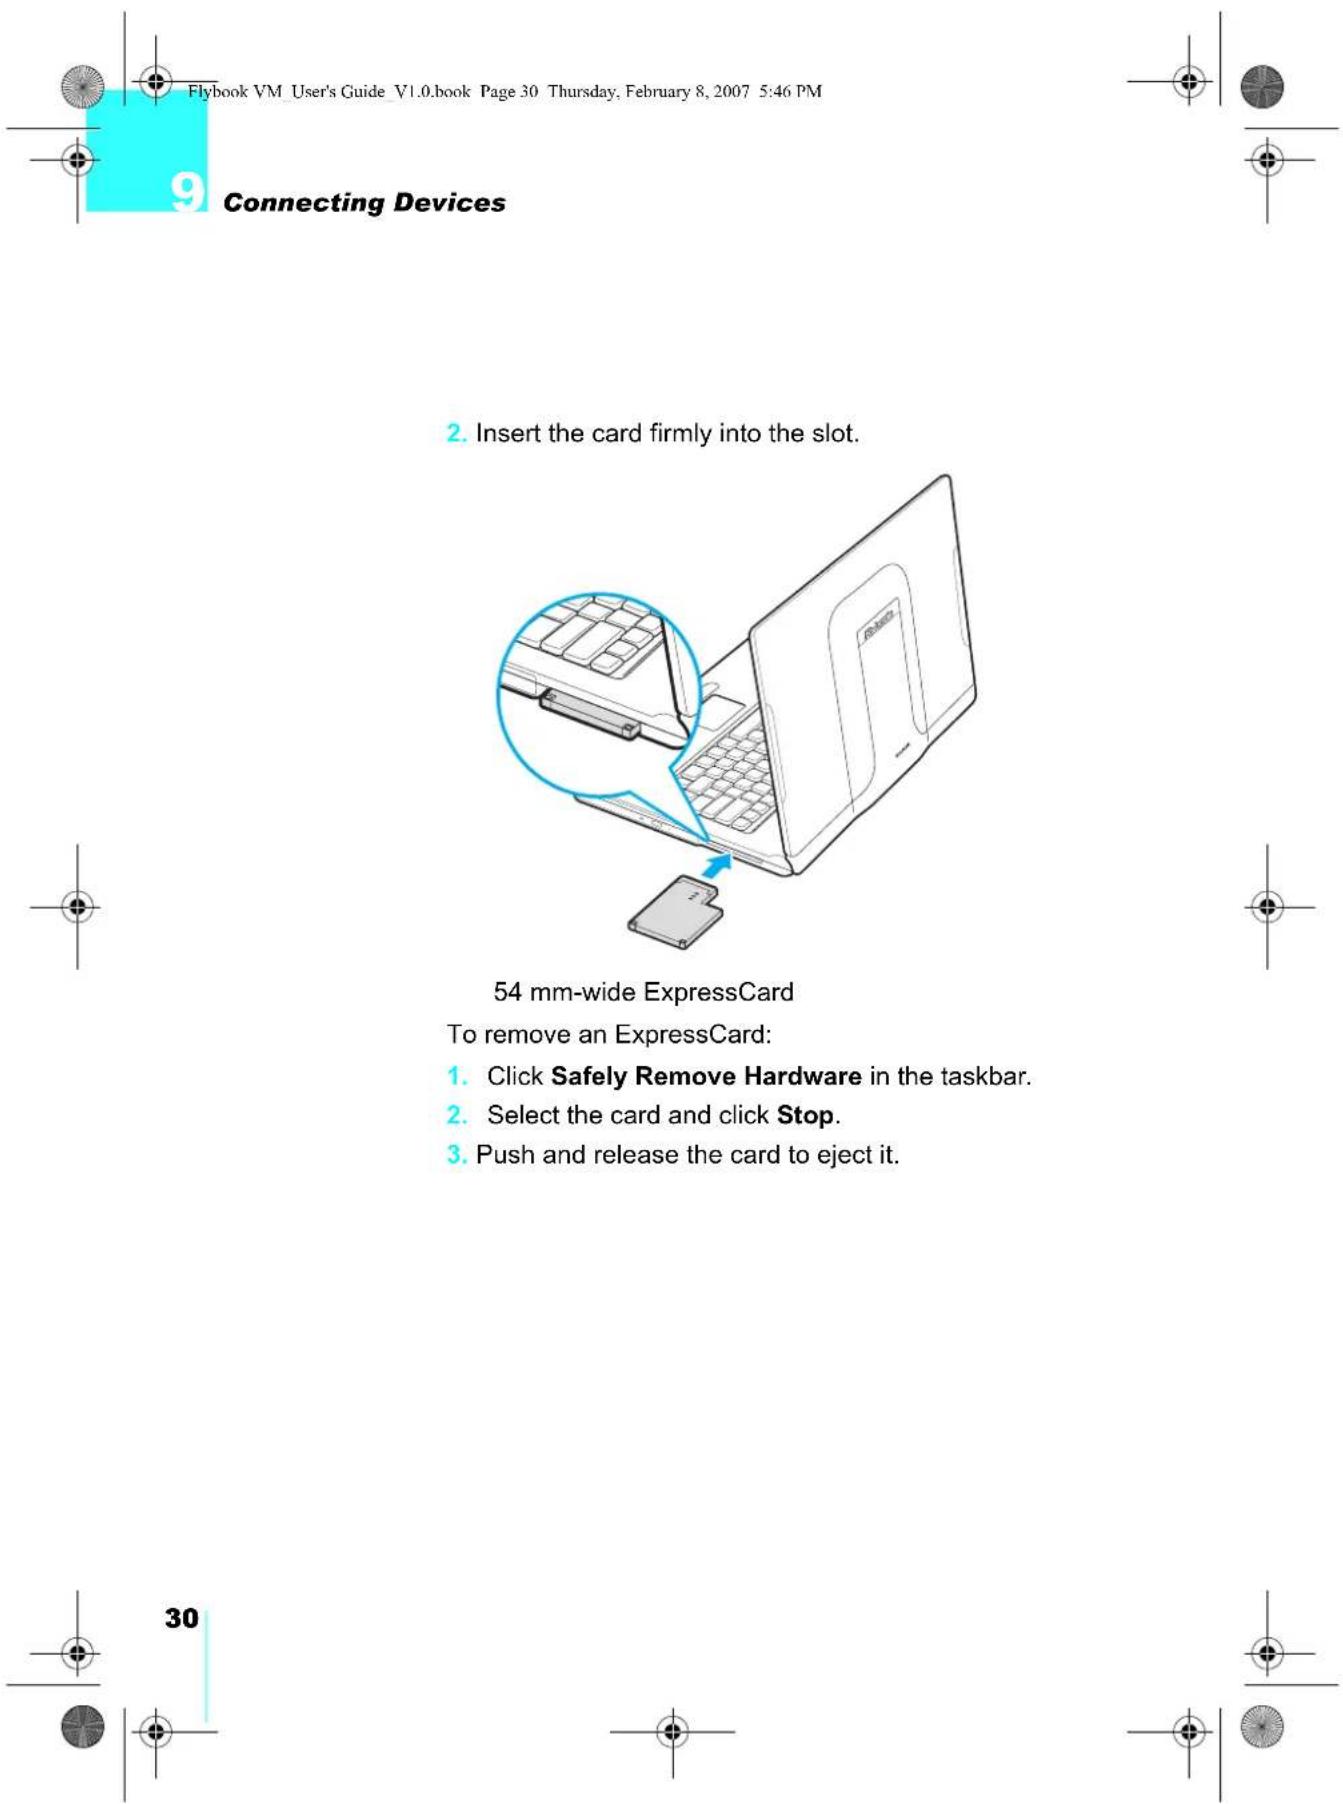
- Insert the card firmly into the slot.
To remove an ExpressCard:
- Click Safely Remove Hardware in the taskbar.
- Select the card and click Stop.
- Push and release the card to eject it.
30
10
Securing Your System
Before You Go Online
Connecting your computer to the Internet opens the way to potential threats such as viruses and spyware. To best secure your computer purchase security software (or download it from a secure system), and then install it on your computer before you connect it to the Internet.
To check your computer's security settings click Start | Control Panel, and then click Security Center in Category View or double-click Security Center in Classic View.
Installing a Firewall
A firewall protects your computer by blocking or allowing traffic between your computer and the Internet. Windows has a built-in firewall that helps to protect your computer. For better security, purchase a router that has a built-in firewall. You can also download free firewall software on the Internet.




10 Securing Your System
Installing Spyware Blocker
Spyware typically retrieves information about your Web-surfing habits. It can be secretly installed on your computer with a free download and can even be installed just by visiting a Web site. Spyware can cause your Web searches to be redirected and pop up annoying adds. Once your computer is infected with spyware, it can be very difficult to remove. The key is to prevent infection in the first place by installing spyware blocker software. Spyware blocking software can be purchased online; and you can even download free spyware blocking programs.

natural_image
Pure geometric crosshair symbol with no text or labels


natural_image
Pure geometric diagram with intersecting lines and a circle, no text or symbols present
natural_image
Pure geometric diagram with intersecting lines and circles, no text or symbols present

Flybook VM User's Guide V1.0.book Page 33 Thursday, February 8, 2007 5:46 PM


11
Connecting Local Area Networks
Your computer has an Ethernet connector that you can use to connect to a wired network at home or in the office. If you have a wireless access point, you can also get online using the built-in wireless LAN of your computer.
Connecting a LAN
Wired connections are more secure and more stable than wireless connections. You can connect your computer to the network while it is turned on. Refer to the following to set up a wired connection:
- Connect an Ethernet cable to the Ethernet connector on the computer.

natural_image
Diagram of a laptop's rear panel showing port, socket, and USB cable with a blue arrow pointing to a network icon (no text or symbols)- Connect the other end of the cable to your router or switch.




11 Connecting Local Area Networks
It takes a few minutes for your router to assign an IP address to your computer. When your computer is connected, the message shown here appears over the LAN icon in the System Tray.
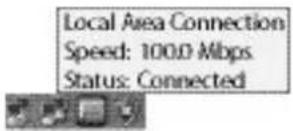
- Double-click the LAN icon to view details for your connection.
Connecting a Wireless LAN (WLAN)
Note: For further information on setting up a local area network, or if you have problems, consult Windows online help or contact your network administrator.
Use your computer's built-in wireless LAN module to access your home or office network. The wireless LAN module is powered by the Intel® PROSet/Wireless utility.
To connect to a wireless network:
- Press Fn + F9. to activate the wireless LAN module. The wireless module automatically scans for available networks.
- Follow the on-screen prompts to access a network. (Click Help in the Intel® PROSet/Wireless utility for assistance.)



12
Using the Built-in WWAN Module
About Wireless WAN Networks
The optional built-in WWAN module uses cellular carriers for transmission. It enables you to connect your Flybook VM to the Internet or use the VM to make phone calls.
Before using the module, you must apply for an access account, and get a SIM card and dialing profile from your wireless WAN service provider. The SIM card acts as an access permission key for your account.
Installing the SIM Card
Note: The VM accommodates 3.5G (HSDPA / UMTS / EDGE / GPRS / GSM) and future advanced WWAN modules. Please check the model of your VM to identify the module that is installed.
Note: The SIM card slot is push-insert and push-reject. When installing your SIM card:
-
Make sure the gold finger side is put upside down and
-
Check whether the card is fully inserted.
-
Remove the battery (see "Battery Installation" on page 11).
- Insert the SIM card to the SIM card slot as shown in the following illustration, ensuring that the notch is in the position indicated.


12 Using the Built-in WWAN Module

- Replace the battery.
Connecting the VM to a Wireless WAN
- Press Fn + F10 to turn on the wireless WAN module, or click the WWAN icon in the Flybook Control Center.
- When the module is turned on, the WWAN utility opens and it seeks your service provider's network and registers. If the service provider's network is inaccessible, the module continues to search for other available networks and ask you to select one and register.
Using the WWAN Utility
Refer to the bundled Flybook WWAN Utility Guide Booklet or the online help of the utility to see how to connect your VM to the Internet, or how to use the VM to place phone calls and send short messages.


natural_image
Pure geometric diagram with intersecting lines and circles, no text or symbols present13
Using the Built-in Bluetooth Module
Using the built-in Bluetooth module the computer can communicate with Bluetooth-equipped devices such as computers, cellular phones, printers, faxes, keyboards, and pointing devices. The module also enables you to take advantage of the following versatile Bluetooth services:
• Personal area networking
• Dial-up networking
- Serial port connection
- File transfer
• LAN access
• Synchronization and PIM data exchange
- Printing
• Human interface device (Keyboard, Mouse) connection
- Faxing
- Connecting a headset
• Audio distribution
To enable the Bluetooth module, press Fn + F11. When the module is turned on, the Bluetooth utility starts and a Bluetooth icon appears in the system tray. Double-click the icon to open the main window of the utility.
Read the online help of the Bluetooth utility to see how to use Bluetooth services.


Flybook VM User's Guide V1.0.book Page 38 Thursday, February 8, 2007 5:46 PM










Flybook VM User's Guide V1.0.book Page 39 Thursday, February 8, 2007 5:46 PM


14
Using the Built-in Webcam
Your computer features a built-in webcam that is already set up and ready to use with most of web applications that support video messaging, such as MSN Messenger or Skype.
Enabling the Webcam
To use the webcam:
- Press Fn + F12 to enable the built-in webcam.




15
Ergonomics
Ergonomics is the science of equipment design, particularly for working situations, with the intention of reducing discomfort. Ergonomic products, such as keyboards or mice, are designed to blend smoothly with your actions.
When using your computer try to develop good habits such as the following:
• Periodically get up, stretch and walk around the room.
- Look away from the display frequently. Don't face a wall so that you can look up from the screen and into the distance. This exercising of the eyes can help to prevent eye-strain.
• Do stretching exercises while you sit.
- Don't work in poor lighting. Position your computer display to minimize glare or reflection.


15 Ergonomics
When sitting at your computer, use the following illustration and guidelines:

natural_image
Illustration of a woman using a laptop at a desk, with an inset showing hand typing on a device (no text or symbols present)- Position the display to avoid glare from overhead lighting. Adjust the display to achieve an optimal viewing angle as shown above. (See “Adjusting the Display” on page 9.)
- Approximately arms-length is a good viewing distance to the display.
- Use a comfortable chair that provides good back support.
- Sit up straight, with your shoulders back in a relaxed position.
- Adjust your chair so that your thighs are parallel to the floor.
- When typing keep your arms, hands, and wrists relaxed and horizontal; type gently and do not rest your palms on the computer.


natural_image
Pure geometric crosshair symbol with no text or labels

16
Power Management
The computer controls its power activities through an ACPI power management unit. The unit employs a set of power management schemes to maximize power conservation and optimize system performance. Windows manages all power-saving features and provides a Power Options utility in customizing the computer's power system.
To start the Power Options utility:
- Click Start | Control Panel.
- Double-click the Power Options icon to display the Power Options Properties window.
- Following the indications to check and change the settings.
Customize your computer's power system in this window. Refer to the Windows online Help and Support Center to see ACPI and Power Options if necessary.






Flybook VM User's Guide V1.0.book Page 44 Thursday, February 8, 2007 5:46 PM







17
The BIOS Setup Utility
Caution: Be sure you understand any changes you make to BIOS settings. Choosing incorrect settings can cause your computer not to boot up.
The BIOS setup utility enables you to you change core settings on your Flybook VM such as the system time, boot order, and auto-repeat rate for your keyboard. Most users will find the default settings optimal for their needs.
Accessing the BIOS Setup
When you turn on your computer a message Press F2 to enter BIOS appears. Press F2 to enter the BIOS setup.
To exit BIOS Setup without saving your changes, select Exit Discarding Changes and press Enter. When prompted to save, select No and press Enter.
| PhoenixBIOS Setup Utility | |||||||
| Main | Advanced | Intel | Security | Boot | Exit | ||
| Item Specific Help | |||||||
| System Time: System Date: IDE Channel 0 Master IDE Channel 0 Slave System Memory Extended Memory | [12:00:00] [05/27/2006] [HTC426030G5CE00- (PM) ] [PHILIPS CD-RW/DVD-ROM-(PS)] 640 KB 1038336 KB | ,or selects field. | |||||
| F1 ESC | Help Exit | ↑↓ | Select Item Select Menu | +/+ Enter | Change Values Select ▶ Sub-Menu | F9 F10 | Setup Defaults Save and Exit |







17 The BIOS Setup Utility

natural_image
Pure geometric crosshair symbol with no text or labelsOn the right side of the Setup screen is an area labeled Item Specific Help. This area lists navigation key shortcuts and information that is specific for the item that is selected.
Updating the BIOS Firmware
You can download updated BIOS from the manufacturer's Web site and upgrade the BIOS on your computer. New BIOS may provide support for new peripherals, improvements in performance or fixes for known bugs.
To download firmware go to http://www.dialogue.com.tw.

natural_image
Pure geometric diagram with intersecting lines and circles, no text or symbols present

natural_image
Pure geometric diagram with crosshair and circular target-like shapes (no text or symbols)A
Troubleshooting
Tips for Troubleshooting
In each problem-specific section, try the steps in the order suggested. This may help you to solve the problem more quickly.
Try to pin point the problem and thus avoid replacing non-defective parts.
Keep a record of the steps you take when troubleshooting: The information may be useful when calling for technical support or for passing on to service personnel.
Identifying Problems
Follow the steps below to identify your problems:
- Turn off the computer.
- Disconnect any peripheral devices such as an external mouse or printer.
- Make sure that the AC adapter is properly connected to your computer and the power source is good. (Use some other electrical device to confirm that the electrical outlet is working.)
- Leave the computer off for approximately 10 seconds, and then switch it on again. The computer should enter the boot sequence and start normally.
- If the computer does not start normally, look for a screen message or other clue on the malfunction.

natural_image
Pure geometric crosshair symbols without any text or labels

natural_image
Pure geometric diagram with intersecting lines and circles, no text or symbols presentTroubleshooting
If failure is detected in an area other than the mainboard, an error message is displayed on the screen and testing is stopped.
If your system does not successfully start, but displays a blank screen, emits a series of beeps, or displays an error code, consult your dealer.
General Hardware Problems
A few common hardware problems and suggested solutions are presented below:
The display screen is dark.
- Adjust the screen brightness.
- Make sure that the computer is not in suspend mode.
An incorrect date and time are displayed.
Correct the date and time using the DOS DATE and TIME commands or the options in the Setup Utility. (You can also set the date and time in Windows by double clicking the clock on the task bar or in the control panel.) If the date and time become incorrect after a short time, your CMOS battery may be depleted. Contact your dealer to change the battery.
The computer does not start or boot-up
- If the power indicator is not on, the computer is without power. Make sure you have properly attached the AC adapter and power cord, or have installed a charged battery.
- If the computer is running on battery power, ensure that the battery charge is not low. If the battery appears to be charged, it may be faulty.
natural_image
Pure geometric crosshair symbol with no text or labels
natural_image
Pure geometric diagram with crosshair and circular shapes, no text or symbols present

natural_image
Pure geometric diagram with intersecting lines and circles, no text or symbols present- If the computer is using the AC adapter, ensure that the AC outlet, airplane seat jack, or car cigarette lighter are working. If the AC outlet power is working, the AC adapter may be faulty.
Hard drive or external boot-up device is inaccessible
- If the hard disk indicator is lit, BIOS may be incorrectly set. Revise the BIOS settings for the Primary Master.
- Security may be set to prevent starting the operating system.
- If you choose to boot up your system from an external device through a USB port, make sure it is on and bootable media is inserted.

The screen is blank or the display is abnormal
- The computer may be set to an external display device only. Press Fn + F1 to switch to the VM display.
- The power management system may automatically blank the screen to save power, and is in video time-out, standby mode, or hibernation mode. Press any key, move the pointer, or push the power button to turn on the display.
- The angle of the display and the brightness level is inadequate for the ambient lighting. Adjust the display angle and press Fn + F2 or Fn + F3 to adjust the brightness level.
- The LCD screen has a default resolution of 1280 x 768 (WXGA). If you set the resolution lower than this, the screen expands to fill the display. When the system can not expand its display to full screen on the LCD screen or on an external display device, you can right click on Windows desktop and select Properties to open the Display Properties window. Then click the Settings tab and set the resolution to an appropriate value.

natural_image
Pure geometric diagram with intersecting lines and a circular pattern (no text or symbols)

natural_image
Pure geometric diagram with intersecting lines and circles, no text or symbols presentTroubleshooting
No audio output
- The audio system is closed or the volume of audio system is too low. Use hot keys or Flybook Control Center to open the audio system and adjust the volume.
- The audio output is disabled or too low for the audio application. Open the audio output and adjust the volume.
- When plugging an earphone or external speaker into the earphone/line-out jack, the built-in speakers are disabled automatically. If you can not hear sound from the built-in speakers, ensure that nothing is plugged into the jack.
The keyboard, touchpad or mouse does not work properly
- The system may have entered Suspend to RAM mode. Push the power button to resume the system.
- An application may have locked out your input device. Restart your system.
- If the keyboard or mouse does not respond on the USB port, ensure that the devices are installed properly and that drivers are installed.
Cannot connect to a wireless LAN
- An incorrect network name (SSID) or network key may be used. Make sure you have set the network name (SSID) and key to the same values as the access point (infrastructure connection) or the computers to be connected (Ad Hoc connection) have.
- The computer may be too far from other communication devices. Retry the connection after moving your computer closer to the computers to be connected with (Ad Hoc connection) or to the access point (infrastructure


natural_image
Pure geometric crosshair symbol with no text or labels

natural_image
Pure geometric diagram with intersecting lines and a central circle, no text or symbols presentconnection). Also, check the wave condition in the Wireless Network Connection Status window.
- Check if the wireless LAN module is turned on. Verify that Disable Radio is not checked in the Network setting window.
- Make sure you have access rights or network authentication to the network you want to connect to.
- Try changing channels to avoid active channel duplication.
- Check the setting of the protocol, work group, shared setting, and IP address.
Cannot charge battery or losing power quickly
- Verify that the battery is properly installed and it is not too hot or too cold.
- Calibrate the battery.
- The installed battery may be faulty. Replace it with a new one.
Having the VM Serviced
If you are unable to solve the problem, you should have the computer serviced. Pack the computer in the original carton. Include a description of the problem and a checklist of the steps you took when trying to fix the problem. The information may be useful to the service personnel. Return the computer to the place you purchased it.

natural_image
Pure geometric crosshair symbols without any text or labels
natural_image
Pure geometric diagram with intersecting lines and circles, no text or symbols present

Flybook VM User's Guide V1.0.book Page 52 Thursday, February 8, 2007 5:46 PM







B
Specifications
Processor: Intel® Centrino® Duo LV / ULV
Main Memory: DDR2 SO-DIMM, up to 4GB
Core Logic: Intel 945GM
Chipset: Mobile Intel® 945 GM Express Chipset
Display: 12.1-inch / 16:10 wide-view Color LTPS
TFT LCD with (32-bit) 1280 x 768 high resolutions display
Hard Disk: 1.8-inch Ultra Slim Hard Disk.
40/60/80GB on selection
DVD: DVD Combo or Super-Multi driver built-in
on selection
BIOS and Flash: Phoenix® TC BIOS
External VGA Dis- Up to 1800 x 1440 resolution (highest to
play: 32-bit color)
LAN: 10/100/1000 Mbps Ethernet
Wireless PAN: Bluetooth® V2.0 with antenna built-in
Wireless LAN: 802.11a/b/g (Intel® 3945 supported) with antenna built-in
Wireless WAN 3.5G (HSDPA / UMTS / EDGE / GPRS / (optional) GSM) or advanced
Camera: 1.3 megapixel web camera
Specifications
| Audio: Array Microphone / Stereo Speaker built-in |
| Authentication: Finger-Print device and recognition built-in |
| Other I/O ports: - USB 2.0 port x 2-RJ-45 LAN jack x 1-Earphone jack x 1-Microphone jack x 1-54mm-wide PCI Express Card slot x 1-D-sub 15 pin VGA port x1 (for external monitor) |
| Input Device: 82-key standard keyboard mouse pad and left/right button (multiple language support) with hot keys |
| Quick Buttons: PowerRF Kill |
| Battery: Swappable Li-lon rechargeable battery (Rating 11.1Vdc, 2600mAh. Type BM326, provided 3 cell, 1-parallel, 3-series.) |
| Dimensions: Dimensions: 292 x 222 x 25.8 (thinnest) mm |
| Weight: 1.7 Kg (with standard battery) |
| Color selection: Red / Yellow / Black / Silver |
| Operating System: Genuine Microsoft® Windows® Vista / XP |
Electrical specifications
DC-in power supply (Through DC-in Power Jack)
Input rating: 19Vdc, 3.42A, 65W
Maximum operating temperature (ambient): 28 degrees C
AC Adapter




natural_image
Pure geometric diagram with intersecting lines and a central circle, no text or symbols present

Flybook VM User's Guide V1.0.book Page 55 Thursday, February 8, 2007 5:46 PM
Specifications

natural_image
Simple geometric diagram with a cyan square, crosshair markers, and a gray circle (no text or symbols)Model no.: SADP-65KB DBE
Input rating: 100-240Vac, 50-60Hz, 1.5A
Output rating: 19Vdc, 3.42A, Class I, marked LPS
Battery
3 cell 18650 Li-Ion rechargeable battery pack
Charging: Direct DC charging


natural_image
Pure geometric diagram with intersecting lines and circles, no text or symbols present

Flybook VM User's Guide V1.0.book Page 56 Thursday, February 8, 2007 5:46 PM









Index
A
ac adapter, connect, 14
adjust display, 9
audio device, connect, 25
B
battery
charge, 13
charging time, 13
install, 12
locks, 11
remove, 13
BIOS
accessing 45
description, 45
updating 46
Bluetooth
enabling 37
using 37
C
charge battery, 13
cleaning the Flybook VM ...... vii
computer specifications, 53
connect
audio device, 25
external display, 28
headset, 25
microphone, 25
USB device, 27
connect ac adapter, 14
Control Center
functions 23
D
display
adjust, 9
connect external, 28
resolution, 28
E
enroll fingerprint, 17
ergonomics
description, 41
tips, 41
ExpressCard
cautions, 29
Index
install, 29
remove, 30
stop, 30
types, 29
F
fingerprint reader
enrolling fingerprint 17
using, 17
fingerprint reader, using, 17
fingerprint, enroll, 17
fingerprint, enrolling 17
firewall, install, 31
Flybook control center
description, 23
use, 23
Flybook V5
do's and don'ts ...... v
introduction 1
Flybook VM
cleaning ......vii
front-left view, 3
1
install
battery, 12
firewall, 31
spyware blocker, 32
install ExpressCard, 29
K
keys
application key, 22
caps lock, 22
fn, description, .....20
fn, using, 20
function keys, description, .....20
function, using, 20
numeric keypad, using, ..... 22
Start key, 22
Windows keys, 22
L
LED description, 15
N
network
wired setup, 33
wireless setup, 34
P
power management
about 43




R
remove
battery, 13
ExpressCard, 30
resolution display, 28
right view, 6,7
S
scroll, touchpad, 19
security, checking, 31
service
contacting ......vii
service computer, 51
set up
wired network, 33
wireless network, 34
SIM card
installing 35
specifications, computer, 53
spyware blocker, install, 32
T
touchpad
click-buttons, 19
scroll area, 19
using, 19
troubleshooting
general problems, 48
identify problem, 47
tips, 47
U
updating BIOS ....46
USB device, connect, 27
using
fn keys, 20
function keys, 20
numeric keypad, 22
Webcam, 39
using fingerprint reader, 17
using touchpad, 19
V
view
front-left, 3
right view, 6, 7
W
Webcam
using, 39
webcam
enabling 39
wireless WAN
about 35
connecting 36


Flybook VM User's Guide V1.0.book Page 60 Thursday, February 8, 2007 5:46 PM


Flybook VM User's Guide V1.0.book Page 61 Thursday, February 8, 2007 5:46 PM


Flybook VM User's Guide V1.0.book Page i Thursday, February 8, 2007 5:46 PM


This publication, including all photographs, illustrations and software, is protected under international copyright laws, with all rights reserved. Neither this manual, nor any of the material contained herein, may be reproduced without written consent of the manufacturer.
© Copyright 2007 Dialogue Technology Corporation


- Flybook VM User's Manual
- Preface
- Copyright and Safety Notices
- Copyright
- Disclaimer
- Trademark Recognition
- Federal Communications Commission (FCC)
- Declaration of Conformity
- FCC Caution
- FCC Radiation Exposure Statement
- Class 1 Laser Product Caution
- FCC Wireless Regulation
- Battery Caution
- About This Manual
- Taking Care of the Flybook VM
- Do's and Don'ts with the Flybook VM
- Safety Information
- Contacting Service
- Cleaning the Flybook VM
- Table of Contents
- Preface......i
- Introducing the Flybook VM....1
- Taking a Tour of Flybook VM 3
- Adjusting the Display 9
- Getting Started with Flybook VM 11
- LED Descriptions 15
- Using the Fingerprint Reader....17
- Using the Keyboard and Touchpad....19
- Using Flybook Control
- Center 23
- Connecting Devices 25
- Securing Your System....31
- Connecting Local Area
- Using the Built-in
- Ergonomics 41
- Power Management 43
- The BIOS Setup Utility 45
- Troubleshooting 47
- Specifications 53
- Index 57
- 1
- Introducing the Flybook VM
- About the VM
- 2
- Taking a Tour of Flybook VM
- Taking a Tour of Flybook VM
- Stereo microphone
- Power button
- Touchpad and touchpad buttons
- Fingerprint reader
- Headphone jack
- Microphone jack
- Ethernet connector
- USB connectors
- Monitor (VGA) connector
- AC power connector
- Air vent
- Speakers
- Wireless off
- Webcam
- Right View
- Rear View
- Battery connector
- SIM slot
- 3
- Adjusting the Display
- Adjusting the Display
- 4
- Getting Started with Flybook VM
- Battery Installation
- Using the battery lock
- Getting Started with Flybook VM
- Installing the battery
- Removing the battery
- Charging the battery
- Connecting the AC Adapter
- Powering on the VM for the First Time
- 5
- LED Descriptions
- Battery
- 2.
- LED Descriptions
- W
- Wireless LAN
- V
- Wireless WAN
- [NO TEXT]
- Bluetooth
- Num
- lock
- Caps
- Webcam
- 6
- Using the Fingerprint Reader
- 7
- Using the Keyboard and Touchpad
- Using the Touchpad
- Using the Keyboard and Touchpad
- Using Function (Fn) Keys
- Using the Numeric Keypad
- Windows®Keys and Other Keys
- Using Flybook Control Center
- Using Flybook Control Center
- Icon Description
- Connecting Devices
- Connecting Audio Devices
- Connecting Devices
- Connecting USB Devices
- Connecting an External Display
- Using an ExpressCard
- 10
- Securing Your System
- Before You Go Online
- Installing a Firewall
- Securing Your System
- Installing Spyware Blocker
- 11
- Connecting Local Area Networks
- Connecting a LAN
- Connecting Local Area Networks
- Connecting a Wireless LAN (WLAN)
- 12
- Using the Built-in WWAN Module
- About Wireless WAN Networks
- Installing the SIM Card
- Using the Built-in WWAN Module
- Connecting the VM to a Wireless WAN
- Using the WWAN Utility
- 13
- Using the Built-in Bluetooth Module
- 14
- Using the Built-in Webcam
- Enabling the Webcam
- 15
- Ergonomics
- Ergonomics
- 16
- Power Management
- 17
- The BIOS Setup Utility
- Accessing the BIOS Setup
- The BIOS Setup Utility
- Updating the BIOS Firmware
- A
- Troubleshooting
- Tips for Troubleshooting
- Identifying Problems
- General Hardware Problems
- The display screen is dark.
- An incorrect date and time are displayed.
- The computer does not start or boot-up
- Hard drive or external boot-up device is inaccessible
- The screen is blank or the display is abnormal
- No audio output
- The keyboard, touchpad or mouse does not work properly
- Cannot connect to a wireless LAN
- Cannot charge battery or losing power quickly
- Having the VM Serviced
- B
- Specifications
- Electrical specifications
- Battery
- Index
- C
- D
- E
- F
- K
- L
- N
- P
- R
- S
- T
- U
Brand : Flybook
Model : VM
Category : Laptop