
DigiWalker 339 - Browser MIO - Free user manual and instructions
Find the device manual for free DigiWalker 339 MIO in PDF.


| Type of product | Portable GPS Navigator |
| Dimensions | 4.2 x 3.2 x 0.8 inches (107 x 81 x 20 mm) |
| Weight | 4.2 oz (120 g) |
| Power source | Rechargeable lithium-ion battery (950 mAh) |
| Display | 3.5-inch touchscreen LCD (320x240 pixels) |
| Processor | 400 MHz Samsung S3C2440 |
| Internal memory | 1 GB flash (expandable via SD card) |
| GPS chipset | SiRF Star III |
| Pre-loaded maps | North America (USA and Canada) |
| Main functions | Turn-by-turn voice guidance, POI search, route planning, speed limits, lane guidance |
| Connectivity | USB 2.0 (for map updates and charging) |
| Audio output | Built-in speaker (also supports FM transmitter via optional accessory) |
| Battery life | Up to 3 hours typical use |
| Mounting | Windshield suction mount and dashboard disk |
| Languages supported | English, French, Spanish (voice and menu) |
| Cleaning and maintenance | Wipe exterior with soft dry cloth. Avoid liquids and abrasive cleaners. |
| Safety warnings | Do not mount where it obstructs view. Use only approved charger. Do not disassemble. |
| Spare parts and repair | Contact Mio support for replacement battery, charger, and cradle. Repair by authorized service only. |
| General information | Manufacturer: Mio Technology. Model: DigiWalker 339. Year: 2007-2008. |
Frequently Asked Questions - DigiWalker 339 MIO
User questions about DigiWalker 339 MIO
0 question about this device. Answer the ones you know or ask your own.
Ask a new question about this device
Download the instructions for your Browser in PDF format for free! Find your manual DigiWalker 339 - MIO and take your electronic device back in hand. On this page are published all the documents necessary for the use of your device. DigiWalker 339 by MIO.
USER MANUAL DigiWalker 339 MIO
All brand and product names are trademarks or registered trademarks of their respective companies.
Note
The information in this manual is subject to change without notice.
Table of Contents
Preface....v
1 Getting Started 1
1.1 Hardware Features....1
Front Components....1
Back Components 2
Right-Side Components....3
Left-Side Components....4
Top Components ....5
Bottom Components....5
USB Cradle....6
1.2 Setting Up Your Pocket PC for Use....7
Performing Initial Startup 7
Connecting to AC Power and Charging the Battery 8
1.3 Turning Your Pocket PC On and Off 9
Turning Off to Suspend....9
Turning On to Resume 9
1.4 Installing Microsoft ActiveSync....10
1.5 Expanding Your Pocket PC 12
Using a SD/MMC Card....12
Accessories 12
2 Basic Skills 14
2.1 Using the Stylus....14
2.2 Using the Navigation Button....15
2.3 Today Screen 15
Status Icons....16
2.4 Navigation Bar and Command Bar....17
2.5 Running Programs....18
2.6 Pop-up Menus 19
2.7 Notifications 19
2.8 Entering Information ....20
Entering Text Using the Input Panel....20
Writing on the Screen 22
Drawing on the Screen 25
Recording a Message 27
Using My Text 29
3 Managing Your Pocket PC ....31
3.1 Managing Power 31
Low Battery Signals and Actions 31
Power-Saving Tips....32
3.2 Managing Memory 33
Storage and Program Memory 33
Additional Memory 33
3.3 Customizing Your Pocket PC 34
3.4 Security 36
Setting a Password 36
Certificates 36
3.5 Finding and Organizing Information.... 37
3.6 Backing Up Data 38
3.7 Adding or Removing Programs.... 38
Adding Programs 38
Removing Programs 40
4 Microsoft Pocket Outlook 41
4.1 Calendar: Scheduling Appointments and Meetings.... 41
Creating an Appointment 42
Using the Calendar Summary Screen 43
Creating Meeting Requests 44
4.2 Contacts: Tracking Friends and Colleagues.... 45
Creating a Contact 45
Finding a Contact....47
Using the Contacts Summary Screen.... 47
4.3 Tasks: Keeping a To Do List.... 48
Creating a Task....49
Using the Tasks Summary Screen 50
4.4 Notes: Capturing Thoughts and Ideas....51
Creating a Note....52
4.5 Inbox: Sending and Receiving E-mail Messages 53
Synchronizing E-mail Messages.... 53
Connecting Directly to an E-mail Server.... 54
Using the Message List....55
Composing and Sending Messages....57
Managing Email Messages and Folders.... 58
5 Companion Programs.... 61
5.1 Pocket Word ....61 Creating a Document....62 Working with Pocket Word Documents....64
5.2 Pocket Excel....65 Creating a Workbook....65 Working with Pocket Excel Workbooks....66
5.3 MSN Messenger....67 Setting Up to Use MSN Messenger....68 Working with Contacts....68 Chatting with Contacts....69
5.4 Windows Media Player for Pocket PC....70
5.5 Microsoft Reader ....71 Getting Books for Your Pocket PC ....71 Using the Library....71 Reading a Book ....72 Using Reader Features....73 Removing a Book ....74
5.6 Pictures....75 5.7 Additional Programs....76 MP3 Player....76
6 Using the Digital Camera....81
6.1 About MioCam....81 Features....81 Screen Elements....82 Status or Button Operation....82
6.2 Taking and Viewing Photos....83 Taking Photos....83 Photo Quick Menu....84 Viewing Photos....86
6.3 Recording and Watching Videos ....88 Recording a Video ....88 Video Quick Menu ....90 Watching Videos....91
6.4 Managing Photos and Videos....93 Storage Folder....93 Deleting Photos or Videos....93
6.5 Camera Setup....94 Basic Setup....94 Advanced Setup....95 System Setup....96
6.6 Hints and Notes 97
7 Getting Connected.... 99
7.1 Connection Options 99
7.2 Connecting to Your Desktop Computer....99 Ways of Connecting to Your Desktop Computer....99 Microsoft ActiveSync....100 Synchronizing Data....101
7.3 Transferring Items Using Infrared....103 Sending Information....103 Receiving Information....104
7.4 Connecting to ISP or Work .... 104 Creating a Modem Connection.... 104 Creating a Network (Ethernet) Card Connection.... 105 Create a Wireless Connection to a Network.... 106 Ending a Connection.... 106 Getting Help on Connecting.... 107
7.5 Using Microsoft Pocket Internet Explorer .... 107 Viewing Mobile Favorites and Channels.... 108 Browsing the Internet.... 109 The Mobile Favorites Folder.... 109 Using AvantGo Channels.... 111
8 Troubleshooting and Maintenance 113
8.1 Resetting Your Pocket PC 113
8.2 Restoring Factory Default State.... 114
8.3 Power Problems.... 115
8.4 Memory Problems.... 115
8.5 Screen Problems 117
8.6 Connection Problems....118 Cradle Connection Problems....118 Infrared Connection Problems....118 Modem Connection Problems....119 Network Connection Problems....120
8.7 Taking Care of Your Pocket PC....121 General Guidelines....121 Travel Guidelines....122
A Regulatory Information 123
A.1 Class B Regulations.... 123
A.2 European Notice 124
A.3 About the AC Adapter 125
A.4 About the Battery 125
A.5 About the Infrared LED 126
A.6 About the Electrostatic Discharge.... 126
Preface
Welcome
Congratulations on purchasing this Windows® Powered Pocket PC. Due to the size and capabilities of the device, you can keep your most important business and personal information up-to-date and close at hand. Microsoft® ActiveSync® increases the power of your Pocket PC by allowing you to synchronize the information on your desktop or Microsoft Exchange Server with your Pocket PC. Picture yourself in the following situations:
- While walking with a colleague, your cell phone rings and your boss asks if you two are free this afternoon for an emergency meeting. While your colleague fumbles through his paper organizer, you press a button on your Pocket PC and instantly see a list of today's appointments and meetings. You are quickly able to tell the boss your available times. For more information on scheduling appointments and meetings, see Chapter 4.
- You are meeting your friends tonight for dinner and a movie. You download the latest movie information from the Internet to your desktop computer and then synchronize it with your Pocket PC. At dinner, you pull out your Pocket PC and review your movie options with your friends. For more information on downloading Web pages to your device, see Chapter 7.
- A Calendar reminder alerts you that it is time to catch the bus. You grab your Pocket PC and catch the bus just in time. Because ActiveSync keeps the information on your Pocket PC up-to-date, you leisurely review your task list, make notes about the new books and CDs you want to buy and read and respond to e-mail messages. When you get back to the office, ActiveSync transfers any task changes you made, your notes and your e-mail message responses to your desktop computer. For more information on ActiveSync, see Chapter 7.
- In addition, your Pocket PC is a digital camera and a MP3 player as well.
About this Manual
This manual contains comprehensive information of your Pocket PC to help you operate the device.
Throughout the manual, the following conventions are used to distinguish elements of text.
NOTE: provides additional hints or information that requires special attention.
CAUTION: identifies important information which, if not followed, may result in loss of data or damage to your device.
Any name of menu, command, icon or button that you can see on the screen is shown in a bold typeset. For example:
On the Start menu, tap Settings.
Where to Find Information
| For information on See this source | |
| First time startup Quick Start Guide | |
| Programs on your Pocket PC | This User's Manual or online Help on your Pocket PC |
| Additional programs that can be installed on your Pocket PC | Companion CD or other CD(s) supplied with your Pocket PC |
| Connecting to and synchronizing with a desktop computer | Chapter 7 of this manual or ActiveSync Help on your desktop computer |
| Troubleshooting | Chapter 8 of this manual or online Help on your Pocket PC |
| Last-minute updates and detailed technical information | The Read Me files in the “Microsoft ActiveSync” folder on your desktop computer or the Pocket PC Companion CD. |
| The latest on Windows Powered Pocket PCs | The Microsoft Mobile Devices Web site: www.pocketpc.com |
1 Getting Started
This chapter introduces you to the external components of your Pocket PC and guides you through the process of setting up your Pocket PC for use.
1.1 Hardware Features
The illustrations below introduce you to the various buttons, connectors, ports and features of your Pocket PC.
Front Components
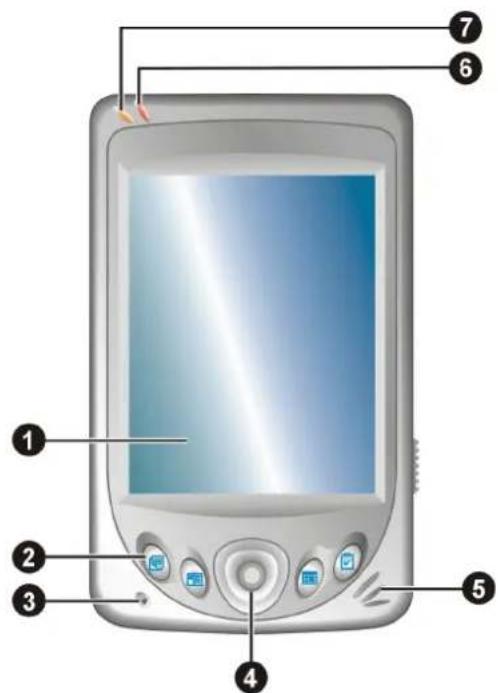
| Ref | Component | Description |
| 1 | Touch Screen | Displays the output of your Pocket PC. Tap the screen with the stylus to select menu commands or enter information. |
| 2 | Program Buttons | Each of the four buttons provides a quick way to run a specific program. By default, they are ☑ Notes, ☑ Contacts, ☑ Calendar and ☑ Tasks buttons. The buttons are customizable. |
| 3 | Microphone | Receives sound and voice to record voice. |
| 4 | Navigation Button | Moves up, down, left or right by pushing the button toward the corresponding direction. |
| Selects by pressing. | ||
| 5 | Speaker | Sends out music, sounds and voice. |
| 6 | Notification Indicator | Flashes in red to inform you of scheduled appointments, alarms and reminders. |
| 7 | Charge Indicator | Glows in amber to indicate that battery charging is in progress and in green when the battery is fully charged. |
Back Components
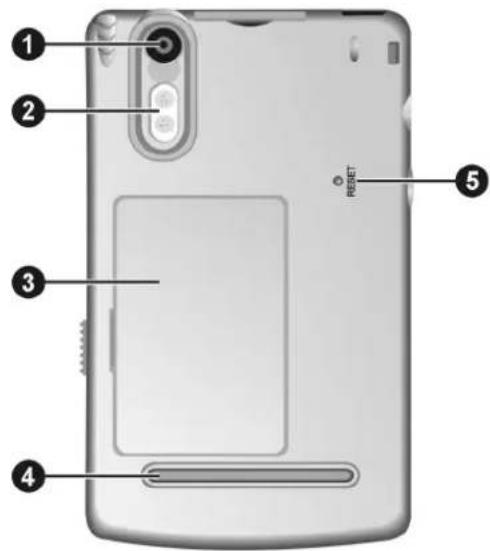
| Ref | Component | Description |
| 1 | Camera Lens | Take photos or record videos. |
| 2 | Flash | Provides extra light when taking photos. |
| 3 | Battery | Supplies power to your Pocket PC when external power is not connected. |
| 4 | Finger Grip | Helps you hold your Pocket PC steady when taking photos or recording videos. |
| 5 | Reset Button | Restarts your Pocket PC. |
Right-Side Components
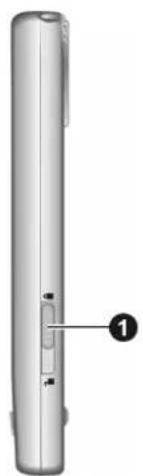
natural_image
Illustration of a cylindrical device with a labeled component (no text or symbols visible)Ref Component Description
① Battery Lock Locks the battery door.
CAUTION: Always keep the battery lock in the lock (💡) position unless you are removing the battery.
Left-Side Components
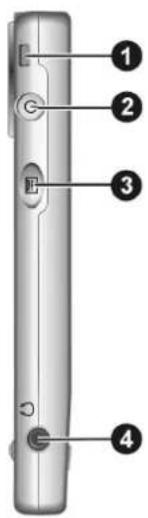
Ref Component Description
| 1 | Lanyard Eyelet | Lanyard attaches to this opening. |
| 2 | Power Button | Turns your Pocket PC on or off by pressing briefly. |
| Turns the screen backlight off by pressing and holding. | ||
| 3 | Record Button | Records voice notes by pressing and holding. |
| 4 | Headphone Connector | Connects to a pair of stereo headphones. |
Top Components
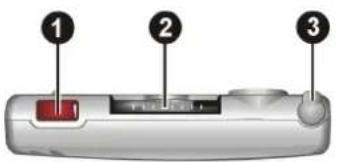
| Ref | Component | Description |
| 1 | IR Port | Beams files to other mobile devices. |
| 2 | SD/MMC Slot | Accepts an optional SD (Secure Digital) or MMC (MultiMediaCard) card for removable storage. |
| 3 | Stylus | Tap on the touch screen to make selections and enter information. Pull the stylus out of its slot to use and store it in the slot when not in use. |
Bottom Components
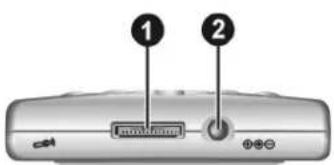
| Ref | Component | Description |
| 1 | ActiveSync Connector | Connects to your desktop compute for synchronizing data. |
| 2 | Power Connector | Connects to the AC adapter if you are not using the cradle. |
USB Cradle
The USB cradle provides a convenient way to charge your Pocket PC and synchronize data with a desktop computer.
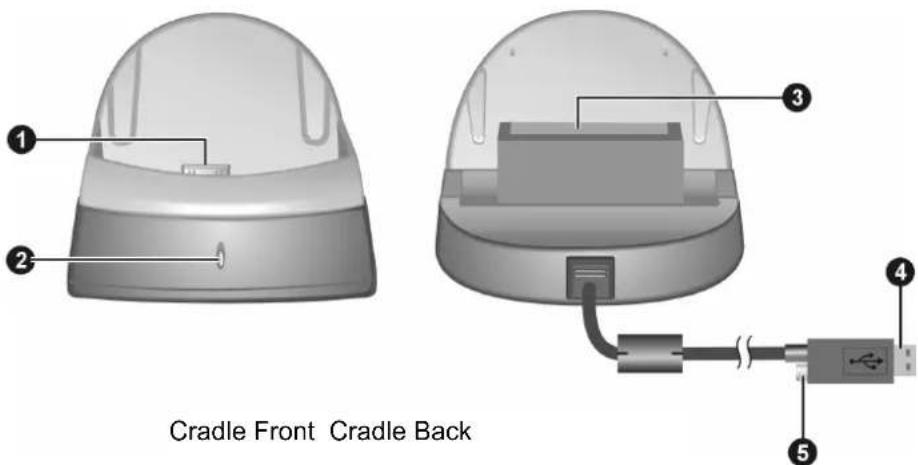
Ref Component Description
| 1 Pocket PC Connector | Connects to your Pocket PC. |
| 2 Battery Charge Indicator | Glows when the additional battery is being charged and turns off when the battery is fully charged. |
| 3 Battery Connector | Accepts an additional battery (available as an accessory) for charging. |
| 4 USB Connector | Connects to the USB port of a desktop computer for data synchronization. |
| 5 Power Connector | Connects to the AC adapter. |
1.2 Setting Up Your Pocket PC for Use
Performing Initial Startup
Initial startup includes installing the battery, setting the backup battery switch and completing the Welcome Wizard.
-
Slide the battery lock to the unlock ( ) position (①) and then open the battery door (②).
-
Insert the projected parts of the battery into the battery compartment (③) and then fit the battery into place (④).
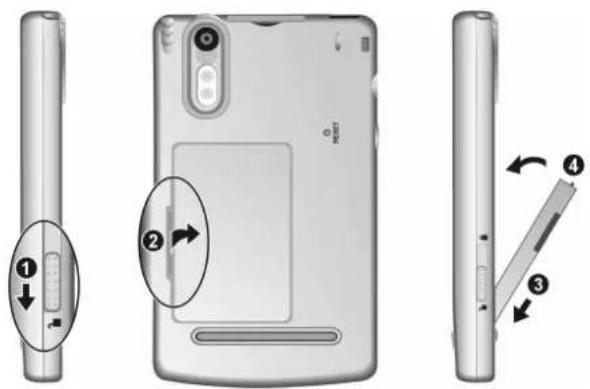
NOTE: To remove the battery, first push the battery downward and then pull it out at an angle.
- The backup battery switch should be set to the ON (right) position for normal operation. Pull out the stylus and use it to slide the battery switch to the ON (right) position.
CAUTION: Always leave the backup battery switch in the ON position for normal operation. Changing the switch will cause your data to be lost.
- Replace the battery door and slide the battery lock to the lock ( 🔍 ) position.
NOTE: If the battery door is not closed, you cannot turn on your Pocket PC.
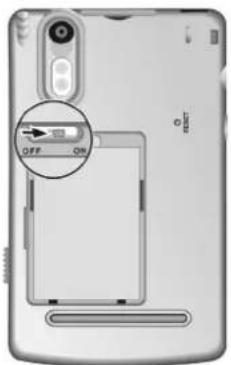
- The red notification indicator on your Pocket PC will flash for approximately 30 seconds. Then your Pocket PC will automatically turn on and display the "Welcome" screen.
- To begin the "Welcome" Wizard, tap the screen with the stylus and follow the onscreen instructions to complete the wizard. The wizard presents a brief orientation to Microsoft® Windows® for Pocket PC, helps you align the touch screen and prompts you to select your city and time zone.
Connecting to AC Power and Charging the Battery
Fully charge the battery before starting to use your Pocket PC for the first time.
-
Plug the converter to the AC adapter.
-
Connect to AC power. You can connect either with or without the cradle.
With the cradle
① Slide your Pocket PC into the cradle. Connect the appropriate end of
② Connect the appropriate end of the AC adapter to the power connector on the cradle cable.
③ Plug the other end of the AC adapter into a wall outlet.
Connect the appropriate end of the AC adapter to the power connector on the bottom of your Pocket PC and the other end into a wall outlet.
Without the cradle
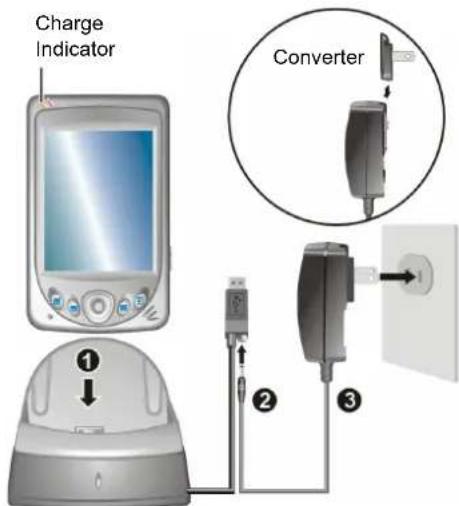
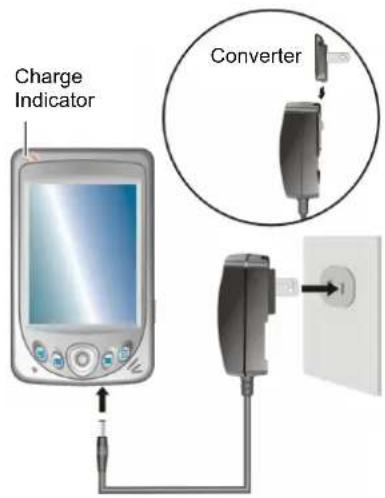
- The charge indicator glows amber when charging is in progress. Do not disconnect your Pocket PC from AC power until the battery is fully charged, as indicated by the amber indicator turning into green. This will take a couple of hours.
NOTE: It is recommended that you keep charging for at least 24 hours when charging your Pocket PC for the first time. This ensures the backup battery in a fully-charged state.
Whenever possible, keep your Pocket PC connected to the AC adapter and a power source. Doing so keeps the battery charged.
1.3 Turning Your Pocket PC On and Off
After the initial startup, your Pocket PC enters a suspend state when you turn it off and resumes when you turn it on.
Turning Off to Suspend
You suspend your Pocket PC by briefly pressing the power button on the side of your Pocket PC.
By default, your Pocket PC will also automatically suspend after 3 minutes of inactivity when operating on battery power. (To change these settings, tap → Settings → System tab → Power icon → Advanced tab.)
Turning On to Resume
You resume your Pocket PC by briefly pressing the power button. You can also press one of the program buttons to resume.
NOTE: If you just removed and replaced the battery door, you can turn on you Pocket PC only with the power button.
1.4 Installing Microsoft ActiveSync
You can use Microsoft ActiveSync technology to synchronize information on your desktop computer and/or a Microsoft Exchange Server with the information on your Pocket PC. ActiveSync compares the information on your Pocket PC with the information on the desktop computer and/or the server and updates all locations, keeping you up-to-date with the most recent information.
ActiveSync is already installed on your Pocket PC. You need to install ActiveSync on your desktop computer. Follow the procedure below:
CAUTION:
- Before installation, make sure that you have Microsoft Outlook installed on your desktop computer. If you do not have Outlook or your version of Outlook is earlier than the version provided on the Companion CD, install Outlook from the Companion CD.
- Do not connect your Pocket PC to your desktop computer before ActiveSync is installed.
-
During the New Partnership setup, select "Synchronize with this desktop computer." Do not select "Synchronize with Microsoft Mobile Information Server and/or this desktop computer" unless you are sure that your company is running Microsoft Mobile Information Server 2002 or later. Contact your network administrator or ISP for detailed information.
-
Turn on your desktop computer.
- Insert the Companion CD into the CD-ROM drive of your desktop computer.
- Click the arrow on the first screen to enter the main screen and click Start Here.
- In the "Start Here" screen, click Install ActiveSync 3.7 on the left column.
- In the "Install ActiveSync 3.7" screen, click Install to start installation.
- In the "File Download" screen, click Open if your operating system is Windows XP or click Run this program from its current location if your operating system is Windows 2000/Me/98.
- Follow the onscreen instructions to install ActiveSync.
- When prompted, connect your Pocket PC to your desktop computer. Slide your Pocket PC into the cradle. Connect the cradle cable to a USB port on your desktop computer.
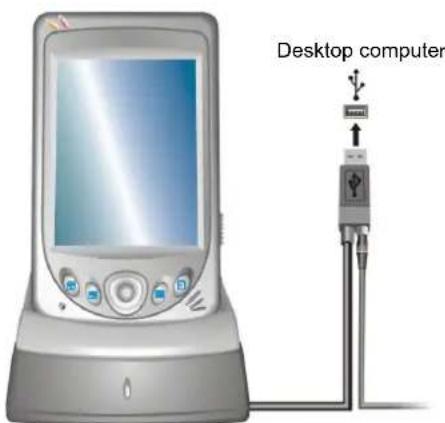
- The "Add New Hardware Wizard" should automatically install the USB driver. (If you need to specify the location of the driver, click Browse and select the CD-ROM drive containing the Companion CD.)
- Follow the onscreen instructions to establish a partnership and synchronize your Pocket PC with your desktop computer.
After your first synchronization, the data you have stored on your desktop computer such as Calendar, Contacts and Tasks is copied to your Pocket PC. You are now ready to take it along with you when you go.
For more information on ActiveSync, see section 7.2.
1.5 Expanding Your Pocket PC
Using a SD/MMC Card
Your Pocket PC has a SD/MMC slot where you can insert an optional Secure Digital or MultiMediaCard storage card. With the removable memory, you can store or backup your data and exchange data with other devices.
NOTE:
- A storage card is also called a memory card.
• Make sure that no foreign objects enter the slot. - Keep a SD or MMC card in a well-protected box to avoid dust and humidity when you are not using it.
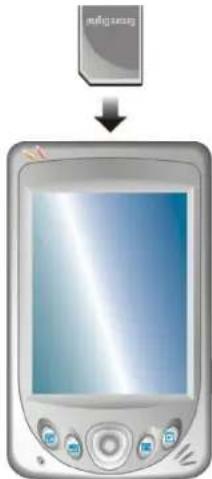
To use a SD/MMC card, insert it into the slot, with the connector pointing to the slot and its label facing the front of the Pocket PC. Follow the instructions supplied with the card for more information.
To remove a card, first make sure that no application is accessing the card, then slightly push the top edge of the card to release it and pull it out of the slot.
Accessories
By purchasing accessories designed for your Pocket PC, you can expand the capabilities of your Pocket PC, replace lost parts or facilitate your operation.
NOTE:
- Please contact your dealer for the availability of accessories from your Pocket PC manufacturer.
- The use of unauthorized accessories will void your Warranty.
Depending on your choice of purchase, you may already have the following accessories:
- Protective Cover
Store your Pocket PC in the cover when you are carrying it on the road.
- Headphone
Use the headphone to output the sound and voice from your Pocket PC.
- Remote Control
Connect the remote control to your Pocket PC and then connect the headphone to the remote control. You can then control the MP3 player with the buttons on the remote control. (For information on the MP3 player, see Section 5.7.)
For detailed information on using the accessories, see the instructions supplied with the accessories.

Basic Skills
This chapter familiarizes you with the basic operations of your Pocket PC such as using the stylus, navigation button, Today screen, menus and programs. You will also know how to enter information.
2.1 Using the Stylus
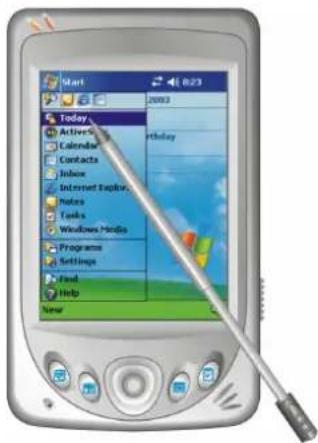
The stylus serves as a mouse for computers. You use it to navigate and select objects on the screen.
Pull the stylus out of the slot and extend it for ease of use. Store it in the slot when not in use.
- Tap
Touch the screen once with the stylus to open items and select options. - Drag
Hold the stylus on the screen and drag across the screen to select text and images. Drag in a list to select multiple items. - Tap and hold
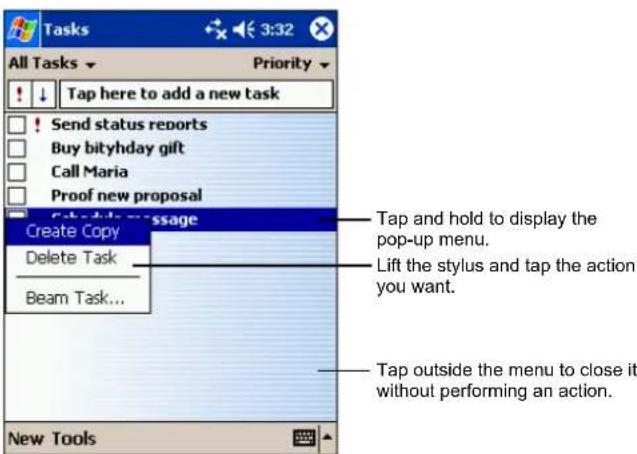
Tap and hold the stylus on an item to see a list of actions available for that item. On the pop-up menu that appears, tap the action you want to perform.
2.2 Using the Navigation Button
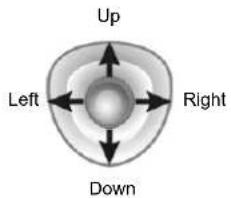
With the navigation button, you can move up, down, left and right within a menu. This is particularly useful for one-hand operation.
To move in a direction, simply push the button toward the corresponding direction.
To activate the selected item, press the button.
2.3 Today Screen
When you turn on your Pocket PC for the first time each day (or after 4 hours of inactivity), you will see the Today screen. You can also display it by tapping and then Today. On the Today screen, you can see at a glance important information for the day.
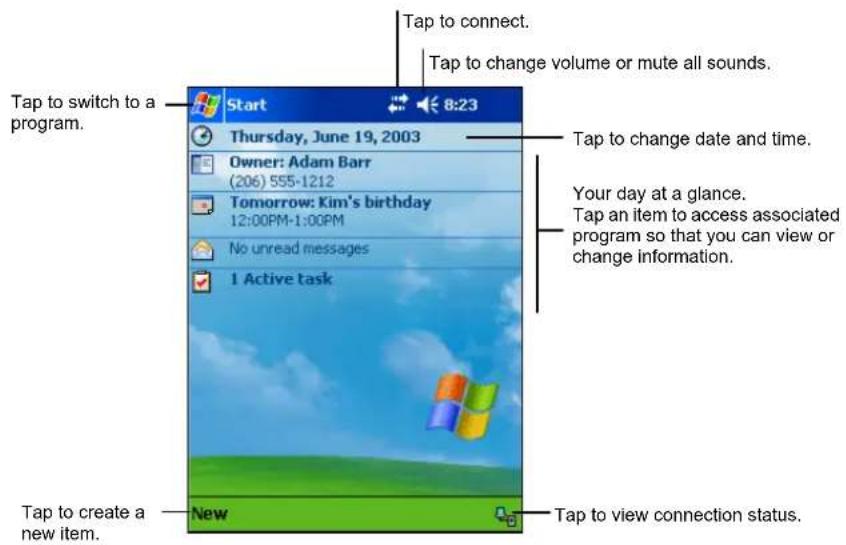
NOTE: You can customize what is displayed on the Today screen by tapping → Settings → Personal tab → Today icon.
Status Icons
When the Today screen is displayed, you may see the following status icons on the Command bar or Navigation bar. In most cases, you can tap a status icon to display the associated control panel or more information related to the item. For example, tap a battery status icon to open the Power control panel.
| Icon Meaning | |
| [0286] | Speaker is on. |
 | Speaker is off. |
 | Battery is charging. |
 | Battery is low. |
| [9XT4] | Battery is very low. |
| [6ZAY] | Battery is fully charged. |
 | Connection is active. |
| [3537] | Connection is not active. |
| [60GT] | One or more e-mail messages were received. |
 | More icons to be displayed than there is room to display them. Tap the icon to view all status icons. |
2.4 Navigation Bar and Command Bar
The Navigation bar is located at the top of the screen. It displays the active program and current time and allows you to switch programs and close screens.
The Navigation bar and Start menu:
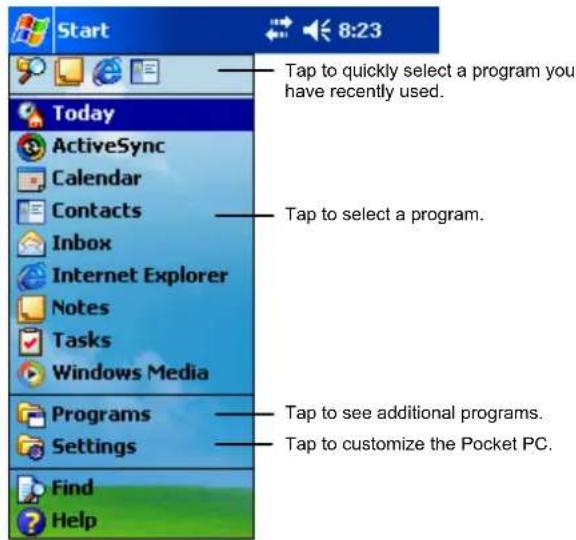
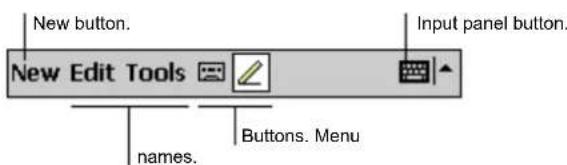
Use the Command bar at the bottom of the screen to perform tasks in programs. The Command bar includes menu names, buttons and the Input panel button. To create a new item in the current program, tap New. To see the name of a button, tap and hold the stylus on the button. Drag the stylus off the button so that the command is not carried out.
The Command bar:
2.5 Running Programs
You can switch from one program to another during your work session without closing any program. To switch to a program, you can:
- Tap 📋 at the left-top corner of the screen and select from the Start menu. (To customize which programs you see on the Start menu, tap → Settings → Personal tab → Menu icon.)
- Tap 📋 and then tap Programs to access additional programs. Tap the program icon to run a program.
- Press a program button on the front of your Pocket PC. The icons on the buttons identify the default programs they are associated with. (To customize which programs are associated with the buttons, tap Settings → Personal tab → Button icon.)
The table below contains a partial list of the programs and their icons.
| Icon Program Description | ||
 | ActiveSync | Synchronize information between your Pocket PC and desktop computer. |
 | Calendar | Keep track of your appointments and create meeting requests. |
 | Contacts | Keep track of your friends and colleagues. |
 | Inbox | Send and receive email messages. |
 | Pocket Internet Explorer | Browse Web and WAP sites and download new programs and files from the Internet. |
 | Notes | Create handwritten or typed notes, drawings and recordings. |
 | Tasks | Keep track of your tasks. |
 | Windows Media | Play digital audio and video files. |
 | Pocket Excel | Create new workbooks or view and edit Excel workbooks created on your desktop computer. |
 | Pocket Word | Create new documents or view and edit Word documents created on your desktop computer. |
2.6 Pop-up Menus
With pop-up menus, you can quickly choose an action for an item. For example, you can use the pop-up menu in the contact list to quickly delete a contact, make a copy of a contact or send an email message to a contact. The actions in the pop-up menus vary from program to program. To access a pop-up menu, tap and hold the stylus on the name of the item that you want to perform the action on. When the menu appears, lift the stylus and tap the action you want to perform. Or tap anywhere outside the menu to close the menu without performing an action.
2.7 Notifications
Your Pocket PC reminds you in a variety of ways when you have something to do. For example, if you have set up an appointment in Calendar, a task with a due date in Tasks or an alarm in Clock, you will be notified in any of the following ways:
• A message appears on the screen.
• A sound, which you can specify, is played.
• The notification indicator flashes in red.
To choose reminder types and sounds for your Pocket PC, tap → Settings → Personal tab → Sounds & Notifications icon.
2.8 Entering Information
You have several options for entering new information:
- Use the Input panel to enter typed text, either by using the soft keyboard or other input methods.
• Write directly on the screen.
• Draw pictures on the screen. - Speak into the microphone to record a message.
Entering Text Using the Input Panel
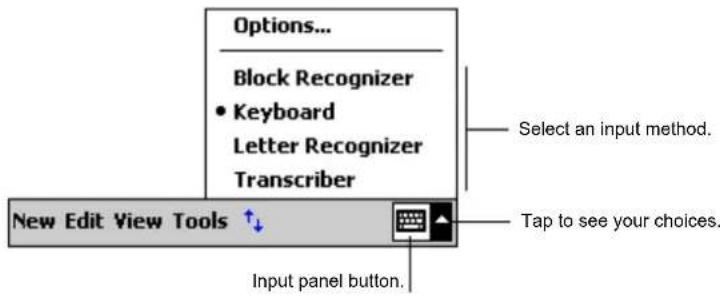
Use the Input panel to enter information in any program on your Pocket PC. You can either type using the soft keyboard or write using the soft keyboard, Block Recognizer, Letter Recognizer or Transcriber. In any case, the characters appear as typed text on the screen.
To show or hide the Input panel, tap the Input panel button. Tap the arrow next to the Input panel button to see your choices.
When you use the Input panel, your Pocket PC anticipates the word you are typing or writing and displays it above the Input panel. When you tap the displayed word, it is inserted into your text at the insertion point. The more you use your Pocket PC, the more words it learns to anticipate.
![Notes 9:31 ok Monthly mee meeting Tap here if this is the right word. 123 1 2 3 4 5 6 7 8 9 0 - = Tab q w e r t y u i o p [ ] CAP a s d f g h j k l ; * Shift z x c v b n m , . / ← CtI áü ` \ ↓ ↑ ← → New Edit Tools ↻](/content/2026/05/989474/images/ea68705e39bfd1d2001c6c7d6058138a2f65a96cdc008840fc4f008713fc7311.jpg)
NOTE: To change word suggestion options, such as the number of words suggested at one time, tap → Settings → Personal tab → Input icon → Word Completion tab.
Block Recognizer
With Block Recognizer, you can use the stylus to input characters using strokes that are similar to the Palm™ Graffiti® method.
To type with Block Recognizer:
- Tap the arrow next to the Input panel button and then tap Block Recognizer.
- Write a letter in the box.
When you write a letter, it is converted to typed text that appears on the screen. For specific instructions on using Block Recognizer, open Block Recognizer and then tap the question mark next to the writing area.
Letter Recognizer
With Letter Recognizer, you can write letters using the stylus just as you would use a pen on paper.
To type with Letter Recognizer:
- Tap the arrow next to the Input panel button and then tap Letter Recognizer.
- Write a letter in the box.
When you write a letter, it is converted to typed text that appears on the screen. For specific instructions on using Letter Recognizer, open Letter Recognizer and then tap the question mark next to the writing area.
Transcriber
With Transcriber you can write anywhere on the screen using the stylus just as you would on paper. Unlike Letter Recognizer and Block Recognizer, you can write a sentence or more of information; then, you pause and let Transcriber change the written characters to typed characters.
To type with Transcriber:
-
Tap the arrow next to the Input panel button then tap Transcriber.
-
Write anywhere on the screen.
For specific instructions on using Transcriber, open Transcriber and then tap the question mark in the lower-right corner of the screen.
Writing on the Screen
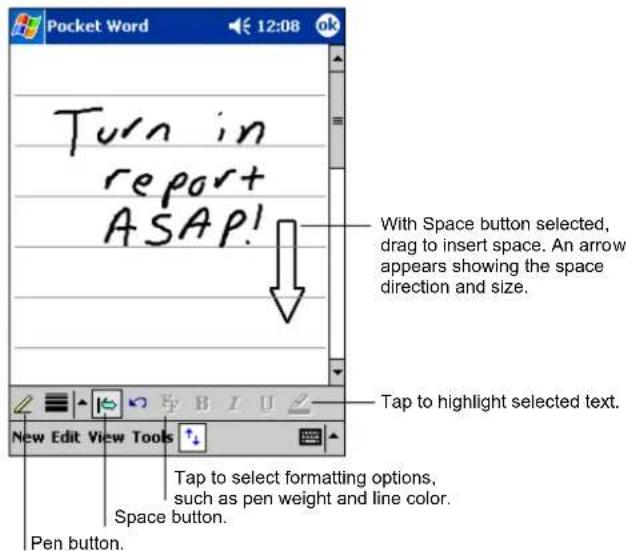
In any program that accepts writing—such as the Notes program and the Notes tab in Calendar, Contacts and Tasks—you can use your stylus to write directly on the screen. Write the way you do on paper. You can edit and format what you have written and convert the information to text later.
Writing
To write on the screen, tap the Pen button to switch to writing mode. This action displays lines on the screen to help you write.
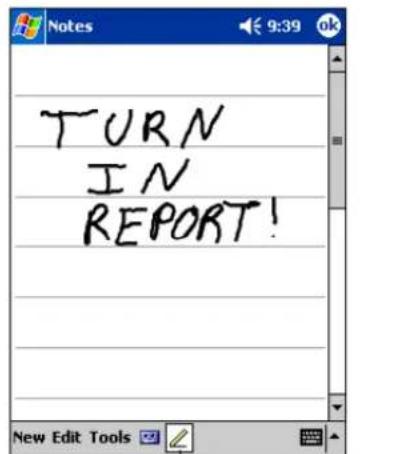
Tap the Pen button and use your stylus like a pen.
NOTE: Some programs that accept writing may not have the Pen button. See the documentation for that program to find out how to switch to writing mode.
Editing Your Writing
If you want to edit or format writing, you must first select the writing and then edit it.
- Tap and hold the stylus next to the text you want to select until the insertion point appears. Without lifting, drag the stylus across the text you want to select.
You can also select text by tapping the Pen button to deselect it and then dragging the stylus across the screen.
- Tap and hold the selected words and then tap an editing command (cut, copy or paste) on the pop-up menu or tap the command on the Edit menu.
If you accidentally write on the screen, tap Tools → Undo and try again.
Converting Your Writing to Text
-
If you want to convert only certain words, select them before going to the next step.
-
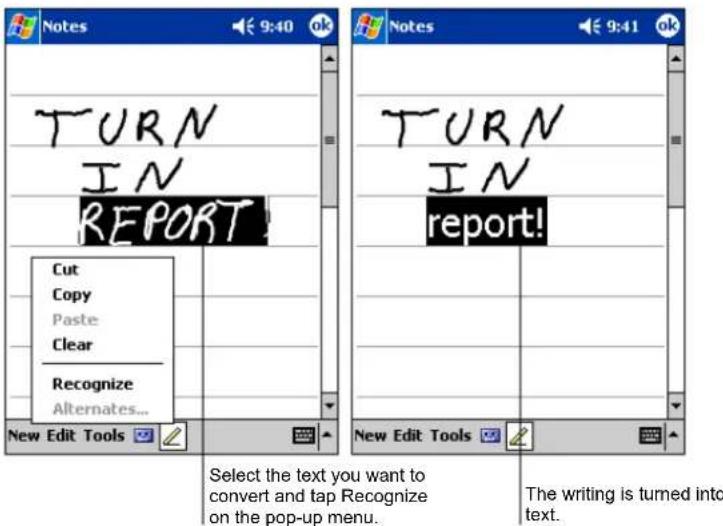
To convert writing to text, tap Tools → Recognize or tap and hold the selected words and then tap Recognize on the pop-up menu. Your writing is turned into text.
If a word is not recognized, it is left as writing.
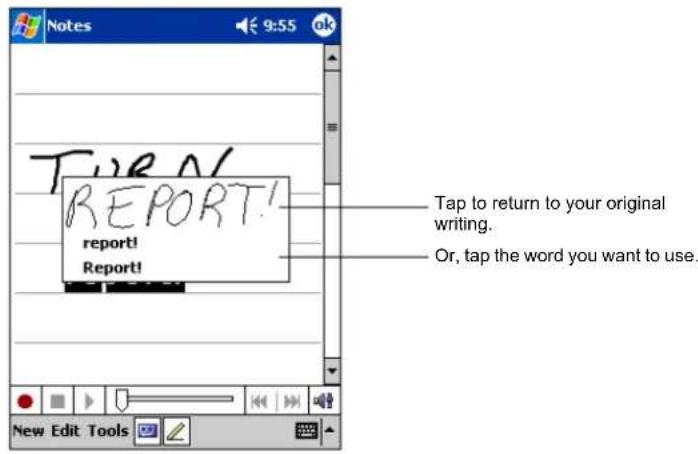
If the conversion is incorrect, you can select different words from a list of alternates or return to the original writing.
- Tap and hold the incorrect word (tap one word at a time).
- On the pop-up menu, tap Alternates. A menu with a list of alternate words appears.
- Tap the word you want to use or tap the writing at the top of the menu to return to the original writing.
Some tips for getting good recognition are listed below:
- Write neatly.
- Write on the lines and draw descenders below the line. Write the cross of the "t" and apostrophes below the top line so that they are not confused with the word above. Write periods and commas above the line.
- For better recognition, use the Tools menu to increase the zoom level to 300%.
- Write the letters of a word close together and leave big gaps between words.
- Hyphenated words, foreign words that use special characters such as accents some punctuation cannot be converted.
- If you add writing to a word to change it (such as changing a “3” to an “8”) after you attempt to recognize the word, the writing you add will not be included if you attempt to recognize the writing again.
Drawing on the Screen
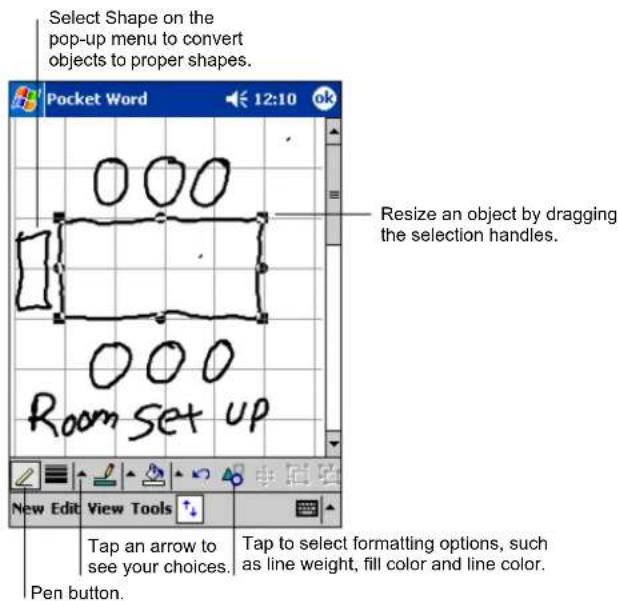
You can draw on the screen in the same way that you write on the screen. The difference between writing and drawing on the screen is how you select items and how they can be edited. For example, selected drawings can be resized, while writing cannot.
Creating a Drawing
-
To create a drawing, cross three ruled lines on your first stroke. A drawing box appears.
-
Subsequent strokes in or touching the drawing box become part of the drawing. Drawings that do not cross three ruled lines will be treated as writing.
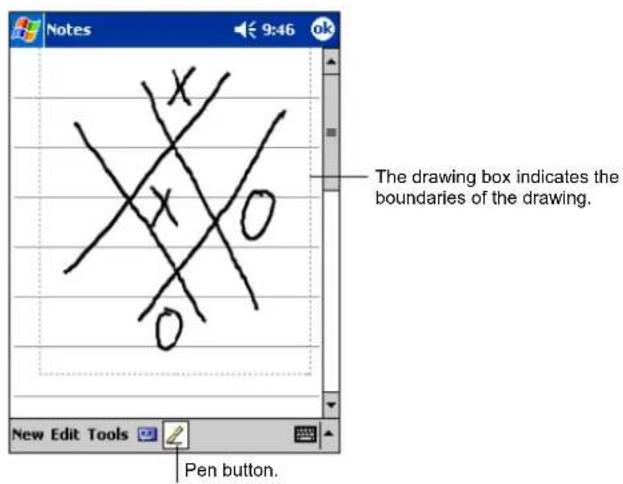
NOTE: You may want to change the zoom level so that you can more easily work on or view your drawing. Tap Tools and then choose a zoom level.
Editing Your Drawing
If you want to edit or format a drawing, you must select it first.
- Tap and hold the stylus on the drawing until the selection handle appears. To select multiple drawings, deselect the Pen button and then drag to select the drawings you want.
- Tap and hold the selected drawing and then tap an editing command (cut, copy or paste) on the pop-up menu or tap the command on the Edit menu.
- To resize a drawing, make sure the Pen button is not selected and then drag a selection handle.
Recording a Message
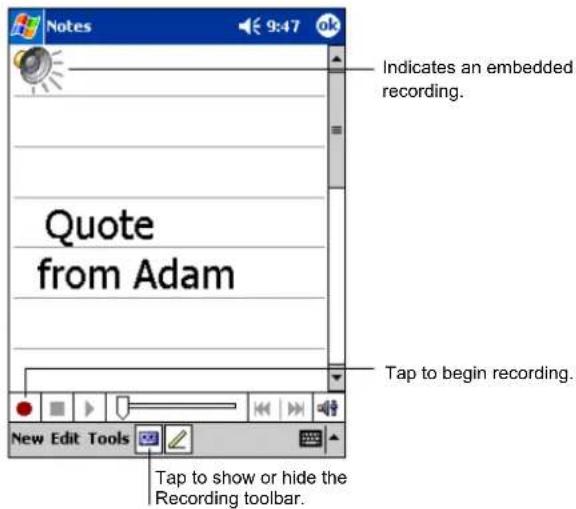
In any program where you can write or draw on the screen, you can also quickly capture thoughts, reminders and phone numbers by recording a message. In Calendar, Tasks Contacts, you can include a recording in the Notes tab. In the Notes program, you can either create a stand-alone recording or include a recording in a written note. If you want to include the recording in a note, open the note first. In the Inbox program, you can add a recording to an email message.
To create a recording:
- Hold the Pocket PC's microphone near your mouth or other source of sound.
- Press and hold the record button on the side of your Pocket PC. If the speaker is not muted, a beep indicates that your Pocket PC is recording. The Notification indicator glows red while recording is in progress.
- While holding down the record button, speak into the microphone.
- To stop recording, release the Record button. Two beeps will sound. The new recording appears in the note list or as an embedded icon.
NOTE: You can also make a recording by tapping the Record button on the Recording toolbar.
To play a recording, tap it in the list or tap its icon in the note.
Recording Formats
Your Pocket PC supports several formats for voice notes. The formats vary in both the quality of the recording and the size of the sound file. When selecting a recording format, you should consider the quality you need as well as how much storage memory the recording will use on your Pocket PC.
Not all recording formats are compatible with other software or computers. If you will share your recordings with others or transfer a recording to your desktop computer, be sure to choose a recording format that is supported by the software used to play recordings on the other computer.
The PCM format offers the highest quality recording and is compatible with all Pocket PC models, other Windows-powered mobile devices and desktop computers that use Windows operating systems. The GSM 6.10 format is compatible with all Pocket PC models and other Windows-powered mobile devices, but may not work with desktop computers.
To select a recording format:
-
Tap → Settings → Input icon.
-
On the Options tab in the Input control panel, select a voice recording format from the drop-down list.
The list of recording formats on your Pocket PC indicates the sample rate, whether the format is stereo or mono and how much storage memory is required per second of recording. You may need to experiment with different sample rates and formats to determine which format best suits your voice.
Using My Text
When using Inbox or MSN Messenger, use My Text to quickly insert preset or frequently used messages into the text entry area. To insert a message, tap My Text and then tap a message.
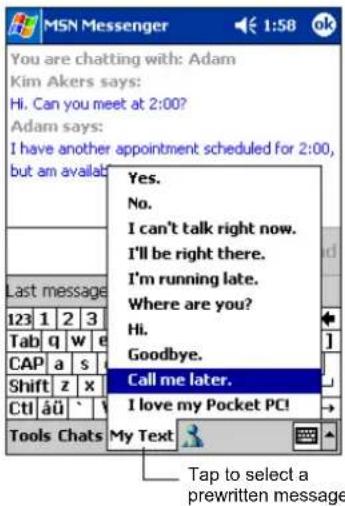
NOTE: After inserting a My Text message, you can add text to it before you send the message.
To edit a My Text message, tap Tools → Edit My Text Messages. Select the message you wish to edit and make desired changes.
3 Managing Your Pocket PC
This chapter tells you how to effectively manage power, memory, settings, data and programs of your Pocket PC.
3.1 Managing Power
You must maintain a continuous power supply to your Pocket PC to retain your data, including any information, programs or settings that you added to your Pocket PC.
A fully charged battery should provide power for up to 8 hours of use. The operating time of a fully charged battery depends on how you are using the Pocket PC. Some functions, such as using multimedia or operating a SD/MMC card, may consume the battery power considerably.
Low Battery Signals and Actions
CAUTION:
- Though your Pocket PC can retain data for 72 hours after its battery runs completely out of power, you must constantly charge the battery of your Pocket PC. This can prevent data loss or damage to the battery caused by the battery's being kept in a discharged state for too long.
- When you recharge the battery upon a warning of low power, you should charge for at least 30 minutes. If you unplug the AC adapter soon, you may not have sufficient battery power for your operation.
You can monitor the battery power by tapping → Settings → System tab → Power icon. The remaining power is displayed on a status bar in the Power control panel.
When the battery is low, your Pocket PC will pop up a warning message. You should save your data and recharge the battery immediately upon a warning of low power; otherwise your Pocket PC will turn off automatically. You need to
connect the Pocket PC to external AC power for charging before you can use it again. If the battery completely runs out of power, you will lose any information, programs or settings that you added.
Power-Saving Tips
Follow these suggestions to maximize the battery's operating time, particularly when you are relying solely on the battery power for extended time periods.
- Suspend frequently.
By default, the screen backlight will automatically turn off and the Pocket PC will also turn off when it has been idle for a period of time. You can shorten the length of the idle time using 📄 → Settings → System tab → Power → Advanced tab to set up.
Press the power button to turn off your Pocket PC when it is not in use, even for a short time. You can also manually turn off the backlight by pressing and holding the power button.
- Turn off functions not needed or adjust settings.
√ Lower the volume.
√ Do not enable sounds or light flashing except for the most necessary notifications. (Tap → Settings → Personal tab → Sounds & Notifications icon to set up.)
√ Remove the SD/MMC card, if installed, from the slot if you are not using it.
- Avoid power-consuming situations such as:
√ When connecting your Pocket PC to your desktop computer (Your Pocket PC will not auto-suspend while it is connected.)
√ When using a modem or other peripheral
√ When monitoring infrared transfers (Although you can set your Pocket PC to constantly monitor the IR port for files sent from other devices, doing so will quickly drain your battery.)
√ When playing sound or music
√ When recording.
3.2 Managing Memory
Storage and Program Memory
Files, settings and data that you add to your Pocket PC are stored in RAM (Random Access Memory). The RAM on your Pocket PC is shared between storage memory and program memory.
- Storage memory
Storage memory is used to store the data you create and additional programs you install.
- Program memory
Program memory is used to run programs on your Pocket PC.
Your Pocket PC automatically manages the allocation between storage and program memory. However, in some situations, such as when the memory is running out, your Pocket PC may not be able to automatically adjust the allocation. (For information on solving memory problems, see section 8.4.)
Additional Memory
You can buy a SD/MMC storage card for backup, storage, archives or to transfer large files to other devices. Files stored on a storage card appear in a folder called SDMMC Disk, listed under My Device in the File Explorer application.
Data stored on a storage card will be saved, even if your Pocket PC loses power. To protect your data, you can back up regularly to a storage card.
3.3 Customizing Your Pocket PC
NOTE: Incorrect settings may cause your system to malfunction. Make sure that you fully understand the function of a certain item before any adjustment.
You can customize the settings of the Pocket PC to your own preferences. Tap → Settings. You can tap any of the icons on the Personal, System or Connections tabs for the options. The items you can customize are described as follows:
| Tab Items Descriptions | ||
| Personal | Buttons | To assigns programs to the hardware buttons and set the repeat rate of the scroll dial. |
| Input | To set up items related to Block Recognizer, soft keyboard, Letter Recognize, Transcriber input methods and voice recording format. | |
| Menus | To customize what appear on the Start menu and to enable a pop-up menu from the New button on the Today screen. | |
| Owner Information | To enter your personal information. | |
| Password | To set a password for security. (See the proceeding section for more information.) | |
| Sounds & Notifications | To set the conditions and types of the sounds, system volume and ways of notifications. | |
| Today | To select the information you want displayed on the Today screen and to select a desired theme for the background. | |
Tab Items Descriptions
| System | About | To show the hardware information of the Pocket PC and to define the device name that your Pocket PC uses for identifying itself to other computers. |
| Backlight | To adjust the brightness level of the display and to set the automatic turnoff for power saving purposes. | |
| Certificate | To establish your identify or the identify of other computers. (See the proceeding section for more information.) | |
| Clock To change the time and date and to set alarms. | ||
| Memory | To temporarily adjust the allocation between storage and program memory, to view the memory on the storage card (if installed) and to manually stop a program if it becomes unstable or program memory is low. | |
| Power | To show the remaining battery power and to set the time for the Pocket PC to turn off automatically. | |
| Regional Settings | To specify the region of your location and the formats of the number, currency, time and date. | |
| Remove Programs | To remove programs you added to the RAM of your Pocket PC. | |
| Screen | To adjust the touch screen for accurate screen taps and to enable ClearType feature for easier reading of text in programs that support ClearType. | |
| Connections | Beam | To send and receive information and files between IR ports. (See Section 7.3 for more information.) |
| Connections | To set up or change connection information. (See Section 7.4 for more information.) | |
3.4 Security
Setting a Password
A password can safeguard your Pocket PC against unauthorized use. Follow this procedure to set a password:
- Tap → Settings → Personal tab → Password icon.
- Check the Prompt if device unused item and select a value to set the time for the Pocket PC to prompt for password after idling.
- Select the type of password you would like to use. You can set a four-digit password or a long password containing a combination of at least seven characters, digits or punctuation
- Tap the digits or characters to set your password.
- To keep a hint for yourself in case you forget your password, tap the Hint tab and enter your hint.
- Tap OK.
NOTE: You need to clear the memory of your Pocket PC if you eventually forget the password. (See Section 8.2.)
Certificates
Certificates help establish your identity when you are logging onto a secured network, such as a corporate network. Certificates also help establish the identity of other computers, such as servers, with which you connect. This helps prevent unauthorized users from accessing your Pocket PC and information.
You can store two types of certificates on your Pocket PC:
• Personal Certificates establish your identity.
- Root Certificates establish the identity of servers with which you connect.
Your Pocket PC may include a set of preinstalled certificates. To manage and view certificates, follow this procedure:
-
Tap → Settings → System tab → Certificates.
-
Tab Personal or Root tab according to your need.
-
The list displays the name of the certificate issuer and the expiration date. To view more information about a certificate, tap it in the list.
-
To delete a certificate, tap and hold it in the list and then tap Delete.
3.5 Finding and Organizing Information
The Find feature on your Pocket PC helps you quickly locate information.
To find a file, tap 📄 → Find. Enter the text you want to find, select a data type and then tap Go to start the search.
NOTE: To quickly find information that is taking up storage space on your Pocket PC, select Larger than 64 KB under Type.
You can also use the File Explorer to find files on your Pocket PC and to organize these files into folders. Tap ➕ → Programs → File Explorer icon.
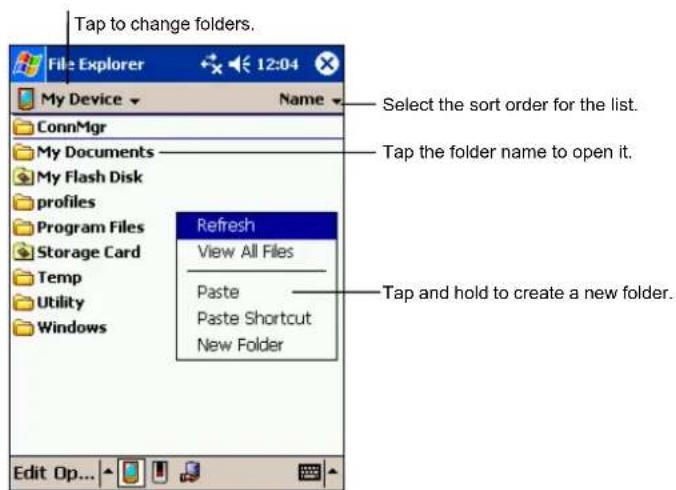
NOTE: You can move files in File Explorer by tapping and holding the item you want to move, tapping Cut or Copy on the pop-up menu, browsing to the new location and then tapping Paste.
3.6 Backing Up Data
To prevent loss of data, you should back up your Pocket PC frequently.
ActiveSync allows you to back up data to your desktop computer. You can back up all data on your Pocket PC or only your PIM databases (Calendar, Contacts and Tasks). You can set ActiveSync to back up automatically each time you connect or you can back up manually, whenever you choose. For more information, see ActiveSync Help on your desktop computer.
3.7 Adding or Removing Programs
Programs added to your Pocket PC at the factory are stored in ROM (Read-Only Memory). You cannot remove the programs and you will never accidentally lose ROM contents. All other programs and data files added to your Pocket PC after factory installations are stored in RAM.
You can install any program created for your Pocket PC as long as your Pocket PC has enough memory. The most popular place to find software for your Pocket PC is on the Pocket PC Web site (http://www.pocketpc.com).
Adding Programs
To Add Programs Using ActiveSync
You will need to install the appropriate software for your Pocket PC on your desktop computer before installing it on your Pocket PC.
- Determine your Pocket PC and processor type so that you know which version of the software to install. Tap → Settings → System tab → About icon → Version tab and make a note of the information in Processor.
- Download the program to your desktop computer or, if you have a CD or disk containing the program, insert the CD or disk into your desktop computer. You might see a single *.zip, *.exe *.zip file, a Setup.exe file or several versions of files for different device types and processors. Be sure to select the program designed for the Pocket PC and your Pocket PC processor type.
-
Read any installation instructions, Read Me files or documentation that comes with the program. Many programs provide special installation instructions.
-
Connect your Pocket PC and desktop computer.
-
Double-click on the *.exe file.
-
If the file is an installer, the installation wizard begins. Follow the directions on the screen. Once the software has been installed on your computer, the installer automatically transfers the software to your Pocket PC.
- If the file is not an installer, you will see an error message stating that the program is valid but it is designed for a different type of computer. You will need to move this file to your Pocket PC. If you cannot find any installation instructions for the program in the Read Me file or documentation, use ActiveSync Explore to copy the program file to the Program Files folder on your Pocket PC. For more information on copying files using ActiveSync, see ActiveSync Help.
NOTE: You can also use Pocket Internet Explorer to download some programs from the Internet directly to your Pocket PC if your Pocket PC is connected to Internet.
Once installation is complete, tap Programs and tap the program icon to switch to it.
To Add a Program to the Start Menu
Use one of the following methods to add a program to the Start menu.
- Tap → Settings → Menu icon and tap the check box for the program. If you do not see the program listed, use any of the following two methods.
- If you are using File Explorer on the Pocket PC: Tap → Program → File Explorer icon and locate the program (tap the folder list, labelled My Documents by default and tap My Device to see a list of all folders on the Pocket PC). Tap and hold the program and tap Cut on the pop-up menu. Open the Start Menu folder located in the Windows folder, tap and hold a blank area of the window and tap Paste on the pop-up menu. The program appears on the Start menu.
- If you are using ActiveSync on the desktop computer: Use the Explorer in ActiveSync to explore your Pocket PC files and locate the program. Right-click on the program and then click on Create Shortcut. Move the shortcut to the Start Menu folder in the Windows folder. The shortcut appears on the Start menu.
Removing Programs
To remove a program from your Pocket PC:
-
Tap → Settings → System tab → Remove Programs.
-
Select the program in the list then tap Remove.
If the program does not appear in the list of installed programs, use File Explorer on your Pocket PC to locate the program, tap and hold the program and then tap Delete on the pop-up menu.
4 Microsoft Pocket Outlook
This chapter tells you how to use Microsoft Pocket Outlook that includes Calendar, Contacts, Tasks, Notes and Inbox. You can use these programs individually or together. For example, e-mail addresses stored in Contacts can be used to address e-mail messages in Inbox.
4.1 Calendar: Scheduling Appointments and Meetings
Use Calendar to schedule appointments, including meetings and other events. You can check your appointments in one of several views (Agenda, Day, Week, Month and Year) and set Calendar to remind you of appointments with a sound or other method. Appointments for the day can be displayed on the Today screen.
Tap → Calendar or press the calendar button on your Pocket PC to switch to the program.
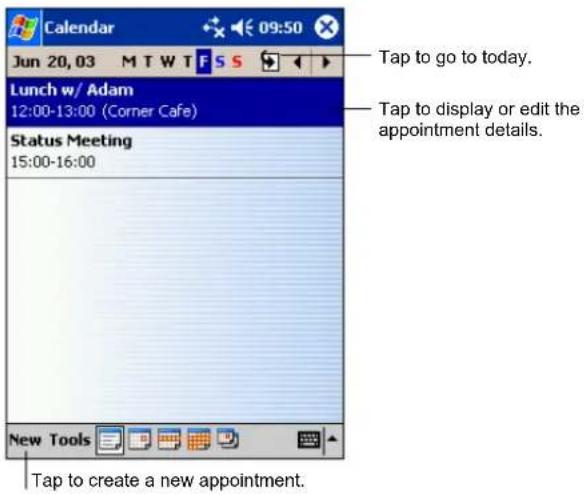
NOTE: You can customize the Calendar display (for example, change the first day of the week), by tapping Tools → Options.
Creating an Appointment
- In Day or Week view, tap the desired date and time for the appointment.
- Tap New.
![Tap to return to the calendar (the appointment is saved automatically). Calendar Subject: Location: Starts: 6/20/03 12:00 PM Ends: 6/20/03 1:00 PM All Day: No Occurs: Once Reminder: Remind me 15 minute(s) Categories: No categories... Appointment Notes 123 1 2 3 4 5 6 7 8 9 0 - = Tab q w e r t y u i o p [ ] CAP a s d f g h j k l ; * Shift z x c v b n m , . / ← CtI áü ` \ Edit Tap to choose from predefined text. Tap to choose from previously entered locations. Tap to select a time. Tap to select a date. Notes is a good place for maps and directions.](/content/2026/05/989474/images/3e7dee8930861c933bd204ed0a6ab8336d4ed7fc22f323a26c0226aac3b55bed.jpg)
-
Using the Input panel, tap first to select the field, and then enter a description and a location.
-
If needed, tap the date and time to change them.
-
Enter other desired information. You will need to hide the Input panel to see all available fields.
-
You can also do the followings with regard to this appointment:
-
Add a note.
• Create an all day event. - Set a reminder.
• Make the appointment recurring. - Assign the appointment to a category.
- Send a meeting request.
- Beam the appointment.
For more information, tap Help.
- Tap OK to return to Calendar.
Using the Calendar Summary Screen
When you tap an appointment in Calendar, a summary screen is displayed. To change the appointment, tap Edit.
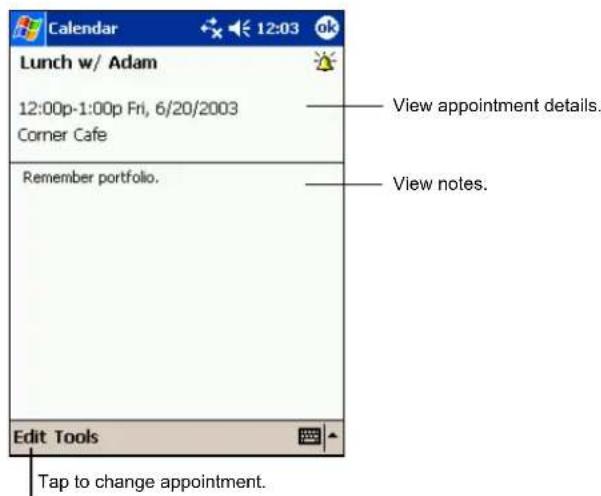
Creating Meeting Requests
You can use Calendar to set up meetings with users of Outlook or Pocket Outlook. The meeting notice will be created automatically and sent either when you synchronize Inbox or when you connect to your email server. Indicate how you want meeting requests sent by tapping Tools → Options. If you send and receive email messages through ActiveSync, select ActiveSync.
To schedule a meeting:
- Create an appointment.
- In the appointment details, hide the Input panel and then tap Attendees.
- From the list of email addresses in Contacts, select the meeting attendees.
The meeting notice is created automatically and placed in the Outbox folder.
For more information on sending and receiving meeting requests, see Calendar Help and Inbox Help on your Pocket PC.
4.2 Contacts: Tracking Friends and Colleagues
Contacts maintains a list of your friends and colleagues so that you can easily find the information you are looking for, whether you are at home or on the road. Using the IR port on the Pocket PC, you can quickly share Contacts information with users of Pocket PCs and other mobile devices.
Tap → Contacts or press the ☐Contacts button on your Pocket PC to switch to the program.
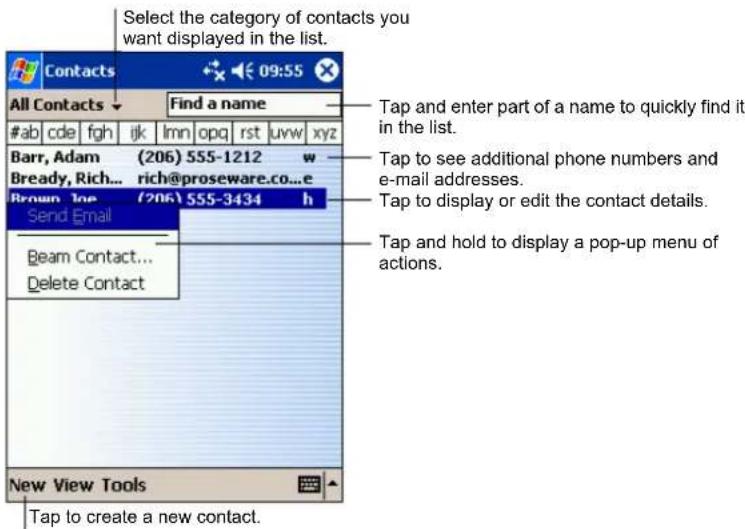
NOTE: To change the way information is displayed in the list, tap Tools → Options.
Creating a Contact
- In Contacts, tap New.
![Tap to return to the contact list (the contact is saved automatically). Contacts Name: Job title: Department: Company: Work tel: Work fax: Work addr: E-mail: Mobile tel: Details Notes 123 1 2 3 4 5 6 7 8 9 0 - = Tab q w e r tyt y u|i pivot[ ] CAP a s d f g h j k;l; Shift z x c v b n m_/_/← Ctrl äü ^\ ↓ ↑ ←→ Edit](/content/2026/05/989474/images/03a27242ebfe12efde37d4f9f6c0497f861c6e036d772e0a7f1528ecd60fb734.jpg)
-
Using the Input panel, enter a name and other contact information. You will need to scroll down to see all available fields.
-
You can also do the followings with regard to this contact:
-
Add a note.
- Assign the contact to a category.
- Send an e-mail to the contact.
• Synchronize the contact. - Beam the contact.
For more information, tap Help.
- Tap OK to return to the contact list.
Finding a Contact
There are four ways to find a contact:
- Tap Find, enter the contact name, select Contacts for the type then tap Go.
- In the contact list, enter a contact name in the box under the Navigation bar. To show all contacts again, clear text from the box or tap the button to the right of the box.
- In the contact list, tap the category list (labeled All Contacts by default) and select the type of contact that you want displayed. To show all contacts again, select All Contacts. To view a contact not assigned to a category, select None.
- To view the names of companies your contacts work for, in the contact list, tap View → By Company. The number of contacts that work for that company will be displayed to the right of the company name.
Using the Contacts Summary Screen
When you tap a contact in the contact list, a summary screen is displayed. To change the contact information, tap Edit.
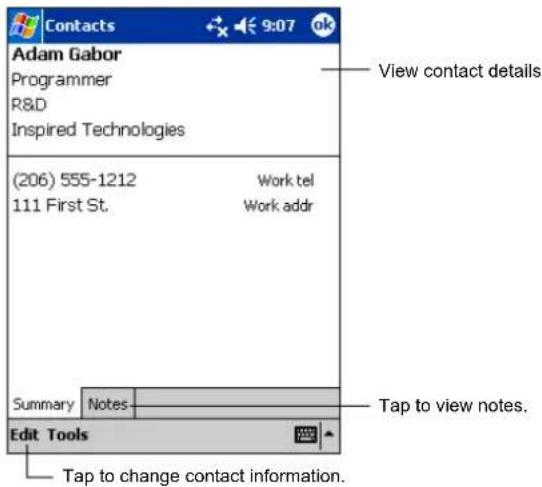
4.3 Tasks: Keeping a To Do List
Use Tasks to keep track of what you have to do.
Tap → Tasks or press the ☑ Tasks button on your Pocket PC to switch to the program.
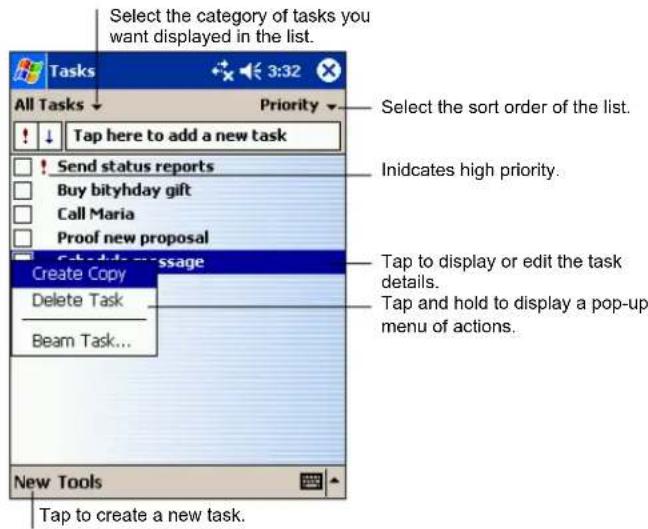
NOTE: To change the way information is displayed in the list, tap Tools → Options.
Creating a Task
1. In Task, tap New.
![Tap to return to the task list (the task is saved automatically). Tasks Subject: Priority: Normal Status: Not Completed Starts: None Due: None Occurs: Once Reminder: None Categories: No categories... Task Notes: 123 1 2 3 4 5 6 7 8 9 0 - = + Tab q w e r t y u i o p [ ] CAP a s d f g h j k l ; ' Shift z x c v b n m , . / ← CtI áü ` \ Edit](/content/2026/05/989474/images/65d6108a005851d109b68c3d8c8cbc1e26cf9d3f196d41fd03d7ac3ca8f804e8.jpg)
-
Using the Input panel, enter a description.
-
You can enter a start date and due date or enter other information by first tapping the field. If the Input panel is open, you will need to hide it to see all available fields.
-
You can also do the followings with regard to this task:
-
Add a note.
- Set a reminder.
• Make the task recurring. - Assign the task to a category.
- Beam the task.
• Synchronize the task.
For more information, tap → Help.
- Tap OK to return to the task list.
NOTE: To quickly create a task with only a subject, tap Tools → Entry Bar → Tap here to add a new task. Enter your task information.
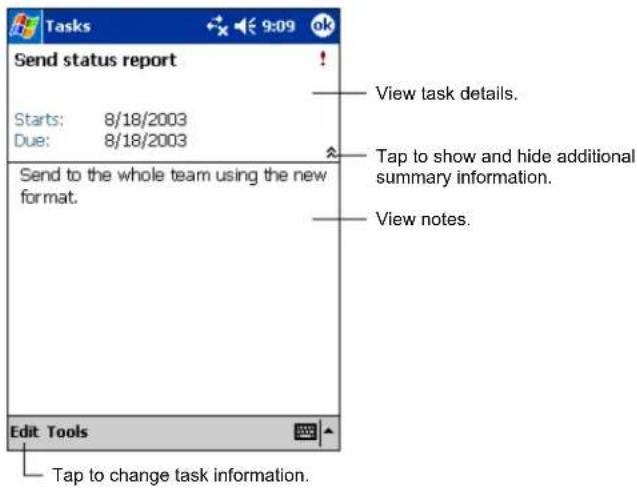
Using the Tasks Summary Screen
When you tap a task in the task list, a summary screen is displayed. To change the task, tap Edit.
4.4 Notes: Capturing Thoughts and Ideas
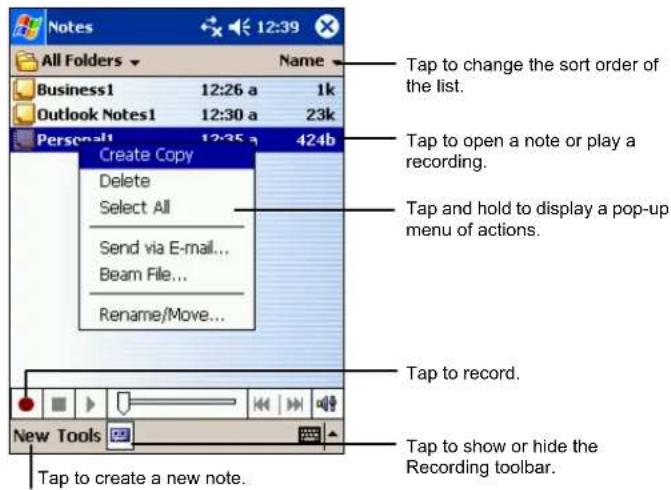
Quickly capture thoughts, reminders, ideas, drawings and phone numbers with Notes. You can create a written note or a recording. You can also include a recording in a note. If a note is open when you create the recording, it will be included in the note as an icon. If the note list is displayed, it will be created as a stand-alone recording.
Tap → Notes or press the Notes button on your Pocket PC to switch to the program.
Creating a Note
- In Notes, tap New.
NOTE: You can create a note by using a template. Tap the folder list (labeled All Folders by default) and then Template. Tap the template you want to use and make your changes.
- Create your note by writing, drawing, typing and recording. For more information about using the Input panel, writing and drawing on the screen and creating recordings, see section 2.8.
![Tap to return to the note list (the note is saved automatically) Team meeting notes: Adam will send current status to core team. Julie will get the revenue numbers. Tanner is back from the conference and reports that the product was a big hit! 123 1 2 3 4 5 6 7 8 9 0 - = Tab q w e r t y u i o p [ ] CAP a s d f g h j k l ; ' Shift z x c v b n m , . / CtI áü ` \ New Edit Tools Tap to show or hide the input panel. Tap to write on the screen. Tap to add a recording to the note.](/content/2026/05/989474/images/a2a96b0329c572dbab15d17e839dd023d7af036c4451b9b0b886422ed7527196.jpg)
-
You can also do the followings with regard to this note:
-
Beam the note.
- Send the note via e-mail.
- Create a template
For more information, tap Help.
- Tap OK to return to the note list.
4.5 Inbox: Sending and Receiving E-mail Messages
You can use Inbox to send and receive email messages in two ways:
- By synchronizing email messages with Microsoft Exchange or Microsoft Outlook on your desktop computer.
- By connecting directly to an e-mail server through an ISP (Internet Service Provider) or a network. This method requires an optional modem or network card.
Tap → Inbox on your Pocket PC to switch to the program.
Synchronizing E-mail Messages
E-mail messages can be synchronized as part of the general synchronization process. To do this, you need to enable Inbox synchronization in ActiveSync For information on enabling Inbox synchronization, see ActiveSync Help on the desktop computer.
During synchronization, the following occurs:
- Messages are copied from the mail folders of Exchange or Outlook on your desktop computer to the ActiveSync folder in Inbox on your Pocket PC. By default, you receive messages from the past three days only, the first 100 lines of each message file attachments of less than 100 KB in size.
- Email messages in the Outbox folder on your Pocket PC are transferred to Exchange or Outlook and then sent from those programs.
- The messages on the two computers are linked. When you delete a message on your Pocket PC, it is deleted from your desktop computer the next time you synchronize.
- Email messages in subfolders in other e-mail folders in Outlook are synchronized only if they have been selected for synchronization in ActiveSync
NOTE: You can also synchronize email messages with your desktop computer from a remote location. For more information, see Section 7.2.
Connecting Directly to an E-mail Server
You can send and receive email messages by connecting to a POP3 or IMAP4 e-mail server if you can connect to your ISP or local area network. (For information on connection, see Sections 7.4.)
Setting up an Email Service
You can use multiple email services to receive your messages. For each email service you intend to use, first set up and name the email service. If you use the same service to connect to different mailboxes, set up and name each mailbox connection.
In Inbox, tap Accouts → New Account. Follow the directions in the New Service Wizard. For an explanation of a screen, tap 🔒 at the upper right corner of the screen.
NOTE: You cannot add a new service while connected. Tap Accounts → Disconnect to disconnect.
When you connect to the email server, new messages are downloaded to the Inbox folder on your Pocket PC, messages in the Pocket PC Outbox folder are sent messages that have been deleted on the email server are removed from the Inbox folder on your Pocket PC.
Messages that you receive directly from an email server are linked to your email server rather than your desktop computer. When you delete a message on your Pocket PC, it is also deleted from the email server the next time you connect based on the settings you selected in ActiveSync.
You can work online or offline. When working online, you read and respond to messages while connected to the email server. Messages are sent as soon as you tap Send, which saves space on your Pocket PC.
When working offline, once you have downloaded new message headers or partial messages, you can disconnect from the email server and then decide which messages to download completely. The next time you connect, Inbox downloads the complete messages you have marked for retrieval and sends the messages you have composed.
Using the Message List
Messages you receive are displayed in the message list. By default, the most recently received messages are displayed first in the list.
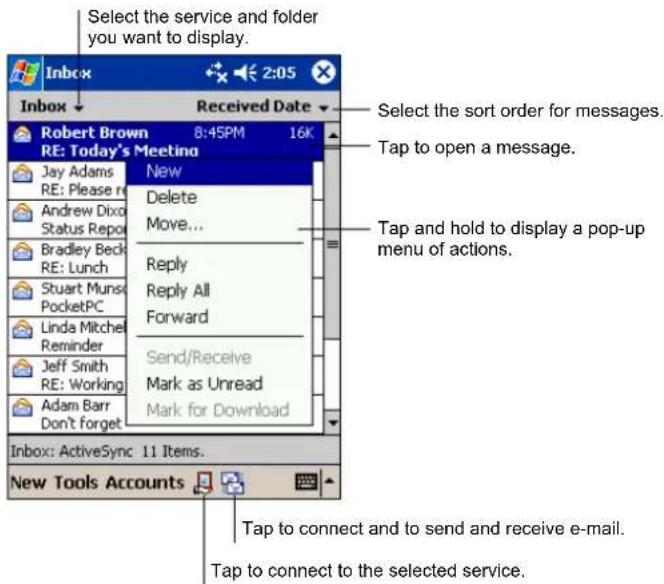
When you receive a message, tap it to open it. Unread messages are displayed in bold.
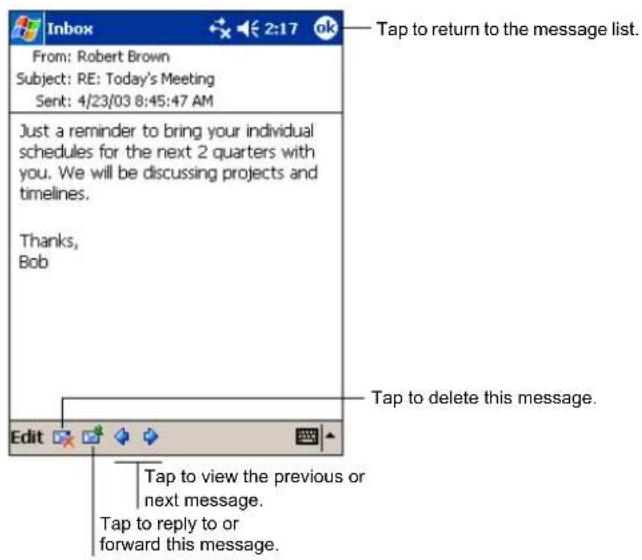
When you connect to your email server or synchronize with your desktop computer or server, by default, you will receive messages from the last three days only, the first 100 lines of each new message file attachments of less than 100KB in size. The original messages remain on the server or your desktop computer.
You can mark the messages that you want to retrieve in full during your next synchronization or email server connection. In the message list, tap and hold the message you want to retrieve. On the pop-up menu, tap Mark for Download. The icons in the Inbox message list give you visual indications of message status.
You specify your downloading preferences when you set up the service or select your synchronization options. You can change them at any time.
- Change options for Inbox synchronization using ActiveSync options. For more information, see ActiveSync Help.
- Change options for direct email server connections in Inbox on your Pocket PC. Tap Accounts → Accounts and tap the service you want to change. Tap and hold the account and tap Delete to remove an account.
Composing and Sending Messages
-
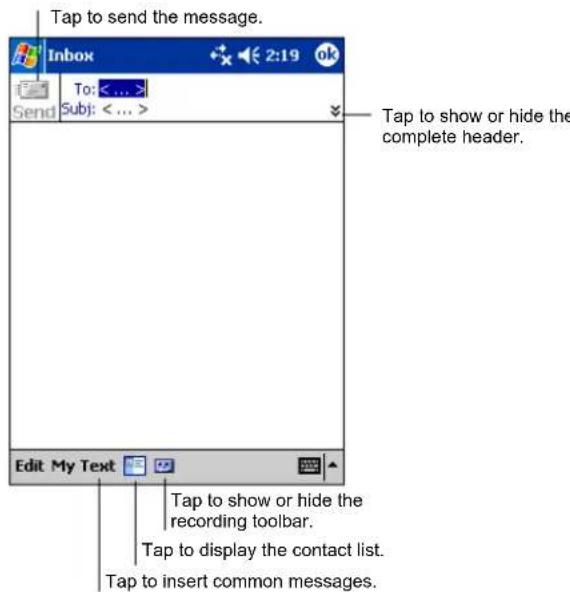
In Inbox, tap New.
-
In tho field, enter an email address of one or more recipients, separating them with a semicolon. If the address is already in your contact list, you can tap To or the 📄 Contacts button in the Command bar to select the e-mail address.
-
To select a service, tap the DOWN arrow to display more header information. In the Account list, select ActiveSyn or the desired e-mail account.
-
Enter your message. To quickly enter common messages, tap My Text and select the desired message.
-
To check spelling, tap Edit → Spell Check.
-
If you want to attach a file to the message, tap Edit → Add Attachment and select the desired file.
NOTE: OLE objects cannot be attached to Inbox messages.
- Tap Send when you have finished the message. If you are working offline, the message is moved to the Outbox folder and is sent the next time you connect.
The message is placed in the Outbox folder on your Pocket PC and will be delivered in one of two ways:
- The message is transferred to the Outbox folder in Exchange or Outlook on your desktop computer and sent the next time you synchronize.
- The message is transferred to your email server the next time you connect. In Inbox, make sure the appropriate service is selected on the Accounts menu. Then tap the Connect button (or Connect on the Accounts menu).
Managing Email Messages and Folders
Each e-mail service account has its own folder hierarchy with five default folders: Inbox, Outbox, Deleted Items, Drafts and Sent Items. The messages you receive and send through the mail service are stored in these folders. You can also create additional folders within each hierarchy.
The Deleted Items folder contains messages that have been deleted on your Pocket PC. The behaviour of the Deleted and Sent Items folders depends on the options you have chosen.
Folder Behavior
The behavior of the folders you create depends on whether you are using ActiveSync, POP3 or IMAP4.
- If you use ActiveSync, email messages in the Inbox folder in Outlook are automatically synchronized with your Pocket PC. You can select to synchronize additional folders by designating them for ActiveSync The folders you create and the messages you move are mirrored on the server. For example, if you move two messages from the Inbox folder to a folder named Family and you have designated Family for synchronization, the server creates a copy of the Family folder and copies the messages into that folder. You can then read the messages while away from your desktop computer.
- If you use POP3 and you move email messages to a folder you created, the link is broken between the messages on the Pocket PC and their copies on the mail server. The next time you connect, the mail server sees that the
messages are missing from the Pocket PC Inbox and deletes them from the server. This prevents you from having duplicate copies of a message, but it also means that you no longer have access to messages that you move to folders created from anywhere except the Pocket PC.
- If you use IMAP4, the folders you create and the email messages you move are mirrored on the server. Therefore, messages are available to you anytime you connect to your mail server, whether it is from your Pocket PC or desktop computer. This synchronization of folders occurs whenever you connect to your mail server, create new folders or rename/delete folders when connected.
For all services except ActiveSync, you can access folder options by tapping Tools → Manage Folders in the message list.
5 Companion Programs
In addition to Microsoft Pocket Outlook, several programs are built into your Pocket PC. They include Microsoft Pocket Word, Microsoft Pocket Excel, Windows Media Player, Microsoft Reader and additional programs. This chapter tells you how to use these programs.
5.1 Pocket Word
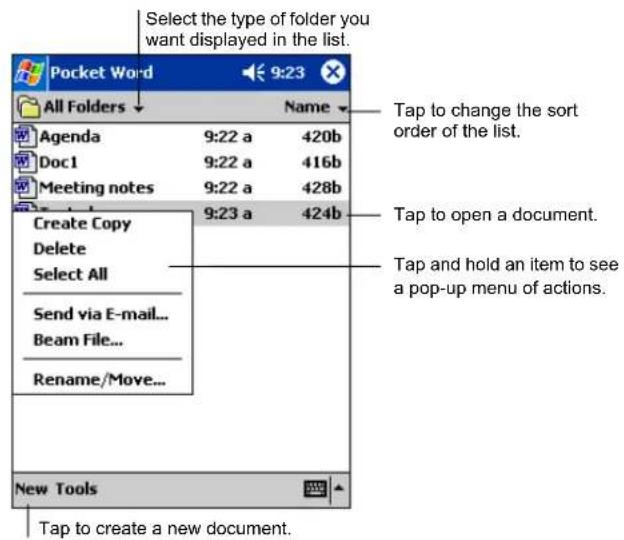
Microsoft Pocket Word works with Microsoft Word on your desktop computer to give you easy access to copies of your documents. You can create new documents on your Pocket PC or you can copy documents from your desktop computer. Synchronize documents between your desktop computer and your Pocket PC regularly so that you have the most up-to-date content in both locations.
Tap → Programs and tap the Pocket Word icon to switch to the program.
Creating a Document
- In Pocket Word, tap New.
NOTE: To open a template rather than a blank document, select a template for new documents. Tap Tools → Options and select the desired template. When you tap New, the template appears with appropriate text and formatting already provided.
- You can enter information in Pocket Word in one of four modes: writing, drawing, typing or recording. Use the View menu to switch between modes. Each mode has its own toolbar, which you can show and hide by tapping the Show/Hide Toolbar button on the Command bar. (For more information on entering information, see section 2.8 or Pocket PC Help.)
NOTE: Written words are converted to graphics (metafiles) when a Pocket Word document is converted to a Word document on your desktop computer.
![Tap and hold to see a pop-up menu of actions. Tap to return to the document list (changes are saved automatically) Meeting not Cut Copy Paste Clear Format... Paragraph... Recognize Alternates... Spell Check Tap to change formatting options. Tap to format text. 123 1 2 3 4 5 6 7 8 9 0 - = ◆ Tab q w e r t y u i o p [ ] CAP a s d f g h j k l ; ' Shift z x c v b n m , . / ← CtI áü ` \ New Edit View Tools ↑ Tap to show or hide the tool bar.](/content/2026/05/989474/images/350101147ff250572c780bbf7676a73552df2e8a3d68db2e257482a69dfb5d27.jpg)
Typing Mode
Writing Mode
Drawing Mode
- When you have finished entering the information and tap OK, the document is automatically saved and named according to the first characters of text entered in the document.
Working with Pocket Word Documents
Opening a Document
Whenever you switch to Pocket Word, you will see the document list. Tap the desired document to open it. You can open only one document at a time; when you open a second document, you will be asked to save the first.
Changing Options of a Document
In an open document, you can:
- Save a document in a variety of formats, including Pocket Word Document (.psw), Rich Text Document (.rtf) and Plain Text Document (.txt), Word 97/2000 Document (.doc) and Word 97/2000 Template (.dot).
NOTE: If your document is simple, save it as a Plain Text Document to save storage space.
- Rename the document.
- Move the document to a storage card or folder.
For more information, see Word Help on your Pocket PC.
Tips for Working in Pocket Word
- You can change the zoom magnification by tapping View → Zoom and select the percentage you want. Select a higher percentage to enter text and a lower one to see more of your document.
- If you are opening a Word document created on a desktop computer, select View → Wrap to Window so that you can see the entire document.
5.2 Pocket Excel
Microsoft Pocket Excel works with Microsoft Excel on your desktop computer to give you easy access to copies of your workbooks. You can create new workbooks on your Pocket PC or you can copy workbooks from your desktop computer to your Pocket PC. Synchronize workbooks between your desktop computer and your Pocket PC so that you have the most up-to-date content in both locations. Pocket Excel provides fundamental spreadsheet tools, such as formulas, functions, sorting and filtering, which enable you to create simple workbooks, such as expense reports and mileage logs.
Tap → Programs and tap the Pocket Excel icon to switch to the program.
Creating a Workbook
- In Pocket Excel, tap New.
NOTE: To open a template rather than a blank workbook, select a template for new workbooks. Tap Tools → Options and select the desired template. When you tap New, the template appears with appropriate text and formatting already provided.
- You can use Pocket Excel much the same way you use Excel on your desktop computer. You can enter formulas and functions and then filter data to see the subset of information you want. (For more information on entering information, see section 2.8 or Pocket PC Help.)
![Pocket Excel A3 =SUM(A1:A2) Cell contents appear here as you enter them. 1 $44.00 2 $22.00 3 $66.00 4 5 6 Format button. Auto Sum button. Ready Sheet1 Sum=$66.00 F Σ $ , .00 123 1 2 3 4 5 6 7 8 9 0 - = Tab q w e r t y u i o p [ ] CAP a s d f g h j k l ; * Shift z x c v b n m , . / ← CtI áü ` \ ↓ ↑ ← → New Edit View Format Tools](/content/2026/05/989474/images/8684e4fd7c0337963a01b7fd71b077ace4de8e929105d558f002e78548c6035a.jpg)
- When you have finished entering the information and tap OK, the workbook is automatically saved and named according to the first characters of text entered in the workbook.
Working with Pocket Excel Workbooks
Opening a Workbook
Whenever you switch to Pocket Excel, you will see the workbook list. Tap the desired workbook to open it. You can open only one workbook at a time; when you open a second workbook, you will be asked to save the first.
Changing Options of a Workbook
In an open workbook, you can:
- Save a workbook in a variety of formats, including Pocket Excel Workbook (.pxl), Pocket Excel 1.0 Workbook (.pxl), Pocket Excel Template (.pxt), Excel 97/2000 Workbook (.xls) and Excel 97/2000 Template (.xlt).
- Rename the workbook.
- Move the workbook to a storage card or folder.
For more information, see Excel Help on your Pocket PC.
Tips for Working in Pocket Excel
- View in full-screen mode to see as much of your worksheet as possible. Tap View → Full Screen. To exit full-screen mode, tap Restore.
- If your workbook contains sensitive information, you can protect it with a password. To do so, open the workbook and tap Edit → Password.
- Show and hide window elements. Tap View and then tap the elements you want to show or hide.
-
Freeze panes on a worksheet. First, select the cell where you want to freeze panes. Tap View → Freeze Panes. You might want to freeze the top and leftmost panes in a worksheet to keep row and column labels visible as you scroll through a sheet.
-
Split panes to view different areas of a large worksheet. Tap View → Split and drag the split bar to where you want it. To remove the split, tap View → Remove Split.
- Show and hide rows and columns. To hide a row or column, select a cell in the row or column you want to hide. Tap Format → Row or Column → Hide. To show a hidden row or column, tap Tools → Go To and then type a reference that is in the hidden row or column. When done, tap Format → Row or Column → Unhide.
5.3 MSN Messenger
MSN ^® Messenger on your Pocket PC provides the same chat environment as MSN Messenger on your desktop computer. These features include:
• See who is online.
- Send and receive instant messages.
- Have an instant message conversation with a group of contacts.
- Tell contacts that you are unavailable.
- Block contacts from seeing your status or sending you messages.
To use MSN Messenger, you must have an Internet connection. (For more information, see section 7.4.)
In addition, you must have a Microsoft Passport™ account or a Microsoft Exchange email account. You must have a Passport to use MSN Messenger Service. If you have a Hotmail® or MSN account, you already have a Passport. Once you have one of these accounts, you are ready to set up your account.
NOTE:
- Sign up for a Microsoft Passport account at http://www.passport.com. Get a free Microsoft Hotmail email address at http://www.hotmail.com.
- Tap → Programs → Pocket MSN to connect to Pocket MSN web site where you can subscribe to get popular MSN services on your Pocket PC.
Tap → Programs and tap the MSN Messenger icon to switch to the program.
Setting Up to Use MSN Messenger
Before you can connect, you must enter Passport or Exchange account information. Set up an account and sign in as follows:
- In MSN Messenger, tap Tools → Options.
- On the Accounts tab, enter your Passport or Exchange account information.
- To sign in, tap the sign-in screen and enter your email address and password.
NOTE: If you already use MSN Messenger on your desktop computer, your contacts show up on your Pocket PC without being added again.
Working with Contacts
The MSN Messenger window shows all of your messenger contacts at a glance and are divided into Online and Not Online categories. From this view, while connected, you can chat, send email, block the contact from chatting with you or delete contacts from your list using the pop-up menu.
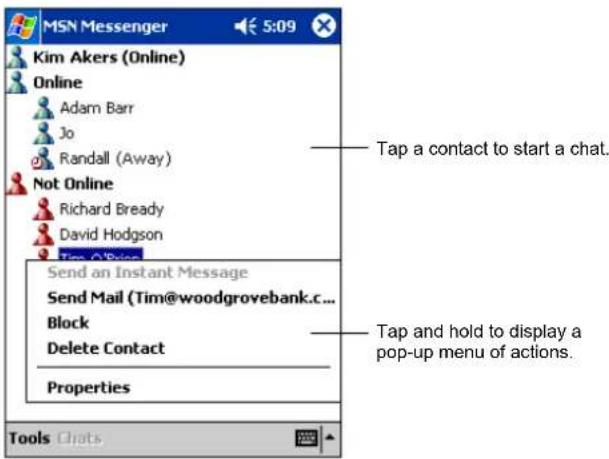
NOTE:
- To see others online without being seen, in the Tools menu, tap My Status and select Appear Offline.
- If you block a contact, it appears offline but remains on the blocked contact's list. To unblock a contact, tap and hold the contact, then tap Unblock on the pop-up menu.
Chatting with Contacts
Tap a contact name to open a chat window. Enter your message in the text entry area at the bottom of the screen or tap My Text to enter a preset message and tap Send. To invite another contact to a multi-user chat, in the Tools menu, tap Invite and tap the contact you want to invite.
NOTE: To switch back to the main window without closing a chat, tap Contacts. To revert back to your chat window, tap Chats and select the person whom you were chatting with.
To know if the contact you are chatting with is responding, look for the message under the text entry area.
For more information on using MSN Messenger, tap 📄 → Help.
5.4 Windows Media Player for Pocket PC
Use Microsoft Windows Media Player for Pocket PC to play digital audio and video files that are stored on your Pocket PC or on a network, such as on a Web site.
Tap → Windows Media to switch to the program.
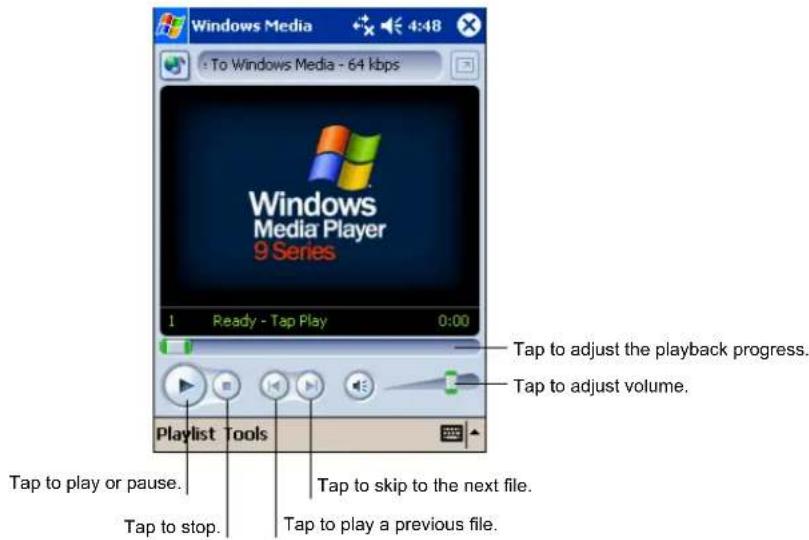
You can play files in either Windows Media or MP3 format (this include files with the extension .asf, .wma, .wmv and .mp3). To find content in Windows Media Format, see the WindowsMedia.com Web site (http://www.windowsmedia.com).
Use Microsoft Windows Media Player on your desktop computer to copy digital audio and video files to your Pocket PC.
For more information about using Windows Media Player, tap → Help.
5.5 Microsoft Reader
Use Microsoft Reader to read eBooks on your Pocket PC. Download books to your desktop computer from your favourite eBook Web site. Use ActiveSync to copy the book files to your activated Pocket PC. The books appear in the Reader Library, where you can tap them in the list to open them.
NOTE: Before you can use Microsoft Reader, you must activate it from the Microsoft activation site (http://das.microsoft.com/activate). Follow the directions given at the Microsoft site.
Each book consists of a cover page, an optional table of contents and the pages of the book. You can:
- Page through the book by using the scroll dial on your Pocket PC or by tapping the page number on each page.
- Annotate the book with highlighting, bookmarks, notes and drawings.
- Search for text and look up definitions for words.
The Guidebook contains all the information you need to use the software. To open the Guidebook, tap Help on the Reader command bar. Or, on a book page, tap and hold on the book title then tap Help on the pop-up menu.
Tap → Programs and tap the Microsoft Reader icon to switch to the program.
Getting Books for Your Pocket PC
You can download book files from the Web. Just visit your favourite eBook retailer and follow the instructions to download the book files.
Sample books and a dictionary are also included in the MSReader folder on the Companion CD.
Use ActiveSync to download the files from your desktop computer to your activated Pocket PC as described in the Read Me file in the MSReader folder.
Using the Library
The Library is your Reader home page. The home page displays a list of all books stored on your Pocket PC or storage card.
To open the Library, use one of the two methods:
- On the Reader command bar, tap Library.
- On a book page, tap the book title and tap Library on the pop-up menu.
To open a book, tap its title in the Library list.
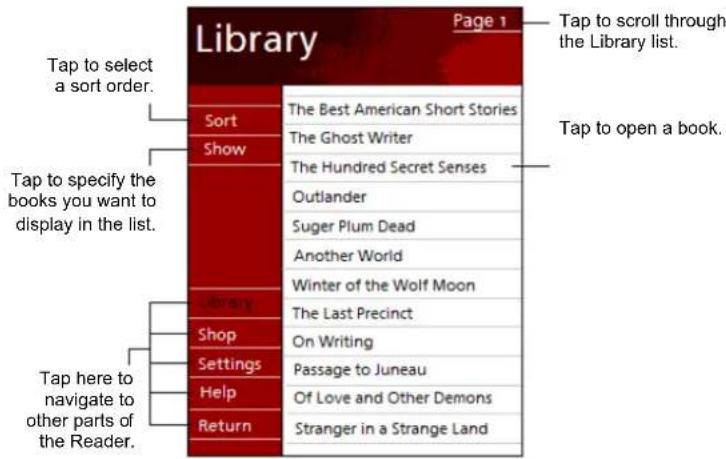
Reading a Book
Each book consists of a cover page, an optional table of contents and the pages of the book. Navigation options are listed in the bottom portion of the cover page.
The first time you open a book, you will probably want to go to the first page or to the table of contents, if there is one. Subsequently, whenever you open the book, you automatically go to the last page read.
In addition to the text, each book page includes a page number and book title.
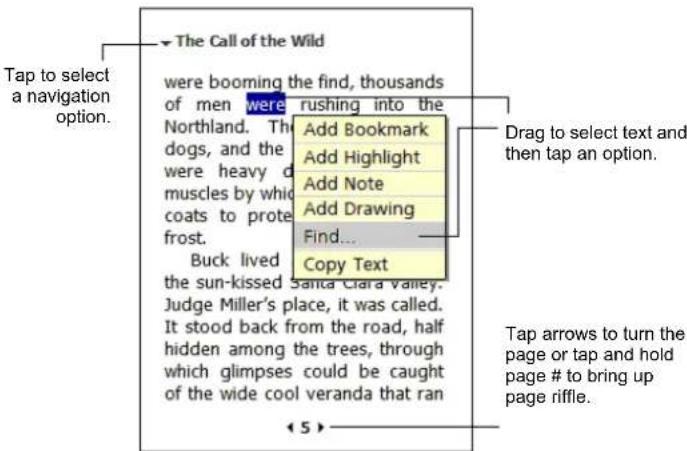
You can also page through a book by using the scroll dial on your Pocket PC.
Using Reader Features
Reading a book electronically gives you several options not available with paper books. These options are available from any book page.
Select text by dragging across the text on the page. Then, tap an option on the pop-up menu, as described here.
- Search for Text
Find text in a book by tapping Find on the pop-up menu. Enter the word you want to search for and tap the desired Find option. Reader highlights found text on the page. To close Find, tap outside the box. To return to your original page, tap the title and then tap Return on the pop-up menu.
- Copy Text
You can copy text from books that support this feature into any program that accepts text. On a book page, select the text you want to copy. Then, tap Copy Text on the pop-up menu. The text can be pasted into the program of your choice.
- Bookmarks
When you add a bookmark to a book, a color-coded bookmark icon appears in the right margin. You can add multiple bookmarks to a book. Then, from anywhere in the book, tap the bookmark icon to go to the bookmarked page.
- Highlights
When you highlight text, it appears with a colored background.
Notes
When you attach a note to text, you enter the text in a note pad that appears on top of the book page. A Note icon displays in the left margin. To show or hide the note, tap the icon.
- Drawings
When you add a drawing, a Drawing icon appears in the bottom-left corner of the page and drawing tools appear across the bottom of the page. Draw by dragging your stylus.
- To see a list of a book's annotations, including bookmarks, highlights, text notes and drawings, tap Annotations Index on the book's cover page. You can tap an entry in the list to go to the annotated page.
Removing a Book
When you finish reading a book, you can delete it to conserve space on your Pocket PC. If a copy of the book is stored on your desktop computer, you can download it again at any time.
To remove a book from your Pocket PC, tap and hold the title in the Library list and then tap Delete on the pop-up menu.
5.6 Pictures
Use Pictures to view jpg pictures stored on your Pocket PC or on a SD/MMC card, send pictures to others, view a slideshow of your pictures or set a picture as the background on the Today screen.
You can copy jpg pictures from your desktop computer to the My Pictures folder, within the My Documents folder on your Pocket PC. For more information on copying files from your desktop computer to your Pocket PC, see ActiveSync Help on your desktop computer.
- To view pictures in a SD/MMC card, insert the card.
-
Tap → Programs and tap the Pictures icon to switch to the program.
-
By default, the program displays thumbnails of the jpg pictures in the My Pictures folder, within the My Documents folder on your Pocket PC. To view the jpg pictures in a SD/MMC card, tap 📋. To view pictures on the Pocket PC, tap 📋.
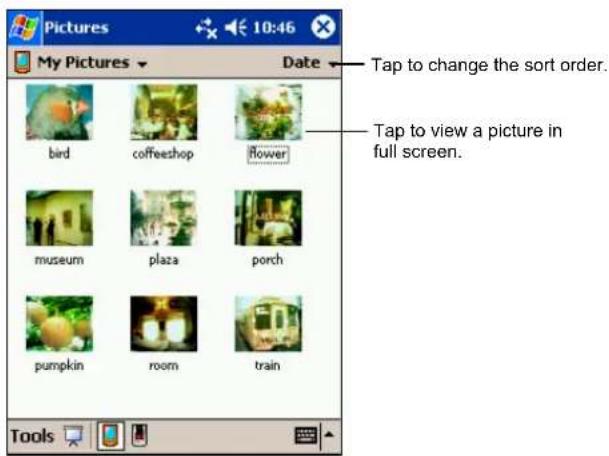
- Thumbnails of pictures appear on the screen. You can tap one of them to view the picture in full screen.
For more information about using Pictures, tap 📄 → Help.
5.7 Additional Programs
In addition to Microsoft software, your Pocket PC manufacturer also provides additional programs to enhance your Pocket PC or facilitate your operation.
MP3 Player
The MP3 Player program turns your Pocket PC into an MP3 player. It features:
- Playback of MP3 and wav files
- Basic playback controls such as play, pause, stop, next and previous
• Equalizer settings with 17 presets - Ways of playback including single playback, normal sequence, random sequence, repeat and sampling playback
- Play list support
- Remote control support when using the headset with the remote control
Tap ➕ → Programs and tap the MP3 Player icon to switch to the program. The control panel will appear on the screen where you can easily control the MP3 player by tapping the control buttons.
Playing MP3 Files
- Have your MP3 files ready. You can copy the files either to the root directory of a SD/MMC card or to the My Documents directory of your Pocket PC.
- Tap → Programs and tap the MP3 Player icon to switch to the program.
- The program will search for MP3 files in the root directory of a SD/MMC card, as the first priority, and in the My Documents directory of your Pocket PC, as the second priority. When MP3 files are detected, they will be added to the play list.
- To start the playbck, tap ▶. To control the playback, use the control buttons as described later.
- To exit the program, tap OK or File → Exit.
NOTE:
- During the playback, you can tap 📋 to switch to other programs. The playback will not be interrupted.
- When files are added to the play list, the play list is automatically saved when you exit MP3 Player.
- You can create your own play lists for future playback. (See below for more information.)
Playback Controls
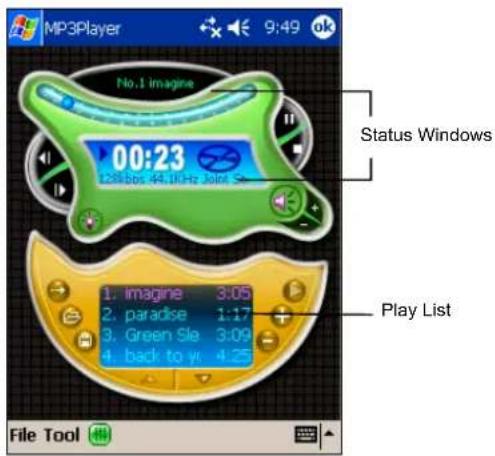
You can control the MP3 Player via control buttons or menus. See the table below for details:
| Control Button | Name | Description | Use Menus as an Alternative |
| Play/Pause | Play or pause the playback. | Tool → Play/Pause | |
| Stop | Stop the playback. | Tool → Stop | |
| Previous/Next | Move to the previous or next file. | Tool → Previous/Next | |
 | Volume | Increase or decrease the volume. The volume indicator will appear. | Tool → Add Volume (+)/Reduce Volume (−) |
| [22T4] | Mute Switch mute on or off. | ||
 | Backlight | Turn off the backlight. To save battery power, turn off the backlight when playing music for extended period of time using battery power. To restore the backlight, press the power button. | Tool → Shut off Backlight |
 | Slider | Move to a different location for playback. | |
 | Playback Mode | Switch among the following modes:Single playbackRepeat allRepeat the current fileSampling playback | |
 | Open Play List | Open a play list. | File → Open play list |
 | Save Play List | Save a play list. | File → Save pay list |
 | Sequence | Normal sequenceRandom sequence | |
 | Add file/Delete file | Add a file to the play list or remove a file from the play list. | File → Add song/Delete song |
 | Up/Down | Move to the previous page or next page of the play list. | |
| [AYS6] | Equalizer | Open or close the equalizer panel. (See below for more information.) | Tool → Equalizer |
Using Play Lists
-
To create your own play list in MP3 Player, tap on the control panel or File Add song.
-
MP3 files detected in the SD/MMC card or My Documents folder will appear in the play list.
-
If you are adding files in other folders, tap Advance to access the browser window. The upper part of the window is where you select the folder and the lower part of the window is where you select the MP3 or wav file. Tap OK after your selection. Repeat the same step for all the other files you wish to add to the play list.
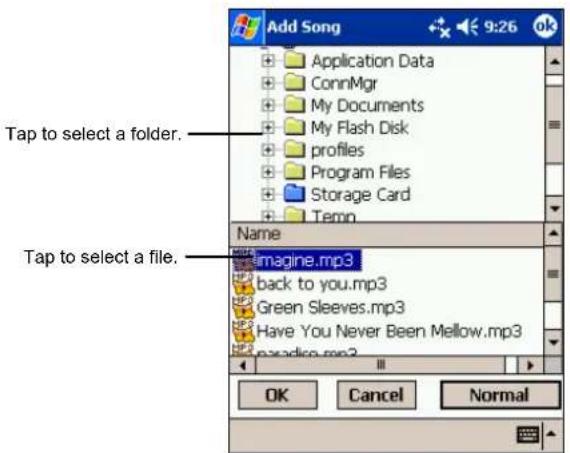
-
The filename will be added to the play list in sequence.
-
To save the play list, tap 📄 or File → Save play list, enter the filename and specify a folder if needed (default folder is My Documents). Tap OK.
-
To open your play list later on, tap 📋 or File → Open play list. The play list files in My Documents folder are displayed. If you are opening a play list in another folder, tap Advance. Tap OK after your selection and the playback will begin.
Equalizer
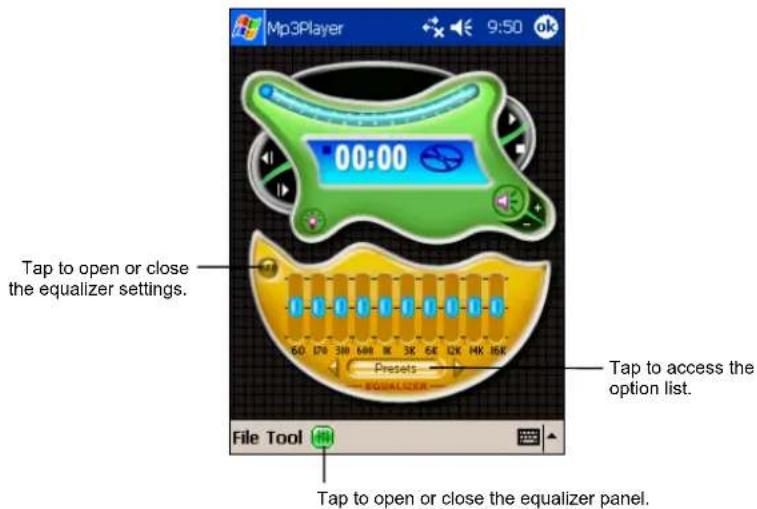
The MP3 Player provides 17 presets for various music effect. Tap 📂 to open the equalizer panel and tap Presets to access the option list. Available options are blues, classical, club, dance, full bass, full bass & treble, full treble, dance hall, live, party, pop, reggae, rock, ska, soft, classic rock and techno.
You can also manually adjust the equalizer. Tap OFF on the equalizer panel to switch it to ON and then move the slider. After your adjustment, tap ON to switch it to OFF.
To close the equalizer panel, tap 📄.
6 Using the Digital Camera
A digital camera is built into your Pocket PC. Using the MioCam program, you can take photos or record videos anywhere, any time with your Pocket PC. You can also view your photos and watch your videos on your Pocket PC.
6.1 About MioCam
Features
• Capability of photo taking and video recording
- Playback of photos and videos
• Available resolutions
√ 640 x 480 and 320 x 240 pixels for photos
√ 320 x 240 and 176 x 144 pixels for videos
- File formats
√ jpg for photos
√ mpg for videos
- Daylight, night, image and black-and-white modes supported
- Adjustable zooming, saturation, white balance and brightness
• One-hand operation as well as stylus operation - Finger grip at the rear panel of your Pocket PC
• Right-handed and left-handed orientations supported
Screen Elements
When you use MioCam, the main screen consists of three major parts:
- Status Bars are on the top and bottom of the screen showing status icons.
• Viewing Window is at the center of the screen. - Menu is along the right side of the screen. The available menu items depend on the current operation.
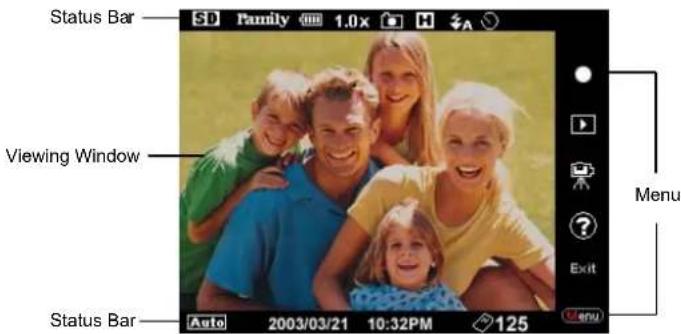
Status or Button Operation
In MioCam, you can use the stylus to select a menu item.
In addition, you can conveniently use the navigation button for one-hand operation. Simply push the navigation button upwards or downwards to select the previous or next item in the menu. When you select an item, it changes to a different color. Press the navigation to perform the selected function.
6.2 Taking and Viewing Photos
Taking Photos
-
If you are using a SD/MMC card as your storage device, insert the card so that the photos will be automatically saved to the device. If there is no SD/MMC card when you start the MioCam program, the photos will be saved in the memory of your Pocket PC.
-
Tap Programs MioCam to run the program. The main screen as shown below will appear.
NOTE: If you are in video or photo-viewing mode, select 📄 (camera icon) in the menu to switch to photo mode.
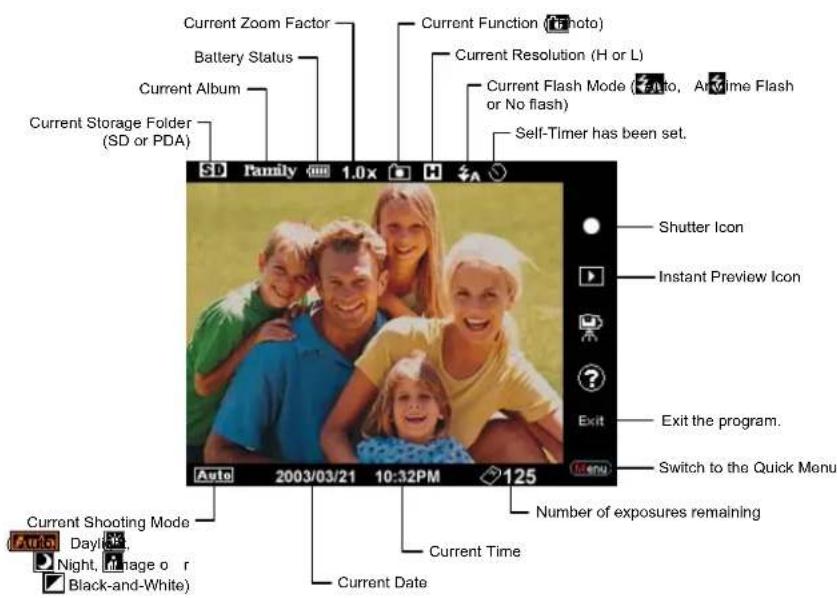
-
When using MioCam for the first time, the default album is "Family." You can select another album (as described in section 6.5). When you change the album, it becomes the default album when you next run MioCam.
-
If you need to adjust the image quality, select menu icon) to switch to the Quick Menu and make your adjustments (as described later). After the adjustments, select (camera icon) to close the Quick Menu.
NOTE: If the photo resolution is set to L (Low), you can directly zoom in or out by pushing the navigation button towards the left or right (with the Pocket PC in a horizontal orientation).
- Frame your target in the viewing window. You can rotate your Pocket PC as needed.
- When ready, select(shutter icon). The photo (jpg format) will be saved at the appropriate location. (See section 6.4 for more information.)
- To view the result, select ▶ (instant preview icon). (See the instructions later on for more information.)
- To exit the MioCam program, return to the photo main screen and select Exit (exit icon).
Photo Quick Menu
If you need manual adjustments when taking photos, select menu (menu icon) to switch to the Quick Menu. The Photo Quick Menu items are described below:
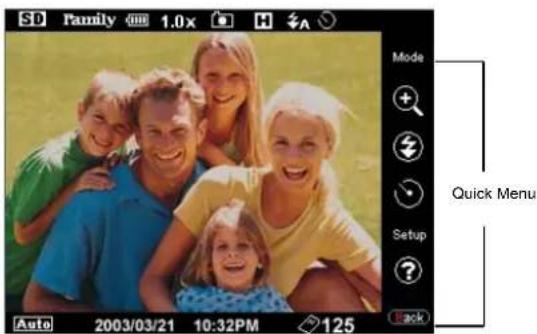
| Icon | Name | Descriptions |
| Mode | Mode | Switches to the mode selection submenu. You can select a shooting mode according to your current environment and need.MioCam will determine certain settings to produce the results you wish for.The available options are:Auto (default)DaylightNightImageBlack-and-White |
| Zoom | Switches to the zoom factor selection submenu. This function is available only when the resolution is set to low.The available options are: 1.0x, 1.2x, 1.4x, 1.6x, 1.8x and 2.0x. | |
| Flash | When you tap the icon or press the navigation button with the icon highlighted, you can switch among three selections as indicated by the flash icon in the status bar. The icon can be:Auto (default). Flash fires when lighting is poor.Anytime Flashno icon No flash allowed | |
| Self-Timer | Switches to the self-timer selection submenu. Timer setting is helpful if you want to avoid obscure photos caused by shaking of the Pocket PC when you press the button. For example, if you set the timer to 5 seconds, the countdown will begin as you release the shutter and countdown icon) appears at the upper right corner of the screen. You can then keep the Pocket PC steady during the countdown period and, when it times up, the photo is taken.The available options are Non (default), 5s (5 seconds) and 10s (10 seconds). | |
| Setup | Setup | Switches to the Setup menu. (See section 6.5 for details.) |
When you complete a setting, select Back (back icon) to go back to the previous screen.
Viewing Photos
You can instantly view your photos in MioCam.
Single Viewing
- In the photo main screen, select ▶(instant preview icon) to view the last-shot photo in the current album.
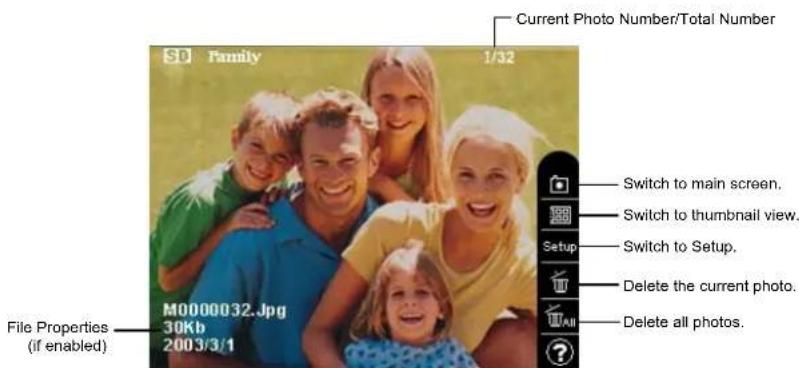
- To view the previous or next photo in the current album, push the navigation button toward the left or right (with the Pocket PC in a horizontal orientation).
- You can zoom in or out on the photo if you want. To zoom out, slide the stylus toward the left across the screen; to zoom in, toward the right.
- To open another album, select Setup → Album Name.
- To end viewing the photo and return to the main screen, select 📄 (camera icon).
Thumbnail Viewing
You can also view thumbnails of the photos.
-
In the photo main screen, select ▶ (instant preview icon).
-
Select the 📄 (thumbnail icon) to view thumbnails of the photos in the current album.

-
Tap a photo with the stylus or move the highlight with the navigation button and then press to view the photo in full screen.
-
To browse the previous or next thumbnail screen, press the navigation button upwards or downwards (with the Pocket PC in a horizontal orientation).
-
To open another album, select Setup → Album Name.
-
To end viewing the thumbnails and return to the single viewing screen, tap the blank area of the screen.
6.3 Recording and Watching Videos
Recording a Video
-
If you are using a SD/MMC card as your storage device, insert the card so that the recordings will be automatically saved to the device. If there is no SD/MMC card when you start the MioCam program, the recordings will be saved in the memory of your Pocket PC.
-
Tap Programs MioCam to run the program. The photo main screen will appear.
-
Select 📄 (recorder icon) to activate the recording function. The screen as shown below will appear.
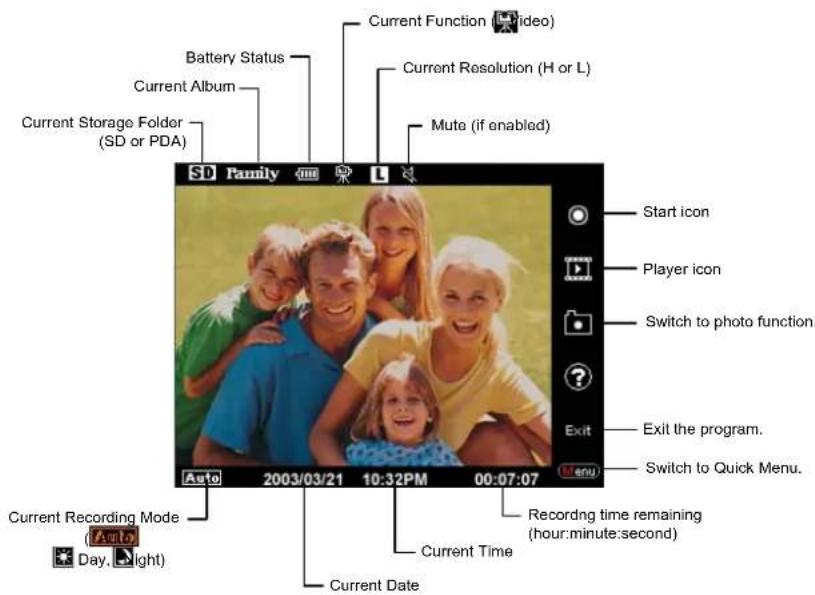
-
When using MioCam for the first time, the default album is "Family." You can select another album (as described in section 6.5). When you change the album, it becomes the default album when you next run MioCam.
-
If you need to adjust the image quality, select 📄 (recorder icon) to switch to the Quick Menu and make your adjustments (as described later). After the adjustment, select 📄 (recorder icon) to close the Quick Menu.
-
If you don't want to record the voice, select Menu → Select System → Mute and select On. The mute icon will appear in the status bar.
-
Frame your target in the viewing windows. You can rotate the Pocket PC if needed.
-
To start recording, select (start icon). The word "REC" in red will appear at the upper left corner to indicate that recording is in progress. The time used up and the available recording time (hour:minute:second) appears at the lower left corner of the screen.
NOTE:
- The available recording time is an estimated value before the recording begins. The value will not be refreshed during the recording.
-
The available time will not appear if the storage device is Pocket PC, not a SD/MMC card.
-
To stop recording, tap the screen or press the navigation button. The video (mpg format) will be saved to the appropriate storage device. (See section 6.4 for more information.)
-
To view what you have recorded, select ▶ (player icon). (See the instructions later on for more information.)
-
To exit the MioCam program, return to the main screen and select Exit (exit icon).
Video Quick Menu
If you need manual adjustments when recording, select menu (menu icon) to switch to the Quick Menu. The Video Quick Menu items are described below:
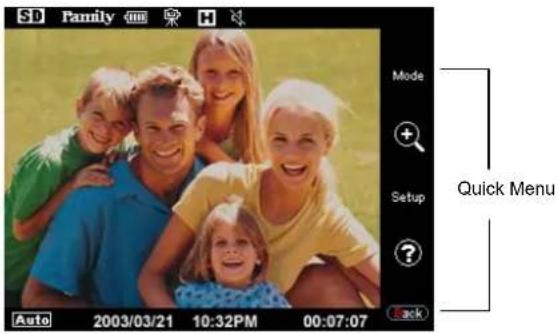
Icon Name Description
Mode
Mode
Switches to the mode selection submenu. You can select a recording mode according to your current environment and need. MioCam will determine certain settings to produce the results you wish for.
The available options are:

Auto (default)

Daylight
Night

Zoom
Switches to the zoom factor selection submenu.
The available options are: 1.0x, 1.2x, 1.4x, 1.6x, 1.8x and 2.0x.
Setup
Setup Switches to the Setup menu. (See section 6.5 for details.)
When you complete a setup, select 📄 to return to the previous screen.
Watching Videos
You can instantly play your videos in MioCam.
Single Viewing
- In the video main screen, select player icon) to play the last-shot video in the current album.
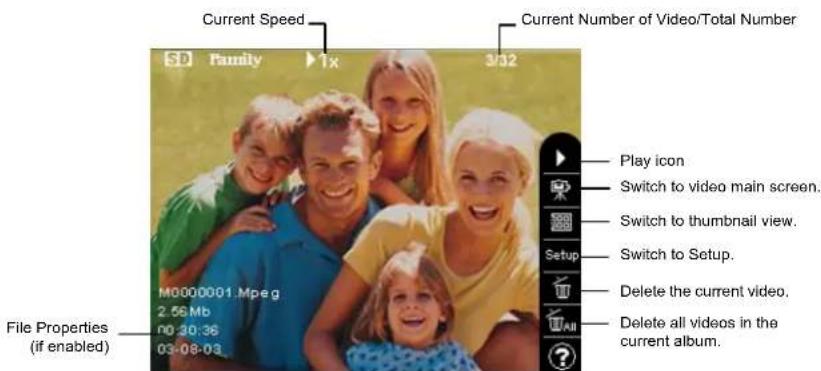
- During the playback, the progressing bar and length of the video appear at the bottom of the screen. To control the playback such as to stop, change the speed or volume, select a corresponding icon in the menu.
NOTE: You can also stop the playback by tapping the screen.
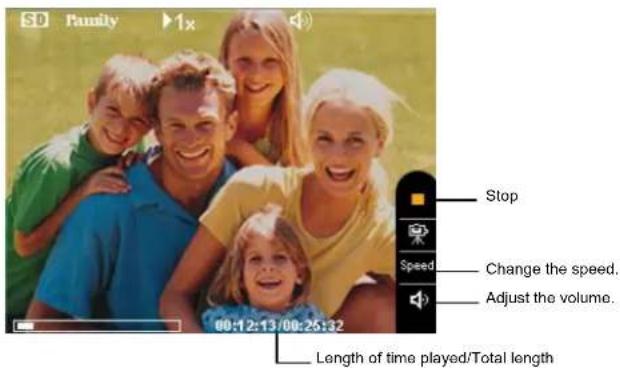
-
To playback the previous or next video, push the navigation button toward the left or right (with the Pocket PC in a horizontal orientation). Then, select ▶ (play icon).
-
To open another album, select Setup → Album Name.
-
To end watching the video and return to the main screen, select 📄 (video recorder icon).
Thumbnail Viewing
You can also view thumbnails of the videos.
-
In the video main screen, select ▶ (player icon).
-
Select 📄 (thumbnail icon) to view thumbnails of the videos in the current album.

-
As you move the highlight using the navigation button, the highlighted video is instantly played. If you tap a video or press the navigation button with a video selected, the video is played in full screen.
-
To browse to the previous or next thumbnail screen, press the navigation button upwards or downwards (with the Pocket PC in a horizontal orientation).
-
To open another album, select Setup → Album Name.
-
To end viewing the thumbnails and return to the single viewing screen, tap the blank area of the screen.
6.4 Managing Photos and Videos
Storage Folder
MioCam will automatically create the following folders and subfolders under your Pocket PC's My Documents folder or your SD/MMC card.
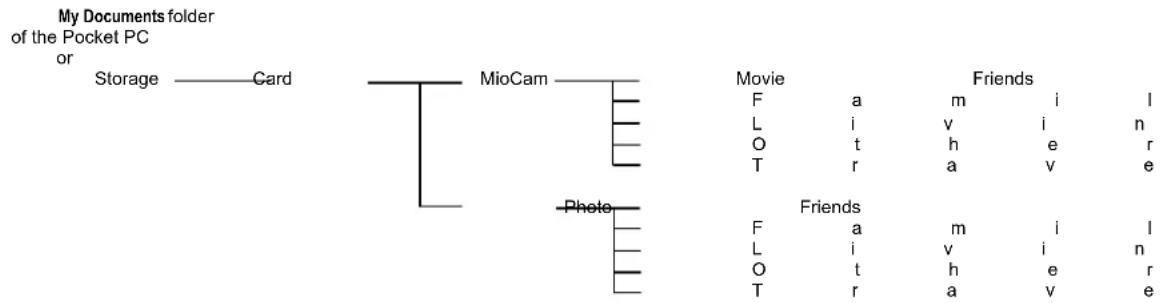
Your photos (jpg) and videos (mpg) will be saved at the appropriate location according to the storage folder and album selected.
Deleting Photos or Videos
MioCam allows you to delete your photos or videos. When playing back the photo or video, you can select 📄 (delete icon) to delete the current photo or video. You can select 📄 (delete all icon) to delete all photos and videos in the current album.
NOTE: If you disable the delete function in MioCam's advanced setup, you cannot delete photos or videos in MioCam. (See section 6.5 for more information.)
6.5 Camera Setup
If you are in the main menu, select menu → Setup. If you are viewing single photo or video, select Setup. The setup menu with four tabs appears on the screen. Described below are Basic, Advanced and System menus.
Once you change the settings, the settings apply immediately and remain the same until you change them again.
Basic Setup
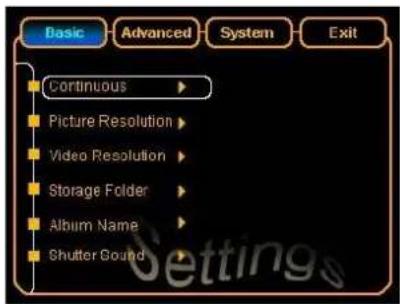
Basic Setup Descriptions
| Continuous | Sets the number of continuous shots when you release the shutter.The options are: 1 (default), 3 and 6. |
| Picture Resolution | Sets the photo resolution.The options are: H (640x480) (default) and L (320x240). |
| Video Resolution | Sets the video resolution.The options are: H (320x240) (default) and L (176x144). |
| Storage Folder | Sets the location for saving the files.The options are: SD/MMC and PDA. |
| Album Name | Selects the album for saving your photos and videos.The options are: Family, Friends, Living, Travel and Others. |
| Shutter Sound | Sets if there is a sound accompanying the release of the shutter.The options are: On (default) and Off.NOTE: For the shutter sound to be effective, make sure that the Programs item is also enabled via Settings Personal tab Sounds & Notifications. |
Advanced Setup
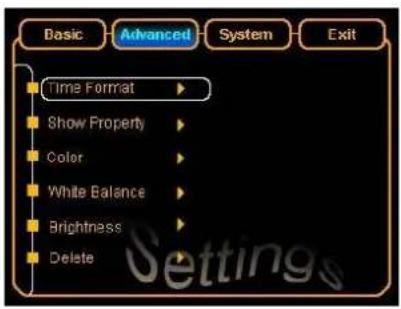
Advanced Setup Descriptions
| Time Format | Sets the format of the time displayed on the screen. When you select a format, the time will always appear on the photo.The options are:NONE (default)YY-MM-DD Displays year, month and date.YY-MM-DD+HH-MM Displays year, month, date, hour and minute. |
| Show Property | Sets if file properties such as time (as specified by Time Format), filename and size will appear when you view the photo or video.The options are: On and Off (default). |
| Color | Sets the saturation of the image, as measured by its freedom from mixture with white. A higher value indicates more freedom.The options are: Lowest, Low, Normal (default), High and Highest. |
| White Balance | Sets the white balance of the image. The perceived color of an object is affected by the lighting under which it is viewed. The human brain is capable of detecting and compensating for such changes in perceived color. As a result, a white object will look white to humans whether viewed in sunlight, under overcast skies, or indoors under incandescent or fluorescent lighting. A digital camera must emulate the human brain and adjust colors according to lighting so that colors that appear white when viewed directly also appear while in the final photo. This adjustment is called “white balance.”The options are: Auto (default), Daytime, Nightfall and Indoor. |
| Brightness | Sets the brightness of the image.The options are: Auto (default), Deep Dark, Dark, Normal, Bright and Deep Bright. |
| Delete | Sets if the delete function is enabled. If set to Disable, you cannot delete photos or videos while in MioCam.The options are: Enable (default) and Disable. |
System Setup
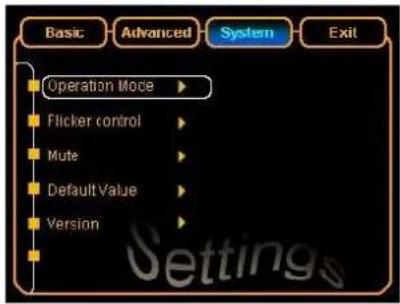
System Setup Descriptions
| Operation Mode | Sets the orientation of the viewing window.The options are:Right Hand(default) and Left Hand. |
| Flicker Control | Sets the flicker control to match local indoor lighting frequency.The options are:50Hz and 60Hz (default). |
| Mute | Turns mute on or off. When set toOn, voice will not be recorded.The options are:Onand Off(default). |
| Default Value | Restores to the default settings.The options are:Yesand No. |
| Version Displays the version of the MioCam program. | |
6.6 Hints and Notes
- In MioCam, you can select 🔒 to obtain the meanings of the icons that appear on the current screen.
- In MioCam, you cannot use any button except the navigation button. You cannot switch to any other program unless you exit MioCam.
- Be careful not to cover the lens and flash with fingers or other objects when taking photos or recording videos.
- When you save your photo or video files in the RAM of your Pocket PC, they will be lost if your Pocket PC runs completely out of power without recharging in time.
- Using flash consumes more power. If you set the usage to “anytime flash,” you will be prompted to disable it in a period of time.
- When you enable the Hardware buttons item via 📄 → Settings → Personal tab → Sounds & Notifications, you will hear a clicking sound accompanying the pushing of the navigation button.
7 Getting Connected
This chapter tells you how you can get your Pocket PC connected to your desktop computer, to an IR device and to the Internet or corporate network. It also describes two applications on your Pocket PC: ActiveSync (for data synchronization) and Internet Explorer (for Web browsing).
7.1 Connection Options
To take full advantage of your Pocket PC, you will want to get connected. You have the following connection options with your Pocket PC:
- Connect to your desktop computer to synchronize information with another computer. (For details, see section 7.2.)
- Use the IR port on your Pocket PC to send and receive files between two devices. (For details, see section 7.3.)
- Connect to the Internet or a corporate network to browse the Internet or intranet and send and receive e-mail messages. (For details, see section 7.4.)
7.2 Connecting to Your Desktop Computer
Ways of Connecting to Your Desktop Computer
CAUTION: Do not shut down or restart your desktop computer while your Pocket PC is connected. Turn off your Pocket PC or disconnect the cable before you shut down your desktop computer.
You can connect your Pocket PC to a desktop computer in several ways:
- Use the USB cradle or ActiveSync cable (available as an optional accessory) (See step 8 of section 1.4 for information.)
- Use the IR port in place of using a cable. IR ports can be found on many notebook computers; however, on a desktop computer, you may need to install and configure an IR port. To install the port, follow the manufacturer's instructions. (For complete instructions on connecting to your desktop computer by infrared, refer to ActiveSync Help on your desktop computer.)
- Use a network or dial-up connection. You can synchronize while connected to your desktop computer by a dial-up connection or over a LAN (Local Area Network).
Microsoft ActiveSync
NOTE: ActiveSync is already installed on your Pocket PC. You need to install ActiveSync on your desktop computer. (For information on installing ActiveSync, see section 1.4.)
When you have established the connection between your Pocket PC and your desktop computer, you can synchronize the information between the two with ActiveSync. Synchronization compares the data on the two sides and updates both computers with the most recent information. For example, you can:
- Keep your Pocket Outlook Contacts, Calendar and Tasks databases up-to-date by synchronizing your Pocket PC with Microsoft Outlook data on your desktop computer.
- Synchronize email messages in your Pocket PC Inbox with email messages in Microsoft Outlook on your desktop computer.
- Synchronize Microsoft Word and Microsoft Excel files between your Pocket PC and desktop computer. Your files are automatically converted to the correct format.
With ActiveSync, you can also:
- Back up and restore your Pocket PC data.
- Copy (rather than synchronize) files between your Pocket PC and desktop computer.
- Add and remove programs on your Pocket PC.
- Pass through your desktop computer to a network or the Internet to perform tasks such as downloading IMAP4 e-mail messages or browsing the Internet on your Pocket PC.
Synchronizing Data
Once you have created a partnership and completed the first synchronization, you can initiate synchronization from your Pocket PC.
To Synchronize from Your Pocket PC
-
Connect your Pocket PC to your desktop computer.
-
On your Pocket PC, tap → ActiveSync.
-
Tap ⬆ to begin synchronization.
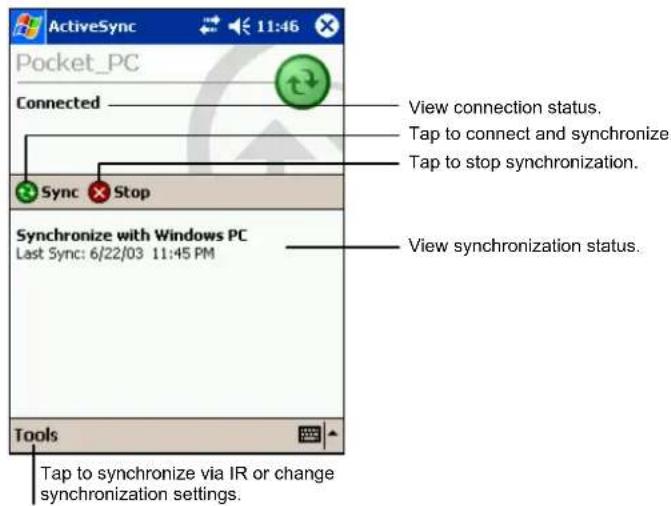
By default, ActiveSync does not automatically synchronize all types of information. Use ActiveSync options to turn synchronization on and off for specific information types. You can:
- Control when synchronization occurs by selecting a synchronization mode. For example, you can synchronize continually while the Pocket PC is connected or only when you choose the synchronize command.
- Select which information types are synchronized and control how much data is synchronized. For example, you can choose how many weeks of past appointments you want synchronized.
For information on setting ActiveSync options and using ActiveSync on your desktop computer, see ActiveSync Help on the desktop computer. For
information on using ActiveSync on your Pocket PC, see ActiveSync Help on the Pocket PC.
To Synchronize from a Remote Location
You can also synchronize by dialing in to your desktop computer or connecting over a network. This can be useful if you need to synchronize files or PIM information while traveling. Before you leave, you must configure both your Pocket PC and your desktop computer.
On your Pocket PC, you need to create a partnership between your Pocket PC and the desktop computer using one of the direct connection methods (USB cable or infrared connection). You must also configure a connection on your Pocket PC as described in section 7.4.
On your desktop computer, you need to ensure the following:
- The desktop computer or network server is configured to allow your Pocket PC to connect. Depending on the version of Windows running on the desktop computer, you may need to install and configure Remote Access Services or Dial-Up Networking on the desktop computer.
- ActiveSync is configured to allow a network connection. For more information, see ActiveSync Help on your desktop computer.
- If you are using a modem on your desktop computer, turn the modem on before you leave.
- Leave your desktop computer on and be sure you logged on under the same user name that you used when you created the partnership.
- Your PIM program and email program (Microsoft Outlook or Microsoft Exchange) should be running correctly.
7.3 Transferring Items Using Infrared
Using infrared (IR), you can send and receive information, such as contacts and appointments, between two devices. In addition, you can use the IR port to synchronize data with your desktop computer, in place of using the synchronizing cable.
Sending Information
-
Switch to the program where you created the item you want to send and locate the item in the list.
-
Align the IR ports so that they are unobstructed and within a close range.
CAUTION: If the devices are too far apart or if something blocks the path between the two ports, data might not be sent or received correctly.
- Tap and hold the item and tap Beam Item on the pop-up menu.
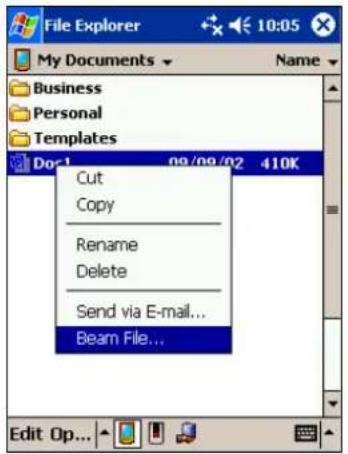
NOTE: You can also send items, but not folders, from File Explorer. Tap and hold the item you want to send and then tap Beam File on the pop-up menu.
Receiving Information
- Align the IR ports so that they are unobstructed and within a close range.
- Have the owner of the other device send the information to you.
- By default, your Pocket PC monitors all incoming beams. A message will pop up on the screen asking if you want to receive. Tap Yes.
NOTE:
- You can disable the automatic monitoring of your Pocket PC by tapping → Settings → Connections tab → Beam and unchecking the Receive all incoming beams item.
- If the incoming beams are from an older device, you may not be prompted to accept the information. In this case, tap 📋 Settings → Connections tab → Beam → Receive an infrared beam.
7.4 Connecting to ISP or Work
Your Pocket PC has two groups of connection settings: "My ISP" and "My Work Network." My ISP settings are used to connect to the Internet; My Work Network settings can be used to connect to any private network, such as a corporate network you use at work.
Connections can be made using a modem, wireless network or network (Ethernet) card.
After setting up the connection, you can browse the Internet or intranet, send and receive e-mail and instant messages and synchronize information using ActiveSync.
Creating a Modem Connection
With a modem, you can dial in to your ISP or corporate network. Create a modem connection as follows:
- Obtain the following information from your ISP or network administrator: server phone number, user name, password, domain name and TCP/IP settings.
-
Install an optional IR modem or SD/MMC modem card. (For information, see the documentation that came with the product.)
-
Tap →Settings → Connections tab → Connections.
-
In My ISP or My Work Network, tap Add a new modem connection.
-
Follow the instructions in the New Connection wizard. To view additional settings, tap ☐.
-
To start the connection, use the desired program. For example, switch to Pocket Internet Explorer and browse to a Web page. Your Pocket PC will automatically connect.
NOTE: To change modem connection settings, in either My ISP or My Work Network, tap Manage existing connections. Select the desired modem connection, tap Settings and follow the instructions on the screen.
Creating a Network (Ethernet) Card Connection
Use an SD/MMC network (Ethernet) card to connect directly to a network. You do not need to create a new connection on your Pocket PC. Insert a network card and you can create a connection as follows:
-
Obtain the following information from your network administrator: user name, password and domain name.
-
Insert the network card into your Pocket PC. (For information, see the documentation that came with the product.)
-
The first time you insert the card, Network Settings appears automatically so that you can configure the network card. If it does not appear or to change settings later, tap → Settings → Connections tab → Connections → Advanced tab → Network Card.
-
If you need to enter specific server information, tap the appropriate adapter and then Properties. Most networks use DHCP, so you should not have to change these settings unless your network administrator instructs you to do so.
-
If necessary, connect the network card to the network by using a network cable. (For information, see the documentation that came with the product.)
-
To start the connection, use the desired program. For example, switch to Pocket Internet Explorer and browse to a Web page. Your Pocket PC will automatically connect.
NOTE: You may need proxy server and VPN connection settings. For more information, see your network administrator.
Create a Wireless Connection to a Network
A wireless network can be added either when the network is detected, or manually by entering settings information.
- Insert the SD/MMC wireless network card into your Pocket PC. (For information, see the documentation that came with the product.)
- To manually enter information, tap Settings Connections tab Connections Network Card Wireless tab Add new. If the network was detected, step one is not necessary.
- In the General tab, enter a network name. If the network was detected, the network name is automatically entered and cannot be changed.
- From Connects to, select what your network connects to, Work or the Internet.
- To connect to an ad-hoc connection, select This is a device-to-computer (ad-hoc) connection.
Networks that you have already configured are preferred networks and are listed in Wireless networks. You can select to connect to only preferred networks or have your Pocket PC search for and connect to any available network whether it is preferred or not.
Ending a Connection
- When connected via dial-up or VPN, tap t ✦ on the Navigation bar and then tap Disconnect.
- When connected via cable or cradle, detach your Pocket PC from the cable or cradle.
- When connected via a network (Ethernet) card, remove the card from your Pocket PC.
- When connected via a wireless network, switch off the connection.
Getting Help on Connecting
More information on the procedures described here, as well as information on additional procedures, can be found in the following locations.
- Online Help on the Pocket PC. Tap 📋 → Help → View → All Installed Help → Inbox or Connections.
- ActiveSync Help on the desktop computer. In ActiveSync, click Microsoft ActiveSync Help on the Help menu.
• Information of Inbox in section 4.5. - Troubleshooting information in section 8.6.
- For troubleshooting information, see the Pocket PC Web site at: http://www.pocketpc.com.
7.5 Using Microsoft Pocket Internet Explorer
Use Microsoft Pocket Internet Explorer to view Web pages in either of these ways:
- Connect to an ISP or network and browse the Web. To do this, you will need to create the connection first, as described in section 7.4.
- During synchronization with your desktop computer, download your favorite links and mobile favorites that are stored in the Mobile Favorites subfolder in Internet Explorer on the desktop computer.
While you are connected to an ISP or network, you can also download files and programs from the Internet or an intranet.
Tap → Internet Explorer to switch to the program. The Pocket Internet Explorer home page appears:
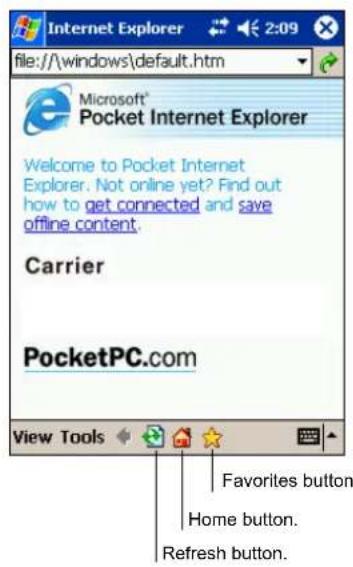
Viewing Mobile Favorites and Channels
- In Internet Explorer, tap the Favorites button to display your list of favorites.
- In the list, tap the page you want to view.
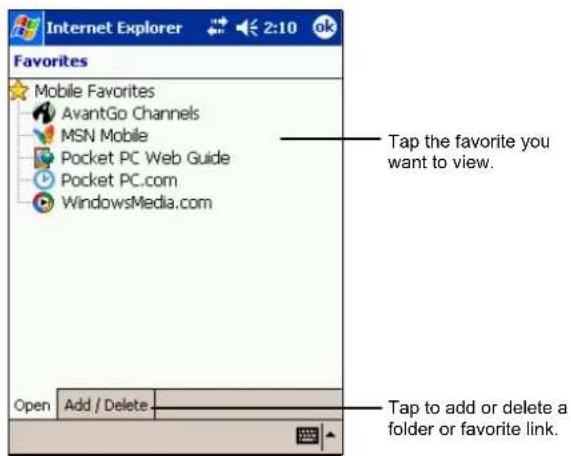
You will see the page that was downloaded the last time you synchronized with your desktop computer. If the page is not on your Pocket PC, it will be dimmed
in the Favorites list. You will need to synchronize with your desktop computer again to download the page to your Pocket PC or connect to the Internet to view the page.
Browsing the Internet
-
Set up a connection to your ISP or corporate network as described in section 7.4.
-
To connect and start browsing, do one of the following:
- Tap the Favorites button and then tap the favorite you want to view.
- Tap View → Address Bar. In the address bar that appears at the top of the screen, enter the Web address you want to visit and then tap Go. Tap the arrow to choose from previously entered addresses.
The Mobile Favorites Folder
Only items stored in the Mobile Favorites subfolder in the Favorites folder in Internet Explorer on your desktop computer will be synchronized with your Pocket PC. This folder is created automatically when you install ActiveSync
Favorite Links
During synchronization, the list of favorite links in the Mobile Favorites folder on your desktop computer is synchronized with Pocket Internet Explorer on your Pocket PC. Both computers are updated with changes made to either list each time you synchronize. Unless you mark the favorite link as a mobile favorite, only the link (and not the page) will be downloaded to your Pocket PC, and you must connect to your ISP or network to view the content. For more information on synchronization, see ActiveSync Help on your desktop computer.
Mobile Favorites
If you are using Microsoft Internet Explorer 5 or later on your desktop computer, you can download mobile favorites to your Pocket PC. When you synchronize your desktop computer and Pocket PC, the content of your mobile favorites is downloaded to your Pocket PC so that you can view pages while you are not connected to your ISP or your network.
Use the Internet Explorer plug-in installed with ActiveSync to create mobile favorites quickly.
To create a mobile favorite:
- In Internet Explorer on your desktop computer, click Tools, and then click Create Mobile Favorite.
• To change the link name, enter a new name in the Name box.
- To change how often the mobile favorite is updated, select a desired update schedule under Update.
-
Click OK. Internet Explorer downloads the latest version of the page to your desktop computer.
-
If you want to download the pages that are linked to the mobile favorite you just created, right-click the mobile favorite and then click Properties. On the Download tab, specify the number of links deep you want to download. To conserve memory on your Pocket PC, download only one level of links.
-
Synchronize your Pocket PC and desktop computer. Mobile favorites that are stored in the Mobile Favorites folder in Internet Explorer are downloaded to your Pocket PC.
NOTE: If you do not specify an update schedule, you must manually download content to keep the information updated on your desktop computer and Pocket PC. Before synchronizing, in Internet Explorer on your desktop computer, click Synchronize on the Tools menu. You will see the last time content was downloaded to the desktop computer, and you can manually download content if needed.
CAUTION: You can add a button to the Internet Explorer toolbar for creating mobile favorites. In Internet Explorer on your desktop computer, on the View menu, click Toolbars, and then click Customize.
Conserving Memory
Mobile favorites take up storage memory on your Pocket PC. Follow these tips to minimize the amount of memory used:
- Use ActiveSync settings to turn off photos and sounds for the Mobile Favorites information type or to stop some mobile favorites from being downloaded to your Pocket PC. For more information, see ActiveSync Help.
- Limit the number of downloaded linked pages. In Internet Explorer on the desktop computer, right-click the mobile favorite you want to change, and then click Properties. On the Download tab, specify 0 or 1 for the number of linked pages you want to download.
Using AvantGo Channels
AvantGo is a free interactive service that gives you access to personalized content and thousands of popular Web sites. You subscribe to AvantGo channels directly from your Pocket PC. Then you synchronize your Pocket PC with your desktop computer or connect to the Internet to download the content. For more information, visit the AvantGo Web site.
To sign up for AvantGo:
- In ActiveSync options on the desktop computer, turn on synchronization for the AvantGo information type.
- In Pocket Internet Explorer on your Pocket PC, tap the Favorites button to display your list of favorites.
- Tap theAvantGo Channels link.
- Tap theActivate button.
- Follow the directions on the screen. You will need to synchronize your Pocket PC with your desktop computer, and then tap the My Channels button to complete the AvantGo setup.
When synchronization is complete, tap the AvantGo Channels link in your list of favorites to see a few of the most popular channels. To add or remove channels, tap the Add or Remove link.

Troubleshooting and Maintenance
This chapter gives solutions to common Pocket PC problems you may encounter. It also provides guidelines on taking care of your Pocket PC.
NOTE: If you encounter a problem you cannot solve, contact your dealer for assistance.
8.1 Resetting Your Pocket PC
| CAUTION: Resetting will cause unsaved data to be lost.
Resetting your Pocket PC is similar to restarting your desktop computer. It restarts the operating system, but you will lose any unsaved data.
Occasionally, you may need to reset your Pocket PC; for example, you should reset:
- After you restore data from your desktop computer.
- When your Pocket PC stops responding; in other words, it appears to be “frozen” or “locked up.”
Follow this procedure to reset your Pocket PC:
- Remove the SD/MMC card (if installed).
- Use the stylus to press the reset button on the rear of your Pocket PC.
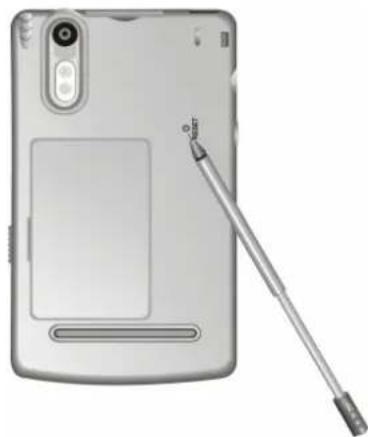
natural_image
Exterior view of a silver smartphone with a stylus probe inserted (no text or symbols visible)8.2 Restoring Factory Default State
In some cases, you may need to restore your Pocket PC to the factory default state by clearing the memory (RAM) from your Pocket PC. For example, you should clear the memory:
- When your Pocket PC does not respond after being reset.
- When you forget your password.
Clearing the memory means all data you have entered in RAM, including all files, system settings and additional programs you have installed, will be erased. (Programs installed to ROM at the factory are not affected.)
CAUTION:
- To ensure the integrity of your data should it be necessary to clear the memory, you're advised to regularly back up your data. (For more information on backing up data, see section 3.5.)
- Do not slide the battery switch unless it is necessary.
Follow this procedure to clear the memory from your Pocket PC:
- Backup your information if necessary.
-
Disconnect all cables, including the AC adapter, from your Pocket PC.
-
Stop all running programs by tapping → Settings → System tab → Memory icon → Running Programs tab → Stop All.
-
Remove the battery door. (See Page 7.)
-
Use the stylus to slide the battery switch to the OFF (left) position.
-
Wait for 1 minute and then slide the switch back to the ON (right) position.
-
The red notification indicator on your Pocket PC will flash for approximately 30 seconds. Then your Pocket PC will automatically turn on and display the Welcome screen.
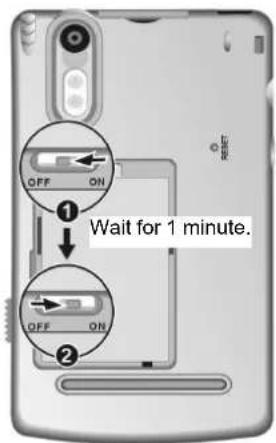
-
To begin the Welcome Wizard, tap the screen with the stylus and follow the onscreen instructions to complete the Welcome Wizard.
-
Reestablish a. partnership with your desktop computer.
-
You may also want to restore data to your Pocket PC from your most recent backup file.
NOTE: If the battery completely runs out of power and is not charged in time, you will get the same result as you restore the factory default state.
8.3 Power Problems
Power does not turn on when using battery power
- The remaining battery power may be too low to run your Pocket PC. Connect the AC adapter to your Pocket PC and to external AC power. Then, turn on your Pocket PC.
Battery runs out of power quickly
- You might be using your Pocket PC in ways that drain power quickly. (See “Power-Saving Tips” in section 3.1 for more information.)
8.4 Memory Problems
If a warning message of not enough memory appears due to the memory allocation problem, try the following to free memory on your Pocket PC.
CAUTION: Be discreet when you delete files. Deleting files of which the function is unknown can cause programs or features to malfunction. It is appropriate to make a backup before deleting files.
- Delete files you no longer need. Tap ➕ → Programs ➕ File Explorer. Tap and hold the file you wish to delete and then tap Delete on the pop-up menu. To find your largest files, tap ➕ → Find. In the Type list, tap Larger than 64KB ➕ Go.
- Remove programs you no longer need. Tap → Settings → System tab → Remove Programs. Tap the program you want to remove and then tap Remove.
- In Internet Explorer options, delete all files and clear history. In Internet Explorer, tap Tools → Options. Tap Delete Files and Clear History.
- If you are copying files from a computer or device to your Pocket PC, try adjusting the slider in the Memory setting. Tap → Settings → System tab → Memory icon. Check if you can manually move the slider before copying files. The maximum storage memory that your Pocket PC can allocate is around 20MB. This means that you cannot save files larger than 20MB to the RAM of your Pocket PC.
- Stop programs you are not currently using. In most cases, programs automatically stop to free needed memory. However, in some situations, such as when confirmation dialog boxes are waiting for a user response, the program may not be able to automatically stop. To check the state of your active programs, tap → Settings → System tab → Memory icon → Running Programs tab. Tap the program you want to view and then tap Activate. Close any open windows or messages and return the program to list view. If this does not work, you can stop the program manually. First, make sure that your work is saved by closing open items and returning the program to list view. Then, stop the program by tapping Stop or Stop All on the Running Programs tab.
- Reset your Pocket PC as described in section 8.1.
If you have a storage card, move data to the storage card as described below.
- Tap → Programs → File Explorer. Tap and hold the file you want to move and tap Cut. Browse to My Documents folder in the storage card folder, tap Edit → Paste. Files stored in folders other than My Documents or stored in subfolders within subfolders in My Documents may not show up in the list view of some programs. When using Notes, Pocket Word Pocket or Excel, you can also move files by opening the item and tapping Tools or Edit then Rename/Move.
- Move email attachments. In Inbox, tap Tools → Options → Storage tab and select Store attachments on storage card. All attachments are moved to the storage card and new attachments are automatically stored on the storage card.
- Set programs such as Notes, Pocket Word and Pocket Excel to automatically save new items on the storage card. In the program, tap Tools → Options.
8.5 Screen Problems
Screen is off
If the screen does not respond even after you press the power button, try the following in order until the problem is solved:
- Connect the AC adapter to your Pocket PC and to external AC power.
- Reset your Pocket PC as described in section 8.1.
Screen responds slowly
- Make sure that your Pocket PC is not running out of battery power or running many active programs. If the problem still exists, reset your Pocket PC as described in section 8.1.
Screen freezes
- Reset your Pocket PC as described in section 8.1.
Screen is hard to read
• Make sure that the backlight of the display is on.
- Move to a location with enough light.
- If you're having a hard time reading a document on the screen, try adjusting the zoom percentage or text size.
√ In Notes, tapTools and select a zoom percentage.
√ In Pocket Word and Pocket Excel, tap View → Zoom and select a zoom percentage.
√ In Pocket Internet Explorer, tap View → Text Size and select a size.
√ In Calendar, Contacts and Tasks, tap Tools → Options and select User large font.
Inaccurate response to stylus taps
- Realign the touch screen. Tap → Settings → System tab → Align Screen icon. If you cannot correctly tap your selection, turn off the Pocket PC. Press in the scroll dial and, while keeping it pressed, press the power button to turn on the Pocket PC. You can then start to align the touch screen.
8.6 Connection Problems
Cradle Connection Problems
- Make sure that your Pocket PC is properly seated on the cradle.
- Make sure that you have installed the correct version of ActiveSync on your desktop computer. Install the version ActiveSync included with your Pocket PC.
- Make sure that your Pocket PC and your desktop computer are both turned on before establishing the connection.
- Make sure that the cable is securely plugged into the USB port on your desktop computer. Connect the USB cable directly to your desktop computer—do not run the cable through a USB hub.
- Make sure that the USB connection is enabled in ActiveSync on your desktop computer. If the USB connection is already enabled, disable the USB connection, close the Connection Settings window and then reopen and re-enable the USB connection.
- Reset your Pocket PC before connecting the cable. (See section 8.1.) Always disconnect your Pocket PC before you restart your desktop computer.
- Connect only one Pocket PC or personal digital assistant to your desktop computer at a time.
- Make sure that you do not have any other active connections. Tap and tap Today. Tap or at the bottom of the screen and then tap Disconnect.
Infrared Connection Problems
- Transfer only one file, or no more than 25 contact cards, at a time.
- Position the IR ports so that they line up in a distance less than 20 cm (8 inches) but more than 5 cm (2 inches) apart.
- Make sure that there are no obstacles between the two IR ports.
- Adjust the room lighting. Some types of light interfere with IR communications. Try moving to a different location or turning off some lights.
Modem Connection Problems
Unable to dial out
- Do not install your Pocket PC in the cradle. You cannot dial out if your Pocket PC has an active connection with your desktop computer.
• Make sure that the telephone line is connected correctly. - Make sure that the telephone line is analog. Do not connect a modem to a digital telephone line unless it is specifically designed for use with a digital line.
Able to dial out but unable to make a proper connection
- Make sure that the network you are trying to connect supports the Point-to-Point Protocol (PPP). Your ISP or network administrator can verify this.
- Make sure that your dialing location is correct. Tap → Settings → Connections tab → Connections → Advanced tab → Select Location. To view help information, tap ?.
- Make sure that the phone number you are trying to reach is correct. Tap → Settings → Connections tab → Connections → Manage existing connections. To view help information, tap ?
Modem connection is unreliable
• Make sure that the modem is installed properly.
• Make sure that the telephone line is connected correctly.
Network Connection Problems
• Make sure that the network card is compatible with your Pocket PC.
- Make sure that you have installed the proper drivers for your Pocket PC.
- In the properties for your network card, make sure that you have correctly configured the IP settings, and the addresses of your DNS servers and/or WINS servers. Your network administrator can verify this.
- Make sure that you have added necessary server information. Tap 📄 → Settings → Connections tab → Connections → Advanced tab → Network Card. Select the installed network card (usually the card's name) and enter any necessary information. Most networks use DHCP to assign IP addresses dynamically; you should not have to change or enter any IP address settings unless your network administrator instructs you to do so.
- If Network Connection is not listed as a connection method in the ActiveSync dialog box when starting synchronization, wait a few minutes and try again. Also, if synchronization does not start right away, the network is probably busy, and it may take a minute for your Pocket PC to connect to the network.
- Verity with your network administrator that your user name and password are correct.
- Verity with your network administrator that the network you are trying to connect to is available, to try to connect to it from another computer.
- You may need to change the device name if you are trying to connect to a network and cannot because another device with the same name is already connected. To change the device name, tap 📄 → Settings → System tab → About → Device ID tab.
8.7 Taking Care of Your Pocket PC
Taking good care of your Pocket PC will ensure trouble-free operation and reduce the risk of damage to your Pocket PC.
General Guidelines
- Keep your Pocket PC away from excessive moisture and extreme temperatures.
- Avoid exposing your Pocket PC to direct sunlight or strong ultraviolet light for extended periods of time.
- Do not place anything on top of your Pocket PC or drop objects on top of your Pocket PC.
- Do not drop your Pocket PC or subject it to severe shock.
- Store your Pocket PC in a protective cover when not in use.
- Do not subject your Pocket PC to sudden and severe temperature changes. This could cause moisture condensation inside the unit that could damage your Pocket PC. In the event of moisture condensation, allow you Pocket PC to dry out completely.
- Take care not to sit on your Pocket PC when it is located in the back pocket of trousers, etc.
- Do not carry your Pocket PC with a card inserted. This can result in the damage or loss of the card.
- The screen surface is easily scratched. Use only the stylus to tap on the screen. Avoid touching it with your fingers, pens, pencils or any other sharp objects.
- Never clean your Pocket PC with its power on. Use a soft, lint-free cloth moistened with water to wipe the screen and the exterior of your Pocket PC.
- Do not use paper towels to clean the screen.
- Never attempt to disassemble, repair or make any modifications to your Pocket PC. Disassembly, modification or any attempt at repair could cause damage to your Pocket PC and even bodily injury or property damage.
- Do not store or carry flammable liquids, gases or explosive materials in the same compartment as your Pocket PC, its parts or accessories.
Travel Guidelines
- Before traveling with your Pocket PC, back up your data. As an added precaution, bring along a backup copy.
- Remove the SD/MMC card, if installed, from the slot.
- Turn off your Pocket PC and disconnect all external devices.
• Make sure that the battery is fully charged. - Take the AC adapter with you. Use the AC adapter as the power source and as a battery-recharger.
- Keep your Pocket PC inside its protective cover when you are not using it on the road.
- Hand-carry your Pocket PC in a protective cover. Do not check it in as luggage.
- If you plan to travel abroad with your Pocket PC, consult your dealer for the appropriate AC adapter for use in your country of destination.
- If you plan to make modem connections abroad, make sure that you have the correct modem and cable for your country of destination.

Regulatory Information
NOTE: Marking labels located on the exterior of your device indicate the regulations that your model complies with. Please check the marking labels on your device and refer to the corresponding statements in this chapter. Some notices apply to specific models only.
A.1 Class B Regulations

Tested To Comply With FCC Standards
FOR HOME OR OFFICE USE
USA
Federal Communications Commission Radio Frequency Interference Statement
NOTE:
This equipment has been tested and found to comply with the limits for a Class B digital device pursuant to Part 15 of the FCC Rules. These limits are designed to provide reasonable protection against harmful interference in a residential installation. This equipment generates, uses, and can radiate radio frequency energy and, if not installed and used in accordance with the instructions, may cause harmful interference to radio communications. However, there is no guarantee that interference will not occur in a particular installation. If this equipment does cause harmful interference to radio or television reception, which can be determined by turning the equipment off and on, the user is encouraged to try to correct the interference by one or more of the following measures:
• Reorient or relocate the receiving antenna.
- Increase the separation between the equipment and receiver.
- Connect the equipment into an outlet on a circuit different from that to which the receiver is connected.
- Consult the dealer or an experienced radio/TV technician for help.
Any changes or modifications not expressly approved by the manufacturer could void the user's authority to operate the equipment.
Please note:
The use of a non-shielded interface cable with this equipment is prohibited.
Canada
Canadian Department Of Communications
Radio Interference Regulations Class B Compliance Notice
This Class B digital apparatus meets all requirements of the Canada Interference-Causing equipment regulations.
Products with the CE marking comply with both the Electromagnetic Compatibility Directive (89/336/EEC) and the Low Voltage Directive (73/23/EEC) – as amended by Directive 93/68/ECC - issued by the Commission of the European Community.
Compliance with these directives implies conformity to the following European Standards:
EN55022: Radio disturbance characteristics
EN55024: Immunity characteristics
EN6100-3-2: Limits for harmonic current emissions
EN6100-3-3: Limitation of voltage fluctuation and flicker in low-voltage supply system
EN60950 : Product Safety
The manufacturer cannot be held responsible for modifications made by the User and the consequences thereof, which may alter the conformity of the product with the CE Marking.
A.3 About the AC Adapter
The AC adapter is designed to ensure your personal safety and to be compatible with this equipment. Please follow these guidelines:
- Use only the AC adapter (PHIHONG, PSC05R-050) supplied with your Pocket PC. Use of another type of AC adapter will result in malfunction and/or danger.
- This product is intended to be supplied by a LISTED Power Unit marked with "LPS", "Limited Power Source" and output rated +5 V dc / 1.0 mA".
- Do not use the adapter in a high moisture environment. Never touch the adapter when your hands or feet are wet.
- Allow adequate ventilation around the adapter when using it to operate the device or charge the battery. Do not cover the AC adapter with paper or other objects that will reduce cooling. Do not use the AC adapter while it is inside a carrying case.
- Connect the adapter to a proper power source. The voltage and grounding requirements are found on the product case and/or packaging.
- Do not use the adapter if the cord becomes damaged.
- Do not attempt to service the unit. There are no serviceable parts inside. Replace the unit if it is damaged or exposed to excess moisture.
A.4 About the Battery
- Caution: Risk of explosion if battery is replaced by an incorrect type. Dispose of used batteries according to the instructions.
- Replace only with the same or equivalent type recommended by the manufacturer.
- Do not mutilate, puncture, or dispose of battery in fire. The battery can burst or explode, releasing hazardous chemicals.
• Use specified charger only.
A.5 About the Infrared LED
The IR port located on the Pocket PC is evaluated as a Class 1 LED (Light-Emitting Diode) device according to International Standard IEC 60825-1 (EN60825-1) requirements.
CLASS 1 LED PRODUCT
A.6 About the Electrostatic Discharge
Electrostatic discharges can interfere with the normal functioning of the electronic devices. Your equipment can behave abnormally owing to such an event, resulting in the possible data corruption or loss of unsaved data. To recover from this, reset your equipment.
To avoid losing data due to electrostatic discharges or other types of events, it is recommended that you regularly save and backup data.
Index
A
AC adapter
Cautions, 125
Connecting, 8
Accessory, 12
ActiveSync, 100
Connector, 5
Installing on desktop computer, 10
Synchronizing data, 101
Synchronizing e-mail messages, 53
Synchronizing from a remote location, 102
Synchronizing mobile favorites, 109
Album, camera, 94
Appointment
Changing, 43
Creating, 42
Summary screen, 43
AvantGo, 111
B
Backing up, 38
Backlight setting, 35
Backup battery switch, 7, 114
Battery, 3
Cautions, 125
Charging, 8
Checking remaining battery power, 31
Installing, 7
Lock, 3
Power low, 31
Status icon, 16
Beam, 35, 103
Block Recognizer, 21
Brightness, camera, 96
Buttons
Power, 4
Program, 2
Record, 4
Reset, 3
Settings, 34
C
Calendar, 41
Creating an appointment, 42
Creating meeting requests, 44
Summary screen, 43
Camera, 81
Album, 94
Brightness, 96
Delete, 96
Features, 81
Finger grip, 3
Flash, 3
Flicker control, 96
Lens, 3
Mute, 96
Photo Quick Menu, 84
Photo resolution, 94
Recording videos, 88
Right or left hand orientation, 96
Saturation, 95
Screen elements, 82
Setup, 94
Show properties, 95
Shutter sound, 94
Storage folder, 93, 94
Taking photos, 83
Time format, 95
Video Quick Menu, 90
Video resolution, 94
Viewing photos, 86
Watching videos, 91
White balance, 95
Certificate, 35
Personal, 36
Root, 36
Charging the battery, 8
Indicator, 2
Status icon, 16
Cleaning, 121
ClearType, 35
Clock, 35
Command bar, 17
Companion CD, vi, 10
Companion programs, 61
Connections, 35, 99
Connecting to a desktop computer, 99
Creating a modem connection, 104
Creating a network card connection, 105
Creating a wireless connection, 106
Ending, 106
Getting help, 107
Status icon, 16
Troubleshooting, 118
Connector
ActiveSync, 5
Headphone, 4
Power connector on cable, 6
Power connector on Pocket PC, 5
USB connector on cable, 6
Contacts, 45
Changing, 47
Chatting with contacts, 69
Creating, 45
Finding, 47
MSN Messenger, 68
Summary screen, 47
Viewing, 47
Converting writing to text, 23
Cradle, 6
Connecting to AC adapter, 8
D
Date, 35
Digital camera. See Camera
Drag, stylus, 14
Drawing on the screen, 25
Pocket Word, 63
E
E-mail. See Inbox
E-mail service setting up, 54
Entering information, 20
Ethernet
connecting to network, 105
Excel. See Pocket Excel
F
Features, 1
File Explorer, 37
Find feature, 37
Flash, camera, 3, 85
Flicker control, camera, 96
G
GSM file format, 28
H
Hardware information, 35
Headphone, 13
Headphone connector, 4
|
Icon
Program, 18
Status, 16
IMAP4 e-mail server, 54
Folder behavior, 59
Inbox, 53
Composing a message, 57
Connecting to e-mail servers, 54
Managing messages and folders, 58
Sending a message, 58
Setting up email service, 54
Status icon, 16
Synchronizing e-mail messages, 53
Using message list, 55
Indicator
Charging, 2
Notification, 2
Infrared, 5
Cautions, 126
Transferring items, 103
Troubleshooting, 118
Input, 20
Settings, 34
Input panel, 20
Button, 17
Instant messages, 67
Internet
Browsing, 109
Internet Explorer. See Pocket Internet
Explorer
IR port, 5
ISP, 104
L
Lanyard eyelet, 4
Letter Recognizer, 21
M
Meeting requests, 44
Memory
Additional, 33
Clearing, 114
Program, 33
RAM, 33
ROM, 38
Settings, 35
Storage, 33
Storage card, 33
Troubleshooting, 115
Memory card, 12. See Storage card
Menu
Settings, 34
Start menu, 17
Microphone, 2
Microsoft ActiveSync. See ActiveSync
Microsoft Mobile Devices Web site, vi
Microsoft Pocket Outlook, 41
Microsoft Reader, 71
Downloading books, 71
Reading a book, 72
Removng a book, 74
Using the Library, 71
MioCam. See Camera
MMC card, 12
MMC slot, 5
Mobile favorites
Creating, 110
Reducing storage memory for, 110
Specifying level of links, 110
Synchronizing, 109
Updating schedule, 110
Viewing, 108
MP3, 70
MP3 Player, 76
Equalizer, 80
Play list, 79
MSN Messenger, 67
MultiMediaCard, 5, 12
Mute, camera, 96
My Pictures, 75
My Text, 29
N
Navigation bar, 17
Navigation button, 2
Using, 15
Network
connecting via ethernet, 105
connecting via wireless network card, 106
Notes, 51
Creating, 52
Template, 52
Notification, 19
Indicator, 2
Settings, 34
0
Owner information, 34
P
Partnership, 101
Pass through, 100
Password, 36
PCM file format, 28
Pen button, 22
Photo
Continuous shots, 94
Deleting, 93
Flash, 85
Resolution, 94
Shooting mode, 85
Taking photos, 83
Timer, 85
Viewing, 86
Zoom, 85
Pictures, 75
Pocket Excel, 65
Creating a workbook, 65
Customizing display of, 66, 67
Opening a workbook, 66
Passwords, 66
Template, 65
Zooming, 66
Pocket Internet Explorer, 107
Clearing history, 115
Delete all files, 115
Pocket Word, 61
Creating a document, 62
Drawing mode, 63
Opening a document, 64
Template, 62
Typing mode, 62
Writing mode, 63
Zooming, 64
POP3 e-mail server, 54
Folder behavior, 59
Pop-up menu, 19
Power, 31
Checking remaining battery power, 31
Connecting, 8
Connector on cable, 6
Connector on Pocket PC, 5
Low battery, 31
Saving, 32
Settings, 35
Troubleshooting, 115
Power button, 4, 9, 32
Program buttons, 2
Program memory, 33
Programs
Adding, 38
Adding to Start menu, 39
Icon, 18
Removing, 39, 40
Stopping, 116
Switching, 18
Protective cover, 12
R
RAM, 33
Record button, 4
Using, 27
Recording, 27
File formats, 28
Playing back, 27
Recording toolbar, 27
Regional settings, 35
Regulatory information, 123
Remote control, 13
Removing programs, 35
Reset button, 3, 113
Resetting, 113
Restarting, 113
Restoring factory defaults, 114
Resume, 9
ROM, 38
Running programs, 18
S
Saturation, camera, 95
Screen
Adjusting zoom percentage, 117
Aligning, 35
Backlight setting, 35
Realigning, 117
Troubleshooting, 117
SD card, 12
SD slot, 5
Secure Digital, 5, 12
Shutter, camera, 84
Sound, 94
Soft keyboard, 20
Sound
Settings, 34
Turning on and off, 16
Speaker, 2
Status icon, 16
Start menu, 17
Status icon, 16
Storage card, 12
Moving files to, 116
Storage memory, 33
Stylus, 5
Using, 14
Suspend, 9, 32
T
Taking care, 121
Tap and hold, stylus, 14
Tap, stylus, 14
Tasks, 48
Changing, 50
Creating, 49
Due date, 49
Start date, 49
Summary screen, 50
Template
Notes, 52
Pocket Excel, 65
Pocket Word, 62
Time, 35
Today screen, 15
Settings, 34
To-do list. See Tasks
Touch screen. See Screen
Transcriber, 22
Traveling, 122
Troubleshooting, 113
Cable connection, 118
Cradle connection, 118
Infrared connection, 118
Memory, 115
Modem connection, 119, 120
Network connection, 119
Power, 115
Screen, 117
Turning off, 9
Turning on, 9
U
USB connector, 6
USB Cradle. See Cradle
V
Video
Deleting, 93
Mute, 96
Recording mode, 90
Recording videos, 88
Resolution, 94
Watching videos, 91
Zoom, 90
Voice notes. See Recording
Volume control, 34
W
Welcome Wizard, 7, 8
White balance, camera, 95
Windows Media Player, 70
Wireless network, 106
Word. See Pocket Word
Writing on the screen, 22
Pocket Word, 63
- Note
- Table of Contents
- Getting Started 1
- Basic Skills 14
- Managing Your Pocket PC ....31
- Microsoft Pocket Outlook 41
- Companion Programs.... 61
- Using the Digital Camera....81
- Getting Connected.... 99
- Troubleshooting and Maintenance 113
- A Regulatory Information 123
- Preface
- Welcome
- About this Manual
- Getting Started
- Hardware Features
- Right-Side Components
- Ref Component Description
- Left-Side Components
- Top Components
- Bottom Components
- USB Cradle
- Setting Up Your Pocket PC for Use
- Performing Initial Startup
- Connecting to AC Power and Charging the Battery
- With the cradle
- Without the cradle
- Turning Your Pocket PC On and Off
- Turning Off to Suspend
- Turning On to Resume
- Installing Microsoft ActiveSync
- CAUTION:
- Expanding Your Pocket PC
- Using a SD/MMC Card
- NOTE:
- Accessories
- - Protective Cover
- - Headphone
- - Remote Control
- Basic Skills
- Using the Stylus
- Using the Navigation Button
- Today Screen
- Status Icons
- Navigation Bar and Command Bar
- Running Programs
- Pop-up Menus
- Notifications
- Entering Information
- Entering Text Using the Input Panel
- Block Recognizer
- Letter Recognizer
- Transcriber
- Writing on the Screen
- Writing
- Editing Your Writing
- Converting Your Writing to Text
- Drawing on the Screen
- Creating a Drawing
- Editing Your Drawing
- Recording a Message
- Recording Formats
- Using My Text
- Managing Your Pocket PC
- Managing Power
- Low Battery Signals and Actions
- Power-Saving Tips
- Managing Memory
- Storage and Program Memory
- - Storage memory
- - Program memory
- Additional Memory
- Customizing Your Pocket PC
- Security
- Setting a Password
- Certificates
- Finding and Organizing Information
- Backing Up Data
- Adding or Removing Programs
- Adding Programs
- To Add Programs Using ActiveSync
- To Add a Program to the Start Menu
- Removing Programs
- Microsoft Pocket Outlook
- Calendar: Scheduling Appointments and Meetings
- Creating an Appointment
- Using the Calendar Summary Screen
- Creating Meeting Requests
- Contacts: Tracking Friends and Colleagues
- Creating a Contact
- Finding a Contact
- Using the Contacts Summary Screen
- Tasks: Keeping a To Do List
- Creating a Task
- In Task, tap New.
- Using the Tasks Summary Screen
- Notes: Capturing Thoughts and Ideas
- Creating a Note
- Inbox: Sending and Receiving E-mail Messages
- Synchronizing E-mail Messages
- Connecting Directly to an E-mail Server
- Setting up an Email Service
- Using the Message List
- Composing and Sending Messages
- Managing Email Messages and Folders
- Folder Behavior
- Companion Programs
- Pocket Word
- Creating a Document
- Working with Pocket Word Documents
- Opening a Document
- Changing Options of a Document
- Tips for Working in Pocket Word
- Pocket Excel
- Creating a Workbook
- Working with Pocket Excel Workbooks
- Opening a Workbook
- Changing Options of a Workbook
- Tips for Working in Pocket Excel
- MSN Messenger
- Setting Up to Use MSN Messenger
- Working with Contacts
- Chatting with Contacts
- Windows Media Player for Pocket PC
- Microsoft Reader
- Getting Books for Your Pocket PC
- Using the Library
- Reading a Book
- Using Reader Features
- - Search for Text
- - Copy Text
- - Bookmarks
- - Highlights
- Notes
- - Drawings
- Removing a Book
- Pictures
- Additional Programs
- MP3 Player
- Playing MP3 Files
- Playback Controls
- Using Play Lists
- Equalizer
- Using the Digital Camera
- About MioCam
- Features
- Screen Elements
- Status or Button Operation
- Taking and Viewing Photos
- Taking Photos
- Photo Quick Menu
- Viewing Photos
- Single Viewing
- Thumbnail Viewing
- Recording and Watching Videos
- Recording a Video
- Video Quick Menu
- Icon Name Description
- Watching Videos
- Managing Photos and Videos
- Storage Folder
- Deleting Photos or Videos
- Camera Setup
- Basic Setup
- Advanced Setup
- System Setup
- Hints and Notes
- Getting Connected
- Connection Options
- Connecting to Your Desktop Computer
- Microsoft ActiveSync
- Synchronizing Data
- To Synchronize from Your Pocket PC
- To Synchronize from a Remote Location
- Transferring Items Using Infrared
- Sending Information
- Receiving Information
- Connecting to ISP or Work
- Creating a Modem Connection
- Creating a Network (Ethernet) Card Connection
- Create a Wireless Connection to a Network
- Ending a Connection
- Getting Help on Connecting
- Using Microsoft Pocket Internet Explorer
- Viewing Mobile Favorites and Channels
- Browsing the Internet
- The Mobile Favorites Folder
- Favorite Links
- Mobile Favorites
- Conserving Memory
- Using AvantGo Channels
- Troubleshooting and Maintenance
- Resetting Your Pocket PC
- Restoring Factory Default State
- Power Problems
- Memory Problems
- Screen Problems
- Screen is off
- Screen responds slowly
- Screen freezes
- Screen is hard to read
- Inaccurate response to stylus taps
- Connection Problems
- Cradle Connection Problems
- Infrared Connection Problems
- Modem Connection Problems
- Unable to dial out
- Network Connection Problems
- Taking Care of Your Pocket PC
- General Guidelines
- Travel Guidelines
- Regulatory Information
- A.1 Class B Regulations
- USA
- Please note:
- Canada
- A.3 About the AC Adapter
- A.4 About the Battery
- A.5 About the Infrared LED
- A.6 About the Electrostatic Discharge
- Index
- A
- B
- C
- D
- E
- F
- G
- H
- |
- L
- M
- N
- 0
- P
- R
- S
- T
- U
- V
- W
Brand : MIO
Model : DigiWalker 339
Category : Browser