
Joya Touch Plus - Barcode scanners DATALOGIC - Free user manual and instructions
Find the device manual for free Joya Touch Plus DATALOGIC in PDF.


| Product Type | Handheld Mobile Computer with Barcode Scanner |
| Brand | Datalogic |
| Model | Joya Touch Plus |
| Scanning Capability | 1D and 2D barcodes |
| Scanner Type | Area Imager |
| Connectivity | Bluetooth 2.1, Wi-Fi 802.11 b/g, USB 2.0 |
| Display | 3.5-inch Color TFT Touchscreen, 320x240 pixels |
| Keyboard | 28-key Numeric Keypad |
| Battery | Rechargeable Li-Ion 3.7V, 3100 mAh |
| Operating System | Windows Embedded Handheld 6.5 |
| Memory | 256 MB RAM / 512 MB Flash |
| Drop Resistance | 1.2 m to concrete |
| IP Rating | IP54 |
| Weight | 270 g (including battery) |
| Dimensions | 166 x 72 x 38 mm |
| Power Supply | 5V DC via USB or charging cradle |
| Charging Time | Approximately 4 hours |
| Operating Temperature | -10°C to 50°C |
| Included Accessories | Hand strap, stylus, charging cradle, USB cable |
| Maintenance | Clean with a soft dry cloth; avoid harsh chemicals |
| Certifications | CE, FCC, RoHS |
Frequently Asked Questions - Joya Touch Plus DATALOGIC
User questions about Joya Touch Plus DATALOGIC
0 question about this device. Answer the ones you know or ask your own.
Ask a new question about this device
Download the instructions for your Barcode scanners in PDF format for free! Find your manual Joya Touch Plus - DATALOGIC and take your electronic device back in hand. On this page are published all the documents necessary for the use of your device. Joya Touch Plus by DATALOGIC.
USER MANUAL Joya Touch Plus DATALOGIC
Multi-Purpose Device for Retail

User's Manual
Datalogic S.r.l.
Via S. Vitalino, 13
An Unpublished Work - All rights reserved. No part of the contents of this documentation or the procedures described therein may be reproduced or transmitted in any form or by any means without prior written permission of
Datalogic S.r.l. or its subsidiaries or affiliates. Owners of Datalogic products are hereby granted a non-exclusive, revocable license to reproduce and transmit this documentation for the purchaser's own internal business purposes.
Purchaser shall not remove or alter any proprietary notices, including copyright notices, contained in this documentation and shall ensure that all notices appear on any reproductions of the documentation.
Should future revisions of this manual be published, you can acquire printed versions by contacting your Datalogic representative. Electronic versions may either be downloadable from the Datalogic website (www.datalogic.com) or provided on appropriate media. If you visit our website and would like to make comments or suggestions about this or other Datalogic publications, please let us know via the "Contact Datalogic" page.
Disclaimer
Datalogic has taken reasonable measures to provide information in this manual that is complete and accurate, however, Datalogic reserves the right to change any specification at any time without prior notice.
Datalogic and the Datalogic logo are registered trademarks of Datalogic S.p.A. in many countries, including the U.S.A. and the E.U.
JOYA is a trademark of Datalogic S.p.A. or of Datalogic Group companies, registered in many countries, including the U.S. and the E.U.
All other brand and product names may be trademarks of their respective owners.
Patents
Patent. See www.patents.datalogic.com for patent list.
Table of Contents
Introduction ...... 1
Conventions 1
Product Presentation 2
Available Models 3
Out of the Box 5
General View 6
Front View 6
Back View 7
Top View 8
Side View 8
Accessories 9
Battery.... 11
Install the Battery 11
Charge the Battery 13
Fast Charge 13
Standard Charge 14
Battery Safety Guidelines 17
Use and Functioning.... 21
Getting Started 21
Taskbar 23
Touch Gestures 24
Data Capture 25
Imager Data Capture 25
Resetting the JOYA TOUCH 28
Warm Boot 28
Cold Boot 29
Clean Boot 29
Control Panel 31
Data Capture Configuration 32
DL Buttons 50
Persistent Registry 52
Wireless Communications 54
Audio Settings 62
Connecting to other Computers 65
Windows Mobile® Device Center 65
Datalogic Firmware Utility 66
Retrieving a Firmware Image Update 66
Installing DFU on the Host PC 67
Updating the Firmware 68
Datalogic Desktop Utility 69
Administrative Options (Admin tab) 70
Locked Web Browser Options (LockedWeb tab) 75
Status Icons Options (Status Tab) 77
Windows Control 78
AppSelector Options (AppSelect tab) 80
Locked Web Browser 83
FlashDisk Directory File Management 84
Connections 87
USB Connection 87
USB Direct Connection 87
Wi-Fi Connection 88
Bluetooth® Serial Connection 90
Wireless and Radio Frequencies Warnings 92
Technical Features.... 95
Technical Data 95
Decode Distances 99
Test Codes.... 101
Maintenance.... 109
Cleaning the Device 109
Ergonomic Recommendations 110
Safety and Regulatory Information.... 111
General Safety Rules 111
Power Supply 112
Laser Safety 113
LED Class 121
Marking and European Economic Area (EEA) 121
Statement of Compliance 122
Radio Technologies and Frequency Bands 125
Information for the User 126
FCC/IC Labeling 127
FCC Compliance 127
ISED Compliance 129
Radiofrequency Radiation Exposure Information 131
WEEE Compliance 132
Support.... 135
Reference Documentation 135
Warranty Terms and Conditions 135
Glossary.... 137
NOTES
Conventions
This manual uses the following conventions:
'Device' and 'JOYA TOUCH' refer to the JOYA TOUCH.
'Dock' refers to the JOYA TOUCH 3-Slot Cradle.
The label artworks may be only a draft. Refer to the product labels for more precise information.
Product Presentation
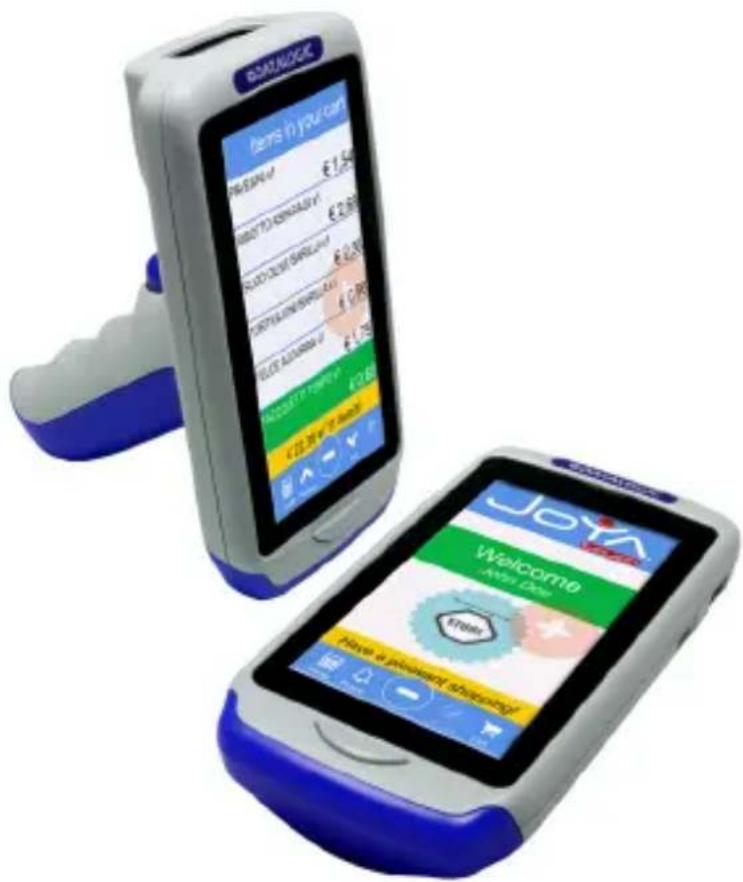
The Datalogic JOYA TOUCH is a pocket-sized Windows embedded compact 7 powered mobile computer, available in two form factors. This compact, lightweight, and versatile device, combines fully integrated automatic data capture (2D bar code), a wireless charging system and wireless communication capabilities, supporting nearly any application.
The Datalogic JOYA TOUCH system architecture is based on the blend of Intel X-Scale series processors coupled with the Windows Embedded Compact operating system and it was developed to meet the most demanding customer needs.
A huge quantity of on-board memory is available. It enables the user to adapt the terminal for any specific need.
Thanks to its great ergonomics and the state of the art architecture, the Datalogic JOYA TOUCH is the right answer to enhance your business opportunities.
Available Models
The Datalogic JOYA TOUCH is available in different models depending on the features it is equipped with. All options are listed below:
- p/n 911350010 JOYA TOUCH Plus Handheld, FWVGA Full Touch color display 4.3" in diagonal, white-illumination 2D imager engine, Green Spot, radio 802.11 A/B/G/N, 512MB RAM, 1GB Flash + 4GB SD, Bluetooth Dual Mode V.4, Windows Embedded Compact 7 with dedicated SDK for developing 3rd party applications. Wavelink Avalanche® device management preloaded. Gray/Blue colors combination (upper case / battery cover).
This model is available also in other colors combinations (indicated colors represent front housing/battery cover):
- 911350014 Grey/Grey
- 911350015 Grey/Red
- 911350020 Blue/Yellow
- 911350021 Orange/Orange
- 911350022 Green/Green
- p/n 911350011 JOYA TOUCH Plus Pistol Grip, FWVGA Full Touch color display 4.3" in diagonal, white-illumination 2D imager engine, Green Spot, radio 802.11 A/B/G/N, 512MB RAM, 1GB Flash + 4GB SD, Bluetooth Dual Mode V.4, Windows Embedded Compact 7 with dedicated SDK for developing 3rd party applications. Wavelink Avalanche® device management preloaded. Grey/Blue/Blue colors combination (upper case / trigger / battery cover).
This model is available also in other colors combinations (indicated colors represent front housing/battery cover/trigger):
- 911350012 Grey/Grey/Blue
- 911350013 Grey/Red/Red
- 911350016 Yellow/Yellow/Yellow
- 911350017 Red/Grey/Grey
- 911350018 Grey/Orange/Orange
- 911350019 Grey/Green/Green
- p/n 911350023. JOYA TOUCH Basic Handheld, FWVGA Full Touch color display 4.3" in diagonal, white-illumination 2D imager engine, Green Spot, radio 802.11 A/B/G/N, 512MB RAM, 512GB Flash, Windows Embedded Compact 7 with dedicated SDK for developing 3rd party applications. Wavelink Avalanche® device management preloaded. Gray/Red colors combination (upper case / battery cover).
- p/n 911350024 JOYA TOUCH Basic Pistol Grip, FWVGA Full Touch color display 4.3" in diagonal, white-illumination 2D imager engine, Green Spot, radio 802.11 A/B/G/N, 512MB RAM, 512GB Flash, Windows Embedded Compact 7 with dedicated SDK for developing 3rd party applications. Wavelink Avalanche® device management preloaded. Grey/Red/Red colors combination (upper case / trigger / battery cover).
For further details about the Datalogic JOYA TOUCH models refer to the web site: www.datalogic.com.
Out of the Box
The JOYA TOUCH package contains:
■ J O Y A T O U C H ( d
■ Rechargeable battery
■ Q u i c k S t a r t G u
■ S a f e t y & R e g u
■ EULA Addendum
Remove all the components from their packaging; check their integrity and compare them with all the packing documents.

CAUTION
Keep the original packaging for use when sending products to the technical assistance center. Damage caused by improper packaging is not covered under the warranty.
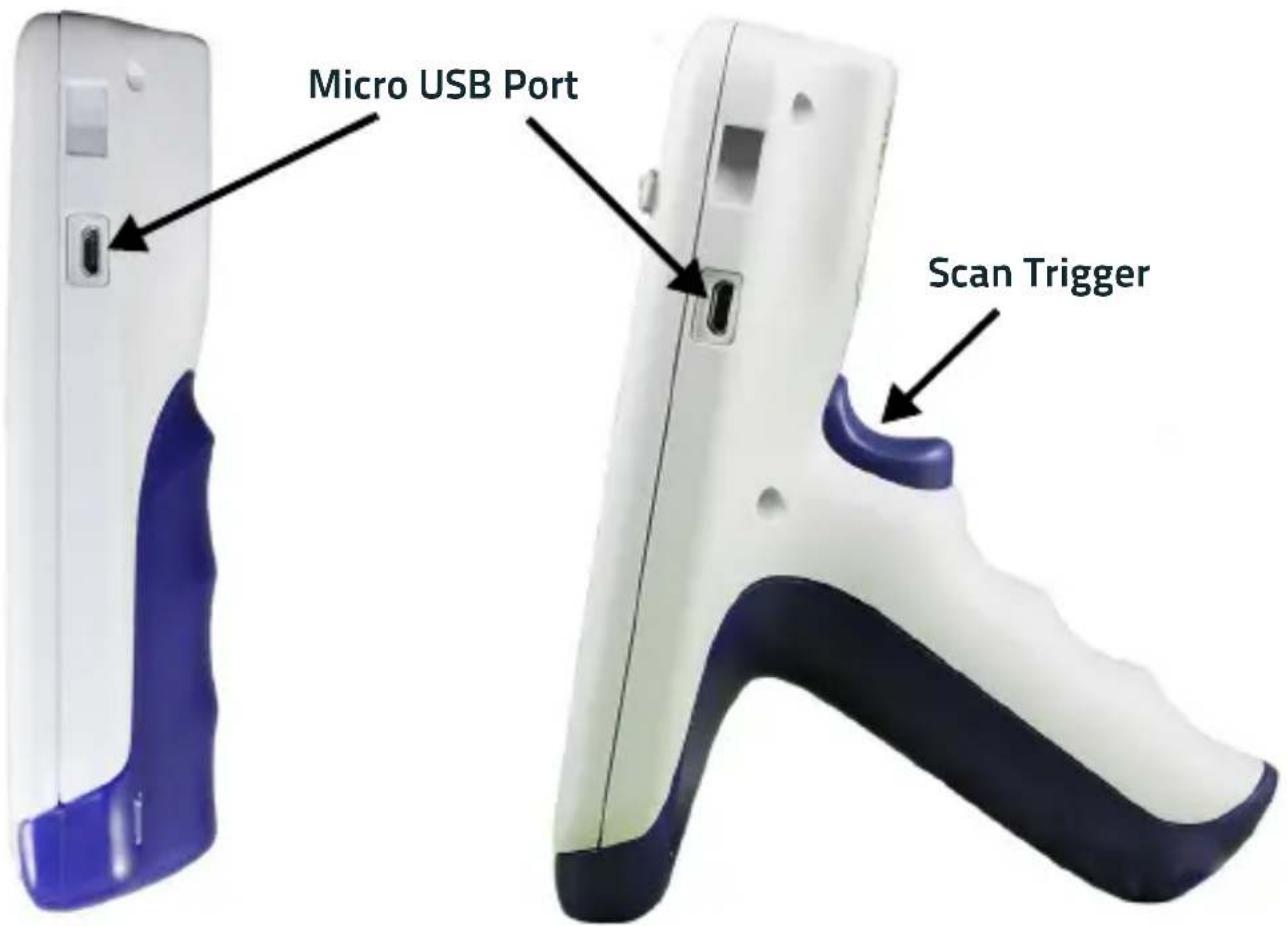
General View
Front View
Back View
Top View
Side View
Handheld Models
Pistol Grip Models
Accessories
Cradle
91ACC0043 JOYA TOUCH 3-Slot Cradle
Cradle Accessories
91ACC0045 JOYA TOUCH Cradle Unlock Key (5 PCS)
91ACC0048 JOYA TOUCH 3-Slot Cradle Power Supply. Line Cord required (max 2 cradles on standard charge, max 1 cradle on fast charge per power supply)
91ACC0049 JOYA TOUCH Cradle Power Jumper (5 PCS)
91ACC0050 JOYA TOUCH 3-Slot Cradle Wall Bracket
91ACC0051 Blue Kit to convert Plus Handheld to a Pistol Grip
91ACC0052 Blue Kit to convert Plus Pistol Grip to a Handheld
91ACC0053 Blue Kit to convert Basic Handheld to a Pistol Grip
91ACC0054 Blue Kit to convert Basic Pistol Grip to a Handheld
Batteries
91ACC0055 JOYA TOUCH Replacement Battery 3.75V 3030 mAh
Various
91ACC0047 JOYA TOUCH Trolley Holder (60pieces)

Use only Datalogic-approved power supply and cables. Use of an alternative power supply will invalidate any approval given to this device and may be dangerous.
NOTES

natural_image
Abstract pattern of blue and gray vertical stripes with a pixelated gray shape on the right (no text or symbols)Battery
Install the Battery
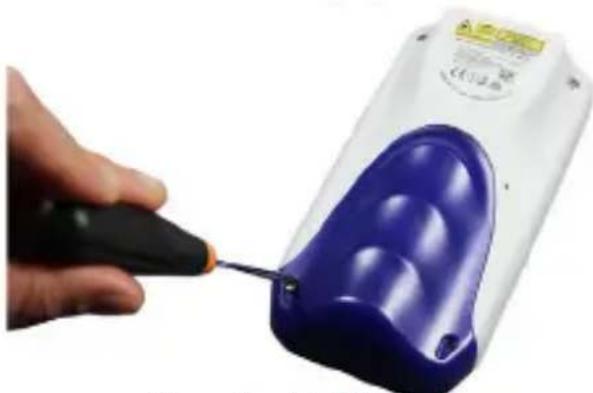
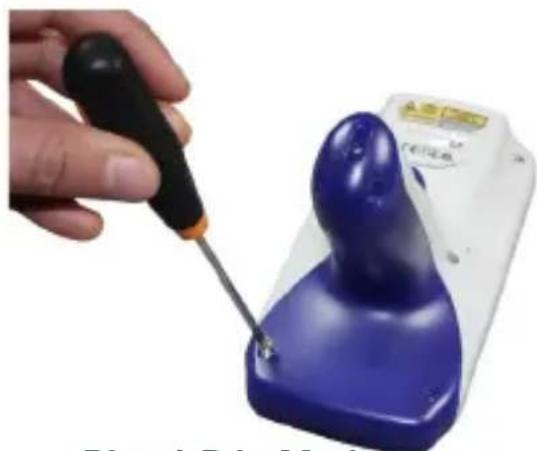
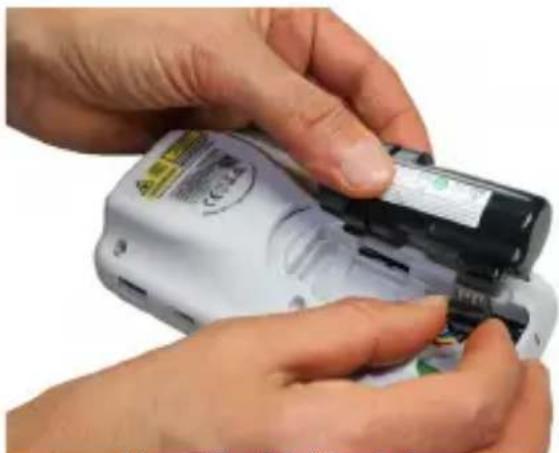
To install the battery pack, follow the steps below:
- Unscrew the battery cover and remove it:
natural_image
Close-up of a hand using a screwdriver to apply blue liquid onto a white and white device (no visible text or symbols)Handheld Models
natural_image
Close-up of a hand using a screwdriver to apply blue and white plastic components (no visible text or symbols)Pistol Grip Models
- Connect the battery contacts to the battery clip located in the battery slot:
natural_image
Close-up of hands installing or adjusting a device with a black plastic cover (no visible text or symbols)Handheld Models
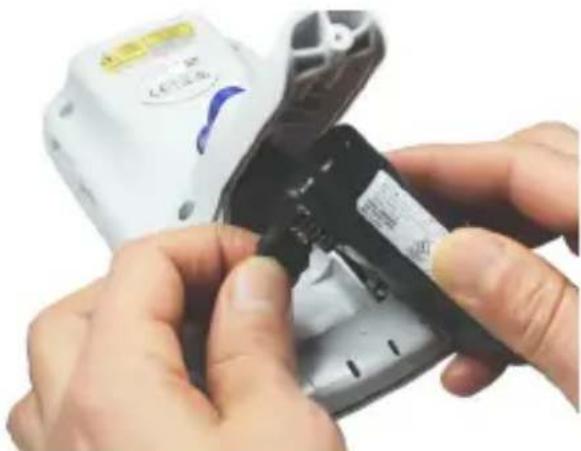
natural_image
Close-up of hands installing or adjusting a black plastic component with a label (no readable text or symbols)Pistol Grip Models
- Insert the battery pack into the slot as shown in the figures below:
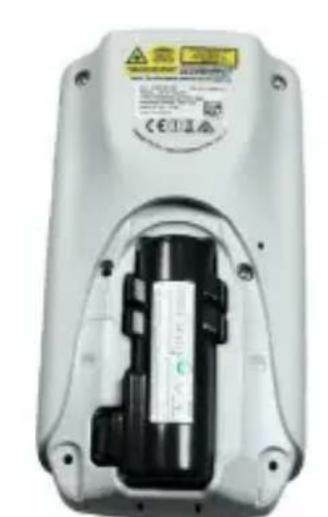
natural_image
Interior view of a white electronic device showing internal battery pack and warning labels (no readable text or symbols)Handheld Models
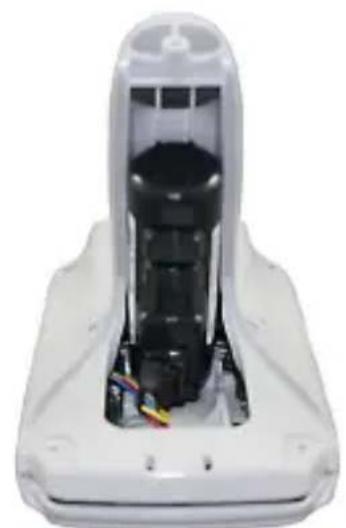
natural_image
White plastic mechanical component with internal black housing and visible wiring (no text or symbols)Pistol Grip Models
- Insert the battery cover and fix the screws:
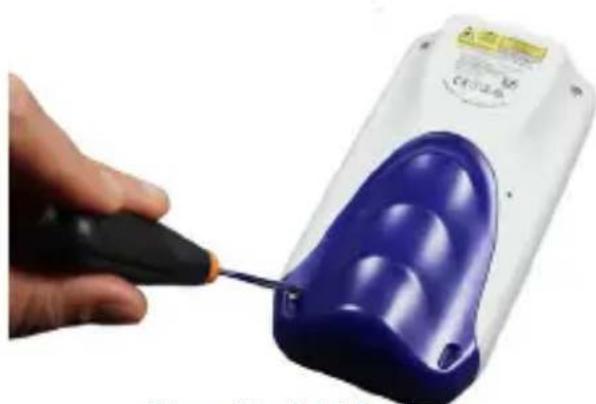
natural_image
Hand using a handheld device to apply blue liquid onto a white device (no visible text or symbols)Handheld Models
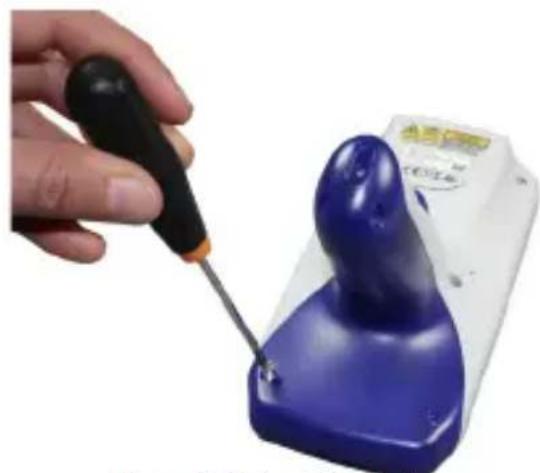
natural_image
Hand using a screwdriver to apply blue and white plastic components (no visible text or symbols)Pistol Grip Models
NOTE
Required torque of the screws is 35 cNm.
Charge the Battery
The JOYA TOUCH battery pack is not initially fully charged. After installing the battery, charge it with the 3-slot cradle.
The device needs to be inserted head down into the cradle.

Charge the battery for a minimum of 7 hours in standard charge and 3 hours in fast charge.
There are two options to connect the cradle to the power supply: fast charge and standard charge.
Fast Charge
The fast charge connection allows to power one crack power supply.
Plug the power supply cable into the power connector on the back of the cradle, then plug the power supply into the AC/DC plug using a Datalogic power cable.
Please see below an example of how to insert the power supply cable through the wall mounting metal bracket:
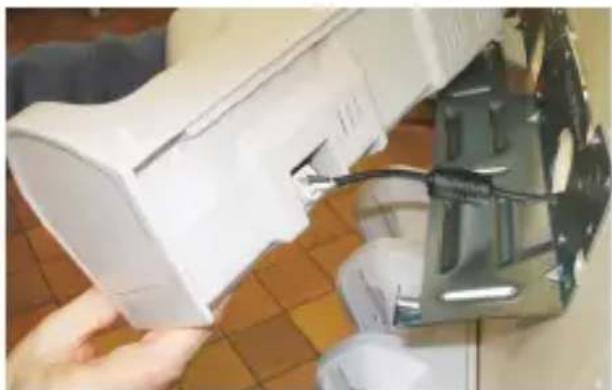
natural_image
Close-up of a hand holding a white electronic device with visible wiring, next to a metallic mechanical component (no text or symbols visible)High Visibility
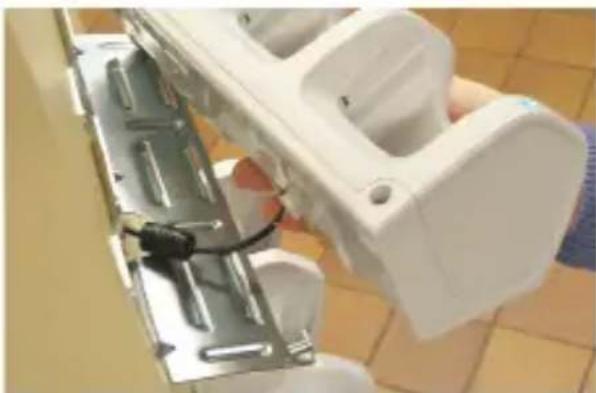
natural_image
Close-up of a white plastic mechanical component with metal clamps, mounted on a tiled floor (no visible text or symbols)High Density
Standard Charge
The standard charge connection allows to power two cradles with one power supply.
To connect a second cradle use the JOYA TOUCH Cradle Power Jumper, available as optional accessory (P/N 91ACC0049).
- Connect the first cradle to the second cradle using the power jumper.
- Connect the power supply to the first cradle.
- Plug the power supply into the AC/DC plug using a Datalogic power cable.
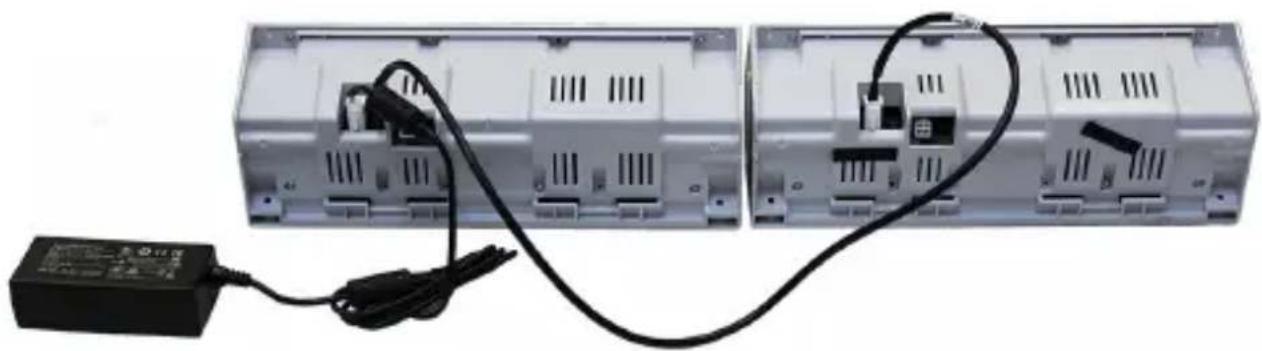
natural_image
Two rectangular electronic units connected by black cables with a power adapter nearby (no visible text or symbols)
For further information on the JOYA TOUCH 3-Slot Cradle, refer to the JOYA TOUCH 3-Slot Cradle Quick Start Guide, included in the cradle's box, and to the JOYA TOUCH 3-Slot Cradle Installation Guide, downloadable from our website www.datalogic.com.
By default, the main battery pack is disconnected at the factory to avoid damage due to excessive draining.
Rechargeable battery pack is less than half of full charge when delivered.
The battery pack autonomy varies according to many factors, such as the frequency of bar code scanning, RF usage, battery life, storage, environmental conditions, etc.
Close to the limits of the working temperature, some battery performance degradation may occur.
The JOYA TOUCH should be charged at an ambient temperature between 0 - 35°C (32 to 95°F) to achieve the maximum charging rate.
Never charge the device battery in a closed space where excessive heat can build up.
As a safety precaution, the battery may stop charging to avoid overheating.
The JOYA TOUCH may get warm during charging; this is normal and does not mean a malfunction.
Even if the storage temperature range is wider, it is recommended to store the terminal and the batteries at environmental temperature, in order to achieve the longest battery life.

Avoid storing batteries for long periods in a state of full charge or very low charge.
We recommend charging the battery pack every two to three months to keep its charge at a moderate level to maximize battery life.
Annual replacement of rechargeable battery pack avoids possible risks or abnormalities and ensures maximum performance.

Do not incinerate, disassemble, short terminals, or expose to high temperature. Risk of fire and explosion. Use specified charger only. Risk of explosion if the battery is replaced by an incorrect type. Dispose of batteries as required by local authorities.

Use only Datalogic approved batteries and accessories for battery charging.
Risk of explosion if battery is replaced by an incorrect type.
Dispose of used batteries according to the instructions.
Battery Safety Guidelines

Installing, charging and/or any other action should be done by authorized personnel and following this manual.
The battery pack may get hot, explode, ignite, and/or cause serious injury if exposed to abusive conditions.
If the battery pack is replaced with an improper type, there is risk of explosion.
Do not place the battery pack in or near a fire or other heat source; do not place the battery pack in direct sunlight, or use or store the battery pack inside unventilated areas in hot weather; do not place the battery pack in microwave ovens, in clothes dryers, in high pressure containers, on induction cook surfaces or similar devices. Doing so may cause the battery pack to generate heat, explode or ignite. Using the battery pack in this manner may also result in a loss of performance and a shortened life expectancy.
To power the cradle, use only a Datalogic approved power supply. The use of an alternative power supply will void the product warranty, may cause product damage and may cause heat, an explosion, or fire.
The area in which the units are charged should be clear of debris and combustible materials or chemicals.
Do not use the battery pack of this terminal to power devices other than this mobile computer.

Immediately discontinue use of the battery pack if, while using, charging or storing the battery pack, the battery pack emits an unusual smell, feels hot, changes color or shape, or appears abnormal in any other way.
Do not short-circuit the battery pack contacts connecting the positive terminal and negative terminal. This might happen, for example, when you carry a spare battery pack in your pocket or purse; accidental short-circuiting can occur when a metallic object such as a coin, clip, or pen causes direct connection of the contacts of the battery pack (these look like metal strips on the battery pack). Short-circuiting the terminals may damage the battery pack or the connecting object.
Do not apply voltages to the battery pack contacts.
Do not pierce the battery pack with nails, strike it with a hammer, step on it or otherwise subject it to strong impacts, pressures, or shocks.
Do not disassemble or modify (i.e. bend, crush or deform) the battery pack. The battery pack contains safety and protection devices, which, if damaged, may cause the battery pack to generate heat, explode or ignite.
In case of leakage of liquid from the battery, avoid contact with liquid the skin or eyes. If the contact occurs, immediately wash the affected area with water and consult a doctor.
Do not solder directly onto the battery pack.
Do not expose the battery pack to liquids.

Avoid any knocks or excessive vibrations. If the device or the battery is dropped, especially on a hard surface, you should take it to the nearest Authorised Repair Centre for inspection before continuing to use it.
If your device stops working for any reason, do not use its battery on other electronic devices without a prior check and approval by an Authorised Repair Centre.
Do not replace the battery pack when the device is turned on.
Do not remove or damage the battery pack's label.
Do not use the battery pack if it is damaged in any part.
Battery pack usage by children should be supervised.
Collect and recycle waste batteries separately from the device in compliance with European Directive 2006/66/EC, 2011/65, 2002/96/EC and subsequent modifications, with US and China regulatory laws and regulations about the environment.
NOTES

natural_image
Abstract pattern of blue and gray vertical stripes with a pixelated white square (no text or symbols)Use and Functioning
The use of the JOYA TOUCH depends on the application software loaded. However, there are several parameters that can be set and utilities that can be used to perform some basic functions such as data capture, communications, file management, etc. Furthermore, Avalanche Enabler is a major utility embedded in the software provided from factory.
Getting Started
The JOYA TOUCH turns on when a charged battery pack is inserted.
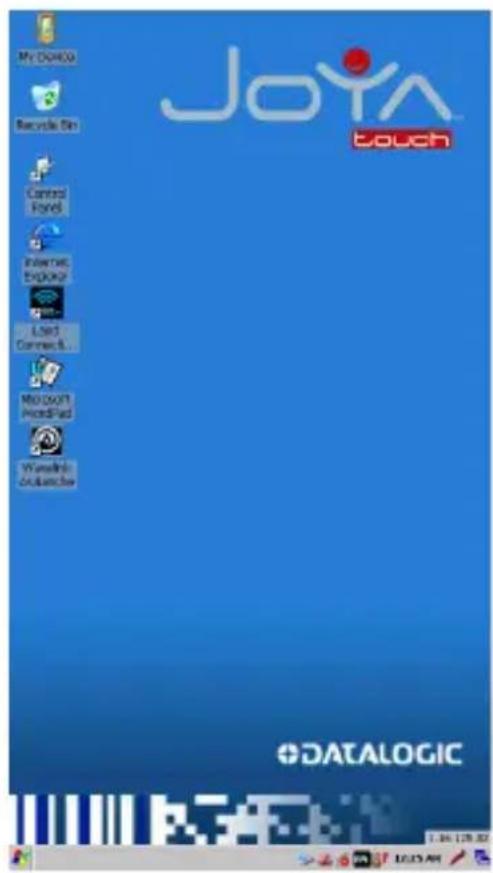
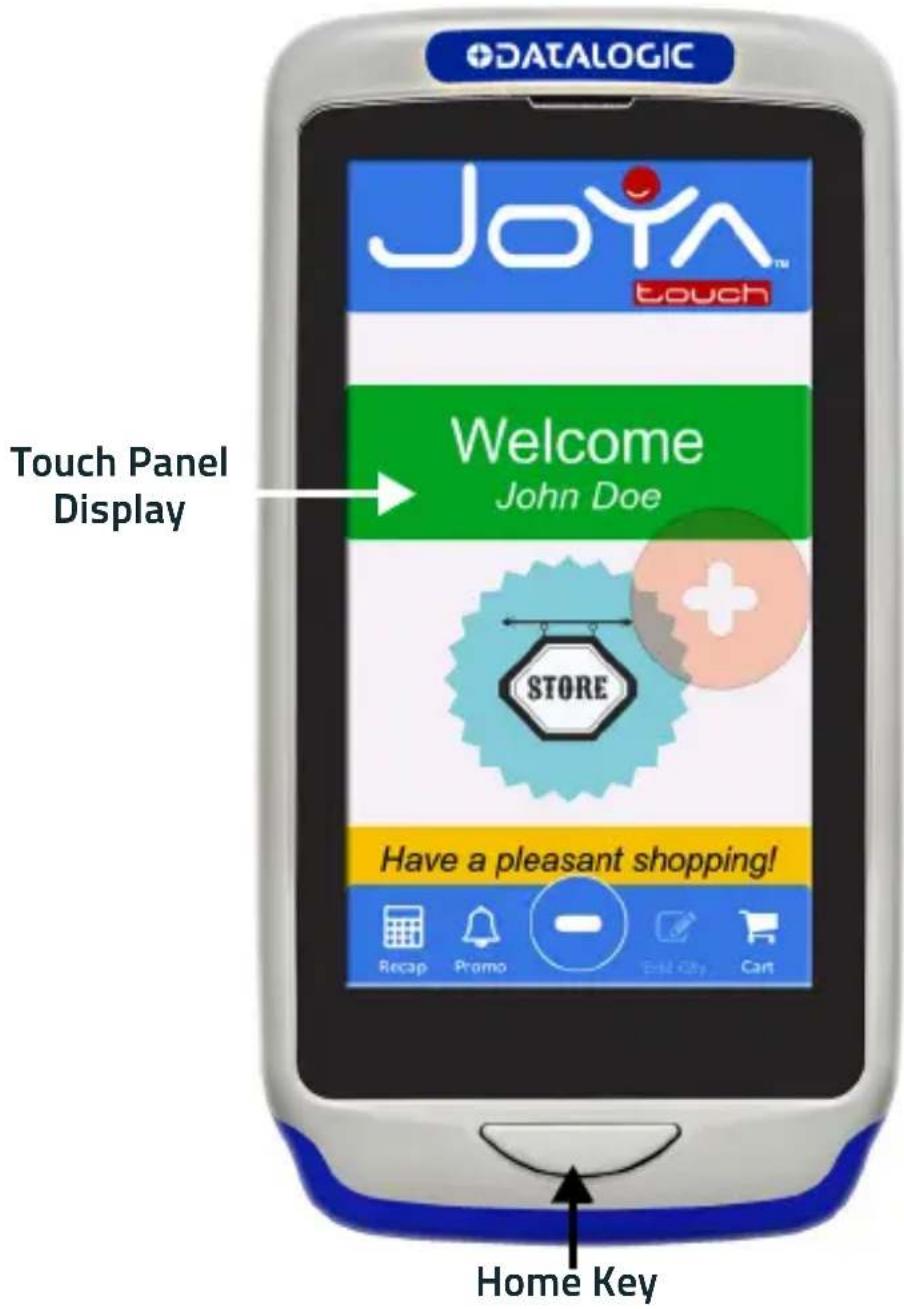
The mobile computer goes into power-off (low power with display and keyboard backlight off), when it is no longer used for more than a programmable timeout, which is defined in the POWER applet of the Control Panel. In this mode it can be awakened (resuming operation) pressing the Home key.

The mobile computer can also be awakened or turned by the application program.
Taskbar
The Taskbar provides information about the time, the battery level, the keyboard function, and the decoding status.


12:25 AM


| ICON DESCRIPTION | |
| Time Icons | |
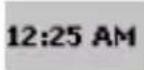 | It displays the time. |
| Radio Status Icons | |
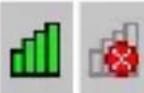 | It indicates if the radio is connected or not with an Access Point. |
| Network Status Icons | |
 | It displays whether you are connected or not to Wi-Fi or Bluetooth Personal Area Network. |
 | ActiveSync connection icon is displayed when connected to ActiveSync or Windows Mobile Device Center either by USB or Bluetooth. Double-tap it to open a status dialog that will let you disconnect the ActiveSync session without physically disconnecting the device from the PC. It is the only way to disconnect a Bluetooth ActiveSync connection. |
Touch Gestures
| Double Tap | Touch the screen twice to open items and select options. |
| Drag | Touch and slide your finger on screen to select text and images. Drag in a list to select multiple items. |
| Tap-and-hold | Tap and hold your finger on an item to see a list of actions available for that item. On the pop-up menu that appears, tap the action you want to perform. |

To prevent damage to the screen, do not use sharp devices or any device other than your finger or a touch screen stylus.
In harsh applications, use of screen protectors should be taken into consideration, in order to extend the touch screen operating life.
Do not apply not necessary high pressures on the screen.
For applications where an intensive use of the touch screen is foreseen, please consider that touch screen components are subject to progressive wear.
Data Capture
To capture data, first of all double-tap Control Panel > Decoding and open the applet.
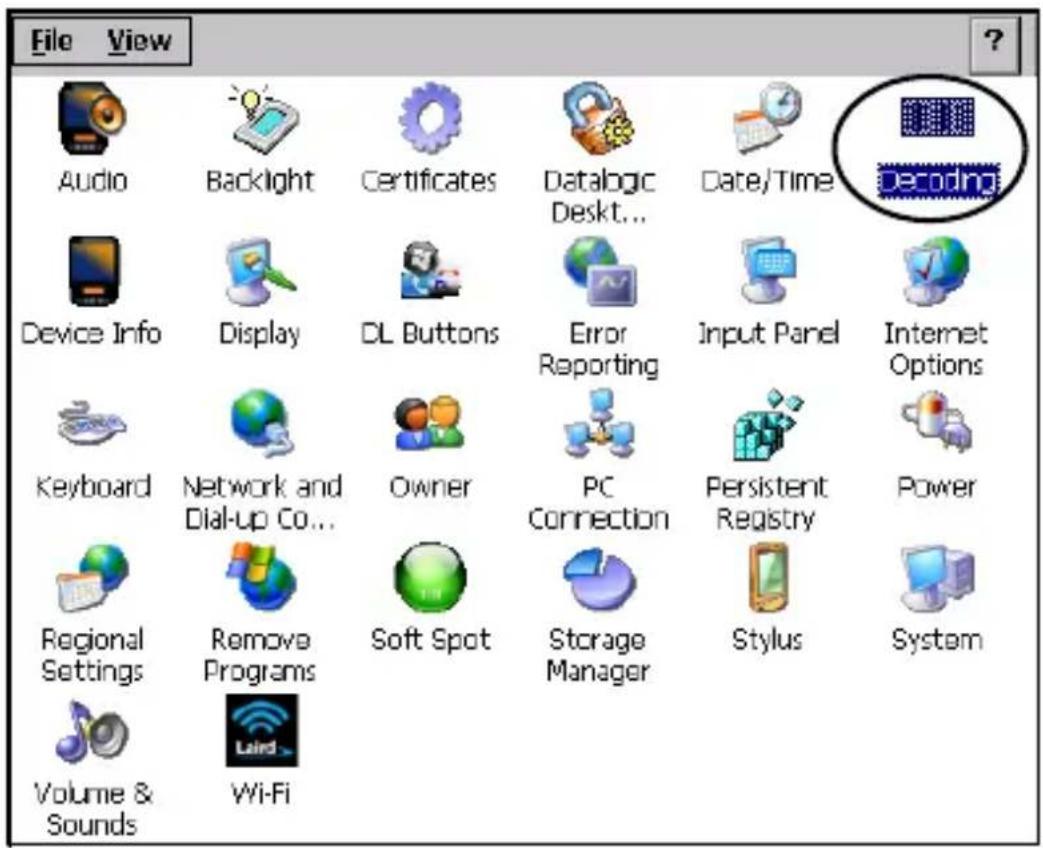
Imager Data Capture
The imager uses digital camera technology to take a digital picture of a bar code, the image is stored in memory and software decoding algorithms are executed to extract the data from the image. The omnidirectional scanning does not require that the operator orient the bar code to align with the scan pattern.
To scan a bar code symbol:
-
Point the scan window at the bar code.
-
Press the home key. The imager projects a laser aiming pattern similar to those used on cameras. The aiming pattern is used to position the bar code or object within the field of view.
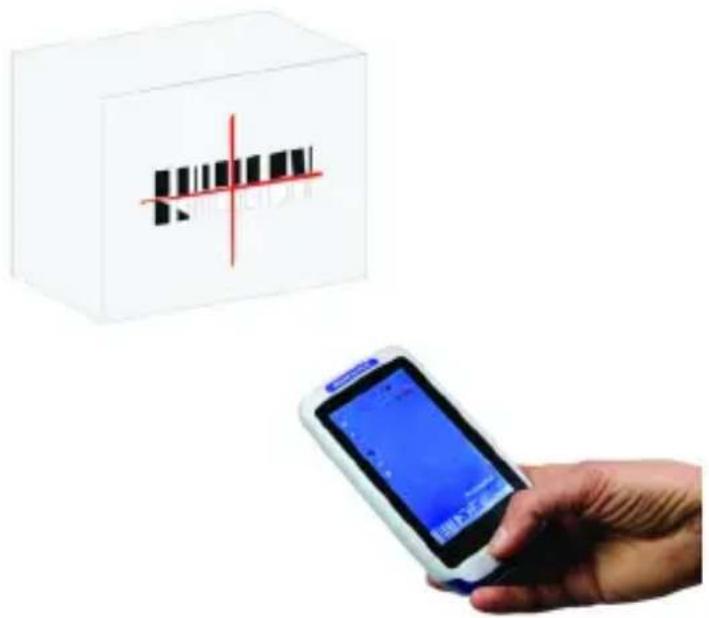
- Center the symbol in any orientation within the aiming pattern. Ensure the entire symbol is within the rectangular area formed by the brackets in the aiming pattern, then either wait for the timeout or release the home key to capture the image. A red beam illuminates the symbol, which is captured and decoded.
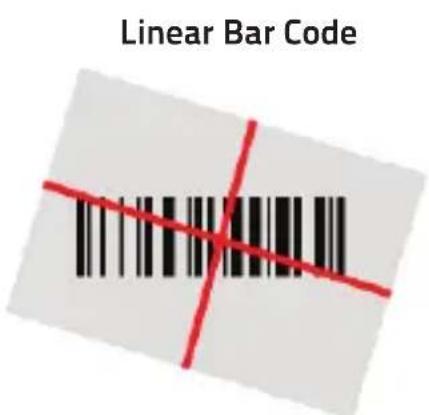
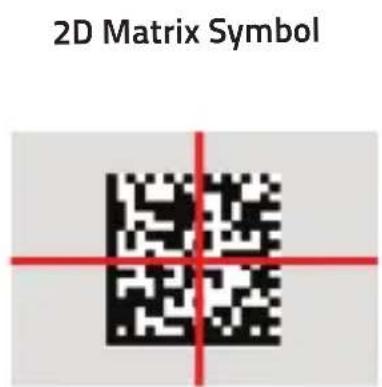
If the scan has been successful:
■ If enabled, the good read beep plays.
- If enabled, the GreenSpot projects a green spot onto the bar code image.
- If enabled, a pop-up window will report the data and the symbology of the scanned bar code (See 'Data Capture Configuration" on page -32).
The field of view changes its size as you move the reader closer or farther away from the bar code. The aiming pattern is smaller when the imager is closer to the bar code and larger when it is farther from the bar codebar code.
Scan symbols with smaller bars or elements (mil size) closer to the unit and those with larger bars or elements (mil size) farther from the unit. Hold the JOYA TOUCH between two and nine inches (depending on symbol density) from the symbol, centering the aiming pattern cross hairs on the symbol.
Resetting the JOYA TOUCH
There are three reset methods for the JOYA TOUCH.
A "warm boot" terminates an unresponsive application and clears the working RAM, but preserves both the file system and the registry.
A "cold boot" forces all applications to close and clears working RAM and files not resident on the persistent flash memory. Registry is restored from persistent memory if available or returned to factory default.
A "clean boot" restore the JOYA TOUCH to factory default.
Warm Boot
A warm boot terminates an unresponsive application and clears the working RAM, but preserves the file system and registry. If an application "hangs" initiate a warm boot to terminate the application.
To perform a warm boot, tap Start > Programs > Warm Boot:
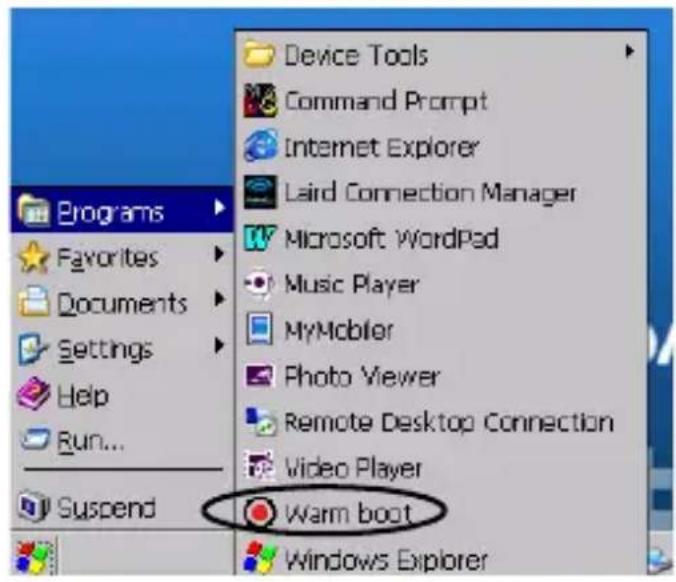
Cold Boot
A cold boot is a complete reset of the JOYA TOUCH applications are forcibly closed and RAM is completely cleared.
Registry is restored from persistent memory if a saved copy is available (see Persistent Registry on page 52) and RAM file system completely erased. You will lose any applications and data (registry too) which are not stored in persistent flash memory.
A cold boot is necessary when the Windows Embedded Compact 7 operating system locks up and the warm boot command does not work.
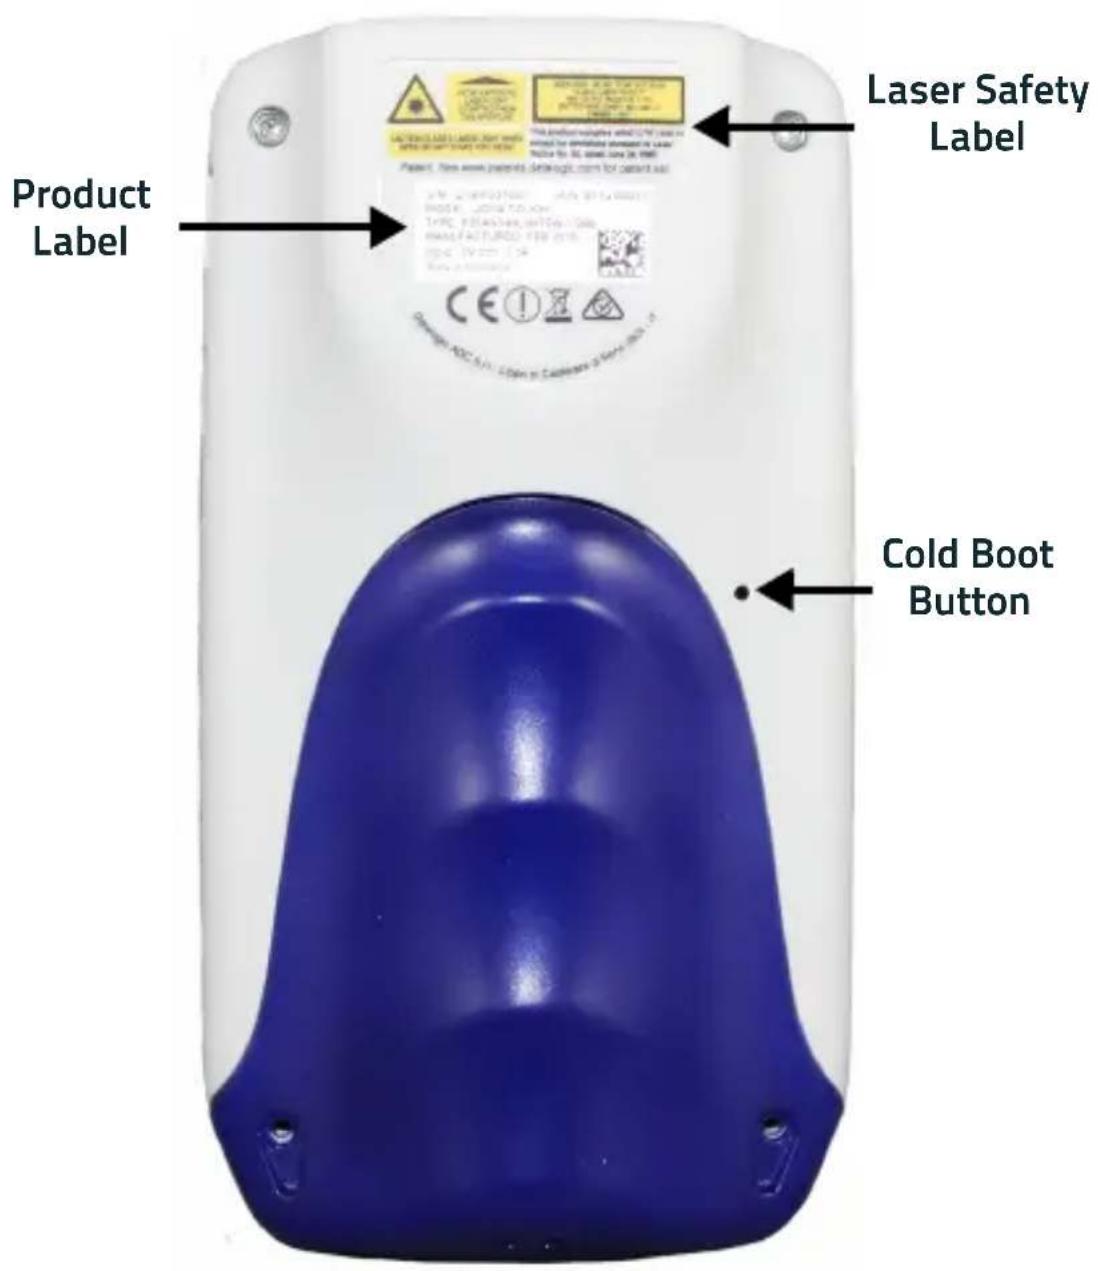
To perform a cold boot, lightly press with a metallic clip inside the circle hole on the back for 10 seconds.
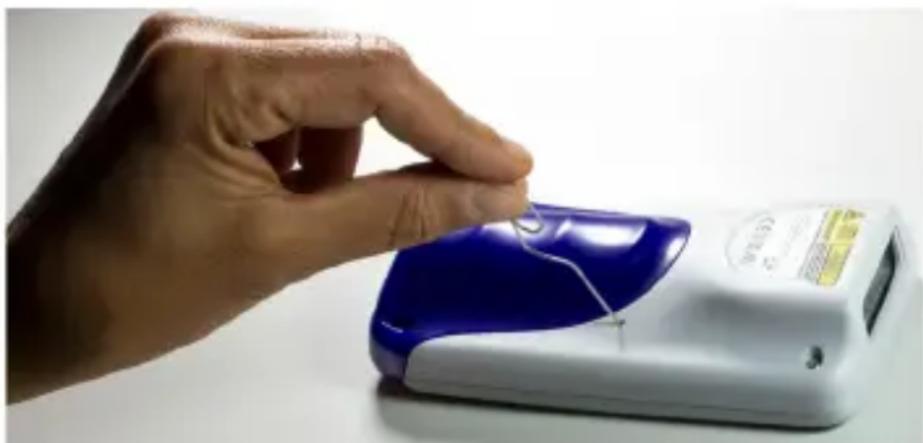
natural_image
Hand holding a blue and white handheld device with a small ear tag, against a plain white background (no text or symbols visible)Clean Boot
A clean boot is a complete restore to factory default and backup folder content erase of the JOYA TOUCH. You will lose any applications and data (registry too).
To perform a clean boot first execute a cold boot while keeping pressed the Home key.
A pop-up will ask you to confirm, confirm by pressing and releasing the Home key for three times, or wait for 3 seconds to cancel.

NOTE
Clean boot may require a considerable amount of time, even a few minutes.
| Warm Boot Cool Boot Clean Boot | |||
| Registry | Preserved | Restored from the latest persistent copy (from flash) | Reinitialized |
| Flash Disk (Backup Folder) | Preserved Preserved Cleared | ||
| Object Store (RAM Disk) | Preserved | Reinitialized, some persistent files could be restored (from flash) | Reinitialized |
| Storage Card (if present) | Preserved Preserved Preserved | ||

Before performing a reset, it is recommended to:
- Execute a system backup to keep your more important files and applications persistent.
- Save the registry to non-volatile memory to guarantee the persistence of the Windows configuration.
Control Panel
From the home screen, double-tap My Device icon or tap Start >Settings and then double-tap Control Panel icon to open the control panel main window.
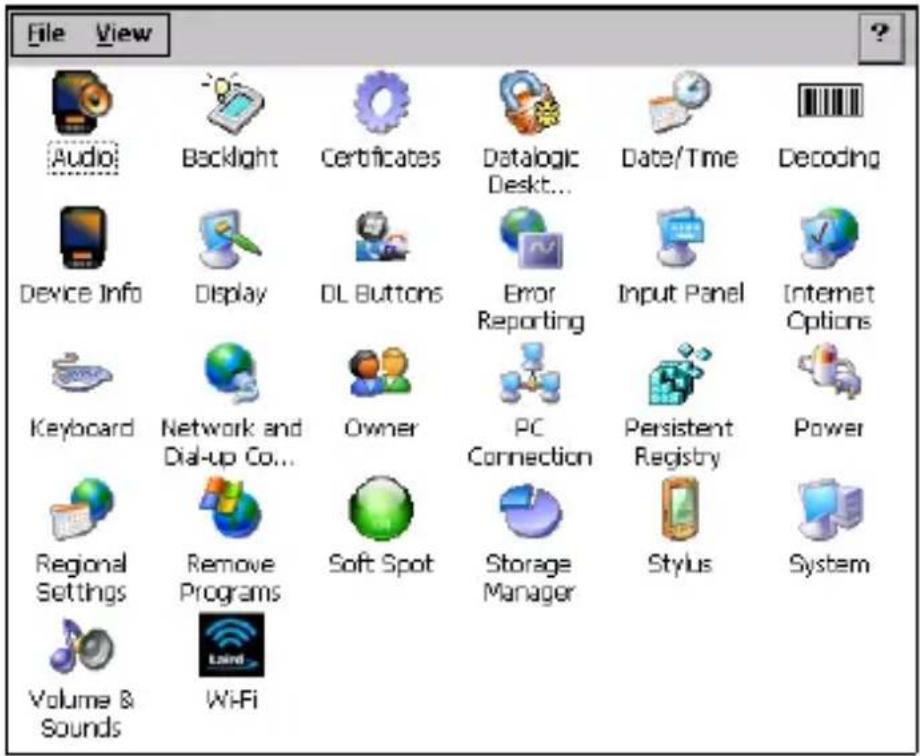
Data Capture Configuration
From the control panel main window, double tap the Decoding icon:

There are two sections in the Decoding control panel, each containing additional pages. There are eight general configuration pages and multiple bar code symbology pages.
Configure
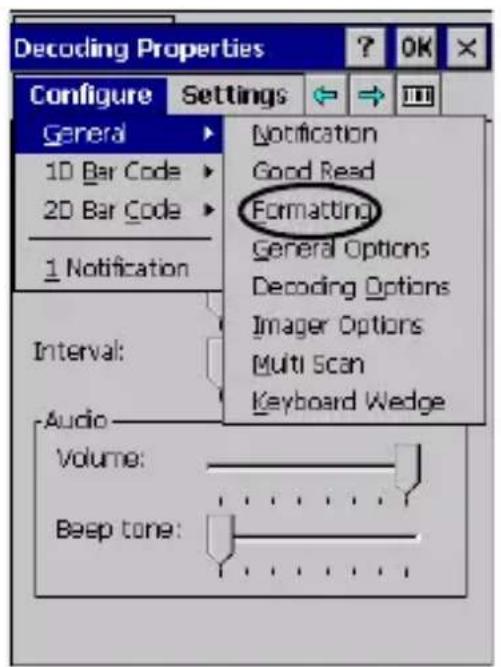
Select the desired configuration from the options shown in the figure below, and the other Decoding Properties figures on the following pages.
Select General, 1D or 2D Bar Code, then use the menu or tap the left and right arrow keys to navigate the different pages of the Decoding utility. The menu options will change to reflect the items most recently selected.
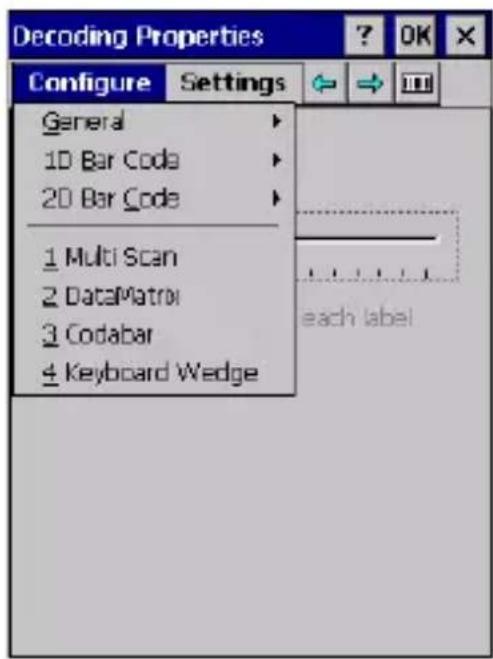
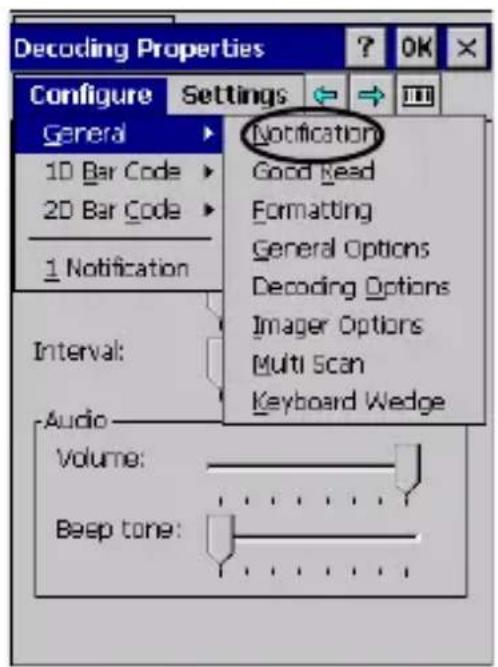
Notification
From the Decoding Properties page, tap Configure > General > Notification. Use to configure the good read green spot, tone and vibration notification.
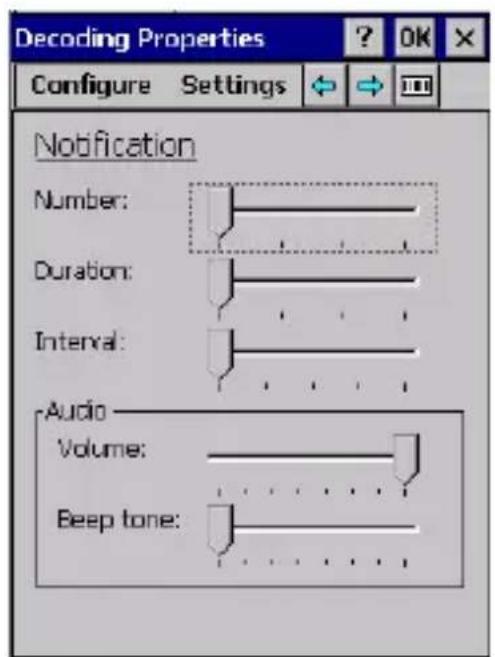
Number
Sets the number of notifications (green spot, beep or vibration) the scanner emits on a good read.
Duration
Sets the duration of the notification (green spot, beep or vibration) the scanner emits on a good read.
Interval
Sets the interval between each notification (green spot, beep or vibration) the scanner emits on a good read.
Volume
Sets the volume of beep tone.
Beep Tone
Sets the type of beep tone.
Good Read
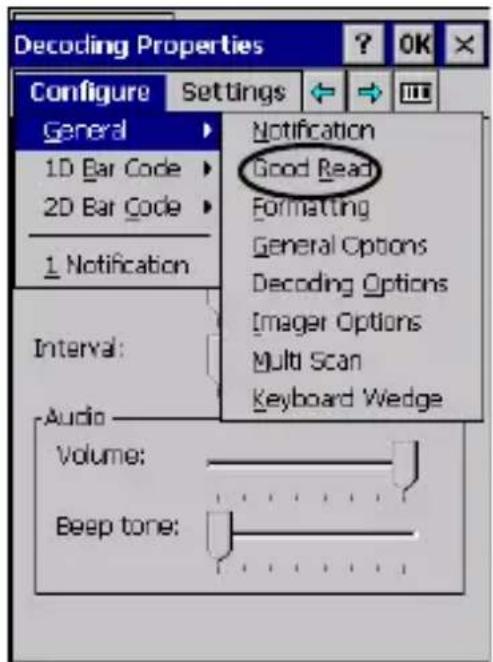
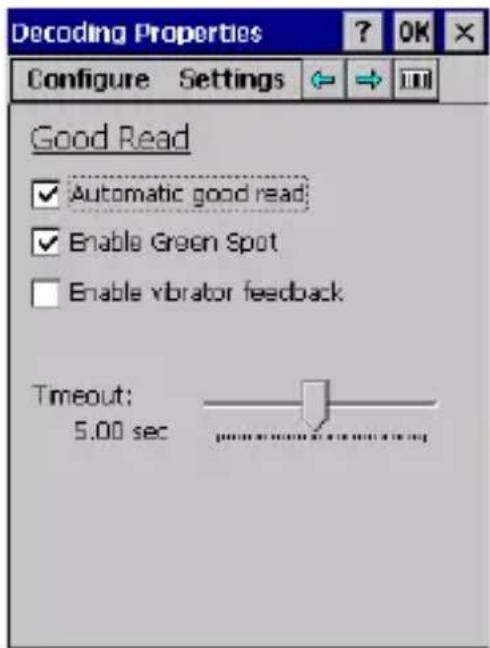
From the Decoding Properties page, tap Configure > General > Good Read. Use it to enable good read notifications (green spot, vibrator) and to set the decoding timeout for decoding labels.
Select Automatic good read to enable/disable notifications (main enabler), then select the notification you want to use.
Formatting
From the Decoding Properties page, tap Configure > General > Formatting. Allows to format the barcode text by configuring the use of prefix, suffix and data separator.
![Decoding Properties Configure Settings Formatting Label prefix: Label suffix: [CR][LF] Data separator: [CR] Edit label prefix Add special: [CR] Add](/content/2026/05/989037/images/b29d488632aeb7539df4655e04fa366cb55b0c931fa1575c2c53b78a9302e62d.jpg)
Label Prefix
Select Label prefix to enter the characters you will be using as prefix. Scroll the Add special dropdown menu to select a special character to be added in the current cursor position.
Label Suffix
Select Label suffix to enter the characters you will be using as suffix. Scroll the Add special dropdown menu to select a special character to be added in the current cursor position.
General Options
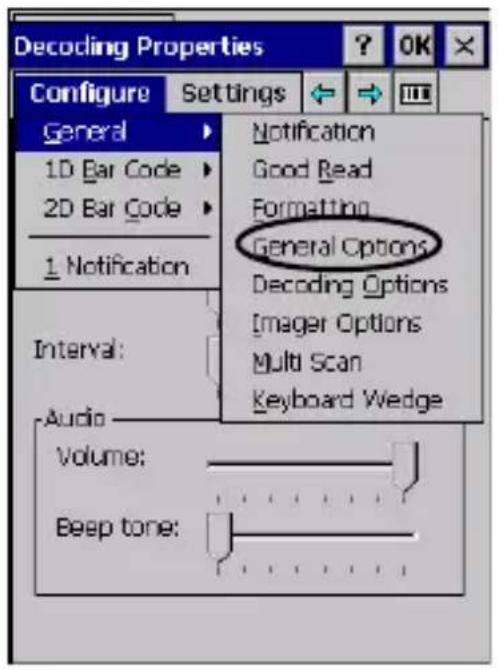
From the Decoding Properties page, tap Configure > General > General Options.
![Decoding Properties Configure Settings General Options ✓ Label programming enable: Symbology ID: Off Group separator [GS] replacement: □ Remove non-printable characters](/content/2026/05/989037/images/5afaefaeb93da27d13915019f3583677ef9d07630b7afb1d063b59e79b190800.jpg)
Label Programming Enable
Parameter reserved to Datalogic personnel.
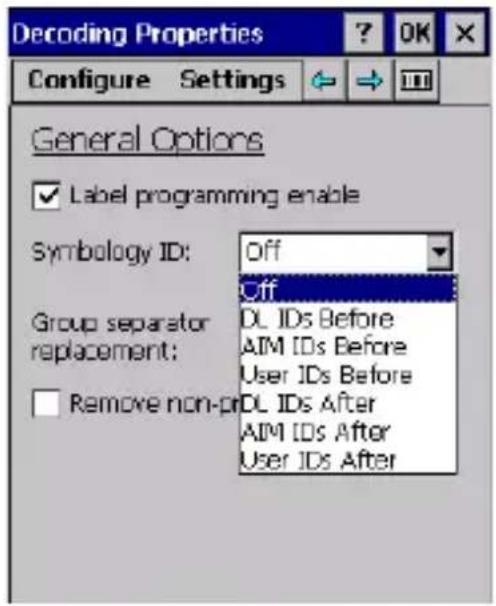
Symbology ID
Scroll the Symbology ID dropdown menu to add a code identifier prefix or suffix to the bar code string.
The AIM ID (Association for Automatic Identification and Mobility) is an international bar code identifier. When AIM IDs Before is enabled, the AIM ID is inserted at the beginning of the decoded bar code.
DL IDs is a Datalogic specific character identifier.
User IDs is a user specific character identifier you can set in the related symbology settings menu.
Group Separator Replacement
The group separator replacement is a non printable data separator character (ASCII code 1D hex). Use the Group separator replacement to select a special character that will be used as GS data separator substituting the standard GS character.
![Decoding Properties Configure Settings General Options ✓ Label programming enable: Symbology ID: Off Group separator [GS] replacement: □ Remove non-printable characters](/content/2026/05/989037/images/a3c390870174fad510b85f104c205002c82cf684a6919f48b6a2121d2f59e3eb.jpg)
Remove Non-printable Characters
Select it to remove non-printable characters from a unicode string.
Decoding Options
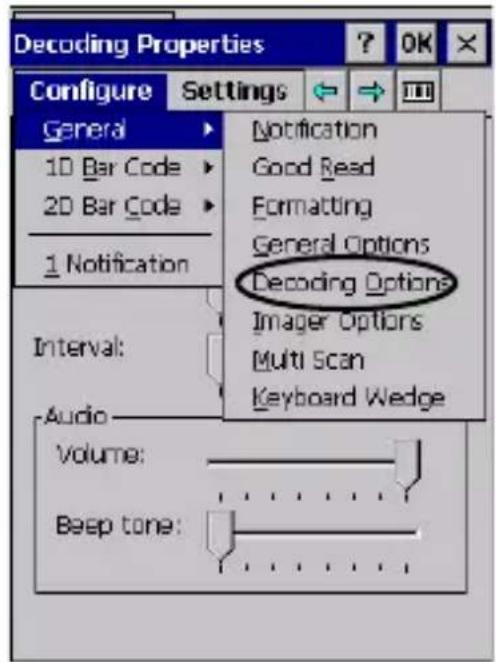
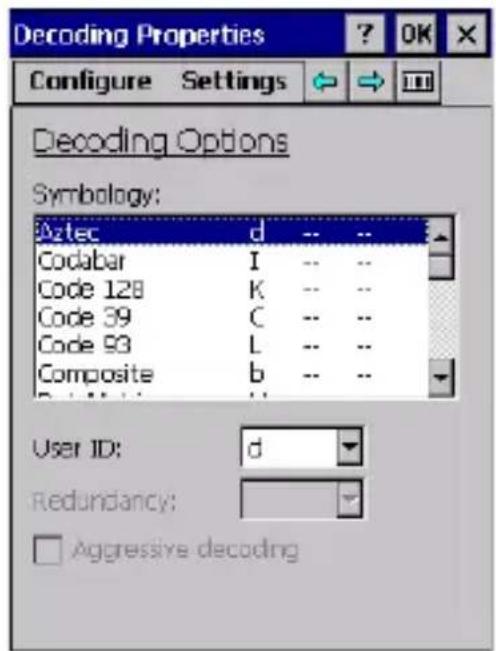
From the Decoding Properties page, tap Configure > General > Decoding Options. Use it to configure the User ID for symbologies, Redundancy and Aggressive Decoding (if supported by the decoding module). Select a symbology to view or change the available properties settings.
Imager Options
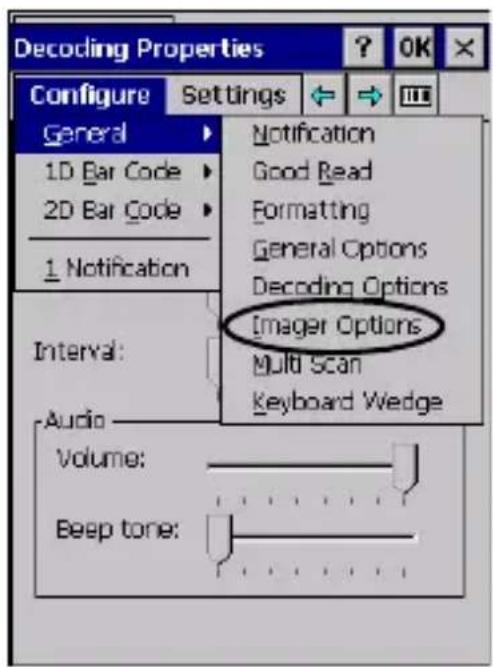
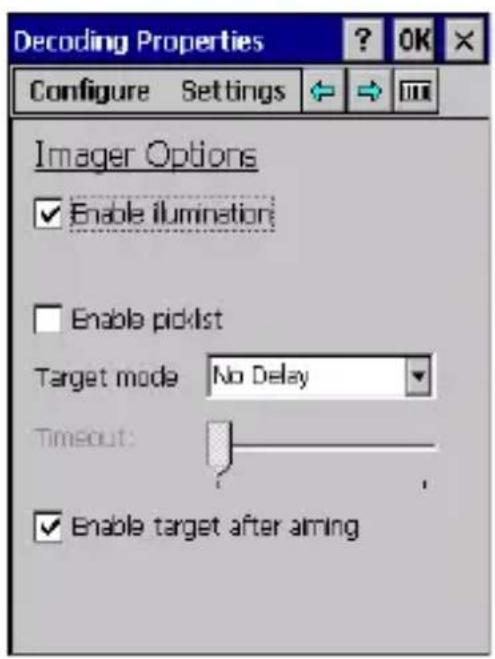
From the Decoding Properties page, tap Configure > General > Imager Options. Use it to customize the JOYA TOUCH scanning behavior.
Enable Illumination
If selected, it causes the scanner to turn on the illumination to aid decoding.
Enable Picklist
If selected, it allows you to pick and decode a bar code from multiple bar codes printed close together, when the scan illumination intersects more than one bar code. Only the targeted bar code will be returned.
Target Mode
If enabled, when the scan button is pressed, the scanner will project an aiming pattern to assist in centering over the bar scanning. Scroll the Target mode dropdown menu to select the desired targeting behavior:
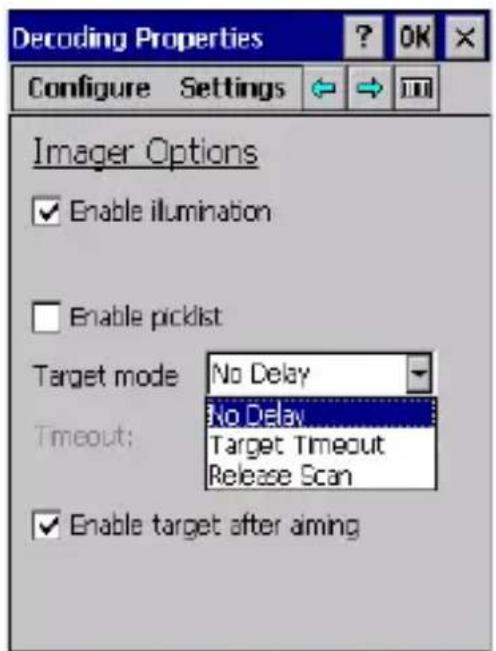
No Delay
Target mode is disabled.
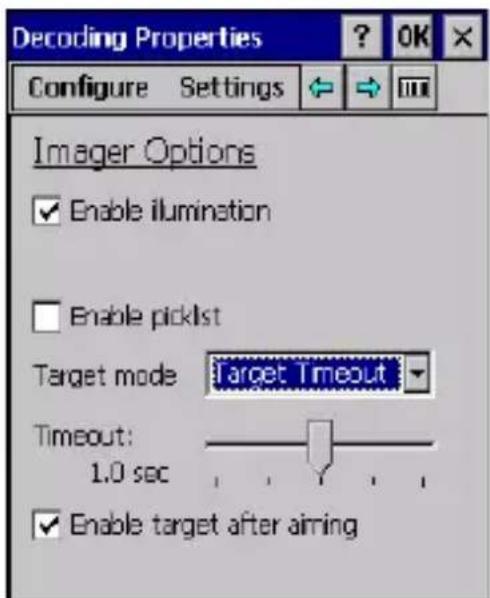
Target Timeout
If selected, scanning takes place after a programmable time upon pressing the scan button. Drag the Timeout slider to set the maximum amount of time the scanner attempt to decode after target timeout:
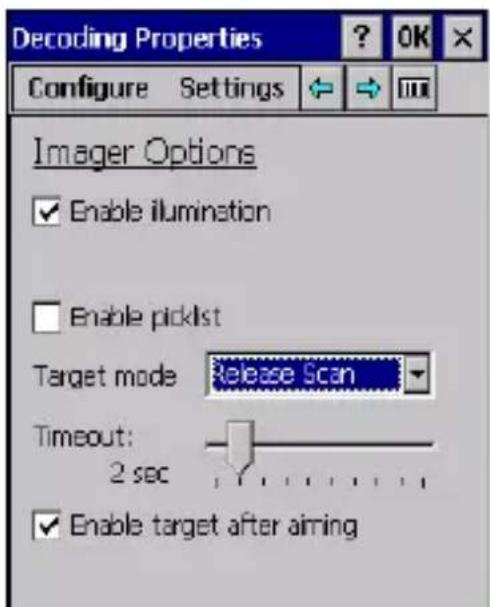
Release Scan
If selected, scanning takes place after the scan button is released. Drag the Timeout slider to set the scanning timeout after releasing the scan button:
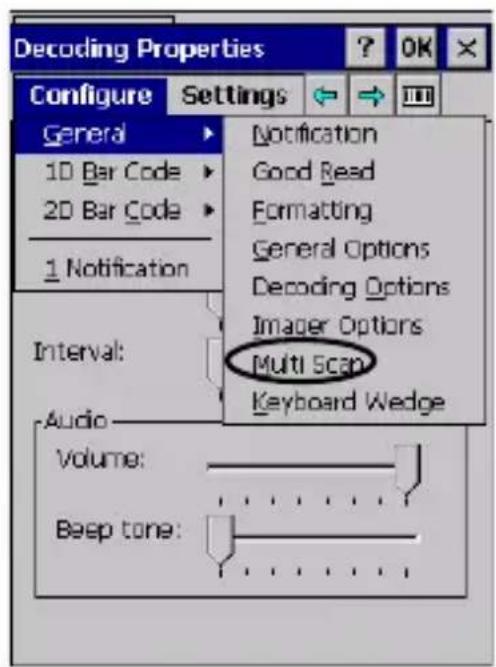
Multi Scan
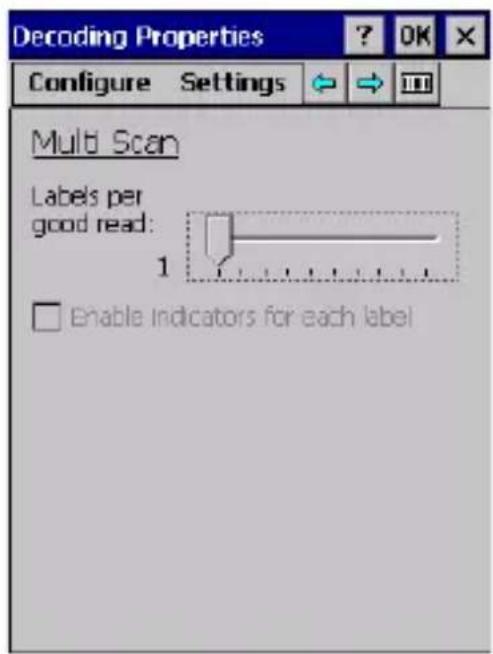
The JOYA TOUCH scanner allows you to scan multiple bar codes by one scan. From the Decoding Properties page, tap Configure > General > Multi Scan and drag the Labels per good read slider to set the number of bar codes allowed to be read per scan.
Select Enable indicators for each label to enable notifications for each bar code that is scanned.
Keyboard Wedge
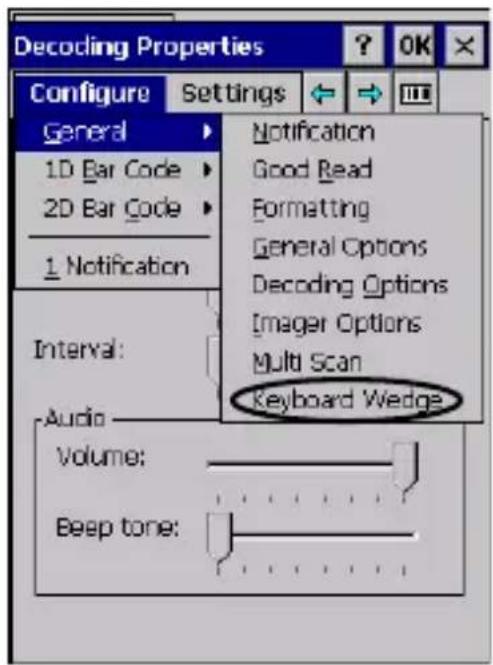
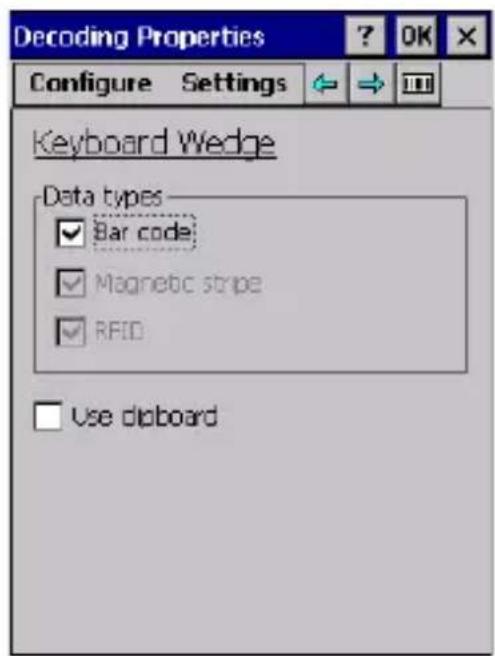
From the Decoding Properties page, tap Configure > General > Keyboard Wedge. Select Bar code to enable the wedge mode.
1D Bar Code Symbology Pages
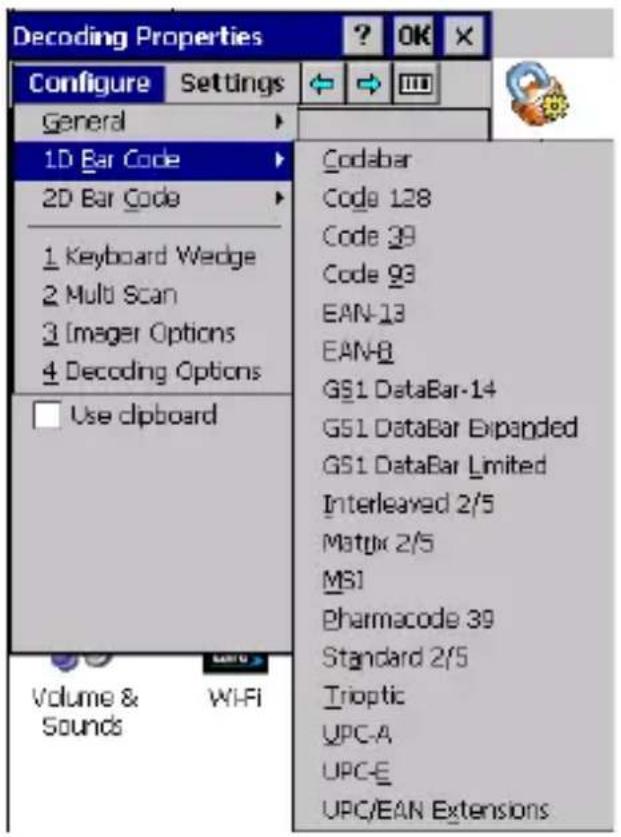
Each bar code symbology can be customized with additional settings that may affect that specific bar code decoding. Scroll the drop-down menus from Configure > 1D Bar Code, or tap the left and right arrow keys to navigate the 1D bar code symbology pages and configure symbology decoding options:
Refer to the sample symbology control panels for examples of the types of fields and options you can modify. The sample below shows the settings of a Code 128 bar code symbology:
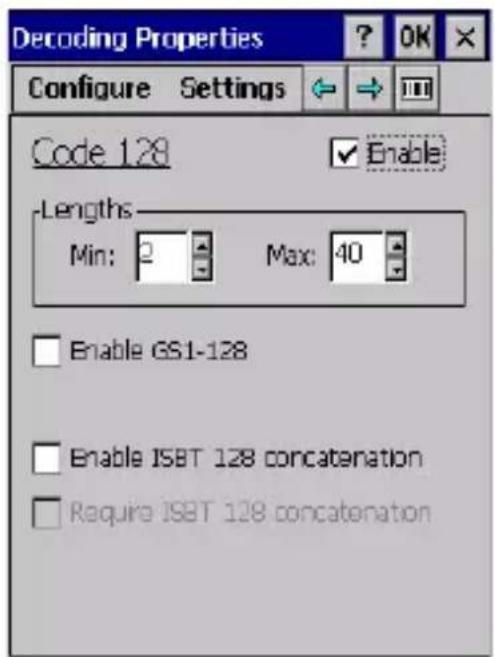
2D Bar Code Symbology Pages
Scroll the drop-down menus from Configure > 2D Bar Code, or tap the left and right arrow keys to navigate the 1D bar code symbology pages and configure symbology decoding options:
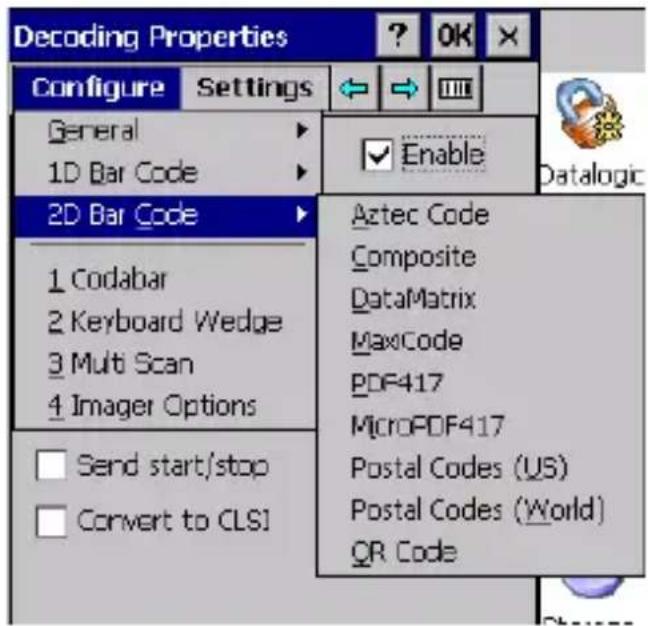
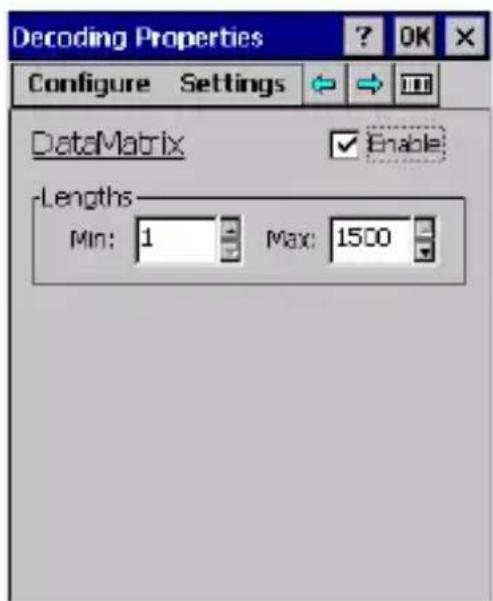
Refer to the sample symbology control panels for examples of the types of fields and options you can modify. The sample below shows the settings of a DataMatrix bar code symbology:
Decoding Settings
Select from the Decoding Properties Settings menu to restore previous configurations and/or other available default settings. Choose from:
■ F a c t o r y D e f a u
■ Minimum Settings
■ Maximum Settings
■ S a v e
■ Revert to Saved Settings
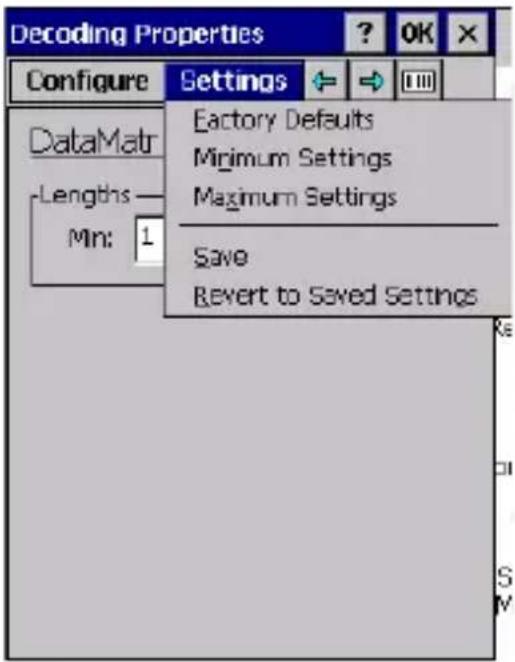
The settings are saved when you tap 'Yes'. To permanently save these settings you need to save the registry using the Persistent Registry applet in the Control Panel. When open, Decoding Properties acts as a simple bar code test tool that provides the Data decoded and the Data Type of the bar code scanned.
DL Buttons
You can use the DL Buttons tab to associate specific keys with specific applications. From the control panel main window, double tap the DL Buttons icon. As for the Joya Touch, it is possible to program the Home key and the Trigger, if present.
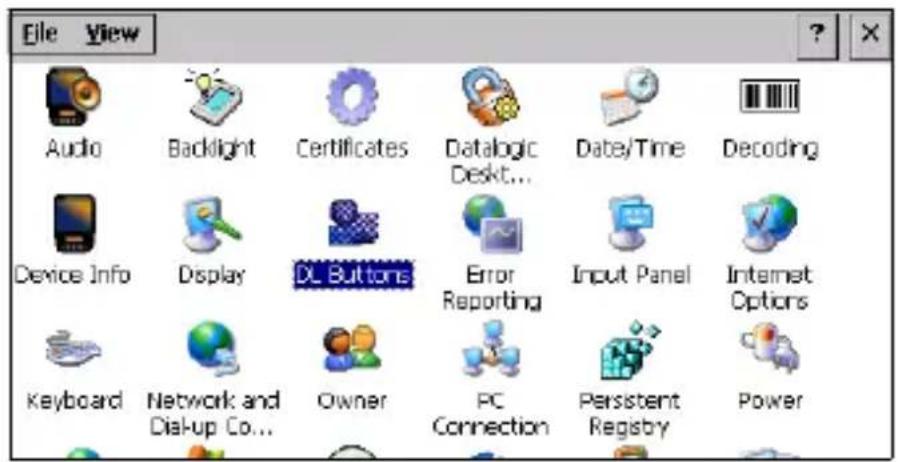
On the DL Buttons tab, customize the program hardware buttons to launch your most used applications. Under Select a button, select the button you want to assign a function to, and then select a program from Assign a function.
Tap OK to confirm.
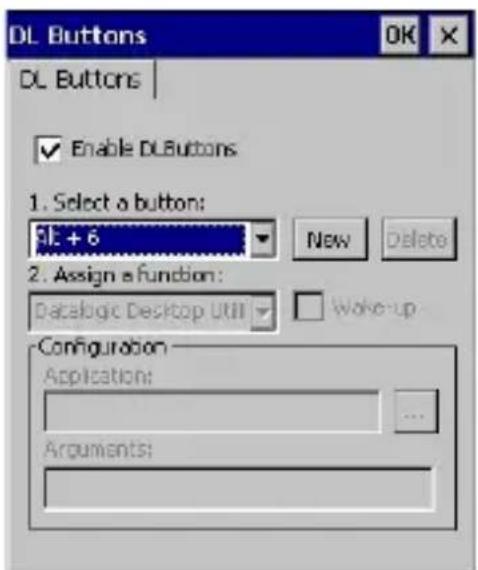
Triggers
Triggers are special customizable buttons that are mapped by default by DL Buttons. Also, they can be set as wakeup buttons:
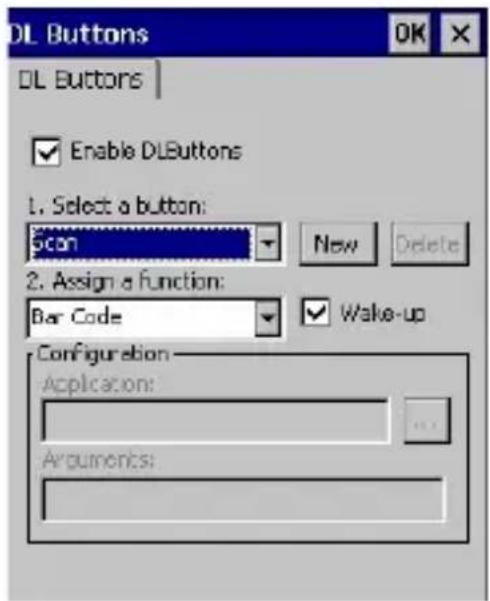
| TRIGGERS AVAILABLE FUNCTIONS | |
| Scan | Bar Code function activates the scanner. |
| Pistol Trigger | |
Persistent Registry
The Registry stores information that are necessary to configure the system for applications and hardware devices. The Registry also contains information that the operating system continually references to during operation. To persist the Re between boots, do the following steps:
- Double-tap the Control Panel icon on the home screen.
- Double-tap the Persistent Registry icon.
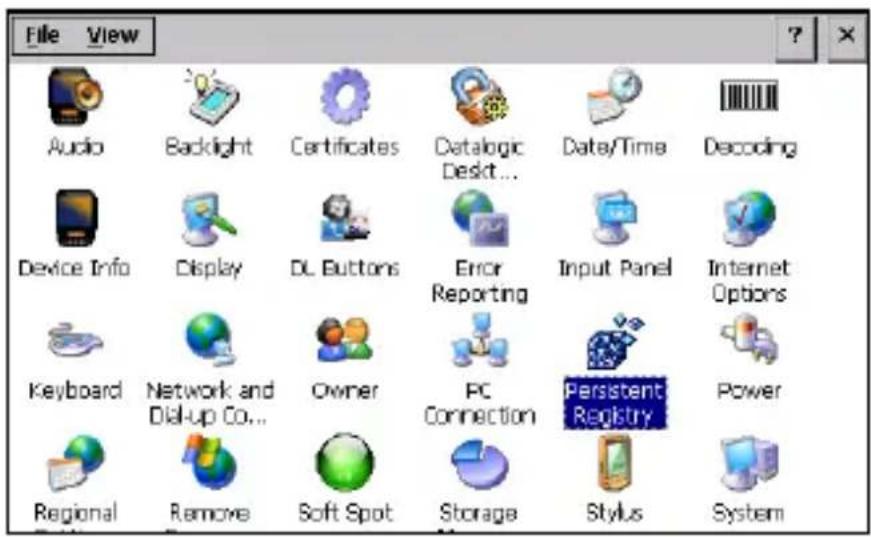
- Tap the Persist button.
- Tap OK to exit.
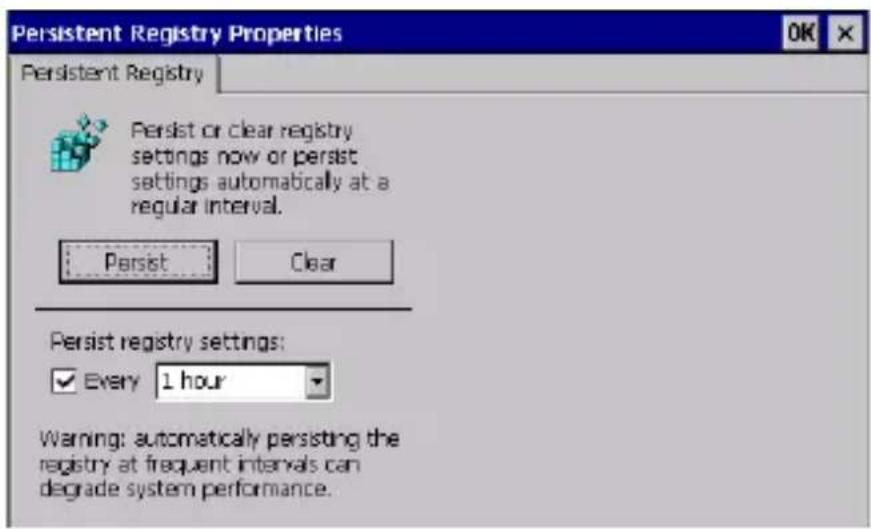
To change Persistent Registry timing, do the following steps:
- Select a time interval from the menu.
- Tap OK to save and exit.
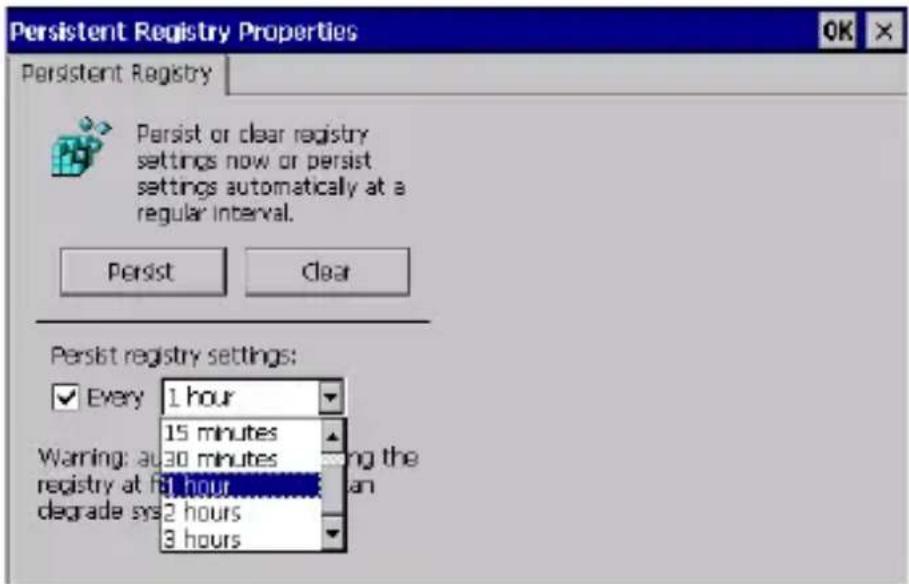
To deselect Persistent Registry timing, do the following steps:
- Deselect the Persist registry settings check box.
- Tap OK to save and exit.
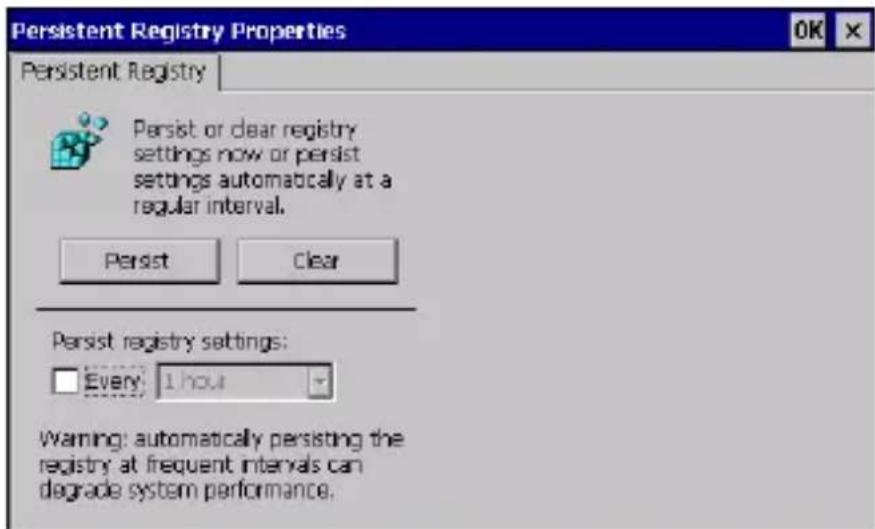
Wireless Communications
Wireless networking has a customized control, Laird Connection Manager (LCM), specific to the radio. LCM allows you to view all radio and security settings, and status. It also enables you to troubleshoot connectivity issues.
To access LCM, double-tap the Laird Connection Manager icon on the home screen, or tap Start > Programs > Laird Connection Manager.
Status Tab
The Status tab provides status information on the radio's Wi-Fi connection between the client device and the access point to which it's associated.
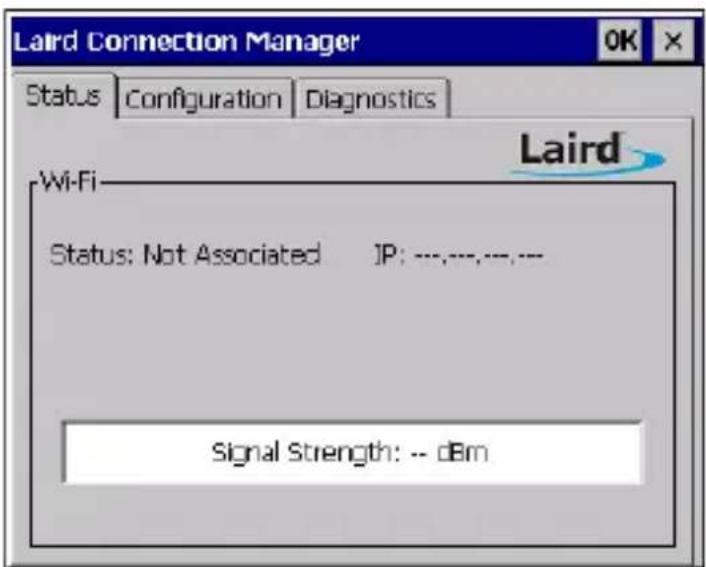
Status
Indicates the current status of the Laird Wi-Fi radio. Connection statuses include:
D o w n
The radio is not recognized by Laird software and therefore is not associated or authenticated.
■ D i s a b l e d
The radio is disabled. To enable the radio, check the Wi-Fi check box located on the Configuration window. When the radio is disabled, it does not attempt to make a connection to an access point.
- Not Associated
The radio has not established a connection to an access point.
- Associated
The radio has established a connection to an access point but is not EAP authenticated. The radio cannot communicate unless it is associated and EAP authenticated.
If the Encryption type is set to WEP or Open (None), it can communicate (send data) while in the Associated state.
■ Connected to [SSID]
The radio is connected to the named SSID.
IP Address
Displays the IP address of the Wi-Fi device.
Signal Strength
Displays the signal strength (or RSSI) in dBm.
Configuration Tab
The Configuration tab allows Wi-Fi to be enabled and disabled. It also allows users to manage and scan for Wi-Fi profiles.
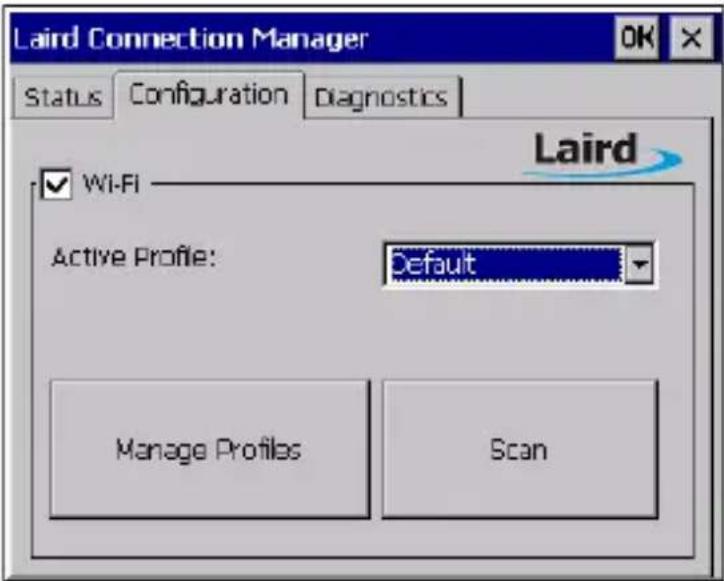
Check on/off box
Check to enable or disable Wi-Fi
Active Profile
Displays the name of the active profile. Use the drop-down menu to select a different profile.
Profiles
Allows user to change profiles and global configurations, and enables administrative abilities.
There are two tabs listed under Manage Profiles:
■ W i - F i - P r o f i l
Profile settings are radio and security settings that are stored for each configuration profile. The Profile tab displays the following properties and options:
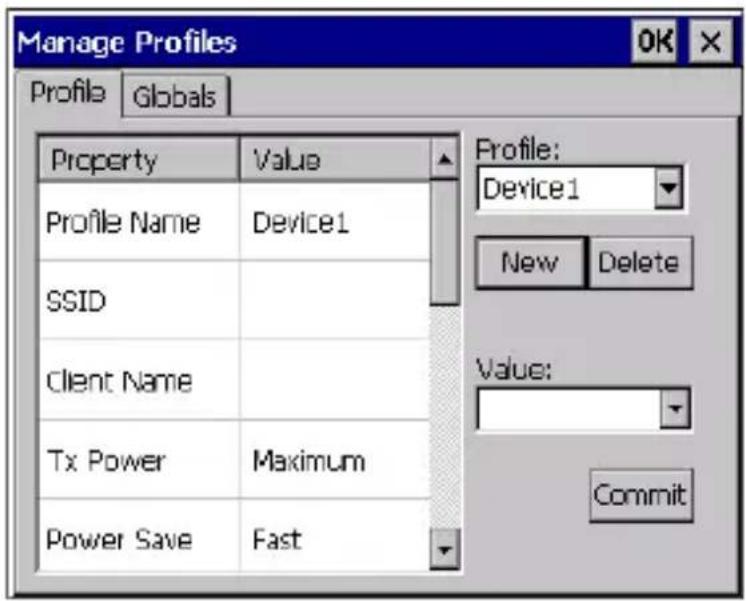
- Property and Value table: displays the properties of each profile and its respective value.
- Profile drop-down menu: displays the current profile and a list of all profiles previously configured or used.
- New: allows a profile to be added to the list.
- Delete: deletes a profile from the list.
- Value box: displays the value of a prospective property.
- Commit: saves the changed value.
■ W i - F i - G l o b a
The Globals tab displays the source device's Wi-Fi global values that apply to all profiles and settings that apply to LCM itself. The following subsections allow these values to be modified:
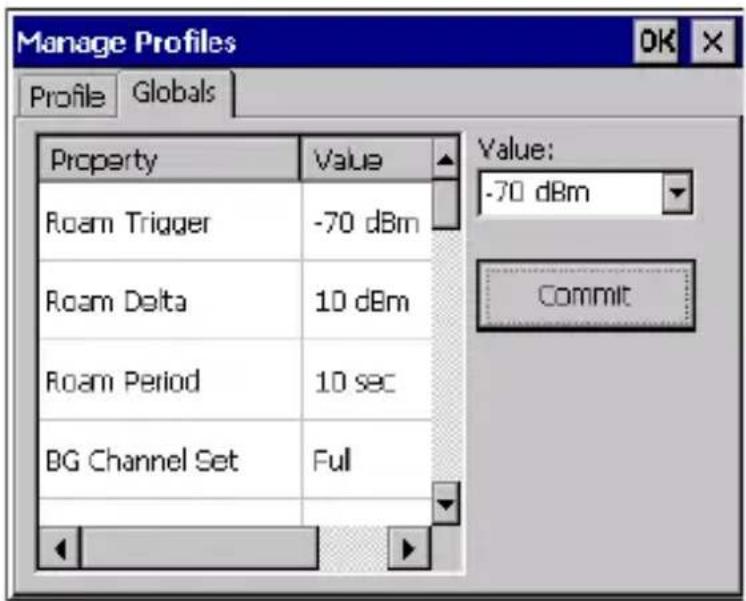
- Property and Value table: displays various properties and their respective values.
- Value box: displays the current and avaliable alternative values for the selected property.
- Commit: saves the changed value.

When you tap Commit, a registry flush occurs for all settings.
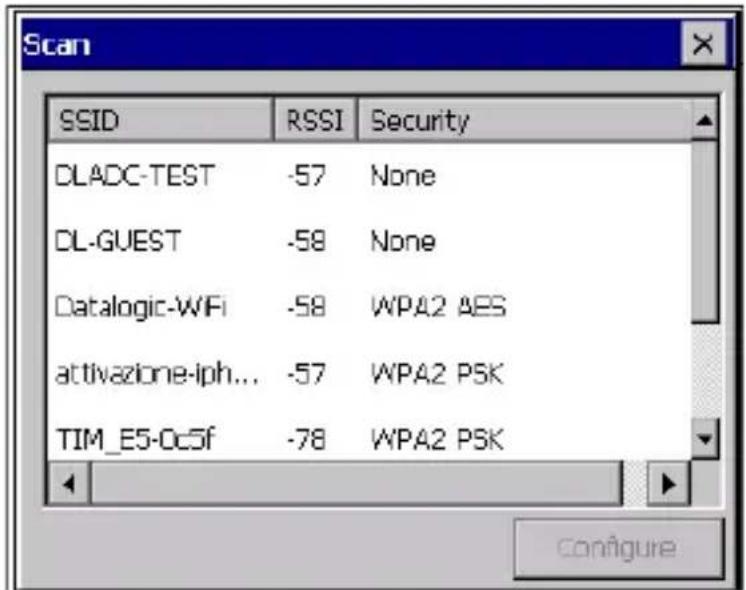
Scan
Opens the scan window to scan the area for available SSIDs. Also displays RSSI and security.
Diagnostics Tab
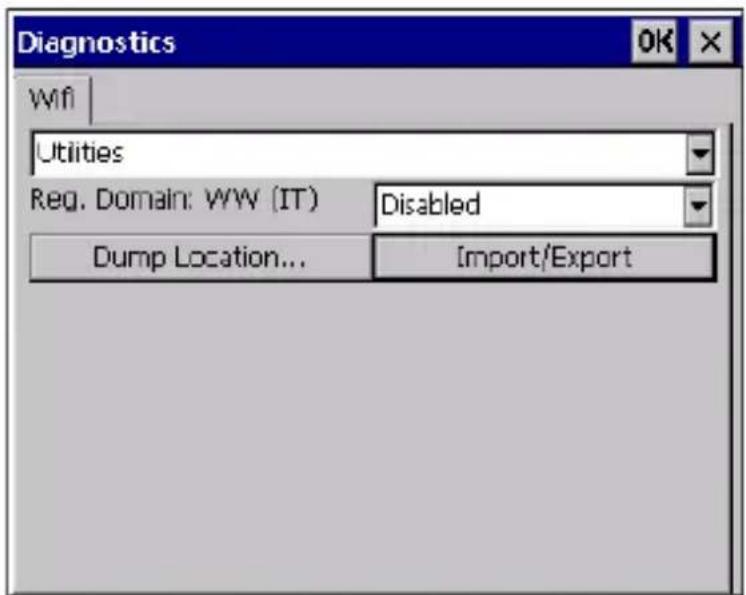
The Diagnostics tab enables you to troubleshoot connection issues within LCM.
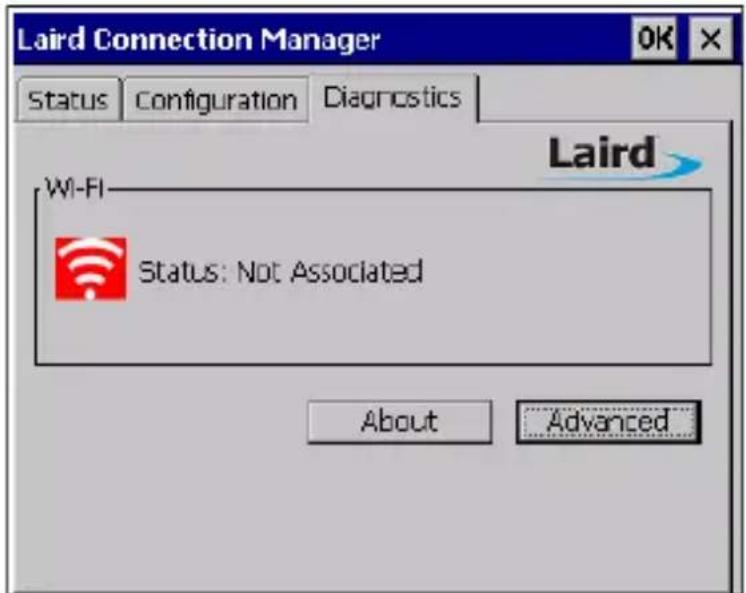
Wi-Fi
Status enabled/disabled
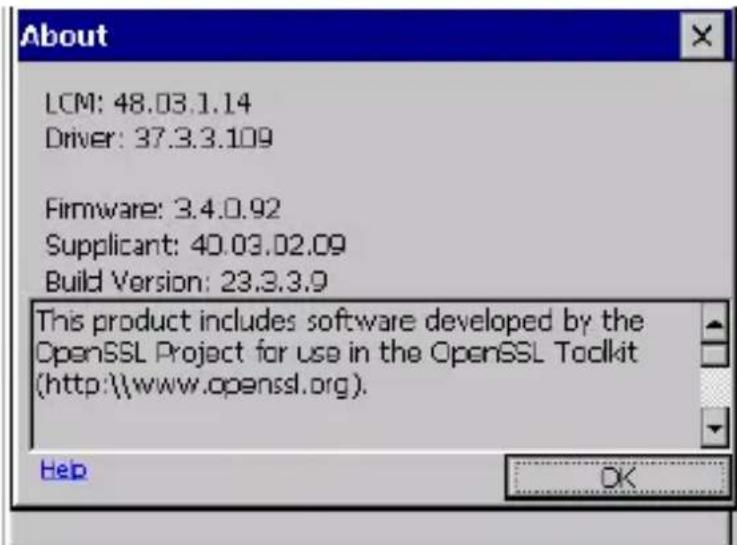
About
Tap to display LCM information including driver and the LCM version.
Advanced
Tap to display advanced settings for Wi-Fi, strength percentage, and quality percentage.
There are three drop-down options:
■ Status
![Diagnostics OK WIFI Status Profile: Default AP Name: [Unknown] IP: IP: IP: IP: IP: IP: IP: IP: IP: IP: IP: IP: IP: IP: IP: IP: IP: IP: IP: IP: IP: IP: IP: IP: IP: IP: IP: IP: IP: IP: IP: IP: IP: IP: II MAC: 00.17.23.e1.3e.86 MAC: --;---;---;---;---;---;---;---;---;---;---;---;---;---;---;---;---;---;---;---;---;---;---;---;---;---;---;---;---;---;---;---;---;---;---;---;---;---;---;---;---;---;---;---;---;---;---;---;---;---;---;-----; Channel: -- Bit Rate: -- Mbps Beacon Period: -- Tx Power: --mW DTIM: Signal Strength: -- dBm](/content/2026/05/989037/images/22969e0b5b2677808c69da547c14d46f22fb74bbddde0b7a98a6453432353d6e.jpg)
- Ping Tools
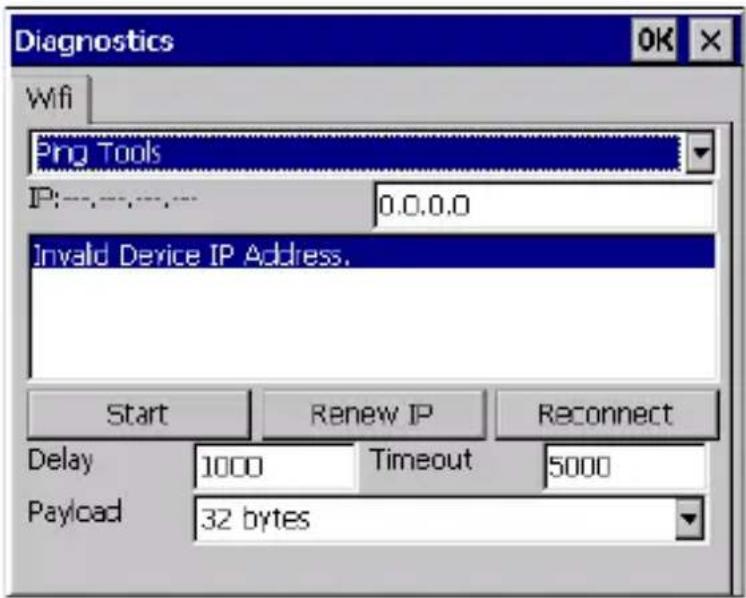
- Utilities
Audio Settings
There are two applets that control volume: Audio and Volume & Sounds.
Audio
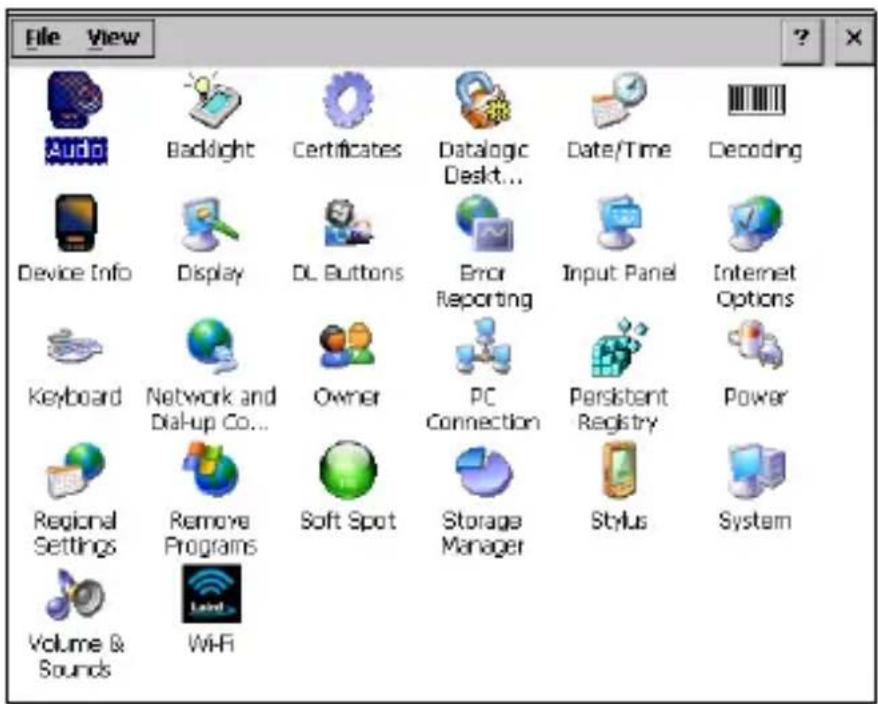
From the control panel main window, double-tap the Audio icon:
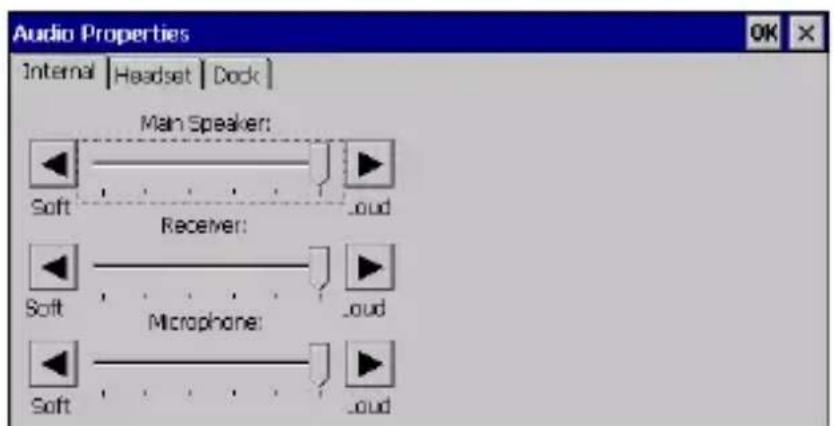
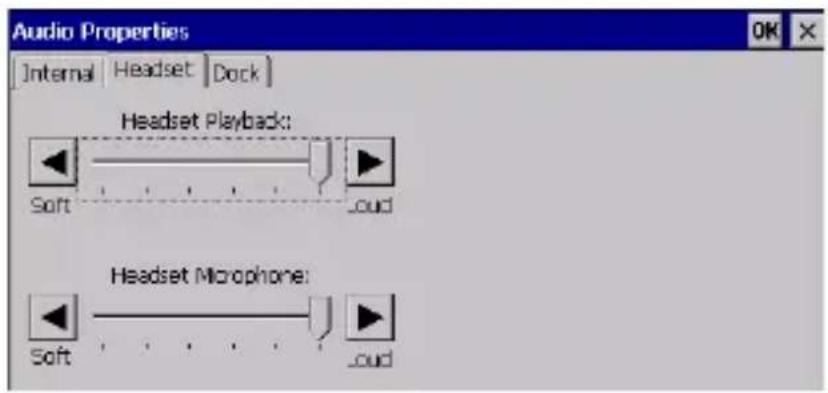
The audio control panel can be used to independently set the playback or recording volume for different types of audio inputs and outputs, such as a headset, powered mobile dock, or the internal speakers and microphone.
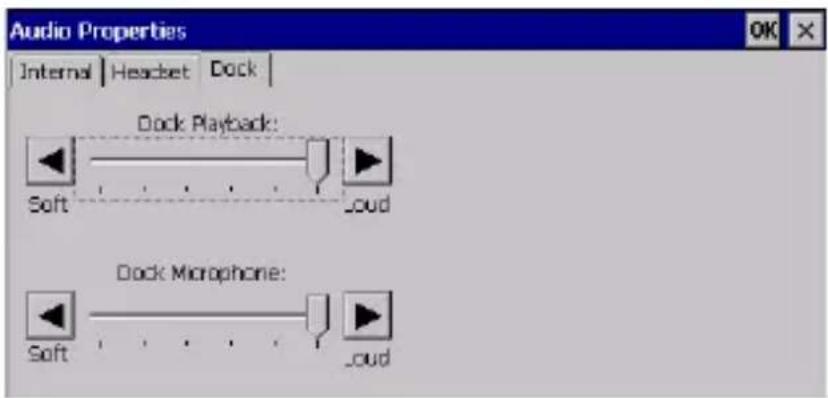
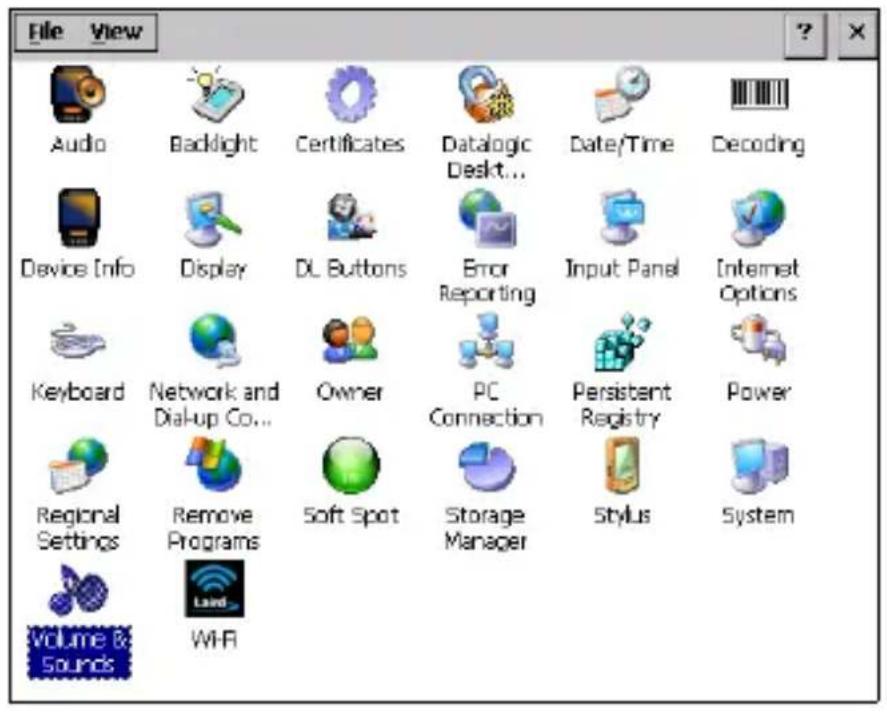
Volume & Sounds
From the control panel main window, select the Volume & Sounds applet by double tapping the Volume & Sounds icon:
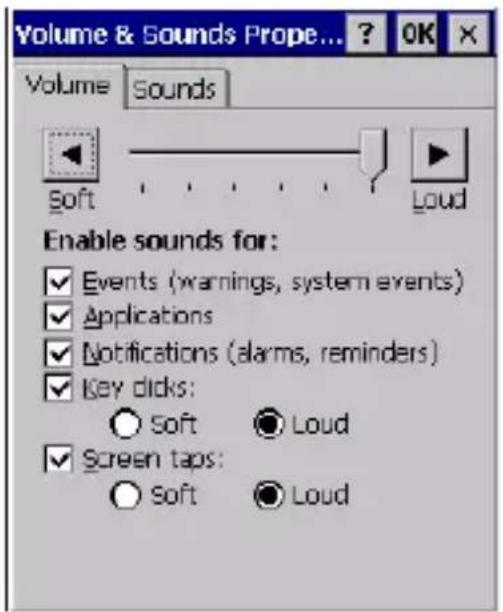
The Volume & Sounds applet configures audio features of all speakers and headphones and appears as follows:
Connecting to other Computers
Windows Mobile® Device Center
The desktop application Windows Mobile® Device Center gives you the ability to synchronize information between a desktop computer and your JOYA TOUCH.
Synchronization compares the data on the JOYA TOUCH with that on the desktop computer and updates both with the most recent information.
Windows Mobile Device Center is only compatible with Windows Vista and Windows 7; if you run Windows XP or earlier, you have to download Microsoft ActiveSync.
To establish a partnership between the JOYA TOUCH and a host PC, start Windows Mobile® Device Center and follow the steps below:
-
Connect the JOYA TOUCH to the host PC. Windows Mobile® Device Center configures itself and then opens.
-
On the license agreement screen, click Accept.
-
On the Windows Mobile Device Center's home screen, click Set up your device.
-
Select the information types that you want to synchronize, then click Next.
-
Enter a device name and click Set Up.
Datalogic Firmware Utility
The Datalogic devices are equipped with a field upgradeable firmware mechanism.
Firmware updates are available on the Datalogic website:
http://www.datalogic.com/eng/support-services/automatic-data-capture/downloads/software-utilities-sw-2.html.
After you have downloaded the desired update, there are several ways you can update the firmware on your device.
- Use Wavelink Avalanche™ if you have multiple Datalogic devices to update. For more information refer to the dedicated section of the Wavelink website.
- If Wavelink Avalanche™ is not available or you have only a few Datalogic devices to update, use the Datalogic Firmware Utility (DFU), described below, to install or update the firmware using an ActiveSync connection.
The following sections provide procedures for the retrieval and installation of the most current firmware image onto a Datalogic device.
Retrieving a Firmware Image Update
The following instructions use Internet Explorer to retrieve the most current firmware image.
- Launch Internet Explorer on your PC and navigate to the Datalogic website.
- Navigate to the Downloads section of the website.
- Using the device selection fields, select the file you want to download, then click Save to begin copying the files to your local machine (or local network location).
Installing DFU on the Host PC
The Datalogic Firmware Utility (DFU) provides administrators with a field upgrade mechanism. You must have Microsoft® ActiveSync (for Windows XP devices) or Windows Mobile® Device Center (for Windows 7 and Vista devices) already loaded and running on the host PC to use DFU. See 'Windows Mobile® Device Center" on page -65 for more information.
NOTE
Prior to installing, you must remove any previous versions of DFU installed on the host PC.
To install the Datalogic Firmware Utility, complete the following steps on the PC:
- Go to the Datalogic website and download the most current version of the Datalogic Firmware Utility. Unzip the file, then double-click to run DFU_Setup.exe.
- Click OK to continue once you have removed previous versions of DFU.
- The Welcome to DFU Setup Program screen opens.
- Please exit all Windows applications before running this installer.
- C l i c k Next to continue the Setup.
- Follow the onscreen instructions to complete the installation.
Updating the Firmware
After copying the firmware image to the host PC and installing DFU, you can upgrade the firmware on your Datalogic device.
NOTE
The following steps require that you have already established an ActiveSync or Windows Mobile® Device Center connection between the host computer and the Datalogic device.
- Go to Start > Programs > Datalogic > DFU > Datalogic Firmware Utility.
- Verify that ActiveSync is selected by clicking Communications >WMDC/ActiveSync.
- Click browse (...) and navigate to the location where you saved the firmware file for your terminal.
- Select the current *.out file and click Open.
- Click Update.
- DFU will compare the selected firmware image with the firmware already loaded on the device; if the image is compatible with the connected device, DFU will proceed to update the firmware image on your device.
After the firmware of your device has been updated, the program will automatically perform a warm reset of the device.
Datalogic Desktop Utility
Datalogic Desktop Utility (DDU) allows administrators to configure Windows® CE and Embedded Handheld devices to control individual user access. This includes the ability to:
■ Prevent users from changing your device OS settings.
- Use Application Selector to replace the desktop with a selection of authorized applications.
- Restrict user access in Internet Explorer (and customized error recovery mechanisms).
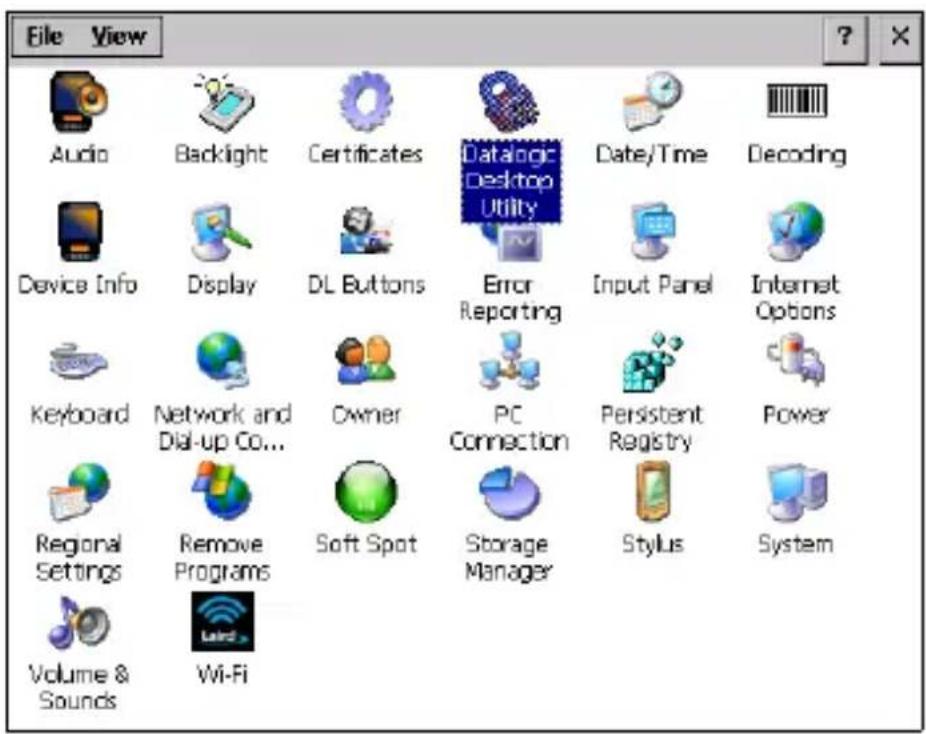
To open DDU, access the Control Panel and double-tap the Datalogic Desktop Utility icon.
Administrative Options (Admin tab)
When you open the DDU control panel, the Admin tab appears.
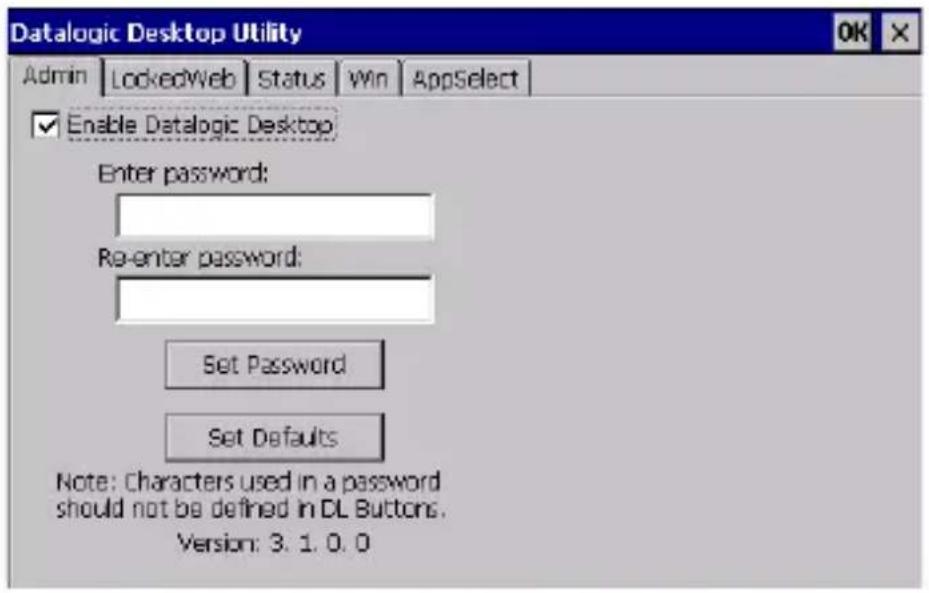
| COMMAND DESCRIPTION | |
| Enable Datalogic Desktop | Tap this checkbox to activate the DDU functions such as Windows Access Restrictions and Application Selector. |
| Enter Password | Enter a password in the text box. This allows the user to specify a password when this utility is launched. By default the password is “blank”. A password can consist of all standard keyboard characters. |
| Re-Enter Password | Carefully re-enter the password in the second text box. |
| Set Password | Tap Set Password to enable the password.To change or remove the password, enter a new value,re-enter the new value, and tap Set Password. |
| Set Defaults | Tap Set Defaults to reset the default values of all the functions on all the tabs. After you select this option, you will receive a prompt to verify this selection. |
Setting a Password
To set a password:
- Enter a password in the field using the virtual keyboard. This allows the user to specify a password when this utility is launched. By default the password is "blank".

Be sure to record the password for future reference.
- Re-enter the password in the second field.
- Tap Set Password to enable the password.
- Tap OK to close the Set Password Confirmation dialog.
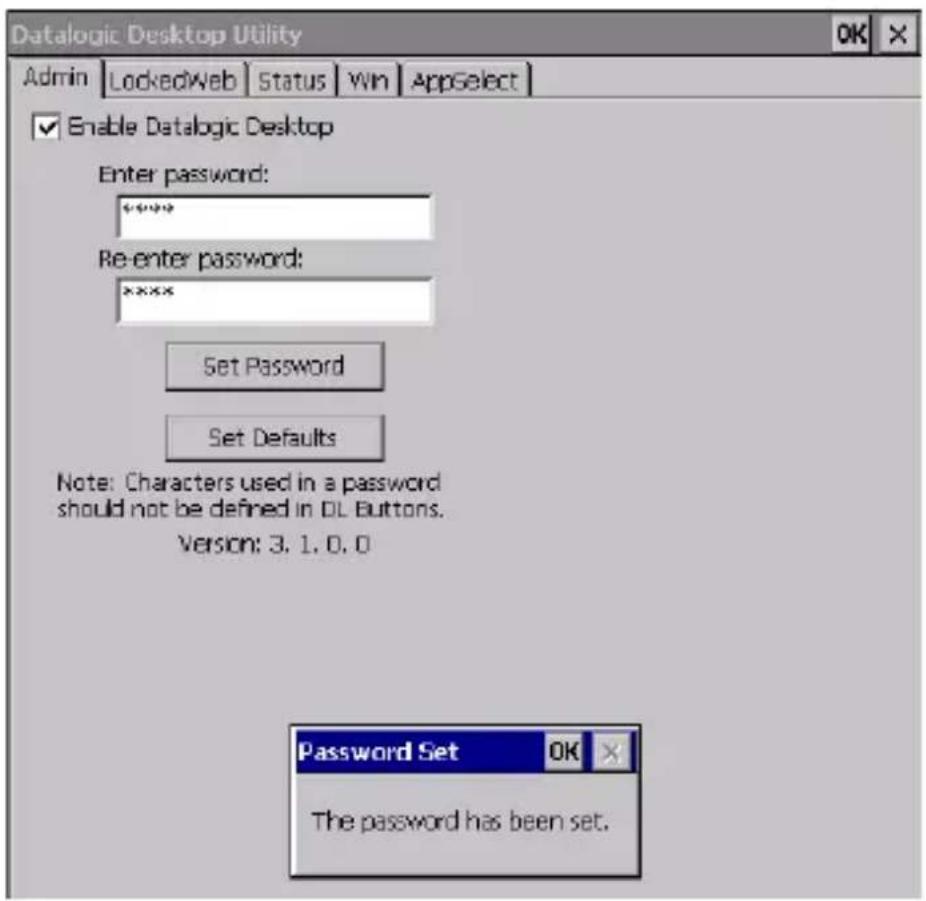

You must tap Set Password prior to exiting DDU in order to store and activate your new password. It is not necessary to select Enable Datalogic Desktop.

If you tap Set Defaults it will remove all custom settings and restore all the factory default settings, except a previously set password.
Changing a Password
To change to a new password:
- Enter a new value in the Enter Password field.
- Re-enter the new value in the Re-enter Password field.
- Tap Set Password.
Removing a Password
To remove a password:
- Enter blanks in both Password fields.
- Tap Set Password.
Password Request Dialog Box
Once the password is set, next time you open the Datalogic Desktop Utility, the DDU Password dialog box opens.
This dialog box will only open if a password was defined:
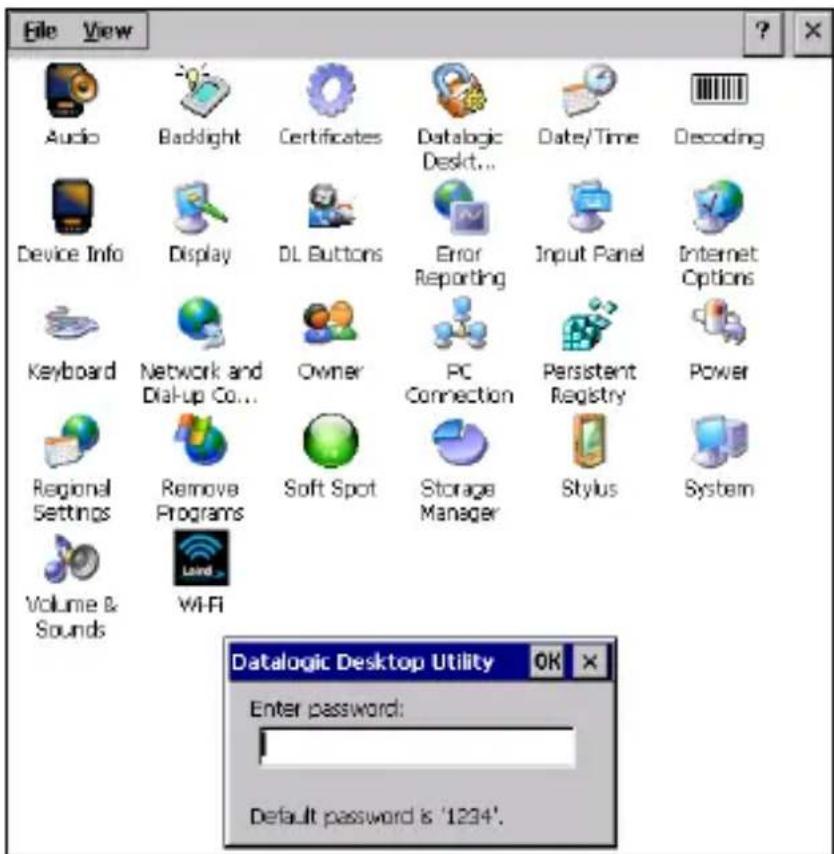
- Type in your password using either the keypad on the unit, or using the stylus on the soft input panel (SIP). If you enter an incorrect password, the system will prompt you to input the correct one.
- Select/tap OK to verify the password. Or tap X to cancel.
Locked Web Browser Options (LockedWeb tab)
Tap the LockedWeb tab to access the Locked Web Browser Configuration.
For additional information about Locked Web Browser commands and metatags, see Locked Web Browser on page 83.
Error Page Redirection
Use the Error Redirection option to provide customized recovery from common errors. When an error occurs, the browser can redirect access to a specified error page with instructions on how to recover from the problem.
![Datalogic Desktop Utility Admin LockedWeb Status Win AppSelect Error redirection [400] Invalid Syntax Error page: ... Full screen ✓ Trap keys ✓ Status icons ✓ Exit password Browser home page: file://\Windows\default.htm ...](/content/2026/05/989037/images/648a058c93b9261b568df2d902fe2bb70ff952b0e04013c111c9bad5adf9c30a.jpg)
| Error Redirection Options | |
| Error Type | The 'Error Type" pull-down list displays available Error Types: (400) Invalid Syntax, (403) Request Forbidden, (404) Object Not Found, (406) No Response Format, (410) Page Doesn't Exist, (500) Internal Server Error, (501) Server Can't Do That, Generic Error, Network Disconnected. |
| Error Page | Edit this textbox to associate a website or html file with the specified error. |
| Other Options | |
| Full Screen | Set the web browser in full screen mode. |
| Status Icon | Enable or disable the status icons view. The status icons can be configured on the Status tab of DDU. |
| Trap Keys | When checked:▪ all key presses will be trapped by the Locked Web Browser to prevent the user from accessing unsafe parts of the system. For example, pressing Ctrl+O to Open a File will not work;▪ safe key presses (e.g. Alpha numeric) will still get processed by the Locked Web Browser as normal. For example entering a number in a text field on a web page;▪ DL Buttons keys will not work in the LockedWeb Browser;▪ all Locked Web Browser command keys will work (e.g. Ctrl+O to exit).When unchecked:▪ all keys will be processed normally by the system and the browser;▪ DL Buttons keys will work normally;▪ all Locked Web Browser command keys will work (e.g. Ctrl+O to exit). |
| Other Options | |
| Exit Password | When checked, a password will be required before the Locked Web Browser can exit. This password is different than the DDU exit password, with a default value of '0000". |
| Browser Home Page | This sets the Internet Explorer home page, regardless of the enable state of the Locked Web Browser. |
Status Icons Options (Status Tab)
Tap the Status tab to access the Status Icons option. You can configure the view of some status icons that are used in LockedWeb and in Application Selector to display the status of Wi-Fi radio and battery.
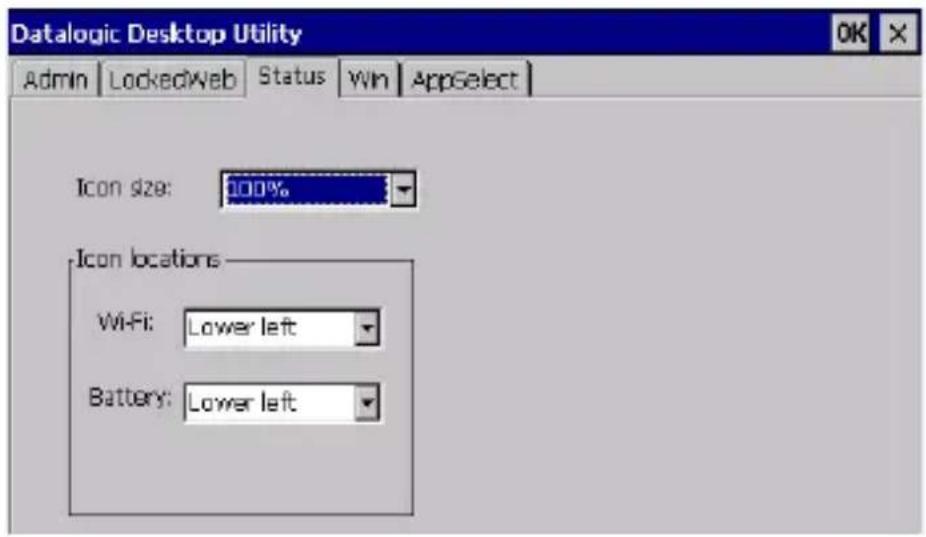
| Status Icons Options | |
| Icon Size | Sets the status icons' size. |
| Icon Location | Selects the preferred location for each status icon. |
Windows Control
Select/tap the Win (Windows Controls) tab to access the Windows Controls option. Use Windows controls to allow or restrict access to Windows system functions.
You can disable normal Windows functions such as the taskbar, leaving nothing but a blank workspace. This allows applications to be run in full screen mode and prevents users from accidental or unauthorized use of the taskbar, Internet Explorer, and any other resident applications.
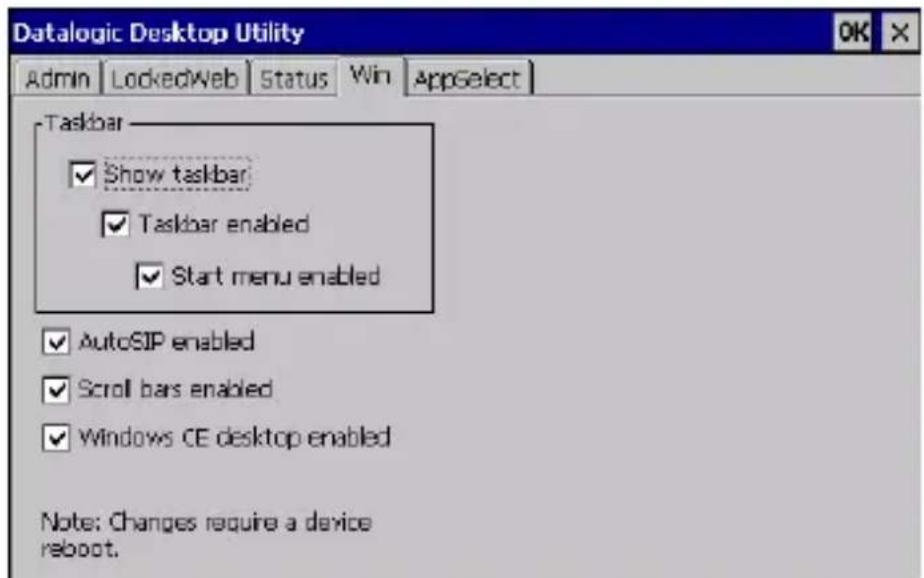
| Windows Controls | |
| Show Taskbar | Tap Show Taskbar to specify whether the Taskbar is displayed or not. |
| Taskbar Enabled | Tap Taskbar Enabled to specify whether the taskbar is accessible. This option is only available when the Show Taskbar is checked. |
| Start Menu Enabled | Tap Start Menu Enabled to specify whether the Start Menu is displayed or not. This option works only when Task Bar Enabled is checked. |
| AutoSIP Enabled | Enables the AutoSIP Windows feature. |
| Scroll Bars Enabled | This control only takes effect in Locked Web Browser. When checked, displays horizontal and vertical scroll bars to help view large web pages which do not fit the screen. When unchecked, scroll bars will not be present. |
| Widows CE Desktop Enabled | When selected, CE Desktop is disabled, so application icons can’t be activated. |

Changes require a device reboot.
AppSelector Options (AppSelect tab)
Tap the Application Selector (AppSelect Tab) to edit, add, or delete applications for the application selector.
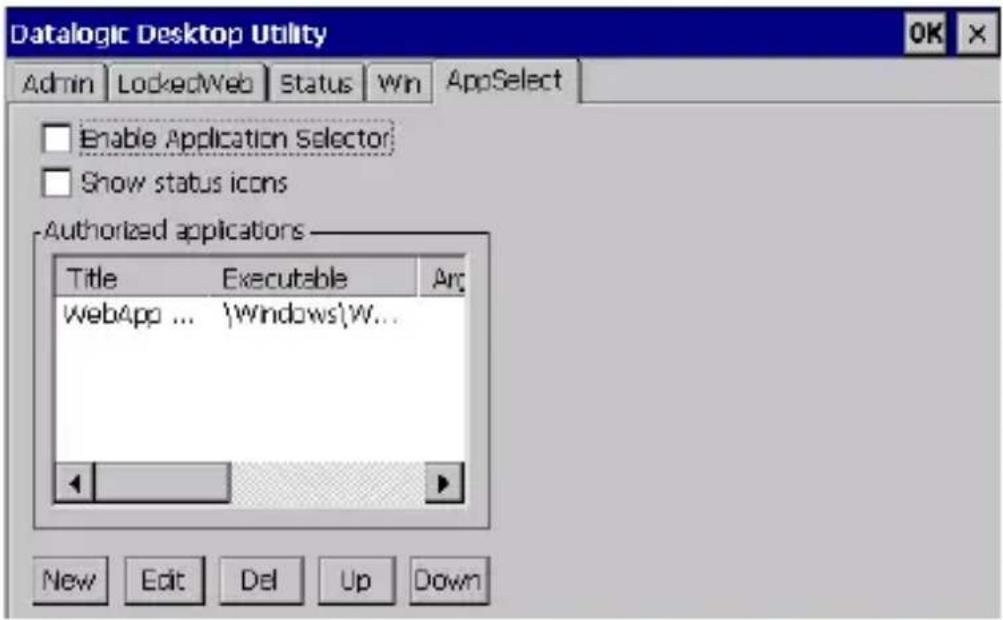
| Application Selector Options | |
| Enable Application Selector | Tap Enable Application Selector to enable/disable the application selector. When enabled, the Application Selector replaces the desktop and allows only authorized use of applications. |
| Show status icons | Enable or disable the status icons view. The status icons can be configured on the Status tab of DDU. |
| Authorized Applications | This is a list of applications that the user can access. |
| Application Selector Commands | |
| New | Tap New to create a new application entry. |
| Edit | Tap Edit to edit the selected entry. |
| Del | This is a list of applications that the user can access. |
| Up/Down | Tap Del to delete the selected entry. |
Add Applications
The Add Application dialog opens when you tap either New or Edit. From the Add Application dialog the administrator can configure and/or add/change a new application entry in the list.
Applications with the Run Application at Startup option enabled will start automatically when the Application Selector starts up.
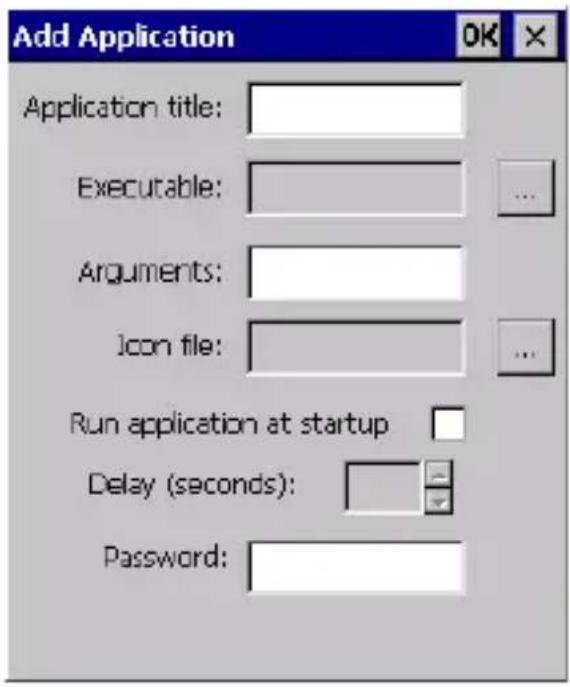
| COMMAND DESCRIPTION | |
| Application Title | Type the name of the application in this textbox in the way you wish it to appear for the user. |
| Executable | Displays the path for the executable file which you want to run. |
| Browse | Browse for the desired executable file. The results of this search are placed in the Executable textbox. |
| Arguments | Type any command line arguments to be used when an application is executed. |
| Icon File | Tap Set Defaults to reset the default values of all the functions on all the tabs. After you select this option, you will receive a prompt to verify this selection. |
| Browse | Browse for the desired icon file. The results of this search are placed in the Icon File textbox. |
| Run Application at Startup | Tap this box to force this application to auto start when the Application Selector starts up. Applications will be started in the order listed in the authorized application list. |
| Delay | Enter a delay duration in seconds in the combo box. This option delays auto start of application(s) to allow drivers to load prior to starting applications. |
| OK | Tap OK to add/save changes. |
| X | X Select/tap X to cancel the creation of this entry. |
Locked Web Browser
The Locked Web Browser is a browser helper object for Internet Explorer. It allows an administrator to define a restricted internet usage environment. Once in the restricted environment, a password is required to exit. This means users can only access web applications and websites set by the administrator.
To launch the application, go to \Windows\WebAppLock.exe.

Configuration is set up through the DDU control panel. See Locked Web Browser Options (LockedWeb tab) on page 75 for more information.
In Full Screen mode, status icons may be used to display signal strength and battery state. For CE, a non-full screen mode exists that allows the status bar to be displayed but with user interaction disabled.
The following command line arguments are supported:
- /E optional parameter which allows for Exit without entering a password
- @URL optional parameter which specifies a URL to use as a home page.
- /C optional parameter which disables the ctrl keys (including the one to exit).
FlashDisk Directory File Management
All of the Windows Embedded Compact 7 system files reside in RAM (volatile memory) except for the FlashDisk directory, which resides in FLASH (non-volatile memory).
Therefore the contents of the FlashDisk directory are persistent even if the mobile computer is rebooted or the battery pack is changed. You can save your more important files that you don't want to lose due to mobile computer reboot, in the FlashDisk directory or create a sub-directory within FlashDisk.
Even though the Windows Directory resides in RAM, it often contains files or sub-directories created by the user or by installation programs that you don't want to lose at re-boot. To keep these files persistent it is necessary to copy them to the directory \FlashDisk\Windows.
This directory doesn't exist originally (only FlashDisk exists), and therefore it must be created. At the next cold boot, before activating the shell, Windows Embedded Compact 7 will copy the contents including all sub-directories of \FlashDisk\Windows to \Windows. Likewise, to maintain files that must be run at Windows Embedded Compact 7 startup, (i.e. .exe, .lnk, .vb, .htm, etc.), it is necessary to copy them to the directory \FlashDisk\Startup.
This directory does not exist originally (only FlashDisk exists), and therefore it must be created. The applications programs will be run after any type of re-boot (both software and cold boot).
However, since file system persistence is performed after the '\FlashDisk\Startup" folder execution, for those programs which depends upon the DLLs and resources copied from '\FlashDisk\Windows" to '\Windows" during the cold-boot, the '\FlashDisk\Windows\dl_startup" folder is to be execute programs and applications, since the execution follows the
file system restore (and no DLL and resource dependence failure will occur).
As an alternative to the Safe Setup function, it is possible to copy the .cab files to the directory \FlashDisk\Cabfiles (the Cabfiles sub-directory doesn't exists originally and must therefore be created) and perform a mobile computer cold boot to have application installed.
Once these files are copied to the directory \FlashDisk\Cabfiles, the application will be run after each re-boot. From the second cold boot on, a message may be displayed such as "
This message blocks the boot process. Press the [Enter] key to continue the system initialization. In a specific JOYA TOUCH version, a 4GB DS type card is available as permanent general purposes storage device (path = \Storage Card).
NOTES
USB Connection
USB Direct Connection
You can use any standard micro USB cable to directly connect the Datalogic JOYA TOUCH to a host computer to transfer data through the USB interface.
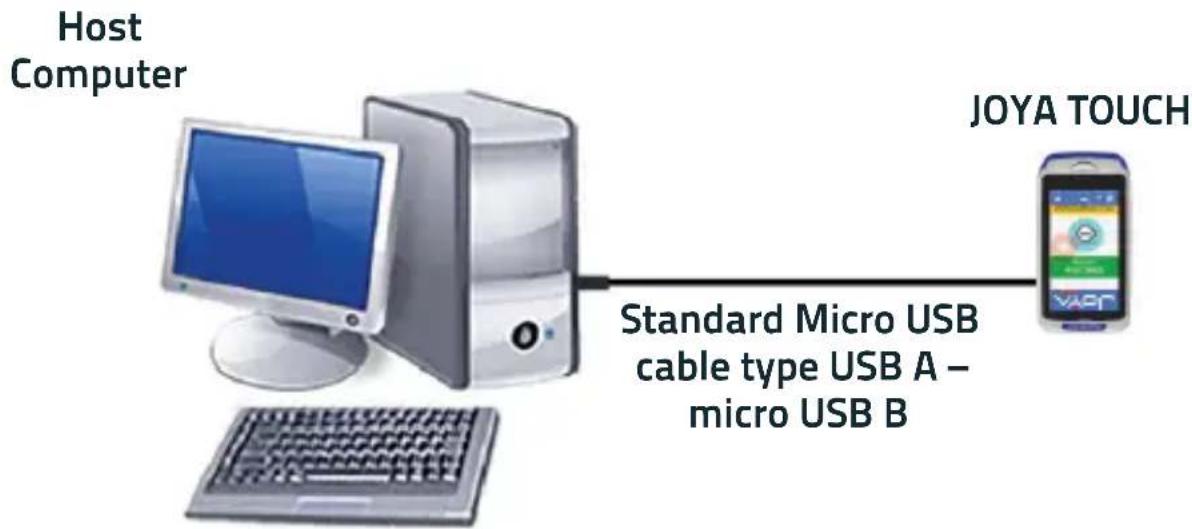
flowchart
graph LR
    A["Host Computer"] -->|Standard Micro USB cable type USB A – micro USB B| B["JOYA TOUCH"]

Connection through the cable complies to USB 2.0 standard.
Wi-Fi Connection
The JOYA TOUCH Wi-Fi 802.11 a/b/g/n radio models can communicate with the host using the on-board radio frequency component and an Access Point connected to the host computer. To launch this utility you can tap the specific icon if it's visible on the taskbar or you can open Connections folder or Control Panel from desktop.
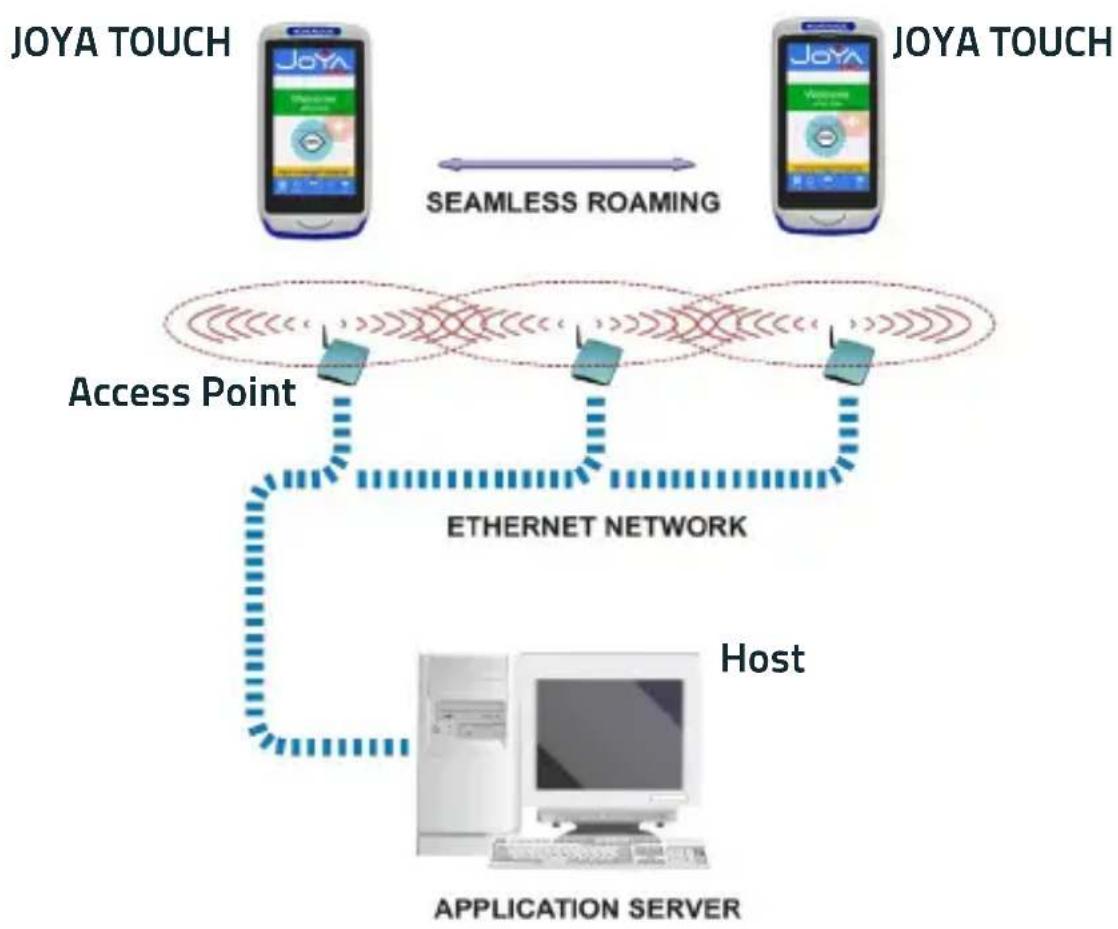
flowchart
graph TD
    A["JOYA TOUCH"] <-->|SEAMLESS ROAMING| B["JOYA TOUCH"]
    B <--> C["ACCESS POINT"]
    C --> D["ETHERNET NETWORK"]
    D --> E["HOST"]
    E --> F["APPLICATION SERVER"]

Wi-Fi module is on by default, in order to avoid wasting energy, you can switch it off using the Wireless Communications applet.

Suspending the terminal powers off the 802.11 a/b/g/n radio and drops the radio connection. When the terminal resumes, depending on the radio power mode and security protocol selected, it may take up to 30 seconds for the 802.11 a/b/g/n radio driver to re-associate the radio to the network.

Area coverage and radio performance may vary, due to environmental conditions, access point types or interference caused by other devices (microwave ovens, radio transmitters, etc.).
Bluetooth® Serial Connection
JOYA TOUCH models can communicate with a Bluetooth® printer, using the on-board Bluetooth® module.
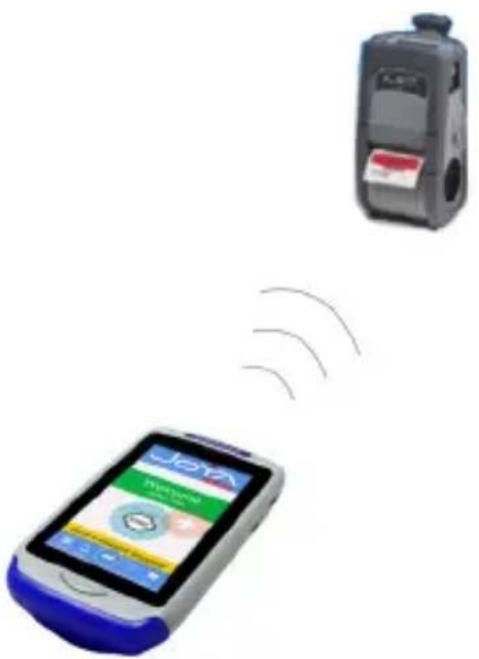

Bluetooth® is only available in Joya Touch plus models.

In order to extend battery life, the Bluetooth® module is off by default. If you need to have Bluetooth® working, the module must be powered on.

Suspending the terminal powers off the Bluetooth® radio and drops the Bluetooth® connection. When the terminal resumes, it takes approximately 10 seconds for the Bluetooth® radio driver to re-initialize the radio.

Area coverage and Bluetooth® radio performance may vary, due to environmental conditions or interference caused by other devices (microwave ovens, radio transmitters, etc.).
Wireless and Radio Frequencies Warnings

Use only the supplied or an approved replacement antenna. Unauthorized antennas, modifications or attachments could damage the product and may violate laws and regulations.
Most modern electronic equipment is shielded from RF signals. However, certain electronic equipment may not be shielded against the RF signals generated by JOYA TOUCH.
Datalogic recommends persons with pacemakers or other medical devices to follow the same recommendations provided by Health Industry Manufacturers Associations for mobile phones.
Persons with pacemakers:
- Should ALWAYS keep this device more than twenty five (25) cm from their pacemaker and/or any other medical device;
- Should not carry this device in a breast pocket;
- Should keep the device at the opposite side of the pacemaker and/or any other medical device;
- Should turn this device OFF or move it immediately AWAY if there is any reason to suspect that interference is taking place.
- Should ALWAYS read pacemaker or any other medical device guides or should consult the manufacturer of the medical device to determine if it is adequately shielded from external RF energy.
In case of doubt concerning the use of wireless devices with an implanted medical device, contact your doctor.

Turn this device OFF in health care facilities when any regulations posted in these areas instruct you to do so. Hospitals or health care facilities may use equipment that could be sensitive to external RF energy.

RF signals may affect improperly installed or inadequately shielded electronic systems in motor vehicles. Check with the manufacturer or its representative regarding your vehicle. You should also consult the manufacturer of any equipment that has been added to your vehicle.

An air bag inflates with great force. DO NOT place objects, including either installed or portable wireless equipment, in the area over the air bag or in the air bag deployment area. If a vehicle's wireless equipment is improperly installed and the air bag inflates, serious injury could result.

Turn off the device when in any area with a potential explosive atmosphere. Observe restrictions and follow closely any laws, regulations, warnings and best practices on the use of radio equipment near fuel storage areas or fuel distribution areas, chemical plants or where any operation involves use of explosive materials.
Do not store or carry flammable liquids, explosive gases or materials with the device or its parts or accessories.
Areas with a potentially explosive atmosphere are often, but not always, clearly marked or shown.
Sparks in such areas could cause an explosion or fire, resulting in injury or even death.
Technical Data
| Physical Characteristics | |
| Dimensions | Handheld: 14.5 x 7.67 x 3.38 cm / 5.7 x 3 x 1.33 inPistol Grip: 14.5 x 7.67 x 11.6 cm / 5.7 x 3 x 4.56 in |
| Weight (with battery) | Handheld: 275 g / 9.7 ozPistol Grip: 310 g / 10.9 oz |
| Colors (standard) | Blue, Red, Green, Orange, Yellow, Grey |
| Color Customization | Topcase and battery covers (both handheld and pistol grip models), and Scan Trigger (pistol grip models) are available in various standard or custom colors |
| Display | 4.3" full touch TFT-LCD color display; FWVGA: 854 x 480 pixels; 16M colors, LED backlight |
| Touch Screen | Capacitive, multitouch, Gorilla Glass 3 |
| Physical Keys | Handheld: 'Home' fully programmable keyPistol Grip: 'Home' fully programmable key, 'Scan Trigger' key |
| Lighting | Software programmable, lights at the bottom of the battery cover |
| User Interfaces | |
| Vibration | Software programmable (available on Plus models) |
| Accelerometer | 3-Axis accelerometer |
| SoftSpot | Virtual trigger/home key |
| Trigger | Pistol grip models only |
| Wireless Communications | |
| Local Area Network (WLAN) | IEEE 802.11 a/b/g/n; Wi-Fi Security Standards, WEP, WPA, WPA2, TKIP, AES, PSK, Cisco CCX v4 compatible |
| Personal Area Network (WPAN) | Bluetooth® v4.0 - Dual Mode (Classic Bluetooth and BLE)(available on Plus models) |
| Reading Performance | |
| Depth of Field | 4.3 to 35.0 cm / 1.7 to 13.8 in, depending on bar code density |
| Minimum Resolution | Linear codes at 4 mils; 2D codes at 5 mils |
| Reading Indicators | Loudspeaker (Polyphonic audio codec); buzzer; Datalogic's patented 'Green Spot' technology for good-read feedback |
| Decoding Capability | |
| 1D / Linear Codes | Auto discriminates all standard 1D codes including GS1 DataBarTM linear codes |
| 2D Codes | Aztec Code, Data Matrix, MaxiCode, QR Code, UPU FICS, USPS Intelligent Mail, Optional Digimarc® bar code |
| Postal Codes | Australian Post, Japan Post, KIX Code, PLANET,POSTNET, Royal Mail Code (RM4SCC) |
| Stacked Codes | Micro-PDF417, PDF417, GS1 DataBar Composites, GS1 DataBar Expanded Stacked, GS1 DataBar Stacked, GS1 DataBar Stacked Omnidirectional |
| Electrical | |
| Battery | Replaceable battery pack with rechargeable Li-Ion batteries; 3.75v; 3,030 mAh (11.3 Watt-hours) |
| Wireless Charging | 2 charging options: Fast Charging or Standard Charging |
| Environmental | |
| Drop Resistance | Withstands drops from 1.2 m / 4.0 ft onto concrete |
| Temperature | Operating: -10 to 50 °C / 14 to 122 °F |
| Interfaces | |
| Interfaces | USB 2.0 Client (with standard Micro-USB connector) |
| Microprocessor | XScaleTM PXA310 @ 806 MHz; 32 bit |
| Operating System | Microsoft Windows Embedded Compact 7 Professional |
| Software | |
| Configuration and Maintenance | Datalogic Configuration Utility (DCU)Datalogic Firmware Utility (DFU)Datalogic Desktop Utility (DDU) |
| Development | SDK Suite available upon request |
| System | |
| Memory | Joya Touch Basic:System RAM: 512 MB;System Flash: 512 MB Flash DiskJoya Touch Plus:System RAM: 512 MB;System Flash: 1 GB Flash Disk;4 GB additional Flash on SD card |
| Warranty | |
| Warranty | 1-Year Factory Warranty |
Decode Distances
| Depth of Field | Far Guaranteed Working Ranges |
| Code 39 | 4.72 in12 cm |
| Code 39 | 8.27 in21 cm |
| 6.69 in17 cm | |
| EAN13 | 14.57 in37 cm |
| Datamatrix | 9.25 in23.50 cm |
| Code 39 | 19.29 in49 cm |
NOTES
High Density Codes - 0.25 mm (10 mils)
Code 39
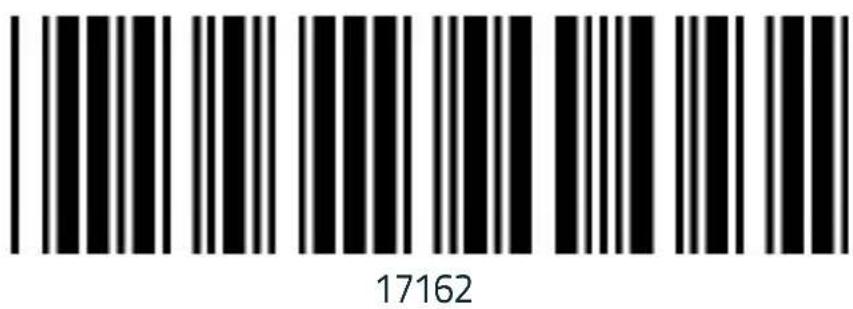
Interleaved 2/5
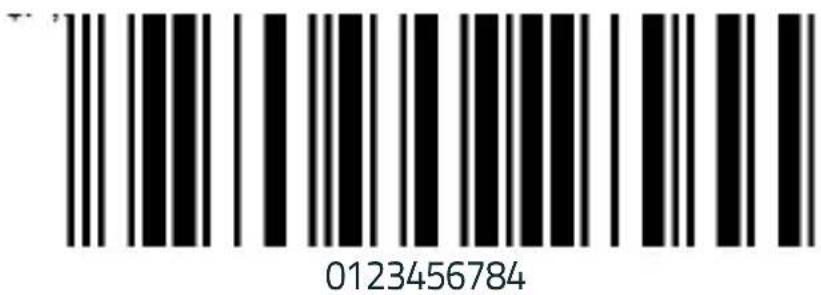
Code 128
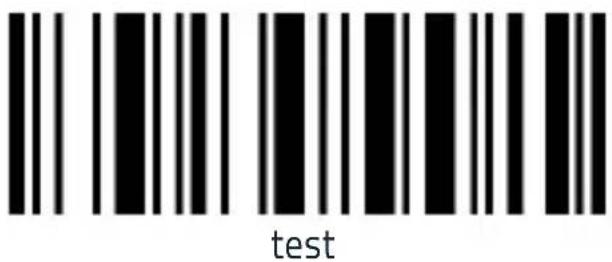
High Density Codes (continued) - 0.25 mm (10 mils)
80%
EAN 13
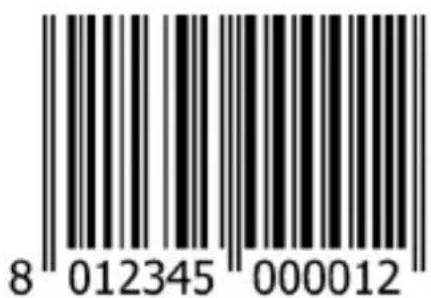
80%
EAN 8
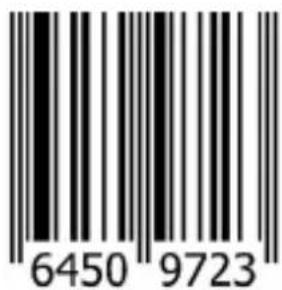
Medium Density Codes - 0.38 mm (15 mils)
Code 39
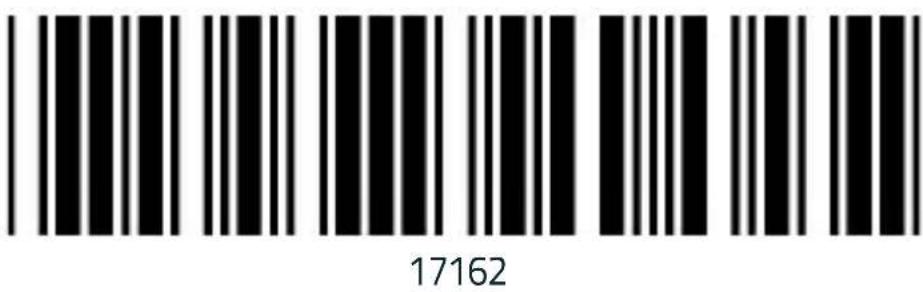
Interleaved 2/5
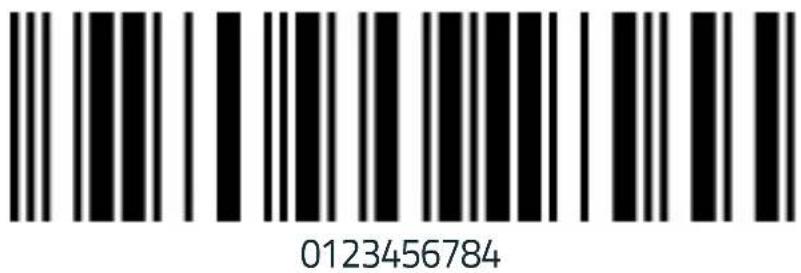
Code 128
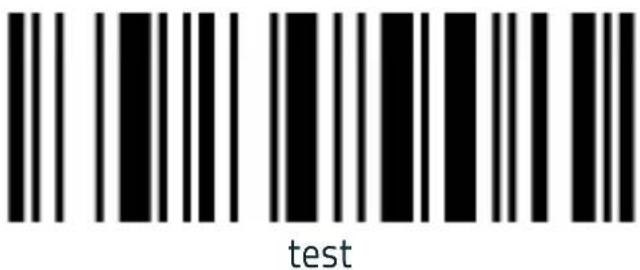
Medium Density Codes (continued) - 0.38 mm (15 mils)
100%
EAN 13
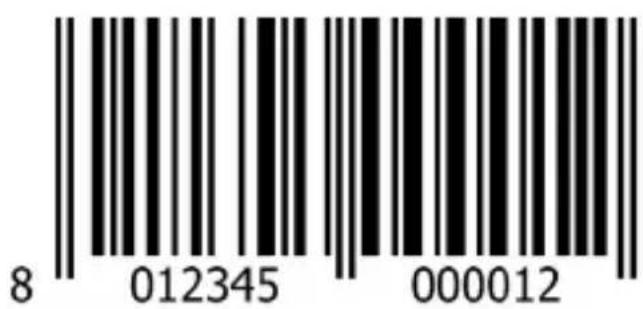
100%
EAN 8
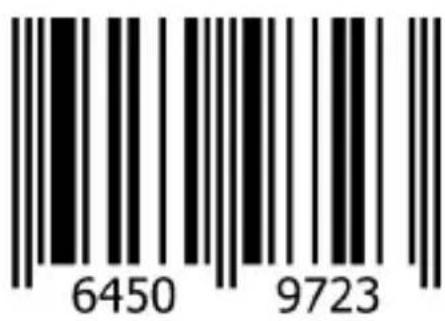
Low Density Codes - 0.50 mm (20 mils)
Code 39
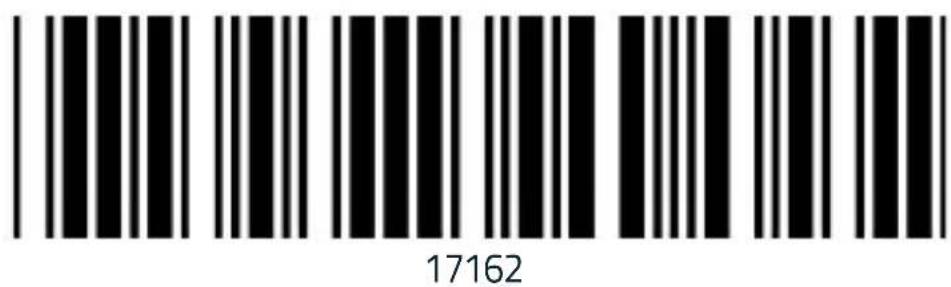
Interleaved 2/5
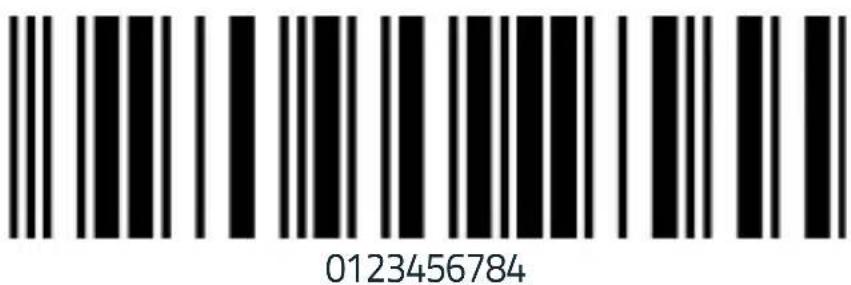
Code 128
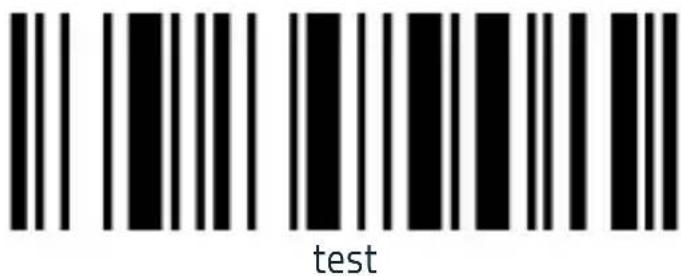
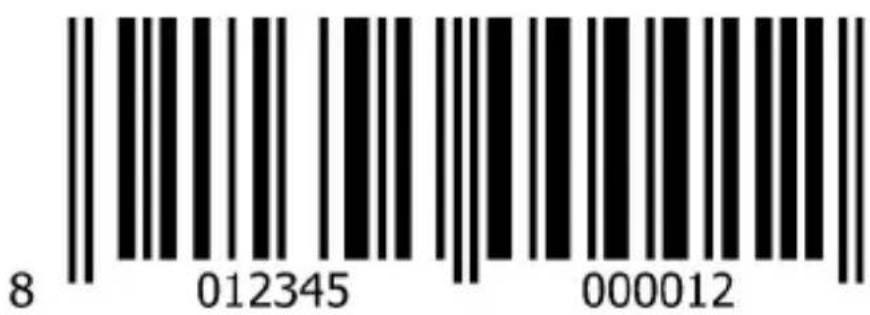
Low Density Codes (continued) - 0.50 mm (20 mils)
120%
EAN 13
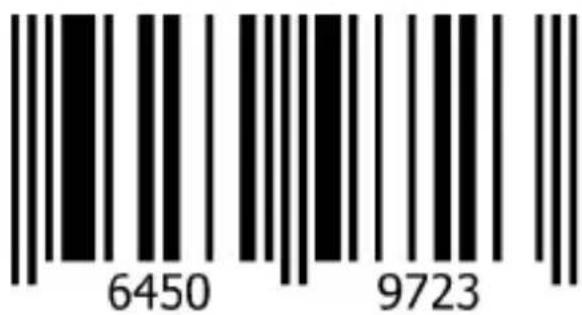
120%
EAN 8
2D Codes
Datamatrix ECC200
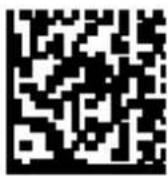
Example
Inverse Datamatrix ECC200
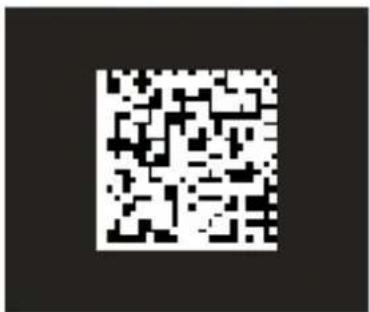
Example
NOTES
Cleaning the Device
Periodically clean the JOYA TOUCH device and the JOYA TOUCH 3-Slot Cradle using a soft cloth slightly dampened with only water or Isopropyl Alcohol (70%).
Do not use any other cleaning agents (e.g. different alcohol, abrasive or corrosive products, solvents) or abrasive pads to clean the device.
Do not spray or pour liquids directly onto the device.
The device is not water resistant. Keep it dry.
Ergonomic Recommendations

In order to avoid or minimize the potential risk of ergonomic injury follow the recommendations below. Consult with your local Health & Safety Manager to ensure that you are adhering to your company's safety programs to prevent employee injury.
■ Reduce or eliminate repetitive motion
- Maintain a natural position
■ Reduce or eliminate excessive force
- Keep objects that are used frequently within easy reach
■ Perform tasks at correct heights
■ Reduce or eliminate vibration
■ Reduce or eliminate direct pressure
■ Provide adjustable workstations
■ Provide adequate clearance
■ Provide a suitable working environment
■ l m p r o v e w o r k
Safety and Regulatory Information

NOTE
Read this manual carefully before performing any type of connection to the JOYA TOUCH.
The user is responsible for any damage caused by incorrect use of the equipment or by inobservance of the indication supplied in this manual.
General Safety Rules
■ Before using the device and the battery pack, read carefully the chapter Battery on page 11.
- Use only the components and accessories supplied by the manufacturer for the specific JOYA TOUCH being used.
- Do not attempt to disassemble the JOYA TOUCH, as it does not contain parts that can be repaired by the user. Any tampering will invalidate the warranty.
- When replacing the battery pack or at the end of the operative life of the JOYA TOUCH, disposal must compliance with the laws in force in your jurisdiction.
- Do not submerge the JOYA TOUCH in liquid products.
- For further information or support, refer to this manual and to the Datalogic web site: www.datalogic.com.
Power Supply
The device is intended to be supplied by a self-contained rechargeable Lithium Ion battery pack (UL listed LPS/SELV power source) and/or by UL Listed/CSA Certified Power Unit LPS/SELV power source which supplies power directly to the unit via the micro USB connector of the cable.
The device could be also used with Certified Accessories (Dock/Cradle) which supply Wireless power. The Dock/Cradle accessories are intended to be supplied by a UL Listed/CSA Certified Power Unit LPS/SELV rating 12V, min 5A power source which supplies power via the power connector of the cable.
Any changes or modifications to equipment, not expressly approved by Datalogic could void the user's authority to operate the equipment.
Laser Safety
The following information applies to Laser Aiming System, used on JOYA TOUCH Imager.
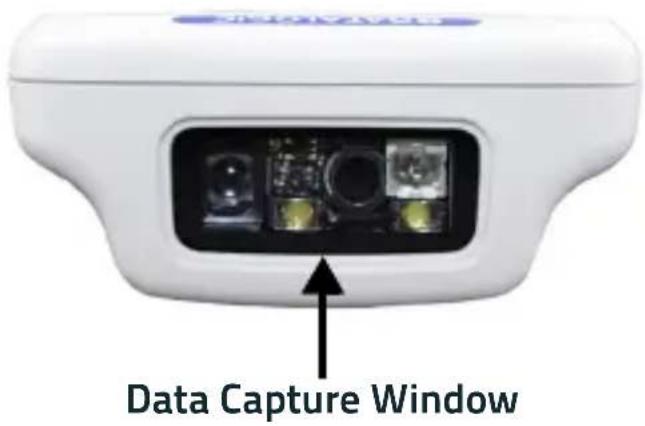
The laser light is visible to the human eye and is emitted from the window indicated in the figure below.
LASER LIGHT - DO NOT STARE INTO BEAM
CLASS 2 LASER PRODUCT
MAX OUTPUT RADIATION 1 mW
COMPLIANT WITH EN 60825-1 (2007)

The artwork below may be only a draft. Please refer to the label attached to the product for information about certification marks.
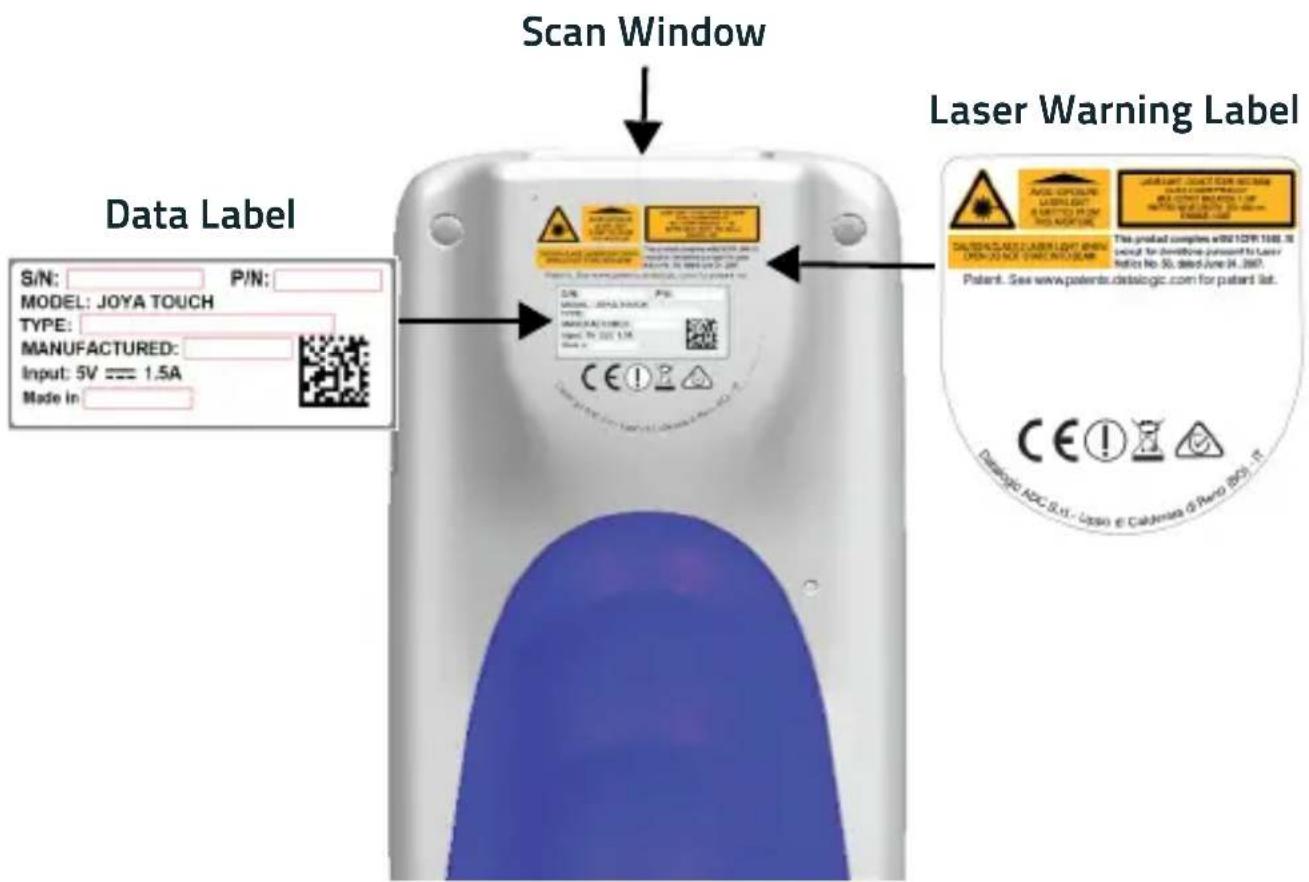
| ITALIANO DEUTSCH FRANÇAIS ESPAÑOL | |||
| LA LUCE LASER È VISIBILEALL'OCCHIOUMANO E VIENEEMESSA DALLAFINESTRAINDICATA NELLAFIGURA. | DIELASER-STRAHLUNG IST FÜR DASMENSCHLICHEAUGE SICHTBARUND WIRD AMSTRAHLAUSTRITTSFENSTERAUSGESENDET(SIEHE BILD) | LE RAYON LASEREST VISIBLE ÀL'OEIL NU ET ILEST ÉMIS PAR LAFENÊTREDÉSIGNÉE SURL'ILLUSTRATIONDANS LA FIGURE | A LUZ LÁSER ESVISIBLE AL OJOHUMANO Y ESEMITIDA POR LAVENTANAINDICADA EN LAFIGURA. |
| LUCE LASERNON FISSARE ILFASCIOAPPARECCHIOLASER DI CLASSE2MASSIMAPOTENZA MEDIADI USCITA: 1 mWLUNGHEZZAD'ONDA EMESSA:630~680 nmCONFORME A EN60825-1 (2007) | LASERSTRAHLUNGNICHT IN DERSTRAHL BLINKENPRODUKT DERLASERKLASSE 2MAXIMALEDURCHSCHNITTLICHEAUSGANGLEISTUNG: 1 mWWELLENLÄNGE:630~680 nmENTSPR. EN60825-1(2007) | RAYON LASEREVITER DEREGARDERLE RAYONAPPAREIL LASERDE CLASSE 2MAXIMUMPUISSANCEMOYENNE DESORTIE: 1 mWLONGUERD'ONDE EMISE:630~680 nmCONFORME A EN60825-1 (2007) | RAYO LÁSERNO MIRAR FIJOEL RAYOAPARATO LÁSERDE CLASE 2MÁXIMAPOTENCIA MEDIADE SALIDA: 1 mWLONGITUD DEONDA EMITIDA:630~680 nmCONFORME A EN60825-1 (2007) |
ENGLISH
The following information is provided to comply with the rules imposed by international authorities and refers to the correct use of your device.
STANDARD LASER SAFETY REGULATIONS
This product conforms to the applicable requirements of both CDRH 21 CFR 1040 and EN 60825-1 at the date of manufacture.
For installation, use and maintenance, it is not necessary to open the device.

Do not attempt to open or otherwise service any components in the optics cavity. Opening or servicing any part of the optics cavity by unauthorized personnel may violate laser safety regulations. The optics system is a factory only repair item.

Use of controls or adjustments or performance of procedures other than those specified herein may result in exposure to hazardous visible laser light.
The product utilizes a low-power laser diode. Although staring directly at the laser beam momentarily causes no known biological damage, avoid staring at the beam as one would with any very strong light source, such as the sun. Avoid shining laser light into any person's eye, even through reflective surfaces such as mir etc.

WARNING
Use of optical systems with the scanner will increase eye hazard. Optical instruments include binoculars, microscopes, eye glasses and magnifying glasses.
ITALIANO
LED illuminator integrated in the imager engine is classified as 'EXEMPT RISK GROUP" according to IEC62471.
Marking and European Economic Area (EEA) C€ ⚠
In radio systems configured with mobile computers and access points, the frequencies to be used must be allowed by the spectrum authorities of the specific country in which the installation takes place. Be absolutely sure that the system frequencies are correctly set to be compliant with the spectrum requirements of the country. The Radio modules used in this product automatically adapt to the frequencies set by the system and do not require any parameter settings.
Statement of Compliance
| csČesky[Czech] | Datalogic S.r.l. tímto prohlašuje, že tento Joya Touch je ve shodě se základními požadavky a dalšími příslušnými ustanoveními směrnice 1999/5/ES - 2011/65/EU. |
| daDansk[Danish] | Undertegnede Datalogic S.r.l. erklærer herved, at følgende udstyr Joya Touch overholder de væsentlige krav og øvrige relevante krav i direktiv 1999/5/EF - 2011/65/EU. |
| deDeutsch[German] | Hiermit erklärt Datalogic S.r.l., dass sich das Gerät Joya Touch in Übereinstimmung mit den grundlegenden Anforderungen und den übrigen einschlägigen Bestimmungen der Richtlinie 1999/5/EG - 2011/65/EU befindet. |
| etEesti[Estonian] | Käesolevaga kinnitab Datalogic S.r.l. seadme Joya Touch vastavust direktiivi 1999/5/EÜ - 2011/65/EU põhinõuetele ja nimetatud direktiivist tulenevatele teistele asjakohastele sätetele. |
| enEnglish | Hereby, Datalogic S.r.l. declares that Joya Touch is in compliance with the essential requirements and other relevant provisions of Directive 1999/5/EC and 2011/65/EU. |
| esEspañol[Spanish] | Por medio de la presente Datalogic S.r.l. declara que el Joya Touch cumple con los requisitos esenciales y cualesquiera otras disposiciones aplicables o exigibles de la Directiva 1999/5/CE - 2011/65/EU. |
| elΕλληνική[Greek] | ME THN ΠΑΡΟΥΣΑ Datalogic S.r.l. ΔΗΛΩΝΕΙ ΟΤΙ Joya Touch ΣΥΜΜΟΡΦΩΝΕΤΑΙ ΠΡΟΣ ΤΙΣ ΟΥΣΙΩΔΕΙΣ ΑΠΑΙΤΗΣΕΙΣ ΚΑΙ ΤΙΣ ΛΟΙΠΕΣ ΣΧΕΤΙΚΕΣ ΔΙΑΤΑΞΕΙΣ ΤΗΣ ΟΔΗΓΙΑΣ 1999/5/EK - 2011/65/EU. |
| frFrançais[French] | Par la présente Datalogic S.r.l. déclare que l'appareil Joya Touch est conforme aux exigences essentielles et aux autres dispositions pertinentes de la directive 1999/5/CE - 2011/65/EU. |
| it Italiano [Italian] | Con la presente Datalogic S.r.l. dichiara che questo Joya Touch è conforme ai requisiti essenziali ed alle altre disposizioni pertinenti stabilite dalla direttiva 1999/5/CE - 2011/65/EU. |
| Latviski [Latvian] | Ar šo Datalogic S.r.l. deklarē, ka Joya Touch atbilst Direktīvas 1999/5/EK - 2011/65/EU būtiskajām prasībām un citiem ar to saistītajiem noteikumiem. |
| Lietuvių [Lithuanian] | Šiuo Datalogic S.r.l. deklaruoja, kad šis Joya Touch atitinka esminius reikalavimus ir kitas 1999/5/EB - 2011/65/EU Direktyvos nuostatas. |
| nl Nederlands [Dutch] | Hierbij verklaart Datalogic S.r.l. dat het toestel Joya Touch in overeenstemming is met de essentiële eisen en de andere relevante bepalingen van richtlijn 1999/5/EG - 2011/65/EU. |
| mt Malti [Maltese] | Hawnhekk, Datalogic S.r.l., jiddikjara li dan Joya Touch jikkonforma mal-ħtiġijiet essenzjali u ma provvedimenti oħrajn relevanti li hemm fid-Dirrettiva 1999/5/EC - 2011/65/EU. |
| hu Magyar [Hungarian] | Alulírott, Datalogic S.r.l. nyilatkozom, hogy a Joya Touch megfelel a vonatkozó alapvető követelményeknek és az 1999/5/EC - 2011/65/EU irányelv egyéb előírásainak. |
| pl Polski [Polish] | Niniejszym Datalogic S.r.l. oświadcza, że Joya Touch jest zgodny z zasadniczymi wymogami oraz pozostałymi stosownymi postanowieniami Dyrektywy 1999/5/EC - 2011/65/EU. |
| pt Português [Portuguese ] | Datalogic S.r.l. declara que este Joya Touch está conforme com os requisitos essenciais e outras disposições da Directiva 1999/5/CE - 2011/65/EU. |
| sl Slovensko [Slovenian] | Datalogic S.r.l. izjavlja, da je ta Joya Touch v skladu z bistvenimi zahtevami in ostalimi relevantnimi določili direktive 1999/5/ES - 2011/65/EU. |
| Slovensky [Slovak] | Datalogic S.r.l. týmto vyhlasuje, že Joya Touch spĺňa základné požiadavky a všetky príslušné ustanovenia Smernice 1999/5/ES - 2011/65/EU. |
| fiSuomi[Finnish] | Datalogic S.r.l. vakuuttaa täten että Joya Touch tyyppinen laite on direktiivin 1999/5/EY - 2011/65/EU oleellisten vaatimusten ja sitä koskevien direktiivin muiden ehtojen mukainen. |
| svSvenska[Swedish] | Härmed intygar Datalogic S.r.l. att denna Joya Touch står l överensstämmelse med de väsentliga egenskapskrav och övriga relevanta bestämmelser som framgår av direktiv 1999/5/EG - 2011/65/EU. |
Radio Technologies and Frequency Bands
JOYA TOUCH incorporates the following radio technologies and supports the corresponding frequencies, as specified below for Plus and Basic Variants:
| Radio Technology | Frequency Bands | Plus Variants FCC ID: U4GJNGWB IC: 3862EJNGW | Basic Variants FCC ID: U4GJNGW IC: 3862EJNGW |
| WLAN IEEE 802.11a/b/g/n, 20MHz channels bandwidth (HT-20) | 2.4GHz Frequency Bands: 2.412 – 2.472 MHz (EU / Japan) 2.412 – 2.462 MHz (USA)5GHz Frequency Bands: 5.180 – 5.240 MHz 5.260 – 5.320 MHz 5.500 – 5.700 MHz 5.735 – 5.825 MHz (USA) | X | X |
| Bluetooth® V4.0 – Dual-Mode | 2402–2480Mhz | X | |
| Wireless Charging (Receiver) | 130kHz X X |
Information for the User
ENGLISH
Contact the competent authority responsible for the management of radio frequency devices of your country to verify any possible restrictions or licenses required.
ITALIANO
| Hand Held variants with WLAN+BT radios Pistol Grip variants with WLAN+BT radios | |
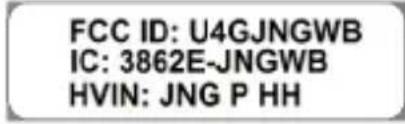 | 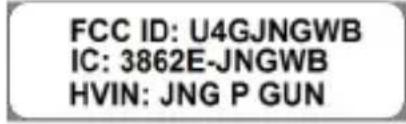 |
| Hand held variants with WLAN only radio Pistol Grip variants with WLAN only radio | |
| FCC ID: U4GJNGWIC: 3862E-JNGWHVIN: JNG B HH | FCC ID: U4GJNGWIC: 3862E-JNGWHVIN: JNG B GUN |
FCC Compliance
This device complies with Part 15 of the FCC Rules.
Operation is subject to the following two conditions:
(1) this device may not cause harmful interference, and
(2) this device must accept any interference received, including interference that may cause undesired operation.
NOTICE:
This device is restricted to indoor use when operated in the 5.15 to 5.25 GHz frequency range.
Changes or modifications made to this equipment not expressly approved by Datalogic S.r.l. may void the FCC authorization to operate this equipment.
NOTE:
This equipment has been tested and found to comply with the limits for a Class B digital device, pursuant to Part 15 of the FCC Rules. These limits are designed to provide reasonable protection against harmful interference in a residential installation. This equipment generates, uses and can radiate radio frequency energy and, if not installed and used in accordance with the instructions, may cause harmful interference to radio communications. However, there is no guarantee that interference will not occur in a particular installation. If this equipment does cause harmful interference to radio or television reception, which can be determined by turning the equipment off and on, the user is encouraged to try to correct the interference by one or more of the following measures:
■ Reorient or relocate the receiving antenna.
- Increase the separation between the equipment and receiver.
- Connect the equipment into an outlet on a circuit different from that to which the receiver is connected.
- Consult the dealer or an experienced radio/TV technician for help.
ISED Compliance
NOTICE:
This device complies with Industry Canada licence-exempt RSS standard(s).
Operation is subject to the following two conditions:
(1) this device may not cause harmful interference, and
(2) this device must accept any interference received, including interference that may cause undesired operation.
(i) the device for operation in the band 5150-5250 MHz is only for indoor use to reduce the potential for harmful interference to co-channel mobile satellite systems;
(ii) high-power radars are allocated as primary users (i.e. priority users) of the bands 5250-5350MHz and 5650-5850 MHz and that these radars could cause interference and/or damage to LE-LAN devices.
AVERTISSEMENT:
Radiofrequency Radiation Exposure Information
This device was tested for handheld and body-worn conditions, according to international Standards covering human exposure to electromagnetic fields from radio devices.
More information about the relevant Standards for SAR measurement methods and procedures may be found in the CE DoC included in the product user manual available at www.datalogic.com website and at the FCC public listing www.fcc.gov under the FCC IDs specified in the FCC/IC labeling section.
Europe
This device is compliant with SAR limits for general population/uncontrolled exposure specified in Council Recommendation 1999/519/EC Annex II.
US and Canada
For body worn operation, this device has been tested and meets the FCC/ISED RF exposure guidelines for use with an accessory that contains no metal and the positions the handset a minimum of 0 cm from the body. Use of other enhancements may not ensure compliance with FCC/ISED RF exposure guidelines.
The antenna(s) used for this transmitter must not be co-located or operating in conjunction with any other antenna or transmitter, expect those approved under the filing.
WEEE Compliance
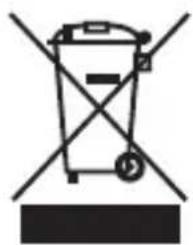
natural_image
Symbol of a trash bin crossed with diagonal lines, no text or numbers presentInformation for the user
At the end of its useful life, the product marked with the crossed out wheeled wastebin must be disposed of separately from urban waste.
For more detailed information about disposal, contact the supplier that provided you with the product in question or consult the dedicated section at the website http://www.datalogic.com.
Datalogic provides several services as well as technical support through its website. Please check our website at www.datalogic.com under 'Support', then select your product to download all the collaterals you may need:
■ Manuals for the latest versions of user manuals and product guides.
■ Software & Utilities for the latest firmware release for your product.
■ Service Program for warranty extensions and maintenance agreements.
■ Repair Program for a list of authorised repair centers.
■ Technical Support email form to contact our technical support.
Reference Documentation
For further information regarding the Joya Touch refer to the SDK Help on-line.
Warranty Terms and Conditions
The warranty period is 1 year for the device and 90 days for consumables (e.g. battery, power supply, cable etc.) from date of purchase at our company.
NOTES
Access Point
A device that provides transparent access between Ethernet wired networks and IEEE 802.11 interoperable radio-equipped mobile units. Hand-held mobile computers, PDAs or other devices equipped with radio cards, communicate with wired networks using Access Points (AP). The mobile unit (mobile computer) may roam among the APs in the same subnet while maintaining a continuous, seamless connection to the wired network.
ASCII
American Standard Code for Information Interchange. A 7 bit-plus-parity code representing 128 letters, numerals, punctuation marks and control characters. It is a standard data transmission code in the U.S.
Bar Code
A pattern of variable-width bars and spaces which represents numeric or alphanumeric data in binary form. The general format of a bar code symbol consists of a leading margin, start character, data or message character, check character (if any), stop character, and trailing margin. Within this framework, each recognizable symbology uses its own unique format.
Bit
Binary digit. One bit is the basic unit of binary information. Generally, eight consecutive bits compose one byte of data. The pattern of 0 and 1 values within the byte determines its meaning.
Bluetooth@
A standard radio technology using a proprietary protocol. The onboard Bluetooth@ module in the device is compatible with the 2.1 protocol with Enhanced Data Rate (EDR).
Boot
The process a computer goes through when it starts. During boot, the computer can run self-diagnostic tests and configure hardware and software.
Byte
On an addressable boundary, eight adjacent binary digits (0 and 1) combined in a pattern to represent a specific character or numeric value. Bits are numbered from the right, 0 through 7, with bit 0 the low-order bit. One byte in memory can be used to store one ASCII character.
CDRH
Center for Devices and Radiological Health. A federal agency responsible for regulating laser product safety. This agency specifies various laser operation classes based on power output during operation.
Character
A pattern of bars and spaces which either directly represents data or indicates a control function, such as a number, letter, punctuation mark, or communications control contained in a message.
Decode
To recognize a bar code symbology (e.g., Codabar, Code 128, Code 3 of 9, UPC/EAN, etc.) and convert the content of the bar code scanned from a visual pattern into electronic data.
Density (Bar Code Density)
The number of characters represented per unit of measurement (e.g., characters per inch).
Depth of Field (DOF)
The portion of a scene that appears acceptably sharp in the image. Although a lens can precisely focus at only one distance, the decrease in sharpness is gradual on each side of the focused distance, so that within the DOF, the unsharpness is imperceptible under normal viewing conditions.
Dock
A dock is used for charging the terminal battery and for communicating with a host computer, and provides a storage place for the terminal when not in use.
Ethernet
The standard local area network (LAN) access method. A reference to "LAN", "LAN connection" or "network card" automatically implies Ethernet. Defined by the IEEE as the 802.3 standard, Ethernet is used to connect computers in a company or home network as well as to connect a single computer to a cable modem or DSL modem for Internet access.
Firmware
A software program or set of instructions programmed on a hardware device. It provides the necessary instructions for how the device communicates with the other computer hardware. Firmware
is typically stored in the flash ROM of a hardware device. While ROM is "read-only memory," flash ROM can be erased and rewritten because it is actually a type of flash memory.
Flash Memory
Non-volatile memory for storing application and configuration files.
Host
A computer that serves other mobile computers in a network, providing services such as network control, database access, special programs, supervisory programs, or programming languages.
IEEE 802.11
A set of standards carrying out wireless local area network (WLAN) computer communication in the 2.4, 3.6 and 5 GHz frequency bands. They are created and maintained by the IEEE LAN/MAN Standards Committee.
IP
Internet Protocol. The IP part of the TCP/IP communications protocol. IP implements the network layer (layer 3) of the protocol, which contains a network address and is used to route a message to a different network or subnetwork. IP accepts 'packets' from the layer 4 transport protocol (TCP or UDP), adds its own header to it and delivers a 'datagram' to the layer 2 data link protocol. It may also break the packet into fragments to support the maximum transmission unit (MTU) of the network.
IP Address
(Internet Protocol address) The address of a computer attached to an IP network. Every client and server station must have a address. A 32-bit address used by a computer on a IP network. Client workstations have either a permanent address or one that is
dynamically assigned to them each session. If written as four sets of numbers separated by periods; for example, 204.171.64.2.
Laser
Light Amplification by Stimulated Emission of Radiation. The laser is an intense light source. Light from a laser is all the same frequency, unlike the output of an incandescent bulb. Laser light is typically coherent and has a high energy density.
Laser Diode
A gallium-arsenide semiconductor type of laser connected to a power source to generate a laser beam. This laser type is a compact source of coherent light.
Light Emitting Diode (LED)
A low power electronic light source commonly used as an indicator light. It uses less power than an incandescent light bulb but than a Liquid Crystal Display (LCD).
Liquid Crystal Display (LCD)
A display that uses liquid crystal sealed between two glass plates. The crystals are excited by precise electrical charges, causing them to reflect light outside according to their bias. They use little electricity and react relatively quickly. They require external light to reflect their information to the user.
MIL
1 mil = 1 thousandth of an inch.
Parameter
A variable that can have different values assigned to it.
RAM
Random Access memory. Data in RAM can be accessed in random order, and quickly written and read.
Resolution
The narrowest element dimension which is distinguished by a particular reading device or printed with a particular device or method.
RF
Radio Frequency.
Scanner
An electronic device used to scan bar code symbols and produce a digitized pattern that corresponds to the bars and spaces of the symbol. Its three main components are:
- Light source (laser or photoelectric cell) - illuminates a bar code.
- Photodetector - registers the difference in reflected light (more light reflected from spaces).
- Signal conditioning circuit - transforms optical detector output into a digitized bar pattern.
SDK
Software Development Kit.
Symbol
A scannable unit that encodes data within the conventions of a certain symbology, usually including start/stop characters, quiet zones, data characters and check characters.
Symbology
The structural rules and conventions for representing data within a particular bar code type (e.g. UPC/EAN, Code 39, PDF417, etc.).
USB
Universal Serial Bus. Type of serial bus that allows peripheral devices (disks, modems, printers, digitizers, data gloves, etc.) to be easily connected to a computer. A 'plug-and-play' interface, it allows a device to be added without an adapter card and without rebooting the computer (the latter is known as hot-plugging). The USB standard, developed by several major computer and telecommunications companies, supports data-transfer speeds up to 12 megabits per second, multiple data streams, and up to 127 peripherals.
WLAN
A Wireless Local Area Network links devices via a wireless distribution method (typically spread-spectrum or OFDM radio), and usually provides a connection through an access point to the wider internet. This gives users the mobility to move around within a local coverage area and still be connected to the network.
WPAN
A Wireless Personal Area Network is a personal area network - a network for interconnecting devices centered around an individual person's workspace - in which the connections are wireless. Typically, a wireless personal area network uses some technology that permits communication within about 10 meters - in other words, a very short range.

DATALOGIC
www.datalogic.com
©2016 Datalogic S.r.l. ■ All rights reserved.
Datalogic and the Datalogic logo are registered trademarks of Datalogic S.p.A. in many countries, including the U.S.A. and the E.U. JOYA is a trademark of Datalogic S.p.A. or of Datalogic Group companies, registered in many countries, including the U.S. and the E.U.
Datalogic S.r.l.
822002110 (Rev A) November 2016
- Multi-Purpose Device for Retail
- Datalogic S.r.l.
- Disclaimer
- Patents
- Table of Contents
- Introduction ...... 1
- Battery.... 11
- Use and Functioning.... 21
- Safety and Regulatory Information.... 111
- Support.... 135
- NOTES
- Conventions
- Product Presentation
- Available Models
- Out of the Box
- General View
- Front View
- Back View
- Top View
- Side View
- Accessories
- Cradle
- Cradle Accessories
- Batteries
- Various
- Battery
- Install the Battery
- Charge the Battery
- Fast Charge
- Standard Charge
- Battery Safety Guidelines
- Use and Functioning
- Getting Started
- Taskbar
- Touch Gestures
- Data Capture
- Imager Data Capture
- Resetting the JOYA TOUCH
- Warm Boot
- Cold Boot
- Clean Boot
- Control Panel
- Data Capture Configuration
- Configure
- Notification
- Number
- Duration
- Interval
- Volume
- Beep Tone
- Good Read
- Formatting
- Label Prefix
- Label Suffix
- General Options
- Symbology ID
- Group Separator Replacement
- Decoding Options
- Imager Options
- Enable Illumination
- Enable Picklist
- Target Mode
- Target Timeout
- Release Scan
- Multi Scan
- Keyboard Wedge
- 1D Bar Code Symbology Pages
- 2D Bar Code Symbology Pages
- Decoding Settings
- DL Buttons
- Triggers
- Persistent Registry
- Wireless Communications
- Status Tab
- Status
- IP Address
- Signal Strength
- Configuration Tab
- Check on/off box
- Active Profile
- Profiles
- Scan
- Diagnostics Tab
- Wi-Fi
- About
- Advanced
- ■ Status
- - Ping Tools
- - Utilities
- Audio Settings
- Audio
- Volume & Sounds
- Connecting to other Computers
- Windows Mobile® Device Center
- Datalogic Firmware Utility
- Retrieving a Firmware Image Update
- Installing DFU on the Host PC
- Updating the Firmware
- Datalogic Desktop Utility
- Administrative Options (Admin tab)
- Setting a Password
- Be sure to record the password for future reference.
- Changing a Password
- Removing a Password
- Password Request Dialog Box
- Locked Web Browser Options (LockedWeb tab)
- Error Page Redirection
- Status Icons Options (Status Tab)
- Windows Control
- AppSelector Options (AppSelect tab)
- Add Applications
- Locked Web Browser
- FlashDisk Directory File Management
- USB Connection
- USB Direct Connection
- Wi-Fi Connection
- Bluetooth® Serial Connection
- Wireless and Radio Frequencies Warnings
- 2D Codes
- Cleaning the Device
- Ergonomic Recommendations
- Safety and Regulatory Information
- General Safety Rules
- Power Supply
- Laser Safety
- ENGLISH
- STANDARD LASER SAFETY REGULATIONS
- ITALIANO
- Marking and European Economic Area (EEA) C€ ⚠
- Radio Technologies and Frequency Bands
- Information for the User
- FCC Compliance
- NOTICE:
- NOTE:
- ISED Compliance
- AVERTISSEMENT:
- Radiofrequency Radiation Exposure Information
- Europe
- US and Canada
- WEEE Compliance
- Reference Documentation
- Warranty Terms and Conditions
- Access Point
- ASCII
- Bar Code
- Bit
- Bluetooth@
- Boot
- Byte
- CDRH
- Character
- Decode
- Density (Bar Code Density)
- Depth of Field (DOF)
- Dock
- Ethernet
- Firmware
- Flash Memory
- Host
- IEEE 802.11
- IP
- Laser
- Laser Diode
- Light Emitting Diode (LED)
- Liquid Crystal Display (LCD)
- MIL
- Parameter
- RAM
- Resolution
- RF
- Scanner
- SDK
- Symbol
- Symbology
- USB
- WLAN
- WPAN
- DATALOGIC
- www.datalogic.com
Brand : DATALOGIC
Model : Joya Touch Plus
Category : Barcode scanners