
VSP500A - Headphones VTECH - Free user manual and instructions
Find the device manual for free VSP500A VTECH in PDF.


| Product Type | Over-Ear Headphones |
| Brand | VTech |
| Model | VSP500A |
| Connectivity | Wired (3.5 mm audio jack) |
| Cable Length | 1.2 m |
| Driver Size | 40 mm |
| Frequency Response | 20 Hz – 20 kHz |
| Impedance | 32 Ω |
| Weight | 150 g |
| Dimensions (folded) | 15 x 15 x 5 cm |
| Volume Limiter | Yes (85 dB max) |
| Microphone | No |
| Compatibility | Smartphones, tablets, computers with 3.5 mm port |
| Recommended Age | 3+ years |
| Material | Plastic, foam ear cushions |
| Color | Black/Blue (typical) |
| Power Source | None (passive) |
| Maintenance | Wipe with a soft, dry cloth. Do not use liquid cleaners. |
| Safety Certifications | CE, RoHS |
| Spare Parts Availability | Not available; device is not user-serviceable. |
| Warranty | 1 year (check local terms) |
Frequently Asked Questions - VSP500A VTECH
User questions about VSP500A VTECH
0 question about this device. Answer the ones you know or ask your own.
Ask a new question about this device
Download the instructions for your Headphones in PDF format for free! Find your manual VSP500A - VTECH and take your electronic device back in hand. On this page are published all the documents necessary for the use of your device. VSP500A by VTECH.
USER MANUAL VSP500A VTECH
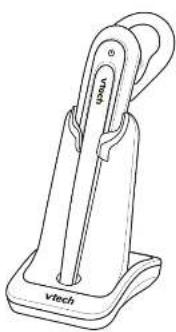
for use with VSP725A/VSP735A
natural_image
Line drawing of a Vtech stand with a handle and base (no text or symbols)Congratulations
on purchasing your new VTech product. Before using this telephone, please need important safety instructions.
This manual has all the feature operations and frequently asked questions necessary to install and operate your new VTech product. Please read this manual thoroughly to ensure proper installation and operation of this VTech product.
For customer service or warranty service, please contact our regional offices / distributors in the country or region where you purchase VSP7SSA.
Parts checklist
Your headset package contains the following items. Save your sales receipt and original packaging in the event warranty service is necessary.
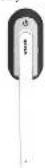
- Cordless headset with medium-sized carbud attached
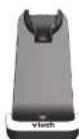
- Headset charger

- Battery pack (with battery compartment cover attached)

- Headset charger power adapter

- Earbud x5

• Over the ear hook x2

• Over the head band

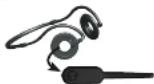
• Behind the neck band

- User's manual
Headset overview
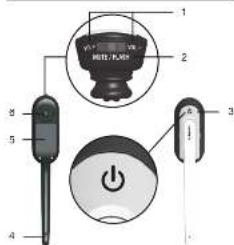
1-VOL+VOL
+ Push to right or left to adjust the ringer volume while in idle mode, or the listening volume while on a cell.
2 - MUTE/FLASH
• Press to make the ringer in the parpiece when there is an incoming call.
- Press to make the microphone during a call - Press and hold for two seconds to answer at incoming call when you receive a call waiting elect during a call.
3-
• Press to make, answer or order a call.
4 - Microphone
5 - Battery pack • Open to replace the battery pack. 6 - Earpiece
Charger overview
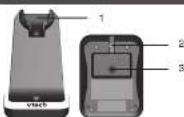
1 - Magnetic charging mount • Pass the header here for charging 2 - Power cord slot 3 - Power jack
Light and alert tones overview
Light:
| Light status | |
| Fast • | On often the headset is changing in the hearest charger. |
| • Flashes every 10 seconds to indicate the battery is lower than the headset is not in the hearest charger. | |
| • Flashes three times to indicate the headset is powering off. | |
| Blue • | On often a fully charged and registered headset is in the hearest charger. |
| • Flashes three times to indicate the headset is powering on. | |
| • Flashes twice every three seconds when the headset is in use. | |
| • Flashes four times every four seconds when there is an incoming call. | |
| • Flashes every 10 seconds when a fully charged and registered headset is in the mode is out of the hearest charger. | |
| Red and Blue | • Flashes slowly when the headset is not registered. |
| • Flashes quickly when the headset is lying on register to a telephone line. | |
| Off • | No battery is installed or out of battery. |
| • The headset is powered off. | |
Alert tones:
| One short beep Headset key tone. | |
| One short beep every 30 seconds | Mixed headset microphone seat tone. |
| Too busy + Empty start time | |
| • The higher volume is at its lowest setting. | |
| • The listening volume is at its highest at knock set setting. | |
| • Any key is pressed while the headed is out of range. | |
| Too low beeps Call starting vent tone. | |
| Too rapid beeps every 20 seconds | Low battery warning. |
| Three rising loops / sorrection call clarts. | |
| Three rapid beeps every 20 seconds | • The headset is out of range. |
| • The headset is not yet rectangular. | |
| Fling tone + Insering call alert tone. | |
| • Fling back tone. | |
| Three rapid beeps the headset is powering on or off. | |
Install the battery
NO
- The battery is permanently attached to the battery compartment cover (known as the battery pack). Do not try to separate them from each other.
Install the battery as shown below.
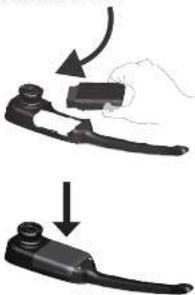
natural_image
Two-step illustration of a hand using a crimping tool to adjust the component (no text or symbols present)NOLES
• Use only the supplied battery.
- Remove any headset attachment (earbud excluded) before hatten replacement
• if the beach was not the year for a
remove the battery to prevent possible leakage
• To purchase a replacement battery pack (model BT191685), visit our website at smartphones which com or call 1 (099) 370-2006.
Connect and charge the battery
©N21LS
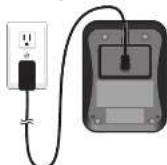
• Use only the supplied adaptor.
- Charge the battery provided with or identified for use with this product only in accordance with the instructions and limitations specified in this manual
Connect the charger
Charge the battery
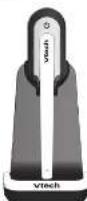
The light turns on when the headset is
charging.
© NOTES
• For best performance, keep the headset in the
• The battery is fully engaged after three hours of
continuous charging.
- When fully charged, the headset battery provides approximately 12 hours of talk time or 5 days of standby time.
Before use
Add and register a headset
You can add new VSP500A headset (purchased separately) to your VSP725A or VSP735A telephone system. Your VSP725A or VSP735A telephone system supports one headset only.
Register the headset with the telephone base before use. After charged, the light on headset flashas in red and blue slowly and alternately.
NOTE
- Changes the raw hosted without interruption for at least 30 minutes before registering it to the telephone base.
To register a headset:
-
Remove the headset from the charger.
-
Press Menu at the telephone base when idle.
-
Press ▼ to highlight User Settings, and then www SELECT
-
Press ▼ to highlight DECT headset, and
then press SELECT
-
With Register highlighted, press SELECT on the telephone base.
-
Place the headset back to the charger. The ⏻ light flashes quickly in red and blue.
It takes about 60 seconds to complete the registration process. The ⏻ light turns red when the headset is registered but not fully charged, or turns blue when it is registered and fully charged.
To verify the registration, press the button on the headset and check for a dial tone. If the registration fails, you hear the voice prompt "Not registered" and the light on the headset flashes slowly in red and blue.
To reset the headset, remove it from the headset charger and reset the registration process again.
Deregister a headset
To replace a headset or register the headset to another telephone base, you must deregister all devices, and then register each device individually.
To deregister all devices:
-
Press Menu at the telephone base when idle
-
Press ▼ to highlight User Settings, and then
press SELECT. 7. Error ▼ to highlight DECT headset, and
than press SELECT
- Press ▼ to highlight Deregister, and then press SELECT.
The light flashes slowly in red and blue when the deregistration process is successful. It takes about 10 seconds to complete the deregistration process.
Position the headset
You can choose a suitable size of carbud and an appropriate way to position your headset.
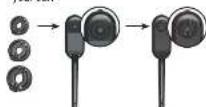
Earbud
There are three sizes of earbuds provided. The medium-sized earbuds is already attached to the headset.
To remove the earbud from the headset earpiece:
- Hold both sides of the earbud. Twist and pull the earbud until it separates from the earpiece.
To attach the earbud to the headset
earpiece:
-
Choose an appropriate earbud.
-
Position the earbud on the earpiece.
-
Press the earbud down on the earpiece until it clicks into place. Move the earbud around so that the protruding bump on the earbud is pointing towards your mouth when placed in your ear.
Over the ear hook
There are two sizes of ear hooks. You can choose the suitable ear hook to attach to the headset.
To adjust the headset to wear on the left or right ear:
• To wear on the left ear • To wear on the right ear
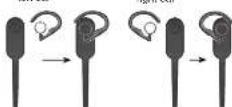
To attach the car hook to the headset.
- Remove any headset attachment (curbs and excludes) currently connected to the headset.
- Insert the service into the per-book dog
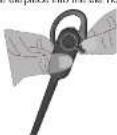
- Press the edge of the car hook ring towards the carpiece until it clicks into piece.
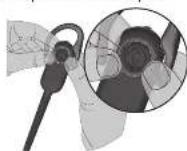
- Hook the headset onto the desired ear. Adjust the angle of the headset until the microphone is pointing towards your mouth.
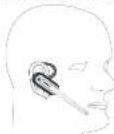
To remove the ear hook from the headset: - Hold the headset with one hand. Twist and pull the ear hook with your other hand until it separates from the earpiece.
Over the head band
To attach the head band to the headset;
-
Remove any headset attachment (earoud excluded) currently connected to the headset
-
Insert the carpions into the loop of the ear pad
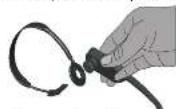
- Push the ear piece towards the loop of the ear pad until it clicks into place.
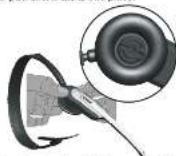
- Adjust the head band to fill your head. Adjust and rotate the angle of the headset until the microphone is pointing towards your mouth.
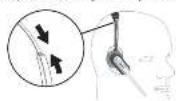
To remove the head band from the headset:
Hold the headset with one hand and the ear pad with your other hand. Twist and pull the headset until it separates from the loop of the ear pad.
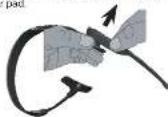
Behind the neck band
To attach the neck band to the headset:
-
Remove any headset attachment (earbud
-
Insert the earpiece into the loop of the ear pad.
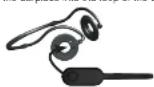
- Push the earplace inward until it clicks into place.
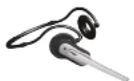
-
Place the neck band around your neck with the ear pads over your ears.
-
Adjust and rotate the angle of the headset until the microphone is pointing towards your mouth.
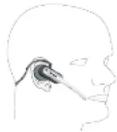
To remove the neck band from the headset:
- Hold the headset with one hand and the ear pad with your other hand. Twist and pull the headset until it separates from the loop of the ear pad.
Use the headset
Make a call
-
Follow the instructions in your telephone
-
Upsc up the headset to join the cell
-
Hang up the handset at any time to leave the
call and the headset continues the call.
Answer a call
- Press on the headset to answer a call.
End a call
- Press on the headset or place the headset on the charger.
Ringer
The headset does not have an external ringer. When there is an incoming call, the headset earplace rings.
If you have telephones connected to the same telephone line, you can rely on the ringers of those telephones to alert you to incoming calls.
Temporary ringer silencing
When there is an incoming call, you can temporarily silence the ringer in the headset earplace without disconnecting the call. The next call ringe normally at the preset volume. To silence the headset ringer:
- Press MUTE/FLASH on the headset.
Volume control
To adjust the ringer volume:
• When the headset is not in use, press
To adjust the
- During a cell process VDI +VDI
Dating of 65m, process 102/102
Call waiting
When you subscribe to call waiting service from your telephone service provider, you hear an alert tone from the headset earpiece if there is an incoming call while you are on another call.
- Press and hold MUTE/FLASH for two seconds to put your current call on hold and take the new call.
- Press and hold MUTE/FLASH for two seconds at any time to switch back and forth between cells.
Mute
The mula feature allows you to hear the other party but the other party cannot hear you.
-
During a call, press MUTE/FLASH on the headset. The headset announces, "Mute on." The headset boaps every 30 seconds until the mute function is turned off.
-
Press MUTE/FLASH again to resume the conversation. The headset announces, 'Mute
Switch a call between a handset and a headset
- To switch from a cordless handset to a headset during a call, press ☑ on the headset, then hang up the cordless handset. - To switch from a headset to a cordless handset during a call, press the button you use to answer call on the cordless handset, then press ☑ on the headset.
Multiple headset/handset use
Headset(s) and handset(s) on the same phone line can join an outside call at the same time. The number of headset(s) and handset(s) that can join may be limited by your telephone system. Refer to the user's manual of your telephone for more information.
To share an outside call:
- When a headset or handset is already on a call, press down another headset to join the call.
- To exit the call, press again or place the headset in the charger. The call continues until all handsets and/or headsets hang up.
Answer an intercom call
Follow the instructions in your telephone user's manual for initiating an intercom call. When there is an intercom call request from a cordless telephone to a headset, the headset earplace rings If it is not in use.
To answer an intercom call:
- Press on the headset to answer the Intercom coil.
Answer an incoming call during an intercom call
If you receive an incoming outside call during an Intercom call, there will be an alert tone.
- To answer the call, press and hold MUTE/FLASH for two seconds. The Intercom call ends automatically.
- To end the intercom call without answering the incoming call, press on the headset. The telephone continues to ring.
End an intercom call
- Press on the headset or place the headset on the charger.
General product care
Taking care of your headset
Your cordless headset contains sophisticated electronic parts, so it must be treated with care.
Avoid rough treatment
Place the headset down gently. Save the original packing materials to protect your headset if you ever need to ship it.
Avoid water
Your headset can be damaged if it gets wet. Do not use the headset outdoors in the rain, or handle it with wet hands. Do not install the headset charger near a sink, bathtub or shower.
Electrical storms
Electrical storms can sometimes cause power surges harmful to electronic equipment. For your own safety, take caution when using electrical appliances during storms.
Cleaning your headset
Your headset has a durable plastic casing that should retain its luster for many years. Clean it only with a soft cloth slightly dampened with water or mild soap.
Do not use excess water or cleaning solvents of any kind.
Frequently asked questions
If you have difficulty with your headset, try the solutions below.
| My headset doesn't work at all. | Make sure the battery is securely installed in the cordless headset, and charged for at least three hours. |
| Make sure your headset is pallet with a VSP/25A or VSP/35A telephone base. | |
| There is no dial tone. | Move the cordless headset closer to the telephone base. You might have moved out of range. |
| Check the installation of your VSP/25A or VSP/35A telephone base. | |
| The other party cannot hear my voice during a call. | Make sure the mute feature is not turned on during a call. |
| Adjust the speaking volume during a call. | |
| I cannot hear any ring time from the headset when there is an incoming call. | Your headset does not have an external ring. The ring time can only be heard through the headset earpiece. |
| Common cure for electronic equipment. | If the headset does not seem to be responding normally, try putting the cordless headset in the charger. If it does not solve the problem, so the following (in the order listed):1. Disconnect the power to the headset charger.2. Remove the cordless headset battery.3. Wait a few minutes.4. Connect the power to the headset charger.5. Install the battery again, and then place the cordless headset into the headset charger.6. Wait for the cordless headsets to reestablish its connection with the telephone base. Allow up to one minute for this to take place. |
Important safety instructions
When using your headset, basic safety precautions should always be followed to reduce the risk of fire, electric shock and injury, including the following:
-
Read and understand all instructions in this user's manual. Observe all markings on the product.
-
Avoid using a headset during a thunderstorm. There may be a slight chance of electric shock from lightning.
-
Do not use the headset to report a gas leak in the vicinity of the oak. Under certain circumstances, a spark may be created when the adapter is plugged into the power source and can be used for a single or two different types of wood in a crate. This is a common event associated with the closing of any electrical circuit. The user should not plug the headset charger into a power outlet, and should not put a charged headset into the crate, if the headset charger is located on an environment could be found in the room of a large space or flame-supporting gear, unless there is adequate ventilation. A spark in such an environment could create a fire or explosion. Such environments might include: medical use of oxygen without adequate ventilation; heating or cooling; heating or cooling; water vapor; etc.; it is lack of natural gas; etc.
-
Do not use this product near water, or when you are wet. For example, do not use it in a wet basement or shower, or next to a swimming pool, bathtub, kitchen sink, or laundry tub. Do not use liquids or aerosol sprays for cleaning. If the product comes in contact with any liquids, unplug any line or power cord immediately. Do not plug the product back in until it has dried thoroughly.
-
Install this product in a protected location where no one can trip over any line or power cords. Protect cords from damage or abrasion.
-
If this product does not operate normally, see the Frequently asked questions section of this user's manual. If you cannot solve the problem, or if the product is damaged, refer to the Limited warranty section. Do not open this product except as may be directed in your user's manual. Opening the product or reassembling it incorrectly may expose you to hazardous voltage or other risks.
-
Replace batteries only as described in your user's manual. Do not burn or puncture batteries — they contain caustic chemicals.
-
This power adapter is intended to be correctly oriented in a vertical or floor mount position. The prongs are not designed to hold the plug in place if it is plugged into a ceiling, an under-the-table or a cabinet outlet.
Especially about cordless headsets
Privacy: The same features that make a cordless headset convenient create some limitations. Telephone calls are transmitted between the telephone base and the headset by radio waves, so there is a possibility that your cordless headset conversations could be intercepted by radio receiving equipment within range of the cordless headset. For this reason, you should not think of cordless headset conversations as being as private as those on corded telephones.
Electrical power: The telephone base of this cordless headset must be connected to a working electrical outlet which is not controlled by a wall switch. Calls cannot be made from the headset if the telephone base is unplugged or switched off, or if the electrical power is interrupted.
Potential TV interference: Some cordless headsets operate at frequencies that may cause interference to TVs and VCRs. To minimize or prevent such interference, do not place the telephone base of the cordless headset near or on top of a TV or VCR. If interference is experienced, moving the cordless headset farther away from the TV or VCR will often reduce or eliminate the interference.
Rechargeable batteries: This product contains lithium-ion rechargeable batteries. Exercise care in handling batteries in order not to create a short circuit with conductive material such as rings, bracelets and keys. The battery or conductor may overheat and cause harm. Observe proper polarity between the battery and the battery charger.
Lithium-ion rechargeable batteries: Dispose of these batteries in a safe manner. Do not burn or puncture. Like other batteries of this type, if burned or punctured, they could release caustic material which could cause injury.
CAUTION
- There may be a risk of explosion if you use a wrong type of battery. Use only the supplied rechargeable battery or replacement battery (model BT191665).
- Change this product's batteries only in accordance with the instructions and limitations specified in this manual.
* As with any batteries, do not allow conductive materials such as rings, bracelets
or keys to come in contact with the metallic parts of the battery. The battery or conductor may overheat and cause harm.
- Do not open or damage the batteries. Released electrolyte is corrosive and may cause injury to the eyes or skin. The electrolyte may be toxic if swallowed.
- Do not dispose of the batteries in a fire. Check with local waste management codes for special disposal instructions. To prevent fire or shock hazard, do not expose this product to water or any type of moisture.
- Observe proper polarity orientation between the battery and metallic contacts.
- Do not disassemble your headact. There are no user-serviceable parts inside. Refer to qualified service personnel for servicing.
Precautions for users of implanted cardiac pacemakers
Cardiac pacemakers (applies only to digital cordless devices):
Wireless Technology Research, LLC (WTR), an independent research entity, led a
multidisciplinary evaluation of the interference between portable digital cordless devices sand implanted cardiac pacemakers. Supported by the U.S. Food and Drug Administration, WTR recommends to physicians that:
Pacemaker patients
- Should keep digital cordias devices at least six inches from the pacemaker.
- Should NOT place digital cordless devices directly over the pacemaker, such as in a breast pocket, when it is turned ON.
- Should use the digital cordless device at the ear opposite the pacemaker.
WTR's evaluation did not identify any risk to bystanders with poomakers from other persons using digital cordless devices.
SAVE THESE INSTRUCTIONS
Declaration of Conformance
Hereby, VTech declares that this VSP500A is in compliance with the essential requirements and other relevant provisions of Directive 1999/5/EC.

Technical specifications
Frequency control Crystal controlled PLL synthesizer
Transmit 1861.792-1697.341MHz
Civorensie
Operating 32°F - 122°F
temperature 0°C - 50°C
Power Charger: 6V DC @ 400mA
requirements Replacement battery
3.7V 240mAh
[Non-Text]
[Non-Text]
[Non-Text]
[Non-Text]
[Non-Text]
[Non-Text]
[Non-Text]
[Non-Text]
[Non-Text]
[Non-Text]
[Non-Text]
VTech Telecommunications Ltd
A member of THE VTECH GROUP OF COMPANIES
Virochis is registered trademark of VISO Holdings Limited. Eria Jarmini ^™ is a member of iTech Communications Inc
registered in the United States.
Special structure are subject to change without notice.
Copyright © 2014. No. 3 (98) 1962.10.15.17.18.19. All rights reserved. Printed in China, Version 2, 14/14

- Congratulations
- Parts checklist
- Install the battery
- Connect and charge the battery
- Before use
- Position the headset
- Behind the neck band
- Use the headset
- Make a call
- Answer a call
- End a call
- Ringer
- Temporary ringer silencing
- Volume control
- Call waiting
- Mute
- Switch a call between a handset and a headset
- Multiple headset/handset use
- To share an outside call:
- Answer an intercom call
- To answer an intercom call:
- Answer an incoming call during an intercom call
- End an intercom call
- General product care
- Taking care of your headset
- Avoid rough treatment
- Avoid water
- Electrical storms
- Cleaning your headset
- Important safety instructions
- Especially about cordless headsets
- CAUTION
- Precautions for users of implanted cardiac pacemakers
- Pacemaker patients
- SAVE THESE INSTRUCTIONS
- Declaration of Conformance
- Technical specifications
Brand : VTECH
Model : VSP500A
Category : Headphones