
ODW8126S - Warming Drawer ASKO - Free user manual and instructions
Find the device manual for free ODW8126S ASKO in PDF.


| Product Type | Built-in Warming Drawer |
| Model | ODW8126S |
| Brand | ASKO |
| Dimensions (H x W x D) | 5 1/2" x 24" x 22 1/2" |
| Weight | 38 lbs |
| Voltage | 120 V |
| Power Consumption | 7.2 A / 864 W |
| Capacity | 1.26 cu ft |
| Temperature Range | 30°F - 140°F |
| Functions | Keep Warm, Slow Cook, Proof, Plates Warming |
| Interior Finish | Stainless Steel |
| Installation Type | Built-in under counter |
| Control Type | Touch controls with digital display |
| Safety Features | Child lock, automatic shut-off, overheat protection |
| Maintenance | Clean with soft cloth and mild detergent; no abrasive cleaners |
| Warranty | 2 years limited |
Frequently Asked Questions - ODW8126S ASKO
User questions about ODW8126S ASKO
0 question about this device. Answer the ones you know or ask your own.
Ask a new question about this device
Download the instructions for your Warming Drawer in PDF format for free! Find your manual ODW8126S - ASKO and take your electronic device back in hand. On this page are published all the documents necessary for the use of your device. ODW8126S by ASKO.
USER MANUAL ODW8126S ASKO
Protection of the environment
Description of warming drawer
Safety tips
Installation
Encasement
Using your warming drawer
Cleaning and maintenance
PROTECTION OF THE ENVIRONMENT:
The packaging materials used for this appliance can be recycled. Take part in recycling and help protect the environment by discarding them in the appropriate waste bins provided by the municipal authorities.

The symbol on the product or on its packaging indicates that this product may not be treated as household waste. Instead it shall be handed over to the applicable collection point for the recycling of electrical and electronic equipment. By ensuring this product is disposed of correctly, you will help prevent potential negative consequences for the environment and human health, which could otherwise be caused by inappropriate waste handling of this product.
For more detailed information about recycling of this product, please contact your local city office, your household waste disposal service or the shop where you purchased the product.
Description of warming drawer
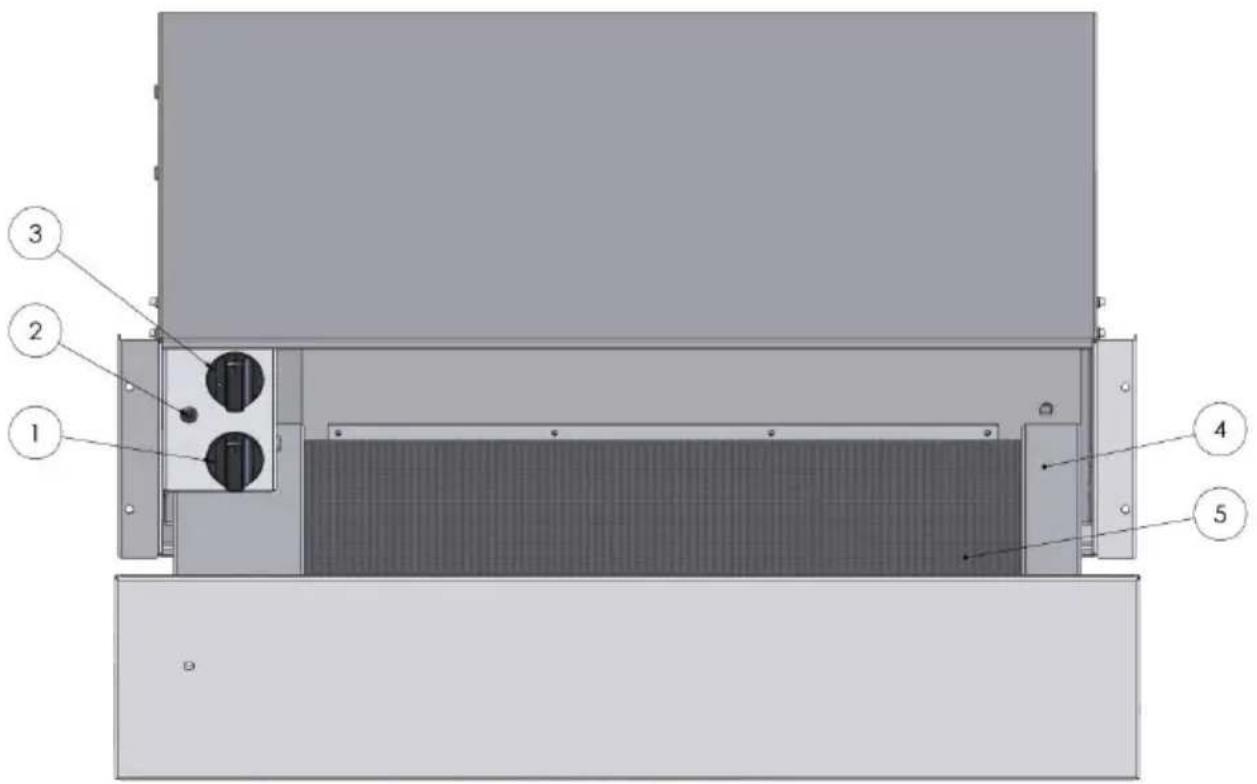
- Timer, stop/start switch
- Signal light on the front showing that power is on
- Temperature control
- Drawer for dishes
- Antiskid mat
Safety tips
Keep these instructions with your appliance. If the appliance should be sold or given to another person, be sure that these instructions are supplied with it.
Please read these recommendations before installing and using your warming drawer. They have been drafted for your safety and that of others.
This warming drawer has been designed for use by private persons in their homes. It is intended exclusively for warming dishes. Any other use is prohibited and could be dangerous. The manufacturer cannot be held liable in the event of non-complying use.
Do not use this appliance until it has been installed in the cabinet. Only full installation of the drawer prevents any risk of contact with powered components.
Never open the body of the appliance.
The inside of the drawer can heat up 70°C depending on the temperature chosen and the duration of use. Use hot-pan holders or gloves to remove the hot dishes.
Do not use the warming drawer to keep food or drinks hot or to reheat or cook food or drinks. The moisture in the food or drinks could cause corrosion of the appliance.
We do not advise standing or sitting on the open drawer; this would damage the telescopic rails. The maximum load of the drawer is 20 kg.
Do not store any plastic goods or inflammable objects in the appliance. They could melt or catch fire when it is turned on.
The appliance is not intended for use by young children or infirm persons without supervision. Young children should be supervised to ensure that they do not play with the appliance.
Installation
Before connecting the appliance to the power supply, check that the wires of your electric installation have sufficient diameter to supply power to the appliance normally. The fuse for the installation should be 10 amps.
It is necessary to provide a bipolar cut-off device in the power supply circuit, with an open contact gap of more than 3 mm.
The electric connection should be done before the appliance is set in the cabinet.
The drawer should be connected by a (standard) power cord with three 1 mm ^2 wires (1 single phase + 1 N + ground) to the 220-240 V single phase power supply via an electric circuit corresponding to the CEI 60083 standard or complying with the installation rules. The protective wire (green/yellow) corresponds to ground on the appliance and should be connected to the ground of the installation.
In the case of a connection via an electric outlet, the outlet should be accessible even with the appliance installed. The neutral on the heating drawer (blue wire) should be connected to neutral on the power supply.
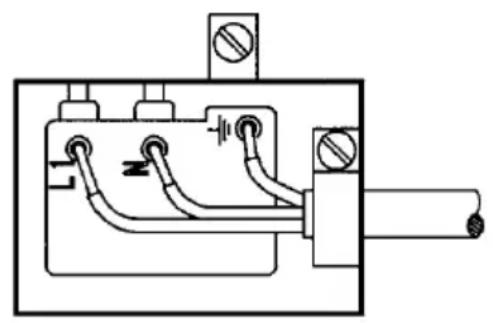
natural_image
Pure electrical circuit lines without any symbolsEncasement
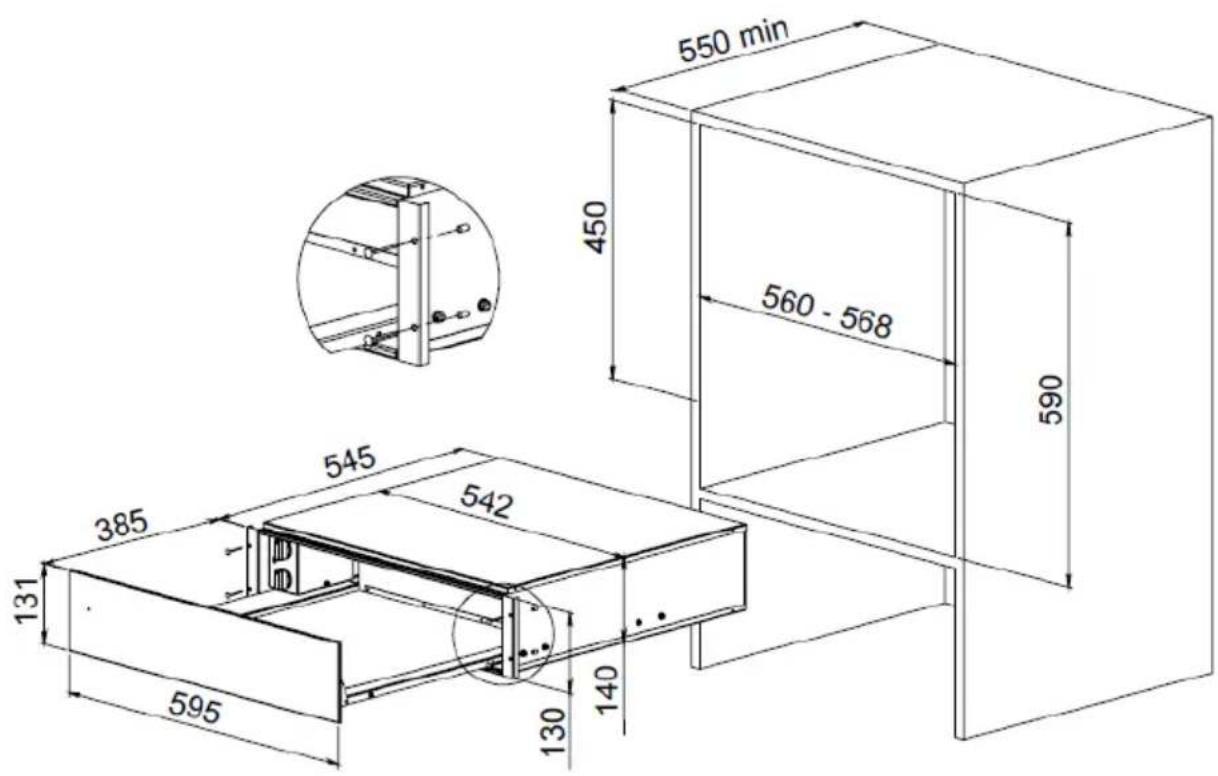
Set the appliance into the niche in the cabinet. Make certain that the body of the appliance is positioned correctly.
Open the drawer and fasten the appliance to the sides of the cabinet with 4 screws and the 4 spacers delivered with the appliance.
Using your warming drawer
INFORMATION BEFORE USE:
The appliance should be used exclusively to preheat dishes.
The appliance uses a hot air system to heat the dishes. A fan distributes the heat from the resistor in the drawer. The dishes are heated rapidly and uniformly by circulation of hot air.
A protective grid prevents the dishes from coming into contact with the resistor or the fan. The floor of the drawer is covered with an antiskid mat that prevents the dishes from sliding when the drawer is opened.
CONTROLS:
The controls include a temperature knob and a Start/Stop switch. These are only visible when the drawer is open. When the drawer is closed, the signal light on the front of the drawer comes on when the appliance is running.
SETTING THE CONTROLS:
- Put the dishes in the drawer.
- Select the temperature.
- Set the timer (minimum 10 minutes).
The signal light shows that the power is on.
- Close the drawer
When the timer runs out, the hot air heating system stops and a bell rings. To turn the bell off, turn the knob to 0.
Using your warming drawer
SELECTING THE TEMPERATURE:
The temperature knob adjusts the temperature between 30 and 70 °C.
The most appropriate temperatures for the types of dishes used are as follows :
- 40 °C: for cups or glasses. Hot drinks stay hot lon ger when poured into cups or glasses preheated to this temperature, without danger of burns when people drink from them.
- 60 °C: for plates and dishes. Food served on prehea ted plates or dishes maintain their heat and the dishes can be touched without burning the hands.
PREHEATING TIME:
Preheating time depends on several factors:
- the thickness of the dishes and the material they are made from
- the load
- disposal of the load
- temperature setting
Consequently, we cannot give times that will correspond systematically.
A few hints :
For a temperature setting of 60 °C , heated evenly:
- dishes for a meal for six take about 30 min.
- dishes for a meal for twelve take about 40 min.
After using the drawer a few times, you will know for yourself how long it takes to heat your dishes.
Using your warming drawer
CAPACITY:
Capacity depends on the height of the model, and the weight and size of your dishes.
The model has maximum capacity of 20 kg.
The following examples are given as an indication only (quantities are determined by volume):
Dishes for 6 :
6 dinner plates ∅ 28 cm
6 soup plates ∅ 22 cm
1 serving bowl ∅ 22 cm
1 serving bowl ∅ 20 cm
1 serving bowl ∅ 18 cm
2 serving platters 36 cm
or 16 large plates ∅ 28 cm
+ 8 bowls ∅ 10 cm
or 24 soup plates ∅ 22 cm
or 40 bowls ∅ 10 cm
or 60 cups ∅ 8 cm
or ...
Cleaning and maintenance
Before any maintenance, turn off the appliance and let it cool.
Clean all surfaces with a sponge, dish washing soap and warm water. Then dry it off with a soft cloth.
Do not steam clean the alliance.
The use of scouring powders, alcohol or grease-cutting products is not recommended – they could damage the appliance.
The stainless steel front can be scratched. Use a special non-abrasive cleanser for stainless steel.
The antiskid mat can be removed to clean the bottom of the drawer.
The antiskid mat can be washed with warm water and dish water soap. Then dry it off and put it back in the drawer when it is completely dry.
Brand : ASKO
Model : ODW8126S
Category : Warming Drawer