
VW140 - Warming Drawer CDA - Free user manual and instructions
Find the device manual for free VW140 CDA in PDF.


| Product Type | Warming Drawer |
| Brand | CDA |
| Model | VW140 |
| Installation Type | Built-in under counter |
| Dimensions (W x H x D) | 596 mm x 140 mm x 560 mm |
| Cut-out Dimensions (W x H x D) | 560 mm x 135 mm x 550 mm |
| Weight | 12 kg |
| Power Supply | 220-240 V, 50 Hz |
| Power Consumption | 250 W |
| Capacity | Up to 10 plates or 1 roasting tray |
| Temperature Range | 30°C - 80°C |
| Functions | Gentle warm, keep warm, low temperature cooking |
| Control Type | Electronic touch panel |
| Display | LED temperature and timer display |
| Material | Stainless steel interior and exterior |
| Safety Features | Child lock, overheat protection, auto shut-off |
| Cleaning & Maintenance | Wipe with damp cloth; do not use abrasive cleaners |
| Spare Parts Availability | Heating element, control board, glass panel available |
| Repairability Index | 8.0 / 10 |
| Energy Class | A+ |
| Noise Level | < 40 dB |
| Warranty | 2 years |
Frequently Asked Questions - VW140 CDA
User questions about VW140 CDA
0 question about this device. Answer the ones you know or ask your own.
Ask a new question about this device
Download the instructions for your Warming Drawer in PDF format for free! Find your manual VW140 - CDA and take your electronic device back in hand. On this page are published all the documents necessary for the use of your device. VW140 by CDA.
USER MANUAL VW140 CDA
vw120, vw140 & vw280 Warming Drawers
Manual for Installation, Use and Maintenance
Important
The manufacturer cannot be held responsible for injuries or losses caused by incorrect use or installation of this product.
Please note that we reserve the right to invalidate the guarantee supplied with this product following incorrect installation or misuse of the appliance.
This appliance is not designed to be used by people (including children) with reduced physical, sensorial or mental capacity, or who lack experience or knowledge about it, unless they have had supervision or instructions on how to use the appliance by someone who is responsible for their safety.
Under no circumstances should any external covers be removed for servicing or maintenance except by suitably qualified personnel.
User information:
- Warming drawers become hot during and immediately after use. Take care not to touch any of the internal components.
- The drawer may become hot during operation.
• After use, please ensure that the warming drawer is switched off. - Keep children away from the appliance when in use, and immediately after use.
Appliance information:
Please enter the details on the appliance rating plate below for reference, to assist CDA Customer Care in the event of a fault with your appliance and to register your appliance for guarantee purposes.
Appliance Model
Serial Number
CE Declarations of Conformity:
This appliance has been designed, constructed and marketed in compliance with safety requirements of Directive 73/23/CEE modified by Directive 93/68/CEE for attribution of CE approval (Low voltage) and requirements of EMC Directive 89/336/CEE modified by Directive 93/68/CEE for attribution of CE approval.
This appliance has been manufactured to the strictest standards and complies with all applicable legislation, including Electrical safety (LVD) and Electromagnetic interference compatibility (EMC). Parts intended to come into contact with food conform to CE Regulation 1935/2004.
IMPORTANT INFORMATION FOR CORRECT DISPOSAL OF THE PRODUCT IN ACCORDANCE WITH EC DIRECTIVE 2002/96/EC.
At the end of its working life, the product must be taken to a special local authority waste collection centre or to a dealer providing appliance recycling services.
Disposing of a household appliance separately avoids possible negative consequences for the environment and health. It also enables the constituent materials to be recovered, saving both energy and resources. As a reminder of the need to dispose of household appliances separately, the product is marked with a crossed-out wheeled dustbin. ✗
Important
- Do not rest or sit on the drawer when open, as this will damage the telescopic runners.
- The maximum capacity of the drawer is 25 kg.
- Do not cover the bottom of the warming drawer with aluminium foil or other objects. Use only the supplied mat.
- Never pour water directly into the warming drawer.
- Do not use this appliance for heating liquids.
- To avoid scratching, do not drag dishes on the bottom of the warming drawer.
- Use suitable containers or crockery.
- Residual condensation could eventually damage the warming drawer and surrounding cabinets. It is advisable to:
- cover food;
- dry the inside of the warming drawer when it has cooled down.
- Do not store plastic or flammable objects in the warming drawer.
- We recommend the use of oven gloves or adequate protection when removing crockery from the drawer.
- Never insert objects (e.g. screwdrivers, sharp objects, papers, etc.) in the heating element and ventilation slots.
THE MANUFACTURER DECLINES ALL RESPONSIBILITY FOR EVENTUAL DAMAGES CAUSED BY FAILURE TO OBSERVE THESE INSTRUCTIONS.
Before first use
Before using the drawer for the first time we recommend that you clean it with a damp cloth, then dry thoroughly.
Preheat the empty drawer for at least two hours at maximum temperature. A slightly unpleasant smell may be produced, caused by grease remaining on the heating element from the production process.
Using Your Warming Drawer

Use
- Place the dishes in the drawer.
- Set the required temperature.
- Press the power switch, which will light up to confirm the warming drawer is switched on:
- Close the drawer gently.
- Switch the appliance off before removing the warmed dishes.
Selecting the Temperature
- The temperature knob enables a temperature adjustment between approx. 30^ C and 80^ C.
- Turn the temperature knob to the required position.
- Do not force the temperature knob past the maximum position to prevent damage to the thermostat.
- The symbols do not indicate absolute temperature values, but recommendations for optimal settings for cups and dishes.
| Temperature Setting Temperature Information Regarding Use | ||
 | approx. 40°C To | prevent hot drinks from cooling too quickly, use this temperature setting to warm the cups to a temperature that is safe to touch. |
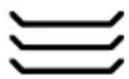 | approx. 60°C To | prevent hot food from cooling too quickly, use this temperature setting to warm plates or serving dishes. The use of oven gloves or pot holders is recommended for this setting. |
 | approx. 80°C The | thermostat is set to max temperature. The use of oven gloves or pot holders is necessary for this setting. |
Warming Times
The time necessary for warming depends on various factors:
• Material and thickness of the dishes.
• Quantity of dishes to be warmed.
- Arrangement of dishes in the drawer.
• Temperature setting.
Therefore exact warming times cannot be provided.
With use, experience will demonstrate optimal warming times and temperature settings.
Load capacity:
- The load capacity depends on the height of the appliance and the size of the dishes.
- The following load examples are only guides.
| vw120 / vw140 Diameter (cm) | |
| 6 Dinner plates 28 | |
| 6 Soup bowls 10 | |
| 1 Serving bowl 22 | |
| 1 Serving bowl 19 | |
| 1 Serving bowl 17 | |
| 2 Serving platters 36 | |
| OR | |
| 10 Dinner plates 28 | |
| 10 Soup bowls 22 | |
| OR | |
| 18 Soup bowls 22 | |
| 2 Soup terrines 21x18 | |
| OR INDIVIDUALLY | |
| 20 Dinner plates 28 | |
| 36 Soup bowls 22 | |
| 30 Soup bowls 10 | |
| 10 Pizza plates 36 | |
| 80 Espresso cups | |
| 40 Cappuccino cups | |
| 30 Punch glasses | |
| vw280 Diameter (cm) | |
| 12 Dinner plates 28 | |
| 2 Serving bowl 22 | |
| 2 Serving bowl 19 | |
| 2 Serving bowl 17 | |
| 2 Serving platters 36 | |
| OR | |
| 20 Dinner plates 28 | |
| 20 Soup bowls 22 | |
| OR INDIVIDUALLY | |
| 40 Dinner plates 28 | |
| 60 Soup bowls 22 | |
| 45 Soup bowls 10 | |
| 20 Dinner plates 28 | |
| 20 Soup bowls 22 | |
| 20 Pizza plates 36 | |
| 120 Espresso cups | |
| 60 Cappuccino cups | |
| 30 Punch glasses | |
Installation
Check the measurements in fig. 4 to confirm the requirements for your installation. Please note, the oven dimensions show a standard CDA oven and will vary depending on the appliance being installed above the warming drawer.
- Connect the mains lead to the product before installation. Run the lead to the power outlet to be used and connect to the mains electrical supply. Do not switch on until installation is complete.
- Locate the product centrally on the supporting shelf and fix into position using the fixing screws and plastic supports (Fig. 3).
- Carefully fit the appliance on top of the warming drawer, taking care not to scratch the top stainless edge of the drawer unit. Ensure that the mains connection lead is located near to the power outlet, to avoid having to remove the product again to connect the mains electrical supply.
- Secure the oven into the housing using appropriate fixing screws.
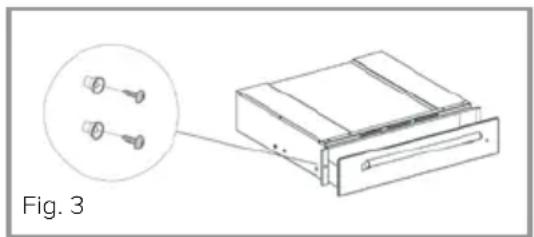
natural_image
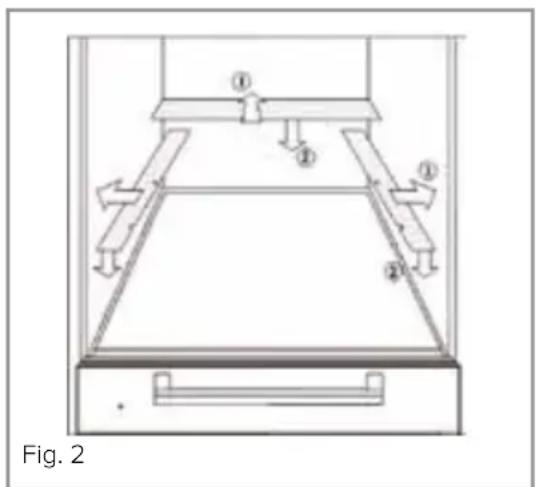
Technical line drawing of a device with two circular components and a rectangular housing, labeled Fig. 3 (no text or symbols on the diagram itself)- The warming drawer is supplied with three metal filler strips with self-adhesive backing. These strips should be attached to the warming drawer to seal any gaps between the appliance and the housing. Remove the protective foil from each strip and position it as shown in fig. 2 so it is flush with the rear and side walls of the housing, then attach to the warming drawer. If there is no rear wall to the housing, the rear trim is not required.
The casing of this appliance will get hot. Ensure that any cables that may come into contact with the appliance once installed are suitable for use at 85^ C .

Care and Maintenance
IMPORTANT
- Before any maintenance is started involving electrical parts, the appliance must be disconnected from the power supply.
- If the warming drawer has been in use, let it cool down before attempting any maintenance.
- Steam cleaners must not be used when cleaning this appliance.
- Once care and maintenance is complete, ensure that all parts are correctly replaced before using the appliance.
Warming drawer exterior
As the warming drawer has a stainless steel surface, you should use a nonabrasive cleaner. Any abrasive cleaner (including Cif) will scratch the surface and could erase the control panel markings. Stainless steel can be cleaned effectively by simply using a dilute solution of water and mild detergent and drying to a shine with a clean cloth.
Proprietary stainless steel cleaners are available. We recommend the CDA E-Cloth available from the CDA Sales Team for cleaning stainless steel surfaces as this has been designed to prolong the finish of your appliance.
Warming drawer interior
The inside should always be cleaned after use when it has cooled down.
The inside should be cleaned using a mild detergent solution and warm water, then dried thoroughly.
Mains Electricity Connection
THIS APPLIANCE MUST BE CONNECTED TO THE MAINS SUPPLY BY A COMPETENT PERSON, USING FIXED WIRING VIA A DOUBLE POLE SWITCHED FUSE SPUR OUTLET AND PROTECTED BY A 3A FUSE.
We recommend that the appliance is connected by a qualified electrician, who is a member of the N.I.C.E.I.C. and who will comply with the I.E.T. and local regulations.
The wires in the mains lead of this appliance are coloured in accordance with the following code:
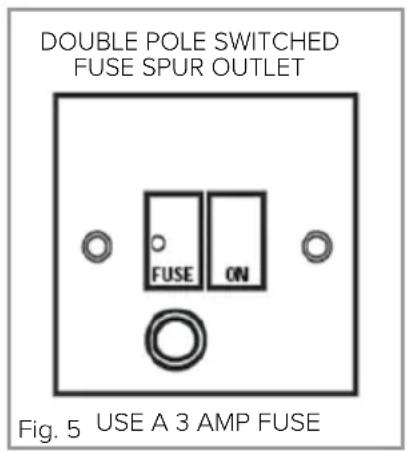
Green & Yellow = Earth, Blue = Neutral, Brown = Live.
As the colours of the wires in the mains lead for the appliance may not correspond with the coloured markings identifying the terminals connecting to the fuse spur, proceed as follows:
- The wire which is coloured green and yellow must be connected to the terminal marked E (Earth) or coloured green.
- The wire which is coloured blue must be connected to the terminal marked N (Neutral) or coloured black.
- The wire which is coloured brown must be connected to the terminal marked L (Live) or coloured red.
Note: Use a 3A Fuse
Assembly and electrical connection should be carried out by specialised personnel.
When installing this product we recommend you seek the help of another individual.
Notes:
Notes:
Notes:
E & O E. All instructions, dimensions and illustrations are provided for guidance only. CDA reserve the right to change specifications without prior notice.
|C|D|A|
Please contact our Customer Care Department for Service on the details below


- vw120, vw140 & vw280 Warming Drawers
- Important
- User information:
- Appliance information:
- CE Declarations of Conformity:
- IMPORTANT INFORMATION FOR CORRECT DISPOSAL OF THE PRODUCT IN ACCORDANCE WITH EC DIRECTIVE 2002/96/EC.
- THE MANUFACTURER DECLINES ALL RESPONSIBILITY FOR EVENTUAL DAMAGES CAUSED BY FAILURE TO OBSERVE THESE INSTRUCTIONS.
- Before first use
- Using Your Warming Drawer
- Use
- Selecting the Temperature
- Warming Times
- Load capacity:
- Installation
- Care and Maintenance
- Warming drawer exterior
- Warming drawer interior
- Mains Electricity Connection
- THIS APPLIANCE MUST BE CONNECTED TO THE MAINS SUPPLY BY A COMPETENT PERSON, USING FIXED WIRING VIA A DOUBLE POLE SWITCHED FUSE SPUR OUTLET AND PROTECTED BY A 3A FUSE.
- Green & Yellow = Earth, Blue = Neutral, Brown = Live.
- Note: Use a 3A Fuse
- Notes:
- |C|D|A|
Brand : CDA
Model : VW140
Category : Warming Drawer