
500M - Mouse Cougar - Free user manual and instructions
Find the device manual for free 500M Cougar in PDF.


| Product Type | Wired Gaming Mouse |
| Model | 500M |
| Brand | Cougar |
| Dimensions (L x W x H) | 125 x 70 x 40 mm |
| Weight | 100 g |
| Connection Type | USB 2.0 |
| Cable Length | 1.8 m braided cable |
| Sensor Type | Optical |
| DPI Range | 400 - 7200 DPI (adjustable) |
| Number of Buttons | 8 programmable buttons |
| Scroll Wheel | Scroll wheel with middle button |
| Lighting | RGB backlight (customizable) |
| Polling Rate | 1000 Hz |
| Software Support | Cougar UIX software for customization |
| Power Supply | Powered via USB (no batteries) |
| Maintenance & Cleaning | Wipe with dry cloth; keep away from liquids |
| Safety | CE, FCC certified; RoHS compliant |
| Spare Parts & Repairability | Only authorized service; no user-serviceable parts |
| General Information | Designed for e-sports and gaming |
Frequently Asked Questions - 500M Cougar
User questions about 500M Cougar
0 question about this device. Answer the ones you know or ask your own.
Ask a new question about this device
Download the instructions for your Mouse in PDF format for free! Find your manual 500M - Cougar and take your electronic device back in hand. On this page are published all the documents necessary for the use of your device. 500M by Cougar.
USER MANUAL 500M Cougar
UIX™ Instructions for Mice
2 1. Introduction
2 2. Install COUGAR UIX
3 3. Game Profile Management
7 4. Performance Panel
7 DPI Settings
7 DP What?
8 Unleash your sensor's power (DPI Adjustment)
9 Pinpoint Sniping
9 Polling Rate
9 Angle Snapping
10 Lift Height
10 Double Click Speed
10 Scroll Speed
11 Windows pointer speed and mouse acceleration
12 5. Key Assignment Panel
12 Basic Operation
12 Shortcut Setting
14 Basic Functions
15 Advanced Functions:
15 DPI Switch
16 Sniper Mode
16 Mode Switch
17 Instant Mode Switch
17 Launch Program
18 Media Functions
19 Macros
20 Macro Playback
20 Single Macro Mode
20 N Repetitions Macro Mode
20 Serial Macro Mode
20 Infinite Macro Mode
25 6. Lighting control
27 7. Checking your UIX's version
natural_image
Line drawing of a robotic device with a targeting device and a COUGAR logo (no text or symbols on the diagram itself)1. Introduction
Dear user,
We want to thank you for purchasing a COUGAR product. All aspects of COUGAR products have been designed with you, the gamer, in mind. We put all our skill in designing and producing tools that help you progress in gaming, whether it is for personal pleasure or for professional competition. UIX is not an exception.
UIX has been designed with a clear objective: to allow the user to easily enjoy the broad functionality COUGAR products and get the most out of them. As part of this effort, and even if it is not necessary to read an instruction manual to use UIX, we have provided this document to make sure you get the most out of your COUGAR Gear.
Before continuing, we would like to say a few words about mouse functionality: UIX has been written to provide you with a great power that carries with it the responsibility of using it properly. When participating in online gaming, or competitions, you should inform yourself about the functions that are allowed in the competition, and abstain from using disallowed capabilities. Online gaming is only as fun as we make it be, and keeping fair play is very important. In other words:
Use this power, but use it responsibly.
2. Install COUGAR UIX
To install COUGAR UIX, please follow the instructions in: http://www.cougargaming.com/downloads.html
3. Game Profile Management
Game profiles are complete sets that contain your device's configuration. All the UIX compatible COUGAR gaming peripherals can store up to three game profiles on board, which will be the ones that stay active. As for macros, the ones used in the on board profiles will be stored on the mouse; the rest will be stored on your computer.
Let's see how to define a Game Profile.
1- Go to Game Profile Management.
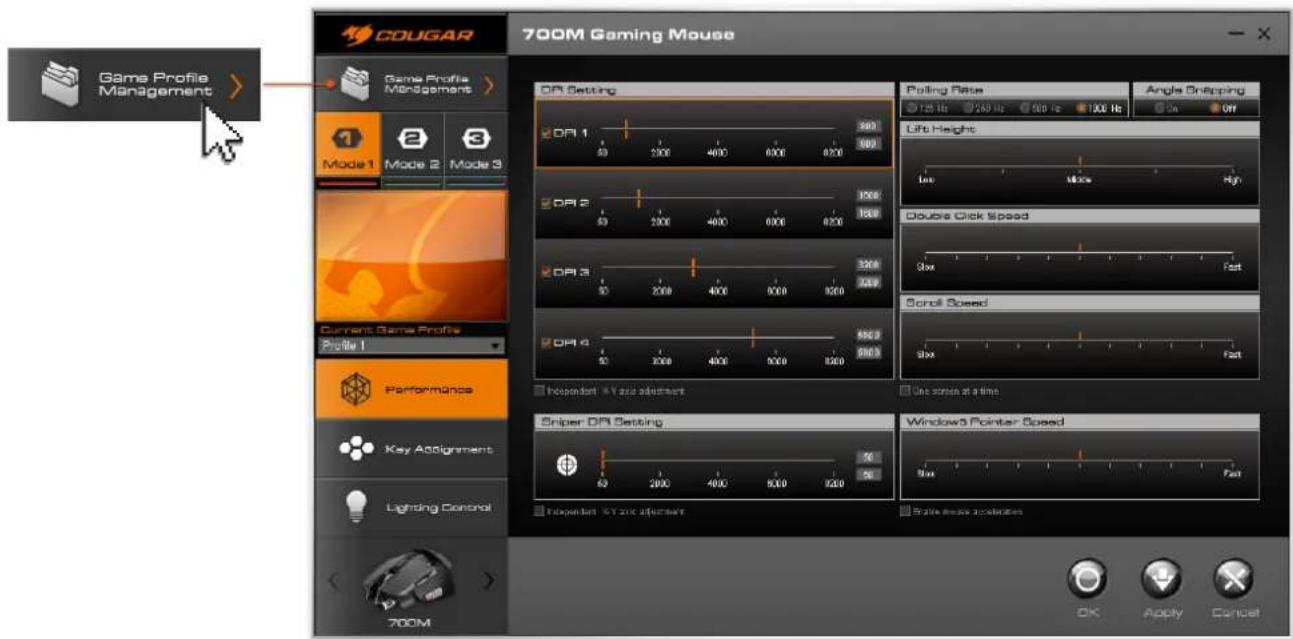
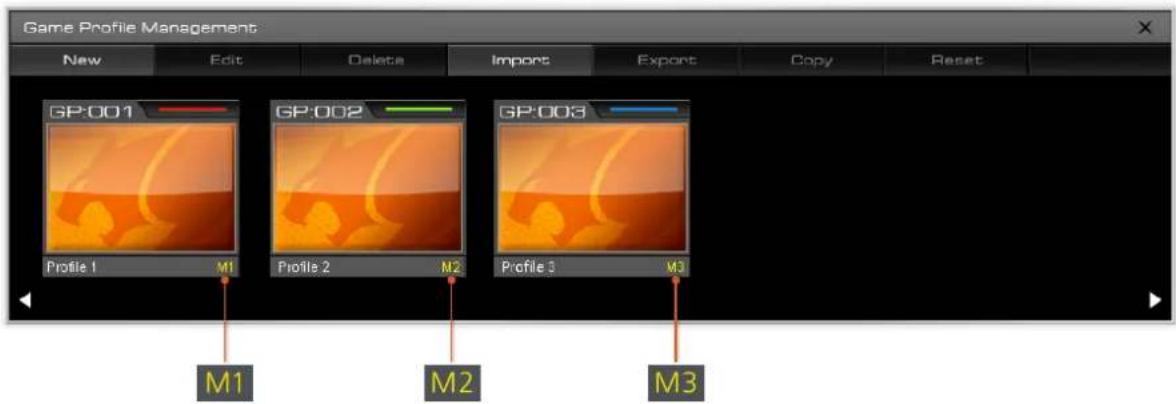
2- When you open UIX for the first time, you will see three profiles.
These three profiles are the ones currently active, and you can identify them through the small M plus number (1 to 3) that will appear on the lower right section of their icon.
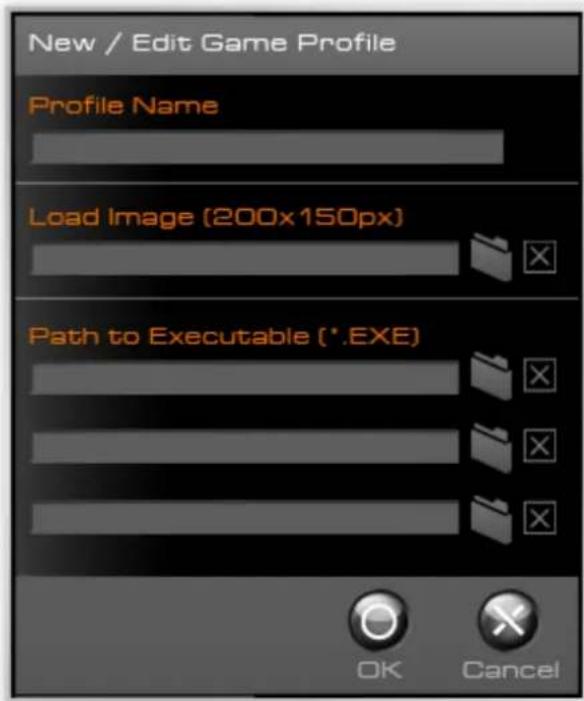
3- You can create new profiles by clicking on "New". When you click on "New", a pop-up window will appear, asking you to fill some fields.
Now, about the different fields:

Profile name is simply the name you want to give that specific profile. Usually it is best to choose a name that is closely related to the usage you plan to give it (for example, "healing spells" if you are setting it up to have quick access to buffs and boosts; or "racing games" if you are defining some settings that are useful for that genre). Alternatively, you can name profiles after different games or applications.
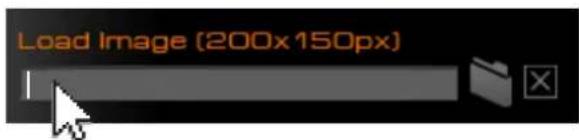
You can choose a BMP or JPG file up to 200x150 size to visually identify the profile.

The last three fields, "Path to executable", allow you to define up to three applications that will trigger the activation of this profile. This profile will automatically be selected when you launch any of these applications. Please mode that only currently active (i.e., loaded on the mice's on-board memory) profiles will launch upon launching their associated applications. Please remember that you need to choose the .exe file, not a shortcut like the ones you can find on your desktop.
4- After creating a new profile, it will be listed below, but it won't be active just yet.
4-1 Close the game profile management window

To make it one of the three active profiles, you need to close the game profile management window, choose one of the three active profiles in the mid left side of the UIX interface and open the sliding menu called current game profile.

From there, choose which of your profiles you want to associate with this mode and click "Apply".
5- With this done, we can go to the game profile management screen. We can see that our newly created profile shows a small M1 on its lower right area. This means that this is now the profile associated with Mode 1.

| New | Creating the new profile. |
| Edit | Edit will allow you to modify this profile's name, picture and the .exe files it is associated with. |
| Delete | The delete option cannot be used on active profiles. You can see the M1 in the lower right area of this profile indicates it is associated with mode 1, which means it is active and cannot be deleted. To delete an active profile, you need first to get out of the game profile management window and select a different profile as the current one for its mode first. Then you can go back to the profile management screen, select it, click on Delete and then "yes". This profile will then be deleted. |
| Import | The import button does exactly that, importing a per-existing profile .ini file. |
| Export | The export button will allow you to create a .ini file with this profile's information. Please note that only the currently selected profile will be exported. You can pick a name for the .ini file, which will be the preset name for the profile once it's imported. There is a default location for exported profiles, but you can select one of your choice. |

| Copy | The Copy button creates an exact copy of the selected profile. |
| Reset | The reset button will allow you to restore the default settings for any given profile. |
4. Performance Panel
Note: After changing any setting, please click 📄 for the changes to take effect.

Apply
To go to the Performance panel, click on the button with that name, located under the profile selection area
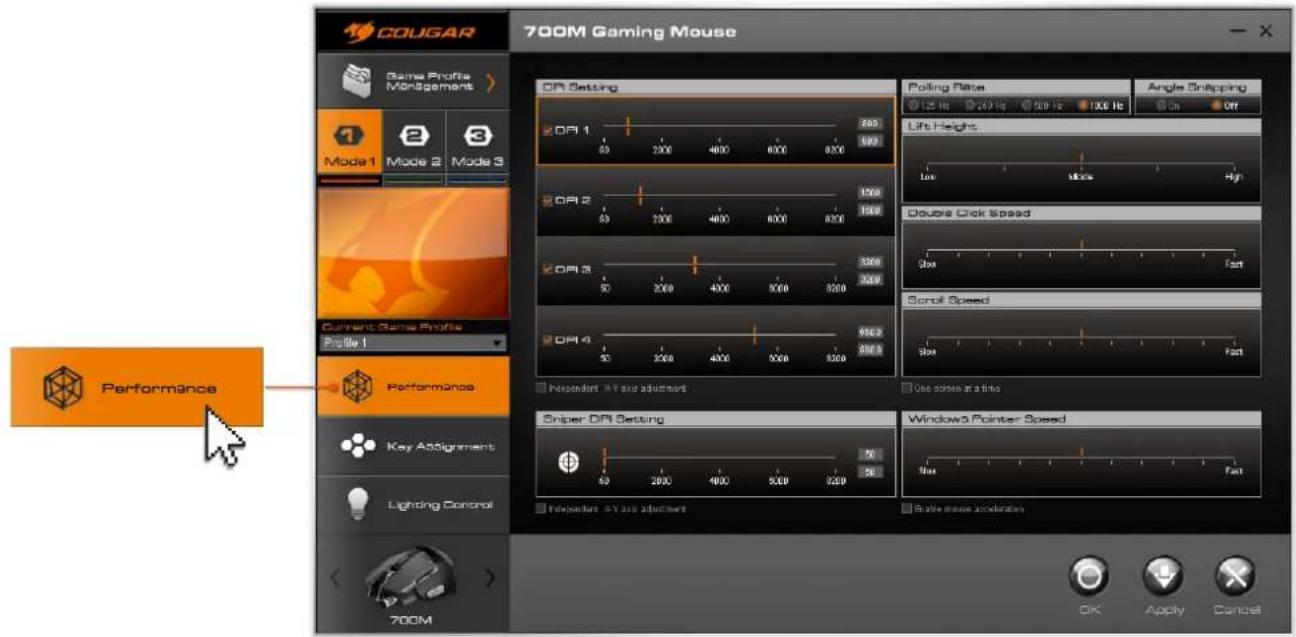
DPI Settings
DP What?
We know that most of you have this quite clear, but for those who don't, now is a good moment to learn! DPI means dot per inch, and it refers to the amount of signals your mouse sends every time you move it an inch. With a 1600 DPI setting, what you get is that a one inch movement will move 1600 dots in your screen. In other words, we could say that a higher DPI makes your mouse more sensitive.
This being said, and while it's important to be able to choose from a wide range of DPI levels, the right DPI will be different for each person. If your screen is especially big, you might want to go for higher DPI settings. If it is small, reducing the DPI level should allow you to be more precise. Another factor that needs to be taken into account is the kind of games that you play, and your personal gaming style. For most users, DPI levels between 1500 and 2000 are good for normal use. Higher resolution/size screens tend to require higher DPI levels and vice-versa. Ultimately it is up to you to decide which is the DPI level that you should use.
Unleash your sensor's power (DPI Adjustment)
Please note that the accuracy with which you will be able to set the DPI levels will vary from model to model. Some models will allow for extremely precise DPI selection, while others will provide a smaller number of choices at some key points.
Having made this clear, let's see what UIX can do for us.
Activation
The box to the left of each mode's name allows us to set it as either activated or deactivated. If we are going to need only two different modes, we can simply keep those two activated. The long bar we see is what allow us to set the specific DPI level for each DPI mode. (Each model has a different amount of DPI modes).

Independent X and Y axis DPI level
(Please note: This feature is not available in all models).
To the right of that bar you will see an X and an Y: these field allow you to independently adjust the DPI level for vertical and horizontal movements. This can be useful for games in which you are required to turn left or right quickly, but that require aiming precisely in the vertical axis to achieve head shots. To be able to set independent values for the X and Y axis, you need to check the box for this under the DPI settings section.
Under DPI settings we can find another section called Sniper DPI section.

This section allows us to set the DPI settings that will become active when you press the Sniper mode button, and stay so until we release it. As with the standard DPI settings, you can adjust independently the DPI levels for the X and Y axis by checking the box under that section. For more information about this mode, see the section about customizing functionality.
(Learn more about the Sniper mode in the section about the Key Assignment Panel).
Polling Rate

First of all we need to understand what the Polling Rate is. The Polling rate is the frequency with which the computer receives input from the mouse. The higher the polling rate, the shorter the response time, allowing you to have your movements transformed into input faster. 1000Hz provide a response time of 1ms, which should be more than enough for... well, anything. To determine which is the best polling rate for you, we recommend that you try yourself the different modes.
Angle Snapping

This function allows you to make mouse movements smoother and tending towards straight lines. Some users enjoy this feature, while others prefer to keep their natural movements without any additional assistance.

This sections allows you to define the height at which the mouse will stop providing input. If you choose "low", the mouse will stop responding almost immediately upon being lifted. If you choose "high", the mouse will still provide input even when you lift it moderately. The right level for this parameter depends entirely on your grip style.
Double Click Speed
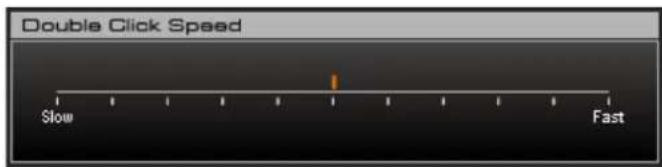
This allows you to define how close in time two clicks need to be to be counted as a double click. Setting it to "slow: will mean that even two moderately separate clicks will counts as a double click, while moving towards "fast" will mean that those clicks need to be progressively closer in time to be counted.
As with other settings, the right speed will vary for each person: experiment and find your optimal speed!
Scroll Speed
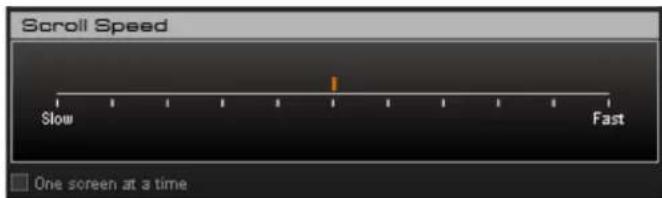
This section allows you to define how much the screen will move when the scroll wheel is rolled up and down. Setting it closer to "Slow" will allow for small and precise movements, while setting it closer to "Fast" will allow you to move bigger distances with small wheel movements.
Which setting is better will depend entirely on the use you are going to give a specific configuration profile.
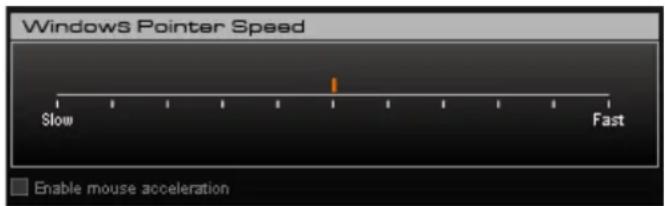
This section allows you to adjust the Windows Pointer Speed. Setting it to Slow will provide you with slower mouse movements, and the opposite applies it you set it closer to Fast. Please note that there is a difference between this and adjusting the DPI mode. Even if both can affect the speed with which the mouse pointer moves on the screen, the resulting feel is quite different. We recommend that you try both approaches for yourself and find the point in which you feel most comfortable. The same applies to the possibility of enabling mouse acceleration: activating this option will make mouse movement speed in real life affect the on screen movements. In other words, if we move the mouse three inches at a given speed and the mouse moves X dots on screen, and then we move it again three inches, only faster, the on-screen result will be that the mouse will move a longer distance.
Some users thoroughly enjoy this feature, while others prefer not to make use of it.
5. Key Assignment Panel
Note: After changing any setting, please click 📄 for the changes to take effect.

Apply
Basic Operation
Here we can see a COUGAR 700M without any function implemented in this profile.
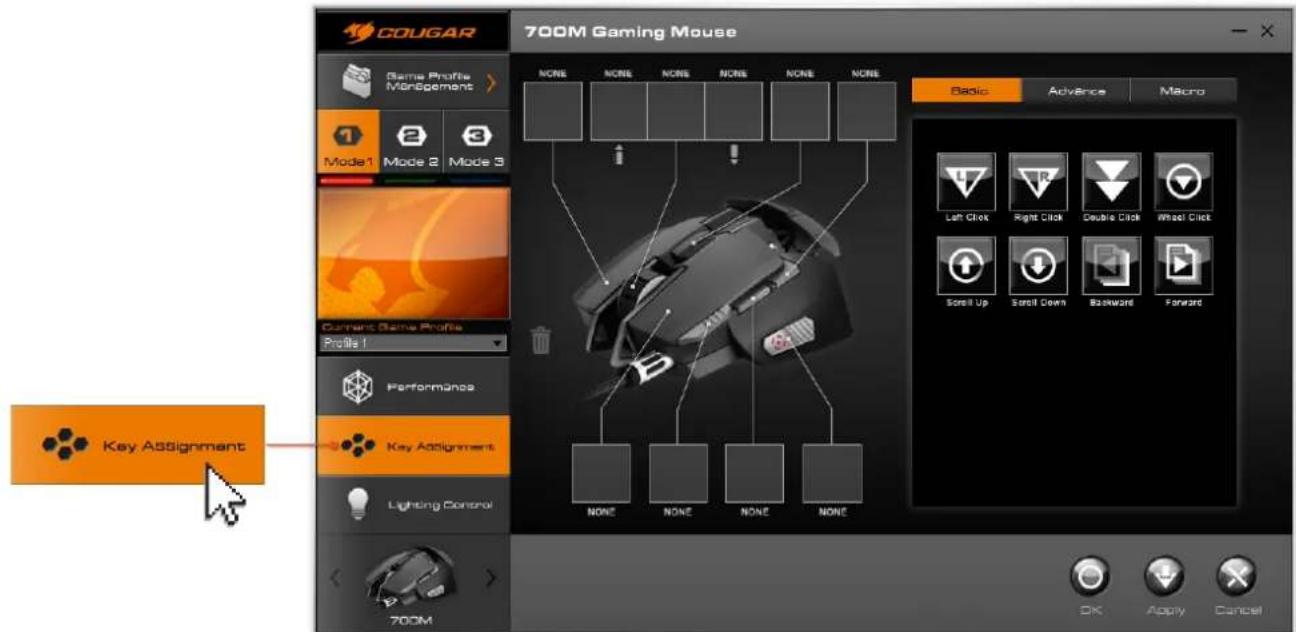
To add any function to a specific button, we need to drag the function's icon from the panel on the right to the box corresponding to the button in which we want to use that function.
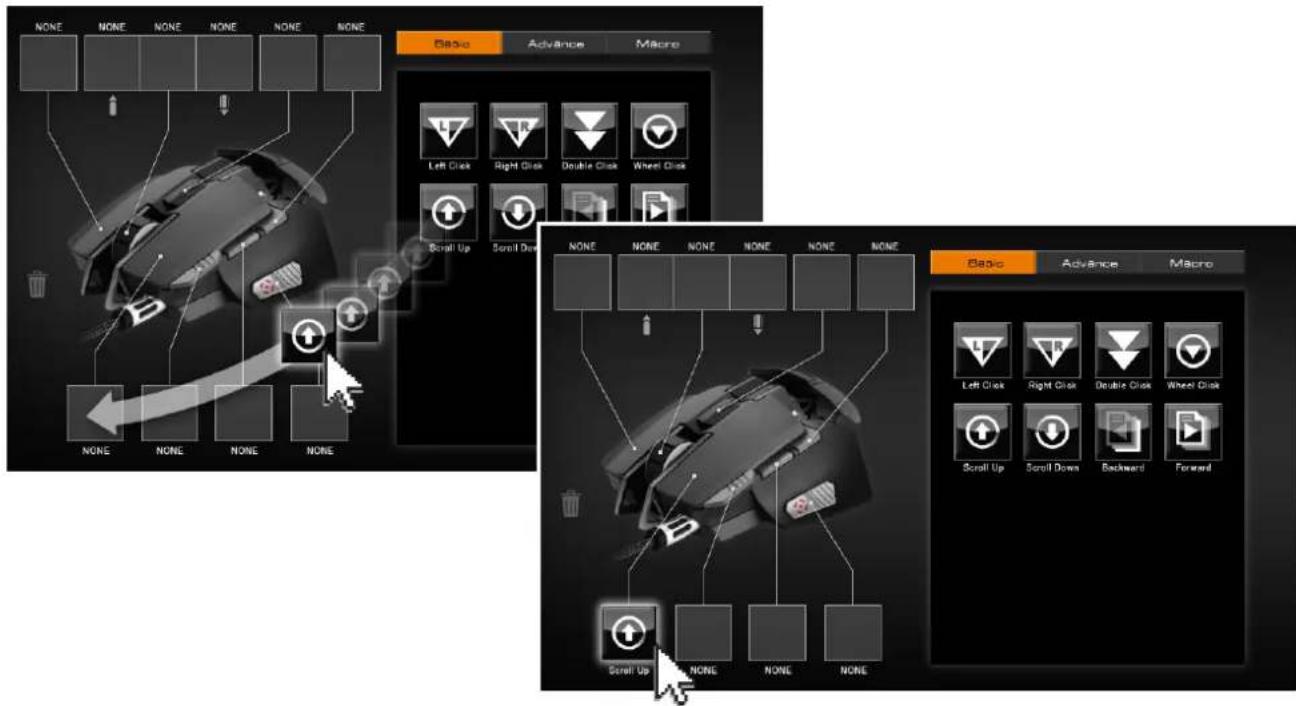
To remove a function, simply drag its icon from the box of the button it is assigned to to the trash can icon.

flowchart
graph TD
    A["User with scroll icons"] --> B{Move to scroll icons}
    B --> C["Check for scroll"]
    C --> D["Action: Left Click, Right Click, Double Click, Wheel Click"]
    D --> E["Control buttons: Scroll Up, Scroll Down, Backward, Forward"]
    E --> F["Action: None"]
    F --> G["End"]
The spaces for icons are linked clearly to their button, and the button spaces below are linked to the wheel up and down movements:

Shortcut Setting
Please note that by double clicking an empty box you can access the shortcut setting mode: you can input a key combination to associate it with a specific button.

Let's have a look now at the functions UIX offers:
5-1.Basic Functions
Those function are essentially the "normal" mouse functions that appear on most standard mice on the market, and no further explanation is needed for them.

Within the Advanced Functions panel, you will find that you have quite a broad range of functions to choose from. Let's see what they can do for you.

DPI Switch
DPI Switch

DPI 1
Sets the DPI mode to the first DPI setting defined for the current game profile mode.

DPI 4
Sets the DPI mode to the fourth DPI setting defined for the current game profile mode.

DPI Cycle
Same as DPI Up, but upon reaching mode 4 it will go back to mode 1 if pressed again.

DPI 2
Sets the DPI mode to the second DPI setting defined for the current game profile mode.
DPI Up
Goes to the next DPI mode in ascending order (e.g. if you are using the DPI mode 2, using this function it will activate the DPI mode 3).

DPI 3
Sets the DPI mode to the third DPI setting defined for the current game profile mode.

DPI Down
Goes to the next DPI mode in descending order (e.g. if you are using the DPI mode 2, using this function it will activate the DPI mode 1).
The Sniper DPI function will activate the DPI settings defined for sniper mode for as long as the button is kept pressed. Upon release of the button, the DPI settings will go back to the previous one.
Sniper

Sniper DPI
Mode Switch
Mode Switch

Mode 2 Mode 1 Mode 3
The Mode 1, 2 and 3 functions allow you, by pressing the button to which they are assigned, to change the active game profile mode to the mode 1, 2 or 3 respectively. Please note that this is different from the DPI modes, and that each game profile mode contains its own DPI modes.



Mode Up Mode Down Mode Cycle
Mode Up and Mode Down will move to the next game profile mode in ascending or descending order respectively, while Mode Cycle will move in ascending order and go back to mode 1 after mode 3 has been reached.
Mode Up and Mode Down will move to the next game profile mode in ascending or descending order respectively, while Mode Cycle will move in ascending order and go back to mode 1 after mode 3 has been reached.
Ins.Mode Switch


I-Mode 1, 2 and 3 switch the mouse to the game profile mode 1, 2 or 3 respectively, but do so only for as long as the button associated to the function is pressed; upon release of the button, the game profile mode will go back to the previous one.
Launch Program
Launch Program

Quick Launch
I-Mode 1, 2 and 3 switch the mouse to the game profile mode 1, 2 or 3 respectively, but do so only for as long as the button associated to the function is pressed; upon release of the button, the game profile mode will go back to the previous one.
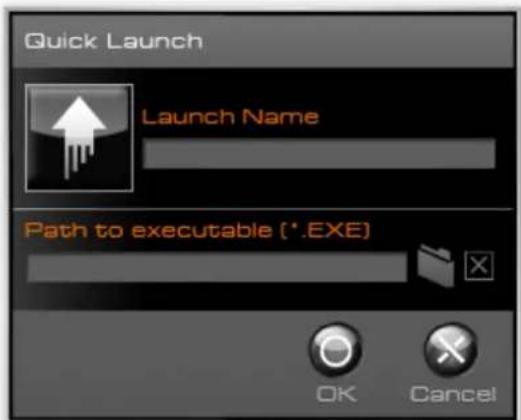
You will need to select a specific .exe file. Every time you press the button associated with this function, the .exe file will run and the selected program will be launched.
Please note that you can select a picture to represent this application by clicking on the upwards arrow icon you can see in this window.
Media Function



Stop Previous TrackPlay/Pause
Next Track

Volume Up Volume Down Mute
These functions are pretty straightforward and should not require any explanation.
flowchart
graph TD
    A["New Group"] --> B["Macro"]
    B --> C["New / Edit Macro Group"]
    C --> D["Group Name"]
    D --> E["OK"]
    D --> F["Cancel"]
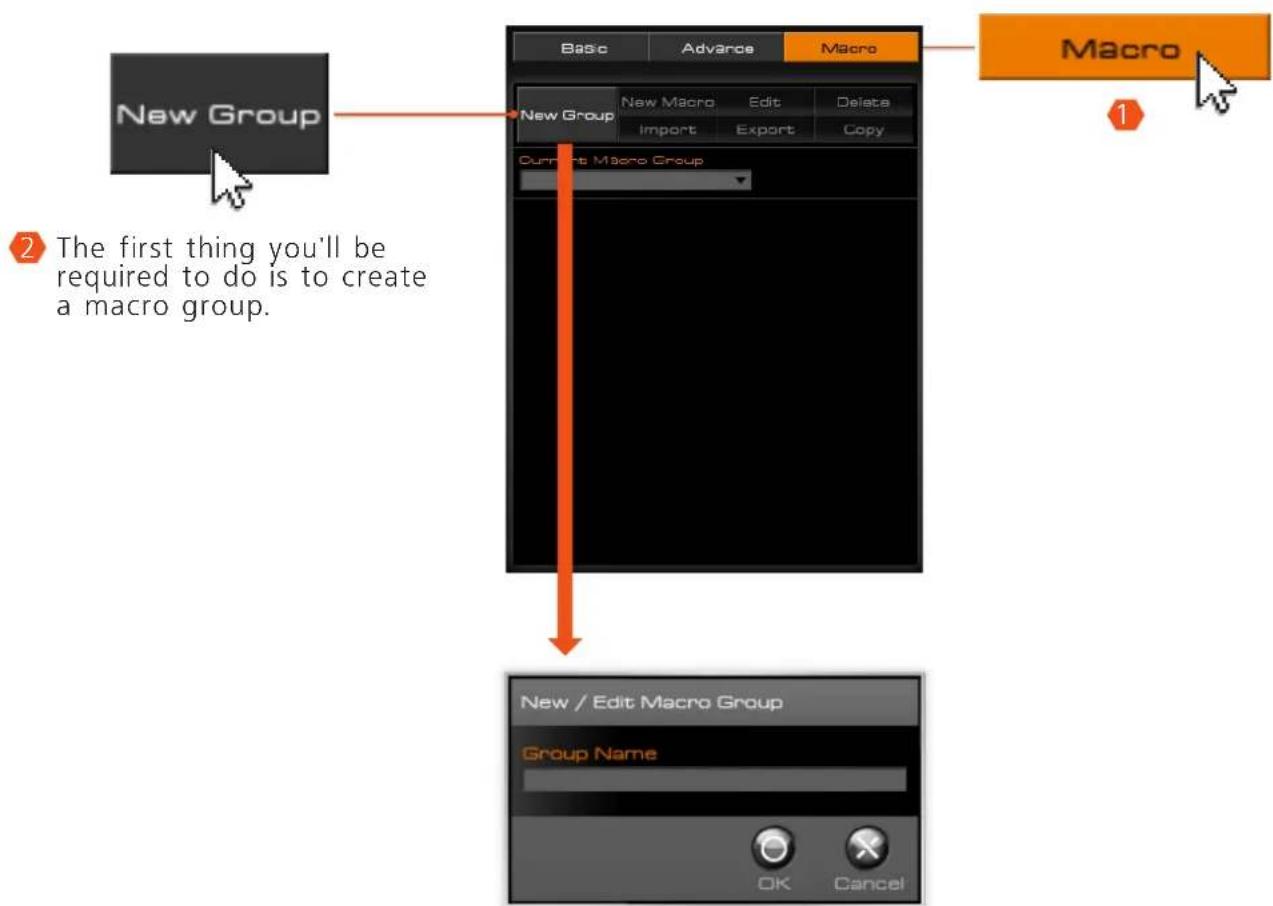
3 To do so, click on New Group and give a name to the macro group.

We will then access the New / Edit Macro window, which allows us to define a macro and its settings. The first thing that we need to define is the macro's name. After doing so, we have three parameters that we must define and will affect the macro.

Macro playback

Single Macro Mode
When this option is chosen, the macro will be played a single time when the associated button is pressed.


N Repetitions Macro Mode
This mode will allow you to define exactly how many times will the macro be executed upon pressing the associated button a single time.
Serial Macro Mode
This option will define the macro's behavior so that it repeats itself for as long as the button associated with it is kept pressed. When the button is released, the macro being currently executed will continue until it's finished, but a new one will not be started.

Infinite Macro Mode
When this mode is selected, the macro will start being executed, and it will repeat itself once and again until the button is pressed again; when this happens it will finish the current execution and stop being repeated.

Record mouse movement

Record mouse movement offers us three different choices related to the macro. First and foremost, it gives us the choice of not recording the mouse's movements, to record absolute coordinates and to record relative coordinates. The first one will omit the mouse movements from the recording process, while the second will record its absolute coordinates and the third will record the mouse's movements with respect to its previous position. Absolute coordinates is especially suitable for games in which you have menus in specific positions such as RTS, etc. Selecting relative coordinates is good for FPS. Ultimately, the specific characteristics of the game will determine which is the most suitable mode.
Delay time
Delay time

Record delay time

Fixed delay time


Ignore delay time
Delay time gives us three choices as to the amount of time that will lapse between each of the macro's components. The first option, record delay time, will record the actual time that lapsed between two inputs in the macro. The second option, fixed delay time, will add a fixed amount of time, measured in milliseconds, between each input. The third option will make all components of the macro consecutive, without time between them.
Under these settings we've got the list of input components of the macro.

No.

The first column, No., simply indicates the order in which the actions listed will be performed when the macro is executed.
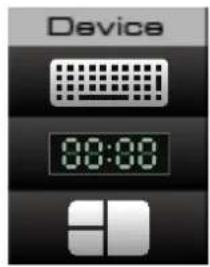
The second column, Device, indicates whether that input comes from the mouse or from the keyboard.
This icon indicates that the action comes from keyboard input.

This icon indicates that the action comes from mouse button input.

This indicates that the action is a mouse movement.

This indicates that what is recorded is the lapse of an amount of time between other inputs.
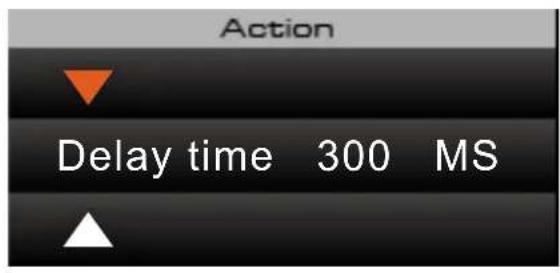
The Action column does exactly that, indicate which is the action that will be performed. Finally, the "Key:

This indicates that the action is pressing a button or key

This indicates that the action is releasing a button or key
Delay time 300 MS
This indicates the amount of time that will be recorded in the macro between two actions, measured in milliseconds.
Relative X:349 Y:-62
This indicates that the action is a relative mouse movement. Positive numbers mean movement upwards for the Y axis and rightwards for the X axis. Negative numbers mean movement downwards for the Y axis and leftwards for the Y axis.
Absolute X:644 Y:56
This indicates that the action is an absolute mouse movement. Absolute movements indicate the position of the mouse pointer taking the whole screen as a reference.
Device
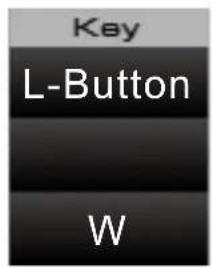
Finally, the Key column indicates which key or mouse button is the action coming from.
6. Lighting control
Note: After changing any setting, please click 📄 for the changes to take effect.

Apply
This is the UIX section that allows you to take full advantage of compatible COUGAR mice's impressive visual capabilities.
Since, for obvious reasons, the backlights will be different for each model, we will only comment that

1- You have three lighting modes:

Breathing
Breathing
A breathing light effect will give your mouse an aura of life, producing an impressive result.

Fully lighted
Fully lighted
The LED lights will show their full power permanently.

Off
Off
No lights.
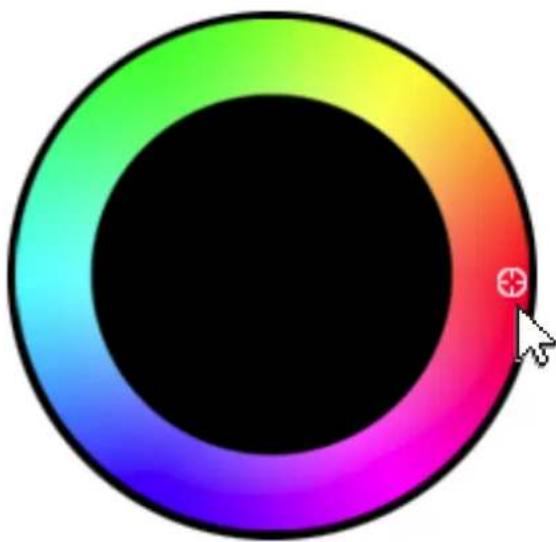
2- There are three ways to choose the color: by clicking on the wheel to pick the one you want, by entering the exact RGB (Red-Green-Blue) amount you want or to pick one from the ones we preselected.
natural_image
Circular gradient ring with a black center and rainbow color bands, featuring a cursor pointer at the bottom right (no text or symbols)- By clicking on the wheel to pick the one you want.

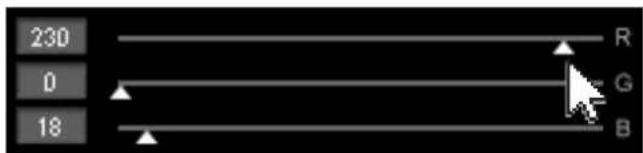
- By entering the exact RGB (Red-Green-Blue) amount you want.

natural_image
Color palette bar with gradient and color swatches, no text or symbols present- To pick one from the ones we preselected.
7. Checking your UIX's version
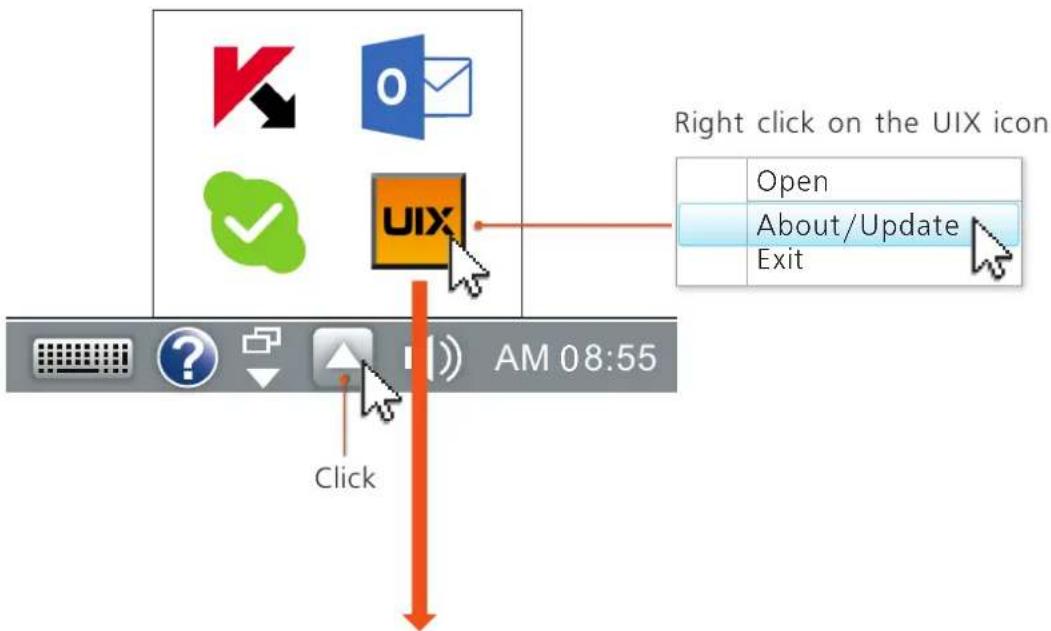
To know which version of UIX you're currently using, please click on the upwards arrow on the Windows Task Bar, right click on the UIX icon on the pop-up that will appear and click About/Update.


- Introduction
- Install COUGAR UIX
- Game Profile Management
- 1- Go to Game Profile Management.
- 2- When you open UIX for the first time, you will see three profiles.
- Performance Panel
- DPI Settings
- DP What?
- Unleash your sensor's power (DPI Adjustment)
- Activation
- Independent X and Y axis DPI level
- Polling Rate
- Angle Snapping
- Double Click Speed
- Scroll Speed
- Key Assignment Panel
- Basic Operation
- Shortcut Setting
- 5-1.Basic Functions
- Sniper
- Mode Switch
- Mode Up Mode Down Mode Cycle
- Ins.Mode Switch
- Launch Program
- Quick Launch
- Media Function
- Macro playback
- Single Macro Mode
- N Repetitions Macro Mode
- Serial Macro Mode
- Infinite Macro Mode
- Record mouse movement
- Delay time
- Device
- Lighting control
- 1- You have three lighting modes:
- Breathing
- Fully lighted
- Off
- Checking your UIX's version
Brand : Cougar
Model : 500M
Category : Mouse