HNW600ACU - Network card / adapter Hamlet - Free user manual and instructions
Find the device manual for free HNW600ACU Hamlet in PDF.


| Product Type | Network card / adapter |
| Model | HNW600ACU |
| Brand | Hamlet |
| Interface | USB 3.0 / USB-C (compatible with USB 2.0) |
| Wireless Standards | IEEE 802.11ac, 802.11a/b/g/n |
| Frequency Bands | 2.4 GHz and 5 GHz |
| Maximum Data Rate | Up to 600 Mbps (2.4 GHz: 300 Mbps, 5 GHz: 300 Mbps) |
| Antenna | Built-in dual antenna |
| Security | WEP, WPA/WPA2, WPA3 |
| Operating Systems Supported | Windows 10/11, macOS, Linux |
| Dimensions (L x W x H) | 80 x 25 x 12 mm |
| Weight | 20 g |
| Power Supply | USB bus-powered (5V, 500 mA) |
| Operating Temperature | 0°C to 40°C |
| Storage Temperature | -20°C to 70°C |
| Humidity | 10% to 90% non-condensing |
| Maintenance | Keep dry; clean with a soft, dry cloth |
| Safety Precautions | Avoid exposure to moisture and extreme temperatures; do not disassemble |
| Spare Parts & Repairability | Not user-serviceable; contact Hamlet support for warranty service |
| General Information | Compatible with desktops, laptops, and smart TVs; plug-and-play installation |
Frequently Asked Questions - HNW600ACU Hamlet
User questions about HNW600ACU Hamlet
0 question about this device. Answer the ones you know or ask your own.
Ask a new question about this device
Download the instructions for your Network card / adapter in PDF format for free! Find your manual HNW600ACU - Hamlet and take your electronic device back in hand. On this page are published all the documents necessary for the use of your device. HNW600ACU by Hamlet.
USER MANUAL HNW600ACU Hamlet
natural_image
Black wireless router with antenna and USB port, isolated on white background (no text or symbols visible)USER MANUAL
HNW600ACU
Table of Contents
1. Introduction......4
1.1 Product Features ....4
1.2 Package contents ....4
2. Wireless USB Adapter Installation.... 5
2.1 Driver Installation....5
2.2 Connect to Wireless Access Point....8
3. Client Utility.... 15
3.1 Connection Profile Management ....15
3.2 General Information, Status and Network Statistics ......20
3.3 Other Settings....22
3.4 Establish secure connection using WPS 23
4. Soft AP Function ...... 27
4.1 Switch to AP Mode and Station Mode 27
4.2 Advanced Settings....30
4.3 Wireless Statistics....31
4.4 Internet Connection Sharing (ICS)....32
5. Troubleshooting 33
Dear Customer,
thanks for choosing an Hamlet product. Please carefully follow the instructions for its use and maintenance and, once this item has run its life span, we kindly ask You to dispose of it in an environmentally friendly way, by putting it in the separate bin for electrical/electronic waste, or to bring it back to your retailer who will collect it for free.

Responsibility Statement
The European importer declares that this product is compliant with CE standards. Importer references and contact details available on www.hamletcom.com in the “About Us” section.
The importer for Italy is:
The complete CE declaration of conformity of the product can be obtained by contacting Hamlet at info@hamletcom.com.
The information on the importer for your country are available in the “About Us” section of the Hamlet website at www.hamletcom.com.
We inform You this product is manufactured with materials and components in compliance with RoHS directive 2011/65/EU, with RAEE directive 2002/96/CE, 2003/108/EC Italian Legislative Decree 2005/151 and EMC 2004/108/EC, R&TTE 1999/5/EC, LVD 2006/95/EC directives for the following standards:
EN 60950-1: 2006 + A11: 2009 + A1: 2010 + A12: 2011, EN 62311: 2008,
EN 300 328 V1.7.1, EN 301 489-1 V1.9.2, EN 301 489-17 V2.2.1.
CE Mark Warning
This is a Class B product. In a domestic environment, this product may cause radio interference, in which case the user may be required to take adequate measures.

Trademarks and Changes
All trademarks and company names mentioned in this document are used for description purpose only and remain property of their respective owners.
The material in this document is for information only and subject to change without notice.
Specifications and appearance are subject to change without prior notice.
1. Introduction
Hamlet Wi-Fi 600AC USB adapter upgrades your notebook or desktop to the standard 802.11ac, the next generation wireless technology that offers high speed and stability. The Dual Band support allows wireless connection speed up to 433Mbps on the 5GHz band, ideal for HD video streaming and online gaming, and up to 150Mbps on the 2.4GHz frequency for web surfing, providing the router supports such speeds too.
1.1 Product Features
- Complies with IEEE 802.11ac, IEEE 802.11a, IEEE 802.11n, IEEE 802.11g and IEEE 802.11b wireless standards
• Supports 5GHz and 2.4GHz frequency bands - Wireless data rates: up to 433Mbps (5GHz); up to 150Mbps (2.4GHz)
- RTL8811 chipset
- Wireless range: 15 m
- External omni-directional detachable Antenna (3dBi)
• Transmit Power (EIRP): 100mW
• USB 2.0 interface connection (480Mbps)
• Supports 20MHz/40MHz/80MHz frequency width - Auto-detects and changes the network transmission rate
- Provides two work modes: Infrastructure and Ad-Hoc
• Supports Soft AP to establish your wireless LAN networking - Supports 64/128-bit WEP, WPA, WPA2 encryption methods and 802.1x security authentication standard
• Supports WPS (Wi-Fi Protected Setup) encryption method - Easy plug and play installation
• Dimensions (L x W x H): 47 × 19 × 12 mm (without antenna) - Compatible with: Windows XP/Vista/7 and 8, Mac OS X 10.4 or above, Linux
1.2 Package contents
The Wireless USB Adapter package includes the following.
- Wireless USB Adapter
- Quick Installation Guide
- Driver CD
The latest drivers are available on the website www.hamletcom.com
2. Wireless USB Adapter Installation
This chapter is to assist you how to use the included CD-ROM which comprises the Driver and the Client Utility Interface.
2.1 Driver Installation
Please follow the following instructions to install your new wireless USB Adapter.
- Insert the USB wireless network adapter into an empty USB 2.0 port of your computer when computer is switched on.
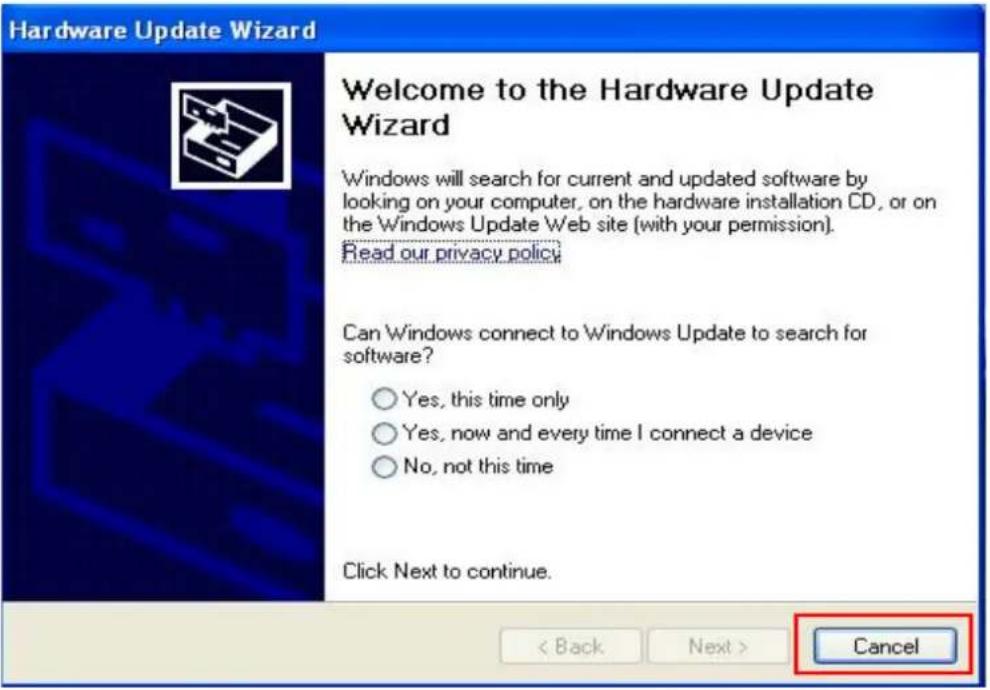
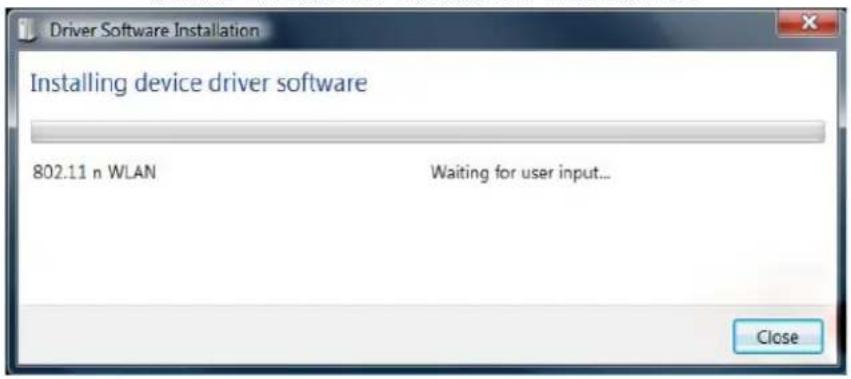
- If the following message will appear on your computer, click Cancel/Close.
Under Windows XP
Under Windows Vista and Windows 7
- Insert the driver CD into your CD-ROM. The autorun screen below will appear. if not, you can double click autorun.exe file on CD.
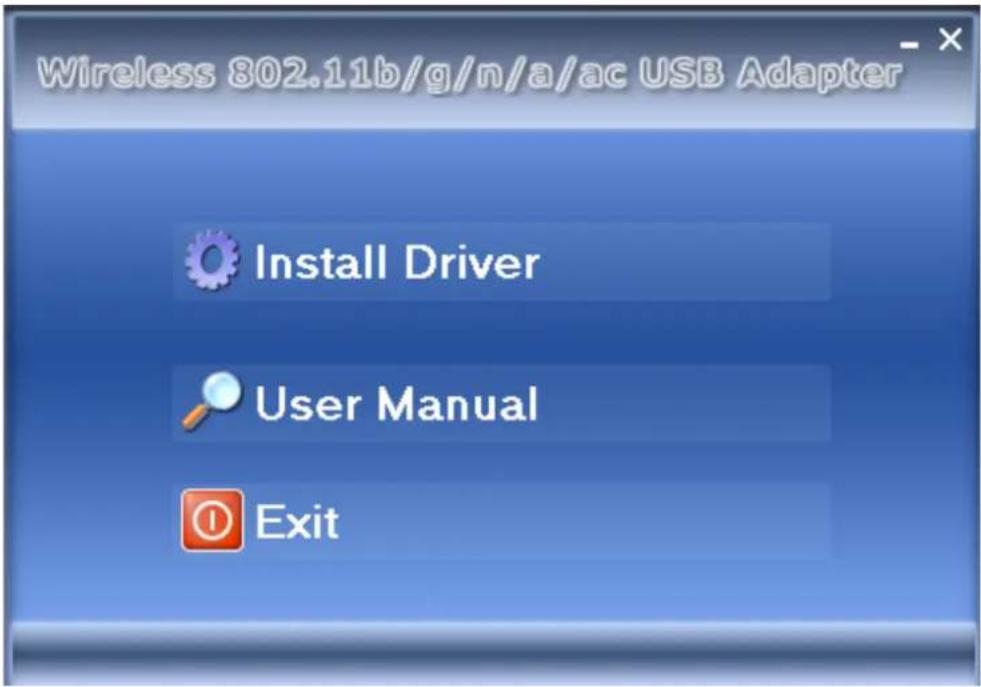
- Click Install Driver to start the installation procedure.
- Follow the installation wizard and click Next to continue.
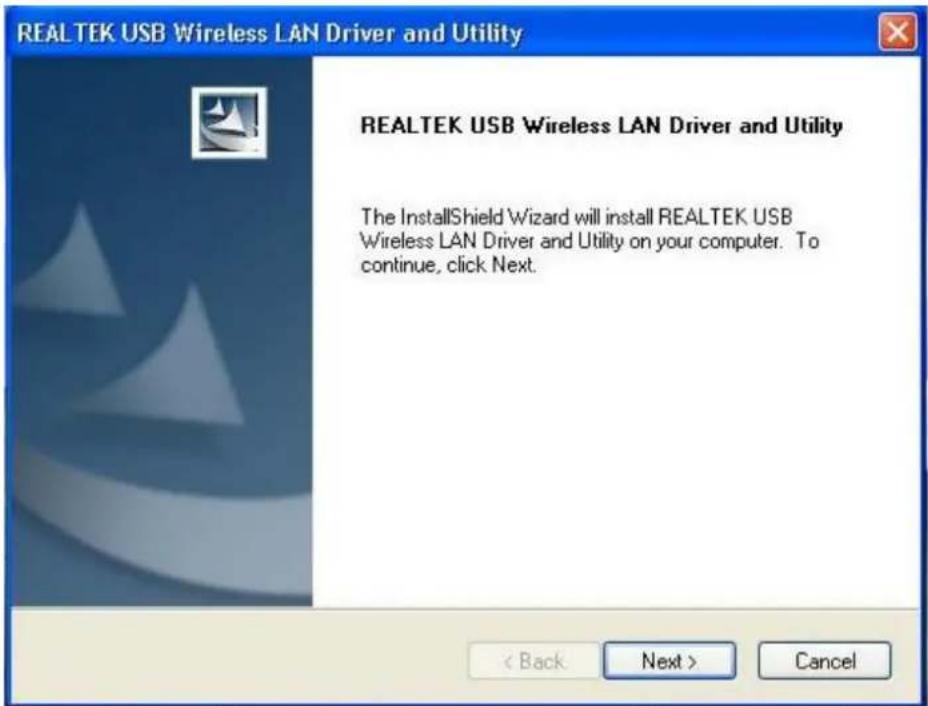
- Once the installation is finished the computer will be asked to reboot. you can click Finish and reboot the computer to finish the installation of driver files.
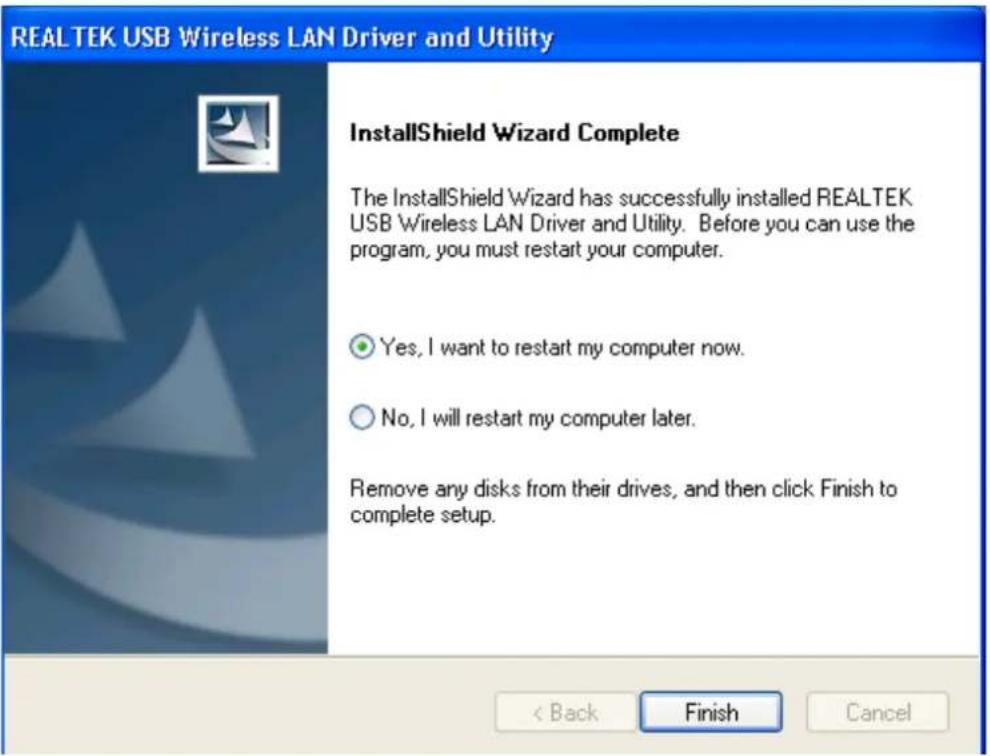
After the installation the new icon of the wireless utility software will appear on the desktop and near the clock in the system tray.

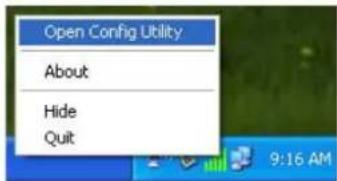
Left-click the icon will launch wireless network configuration utility, and you can right-click the icon to show the quick menu of configuration utility.
This icon also uses different color to show the status of wireless connection:

Wireless connection is established, good signal reception.
Wireless connection is established, weak signal reception.
Connection is not established yet.
Wireless network adapter is not detected.
For detailed instructions of wireless network configuration utility, please see next chapter.
2.2 Connect to Wireless Access Point
To use wireless network, you have to connect to a wireless access point first. You can either use Client utility (comes with network adapter driver), or Windows Zero Config utility (comes with Windows operating system).
Using Client Wireless Utility
Please follow the following instructions to use Client configuration utility to connect to wireless access point.
- Left-click the Client configuration utility icon located at lower-right corner of computer desktop, and configuration menu will appear.

- Wireless utility will appear. Click Available Network menu to search for wireless access points nearby.
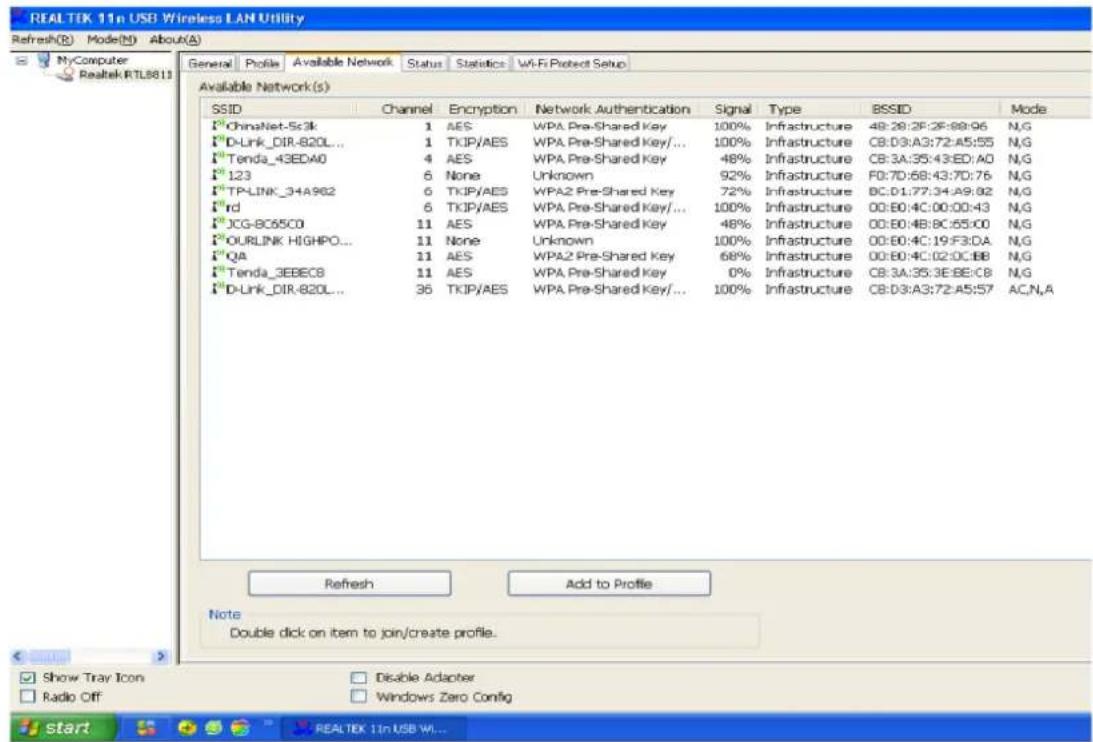
Please wait for a while, and all wireless access points which can be reached by this wireless network adapter will be displayed here.
If the wireless access point you wish to connect does not appear here, you can click Refresh button to scan for wireless access points again; if the wireless access point you're looking for still not appear, try to move the computer closer.
- When the access point you're looking for is on the list, double click it or click Add to Profile.
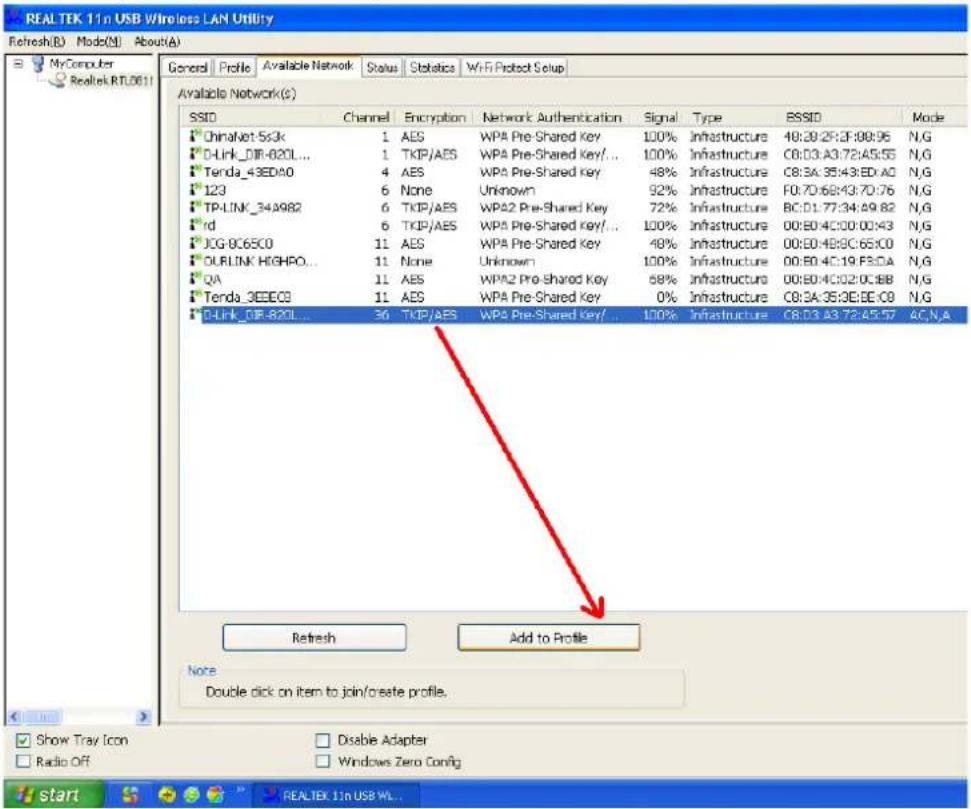
- If a password ("Network Key") is required to access the wireless access point, please input it in Network key text field (and input it again in Confirm network key for confirmation).
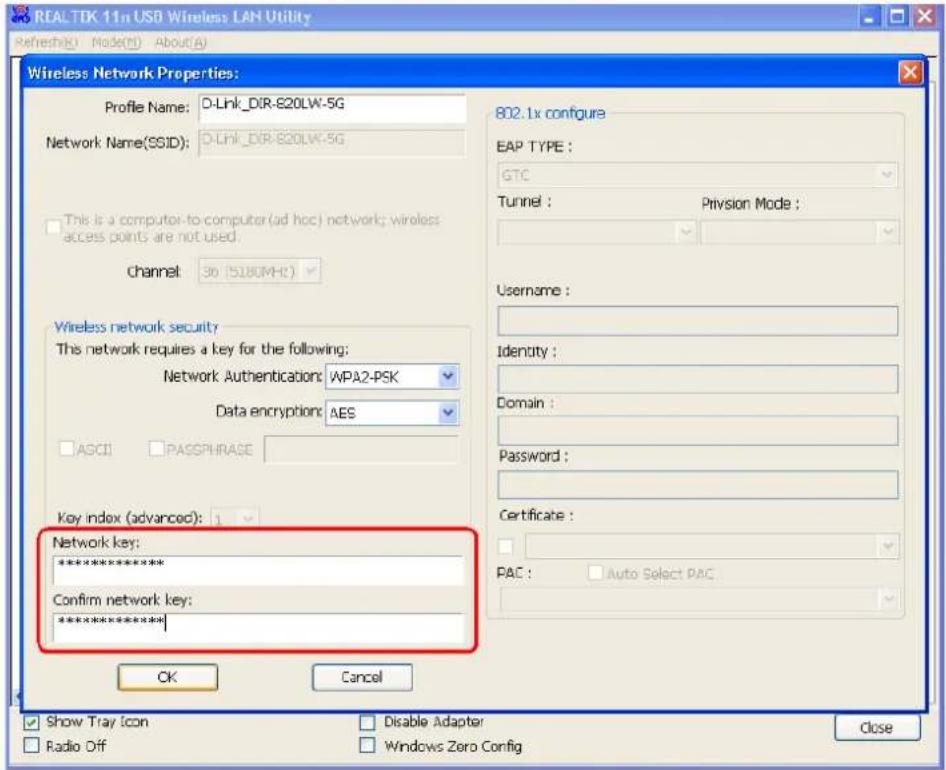
NOTE: Network security type (Network Authentication and Data encryption) will be selected automatically based on wireless access point's security setting. It's not required to change these settings by yourself.
- After the password is properly inserted, click OK to confirm.
The network adapter will attempt to connect to access point now, this may require few seconds to minutes. When the “Status” become “Associated”, your computer is connected to access point you selected and you can close the client configuration utility.
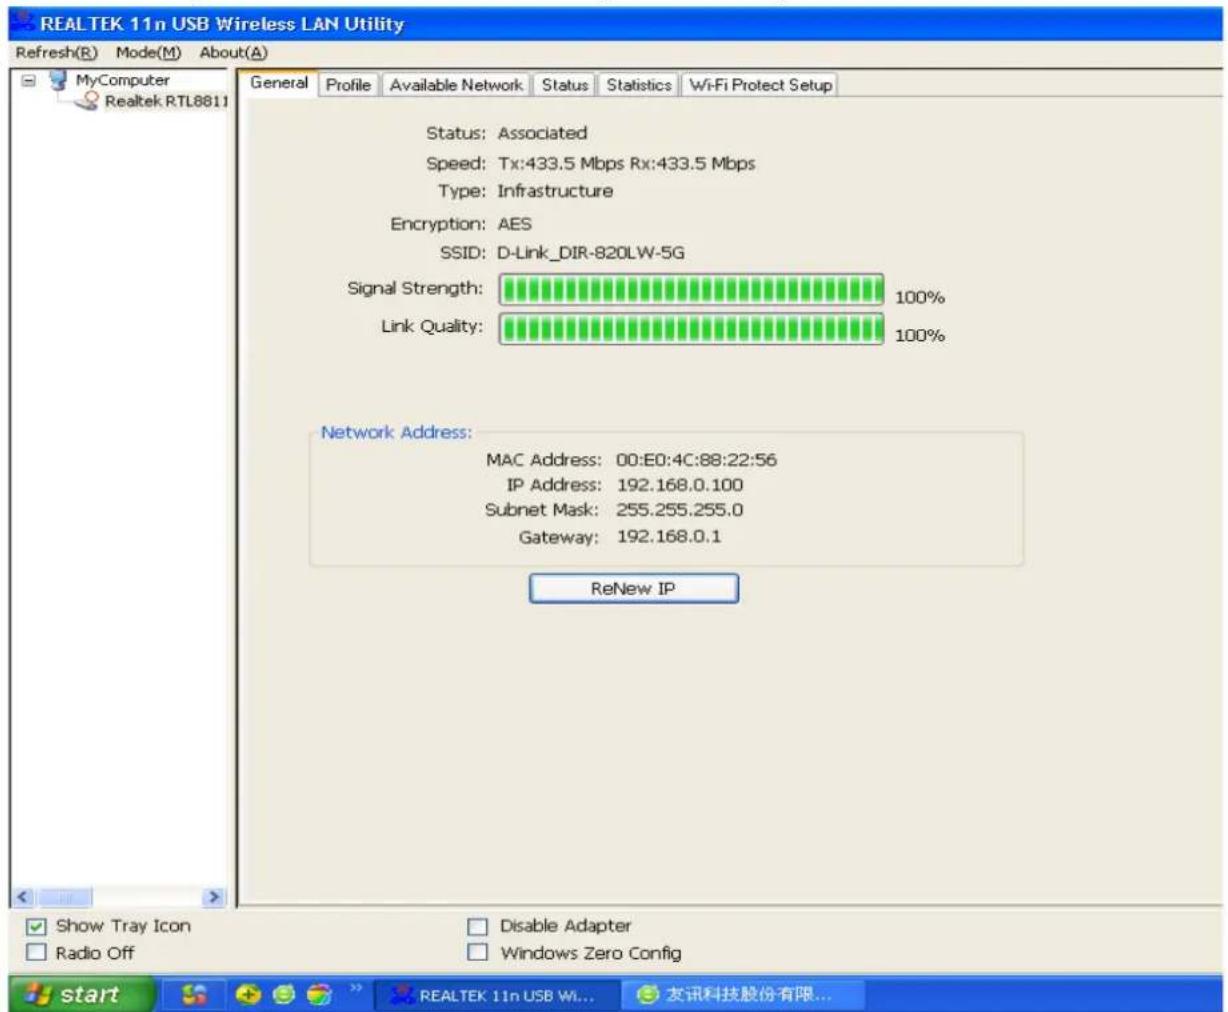
NOTE: If you connected to an access point but the connection has been dropped soon, please check security settings and re-check password spelling.
Using Windows Zero Configuration
Windows XP and Vista has a built-in wireless network configuration utility, called as "Windows Zero Configuration (WZC)". You can also use WZC to configure your wireless network parameter.
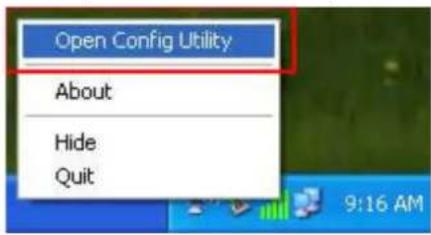
- Right-click Client configuration utility icon and click Open Config Utility.
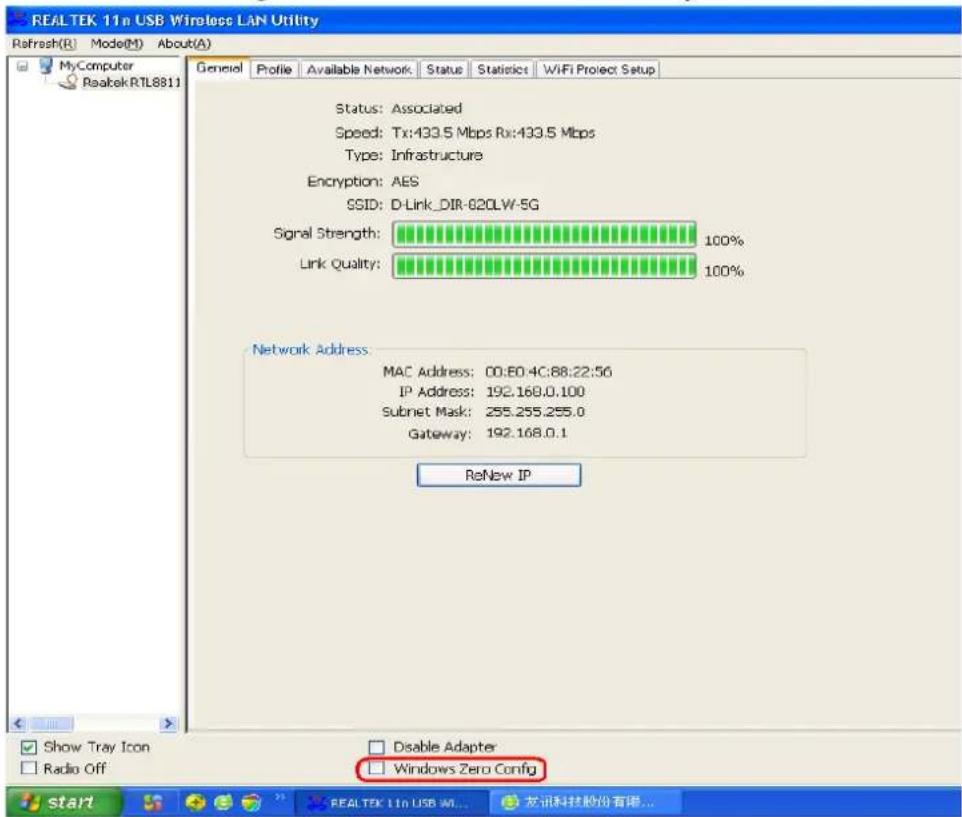
- Check "Windows Zero Config" box at the bottom of the utility interface.
- A message indicating that you've been switched to Windows Zero will be displayed. Click OK to confirm.
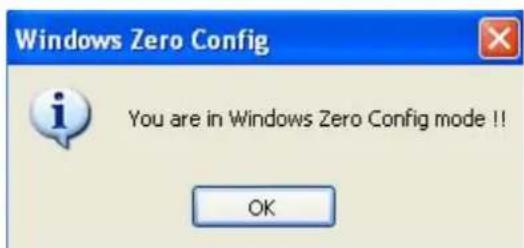
NOTE: To return to use Client utility, uncheck "Windows Zero Config" box.
- Click Start button, select Control Panel, then click Network and Internet Connections in Control Panel window.
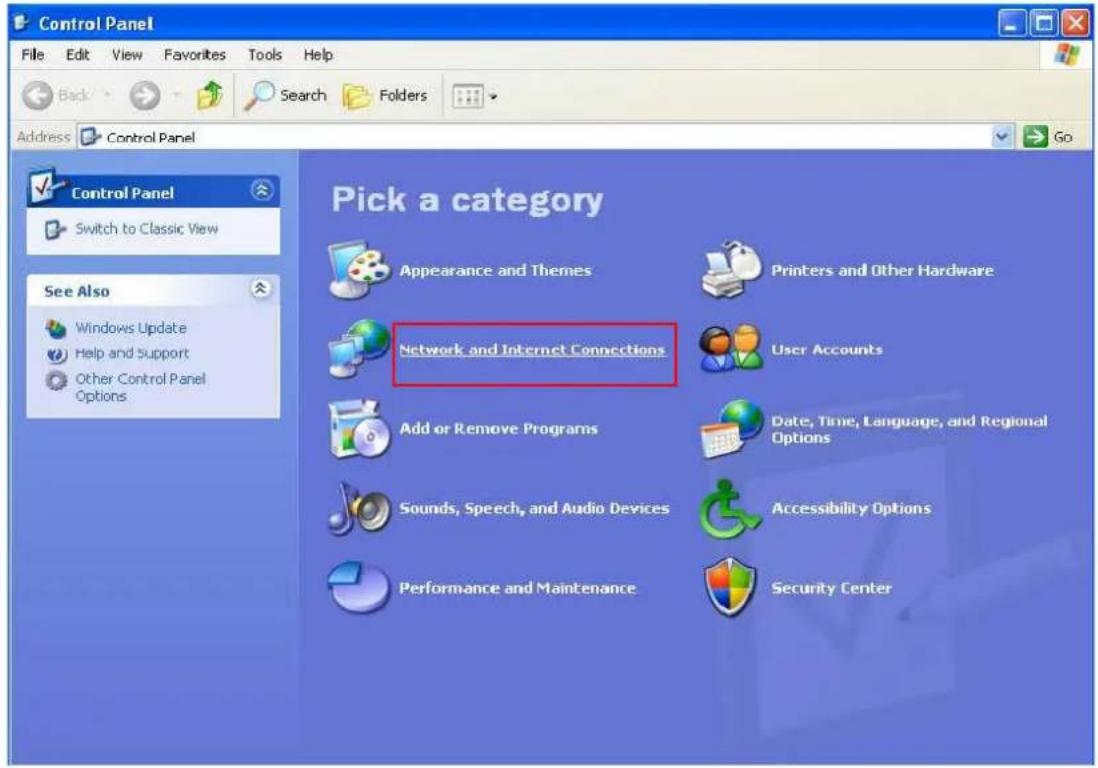
- Double click Network Connections.
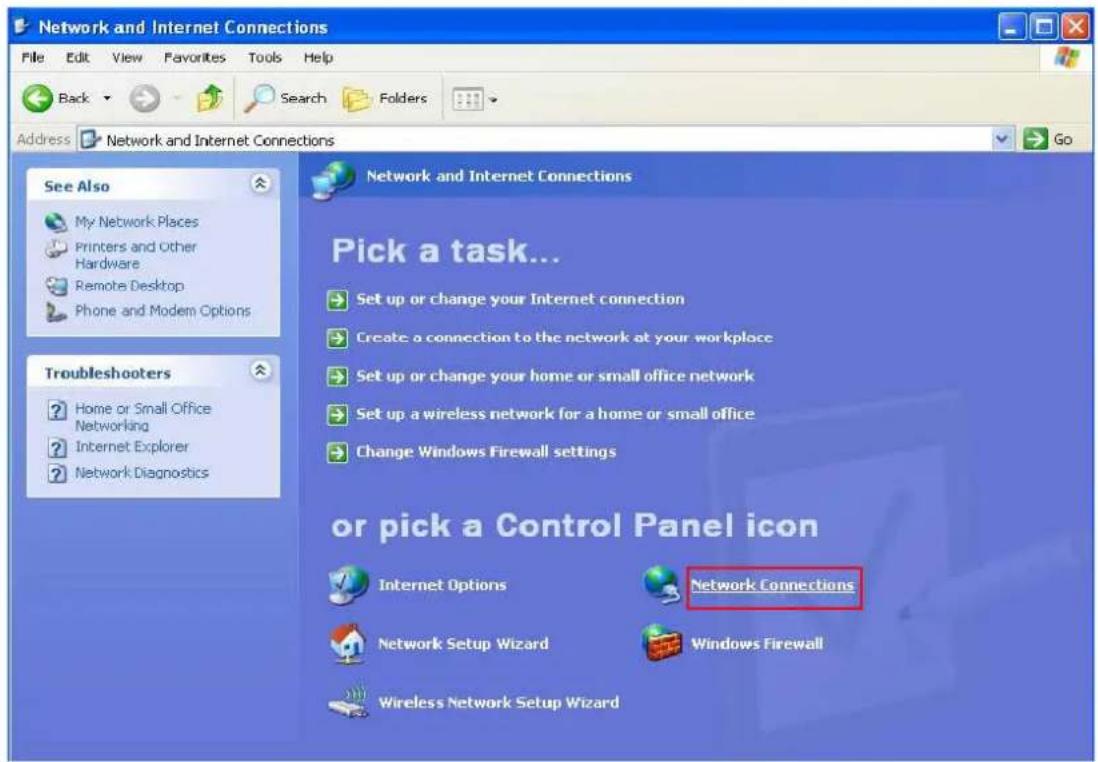
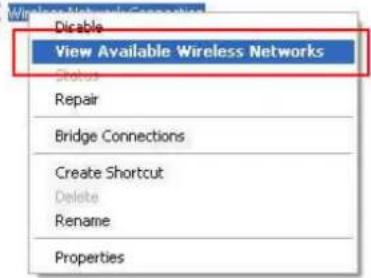
- Right-click on Wireless Network Connection icon (it may have a number as suffix if you have more than one wireless network adapter, please make sure you right-click the Wireless LAN 802.11ac USB Network Adapter), then select View Available Wireless Networks.

Local Area Connection 2

Local Area Connection

- All wireless access points in proximity will be displayed here. Select the access point you want to use, then press Connect button.
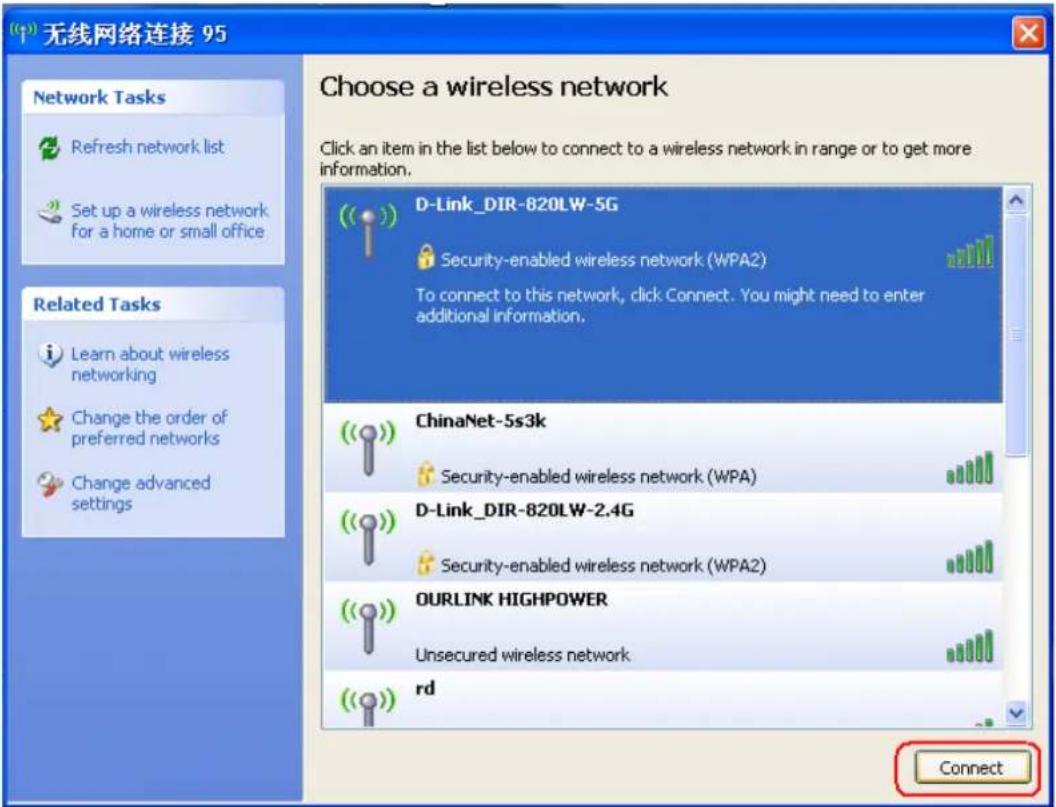
- If the access point is protected by encryption, you have to input its security key or passphrase here. If the access point you selected does not use encryption, you'll not be prompted for security key or passphrase.
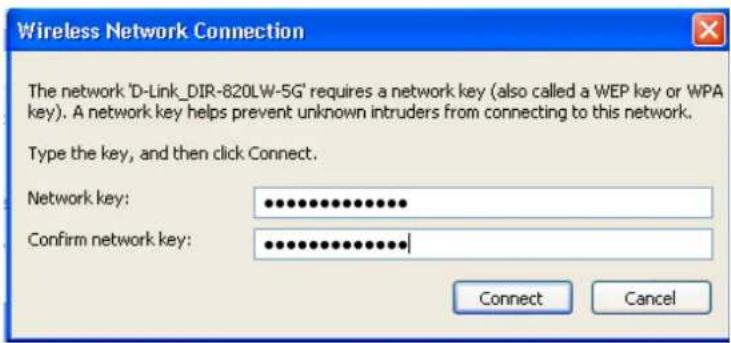
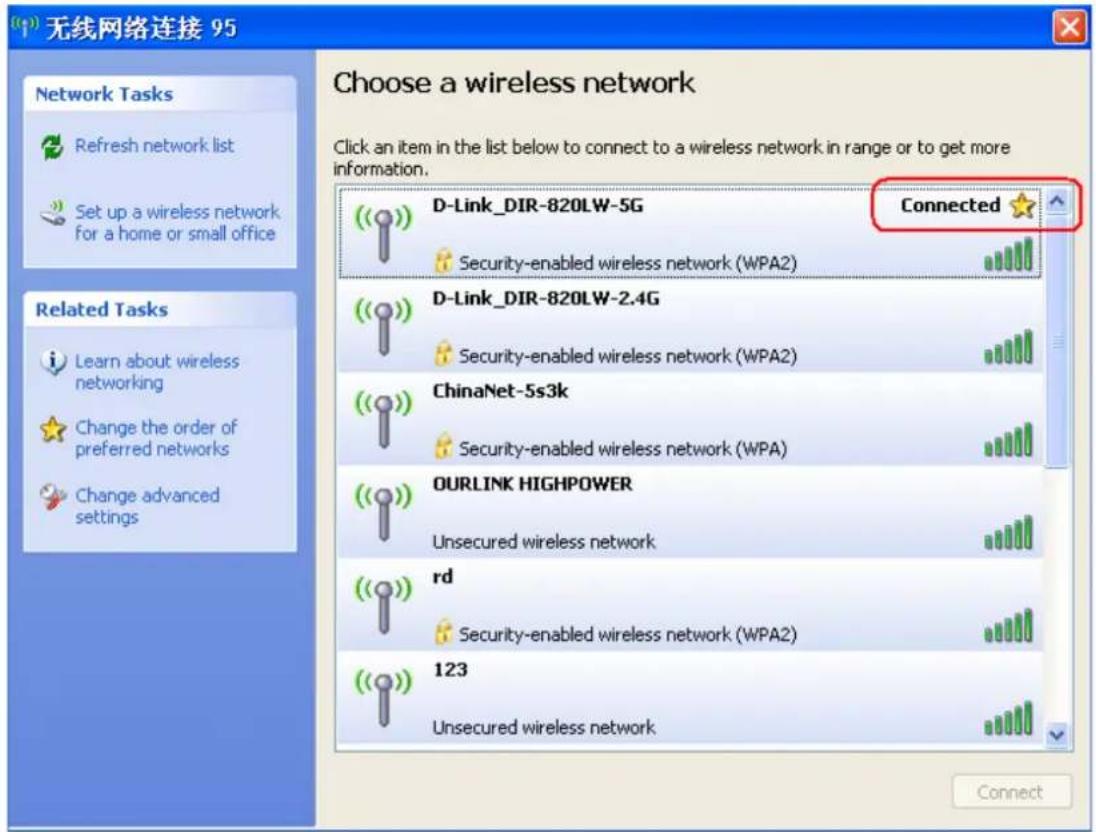
- If you can see Connected message next to the wireless network you selected, the connection between your computer and wireless access point is successfully established.
3. Client Utility
3.1 Connection Profile Management
If you need to connect to different wireless access points at different time, like access point of your home, office or public wireless service, you can store the connection parameters as a profile for every access point, so you don't have to input these parameters every time when you want to connect to a specific wireless access point.
- To manage profiles, right-click the Client configuration utility icon located at lower-right corner of computer desktop, then click Open Config Utility.
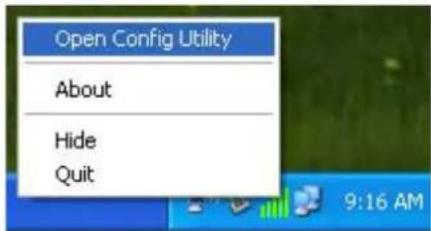
- Click the Profile tab in the main window of the configuration utility.
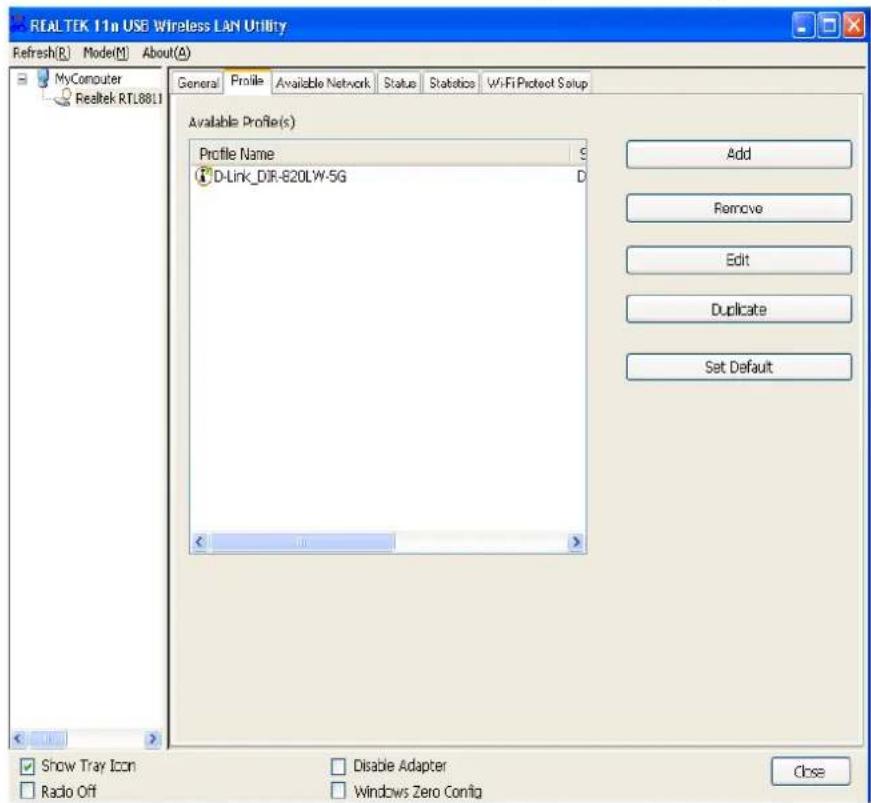
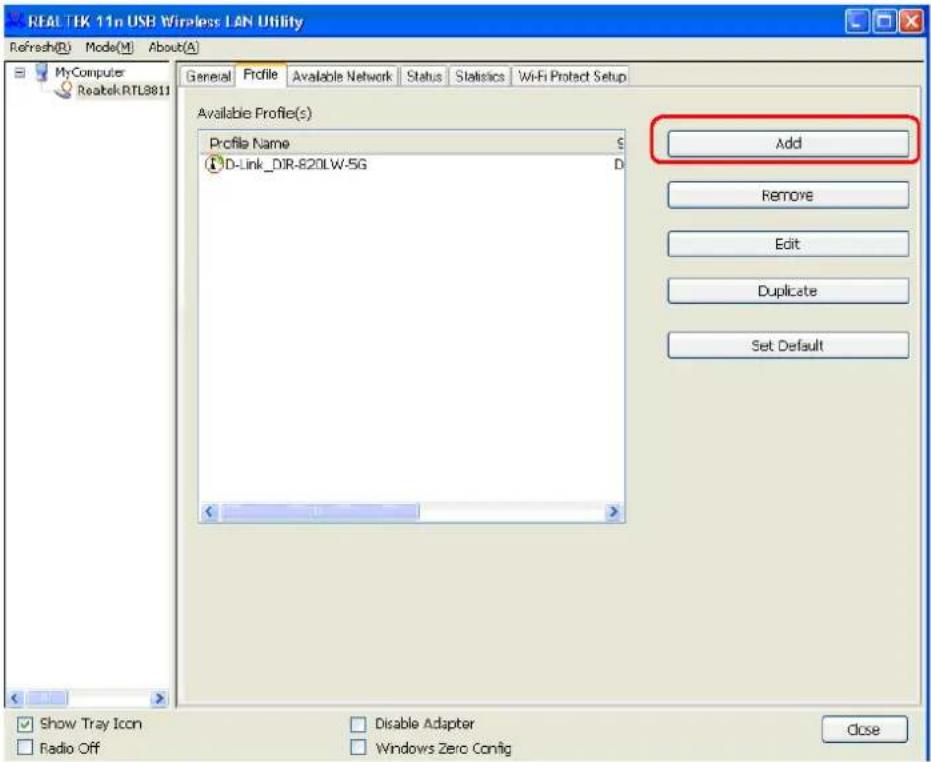
The “Available Profile” window displays the existing profiles and the buttons on the right side allow the user to manage and create new profiles for different networks configurations.
Add a new profile
By this function you can setup the connection parameters for a specific wireless access point in advance, without contacting it first.
- If you want to create a new profile, click Add button in the "Profile" window.
- You'll be prompted to input connection parameters for the wireless access point you wish to connect.
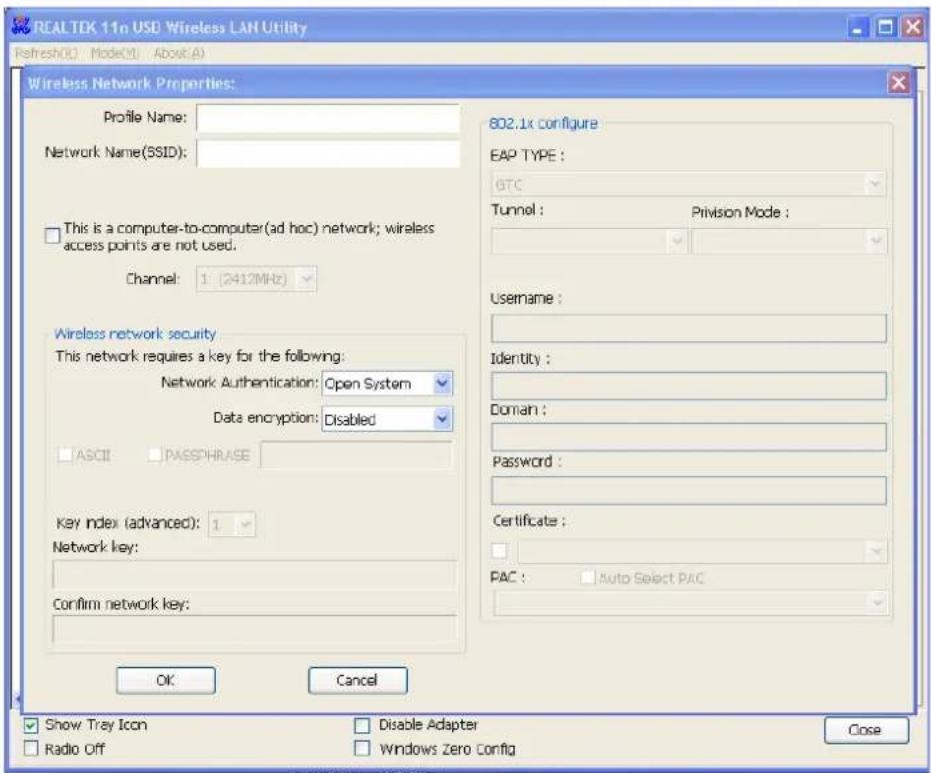
- Fill in the required parameters, then click OK to create and save a new profile.
The following table describes the parameters that can be configured in the “Wireless Network Properties” window.
| Profile name | You can give a name to this profile, so you can remember its purpose easily. It can be any phrase to help you remember. |
| Network Name (SSID) | The SSID (Service Set IDentifier, i.e. access point's name). This must be identical with the SSID of the access point you wish to connect. |
| This is a computer-to-computer (ad hoc) network | Check this box if you wish to connect to another computer / network device by ad hoc method. When not accessing to wireless access point, you have to check this box. |
| Channel | Select wireless channel for ad hoc connection. This option only appears when you're using ad hoc connection. |
| Network Authentication | Select the network authentication type from drop-down menu. This setting must be identical with the setting of wireless access point you with to connect. |
| Data encryption | Select the data encryption type from drop-down menu. This setting must be identical with the setting of wireless access point you with to connect. |
| ASCII / PASSPHRASE | When the encryption type is “WEP”, it's required to input a set of “passphrase” to connect to wireless access point. Check “ASCII” or “PASSPHRASE” depends on the security setting of access point, and input it in the box; if you select “PASSPHRASE” you also need to select the length of the key.The passphrase must be identical with the setting of wireless access point you with to connect. |
| Key index | Select WEP key index. For most of access points you can select “1”, but please refer to the setting of the access point. |
| Network key / Confirm network key | When the encryption type is “WPA” or “WPA2-PSK”, it's required to input a set of “passphrase” to connect to wireless access point. Please input the same passphrase in two boxes for confirmation. |
| EAP TYPE / Tunnel / Provision Mode | When authentication type is any of 802.1X, you have to select EAP type, tunnel, and provision mode from dropdown menu. This setting must be identical with your 802.1x authentication server. |
| Username / Identity / Domain / Password | Please input 802.1x related authentication information here. |
| Certificate | If certification is required to authenticate with 802.1x authentication server, please select a local certificate from dropdown list. |
| PAC | Check this box and PAC (Privilege Access Certificate) will be automatically selected. |
Remove an existing profile
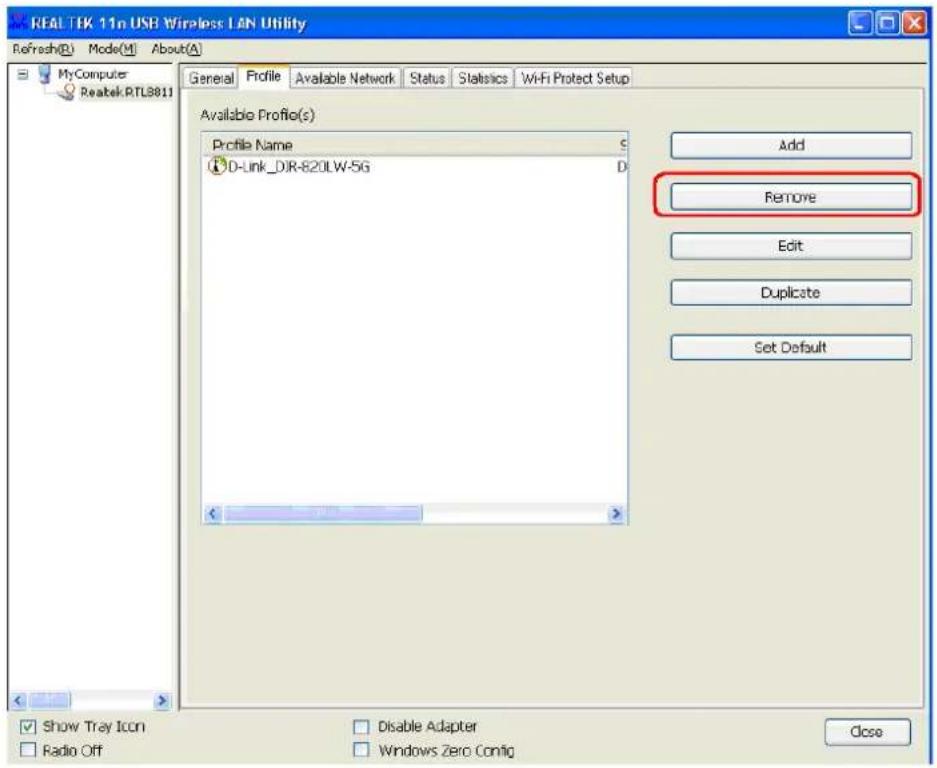
When you no longer need an existing profile, you can remove it.
Select an existing profile which you wish to remove in the "Profile" window, then click Remove button.
Edit an existing profile
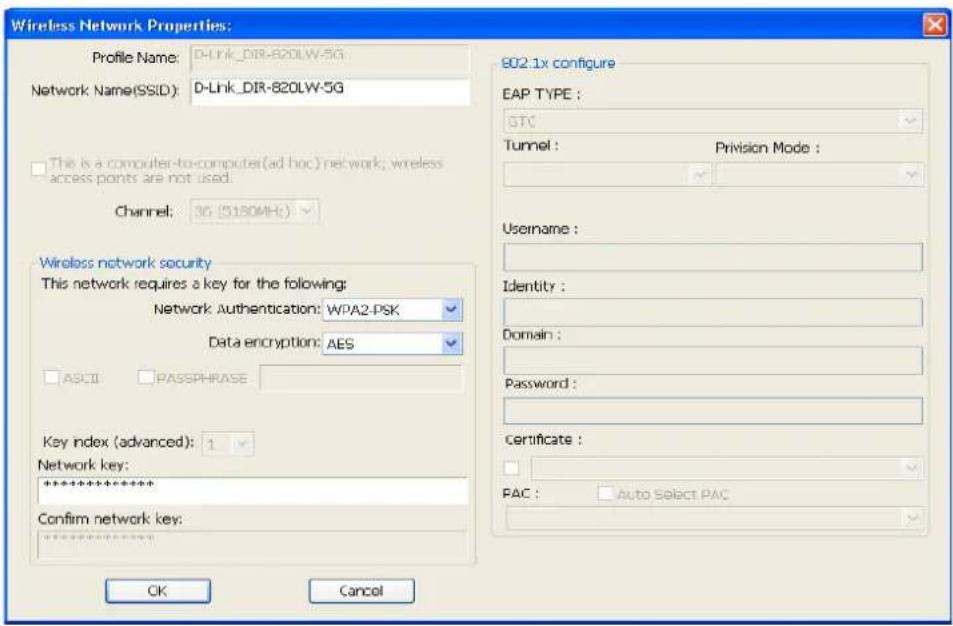
If you have added a profile before, and you wish to change the content of the profile, you can use this function. Please select a profile from the list first, then click Edit button.
You'll be provided with the contents of selected profile, and you can edit them. Click OK to save changes or Cancel to discard them.
Make a copy of existing profile
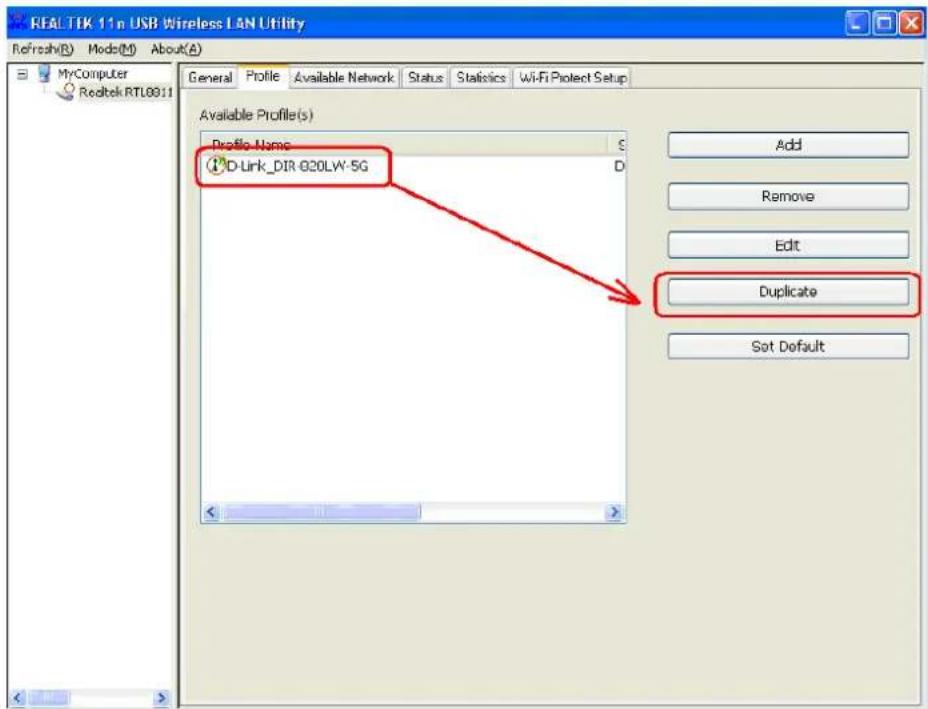
If you need to make a copy of a specific profile, you can use this function. This function is very convenient when you need to build a new profile which parameters are similar to any existing profile. Select an existing profile from the list, then click Duplicate button.
You'll be prompted to input a profile name, please use a name that does not exist in profile list.
Set as default profile
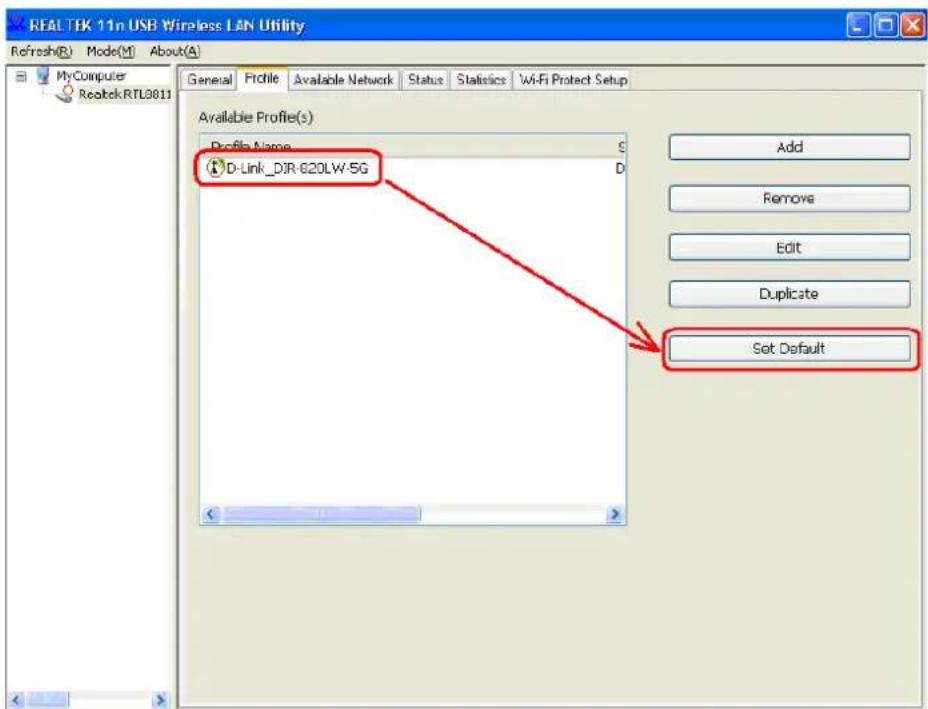
If you wish to use a specific profile as default connection, you can select a profile in the list, and click Set Default. Selected profile will become default selection and Client configuration utility will attempt to connect to selected access point.
3.2 General Information, Status and Network Statistics
The wireless configuration utility provides information about network statistics and link status. If you want to know how your wireless network adapter works, you can use these functions to get detailed information about the wireless connection you're using.
General Information
If you want to know the general information of the access point you're connecting to, click on General menu tab.
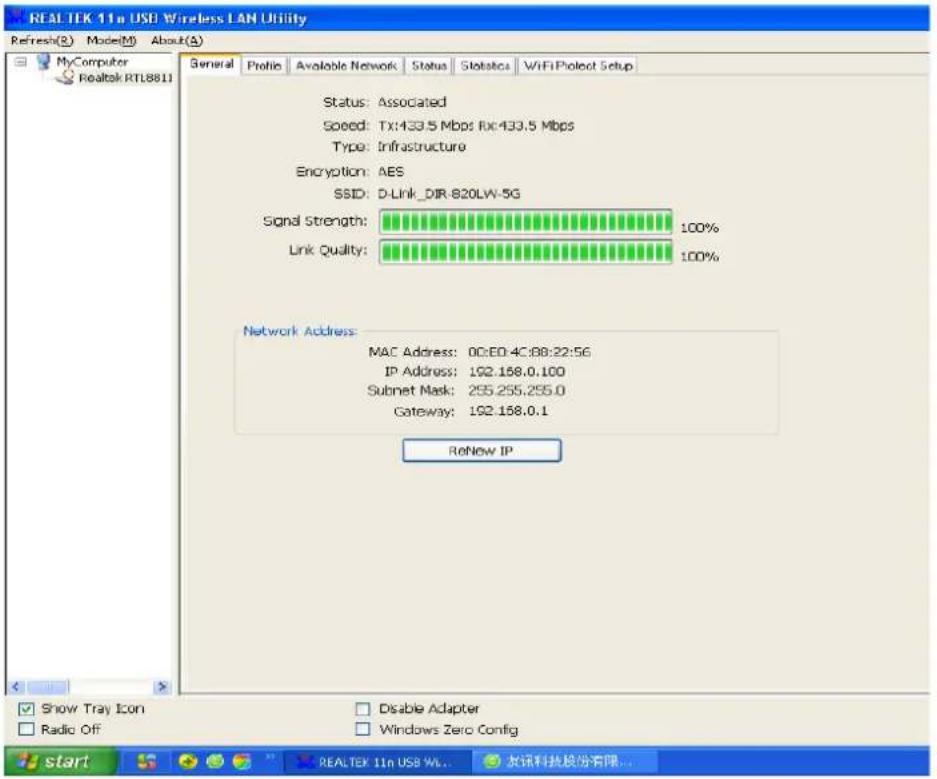
The information displayed here are described in the below table. These information are very useful when you encounter some problem on connecting to access point. If you wish to get a new IP address from DHCP server, you can click ReNew IP button.
| Status | Check if the device associated to target network. |
| Speed | The transmission (Tx) and receiving (Rx) speed of the current connection. |
| Type | Infrastructure or Ad-Hoc mode. |
| Encryption | The encryption mode for connecting to current network profile. |
| SSID | The SSID (network name) of the connected wireless network. |
| Signal Strength | Indicates the signal strength. |
| Link Quality | Indicates the link quality. |
| Network Address | Shows the current IP addresses settings. |
Status
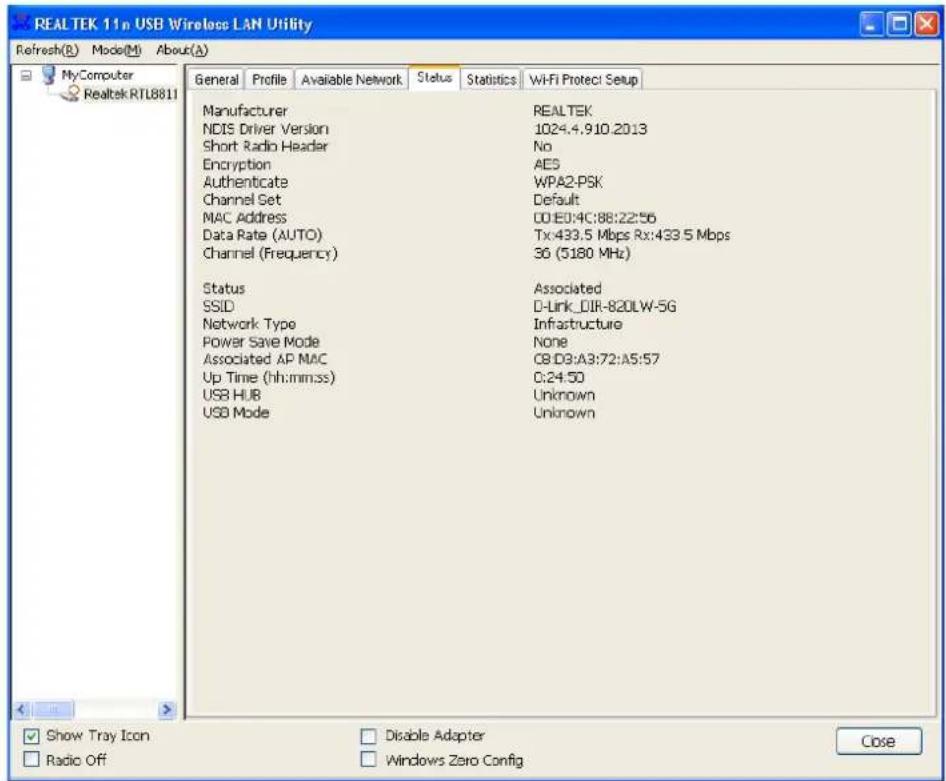
If you want to know the status of your wireless network adapter, click Status menu tab.
Network Statistics
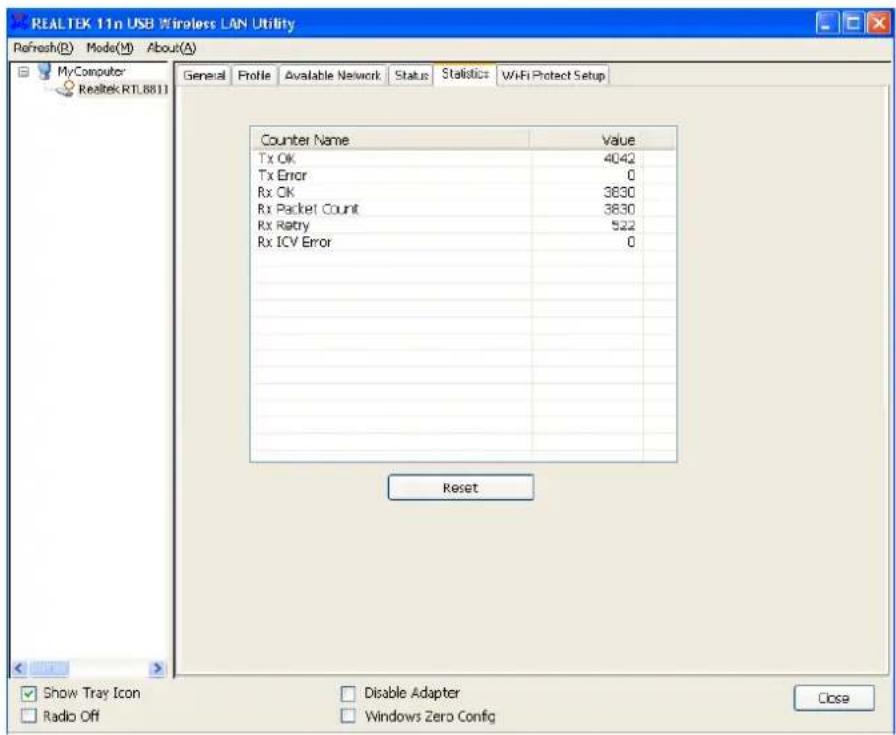
Click Statistics menu tab to view the statistical data of wireless adapter. You can click Reset button to reset the statistics of all items back to 0.
3.3 Other Settings
There are few functions provided by Client configuration utility you can access from the bottom of utility interface.
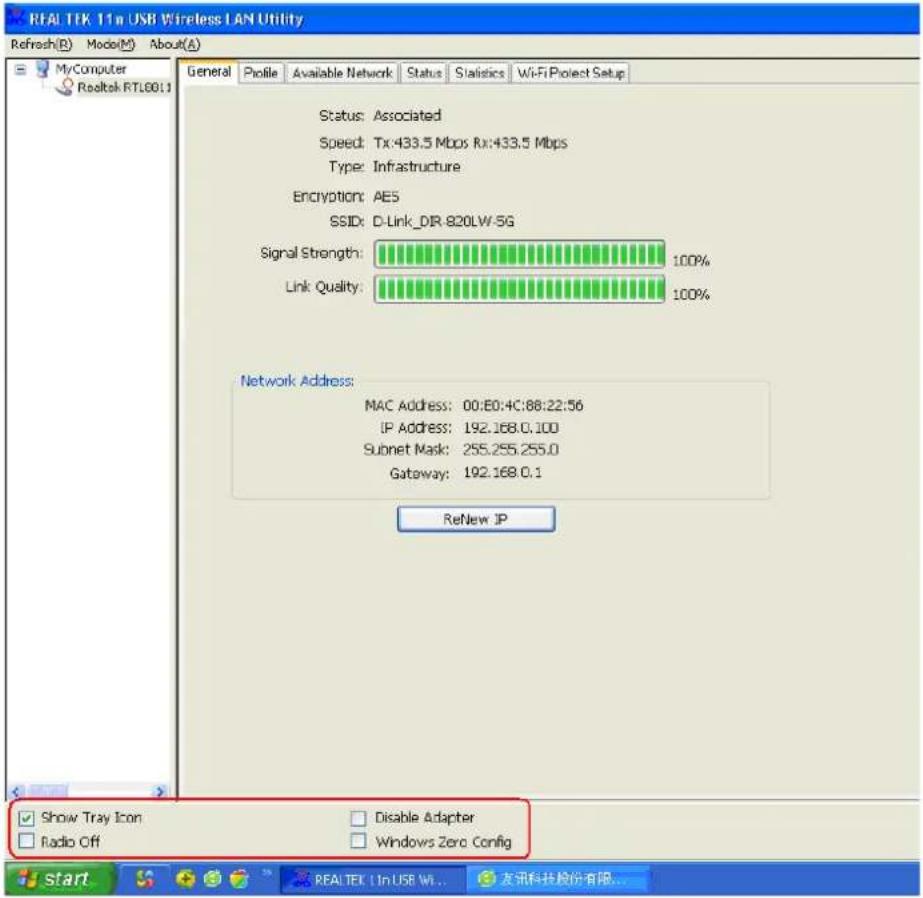
The descriptions of these function are listed in the following table.
| Show Tray Icon | Check this box to show an icon on system tray. Uncheck this box to hide it. |
| Radio Off | Switch wireless radio off. Wireless network functionalities are disabled. |
| Disable Adapter | Disable wireless network adapter. All functionalities of configuration menu will disappear. To resume, uncheck “Disable Adapter”. |
| Windows Zero Config | Use Windows Zero Configuration to manage wireless connections. |
3.4 Establish secure connection using WPS
Wi-Fi Protected Setup (WPS) is the latest wireless network technology which makes wireless network setup become very simple. If you have WPS-enabled wireless access point, and you want to establish a secure connection to it, you don't have to configure the wireless access point and setup data encryption by yourself. All you have to do is to go to the WPS setup page of this wireless adapter, click a button, and then press a specific button or enter a set of 8-digit code on the wireless access point you wish to establish a secure connection - just three simple steps!
For older wireless access points, it's possible to perform a firmware upgrade to become a WPS-enabled access point. Since they may not have a hardware button to press for WPS setup, you can use an alternative WPS setup method - input the pin code. Every WPS-compatible wireless network adapter support pin code configuration method; you can just input the code to wireless access point, and the wireless access point and wireless network adapter will do the rest for you.
This wireless network adapter is compatible with WPS. To use this function, the wireless access point you wish to connect to must support WPS function too.
This wireless network adapter supports two kinds of WPS: PIN code and Push Button Configuration (PBC). In the following pages are described the instructions to establish secure connection between WPS-enabled wireless access point and your wireless network adapter.
PIN Code
- Open the Client configuration utility and click Wi-Fi Protect Setup tab.
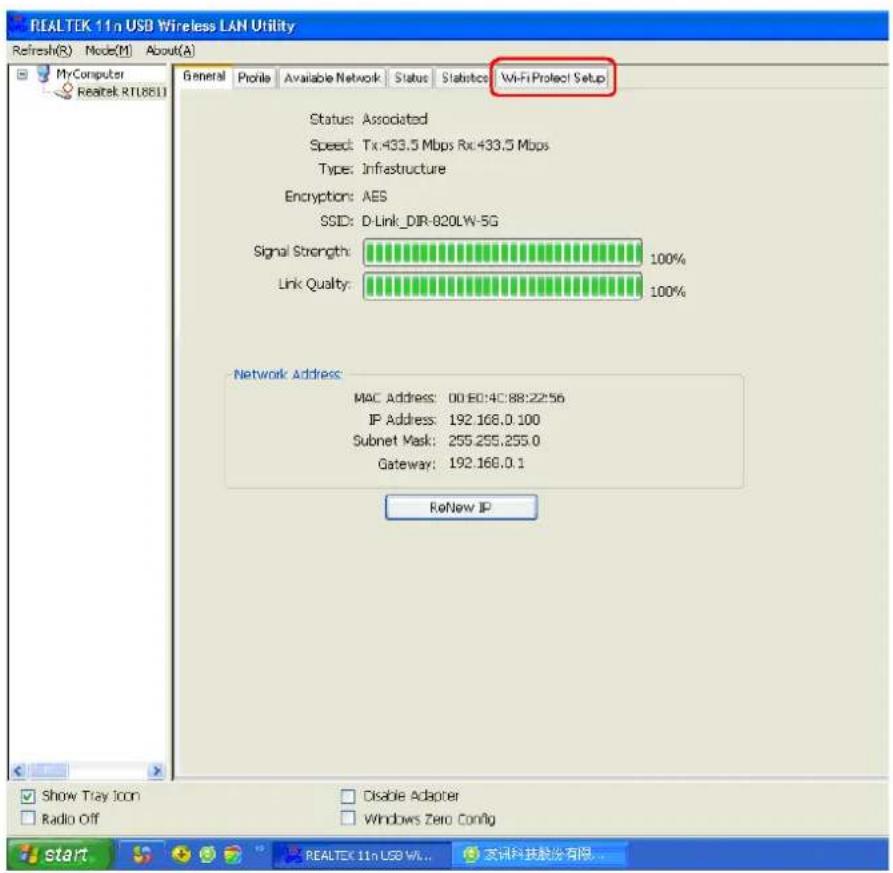
- To use PIN Code, please click Pin Input Config (PIN) button:
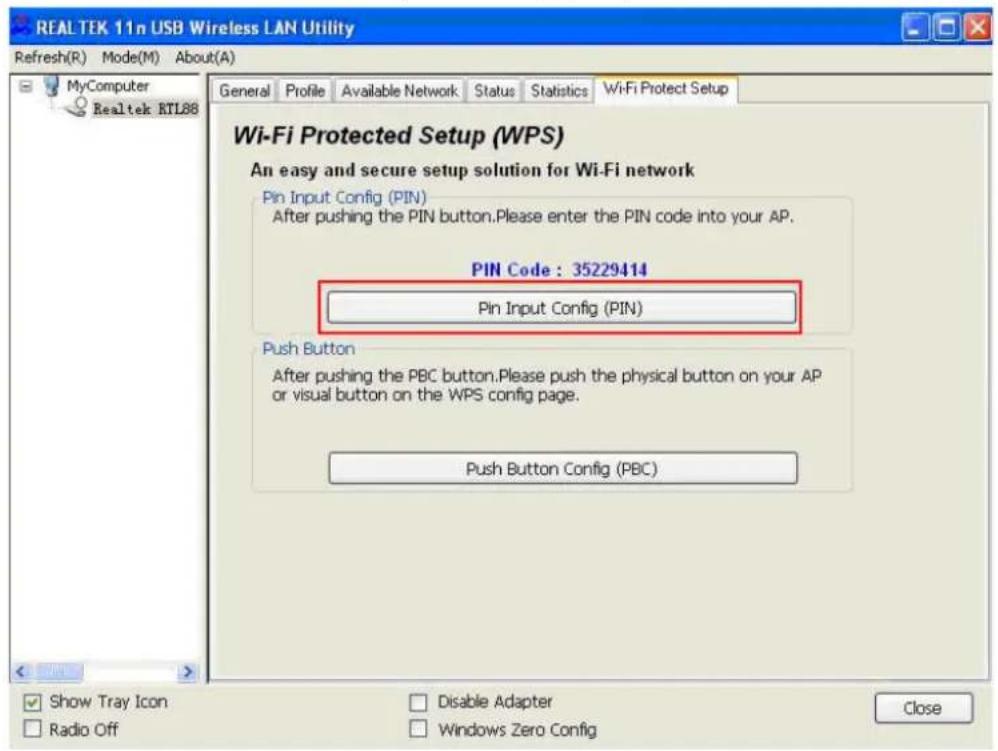
- You'll be prompted to select an access point you wish to connect. If you know its SSID, click Yes, otherwise click No.
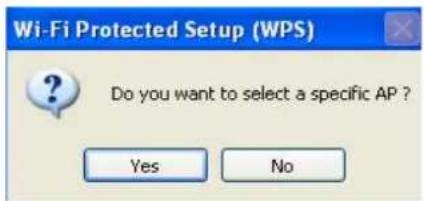
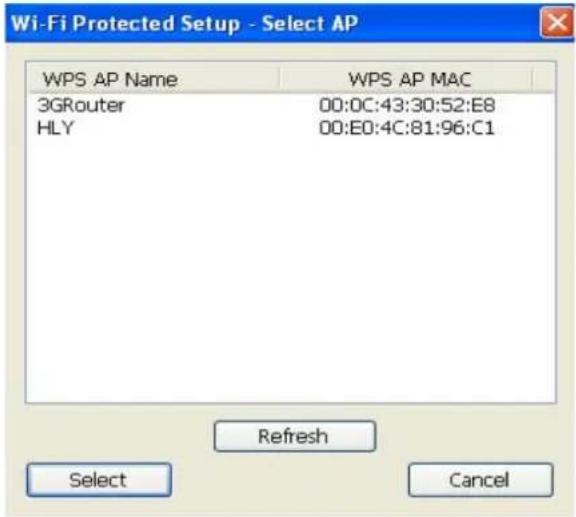
- If you select Yes, a list of all WPS-compatible AP nearby will be displayed; you can click Refresh to rescan, then select an AP and click Select button.
- If you select No, wireless network adapter will prompt you to enter 8-digit PIN code into your AP, without selecting an AP in advance.
- After you select Yes or No in previous step, network adapter will attempt to connect to WPS-compatible AP, and an 8-digit number will appear. Please input this number to AP's configuration menu within 2 minutes, and network adapter will establish secure connection with AP automatically.
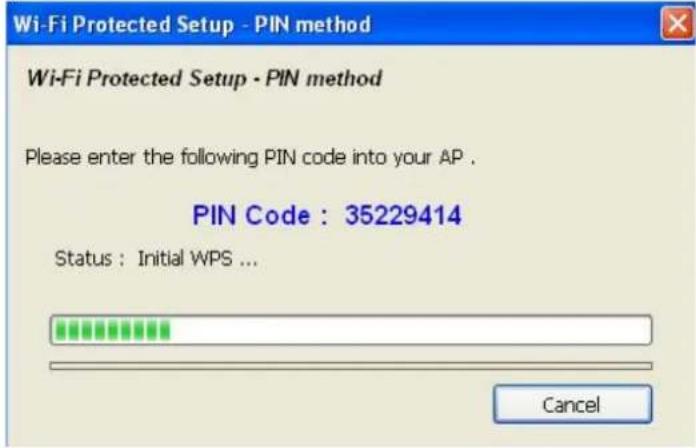
- If you want to stop this procedure before connection is established, click Cancel.
Push Button
- To use Push-Button WPS configuration, select the Wi-Fi Protect Setup tab of the configuration utility and click Push Button Config (PBC) button.
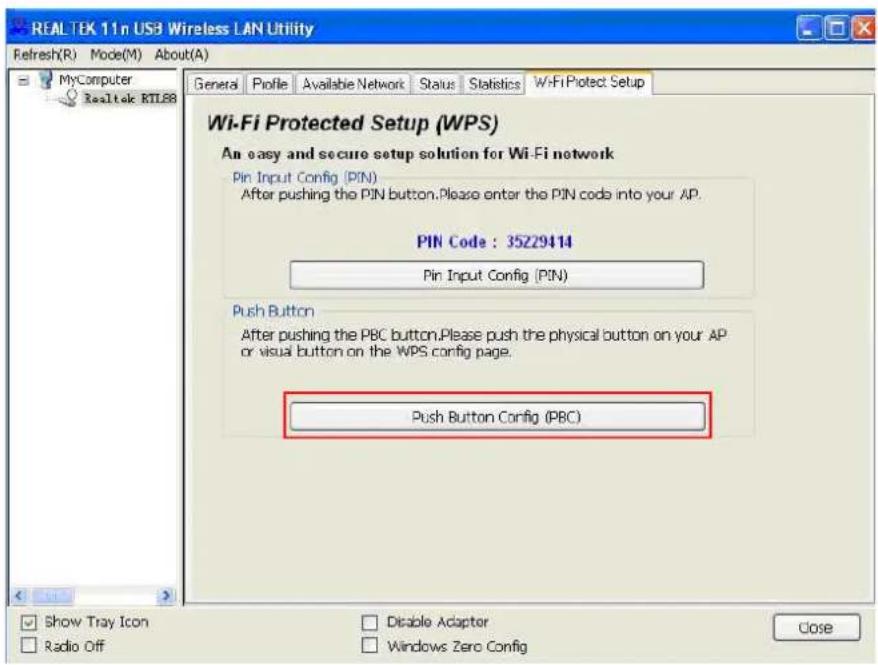
- After you click "Push Button Config (PBC)", a message box will appear.
![Wi-Fi Protected Setup - PBC method If there is more than one AP on the PBC mode,there will be [Session Overlap].Please use PIN method or wait for a while and use PBC method again. Status : AP Sitesurvey ... Complete : Push Button Config (PBC) Cancel](/content/2026/05/988794/images/5157bf2c2f9056c7add34c3af225be35b2721c80e371f59d375366e4b34ee1fa.jpg)
- Please activate Push Button function on wireless access point now, and wireless network adapter will establish secure connection with access point within one minute.
This is the easiest way to establish secure connection through WPS, but if there're more than one WPS-compatible AP using Push Button configuration, please use PIN Code instead.
4. Soft AP Function
In Soft AP mode, this wireless adapter can act as a wireless Access Point. You can switch this wireless adapter's operating mode to "AP" mode to simulate the function of a real wireless access point by software, and all other computers and wireless devices can connect to your computer wirelessly and share the internet connection.
Please follow the instructions in following pages to use the AP function of your wireless adapter.
4.1 Switch to AP Mode and Station Mode
The default operating mode of the wireless adapter is “Station Mode” (becoming a client of other wireless access points). Follow the instructions below to switch to AP mode.
- Right-click Client configuration utility icon, and click Open Config Utility.
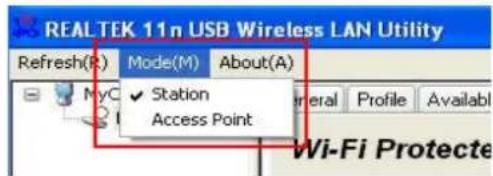
- Select Mode, and then select Access Point.
- It requires few seconds to switch to AP mode, please be patient.
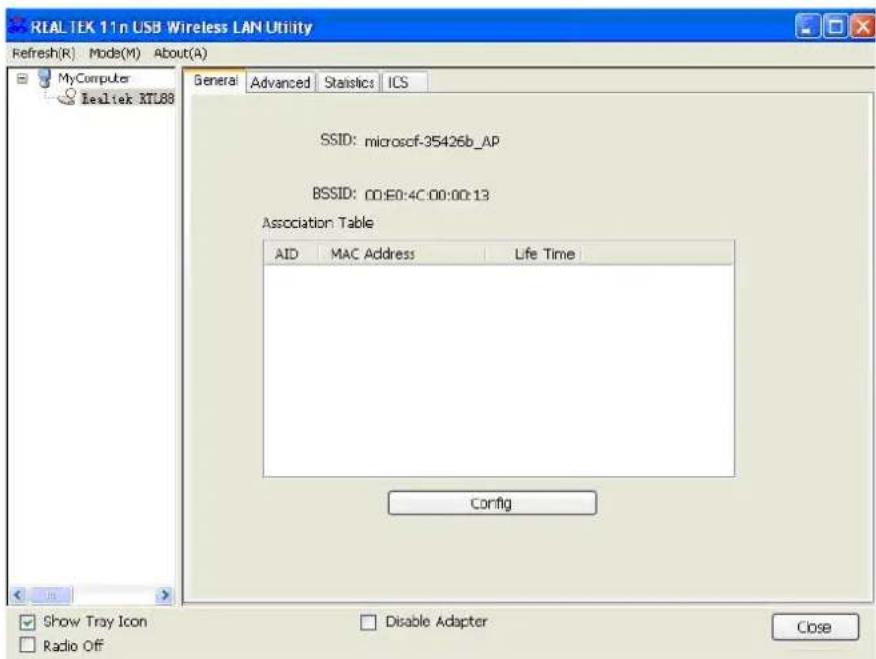
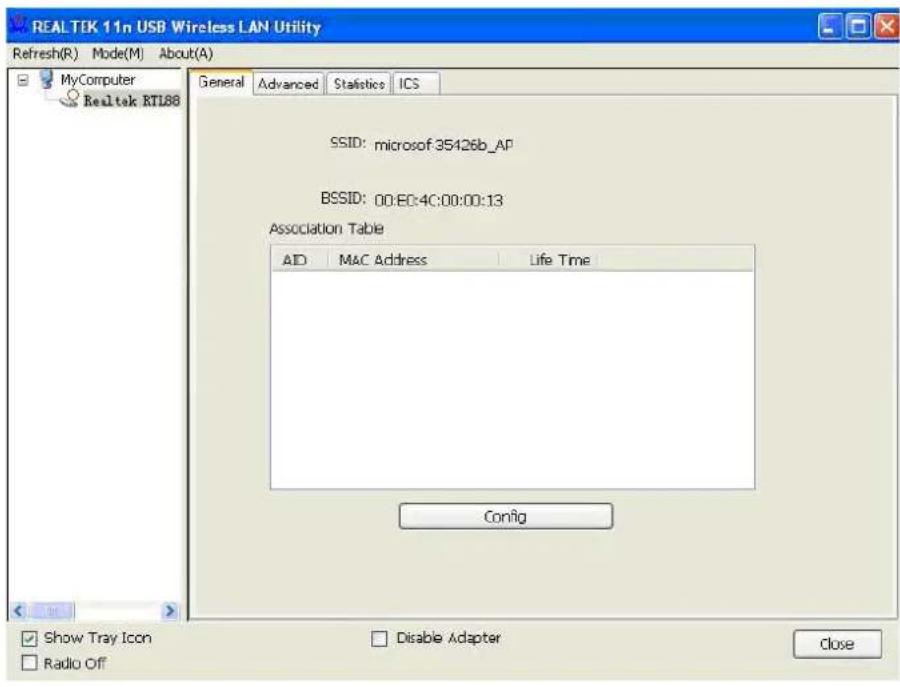
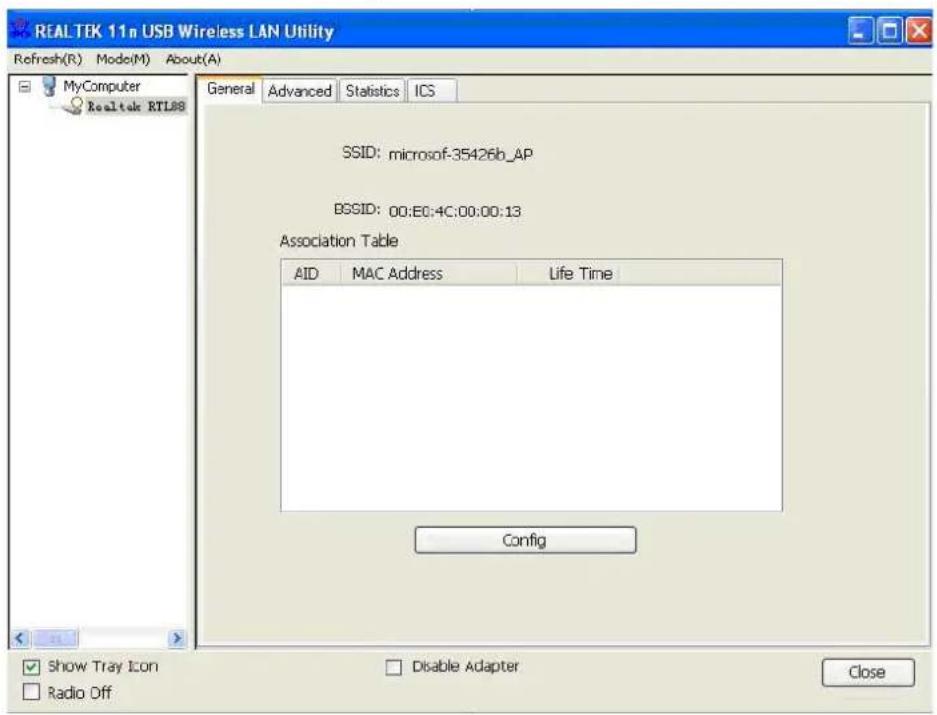
- After mode switch is complete, you'll see general information of software AP, which shows AP's SSID and connected wireless clients.
Client mode icon:

Soft AP icon:

Configure SSID and Channel
- To configure software AP, click Config button.
2. The Wireless Network Properties is displayed.
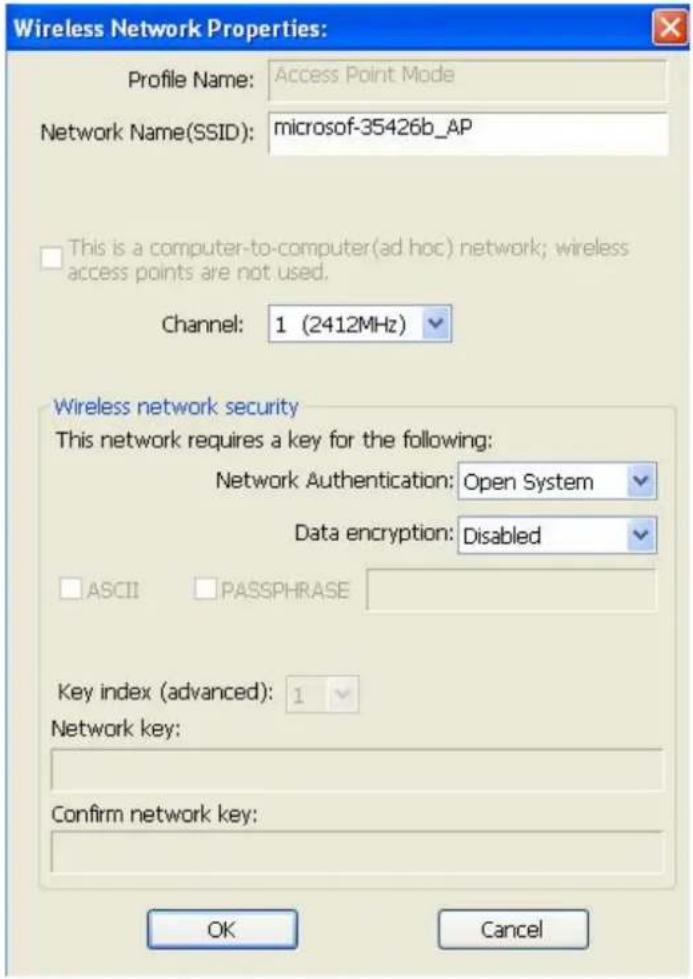
The description of major setup items are listed below.
| Network Name (SSID) | Please input the SSID (the name used to identify this wireless access point) here. Up to 32 numerical characters can be accepted here, excepting space. |
| Channel | Please select the wireless channel you wish to use, from 1 to 13. |
If you want to setup security options for Soft AP, configure "Wireless Network Security" section referring to the following items.
| Network Authentication | Select network authentication mode from dropdown menu. |
| Data Encryption | Select data encryption method from dropdown menu. |
| ASCII / PASSPHRASE | If the encryption method is WEP, check either “ASCII” or “PASSPHRASE” box and input it in the box as WEP passphrase. |
| Key Index | Select WEP key index (1-4). If you don’t know which one you should use, select 1. |
| Network key / Confirm network key | IF network authentication mode is WPA, please input WPA passphrase in both box. |
- To save changes, click OK; otherwise click Cancel to leave this menu and keep settings untouched.
Please note that Ad-Hoc mode is not available when network adapter is in AP mode. The description of major setup items are listed below.
4.2 Advanced Settings
If you want to setup advanced settings of software access point, select Advanced menu. If you don't know the meaning and affects of these settings, keep them untouched.
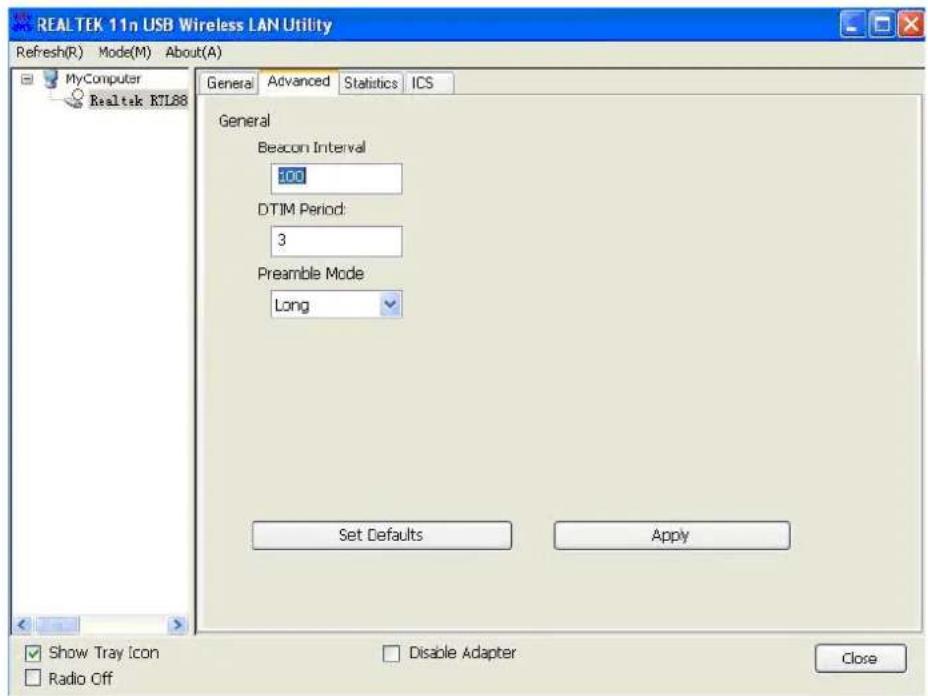
The description of all setup items are listed below.
| Beacon Interval | Please input wireless beacon time interval here. |
| DTIM Period | Please input DTIM (Delivery Traffic Indication Message) here. |
| Preamble Mode | Select wireless frame preamble mode (long or short) from dropdown menu. |
| Set Defaults | Reset all settings back to factory default value. |
| Apply | Save changes. |
If you changed any setting here and cause problem on communicating with wireless clients, click Set Defaults to reset all settings back to default setting.
4.3 Wireless Statistics
Select Statistics tab and the data statistics about software access point will be displayed. Click Reset to reset the value of every item back to "0".
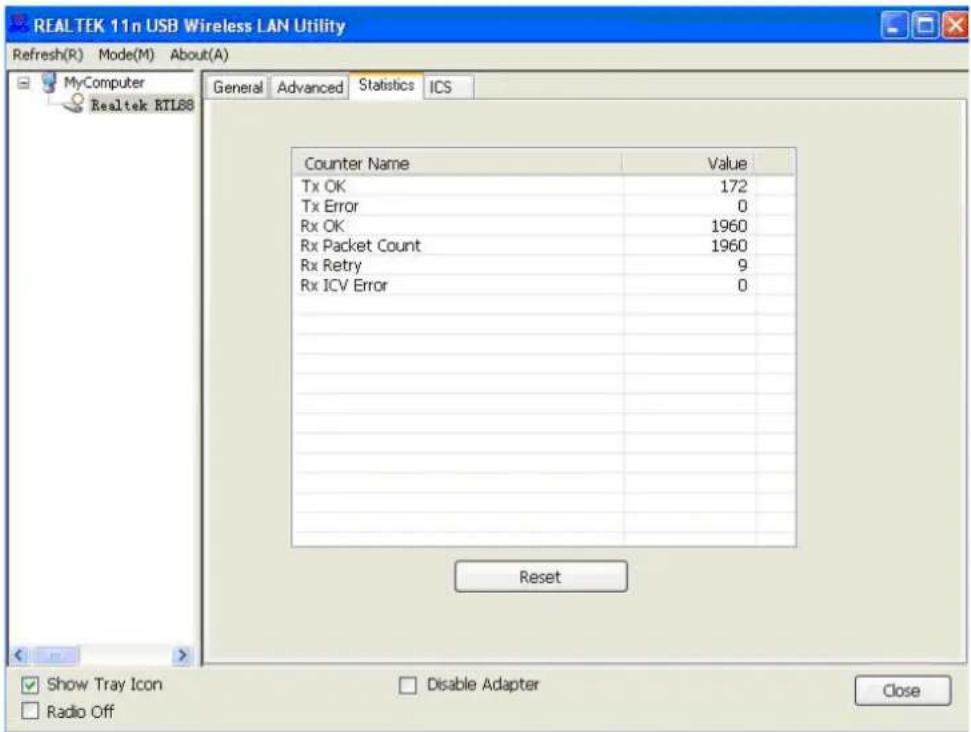
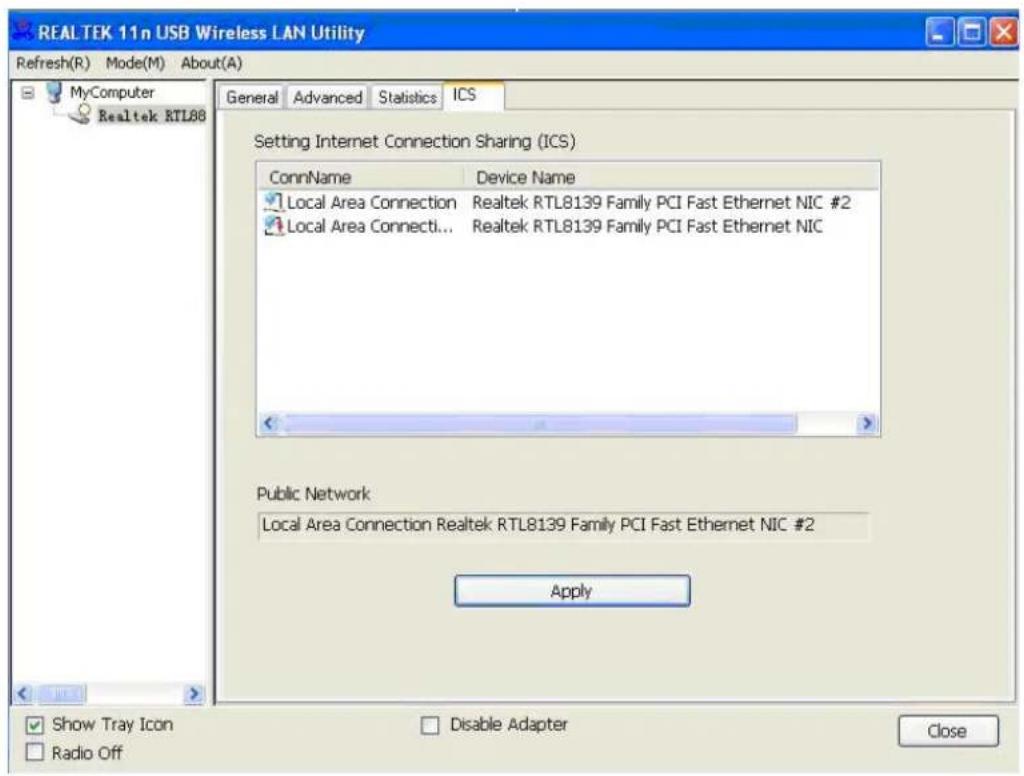
4.4 Internet Connection Sharing (ICS)
In this page, you can assign a network adapter on your computer as the path for all wireless clients to get connected to Internet.
If you have only one network adapter (except this software access point), you don't have to select network adapter here.
If you have more than one network adapter, select the one you wish to be used as Internet gateway and Click Apply to save changes (Apply is grayed out when no changes are made in this page).
5. Troubleshooting
If you encounter any problem when you're using this wireless network adapter, please check this troubleshooting table, the solution of your problem could be very simple and you can solve the problem by yourself.
| Scenario | Solution |
| I can’t find any wireless access point / wireless device in Site Survey function. | 1. Click Rescan for few more times and see if you can find any wireless access point or wireless device. 2. Please move closer to any known wireless access point. 3. “Ad hoc” function must be enabled for the wireless device you wish to establish a direct wireless link. 4. Please adjust the position of network adapter (you may have to move your computer if you’re using a notebook computer) and click Rescan button for few more times. If you can find the wireless access point or wireless device you want to connect by doing this, try to move closer to the place where the wireless access point or wireless device is located. |
| Nothing happens when I click Open Config Utility | 1. Please make sure the wireless network adapter is inserted into your computer’s USB port. 2. Reboot the computer and try again. 3. Remove the adapter and insert it into another USB port. 4. Remove the driver and re-install. 5. Contact the dealer of purchase for help. |
| I can not establish connection with a certain wireless access point | 1. Click Add to Profile for few more times. 2. If the SSID of access point you wish to connect is hidden (nothing displayed in “SSID” field in Site Survey function), you have to input correct SSID of the access point you wish to connect. Please contact the owner of access point to ask for correct SSID. 3. You have to input correct passphrase / security key to connect an access point with encryption. Please contact the owner of access point to ask for correct passphrase / security key. 4. The access point you wish to connect only allows network adapters with specific MAC address to establish connection. Please go to Status menu and write the value of MAC Address down, then present this value to the owner of access point so he / she can add the MAC address of your network adapter to his / her access point’s list. |
| The network is slow / having problem when transferring large files | 1. Move closer to the place where access point is located.2. There could be too much people using the same radio channel. Ask the owner of the access point to change the channel number.Please try one or more solutions listed above. |
- Table of Contents
- Introduction......4
- Wireless USB Adapter Installation.... 5
- Client Utility.... 15
- Soft AP Function ...... 27
- Troubleshooting 33
- Responsibility Statement
- CE Mark Warning
- Trademarks and Changes
- Introduction
- Product Features
- Package contents
- Wireless USB Adapter Installation
- Driver Installation
- Under Windows XP
- Under Windows Vista and Windows 7
- Connect to Wireless Access Point
- Using Client Wireless Utility
- Using Windows Zero Configuration
- Client Utility
- Connection Profile Management
- Add a new profile
- Remove an existing profile
- Edit an existing profile
- Make a copy of existing profile
- Set as default profile
- General Information, Status and Network Statistics
- General Information
- Status
- Network Statistics
- Other Settings
- Establish secure connection using WPS
- PIN Code
- Push Button
- Soft AP Function
- Switch to AP Mode and Station Mode
- Configure SSID and Channel
- The Wireless Network Properties is displayed.
- Advanced Settings
- Wireless Statistics
- Internet Connection Sharing (ICS)
- Troubleshooting
Brand : Hamlet
Model : HNW600ACU
Category : Network card / adapter