AT-HDVS-RX - AV Extender Atlona - Free user manual and instructions
Find the device manual for free AT-HDVS-RX Atlona in PDF.


| Product Type | AV Extender (Receiver) |
| Brand | Atlona |
| Model | AT-HDVS-RX |
| Dimensions (W x H x D) | 4.1 x 0.9 x 2.8 in (104 x 23 x 71 mm) |
| Weight | 0.3 lb (0.14 kg) |
| Power Supply | 12V DC, 1A (included) |
| Input Interface | 1 x HDMI (receiver side) |
| Output Interface | 1 x HDMI (to display) |
| Supported Video Resolutions | Up to 4K@60Hz (3840x2160) |
| HDCP Version | HDCP 2.2 |
| Maximum Extension Distance | Up to 230 ft (70 m) at 1080p, 130 ft (40 m) at 4K |
| Audio Support | LPCM 2.0, Dolby Digital, DTS |
| IR Pass-Through | Yes (via IR emitter/receiver) |
| RS-232 Control | Yes (pass-through) |
| Operating Temperature | 32°F to 104°F (0°C to 40°C) |
| Storage Temperature | -4°F to 140°F (-20°C to 60°C) |
| Humidity | 20% to 90% RH (non-condensing) |
| Cleaning Instructions | Wipe with a dry, soft cloth; do not use liquids |
| Safety Precautions | Avoid exposure to moisture, heat, and physical shock |
| Spare Parts & Repairability | No user-serviceable parts; contact Atlona for service |
| Warranty | Limited 10 years (upon registration) |
| Included Accessories | Power supply, IR emitter/receiver, mounting brackets |
Frequently Asked Questions - AT-HDVS-RX Atlona
User questions about AT-HDVS-RX Atlona
0 question about this device. Answer the ones you know or ask your own.
Ask a new question about this device
Download the instructions for your AV Extender in PDF format for free! Find your manual AT-HDVS-RX - Atlona and take your electronic device back in hand. On this page are published all the documents necessary for the use of your device. AT-HDVS-RX by Atlona.
USER MANUAL AT-HDVS-RX Atlona
Atlona HDBaseT to HDMI Receiver/Scaler with Audio De-Embedding
AT-HDVS-RX
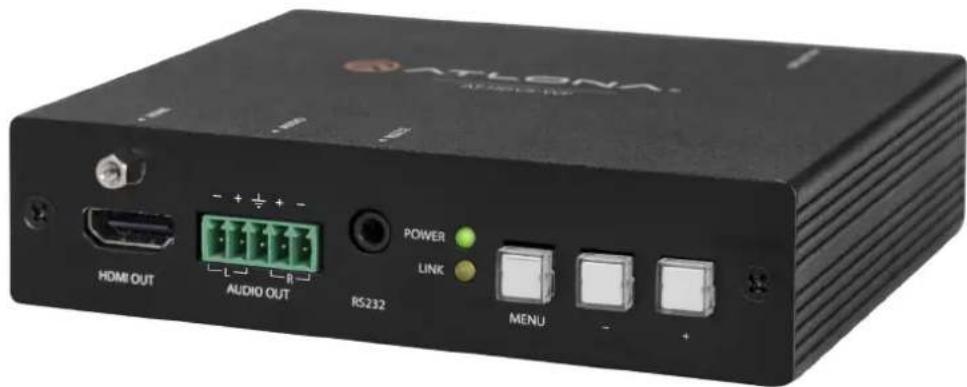
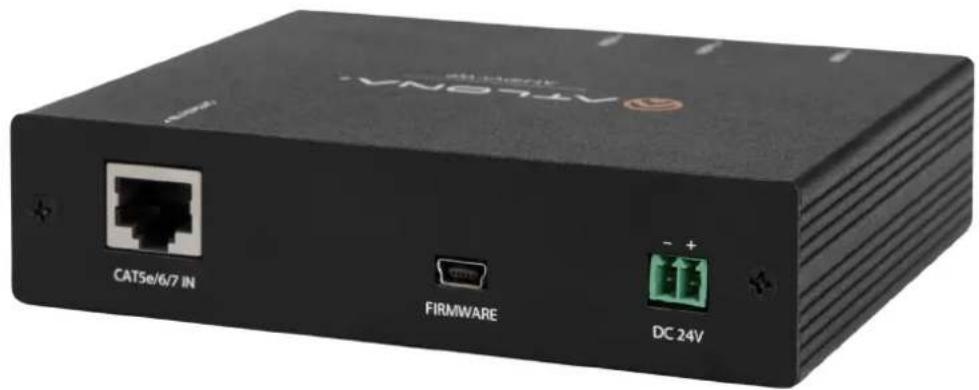
User Manual
Table of Contents
- Introduction 3
- Package Contents 3
- Features
- Panel Descriptions
a. Front Panel 4
b. Rear Panel 4
5. OSD Menu 5-6
6.RS-232&Software 7-11
7. Connection and Installation 12
8. Specifications 13
9. Safety Information 14
10. Warranty 15-16
11. Atlona Product Registration 16
Firmware 1.1.0 (5/1/14):
Pages 3, 5-10 Added EDID configuration for inputs
Auto ON/OFF for display when HDMI source is detected
HDCP reporting On/Off/Auto mode added
New GUI software
Firmware 2.1.0
Apple and Windows 8.X updating
Introduction
Atlona HDVS receiver was designed to smooth the transition from analog to digital displays in schools and businesses, allowing advanced HDMI display devices to be used with the many VGA computers still in use. Many displays don't support the resolutions and refresh rates typical of VGA sources. In addition, the HDVS-RX is compatible with Atlona PoCc switchers and distribution amplifiers with HDBaseT outputs and is a good solution when scaling is required for a specific display.
When used with a matching HDVS-TX or HDVS-TX-WP, projector control is enabled. HDBaseT and power over category cable (PoCc) allow signal and power over a single category cable, with RS-232 control capability.
Package Contents
- 1 x AT-HDVS-RX
- 1 x 3.5mm to D-sub adapter
- 2 x Captive screw female connector (5 pin: audio, 2 pin: power)
- 1 x 24V DC captive screw power adapter
- 1 x User manual
Features
- Scales incoming signals at a variety of common resolutions up to 1080p or 1920x1200
- Complete control of video brightness, contrast, saturation, hue, and more
- Extends common resolutions up to 1080p or 1920x1200 to distances as long as 230ft (70 meters)*
- Front panel on-screen menu control for ease of use
- Set preferred input resolution to match display requirements
- 2 channel balanced analog audio output to an amplifier (Ex. AT-PA100-G2)
- PoCc (Power over Category cable) sends power to compatible transmitters ex. AT-HDVS-TX-WP, AT-HDVS-TX, or AT-HDTX-WP
- Ability to switch HDCP reporting between compliant, noncompliant, and auto
- Firmware upgradable for easy field service through USB
Note: For full functionality and features, ensure the transmitter and receiver are using compatible firmware
| Receiver firmware V 1.0.1 Receiver firmware V 1.1.0 Receiver firmware V 2.1.0 | ||
| Transmitter firmware V 1.0.1 Compatible Not Compatible Not Compatible | ||
| Transmitter firmware V 1.1.0 Not Compatible Compatible Compatible | ||
| Transmitter firmware V 2.1.0 Not Compatible Compatible Compatible | ||
| GUI Version .4 1.1.0 1.1.0 | ||
Panel Description
Front Panel
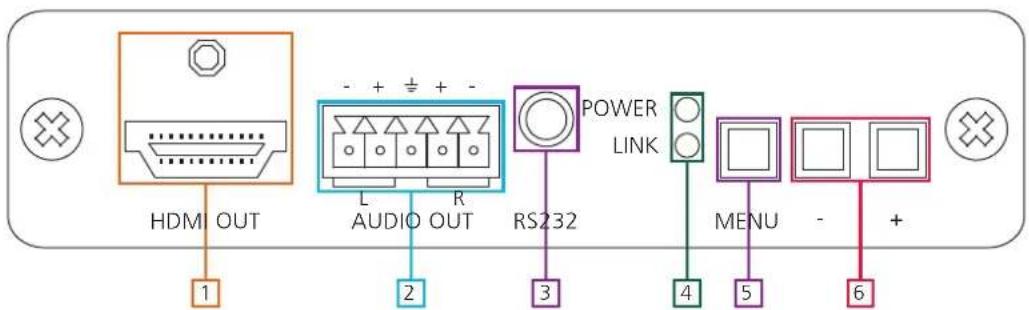
- HDMI OUT: Connect to display
- AUDIO OUT: Connect to amplifier (ex. AT-PA100-G2)
-
RS-232: Connect to PC or control system to program RS-232 control then connect to a display for on / off command control
-
Status LEDs
POWER LED: Illuminates when receiving power
LINK LED: Illuminates when HDBaseT link is functioning properly
-
MENU button: Use to enter, exit, and select within the on-screen display OSD menu
-
Navigation buttons: Navigate through OSD menu or use to set output resolutions
"Menu" and "-" : Set output resolution to 720p@50Hz
“-” and “+”: Factory resets receiver and sets output resolution to 720p@60Hz
Note: Pressing the "+" button while the OSD menu is closed and a VGA source is selected will cause the video to auto adjust
Back Panel
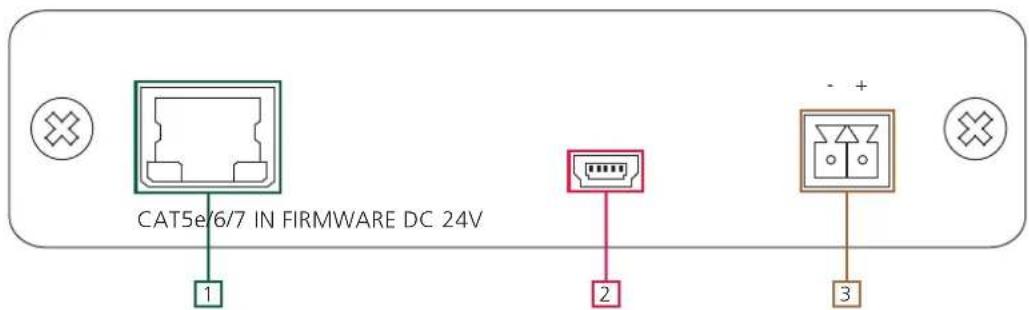
- CAT5e/6/7 IN: Connect HDBaseT source here
- FIRMWARE: Connect to a PC using a mini USB to USB for firmware updating
- DC 24V: Connect included 24V DC adapter here to power HDVS-RX and compatible transmitters
OSD Menu
| Menu Option Sub- | Menu Option Adjust | ||
| Input Select VGA | |||
| HDMI | |||
| HDMI 2 (AT-HDVS-TX) | |||
| Menu Back | |||
| Input Resolution 800 | x600 1280x800 1920x1200 | ||
| 1024x768 1366x768 | |||
| 1280x720 1920x1080 | |||
| Output Resolution 1 | 024x768 720p59.94 1080p60 | ||
| 1280x800 720p60 Native | |||
| 1280x1024 1080i50 Menu Back | |||
| 1366x768 1080i59.94 | |||
| 1400x1050 1080i60 | |||
| 1600x1200 1080p23.98 | |||
| 1680x1050 1080p24 | |||
| 1920x1200 1080p25 | |||
| 720p35 1080p29.97 | |||
| 720p29.97 1080p30 | |||
| 720p30 1080p50 | |||
| 720p50 1080p59.94 | |||
| VGA Adjust | |||
| Picture Adjust Brightness 0 to 100 | |||
| Menu Option Sub-M | Menu Option Adjust | ||
| OSD Position Left-Top | Right-Top, Right-Bottom, Left-Bottom, Center | ||
| Transparency 0 (transparent) to 15 (solid) | |||
| Info. Timer 5 to 100 seconds | |||
| Menu Timer 5 to 100 seconds | |||
| Info. Display Always On, Auto, or | Always Off | ||
| Background Grey, Cyan, Magenta, or Yellow | |||
| Menu Back | |||
| Others In Auto Switch | On or Off | ||
| Display HDCP Compliant, Noncompliant, Auto | |||
| Mirror-V On or Off | |||
| ASP Background Grey, Black | |||
| Display Mode DispSW AVon, Disp | SW AVSW, AV SW, Always On | ||
| Disp. Key Lock 0 to 15 seconds | |||
| Auto Disp. On On or Off | |||
| Auto Disp. Off On or Off | |||
| ProJSW Mode | 5 to 300 (increases by 5) | ||
| Standby (min.) 0 to 15 | |||
| Menu Back | |||
| Information | SourceNameProductSinkModelNative 1Native 2FW TX: RX:Menu Back | ||
| System Reset | No | ||
| Yes | |||
| Menu Back | |||
| Menu Exit | |||
Note: Display Mode does a variety of changes, see below
DispSW AVon - Display switches on/off, source audio/video signal always on DispSW AVSW - Display switches on/off, source audio/video signal switches on/off AV SW - Display is always on, source audio/video signal switches on/off Always On - Default, no function
Note: Must be in DispSW AVon or DispSW AVSW for RS-232 display control to work
ProJSW Mode: Used with a projector whose lamp cannot be turned on for up to 5 minutes after being shut off. Keeps control in same state as projector. Match settings with lamp delay on projector in 5 to 300 seconds. The LED will blink for the full amount of the delay time (ex. 40 seconds).
Standby (min.): Adjusts period of time before scaler goes into standby following loss of signal. Default is 0 minutes (standby off)
Note: Standby must be active for Display Off to work - Standby time will set display off time as well.
RS-232
Connection
RS-232 is connected through a 9-pin female DB connector. Only pins 2, 3, and 5 are terminated.
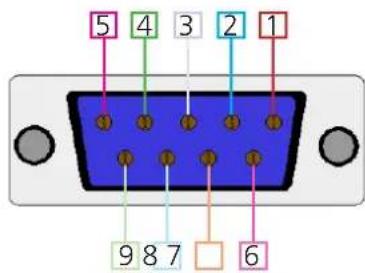
| No. Pin Function | ||
| 1 ---- | Not used | |
| 2 Rx | Receiver | |
| 3 Tx | Transmit | |
| 4 ---- | Not used | |
| 5 Grid Ground | ||
| 6 ---- | Not used | |
| 7 ---- | Not used | |
| 8 ---- | Not used | |
| 9 ---- | Not used | |
Set up and Control Software
Set up and control software can be found on the AT-HDVS-RX webpage on atlona.com.
URL: http://www.atlona.com/HDVS-RX.html (software found under the "Downloads" tab)
Set Up
- Connect the receiver to a PC using a 9 pin serial to USB adapter
Note: Receiver must be disconnected from the display for RS-232 set up
-
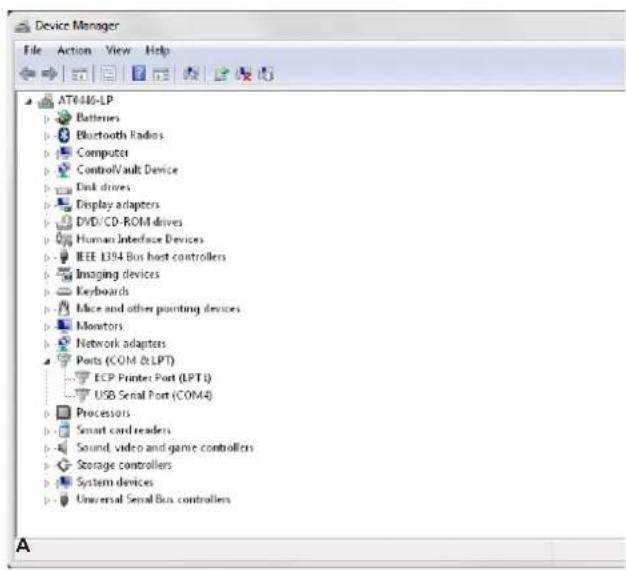
Go to the device manager folder (see picture A) on your computer
-
Find the receiver COM port.
Note: If unsure which COM port is connected, unplug the USB cable and plug it back in. It will disappear and reappear on the COM port list.
- Open software, select the correct COM port, and press connect. (see picture B)
Note: You can test the connection by pressing READ
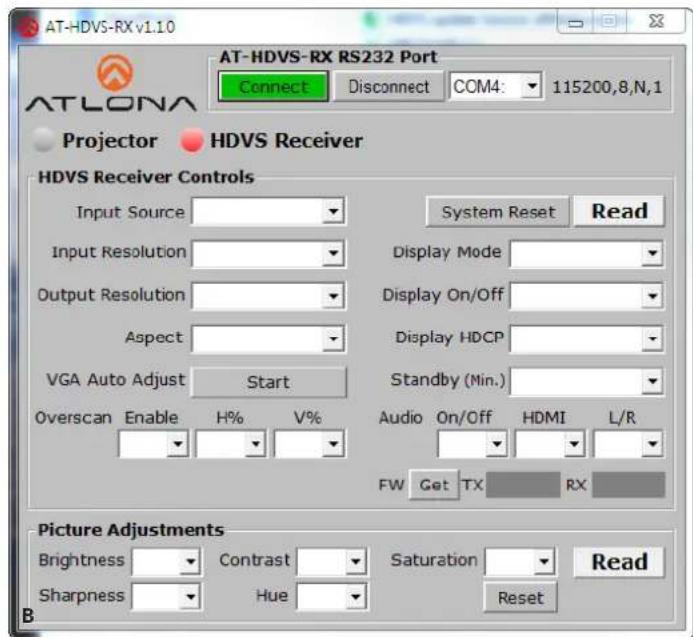
Note: If you are having trouble reading or controlling the HDVS try using a null modem adapter
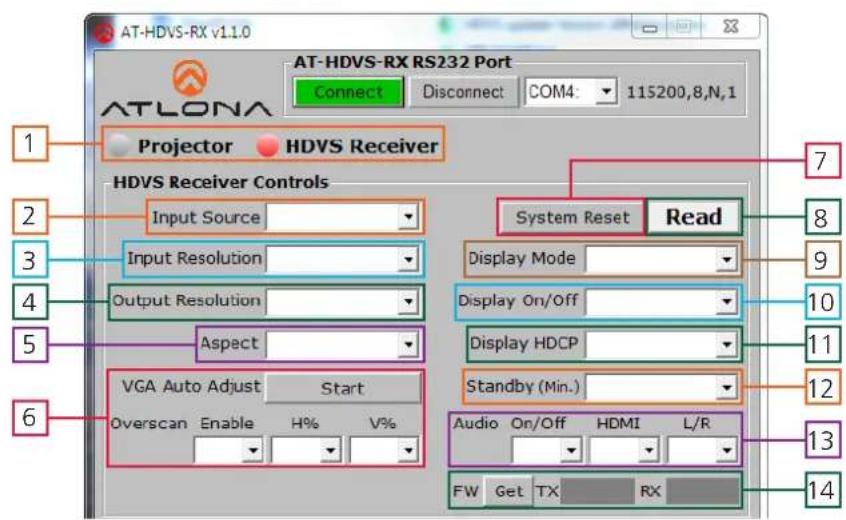
- Control select - switch between projector on/off controls and the HDVS-RX controls
- Input source selection - choose between the HDMI and VGA ports
- Input resolution - switch between the preferred resolutions 800x600, 1024x768, 1280x720, 1280x800, 1366x768, 1920x1080, 1920x1200
- Output resolution - switch between the output resolutions and native resolution VESA: 1024x768, 1280x800, 1280x1024, 1366x768, 1400x1050, 1600x1200, 1680x1050, 1920x1200
Video: 720p@30/50/59.94/60, 1080i@50/59.95/60, 1080p@24/25/29.97/30/50/59.94/60
- Aspect - changes the HDVS's ratio to work with the connected display
- VGA auto adjust and Overscan - Adjust the picture positioning on the display
Note: It is recommended to set the HDVS to 0% for PCs and Overscan for BluRay players
- System reset - Sets the HDVS back to the default settings
Note: Saving is recommended before using the system reset - Read - Displays the current HDVS settings
- Display mode - Display on/off button operation selection for the HDVS-TX/TX-WP
DispSW AVon - Display switches on/off, source audio/video signal always on (default)
DispSW AVSW - Display switches on/off, source audio/video signal switches on/off
AV SW - Display is always on, source audio/video signal switches on/off
Always On - No function
Note: Must be in DispSW AVon or DispSW AVSW for RS-232 display control to work
- Display on/off - Video signal to display is turned on/off
- Display HDCP - set HDCP reporting to Compliant, Noncompliant, or Auto
Compliant - Tells the source it is connected to an HDCP compliant device
Noncompliant - Tells the source it is connected to an HDCP noncompliant device
Auto - Will report compliant or noncompliant to the source depending on what the display reports.
- Standby (min.) - select how long it takes before the RX goes into standby
Standby (min): Adjusts period of time before the scaler goes into standby following loss of signal. Default has standby mode off
Note: Standby must be active for Display Off to work - Standby time will set display off time as well.
- Audio on/off - use to turn audio on and off
- FW - Press the "GET" button to display the current firmware of the RX and TX units
Note: See the chart on page 3 to verify compatibility

- Picture settings - Set the brightness, contrast, saturation, sharpness, and hue for the output
Note: Calibrate the display before using the HDVS-RX picture settings to adjust the output
-
Read - Press to populate the HDVS settings
-
Reset - Resets the picture to factory default settings
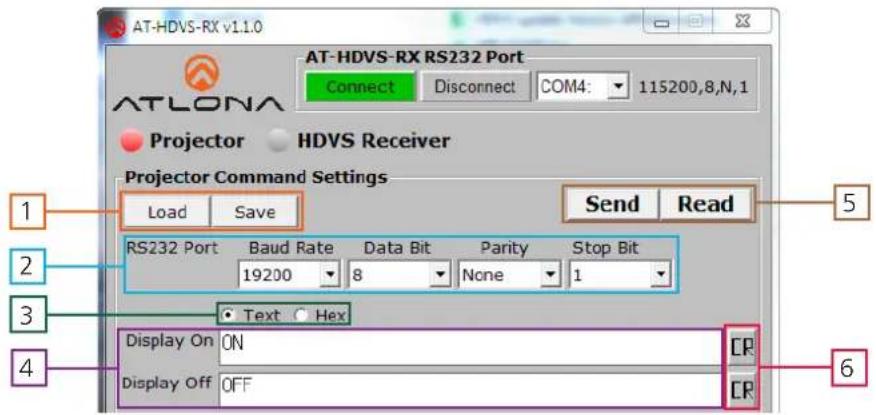
- Save: Allows a display's RS-232 settings to be saved to the PC for easy set up in the future
Load: A previously saved display's settings from your PC
- RS-232 port - Set to display's port settings
(See display's manual for the recommended device settings)
-
Select between text (ASCII) and hex commands input for display on and off
-
Type commands for display on and display off in these fields
-
Send: Once the information is entered, press send to transmit command to RX to set up control Read: Verifies commands are correctly stored on the HDVS-RX
-
Use these buttons to add a carriage return at the end of the command
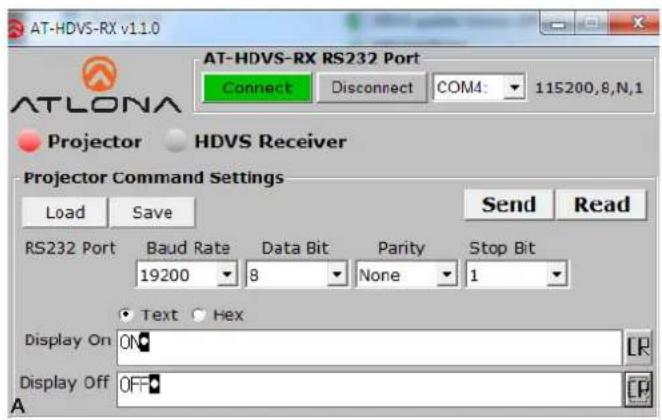
Note: Carriage return will show a square and circle to confirm the carriage return (see picture A)
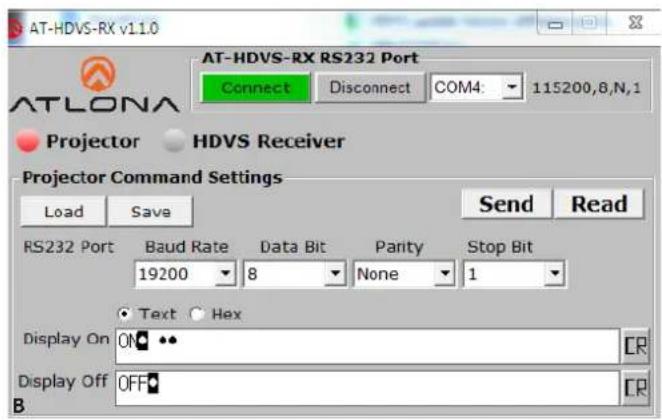
Note: When switching back to text, any non-ASCII HEX will display as bullets (see picture B)
- Auto display on - select on or off
On: turns the display on when a source is detected
- Auto display off - select on or off
On: turns the display off when no signal has been detected for the amount of time selected under standby mode
-
Read - displays the current settings
-
ProjSW mode (sec.) - Locks the front panel keys (after display off command) for the amount of time specified. Sets time from 0 to 300 seconds (in increments of 5)

Commands
The command codes are case sensitive, do not change capitalization, spacing, or lettering.
| Command Parameters Description | ||
| WP_DisplaySet[a,b,c,d]WP_DisplaySet[?] | [a] baud rate: 2400, 9600, 19200, 38400, 56000, 57600, 115200[b] data bit: 5, 6, 7, 8[c] parity: N (None), O (Odd), E (Even), M (Mark), S (Space)[d] stop bit: 1, 1.5, 2 | Set projector's RS-232 port |
| WP_DisplayOn[a,b]WP_DisplayOn[?] | [a] command length.carriage return is computed, if it has one.Max. command length is 50[b]command string.Include carriage return, if it has one.Supports multi-command in a command string.Supports delay-command COMMA(a comma=5 sec) | Set projector's Display On command |
| WP_DisplayOff[a,b]WP_DisplayOff[?] | [a] command length.carriage return is computed, if it has one.Max. command length is 50[b]command string.Include carriage return, if it has oneSupports multi-command in a command string.Supports delay-command COMMA(a comma=5 sec) | Set projector's Display Off command |
| WP_IdentifyTx[a][a] ? Identify Tx model; reply TX=AT-HDVS- | TX, TXWP=AT-HDVS-TX-WP | |
| WP_Input[a] [a] ? , Hdmi1 | , Hdmi2 , Vga Select input source | |
| WP_Input[a][a] ? , Hdmi , | Vga Select input source | |
| WP_InputPrefer[a] [a] ?, 0 | , 1, 2 ...* Select preferred input resolution | |
| WP_Display[a][a] ? , On , | Off Display On/Off control | |
| WP_DisplayMode[a] [a] ? , | DispSWAVOn , DispSWAVSW , AVSW , AlwaysOn | Set display mode |
| WP_Axpect[a] | [a] ? , Full , 16:9 , 16:10 , 4:3 , Keep | Select output aspect ratio |
| WP_AutoSwitch[a] | [a] ? , On, Off | Input Auto Switch enable/disable |
Input Resolutions: 0 = 800x600, 1 = 1024x768, 2 = 1280x720, 3 = 1280x800,
$$ 4 = 1 3 6 6 \times 7 6 8, 5 = 1 9 2 0 \times 1 0 8 0, 6 = 1 9 2 0 \times 1 2 0 0 $$
Commands cont.
| WP_AutoDispOn[a][a] ? , | On , Off Set auto [Dispaly On] enable/disable | |
| WP_AutoDispOff[a] [a] ? , | On , Off Set auto [Dispaly Off] enable/disable | |
| WP_HdcpInput[a][a] ? , HDCP , NotHDCP, Auto HDCP input mode | ||
| WP_VgaAuto[a] [a] Go Run VGA source auto-adjust | ||
| WP_VgaClock[a] | [a] ? , Normal , Inverse | Set VGA ADC clock polarity |
| WP_Info[a] | [a] ? | Get RX firmware version |
| WP_InfoTx[a] | [a] ? | Get TX / TX-WP firmware version |
| WP_Output[a] | [a] ? , 0 , 1 , 2 ... (map osd menu Output list) | Select output resolution |
| WP_OverscanEn[a] | [a] ? , Yes , No | Set overscan enable/disable |
| WP_OverscanH[a] | [a] ? , 0 ~ 50 | Set overscan H size (%) |
| WP_OverscanV[a] | [a] ? , 0 ~ 50 | Set overscan V size (%) |
| WP_AudioEn[a] | [a] ? , On , Off Set audio out On/Off | |
| WP_AudioHdmi[a] | [a] ? , On , Off Set hdmi audio out On/Off | |
| WP_AudioLR[a] | [a] ? , On , Off Set analog L/R audio out On/Off | |
| WP_SystemRst[a] | [a] Go Run system reset | |
| WP_PictureBri[a] | [a] ? , + , - , 0 ~ 100 | Set picture brightness |
| WP_PictureCon[a] | [a] ? , + , - , 0 ~ 100 | Set picture contrast |
| WP_PictureSat[a] | [a] ? , + , - , 0 ~ 100 | Set picture saturation |
| WP_PictureHue[a] | [a] ? , + , - , 0 ~ 100 | Set picture hue |
| WP_PictureSha[a] [a] ? , + , - , 0 ~ 100 Set picture sharpness | ||
| WP_PictureRst[a] | [a] Go Run picture reset | |
| WP_ProjSW[a] | [a] ? , 0 , 5 , 10 , ~ 300 | |
| WP_Standby[a] | [a] ? , 0 ~ 10 | Standby timer in minute |
| ] | Abort command, Feedback is COMMAND FAIL | |
Note:
-
Each command and feedback is terminated with a carriage return.
-
Spaces aren't allowed except in projector display on/off command strings.
-
AT-HDVS-RX RS-232 port settings:
115200 bps, 8 bit data length, No parity bit, 1 bit stop-bit, No flow control.
-
Feedback for a command repeats the original command.
-
If a command fails or is aborted, the feedback will be "COMMAND FAIL".
-
Some commands support query function by parameter [?]
Example: To get projector's display on command -> WP_DisplayOn[?]\$
To get input status -> WP_Input[?]\$
HDCP Reporting
The HDVS-RX has three HDCP reporting modes: compliant, noncompliant, and auto.
Note: HDVS does not alter the signal in any way
Note: HDVS will not pass HDCP compliant source signal to a non HDCP display
Complaint
Reports to the source it is connected to an HDCP compliant device
Note: Will pass all HDCP compliant and non compliant source signals to an HDCP compliant display NonCompliant
Reports to the source it is connected to an HDCP noncompliant device
Note: Some Apple products (and other PCs) will protect non HDCP content, stopping nonHDCP compliant displays from receiving even personal files such as: powerpoints, Excel, or word files. Use this mode to pass nonHDCP content
Note: BlueRay content, apple TV, and other HDCP complaint source signals will not pass
Auto
Will report compliant or noncompliant to the source depending on what the display reports.
Note: This mode is made to work with direct connection to a display and will not work with Atlona matrices
Connection and Installation
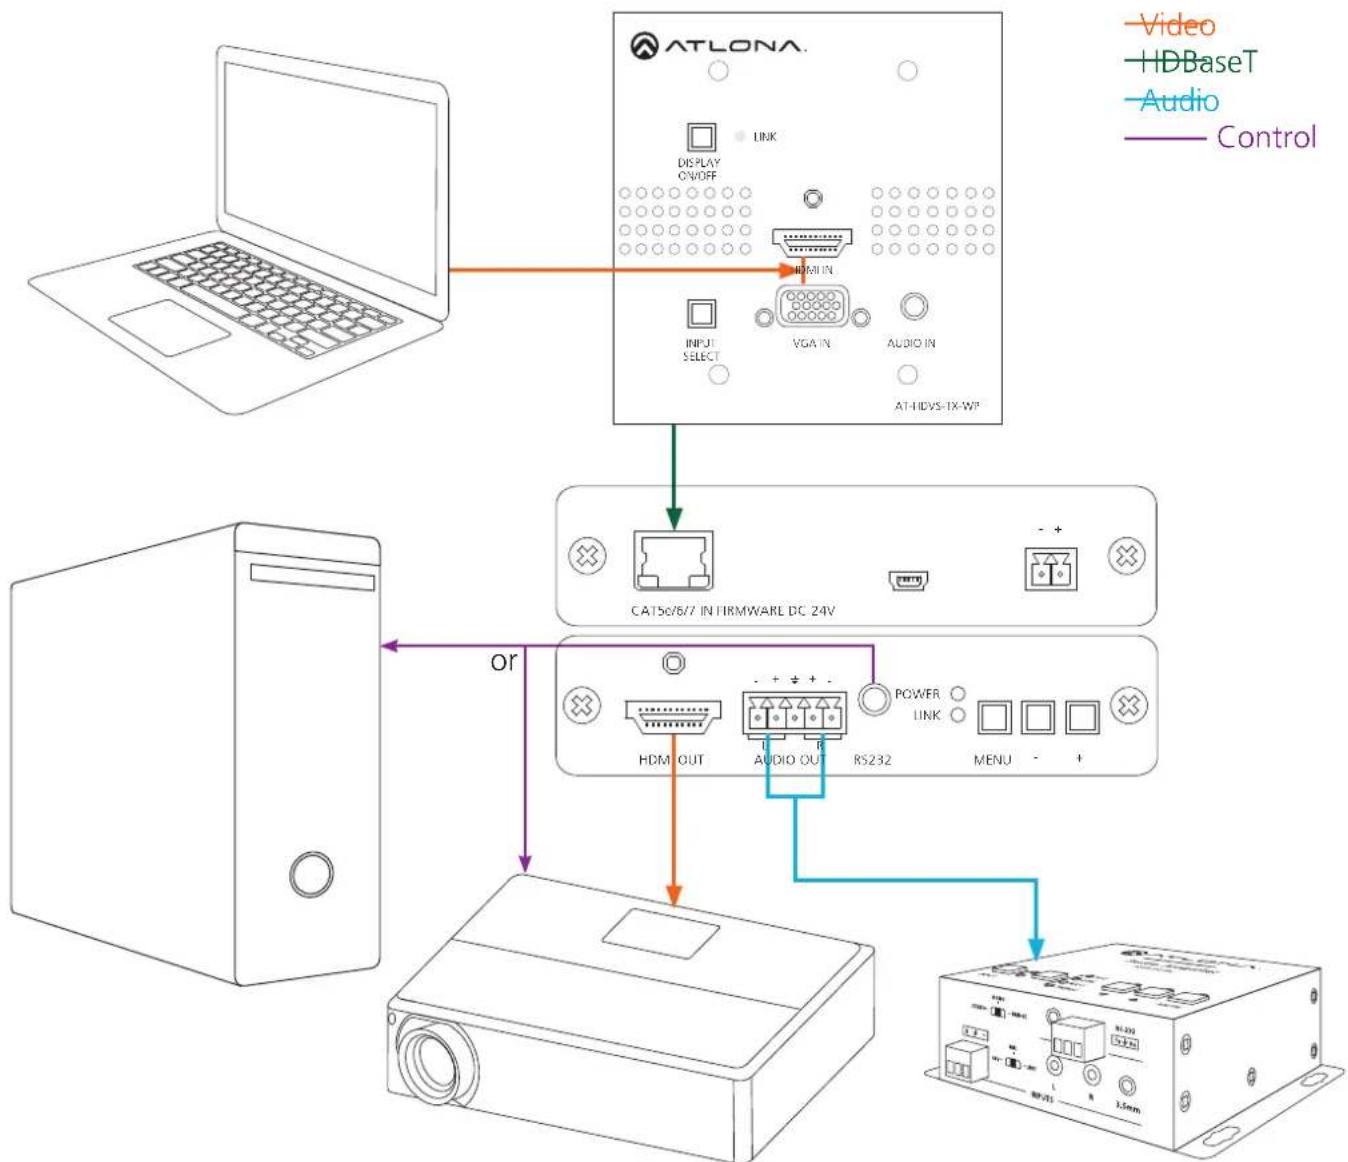
flowchart
graph TD
    A["Laptop"] --> B["ATLONA"]
    B --> C["AT-HDVS-IX-WP"]
    C --> D["CAT5c/6/7 IN FIRMWARE DC 24V"]
    D --> E["AT-HDVS-IX-WP"]
    E --> F["Video"]
    E --> G["HDBaseT"]
    E --> H["Audio"]
    E --> I["Control"]
    D --> J["Power"]
    D --> K["Link"]
    D --> L["HDM OUT"]
    D --> M["AUDIO OUT"]
    D --> N["RS232"]
    D --> O["MENU"]
    D --> P["+"]
    D --> Q["+"]
    D --> R["+"]
    D --> S["+"]
    D --> T["+"]
    D --> U["+"]
    D --> V["+"]
    D --> W["+"]
    D --> X["+"]
    D --> Y["+"]
    D --> Z["+"]
    D --> AA["+"]
    D --> AB["+"]
Specifications
Video Resolutions
| IN | 480i, 480p, 576i, 576p, 720p@25/29/30/50/59/60Hz, | |||||
| 1080i@50/59/60Hz, | 1080p@23/24/25/29/30/50/59/60Hz | |||||
| 640x480, 720x400, 800x600, 1024x768, 1152x864, 1280x768, | ||||||
| 1280x800, | 1280x960, | 1280x1024, | 1366x768, | 140i | ||
| 1440x900, | 1600x900, | 1600x1200, | 1680x1050, | 19i | ||
| Colorspace | RGB, YCbCr 444, YCbCr 422 | |||||
| Color Depth | 10-bit, 12-bit, 16-bit | |||||
Audio
| Formats | PCM 2Ch, LPCM 5.1, LPCM 7.1, Dolby Digital, DTS 5.1,Dolby Digital Plus, Dolby TrueHD, DTS-HD Master Audio |
| Sample Rate | 44.1kHz, 48kHz, 96kHz, 192kHz |
Distance
| HDMI | 10 meters | 30 feet | ||
| CAT5e/6 | 60 meters | 197 feet | ||
| CAT6a/7 | 70 meters | 230 feet | ||
| Signal | ||||
| Bandwidth | 6.75 Gbps | |||
| CEC | No | |||
| HDCP | Compliant | |||
Temperature
| Operating | 0°C | to | 40°C | 32°F | to |
| Storage | -20°C | to | 60°C | -4°F | to |
| Humidity | 20 to 90% non-condensing | ||||
Power
| Consumption Supply | 15W (varies per paired transmitter) | ||||
| Input: | AC100-240V | ~ | 50/60Hz | ||
| Output: | DC | 24V/2.7A | (to RX) | ||
Dimension
| H x W x D | 30 x 122 x 125 (mm) | 1.18 x 4.8 x 4.92 (inch) |
Weight
| Device Shipping | 0.31 | kg | 0.67 | lbs |
Certification
| Unit | CE, | FCC |
| Power Supply | CE, FCC, RoHs, cULus |
Safety Information
Safeguards

To reduce the risk of electric shock, do not expose this product to rain or moisture

If the wall plug does not fit into your local power socket, hire an electrician to replace your obsolete socket.

Do not modify the wall plug. Doing so will void the warranty and safety features.
This equipment should be installed near the socket outlet and the device should be easily accessible in the case it requires disconnection.
Precautions
FCC regulations state that any unauthorized changes or modifications to this equipment, not expressly approved by the manufacturer, could void the user's authority to operate this equipment.
Operate this product using only the included external power supply. Use of other power supplies could impair performance, damage the product, or cause fires.
In the event of an electrostatic discharge this device may automatically turn off. If this occurs, unplug the device and plug it back in.
Protect and route power cords so they will not be stepped on or pinched by anything placed on or against them. Be especially careful of plug-ins or cord exit points from this product.
Avoid excessive humidity, sudden temperature changes or temperature extremes.
Keep this product away from wet locations such as bathtubs, sinks, laundries, wet basements, fish tanks, and swimming pools.
Use only accessories recommended by Atlona to avoid fire, shock, or other hazards.
Unplug the product before cleaning. Use a damp cloth for cleaning and not cleaning fluid or aerosols. Such products could enter the unit and cause damage, fire, or electric shock. Some substances may also mar the finish of the product.
Never open, remove unit panels, or make any adjustments not described in this manual. Attempting to do so could expose you to dangerous electrical shock or other hazards. It may also cause damage to your product. Opening the product will void the warranty.
Do not attempt to service the unit. Disconnect the product and contact your authorized Atlona reseller or contact Atlona directly.
Atlona, Inc. ("Atlona") Limited Product Warranty Policy
Coverage
Atlona warrants its products will substantially perform to their published specifications and will be free from defects in materials and workmanship under normal use, conditions and service.
Under its Limited Product Warranty, Atlona, at its sole discretion, will either:
A) repair or facilitate the repair of defective products within a reasonable period of time, restore products to their proper operating condition and return defective products free of any charge for necessary parts, labor and shipping OR
B) replace and return, free of charge, any defective products with direct replacement or with similar products deemed by Atlona to perform substantially the same function as the original products
OR
C) refund the pro-rated value based on the remaining term of the warranty period, not to exceed MSRP, in cases where products are beyond repair and/or no direct or substantially similar replacement products exist.
Repair, replacement or refund of Atlona's products is the purchaser's exclusive remedy and Atlona's liability does not extend to any other damages, incidental, consequential or otherwise.
This Limited Product Warranty extends to the original end-user purchaser of Atlona's products and is non-transferrable to any subsequent purchaser(s) or owner(s) of these products.
Coverage Periods
Atlona's Limited Product Warranty Period begins on the date of purchase by the end-purchaser. The date contained on the end-purchaser 's sales or delivery receipt is the proof purchase date.
Limited Product Warranty Terms – New Products
• 10 years from proof of purchase date for hardware/electronics products purchased on or after June 1, 2013
• 3 years from proof of purchase date for hardware/electronics products purchased before June 1, 2013
• Lifetime Limited Product Warranty for all cable products
Limited Product Warranty Terms – Refurbished (B-Stock) Products
- 3 years from proof of purchase date for all Refurbished (B-Stock) hardware and electronic products purchased on or after June 1, 2013
Remedy
Atlona recommends that end-purchasers contact their authorized Atlona dealer or reseller from whom they purchased their products. Atlona can also be contacted directly. Visit www.atlona.com for Atlona's contact information and hours of operation. Atlona requires that a dated sales or delivery receipt from an authorized dealer, reseller or end-purchaser is provided before Atlona extends its warranty services. Additionally, a return merchandise authorization (RMA) and/or case number, is required to be obtained from Atlona in advance of returns.
Atlona requires that products returned are properly packed, preferably in the original carton, for shipping. Cartons not bearing a return authorization or case number will be refused. Atlona, at its sole discretion, reserves the right to reject any products received without advanced authorization. Authorizations can be requested by calling 1-877-536-3976 (US toll free) or 1-408-962-0515 (US/international) or via Atlona's website at www.atlona.com.
Exclusions
This Limited Product Warranty excludes:
- Damage, deterioration or malfunction caused by any alteration, modification, improper use, neglect, improper packing or shipping (such claims must be presented to the carrier), lightning, power surges, or other acts of nature.
- Damage, deterioration or malfunction resulting from the installation or removal of this product from any installation, any unauthorized tampering with this product, any repairs attempted by anyone unauthorized by Atlona to make such repairs, or any other cause which does not relate directly to a defect in materials and/or workmanship of this product.
- Equipment enclosures, cables, power supplies, batteries, LCD displays, and any accessories used in conjunction with the product(s).
- Products purchased from unauthorized distributors, dealers, resellers, auction websites and similar unauthorized channels of distribution.
Disclaimers
This Limited Product Warranty does not imply that the electronic components contained within Atlona's products will not become obsolete nor does it imply Atlona products or their electronic components will remain compatible with any other current product, technology or any future products or technologies in which Atlona's products may be used in conjunction with. Atlona, at its sole discretion, reserves the right not to extend its warranty offering in instances arising outside its normal course of business including, but not limited to, damage inflicted to its products from acts of god.
Limitation on Liability
The maximum liability of Atlona under this limited product warranty shall not exceed the original Atlona MSRP for its products. To the maximum extent permitted by law, Atlona is not responsible for the direct, special, incidental or consequential damages resulting from any breach of warranty or condition, or under any other legal theory. Some countries, districts or states do not allow the exclusion or limitation of relief, special, incidental, consequential or indirect damages, or the limitation of liability to specified amounts, so the above limitations or exclusions may not apply to you.
Exclusive Remedy
To the maximum extent permitted by law, this limited product warranty and the remedies set forth above are exclusive and in lieu of all other warranties, remedies and conditions, whether oral or written, express or implied. To the maximum extent permitted by law, Atlona specifically disclaims all implied warranties, including, without limitation, warranties of merchantability and fitness for a particular purpose. If Atlona cannot lawfully disclaim or exclude implied warranties under applicable law, then all implied warranties covering its products including warranties of merchantability and fitness for a particular purpose, shall provide to its products under applicable law. If any product to which this limited warranty applies is a "Consumer Product" under the Magnuson-Moss Warranty Act (15 U.S.C.A. §2301, ET SEQ.) or other applicable law, the foregoing disclaimer of implied warranties shall not apply, and all implied warranties on its products, including warranties of merchantability and fitness for the particular purpose, shall apply as provided under applicable law.
Other Conditions
Atlona's Limited Product Warranty offering gives legal rights, and other rights may apply and vary from country to country or state to state. This limited warranty is void if (i) the label bearing the serial number of products have been removed or defaced, (ii) products are not purchased from an authorized Atlona dealer or reseller. A comprehensive list of Atlona's authorized distributors, dealers and resellers can be found at www.atlona.com.
Atlona, Inc Product Registration
Thank you for purchasing this Atlona product. - We hope you enjoy it and will take an extra few moments to register your new purchase.
Registration creates an ownership record if your product is lost or stolen and helps ensure you'll receive notification of performance issues and firmware updates.
At Atlona we respect and protect your privacy, assuring you that your registration information is completely secure. Atlona product registration is completely voluntary and failure to register will not diminish your limited warranty rights.
To register go to: http://www.atlona.com/registration
- Atlona HDBaseT to HDMI Receiver/Scaler with Audio De-Embedding
- Table of Contents
- Firmware 1.1.0 (5/1/14):
- Firmware 2.1.0
- Introduction
- Package Contents
- Features
- Panel Description
- Front Panel
- Back Panel
- RS-232
- Connection
- Set up and Control Software
- Set Up
- Commands
- HDCP Reporting
- Complaint
- Auto
- Specifications
- Safety Information
- Safeguards
- Precautions
- Atlona, Inc. ("Atlona") Limited Product Warranty Policy
- Coverage
- OR
- Coverage Periods
- Limited Product Warranty Terms – New Products
- Limited Product Warranty Terms – Refurbished (B-Stock) Products
- Remedy
- Exclusions
- Disclaimers
- Limitation on Liability
- Exclusive Remedy
- Other Conditions
- Atlona, Inc Product Registration
Brand : Atlona
Model : AT-HDVS-RX
Category : AV Extender