
SPT 229 GN - Radio SENCOR - Free user manual and instructions
Find the device manual for free SPT 229 GN SENCOR in PDF.


| Product Type | Portable AM/FM Radio |
| Brand | Sencor |
| Model | SPT 229 GN |
| Color | Green (GN) |
| Dimensions (W x H x D) | Approx. 200 x 120 x 80 mm |
| Weight | Approx. 0.5 kg |
| Power Supply | 3x AA batteries (1.5V each) or DC adapter (not included) |
| Radio Bands | AM (530-1600 kHz) and FM (87.5-108 MHz) |
| Tuning Method | Analog dial |
| Antenna | Telescopic rod antenna for FM; built-in ferrite for AM |
| Speaker | Built-in 3-inch dynamic speaker |
| Headphone Jack | 3.5 mm stereo jack |
| Volume Control | Rotary knob |
| Power Indicator | LED on when powered |
| Material | Plastic casing |
| Care Instructions | Wipe with a soft, dry cloth; avoid moisture and solvents |
| Safety | Keep away from water; do not disassemble; use only specified batteries |
| Spare Parts | Not available; device should be serviced by a professional |
| Reparability | Not designed for user repair; contact authorized service |
| General Information | Portable radio for home or travel; easy to use with simple controls |
Frequently Asked Questions - SPT 229 GN SENCOR
User questions about SPT 229 GN SENCOR
0 question about this device. Answer the ones you know or ask your own.
Ask a new question about this device
Download the instructions for your Radio in PDF format for free! Find your manual SPT 229 GN - SENCOR and take your electronic device back in hand. On this page are published all the documents necessary for the use of your device. SPT 229 GN by SENCOR.
USER MANUAL SPT 229 GN SENCOR
natural_image
Line drawing of a portable electronic device with control panel and buttons (no text or symbols)USER'S MANUAL
MICRO PORTABLE RADIO CD-MP3 USB PLAYER
EN
USB
 The lightning flash and arrowhead within the triangle is a warning sign alerting you of „dangerous voltage“ inside the product. The lightning flash and arrowhead within the triangle is a warning sign alerting you of „dangerous voltage“ inside the product. | CAUTIONRISK OF ELECTRICSHOCK DO NOT OPEN | The exclamation point within the triangle is a warning sign alerting you of important instructions accompanying the product. |
| WARNING: To reduce the risk of electric shock, do not remove cover (or back). No user-serviceable parts inside. Refer servicing to qualified service personnel. | ||
| WARNING:To reduce the risk of fire or electric shock, do not expose this appliance to dripping or splashing liquids. | ||
| The mains plug is used as the disconnect device and it shall remain readily operable.To completely disconnect the power input, the mains plug of the apparatus must be disconnected from the mains completely. The mains plug should not be obstructed or should be easily accessed during intended use. | ||
| PLEASE NOTE: You will find the rating label for this product located on the bottom of the unit. |  | CAUTION:Do not expose to dripping or splashing liquids! |
| CAUTION: Grounding or polarization. The precautions should be taken so that the wider blade of the AC plug must match the slot in receptacle „wall socket“. | ||
NOTE: Caution symbols are printed on bottom of unit. Please refer to instruction manual.
| CAUTION: INVISIBLE LASER RADIATION WHEN OPEN AND INTERLOCKS DEFEATED, AVOID EXPOSURE TO BEAM. |
| VORSICHT: UNSICHTBARE LASERSTRAHLUNG TRITT AUS, WENN DECKEL GEÖFFNET UND WENN SICHERHEITSVERRIEGELUNG ÜBERBRÜCKT IST, NICHT DEM STRAHL AUSSETZENI. |
| VARNING: OSYNLIG LASERSTRÄLNING NÄR DENNA DEL ÄR ÖPPNAD OCH SPÄRR ÄR URKOPPLAND, STRÄLEN ÄR FARLIG. |
| ADVARSEL: USYNLIG LASERSTRÄLING VED ÅBNING. NÄR SKKERHEDSAFBRYDERE ER UDE AF FUNKTION. UNDGÅ UDS/ETTELSE FOR STRÄLING. |
| ATTNENZIONE: RADIONS LASER INVISIDILE. NON GUARDARE DIRETTAMENTE NELLA SORGENTE DEL LASER. |
| ACHTUNG: LASERLINSE NICHT BERÜHREN UNSICHTBARER LASERSTRAHL. |
| AVISO: A LENTE NUNCA DEVE SER TOCADA. |
CAUTION: Invisible laser radiation when open and interlocks defeated. Avoid exposure to beam.
CLASS 1 LASER PRODUCT
LOCATION OF CONTROLS
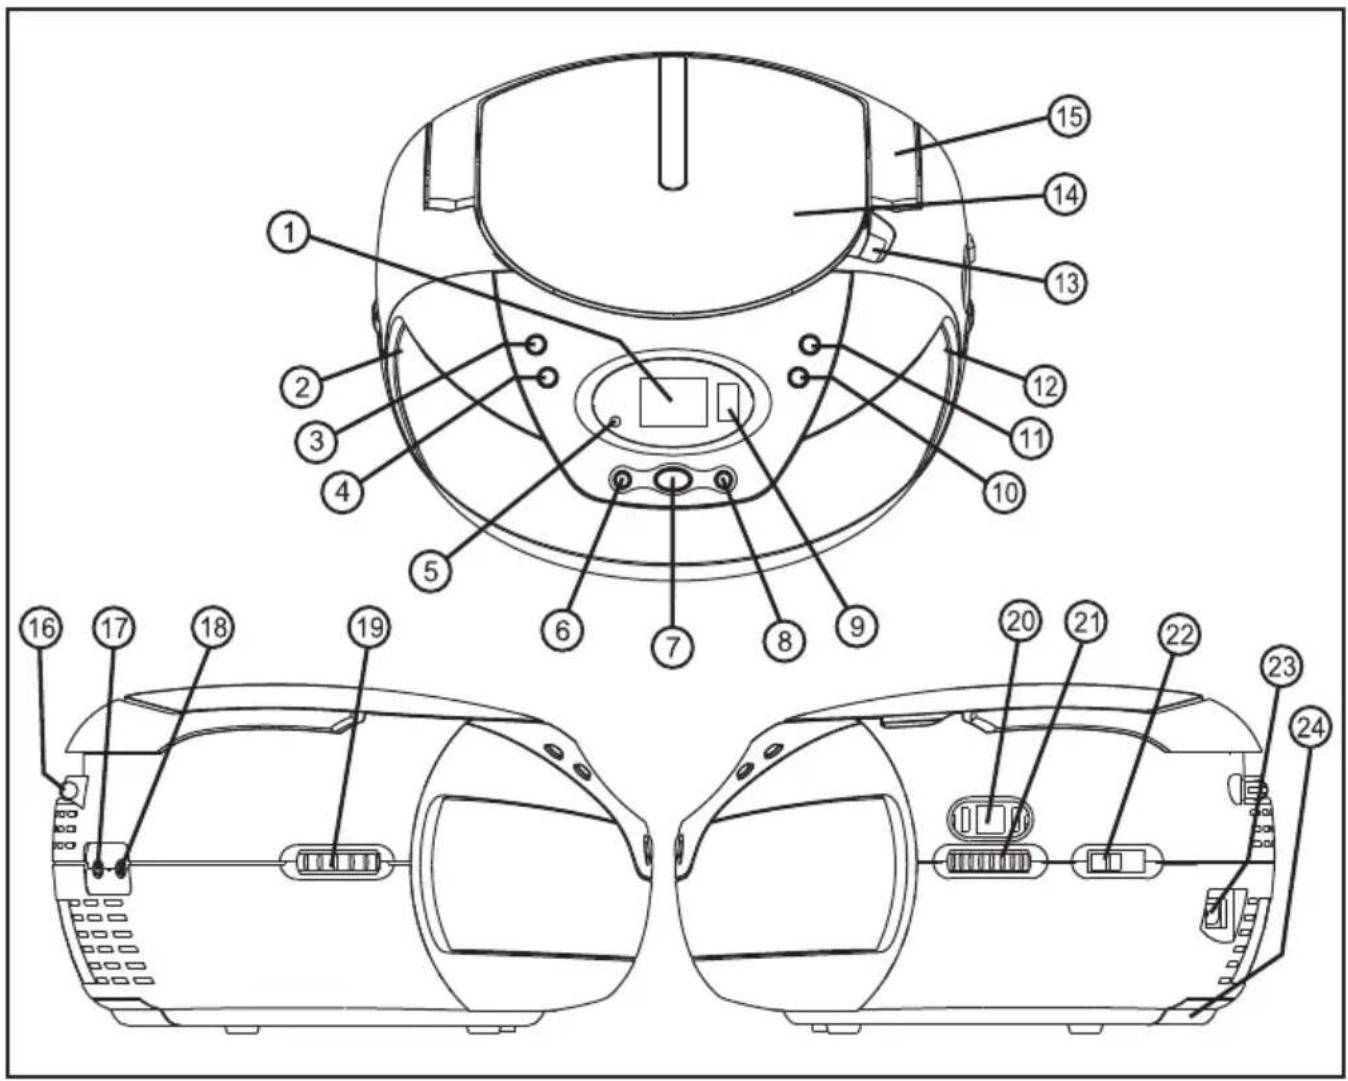
- LCD display
- Speaker (left)
- Repeat key
- SKIP+10/ FOLDER+ key
- Power LED light
- Back key
- PLAY/PAUSE/USB key
- NEXT key
- USB socket
- STOP key
- PROGRAM key
- Speaker (right)
-
CD-door opening recess
-
CD-door
- Handle
- Telescopic antenna (FM)
- Aux in jack
- Headphones jack
- Volume control knob
- Radio dial scale window
- Radio tuning control knob
- Function switch (OFF/CD/MP3/USB/AUX/AM/FM)
- AC socket
- Battery compartment
POWER SUPPLY
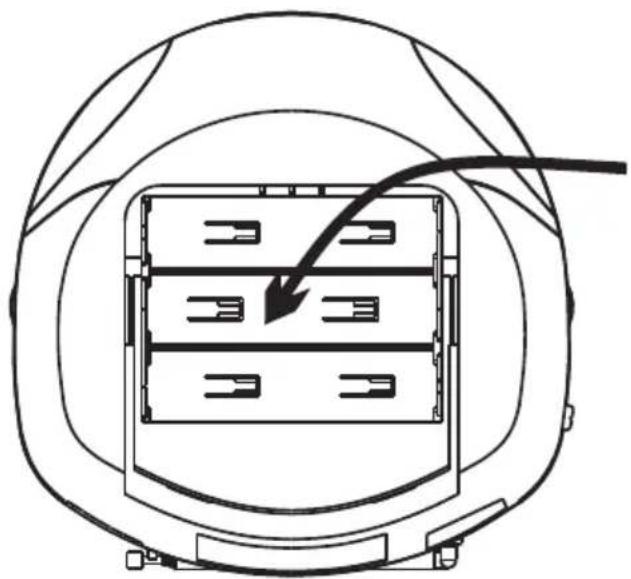
BATTERY OPERATION
- Open the battery door and insert 6 pcs „C-cell“ (UM-2/LR14 type) batteries. Please observe correct battery polarities or the set will not work.
- IMPORTANT: when the set is only used with "AC", or is not used for 4 weeks or more, please remove the batteries, to avoid damage to the set from leakage of batteries.
BOTTOM VIEW
natural_image
Diagram of a device housing with internal compartments and a curved arrow indicating direction (no text or symbols)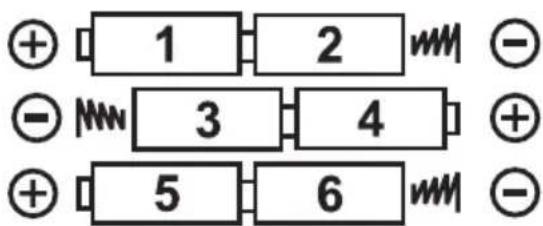
UM-2/"C"/LR14
(1.5 V) SIZE ×6 PCS
AC OPERATION (BUILT-IN TRANSFORMER)
- Make sure the set voltage of the unit matches your local household voltage.
- Insert the plug of the AC-cord into a wall outlet with AC-power.
IMPORTANT!
Please make sure to set the function switch to „OFF“
Position when unit is not in use to conserve power.
OPERATION OF RADIO
- Set the FUNCTION switch to the desired band (AM or FM).
- Rotate tuning knob to tune-in the desired station.
- Adjust the telescopic antenna (for "FM") and position of the set (for "AM") to obtain the best reception.
- Adjust the VOLUME knob to the desired level.
- To turn off the radio, slide the FUNCTION switch to „OFF“.
HEADPHONE JACK
- This unit is equipped with a stereo headphone jack (3.5MM diameter) which accepts most standard headphones (or earphones) (not included).
- When the plug of a standard headphones (or earphones) is inserted into this jack, the built-in speakers will automatically be disabled.
- When the headphones/ earphones is disconnected, the speakers will be re-activated.
INSERTION & REMOVAL OF DISCS
- When opening the CD-door, always ensure the disc is not in motion (not spinning) when you open the CD-door. Always press „STOP“ key to stop the disc spinning first.
- Place a cd into the compartment with the label-side (printed side of disc) facing upwards. Press down in the center part of disc until the disc „locks“ onto the center spindle.
- When the cd has been placed onto the center spindle, gently lower the CD-door downwards until it locks shut.
- The CD is now ready to be played.
- To remove a disc, follow the same procedure as described above, except to remove the CD instead of inserting it into the compartment, by placing one finger at the middle of disc (center spindle) & the other at the edge of the disc & gently pulling upwards.
- IMPORTANT: always hold a CD by its edges. Avoid getting any finger prints, smudges or dirt onto the surface of a disc. In case this happens, use a special CD-cleaning cloth or cleaning kit to remove the dirt or smudges.
NORMAL CD OPERATION
- Insert a CD as described.
- Slide the function switch to "CD/MP3/USB/AUX".
- The CD will spin momentarily and then the display will show the total number of tracks (songs) of the disc.
- At anytime during playback, press the PLAY/PAUSE key ▶II to pause operation of the unit. Press the PLAY/PAUSE key to resume operation at the same track & position.
- At anytime during playback, press the STOP key to stop operation of the set. This will reset the CD-player to the first track (if you press play after stop, the first track will always start playing).
- At anytime during playback, "press and release" the BACK/NEXT keys to skip backwards or forwards by one track, as desired.
- At anytime during playback, "press and hold" the BACK/NEXT keys to fast-reverse (review) or fast-forward (cue) the specific track, which is currently playing.
HOW TO PLAY MP3 DISCS
- Insert a MP3 CD disc, close the door.
- Slide the function switch to „CD/MP3/USB/AUX“ position.
- The disc will spin and perform a full check of the disc to count the total number of songs. Then playback of the first song (track) will begin and the display will indicate the current track no: (001).
-
If your disc has „folder“ (see below) the display will show the folder number (eg. F01, F02, etc..) every 5 seconds.
-
At any time during playback, press and release „NEXT“ or „BACK“ to skip backwards or forwards by one track.
- MP3 discs often have several "folder" (sub-directories) which contain groups of songs.
- If your MP3-CD has no folders, you can use the FOLDER+/SKIP+10 key to jump 10 songs ahead. This is useful if you have many songs on you want to quickly jump to a particular song.
- Press & release FOLDER+/SKIP+10 several times until you reach a song number near to your desired song, and then press „NEXT“ or „BACK“ repeatedly to arrive and the exact song you desire.
- If your MP3-CD has folders, you can select the folder to playback by pressing and holding the FOLDER+/SKIP+10 key for about 2 seconds.
- Each time you press & hold the FOLDER+/SKIP+10 key (for 2 seconds), the player jumps to the first song in the next folder. (The display will alternate between the song number & the folder number every 5 seconds). (NOTE: the „folder“ function only works on MP3-discs which have folders. If your disc has no folders, pressing FOLDER+/SKIP+10 will perform the „skip +10“ function).
USB FLASH PEN DRIVE MP3 PLAYBACK
- Insert a USB flash drive into the USB socket.
- Set the FUNCTION switch to „CD/MP3/USB/AUX“.
- Display will show total folder (if it has folders) and total tracks.
Then playback of the first song (track) will begin and the display will indicate the current track no: (001)
- At any time during playback, press and release „NEXT“ or „BACK“ to skip backwards or forwards by one track.
- You may also use the FOLDER+/SKIP+10 key in the same manner as with MP3-CD playback (note: this key will function as „SKIP + 10“ if there are no folders on the flash drive).
FROM CD/ CD-MP3 MODE TO USB MODE
- Press STOP key once.
- Insert a USB flash drive into the USB socket.
- Press and hold „PLAY/ PAUSE/ USB“ key until the display shows „USB“.
- Then the first song will start playback.
FROM USB MODE TO CD/ CD-MP3 MODE
- Press STOP key once.
- Press and hold „PLAY/ PAUSE/ USB“ key for above 2 seconds.
- The disk will spin and perform a full check of the disc to count the total number of songs. Then the first song will start playback.
IMPORTANT - MP3 FILE NAME FORMAT
Please take care to use only regular english alphabets (A to Z) & numerals (0 to 9) in the file names of MP3 songs. Characters such as „ _ ” (underscore) & „ _ ” (space) may result in the files being unreadable or inconsistently unrecognizable by the player.
| NOTE:Although this product is fully compatibly with USB 1.1 & 2.0 Standards, a small percentage (about 5 %) of USB flash drives might not be readable, due to those USB-flash drive manufacturers non-compliance with the full (official) USB 1.1 / 2.0 Standards. |
| IMPORTANTREMOVAL OF USB DRIVESNever remove (or unplug) USB-drives from the set during playback of MP3 songs from these media. Always press STOP first and then press and hold (for 2 seconds) the „PLAY/ PAUSE/ USB“ key to switch to „CD“ mode before removing or unplugging USB memory, to prevent damage to your song files or memory devices. |
| IMPORTANT: This unit does not support USB-MP3 player, due to their inherent lack of software compatibility. Only USB „pen drives“ (flash memory usb drives) can be used, for MP3 playback. |
| IMPORTANT POINTPlease do NOT use a USB Extension Cable to connect your USB FLASH DRIVE to the USB PORT of this unit.Such cables can pick up additional interference which can corrupt the data flow, preventing normal operation and usage of the USB port.Always connect your USB Flash Drive DIRECTLY to the USB PORT without any USB extension cables. |
REPEAT PLAYBACK FUNCTION
- At anytime during playback, press the „REPEAT“ key as follows: press once, display shows a flashing „repeat“ symbol: ≥slant ≤slant = to repeat the current track press twice, display shows a „REPEAT“ symbol remind on: = to repeat all track (full CD)
PROGRAMMING THE CD-PLAYER
- The CD player can be programmed to play any sequence of upto 20 tracks for audio-CD / 99 tracks for CD-MP3 / USB-MP3, as desired.
- Always press the STOP ☐ key before starting the programming.
- Press the PROGRAM key, the display will show a symbol (flash) and the display will show "PO1", to indicate that the set is now in „memory programming mode“, at memory position No. 1.
- Press the „NEXT“ or „BACK“ key to select the track (song) number you wish to be stored in the first memory (program) position, and press the PROGRAM key to confirm your selection.
- When you press PROGRAM key the display will advance to the next memory position number (eg. "PO2" for 2^nd position).
- Repeat the previous 2 steps, each time selecting any track number of your choice to be stored in the successive memory (program) positions.
- After each track number, remember to press the PROGRAM key.
- After a maximum of songs (or less) have been selected as described above, press the PROGRAM key.
- Also, the symbol will remain „ON“ to indicate that you have saved a program-memory (sequence).
- Pressing PLAY ▶ will now play back the „saved sequence“ in the program memory.
- Pressing NEXT/ BLACK will move to the next or previous song in the saved sequence.
- To clear (cancel) the entire program which is stored in the memory, simply press „STOP“ ☐ twice (☐ symbol disappear), or switch „OFF“ the set.
USING THE AUDIO LINE IN CONNECTION (AUX-INPUT)
- You can connect the audio output of an external device such as a CD-player to this unit, to listen to the sound of that device through the amplifier of this music system.
- To connect an external audio device (eg. MP3 player, please use a standard (not included) stereo cable (with 3.5Mm to 3.5Mm plugs) to connect the "headphone-out or audio line-out" of the external device to the AUX-input socket of this unit.
- Switch the FUNCTION switch to "CD/MP3/USB/AUX".
- Switch on the external device (eg. CD-player).
- Start playback of the external device and adjust the VOLUME control of the main unit to the desired level.
- Remember to switch off the power of the music system (main unit) when you are finished using the external device.
SPECIFICATIONS
| Power supply | AC 230V ~ 50HZDC 9V (6x C-CELL/ UM-2/ LR14 size)(batteries not included) |
| Power consumption | 15 W |
| Frequency | AM 522–1 620 kHzFM 87,5–108 MHz |
| Power | 2× 1 W RMS |
| USB connector | max 16 GB |
| Dimensions | 208 × 122 × 210 mm |
| Weight | 1.2 kg |
| Under the influence of electrostatic phenomenon, the product may malfunction and user to power reset. |
| Excessive sound pressure from earphones and headphones can cause hearing loss. |
| Battery shall not be exposed to excessive heat such as sunshine, fire or the like. |
| ELECTROSTATIC DISCHARGE (ESD) PRECAUTIONWhen electrostatic discharge (ESD) occurs at the front surface (whether metal or plastic) or near any part or any button of this unit, or at the usb port and/ or SD-card slots (if they exist on this product), there may be a possibility that the product may stop operation and/ or shut down immediately. This is a normal condition and intended to protect the unit and internal components against damage.In such a case, please reset the unit (by disconnecting and reconnecting ac-power source) to revert the unit to normal operation. |
INSTRUCTIONS AND INFORMATION REGARDING THE DISPOSAL OF USED PACKAGING MATERIALS
Dispose of packaging material at a public waste disposal site.
DISPOSAL OF USED ELECTRICAL AND ELECTRONIC APPLIANCES
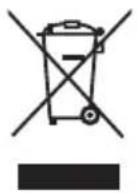
The meaning of the symbol on the product, its accessory or packaging indicates that this product shall not be treated as household waste. Please, dispose of this product at your applicable collection point for the recycling of electrical & electronic equipment waste. Alternatively in some states of the European Union or other European states you may return your products to your local retailer when buying an equivalent new product. The correct disposal of this product will help save valuable natural resources and help in preventing the potential negative impact on the environment and human health, which could be caused as a result of improper liquidation of waste. Please ask your local authorities or the nearest waste collection centre for further details. The improper disposal of this type of waste may fall subject to national regulations for fines.
For business entities in the European Union
If you wish to dispose of an electrical or electronic device, request the necessary information from your seller or supplier.
Disposal in other countries outside the European Union
If you wish to dispose of this product, request the necessary information about the correct disposal method from local government departments or from your seller.
CE
This product meets all the basic EU regulation requirements that relate to it.
Changes to the text, design and technical specifications may occur without prior notice and we reserve the right to make these changes.
SENCOR®
EN Warranty conditions
Warranty card is not a part of the device packaging.
This product is warranted for the period of 24 months from the date of purchase to the end-user. Warranty is limited to the following conditions. Warranty is referred only to the customer goods using for common domestic use. The claim for service can be applied either at dealer's shop where the product was bought, or at below mentioned authorized service shops. The end-user is obligated to set up a claim immediately when the defects appeared but only till the end of warranty period. The end user is obligated to cooperate to certify the claiming defects. Only completed and clean (according to hygienic standards) product will be accepted. In case of eligible warranty claim the warranty period will be prolonged by the period from the date of claim application till the date of taking over the product by end-user, or the date the end-user is obligated to take it over. To obtain the service under this warranty, end-user is obligated to certify his claim with duly completed following documents: receipt, certificate of warranty, certificate of installation.
This warranty is void especially if apply as follows:
■ Defects which were put on sale.
■ Wear-out or damage caused by common use.
The product was damaged by unprofessional or wrong installation, used in contrary to the applicable instruction manual, used in contrary to legal enactment and common process of use or used for another purpose which has been designed for.
■ The product was damaged by uncared-for or insufficient maintenance.
■ The product was damaged by dirt, accident of force majeure (natural disaster, fire, and flood).
■ Defects on functionality caused by low duality of signal, electromagnetic field interference etc.
The product was mechanically damaged (e.g. broken button, fall).
■ Damage caused by use of unsuitable media, fillings, expendable supplies (batteries) or by unsuitable working conditions (e.g. high temperatures, high humidity, quakes).
■ Repair, modification or other failure action to the product by unauthorized person.
■ End-user did not prove enough his right to claim (time and place of purchase).
■ Data on presented documents differs from data on products.
■ Cases when the claiming product cannot be identified according to the presented documents (e.g. the serial number or the warranty seal has been damaged).
Authorized service centers
Visit www.sencor.eu for detailed information about authorized service centers.
- LOCATION OF CONTROLS
- POWER SUPPLY
- BATTERY OPERATION
- AC OPERATION (BUILT-IN TRANSFORMER)
- IMPORTANT!
- OPERATION OF RADIO
- HEADPHONE JACK
- INSERTION & REMOVAL OF DISCS
- NORMAL CD OPERATION
- HOW TO PLAY MP3 DISCS
- USB FLASH PEN DRIVE MP3 PLAYBACK
- FROM CD/ CD-MP3 MODE TO USB MODE
- FROM USB MODE TO CD/ CD-MP3 MODE
- IMPORTANT - MP3 FILE NAME FORMAT
- REPEAT PLAYBACK FUNCTION
- PROGRAMMING THE CD-PLAYER
- USING THE AUDIO LINE IN CONNECTION (AUX-INPUT)
- INSTRUCTIONS AND INFORMATION REGARDING THE DISPOSAL OF USED PACKAGING MATERIALS
- DISPOSAL OF USED ELECTRICAL AND ELECTRONIC APPLIANCES
- For business entities in the European Union
- Disposal in other countries outside the European Union
- CE
- SENCOR®
- EN Warranty conditions
- This warranty is void especially if apply as follows:
- Authorized service centers
Brand : SENCOR
Model : SPT 229 GN
Category : Radio