
iBT44 - Docking Station IHOME - Free user manual and instructions
Find the device manual for free iBT44 IHOME in PDF.


| Product Type | Docking Station |
| Brand | iHome |
| Model | iBT44 |
| Dimensions (Approx.) | 12 x 6 x 3 inches |
| Weight | 2.5 lbs |
| Power Supply | AC adapter (included) |
| Power Consumption | 5W typical |
| Bluetooth Version | 4.0+ |
| Bluetooth Range | Up to 33 ft (10 m) |
| Speaker Output | 2 x 5W |
| Audio Input | 3.5mm auxiliary |
| Compatible Devices | Bluetooth-enabled devices, Apple Lightning, USB |
| Charging Function | Charge connected devices via USB |
| Remote Control | Yes (included) |
| Alarm Clock | Yes, dual alarm |
| FM Radio | Yes, built-in |
| Display | LED display with dimmer |
| Cleaning Instructions | Wipe with dry, soft cloth |
| Safety Warnings | Do not expose to water or extreme temperatures |
| Spare Parts Availability | Contact iHome customer support |
Frequently Asked Questions - iBT44 IHOME
User questions about iBT44 IHOME
0 question about this device. Answer the ones you know or ask your own.
Ask a new question about this device
Download the instructions for your Docking Station in PDF format for free! Find your manual iBT44 - IHOME and take your electronic device back in hand. On this page are published all the documents necessary for the use of your device. iBT44 by IHOME.
USER MANUAL iBT44 IHOME
Bluetooth Wireless Boombox with FM Radio and USB Charging

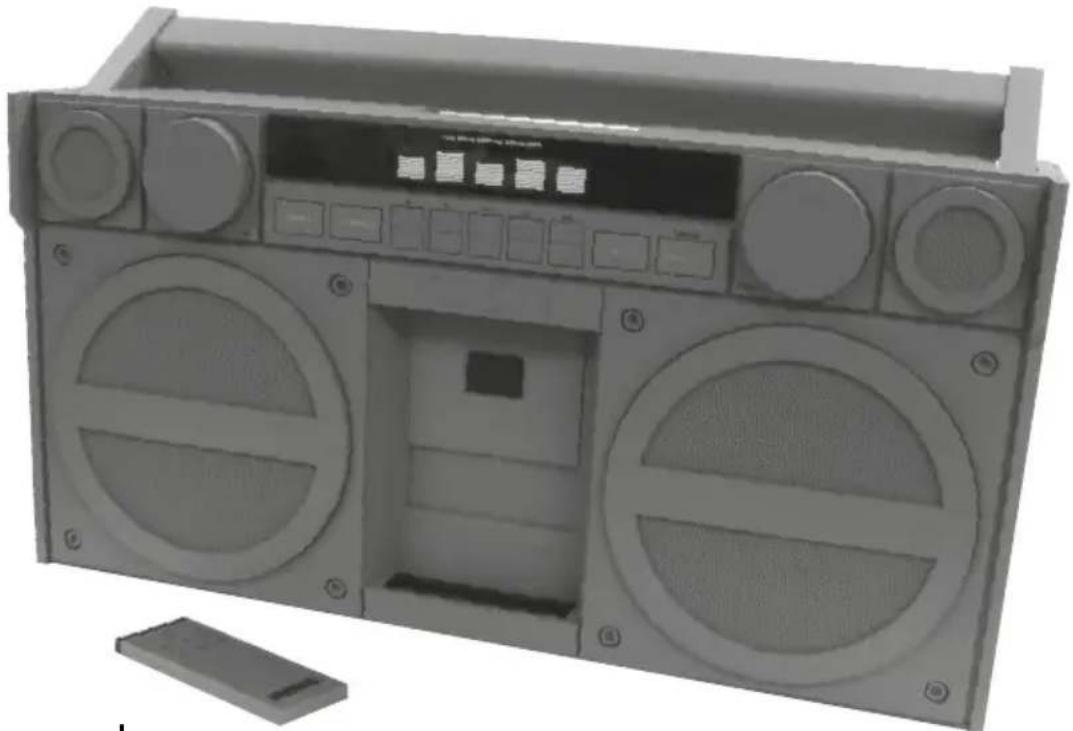
natural_image
Exterior view of a portable electronic device with front panels and control buttons (no visible text or symbols)instruction manual
iBT44
Introduction
Thank you for purchasing the iHome iBT44. This product is designed to provide high quality wireless sound for your Bluetooth audio device.
Along with the included Quick Bluetooth Connection Guide this instruction booklet explains the basic operation and care of the unit. Please read them carefully and keep for future reference.
Maintenance
- Place the unit on a level surface away from sources of direct sunlight or excessive heat.
- Protect your furniture when placing your unit on a natural wood and lacquered finish. A cloth or other protective material should be placed between it and the furniture.
- Clean your unit with a soft cloth moistened only with mild soap and water. Stronger cleaning agents, such as benzene, thinner or similar materials can damage the surface of the unit.
FCC Information
iBT44
FCC ID: EMOIBT44
IC: 986B-IBT44
FCC Radiation Exposure Statement
This equipment complies with FCC RF radiation exposure limits set forth for an uncontrolled environment. This transmitter must not be co-located or operating in conjunction with any other antenna or transmitter.
This Device complies with RSS-210 of the IC Rules; Operation is subject to the following two conditions:
(1) This device may not cause harmful interference and
(2) This device must accept any interference received, including interference that may cause undesired operation.
This device complies with Part 15 of the FCC Rules, operation is subject to the following two conditions: (1) This device may not cause harmful interference, and (2) this device must accept any interference received, including interference that may cause undesired operation.
- Warning: Changes or modifications to this unit not expressly approved by the party responsible for compliance could void the user's authority to operate the equipment.
NOTE: This equipment has been tested and found to comply with the limits for a Class B digital device, pursuant to Part 15 of the FCC Rules.
These limits are designed to provide reasonable protection against harmful interference in a residential installation. This equipment generates, uses and can radiate radio frequency energy and, if not installed and used in accordance with the instructions, may cause harmful interference to radio communications.
However, there is no guarantee that interference will not occur in a particular installation. If this equipment does cause harmful interference to radio or television reception, which can be determined by turning the equipment off and on, the user is encouraged to try to correct the interference by one or more of the following measures:
• Reorient or relocate the receiving antenna.
- Increase the separation between the equipment and receiver.
- Connect the equipment into an outlet on a circuit different from that to which the receiver is connected.
- Consult the dealer or an experienced radio/TV technician for help.
This Class B digital apparatus complies with Canadian ICES-003.
Playing Audio Via Bluetooth....6
Playing Audio Via Aux-in/FM Radio....7
Using FM Radio in Other Countries/Charging Devices via USB Port 8
The Remote Control 9-10
Consumer Product Safety Guide.... 11-12
Troubleshooting 13
Warranty....13
iBT44
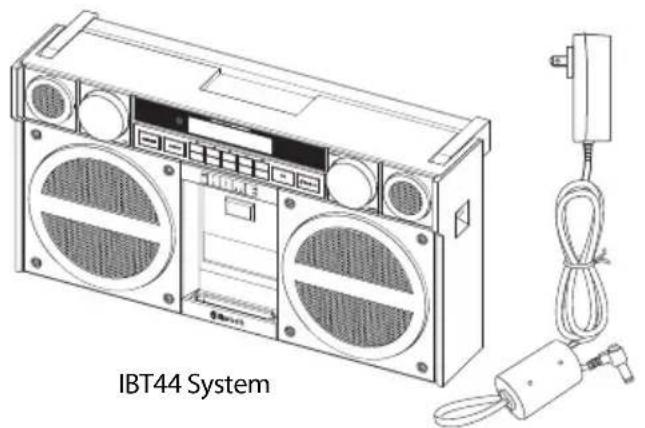
Included
- iBT44 system
• 100V-240V universal AC adaptor
• 3.5mm stereo audio cable - FM Antenna
- Shoulder strap
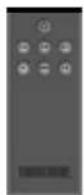
- Remote control
natural_image
Line drawing of an IBT44 System with two large front speakers and a connected cable (no text or symbols on the device itself)AC power adaptor
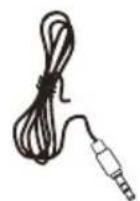
FM Antenna

3.5mm audio cable
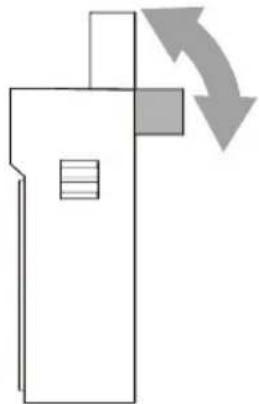
The handle of the unit can be placed in two positions, upright for carrying, or back for general use or tilt-back play.
natural_image
Pure mechanical diagram showing a lever mechanism with directional arrows (no text or symbols)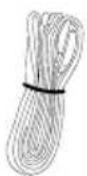
shoulder strap
remote control
Meet Your iBT44
iBT44
Back
Using the iBT44
Setting Up the Unit
This unit can be operated using the included AC adaptor or with 6 "D" batteries for portable use (not included).
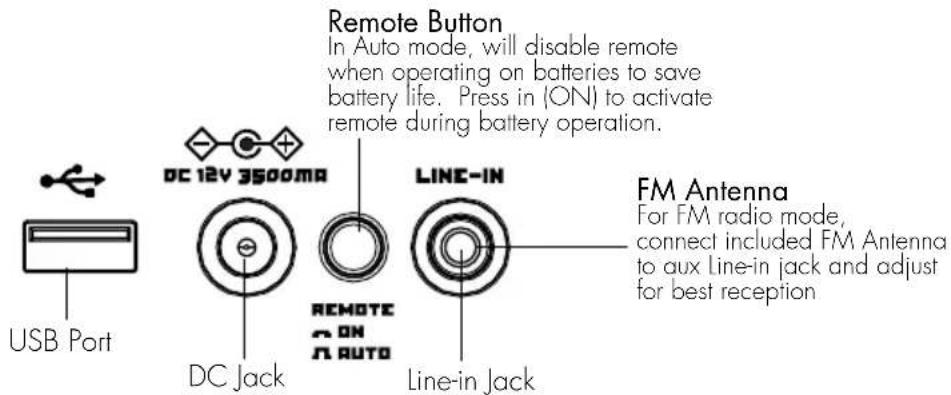
For AC operation, place unit on a stable surface. Plug the power adaptor into the DC jack on back of the unit and the other end into a wall socket. The USB port can charge devices while connected to AC power
For battery operation, place unit upside down to access the battery compartment. Press down directly on arrow with thumb and slide the battery compartment cover to release it. If replacing existing batteries, remove and dispose of properly. Insert 6 fresh "D" alkaline batteries with polarity (+ or -) as shown. Replace battery compartment door.
Note: unit will not charge USB devices while operating on batteries.
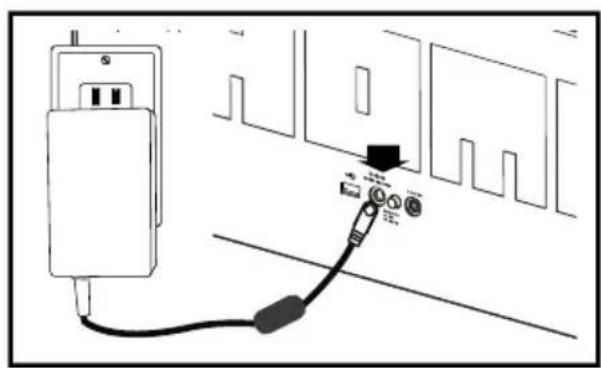
natural_image
Diagram showing a cable being inserted into an electronic device (no text or symbols present)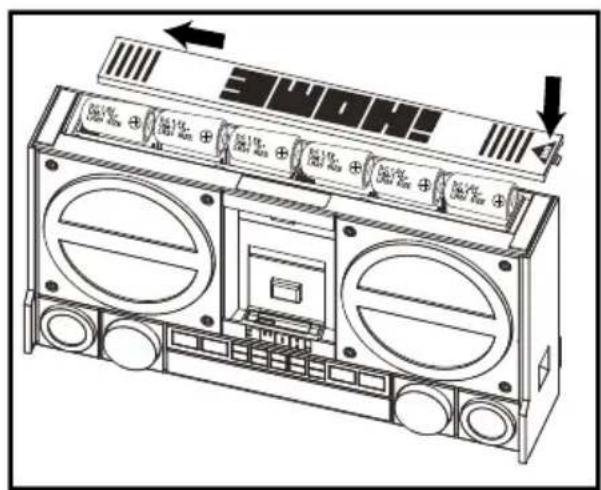
Setting Up the Unit
Installing and adjusting the carry strap
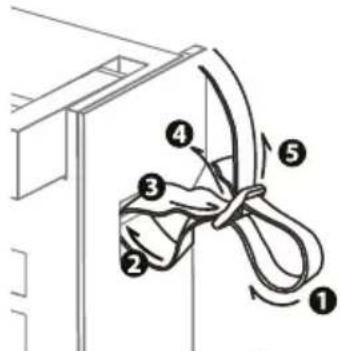
Insert the folded end of the strap under the strap pin and pull up, then thread this end through the strap adjuster slide. Pull on strap adjuster to adjust for proper fit and comfort.
Make sure the strap is securely fastened. Repeat on opposite end of unit.
The Display
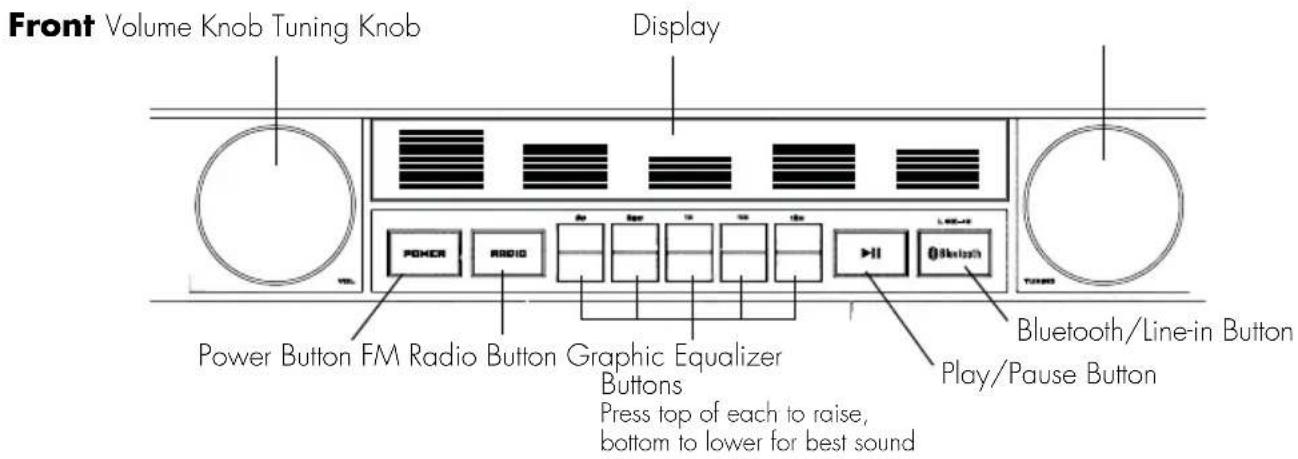
By default, the display shows the five bands of the graphic equalizer as the frequencies change during audio playback.

The display will change to show changes in volume, EQ, mode, FM tuning, Bluetooth pairing, etc.
Note: the display can be dimmed in Bluetooth mode by turning the Tuning Knob.
Using the iBT44
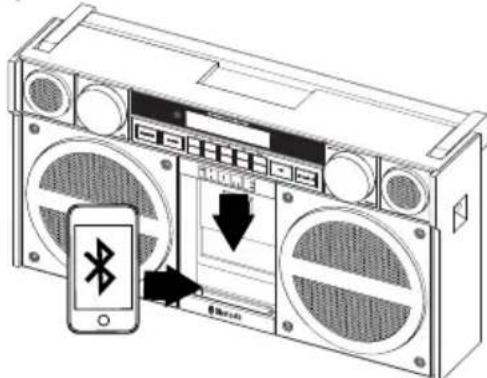
To store your Bluetooth device, place it in the rubberized well and pull down on the retention bar until the device is secure. DO NOT LEAVE DEVICE IN UNIT DURING TRANSPORT OR WHILE CARRYING.
Using Bluetooth: Pairing Your Device
Using the iBT44
- Turn on your Bluetooth-enabled device and turn on Bluetooth capability as described in the device's user manual.
- Press the Power Button to turn the unit ON (pairing is available in any mode).
- Press and hold the Bluetooth Button on the unit for 2 seconds to begin pairing the unit with your device. "PAIR" will flash on the display, and the button will flash blue, indicating pairing attempt.

"iHome iBT44" should appear on your device's menu. If "Not Paired", "Not Connected" or similar message appears, select "iHome iBT44" on the device to connect it. If your device asks for a password, enter 1234 or 0000 on the keyboard of your device. If no device is paired within 2 minutes, a tone will sound and the unit will revert to its previous mode. To retry pairing, press the Power Button to turn the unit OFF then press again to turn back on, then follow steps 2 & 3 again.
- Once paired with a device, the PAIR indicator on the display will stop flashing then "DONE" will appear briefly. The Bluetooth Button will flash twice then glow solid blue. On some devices, you must then select "Use as Audio Device" or similar on the device's Bluetooth menu. Once paired, your device should link to the iBT44 whenever within range (about 30 feet).

Using the iBT44
Pairing with a Different Device
When you power ON the unit, it will automatically link with the previously paired Bluetooth device as long as that device is still within range (about 30 feet).
Playing Audio Via Bluetooth
- Press the Power Button to turn on the unit in the last active mode. If needed, press the Bluetooth Button to enter Bluetooth mode. The blue light on the Bluetooth Button will flash and a tone will sound as the unit searches for a previously paired device, and then turn solid blue once a previously paired device is detected.
- Press the ▶Play Pause Button on the unit to play audio from your linked Bluetooth device. While audio is playing, press to pause play, and again to resume play.
- Use the controls on your device to navigate tracks, etc.
- Turn the Volume Knob to control the system volume. Adjust EQ settings as desired.
NOTE: The volume ranges from 0 - 40. While the dial can still be turned when these limits are reached, doing so has no effect. - When done listening, press the Power Button to turn the unit off. Remember to turn off your audio device, too.
TIP: In Bluetooth mode, turn the Tuning Knob to adjust the brightness on the display. Note that the tuning knob can continue turning even when the brightest or dimmest (off) settings have been reached.
Playing Audio via Line-In
Using the iBT44
- Connect one end of the standard stereo 3.5mm audio cable (included) into the line-in jack on the back of the unit and the other end into the headphone or output jack of your audio device.
- Power on the audio device and use the controls on the device to play or pause audio and navigate tracks.
- Press the Power Button to turn on the unit in the last active mode. Press the Bluetooth Button as needed until you hear the audio from your connected device through the iBT44 speakers.
- Turn the Volume Knob to control the system volume. Adjust EQ settings as desired.
- When done listening, press the Power Button to turn the unit off. Remember to turn off your audio device, too.
FM Radio
- Press the FM Radio Button to turn on the unit in FM radio mode.
- Turn the Tuning Knob on the unit to tune in the desired station
- The unit comes with an external FM radio antenna; connect it to the line-in jack on the back of the unit, then extend the antenna and adjust it for best FM reception.
- Turn the Volume Knob to control the system volume. Adjust EQ settings as desired.
- When done listening, press the Power Button to turn the unit off.
Using the iBT44
Using FM Radio in Other Countries
Different areas of the world use different FM frequency steps and ranges. By default, this unit is set to USA frequency steps. To use the radio outside the USA:
- Press and hold the FM Radio Button for 5 seconds until "USA" appears in the display.
- Turn the Tuning Knob to select to your location: Europe, Japan, Australia, China or USA.
- Press the FM Radio Button to exit frequency setting mode.
Charging Devices via USB Port
Make sure the unit is connected to AC power. The USB port does not charge when operating on battery power.
- Connect the standard size end of a USB cable (not included) to the USB Port on back of the unit and connect the other end to the charging port on your device.
- Monitor the charging on your device. Some devices use a proprietary charging method and will not charge using the USB Port. If this happens, you must charge your device using the charger that came with it.

is a registered trademarks of SRS Labs, Inc. TruBass technology is incorporated under license from SRS Labs, Inc.
SRS WOW HD™, which features TruBass®, significantly improves the playback quality of audio, delivering a dynamic 3D entertainment experience with deep, rich bass and high frequency clarity for crisp detail.
The Remote Control
Using the iBT44
The unit comes with a magnetized remote control which fits into a slot on the top of the unit. The remote comes with one CR2032 battery already installed. Remove the battery tab to use the remote.
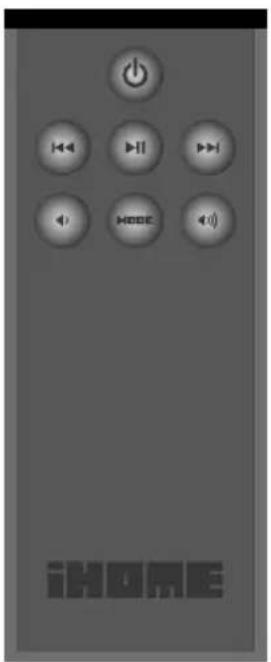


Power Button
- Turns unit ON or OFF.
Mode Button
• Cycle through modes: Bluetooth, FM radio and Line-in
Lower/Raise Volume
- Raises or lowers volume of the unit
Play/Pause Button
• Switches linked Bluetooth device between Play and Pause modes
Track Buttons
- Skip to next or previous track - HOLD to scan reverse or forward within a track
The Remote Control (continued)
Using the iBT44
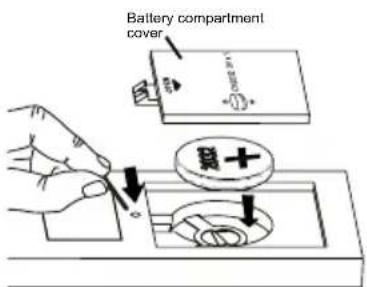
When the range of the remote seems reduced or if it ceases to work properly, it's time to replace the battery.
- Press point of a pin or paperclip firmly into the hole by the battery compartment cover on the rear of the remote control to release the cover.
- Slide battery compartment cover off (remove old battery if replacing).
- Place new CR2032 in battery well as shown (make sure + side is facing up).
- Replace battery compartment cover.
WARNING: Lithium batteries can explode or cause burns if disassembled, shorted, recharged, exposed to water, fire, or high temperatures. Do not place loose batteries in a pocket, purse, or other container containing metal objects, mix with used or other battery types, or store with hazardous or combustible materials. Store in cool, dry, ventilated area. Follow applicable laws and regulations for transport and disposal.
Consumer Product Safety Guide
IMPORTANT SAFETY INSTRUCTIONS
When used in the directed manner, this unit has been designed and manufactured to ensure your personal safety. However, improper use can result in potential electrical shock or fire hazards. Please read all safety and operating instructions carefully before installation and use, and keep these instructions handy for future reference. Take special note of all warnings listed in these instructions and on the unit.
- Water and Moisture – The unit should not be used near water. For example: near a bathtub, washbowl, kitchen sink, laundry tub, swimming pool or in a wet basement.
- Ventilation – The unit should be situated so that its location or position does not interfere with its proper ventilation. For example, it should not be situated on a bed, sofa, rug or similar surface that may block ventilation openings. Also, it should not be placed in a built-in installation, such as a bookcase or cabinet, which may impede the flow of air through the ventilation openings.
- Heat – The unit should be situated away from heat sources such as radiators, heat registers, stoves or other appliances (including amplifiers) that produce heat.
- Power Sources – The unit should be connected to a power supply only of the type described in the operating instructions or as marked on the appliance.
- Power-Cable Protection – Power supply cables should be routed so that they are not likely to be walked on or pinched by items placed upon or against them. It is always best to have a clear area from where the cable exits the unit to where it is plugged into an AC socket.
- Cleaning – The unit should be cleaned only using a warm damp cloth. Do not use solvents, etc.
-
Objects and Liquid Entry – Care should be taken so that objects do not fall and liquids are not spilled into any openings or vents located on the product.
-
Attachments – Do not use attachments not recommended by the product manufacturer.
- Lightning and Power Surge Protection – Unplug the unit from the wall socket and disconnect the antenna or cable system during a lightning storm or when it is left unattended and unused for long periods of time. This will prevent damage to the product due to lightning and power-line surges.
- Overloading – Do not overload wall sockets, extension cords, or integral convenience receptacles as this can result in a risk of fire or electric shock.
- Damage Requiring Service – The unit should be serviced by qualified service personnel when:
A. the power supply cable or plug has been damaged.
B. objects have fallen into or liquid has been spilled into the enclosure.
C. the unit has been exposed to rain.
D. the unit has been dropped or the enclosure damaged.
E. the unit exhibits a marked change in performance or does not operate normally.
-
Periods of Nonuse – If the unit is to be left unused for an extended period of time, such as a month or longer, the power cable should be unplugged from the unit to prevent damage or corrosion.
-
Servicing – The user should not attempt to service the unit beyond those methods described in the user's operating instructions. Service methods not covered in the operating instructions should be referred to qualified service personnel.
Questions? Visit www.ihomeaudio.com
or call 1-800-288-2792 Toll Free
Troubleshooting
Unit doesn't respond (no power)
- Make sure unit is connected to AC power OR has 6 fresh "D" batteries.
- Check that all connections are correct and properly plugged in.
- Make sure your device is properly paired with the iBT44.
- Make sure the Remote Button on the back of unit is pressed in while operating on batteries to control using the remote.
Can't see the display
- The display may have been dimmed/turned off in Bluetooth mode. Turn the unit on and press the Bluetooth Button to enter Bluetooth mode, indicated by the Bluetooth Button turning blue. Turn the Tuning Knob to the right to increase display brightness.
Trouble pairing device/computer with iBT44
Bluetooth implementation varies depending on your device's hardware and operating system. Please see our website for updates on pairing.
- When you power ON the unit, it will automatically link with the last previously paired Bluetooth device if the device is still within range (about 30 feet).
- Make sure your device is working properly. Check your device's manual for details on Bluetooth pairing and linking.
For further information and to see the latest instructions, visit www.ihomeaudio.com/support
Limited 1 Year Warranty
iHome Products, a division of SDI Technologies Inc. (hereafter referred to as SDI), warrants this product to be free from defects in workmanship and materials, under normal use and conditions, for a period of one (1) year from the date of original purchase.
Should this product fail to function in a satisfactory manner, it is best to first return it to the store where it was originally purchased. Should this fail to resolve the matter and service still be required by reason of any defect or malfunction during the warranty period, SDI will repair or, at its discretion, replace this product without charge. This decision is subject to verification of the defect or malfunction upon delivery of this product to the Factory Service Center authorized by SDI Customer Service. The product must include proof of purchase, including date of purchase. An out-of-warranty fee for service will be charged for units that are received without proof of purchase.
Before returning this product for service, please first replace the batteries (if applicable) with fresh ones, as exhausted or defective batteries are the most common cause of problems encountered.
If service is still required:
-
Call SDI Customer Service at 1-800-288-2792 for Return Authorization and for the address of the Factory Service Center.
-
Remove the batteries (if applicable) and pack the unit in a well padded, heavy corrugated box. SDI is not responsible for damage that occurs during shipping to the Factory Service Center.
-
Enclose a photocopy of your sales receipt, credit card statement, or other proof of the date of purchase, if within the warranty period. Also include your name and address information, a brief description for why the unit is being returned, and the return authorization number. No unit can be processed without a return authorization number.
-
Write the return authorization number on the side of the shipping package and send the unit prepaid and insured to the Factory Service Center address authorized by SDI Customer Service.
Disclaimer of Warranty
NOTE: This warranty is valid only if the product is used for the purpose for which it was designed. It does not cover (i) products which have been damaged by negligence or willful actions, misuse or accident, or which have been modified or repaired by unauthorized persons; (ii) cracked or broken cabinets, or units damaged by excessive heat; (iii) damage to digital media players, CD's or tape cassettes (if applicable); (iv) the cost of shipping this product to the Factory Service Center and its return to the owner. This warranty is valid only in the United States of America and does not extend to owners of the product other than to the original purchaser. In no event will SDI or any of its affiliates, contractors, resellers, their officers, directors, shareholders, members or agents be liable to you or any third party for any consequential or incidental damages, any lost profits, actual, exemplary or punitive damages. (Some states do not allow limitations on implied warranties or exclusion of consequential damages, so these restrictions may not apply to you.) This warranty gives you specific legal rights, and you may also have other rights which vary from state to state.
Your acknowledgement and agreement to fully and completely abide by the above mentioned disclaimer of warranty is contractually binding to you upon your transfer of currency (money order, cashier's check, or credit card) for purchase of your SDI product.
© 2013 SDI Technologies, Inc. All rights reserved
Questions? Visit www.ihomeaudio.com
or call 1-800-288-2792 Toll Free Printed in China
iBT44-121412-A
- iBT44
- Introduction
- Maintenance
- FCC Information
- FCC Radiation Exposure Statement
- Included
- Meet Your iBT44
- Back
- Using the iBT44
- Setting Up the Unit
- The Display
- Using Bluetooth: Pairing Your Device
- Pairing with a Different Device
- Playing Audio Via Bluetooth
- Playing Audio via Line-In
- FM Radio
- Using FM Radio in Other Countries
- Charging Devices via USB Port
- The Remote Control
- Power Button
- Mode Button
- Lower/Raise Volume
- Play/Pause Button
- Track Buttons
- The Remote Control (continued)
- Consumer Product Safety Guide
- IMPORTANT SAFETY INSTRUCTIONS
- Troubleshooting
- Unit doesn't respond (no power)
- Can't see the display
- Trouble pairing device/computer with iBT44
- Limited 1 Year Warranty
Brand : IHOME
Model : iBT44
Category : Docking Station