
524698 - Network card IC Intracom - Free user manual and instructions
Find the device manual for free 524698 IC Intracom in PDF.


| Product Type | Wireless 150N USB Adapter |
| Dimensions (H x W x D) | 10 x 28 x 89.6 mm (0.4 x 1.1 x 3.5 in) |
| Weight | 0.17 kg (0.4 lbs) |
| Interface | Hi-Speed USB 2.0 |
| Wireless Standards | IEEE 802.11b/g/n (draft 2.0) |
| Maximum Link Speed | 150 Mbps |
| Frequency Band | 2.4000 – 2.4835 GHz (ISM Band) |
| Security | WEP 64/128-bit, WPA, WPA2, WPA-PSK, WPA2-PSK, Cisco CCX |
| Special Features | SoftAP (Access Point mode), WPS (Push Button and PIN), WMM QoS |
| Chipset | Ralink RT3070 |
| Power Source | USB bus powered |
| Operating Temperature | 0 – 40 °C (32 – 104 °F) |
| Humidity | Max. 95% RH, non-condensing |
| Certifications | FCC Class B, CE |
| Warranty | Three-Year Warranty |
| System Requirements | Pentium 1 GHz or higher, Windows 2000/XP/Vista/7, available USB 2.0 port |
| Package Contents | Wireless 150N USB Adapter, USB extension cable, setup CD with user manual, quick installation guide |
| Antenna | External detachable antenna |
| LED Indicators | Link/Activity |
| Transmit Power | 802.11n/g: 14 dBm ±1.5 dBm; 802.11b: 17 dBm ±1.5 dBm |
| Receive Sensitivity | 150Mbps OFDM: -70 dBm ±1.5 dBm; 54Mbps OFDM: -78 dBm ±1.5 dBm; 11Mbps CCK: -92 dBm ±1.5 dBm |
| Maintenance & Cleaning | Clean with a dry, soft cloth. Do not use harsh chemicals. |
Frequently Asked Questions - 524698 IC Intracom
User questions about 524698 IC Intracom
0 question about this device. Answer the ones you know or ask your own.
Ask a new question about this device
Download the instructions for your Network card in PDF format for free! Find your manual 524698 - IC Intracom and take your electronic device back in hand. On this page are published all the documents necessary for the use of your device. 524698 by IC Intracom.
USER MANUAL 524698 IC Intracom
Disposal of Electric and Electronic Equipment
(applicable in the European Union and other European countries with separate collection systems)
ENGLISH
This symbol on the product or its packaging indicates that this product shall not be treated as household waste. Instead, it should be taken to an applicable collection point for the recycling of electrical and electronic equipment. By ensuring this product is disposed of correctly, you will help prevent potential negative consequences to the environment and human health, which could otherwise be caused by inappropriate waste handling of this product. If your equipment contains easily removable batteries or accumulators, dispose of these separately according to your local requirements. The recycling of materials will help to conserve natural resources. For more detailed information about recycling of

this product, contact your local city office, your household waste disposal service or the shop where you purchased this product. In countries outside of the EU: If you wish to discard this product, contact your local authorities and ask for the correct manner of disposal.
DEUTSCH
Thank you for purchasing the INTELLINET NETWORK SOLUTIONS ™ Wireless 150N USB Adapter, Model 524698.
The Wireless 150N USB Adapter is a compact high-speed adapter that allows you to connect your notebook or desktop PC to wireless networks at faster speeds than ever before. Transfer or receive digital images, videos and MP3 files by connecting to the wireless network with link speeds of up to 150 Mbps using the latest in wireless technology. This adapter is also compatible with 802.11b and 802.11g wireless access points and wireless routers, giving you the flexibility to start upgrading your wireless network without the need to replace existing equipment.
With the easy-to-follow instructions in this manual, you'll soon be able to enjoy the benefits of these additional features:
- Includes USB stand and extension cable (Hi-Speed USB 2.0)
• Supports WMM for increased multimedia data throughput
• Supports WEP (64/128 bit), WPA and WPA2 data encryption
• Supports Software AP function; Windows 2000, XP, Vista, 7 - Three-Year Warranty
FCC CERTIFICATIONS
This equipment has been tested and found to comply with the limits for a Class B digital device, pursuant to Part 15 of the FCC Rules. These limits are designed to provide reasonable protection against harmful interference in a residential installation. This equipment generates, uses and can radiate radio frequency energy and, if not installed and used in accordance with the instructions, may cause harmful interference to radio communications.
However, there is no guarantee that interference will not occur in a particular installation. If this equipment does cause harmful interference to radio or television reception, which can be determined by turning the equipment off and on, the user is encouraged to try to correct the interference by one or more of the following measures:
- Reorient or relocate the receiving antenna.
- Increase the separation between the equipment and the receiver.
- Connect the equipment to an outlet on a circuit different from that to which the receiver is connected.
- Consult the dealer or an experienced radio/TV technician for help.
CAUTION: Any changes or modifications not expressly approved by the party responsible for compliance could void the user's authority to operate the equipment.
This device complies with Part 15 of the FCC Rules. Operation is subject to the following two conditions: (1) This device may not cause harmful interference; and (2) this device must accept any interference received, including interference that may cause undesired operation.
FCC RF RADIATION EXPOSURE STATEMENT
This equipment complies with FCC RF radiation exposure limits set forth for an uncontrolled environment, and should be installed and operated with a minimum distance of 2.5 cm (1 in.) between the radiator and your body.
SAR (specific absorption rate) compliance has been established in laptop computer configurations with a USB port on the side near the center, as tested in the application for certification, and can be used in laptops with substantially similar physical dimensions, construction and electrical and RF characteristics. Use in other devices, such as PDAs or lap pads, is not authorized. This transmitter is restricted for use with the specific antenna(s) tested in the application for certification. The antenna(s) used for this transmitter must not be co-located or operated in conjunction with any other antenna or transmitter.
R&TTE COMES
This equipment complies with all the requirements of Directive 1999/5/EC of the European Parliament and the Council of March 9, 1999, on radio equipment and telecommunication terminal equipment (R&TTE) and the mutual recognition of their conformity. The R&TTE directive repeals and replaces Directive 98/13/EEC (Telecommunications Terminal Equipment and Satellite Earth Station Equipment) as of April 8, 2000.
EU COUNTRIES INTENDED FOR USE
The ETSI version of this device is intended for home/office use in Austria, Belgium, Denmark, Finland, France, Germany, Greece, Ireland, Italy, Luxembourg, the Netherlands, Portugal, Spain, Sweden and the U.K., and is also authorized for use in EFTA member states Iceland, Liechtenstein, Norway and Switzerland. (EU countries not intended for use: none.)
TABLE OF CONTENTS
section page
Installation....6
Configuration 7
Network....9
Profile 10
Profile Configuration 12
Profile Authentication & Encryption (Security) 13
802.1x Setting/Certification 16
802.1x Setting/CA Server.... 17
Statistics 18
Advanced 18
WMM....21
About....22
WPS Configuration 22
SoftAP 26
Configuration 26
Security Setting 28
Access Control 30
MAC Table 31
Event Log 31
Statistics 32
About....32
Specifications 33
NOTE: The Windows XP screen images are similar for Windows 2000/2003/Vista/7. Some images have been modified to fit the format of this user manual.
INSTALLATION
- Remove the adapter's protective cap and attach the antenna by securely screwing it onto the antenna connector.
- With your computer on, gently insert the adapter into a USB 2.0 port. NOTE: If the adapter doesn't easily slide into the port, flip the adapter over and try again.
- The Welcome to the Found New Hardware Wizard screen will display automatically. Click "Cancel" to continue.
- Insert the included setup CD and run the "Setup.exe" program. Read the license agreement that displays; select "I accept the terms of the license agreement" and click "Next" to continue.
- On the Setup Type screen, select "Install driver and INTELLINET WLAN
Utility." Select "Install driver only" if you prefer to use the Windows integrated WLAN function. Click "Next."

- In Windows XP, a "Microsoft Zero Configuration Tool" option displays. It's

recommended that the alternative "INTELLINET Configuration Tool" option be selected, as it features more functions. Click "Next."
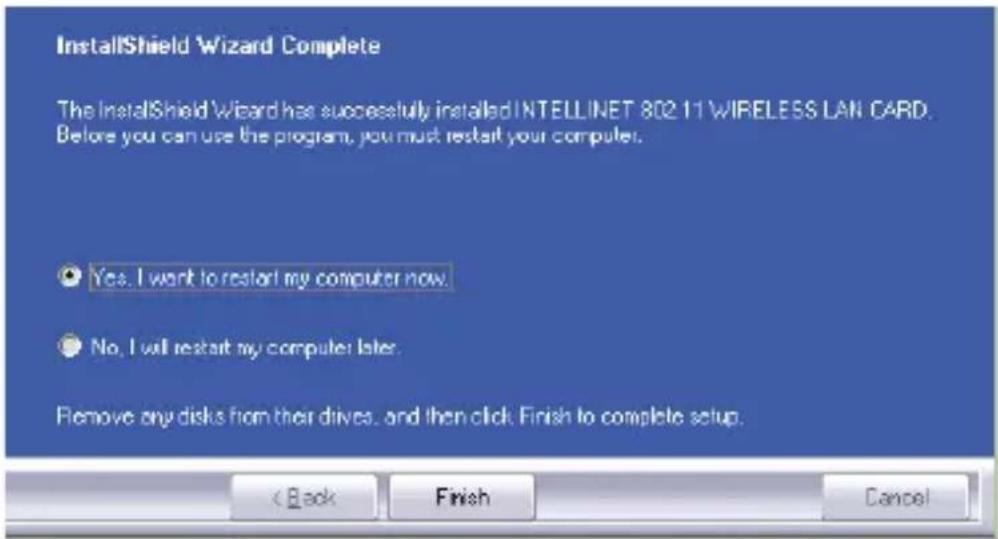
- Once the software installation is complete, select "Yes, I want to restart my computer." Once the reboot is complete, connect the Wireless N USB Adapter to your computer. When the Found New Hardware Wizard screen displays, select the option that allows Windows to automatically search for the correct driver. Your adapter is now installed.
CONFIGURATION
The configuration utility — which displays automatically once the adapter is connected — is a powerful application that helps you configure the adapter and monitor link status and statistics during the communication process. This adapter will auto-connect to the wireless device that has the better signal strength and no wireless security setting.

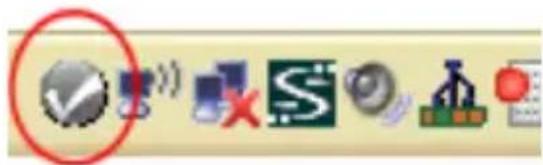
The configuration utility appears as an icon in the Windows system tray
while the adapter is running. You can open it by double-clicking on the icon.
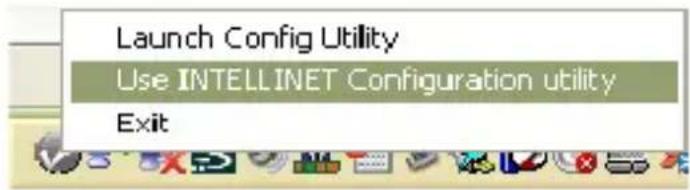
In Windows XP, there is a "Windows Zero Configuration Tool" option for setting up wireless clients. If you prefer to use the configuration utility, there are two ways to switch to it instead of using the Windows tool.
OPDN1
- Right-click the utility icon in the system tray and select "Use INTELLINET Configuration utility."
OPDN2
- Right-click the icon on the left side of the system tray and select "View Available Wireless Networks."
- Click "Change advanced settings."
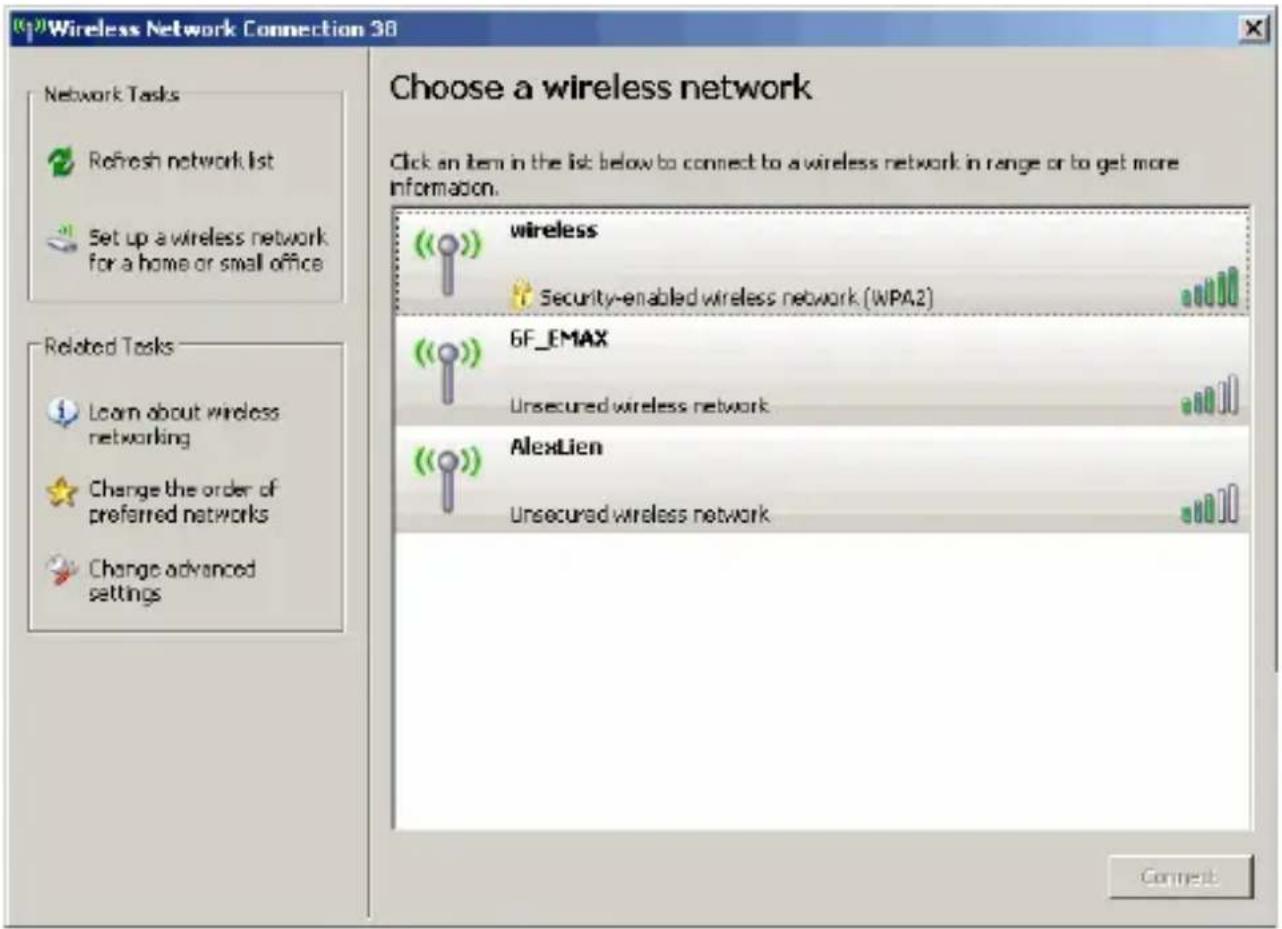
- Uncheck "Use Windows to configure my wireless network settings" to enable the utility for the adapter. NOTE: If "Wireless Zero Configuration Tool" is enabled, you can only configure the advanced settings or check the link status and statistics from the configuration utility of the adapter.

NETWORK
When you open the configuration utility, the system scans all the channels to find access points/stations within the accessible range of the adapter and automatically connect to the wireless device with the highest signal strength. On the Network screen, all the networks nearby are listed. You can change the connection to another network or add one of the networks to your own profile list.
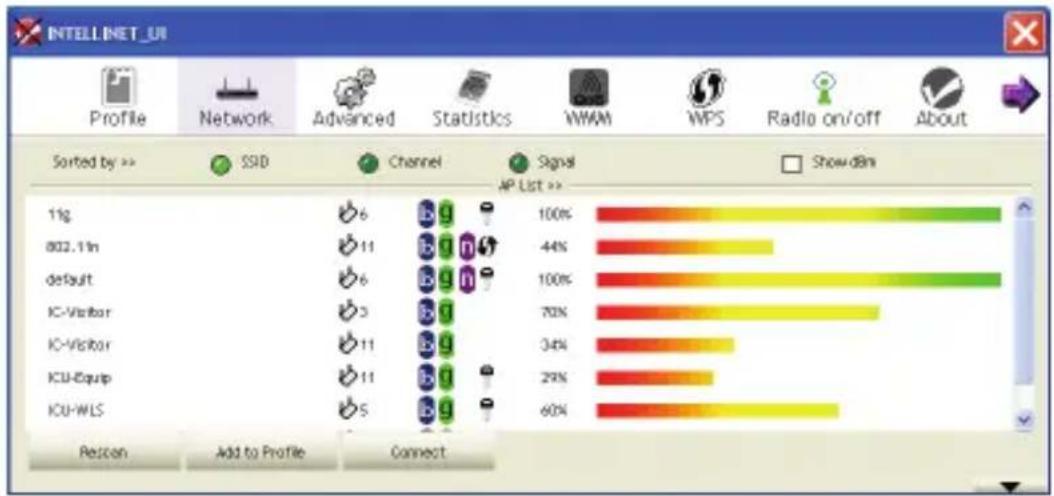
Available Networks: This list shows all available wireless networks within the range of the adapter. It also displays network information: SSID, BSSID, Signal Strength, Channel, Encryption, Authentication and Network Type. To connect to a network on the list, double-click the item and the adapter will connect automatically to it.
Rescan: Click "Rescan" to collect the new information of all the wireless networks nearby.
Connect: Click "Connect" to connect to the selected network.
Add to Profile: Click to add the selected network to the Profile list.
PROFILE
The Profile screen is for managing networks you connect to frequently. You can add, delete, edit and activate a profile on this screen.

Profile List: The Profile List displays all the profiles and their related settings, including Profile Name, SSID, Channel, Authentication, Encryption and Network Type.
Add, Edit, Delete: Click the corresponding button to add, edit or delete the selected profile(s). Clicking "Add" displays the Add Profile screen, which presents 1) Configuration and 2) Authentication and Encryption (Security).
Activate: To display status information about your current wireless connection, select the profile and click "Activate." When a profile is activated, the adapter will be initially connected to it.
![Profile List INTELLINET Wireless G Router 520431 PROF2 default PROF3 IC-Visitor Add Edit Delete Activate Profile Name >> PROF3 SSID >> IC-Visitor Network Type >> Infrastructure Authentication >> Open Encryption >> None Use 602.1x >> NO Tx Power >> 100% Channel >> Auto Power Save Mode >> CAM RTS Threshold >> 2347 Fragment Threshold >> 2346 Status >> IC-Visitor <-> 00-08-9F-28-65-91 Extra Info >> Link to Up [TxPower: 100%] Channel >> 3 <-> 2422 MHz Authentication >> Open Encryption >> NONE Network Type >> Infrastructure IP Address >> 10.180.149.242 Sub Mask >> 255.255.255.252 Default Gateway >> 10.180.149.241 Link Quality >> 100% Signal Strength 1 >> 100% Noise Strength >> 70% Transmit Link Speed >> 54.0 Mbps Throughput >> 0.000 Kbps Receive Link Speed >> 54.0 Mbps Throughput >> 5.832 Kbps Max 1.392 Kbps Max 7.612 Kbps](/content/2026/05/987946/images/10af6eb710d22d451c96939e55366e101022d3b83b11b81a8169fc061ee426bd.jpg)
Status: This field displays the SSID and MAC ID of the network the adapter is connecting to.
Extra Info: This field displays the link status.
Channel: This field displays the number of the radio channel and the frequency used for the networking.
Link Speed (Mbps): These fields display the transmission (Tx) and the reception (Rx) rates of the network. The maximum transmission rate is 54 Mbps.
Throughput (Kbps): These fields display the speed of data being transmitted (Tx) and received (Rx).
Link Quality: This status bar indicates the quality of the link. The higher the percentage, the better the quality.
dBm: To display the signal strength measured in dBm (decibels in milliwatts), click this box on the Network screen (see Page 9).
Signal Strength: This bar shows the signal strength level. The higher the percentage being shown in the bar, the more radio signal being received by the adapter. This indicator helps to find the proper position of the wireless device for quality network operation.
Noise Strength: This bar displays the noise level in the wireless environment.
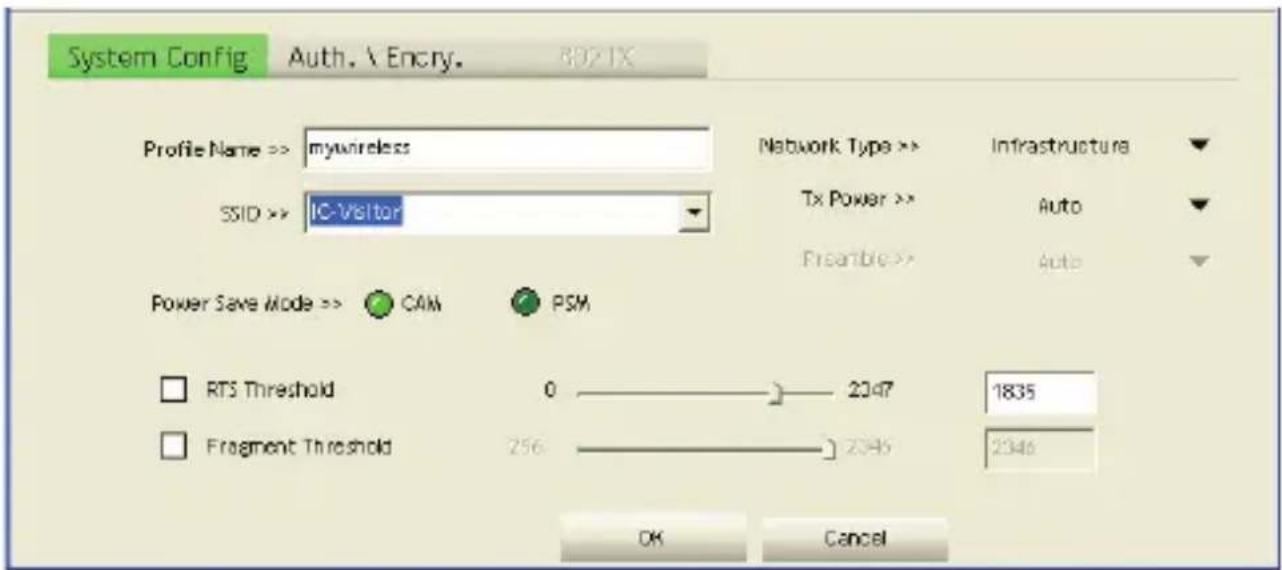
Profile Name: Define easily recognizable profile names to identify the different networks.
SSID: The SSID (up to 32 printable ASCII characters) is the unique name identified in a WLAN. The ID prevents the unintentional merging of two co-located WLANs. If you specify an SSID for the adapter, then only the device with the same SSID can interconnect to the adapter. To add a nearby network to the profile list, pull down the menu to view all the networks that can be selected.
Power Save Mode: The two power-saving functions are available only when Network Type (see below) is set to “Infrastructure.”
- CAM (Constantly Awake Mode): With this selected, the adapter will remain in an active mode.
- PSM (Power Save Mode): Enable the adapter in the power-save mode when it is idle.
Network Type: Select from the drop-down menu.
- Infrastructure: This operation mode requires the presence of an 802.11 access point. All communication is done via the AP or router.
- Ad-Hoc: Select this mode to connect to another wireless station in the wireless LAN network without using an access point or router.
Tx Power: To lower the transmit power of the adapter to reduce the power used by the system, select a lower percentage from the drop-down menu. NOTE: A lower power level will result in lower signal strength and reduced coverage range.
RTS Threshold: This is the minimum packet size required for an RTS (request to send). For packets smaller than this threshold, an RTS is not sent and the packet is transmitted directly to the wireless network.
Select a setting within a range of 0 to 2347 bytes. NOTE: A minor change is recommended.
Fragment Threshold: This value defines the maximum size of packets; any packet size larger than the value will be fragmented. If you've decreased this value and experience high packet-error rates, you can increase it again, but it will likely decrease overall network performance. Select a setting within a range of 256 to 2346 bytes.
NOTE: A minor change is recommended.
PROFILE AUTHENTICATION AND ENCRYPTION (SECURITY)
Authentication Type: This pull-down menu setting has to be consistent with the wireless networks that the adapter is intended to connect.
- Open: No authentication is needed within the wireless network.
- Shared: Only wireless devices using a shared key (WEP key identified) are allowed to connect to each other.
- LEAP: This is a pre-EAP, Cisco-proprietary protocol with many of the features of EAP protocols. Cisco controls the ability of other vendors to implement this protocol, so it should be selected for use only when a limited vendor choice for client, access point and server products is not a concern. When you've set up LEAP authentication, you need to enter the username and password of your computer.
- WPA: WPA provides a scheme of mutual authentication using either IEEE 802.1x/Extensible Authentication Protocol (EAP) authentication
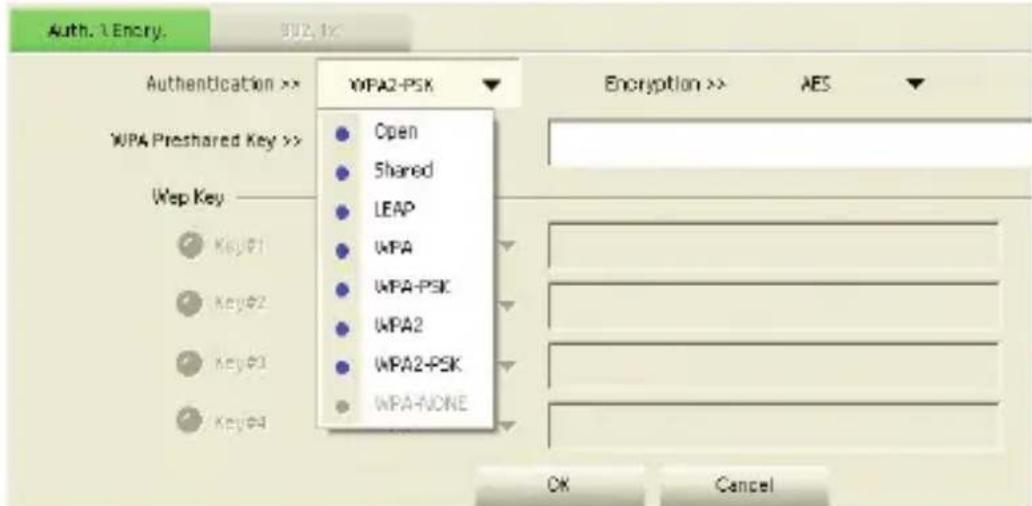
or pre-shared key (PSK) technology. It provides a high level of assurance to enterprises, small businesses and home users that data will remain protected and that only authorized users may access their networks. For enterprises that have already deployed IEEE 802.1x authentication, WPA offers the advantage of leveraging existing authentication databases and infrastructure.
- WPA-PSK: This is a special mode designed for home and small business users who do not have access to network authentication servers. In this mode, known as Pre-Shared Key, you manually enter the starting password in your access point or gateway, as well as in each wireless station in the network. WPA-PSK takes over automatically from that point, keeping unauthorized users who don’t have the matching password from joining the network, while encrypting the data traveling between authorized devices.
- WPA2: Like WPA, WPA2 supports IEEE 802.1x/EAP authentication, or PSK, technology. It also includes a new advanced encryption mechanism using the Advanced Encryption Standard (AES). AES is required for corporate or government users. The difference between WPA and WPA2 is that WPA2 provides data encryption via AES. In contrast, WPA uses the Temporal Key Integrity Protocol (TKIP).
- WPA2-PSK: This is also for home and small business use. The difference between WPA-PSK and WPA2-PSK is that WPA2-PSK provides data encryption via the AES. In contrast, WPA-PSK uses the Temporal Key Integrity Protocol (TKIP).
- WPA-NONE: This is defined for Ad Hoc mode and behaves like WPA-PSK (WPA-PSK is only defined for Infrastructure mode). The user manually enters the Pre-Shared Key in each wireless station in the network, and WPA-NONE controls unauthorized users who don't have the matching Pre-Shared Key from joining the network. It also encrypts the data traveling between authorized devices.
802.1x Setting: When Authentication Type is set to “Open,” “Shared,” “WPA” or “WPA2,” you can also enable IEEE 802.1x Setting to use the authentication server or certification server to authenticate client users.
NOTE: See the two separate 802.1x Setting sections below for details.
Encryption: Select from the drop-down menu.
- None: Disables the encryption mode.
- WEP: Enables the WEP Data Encryption. When the item is selected, you need to continue setting the WEP Encryption keys.
- TKIP: The Temporal Key Integrity Protocol changes the temporal key every 10,000 packets (a kind of message transmitted over a network.) This ensures much greater security than the standard WEP security.
- AES: AES has been developed to ensure the highest degree of security and authenticity for digital information. It's the most advanced solution defined by IEEE 802.11i for security in the wireless network.
NOTE: All devices in the network should use the same encryption method to ensure the security of communications.
WPA Pre-Shared Key: The WPA-PSK key can be 8 to 64 characters in length and can be letters or numbers. This same key must be used on all the wireless stations in the network.
WEP Key (Key#1-4): WEP keys are used to encrypt data transmitted in the wireless network. There are two types of key length: 64-bit and 128-bit. Assign a default encryption key (Key#1 to Key#4) by clicking on the corresponding radio button. To fill in each text field:
- 64-bit: Input 10-digit hex values (in the A-F, a-f and 0-9 range) or 5-digit ASCII characters (a-z and 0-9) as the encryption keys.
For example: "0123456aef" or "test1."
- 128-bit: Input 26-digit hex values (in the A-F, a-f and 0-9 range) or 13-digit ASCII characters ("a-z" and "0-9") as the encryption keys.
For example: "01234567890123456789abcdef" or "administrator."
The IEEE 802.1X specification describes a protocol that can be used for authenticating both clients (802.1x Setting/Certification below) and servers (802.1x Setting/CA Server below) on a network. The authentication algorithms and methods are those provided by the Extensible Authentication Protocol (EAP), a method of authentication that has been in use for a number of years on networks that provide Point-to-Point Protocol (PPP) support (as many Internet service providers and enterprises do). EAP runs before network layer protocols transmit data over the link.
When an AP acting as an authenticator detects a wireless station on the LAN, it sends an EAP request for the user's identity to the device. In turn, the device responds with its identity, and the AP relays this identity to an authentication server (typically an external RADIUS server).

flowchart
graph TD
    A["IEEE 802.1x Access Client"] -->|1| B["RADIUS Client"]
    B -->|2| C["Access Point"]
    C -->|3| D["RADIUS Server"]
    D -->|4| C
    C -->|Win| E["Server with database icon"]
    style A fill:#f9f,stroke:#333
    style B fill:#ccf,stroke:#333
    style C fill:#cfc,stroke:#333
    style D fill:#fcc,stroke:#333
    style E fill:#ffc,stroke:#333
802.1x SETTING/CERTIFICATION
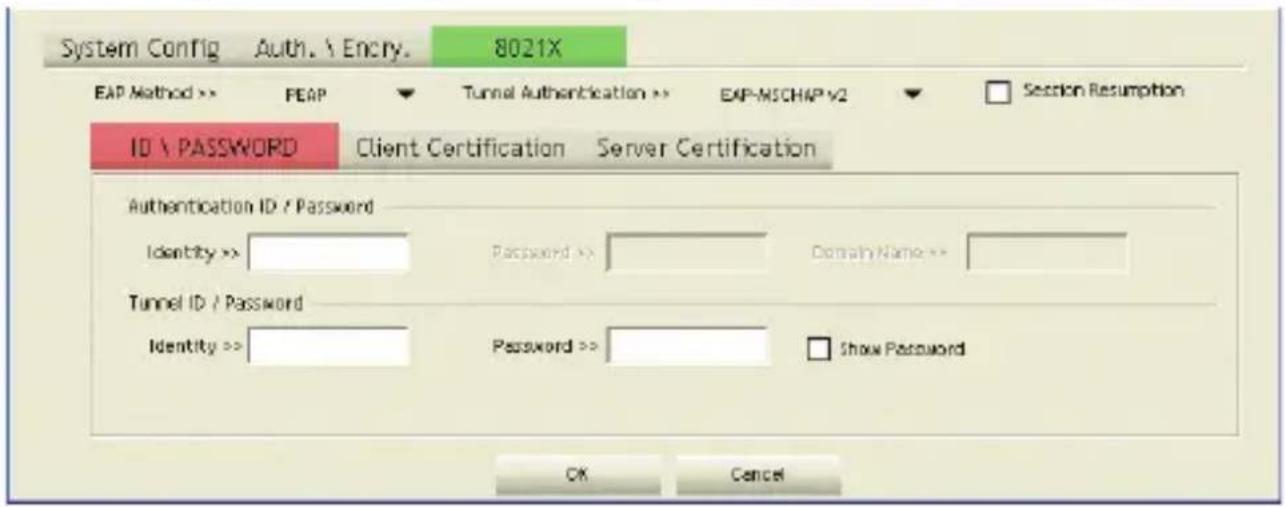
EAP Method: The EAP authentication protocols supported by this adapter require that settings be consistent with the wireless access points or routers that the adapter is intended to connect.
- PEAP & TTLS: These protocols are similar and easier to use than TLS (below) in that they specify a stand-alone authentication protocol to be used within an encrypted tunnel. TTLS supports any protocol within its tunnel, including CHAP, MS-CHAP, MS-CHAPv2, PAP and EAP-MD5. PEAP specifies that an EAP-compliant authentication protocol be used; this adapter supports EAP-MSCHAP v2, EAP-TLS/Smart Card and Generic Token Card. The client certificate is optional.
- TLS/Smart Card: This is the most secure of the EAP protocols, but isn't easy to use: It requires that digital certificates be exchanged in
the authentication phase. The server presents a certificate to the client and, after validating the server's certificate, the client presents a client certificate to the server for validation.
Session Resumption: Click/check the box to activate or de-activate.
ID/Password: Enter the password as the identity for the server.
Client Certification: A client certificate is required for TLS, but is optional for TTLS and PEAP. This forces a client certificate to be selected from the appropriate Windows Certificate Store and made available to the RADIUS server for certification.
Tunneled Authentication/Protocol: When the authentication type is PEAP or TTLS, select a protocol for building the encrypted tunnel.
Tunnel Authentication: Select one of three options from the drop-down menu: "EAP-MSCHAPv2," "EAP-TLS/Smart card" or "Generic Token Card."
802.1x SETTING/CA SERVER
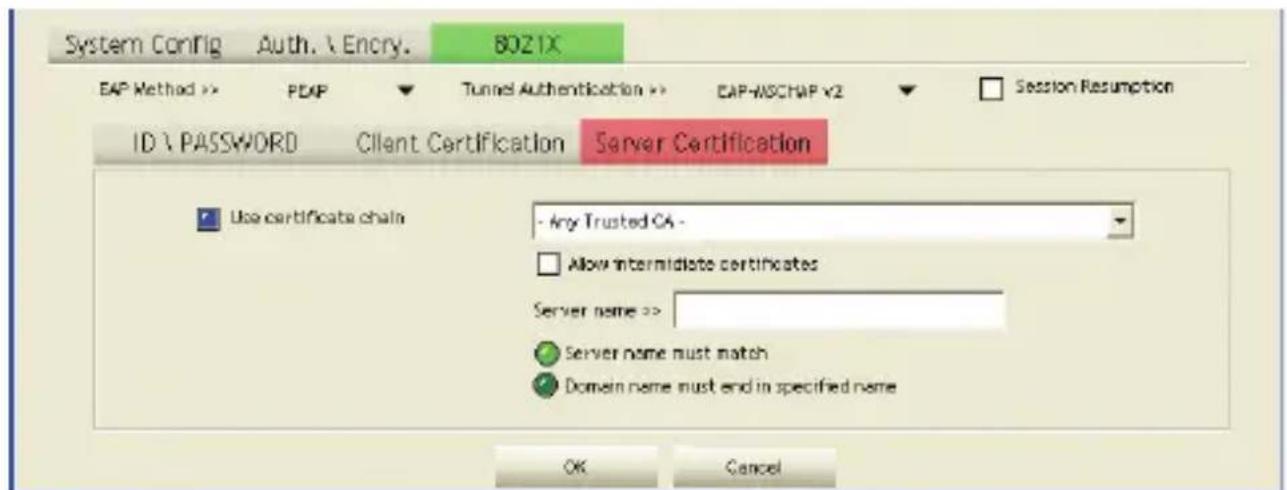
Use certificate chain: When the Extensible Authentication Protocol (EAP) authentication type — such as TLS, TTLS or PEAP — is selected and requires certification to tell the client what credentials to accept from the authentication server in order to verify the server, you need to enable this function. Choose the preferred server from the drop-down menu to issue the certificate. If “Any Trusted CA” is selected, any CA (certification authority) on the list (which is provided by the Microsoft Certificate Store) is permitted.
Allow intermediate certificates: A server designates an issuer as a trusted root authority by placing the issuer's self-signed certificate,
which contains the issuer's public key, into the trusted root certification authority certificate store of the host computer. Intermediate or subordinate certification authorities are trusted only if they have a valid certification path from a trusted root certification authority.
Server Name: Enter the authentication server name.
Server name must match exactly: When selected, the server name must exactly match the server name found on the certificate.
Domain name must end in specified name: When this is selected, the server name field identifies a domain. The certificate must use a server name belonging to this domain or one of its sub-domains (e.g., zeelans.com, where the server is blueberry.zeelans.com), but it may be any name used in the certificate name field.
STATISTICS
This screen enables you to view/compare the transmit and receive statistical information of the connection. To reset the counters, click "Reset Counter."

ADVANCED
This screen enables you to configure more advanced settings, such as the wireless mode and the protection mode.
Wireless Mode: Select from the drop-down menu.
- 802.11 B/G mix: If you have a mix of 802.11b and 802.11g wireless stations in your network, it is recommended that the adapter be set

to this mode. This mode is also the default setting.
- 802.11 B only: Though the adapter is compatible with both 802.11g and 802.11b wireless stations, if there are only 802.11b wireless stations in the network, you can set the adapter to this mode.
Ad Hoc Wireless Mode: When the adapter is set in Ad Hoc (Peer to Peer) mode, you can designate the wireless connection mode for the Ad Hoc network.
- Only B: Though the adapter is compatible with both 802.11g and 802.11b wireless stations, if there are only 802.11b wireless stations in the network, you can set the adapter to this mode.
- B/G Mixed: If you have a mix of 802.11b and 802.11g wireless stations in your network, it is recommended that the adapter be set to this mode. This mode is also the default setting.
- Only G: Though the adapter is compatible with both 802.11g and 802.11b wireless stations, if there are only 802.11g wireless stations in the network, you can set the adapter to this mode.
Wireless Protection: If you have a mix of 802.11b and 802.11g wireless stations in the network, it's recommended that you enable the protection mechanism, which can decrease the rate of data collisions between 802.11b and 802.11g wireless stations. When the protection mode is enabled, the throughput of the adapter will be a little lower.
• Auto: Depending on the status of the network, this automatically disables/enables the protection mode.
- On: Always enables the protection mode.
- Off: Always disables the protection mode.
Tx Rate: There are several options in the drop-down menu: "Auto" and a range of speeds from "1 Mbps" to "54 Mbps." When "Auto" is selected, the device automatically chooses the most suitable transmission rate. The higher the data rate designated in the network, the shorter the distance allowed between the adapter and the wireless stations.
Enable Tx Burst: This enables the adapter to deliver better throughput in the same period and environment.
Enable TCP Window Size: The TCP window is the amount of data a sender can deliver on a particular connection before it gets an acknowledgment back from the receiver that it has gotten some of it. When the router or AP the adapter is connecting to has set up the TCP window, you can enable the parameter to meet the data size for the router or AP connection. The larger the TCP window, the better the performance.
Fast Roaming at [-70] dBm: To fast roam to a nearby network without interrupting the wireless connection (such as a multimedia application or a voice call), you can set this parameter. The adapter will fast roam when the receive sensitivity (signal strength) is below the value entered.
Show Authentication Status Dialog: Select to display.
Select Your Country Region Code: Channel availability varies from country to country; for example, USA (FCC) channels are 1-11, while Europe (ETSI) channels are 1-13.
Enable CCX: Cisco Compatible Extensions, for radio monitoring and fast roaming.
Turn on CCKM: During normal operation, LEAP-enabled client devices mutually authenticate with a new AP by performing a complete LEAP authentication, including communication with the main RADIUS server.
When a wireless LAN is configured for fast re-association, however, LEAP-enabled client devices roam from one access point to another without involving the main server. Using Cisco Centralized Key Management (CCKM), an access point configured to provide wireless domain services (WDS) takes the place of the RADIUS server and authenticates the client so quickly that there is no perceptible delay in voice or other time-sensitive applications.
Enable Radio Measurement: When this parameter is enabled, the Cisco
AP can run the radio monitoring through the associated CCX-compliant clients to continuously monitor the WLAN radio environment and discover any new APs that are transmitting beacons.
Non-Serving Channel Measurements: The Cisco access point can perform monitoring measurements through the CCX-compliant clients on the non-serving channels when this parameter is enabled.
Limit [xxx] milliseconds (0-2000): This setting limits the channel measurement time. The default value is 250 milliseconds.
Turn off RF: Click to turn off the radio of the adapter; click again to turn it back on.
WMM
This screen enables you to configure WMM (Wi-Fi Multimedia) and other QoS settings, such as Power Save and Direct Link Setup.

WMM Enable: Click the check box (then click "Apply") to enable the WMM function, which then lets you configure the WMM Power Save and Direct Link Setup functions.
- WMM – Power Save Enable: Click the check box to enable, then click "Setting" to further configure the function as "AC_BK," "AC_BE," "AC_VI" or "AC_VO."
- Direct Link Setup Enable: Click the check box to enable, then click "Apply" to further configure the function (all within the Direct Link panel).
- MAC Address: Specify the MAC address of the client adapter you
want to direct link to and click "Apply" to add to the DLS Status table (below).
- Timeout Value: Specify the timeout value for the direct link being set up.
ABOUT
On this screen, you can click the hyperlink for information on the wireless chipset manufacturer. Basic information about the utility (driver, EEPROM version, etc.) also displays, as do various addresses for quick reference.

NOTE: This adapter features Turbo Mode, which delivers a higher throughput than IEEE 802.11g standard (up to 54 Mbps) by compressing data and decreasing the wait time for sending data to routers or access points. Turbo Mode is enabled automatically without any configuration.
WPS CONFIGURATION
The adapter supports WPS (Wi-Fi Protected Setup), allowing connection to wireless APs that also support WPS without complicated procedures. Two WPS configuration methods are available when you click to display this screen: PBC (push-button configuration) and PIN Code (an option for older APs not equipped with the WPS push button but which may be transformed into a WPS-enabled access point through a firmware upgrade).
PBC (Push-Button Configuration)

- From the "Config Mode" drop-down menu, select "Enrollee," then press the WPS button (or whichever button is used to activate the WPS Standby mode) on your wireless access point. NOTE: Refer to your wireless access point's user manual for the specific procedure(s).
Alternatively, you can select "Registrar," in which case this adapter will wait for other WPS-enabled access points to send WPS pairing requests. NOTE: Refer to your wireless access point's user manual to understand how to send WPS requests. - Before you start to establish the wireless connection using WPS, you can click "Rescan" to search again for WPS-enabled access points near you in order to make sure the WPS function of your access point is activated. All access points with the WPS function enabled will be displayed in the WPS AP List field. If the access point you want to connect to isn't listed, click "Rescan" a few more times.
-
Begin the PBC pairing procedure on the access point side (again, refer to your access point's manufacturer's instructions), then click "PBC" to establish a wireless connection via WPS. NOTE: This may require as much as a full minute to complete. When the "WPS status is connected successfully" message displays, the connection between the adapter and the access point has been successfully established through WPS and information about the access point you connected to will be displayed.
-
Should the WPS function fail (as indicated on the following screen, which shows that WPS pairing failed because no WPS-enabled AP was found), you may find that clicking "PBC" a few more times will result in a connection. When an access point is connected, you can click "Disconnect" to break the connection, or you can highlight/select another WPS-enabled wireless access point when more than one is found, then click "Connect" to establish that connection. You can also click "Rotate" to select the next access point on the list for connection.

Information: Click to display a pop-up window describing a selection. Detail: Click to show details of a selected WPS-enabled access point.
Export Profile: Click to save a highlighted connection on the list as a profile, which will display on the WPS Profile list and which can be retrieved in the Profile menu.
Delete: Delete the selected WPS-enabled access point from the list.
WPS Associate IE: Select to send the association request with WPS IE (Information Element) during WPS setup. This is optional: You can use the default value if you don't know what will be affected.
WPS Probe IE: The Wireless Provisioning Services Information Element (WPS IE) makes it easier to connect to public Wi-Fi networks you've not previously connected to. Your computer must have the WPS IE update for Windows XP SP2 installed in order to use the function. This is optional: You can use the default value if you don't know what will be affected.
Auto: See PIN Code below.
PIN COE
- Enter the 8-digit PIN code of the adapter (highlighted below) in your wireless access point as the WPS PIN code. NOTE: Refer to your wireless access point's user manual for instructions. If you have a problem with the PIN code provided here, click "Renew" to get a new PIN code.
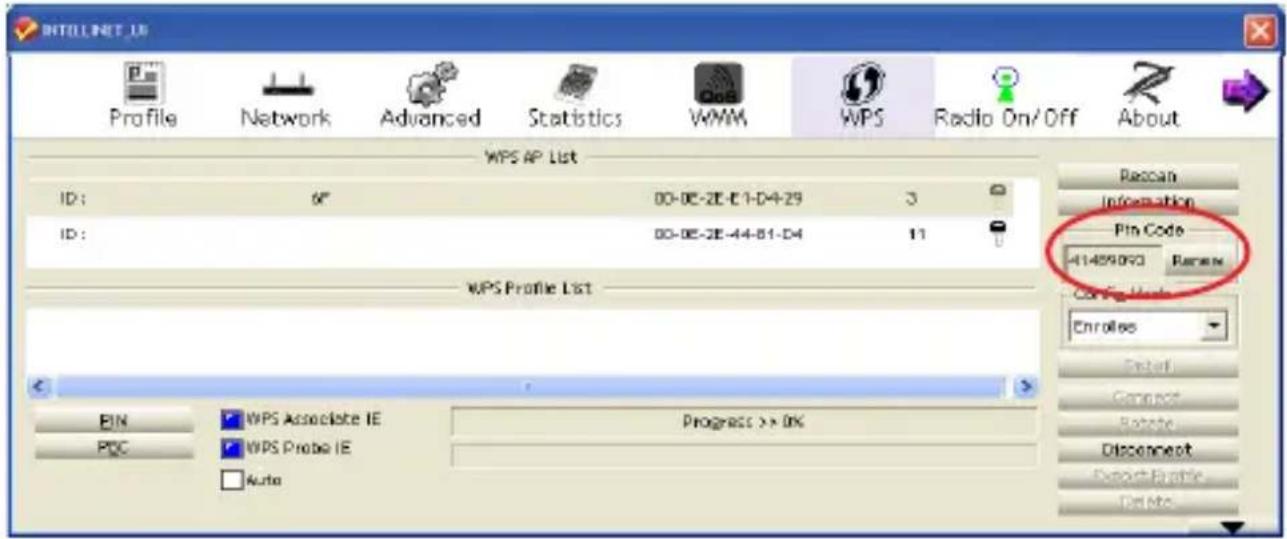
- Click "PIN." After a short period (up to a minute), if a wireless access point with the correct PIN code is found, you'll be connected to that access point. NOTE: As with PBC, you may need to click "PIN" a number of times to make a connection. (It helps to confirm you've entered the correct PIN code into the AP.)
Information: Click to display a pop-up window describing a selection.
Detail: Click to show details of a selected WPS-enabled access point.
Export Profile: Click to save a highlighted connection on the list as a profile, which will display on the WPS Profile list and which can be retrieved in the Profile menu.
Delete: Delete the selected WPS-enabled access point from the list.
WPS Associate IE: Select to send the association request with WPS IE (Information Element) during WPS setup. This is optional: You can use the default value if you don't know what will be affected.
WPS Probe IE: The Wireless Provisioning Services Information Element (WPS IE) makes it easier to connect to public Wi-Fi networks you've not previously connected to. Your computer must have the WPS IE update for Windows XP SP2 installed in order to use the function.
This is optional: You can use the default value if you don't know what will be affected.
Auto: When selected, the wireless access point to be connected will be selected automatically.
SAP
This adapter can run as a wireless access point (AP). Right-click the configuration utility icon on the Windows system tray and select "Switch to AP Mode" to activate the SoftAP function.

CONFIGURATION
This screen enables you to configure the AP connection setting, the Country Region Code and other advanced functions.
SSID: The SSID (up to 32 printable ASCII characters) is the unique

name identified in a wireless LAN. The ID prevents the unintentional merging of two co-located WLANs. The default SSID of the AP is "SoftAP-X." ("X" is the last number of this adapter's MAC address). Wireless adapters connected to the access point should be set up with the same SSID as the AP.
Channel: Select the number of the radio channel used by the access point. Any wireless adapters connected to the AP should be set up with the same channel.
Wireless Mode: Selects the wireless mode supported by the AP.
Use MAC Address: Click to create a unique SSID based on the adapter's MAC address.
Security Setting: Click to further configure WLAN authentication and security settings. (See the separate Security Setting section below.)
Country Region Code: Channel availability varies from country to country; e.g., USA (FCC) channels are 1-11, while Europe's (ETSI) are 1-13.
Beacon (ms): Define the time between beacons (default is 100 ms.)
Tx Power: To lower the transmit power of the AP to reduce the power used by the system, select a lower percentage from the drop-down menu. NOTE: A lower power level will result in lower signal strength and reduced coverage range.
Idle Time: Select the idle time for the wireless access point. The default value is 300, and normally there is no need to change it.
No forwarding among wireless clients: Enable to prevent wireless clients connected to this AP from sharing information with each other.
Hide SSID: When this box is checked, the AP will not appear in the site survey list of any wireless clients, meaning only the wireless clients set with the same SSID can connect to the AP. This prevents the AP being connected to by unauthorized users.
Allow BW 40 MHz: Check this box to allow BW 40 MHz capability.
Tx Burst: Check this box to accelerate the data transmit rate. It may not work with all wireless access points and wireless devices.
Default: Click to use the default value.
Apply: Click to apply the setting change(s).
SECURITY SETTING
This screen — accessed by clicking “Security Setting” on the previous SoftAP Configuration screen — lets you to configure the authentication mode and encryption algorithm used within the AP.

Authentication Type: Four types of authentication mode are supported and presented in the drop-down menu.
- Open: No authentication is needed within the wireless network.
- WPA-PSK: This is a special mode designed for home and small business users who do not have access to network authentication servers. In this mode, known as Pre-Shared Key, you manually enter the starting password in your access point or gateway, as well as in each wireless station in the network. WPA-PSK automatically takes over from that point, keeping unauthorized users who don't
have the matching password from joining the network, while encrypting the data traveling between authorized devices.
- WPA2-PSK: This is also for home and small business use.
- WPA-PSK/WPA2-PSK: When selecting this mode, the AP supports both WPA-PSK and WPA2-PSK.
Encryption Type: Five options are available in the drop-down menu.
- Not Use: Disables the encryption mode.
- WEP: Enables WEP Data Encryption. When the item is selected, continue setting the WEP Key.
- TKIP: The Temporal Key Integrity Protocol changes the temporal key every 10,000 packets (a kind of message transmitted over a network.) This ensures much greater security than standard WEP security.
- AES: Advanced Encryption Standard was developed to provide the highest degree of security and authenticity for digital information. It's the most advanced solution defined by IEEE 802.11i for security in a wireless network.
- BOTH: In this mode, the AP supports both TKIP and AES.
WPA Pre-Shared Key: The WPA-PSK key can be 8 to 64 characters in length and can be letters or numbers. This same key must be used on all the wireless stations in the network.
Group Rekey Interval: This function is available when using WPA-PSK and WPA2-PSK encryption algorithms.
WEP Key (Key#1-4): WEP keys are used to encrypt data transmitted in the wireless network. There are two types of key length: 64-bit and 128-bit. Assign a default encryption key (Key#1 to Key#4) by clicking on the corresponding radio button. To fill in each text field:
- 64-bit: Input 10-digit hex values (in the A-F, a-f and 0-9 range) or 5-digit ASCII characters (a-z and 0-9) as the encryption keys.
For example: "0123456aef" or "test1."
- 128-bit: Input 26-digit hex values (in the A-F, a-f and 0-9 range) or 13-digit ASCII characters ("a-z" and "0-9") as the encryption keys.
For example: "01234567890123456789abcdef" or "administrator."
Show Password: The password will be displayed in clear text instead of with asterisks.
ACCESS CONTROL
This screen lets you configure the access control policy used within the access point.

Access Policy: Select from the drop-down menu.
- Disable: Disables the MAC address filtering function.
- Allow All: Only wireless adapters with a MAC address on the access list can connect to the AP.
- Reject All: Wireless adapters with a MAC address on the access list will be prevented from connecting to the AP.
MAC Address: This is the unique 12-digit hexadecimal identification for hardware devices in the network.
Access List: Displays all the MAC address that have been added.
- Add: Add the MAC address to the access list.
- Delete: Delete the selected MAC address from the access list.
- Remove All: Remove all MAC addresses from the access list.
Apply: Click to apply the setting change(s).
MAC TABLE
This screen displays details of the wireless adapters connected to the AP.
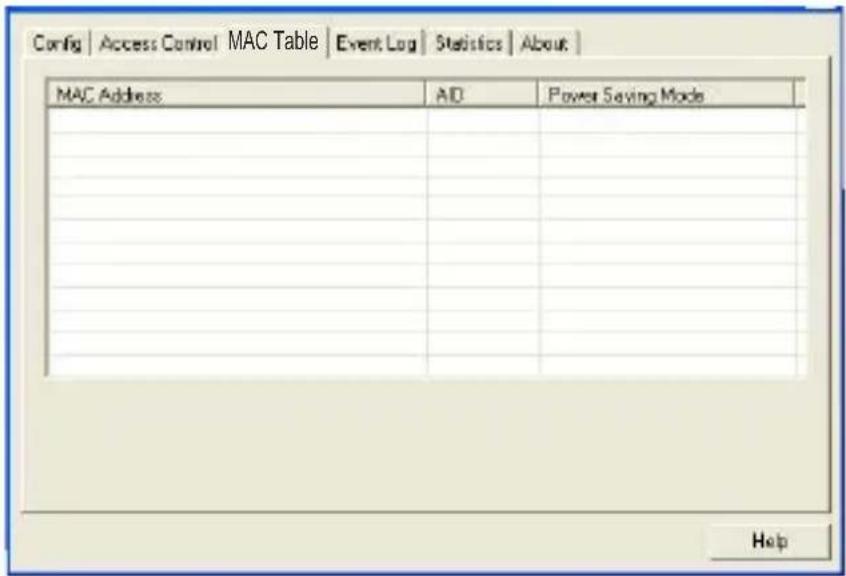
MAC Address: The addresses of wireless adapters connected to the AP. AID: The Association ID of the current connection.
Power Saving Mode: The supporting status of the power saving mode of the connected wireless adapter.
EVENT LOG
This screen displays event times and messages. Click “Clear” to remove displayed information.

STATISTICS
This screen displays the transmit and receive statistical information of the AP. Click “Reset Counters” to clear the data.

ABOUT
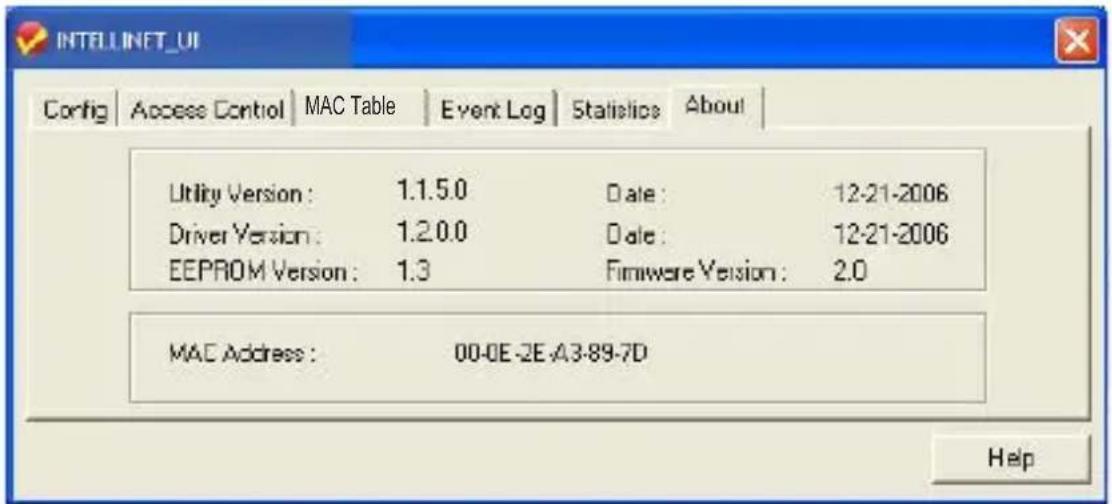
This screen displays basic information about the utility, including the MAC address.
SPECIFICATIONS
Standards
• IEEE 802.11b (11 Mbps Wireless LAN)
• IEEE 802.11g (54 Mbps Wireless LAN)
- Upward compatible to IEEE 802.11n draft 2.0 (150 Mbps Wireless LAN)
General
• Interface: Hi-Speed USB 2.0
- Chipset: Ralink RT3070
• Frequency band: 2.4000 – 2.4835 GHz (Industrial Scientific Medical Band)
• Modulation technologies:
- 802.11b: Direct Sequence Spread Spectrum (DSSS): DBPSK, DQPSK, CCK
- 802.11g: Orthogonal Frequency Division Multiplexing (OFDM): BPSK, QPSK, 16QAM, 64QAM
- 802.11n: Orthogonal Frequency Division Multiplexing (OFDM): BPSK, QPSK, 16QAM, 64QAM
• Security:
- 64/128-bit WEP data encryption
- WPA and WPA2
- Cisco CCX
- Transmit power:
- 11n: 14 dBm +/- 1.5 dBm
- 11g: 14 dBm +/- 1.5 dBm
- 11b: 17 dBm +/- 1.5 dBm
- Receive sensitivity:
- 150 Mbps OFDM: -70 dBm +/- 1.5 dBm
- 54 Mbps OFDM: -78 dBm +/- 1.5 dBm
- 11 Mbps CCK: -92 dBm +/- 1.5 dBm
• Certification: FCC Class B, CE
LEDs
- Link/Activity
Environmental
- Dimensions: 10 (H) x 28 (W) x 89.6 (L) mm (0.4 x 1.1 x 3.5 in.)
• Weight: 0.17 kg (0.4 lbs.) - Operating temperature: 0 - 40ircC (32 - 104°F)
- Operating humidity: max. 95% RH, non-condensing
System Requirements
- Notebook or Desktop PC with Pentium 1 GHz-compatible processor or higher
• Windows 2000/XP/Vista/7
• Available Hi-Speed USB 2.0 type-A port
Package Contents
• Wireless 150N USB Adapter
- USB extension cable
- Setup CD with user manual; quick installation guide

INTELLINET™
NETWORK SOLUTIONS
INTELLINET NETWORK SOLUTIONS™ offers a complete line of active and passive networking products.
Ask your local computer dealer for more information or visit
www.intellinet-network.com.
Copyright © INTELLINET NETWORK SOLUTIONS
All products mentioned are trademarks or registered trademarks of their respective owners.
- Disposal of Electric and Electronic Equipment
- ENGLISH
- DEUTSCH
- FCC CERTIFICATIONS
- FCC RF RADIATION EXPOSURE STATEMENT
- R&TTE COMES
- EU COUNTRIES INTENDED FOR USE
- TABLE OF CONTENTS
- section page
- Installation....6
- Configuration 7
- SoftAP 26
- Specifications 33
- INSTALLATION
- CONFIGURATION
- OPDN1
- OPDN2
- NETWORK
- PROFILE
- PROFILE AUTHENTICATION AND ENCRYPTION (SECURITY)
- 802.1x SETTING/CERTIFICATION
- 802.1x SETTING/CA SERVER
- STATISTICS
- ADVANCED
- WMM
- ABOUT
- WPS CONFIGURATION
- PBC (Push-Button Configuration)
- PIN COE
- SAP
- SECURITY SETTING
- ACCESS CONTROL
- MAC TABLE
- EVENT LOG
- SPECIFICATIONS
- Standards
- General
- LEDs
- Environmental
- System Requirements
- Package Contents
- INTELLINET™
Brand : IC Intracom
Model : 524698
Category : Network card