SW720 - Docking Station AmpliVox - Free user manual and instructions
Find the device manual for free SW720 AmpliVox in PDF.


| Product Type | Docking Station with Speaker |
| Brand | AmpliVox |
| Model | SW720 |
| Dimensions (W x H x D) | 12 x 10 x 5 inches |
| Weight | 5 lbs |
| Power Source | AC adapter (100-240V) or 6x D batteries |
| Audio Output | 80W RMS |
| Frequency Response | 50Hz - 20kHz |
| Wireless Connectivity | Bluetooth 5.0 |
| Microphone Input | 1/4" (6.35mm) and 3.5mm |
| Auxiliary Input | 3.5mm stereo |
| USB Charging Port | 5V/2.1A |
| Battery Life | Up to 10 hours (alkaline batteries) |
| Speaker Type | Full-range with tweeter |
| Maximum Sound Level | 110 dB SPL |
| Equalizer Presets | Music, Speech, Flat |
| Mounting Options | Pole mount (1.5" socket) or tripod |
| Recommended Cleaning | Wipe with dry cloth; avoid solvents |
| Storage Temperature | -10°C to 50°C |
| Included Accessories | AC adapter, microphone with cable, user manual |
Frequently Asked Questions - SW720 AmpliVox
User questions about SW720 AmpliVox
0 question about this device. Answer the ones you know or ask your own.
Ask a new question about this device
Download the instructions for your Docking Station in PDF format for free! Find your manual SW720 - AmpliVox and take your electronic device back in hand. On this page are published all the documents necessary for the use of your device. SW720 by AmpliVox.
USER MANUAL SW720 AmpliVox
EXTEND YOUR VOICE WITH
AMPLIVox®
PORTABLE SOUND SYSTEMS
iPod WIRELESS PA SYSTEM
With DVD Player

natural_image
Abstract geometric logo design with stylized 'A' letters (no text or symbols)USERS MANUAL
CONTENTS
Table of Contents
- Introduction----1
- Important Safeguards----1
- Product Features----2
- Product Specifications----3
- Parts Description 4-9
- User's Guide----10-12
- Basic Set & System Configuration----13
Should you need any assistance please call 800-267-5486. To register your product for warranty and support please visit http://www.ampli.com/support.htm or submit warranty registration card to...
Amplivox Sound Systems 3995 Commercial Ave. Northbrook, IL 60062
1 Year Limited Warranty on manufacturer's defect only. This does not cover accidental damage or abnormal operating/storage conditions such as extreme heat or cold or excessive moisture. Please contact the manufacturer (information above) for service or replacement. Warranty is considered null and void should the product case be opened or appear tampered with.
BASIC SET & SYSTEM CONFIGURATION
7. What Comes In The Box
(1) Main Unit - 1 PC
(2) DC Cord - 1 PC
(3) Signal Cable - 1 PC
(4) Handheld Wireless Mic - 1 PC
(5) Battery 9V - 1 PC
(6) 1.5V AAA Battery - 2 PCS
(7) User Manual - 1 PC
8. System Configuration
(1) DVD Player
(2) iPod Docking Station
(3) UHF Receiver
(4) Amplifier - 30 Watts
USER'S GUIDE IMPORTANT SAFEGUARDS
6.3 Remote Control Battery
6.3.1 Battery Installation
Open remote control battery cover first. To avoid wasting battery energy the PVC plastic film covers the contact. This insulation must be removed before using remote control.
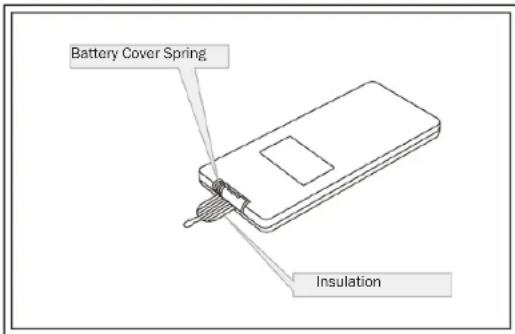
6.3.2 Changing The Battery
Battery service life is about one year. It depends on usage frequency and operation. If remote control does not work when it is near the unit, please change the battery.
6.3.3 Remote Control Operation Range
-
Remote control operation range: Within 13 feet and 15 degrees of front panel
-
Effective distance of remote control may vary according to the environment. Use remote control for most functions. When using for karaoke, it can be used for pitch adjustment to partially eliminate vocals.
6.4 Support I-Pod (Specialized player just with this function)
When using i-Pod, stop playing DVD, turn on i-Pod player and insert iPod into iPod dock (2). The System will amplify music played.
Compatible with all iPhone™ and most iPod® models (Classic, Touch, iPhone 3G & 3GS and Most iPod Nano | Shuffle & other MP3 Players w/ 3.5 mm Jack only)
1. Introduction
Thank you for choosing the Amplivox iPod Wireless PA System. In order to get the best sound from your PA System please read this manual carefully for instructions on proper operation.
Please recharge Unit at least monthly for best performance.
2. Important Safeguards
* Do not attempt to service this product yourself. Any tampering or opening of the case will void your warranty.
* Please call manufacturer for warranty/repair information only.
* One receiver cannot receive signal from two microphones of the same frequency simultaneously. Other manufactures microphones cannot be used for this receiver.
* To reduce the risk of fire or electric shock do not remove the cover. High voltage electronics inside.
* To reduce the risk of electric shock, do not touch power outlet during thunder storms, do not pull power plug with wet hands.
* To reduce the risk of fi re or electric shock from damaged power cord please pull cord out gently and do not force. Grasp fi rmly and pull straight outward. If the equipment will not be used for lengthy period of time please do not leave the unit plugged in.
* To reduce the risk of electric shock, use the specified power voltage only
* To prevent damage from dropping or tilting do not put heavy articles on the top of the equipment. Do not place equipment on unsteady tables or other surfaces.
* To Reduce the risk of electric shock, keep liquids, small objects that could fall into the device or fl ammable materials away from the equipment.
* To reduce the risk of fire or electric shock, do not expose this equipment and power cord to conditions of extreme heat, dust or moisture. Keep away from heaters, humidifi ers or any product that may produce substances that may damage the equipment.
* Please ensure AC Power plug is inserted fully into power jack and keep clean to ensure dust does not create fire hazard.
* Please remove the equipment from the power supply and immediately contact the manufacturer if...
Do Not
Plug
Forbidden
Forbidden
Forbidden
Forbidden
Caution!
(1) Smoke, flames or burning odor comes from unit
(2) Water gets into the interior of the equipment
(3) The unit is dropped and damaged
(4) The Power Cord becomes frayed or damaged
(5) There is no sound output or sound is distorted


Disassemble
Do Not Touch
Power Outlet

Pull Out AC


Caution!
FEATURES USER'S GUIDE
3. Features
- This portable amplifier is suitable for outdoor and indoor audio including vocal and music performance/playing. Rechargeable battery can be easily exchanged for replacement.
- It has high-quality rechargeable battery which is convenient for both indoor and outdoor use.
- Multiple input/output jacks can connect to nearly any audio device and broadcast for any moderate sized gathering.
- Place on virtually any surface or use with tripod with built-in mount.
- Echo Feature is suitable for teaching, singing and karaoke.
- With 1 wired MIC input jack and up 2 wireless microphones (optional 2nd wireless mic not included) it can be used by multiple people simultaneously.
- To save power switch CD player/ MP3 player/ DVD player ON / OFF.
- New type plastic enclosure, multi function configuration.
- Video Out allows you to play DVD's with video projector or television. Simply plug RCA cable into Video Out, and plug other into video device. See video device's instructions to operate video equipment.
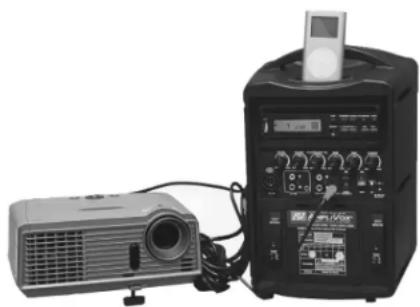
natural_image
Exterior view of a projector and audio amplifier device (no visible text or symbols)6.2 Slot-In DVD Player With USB - Continued
- Please note the following about pressing SUBTITLE (19) while playing...
a. Language setting is defined by the languages of the disc.
b. Some discs has only one language.
c. When the language is selected, there will be marks displaying on the screen. d. Setting subtitles only under DVD mode. - To Play DVD Pres PROG Key on Unit (4) or PROG key (23) on remote and P00:00 will be shown on the screen. Then use direction buttons (13) to play (just on main menu or catalogue).
- Press RDM Button (25) on remote controller to play songs in random order. NOTE: Random is not functional with MP4's.
- To turn play VCD, press MENU(27) on the remote control to play PBC. Then songs list will be shown on the screen, then you can press key(4) for selecting the preferred songs. Press it again to cancel PBC. Press MENU(27) on the remote control to return main menu. Then you can use key(4) to control, Press it again to enter title menu, Press it on the third time to close it.
- To set to audio mode press SETUP (15) on the remote control to enter into main menu, Then use the direction key (13) to set TV MODE, Voice, Multimedia, TV standard, Pin code etc (and also you can use default Parameters without making any change on parameters).
Continued Next Page
USER'S GUIDE SPECIFICATIONS
6. User's Guide
6.1 Handheld Microphone Instructions
- Open battery compartment (6), insert attached 9V battery into battery compartment and then close battery cover.
- Turn on microphone power switch (3), power LED indicator will Light (2).
- If power switched to top most setting too quickly popping sound may occur (wait at least .5 seconds).
6.2 Slot-In DVD Player With USB
- Insert standard CD, VCD, DVD disk(12cm) into disk slot (1).
- NO DISC will appear if disc is not present or if disk is dirty and cannot be read. Clean and reinsert.
a. Press OSD key (12) on remote control to dsiplay playing time, press again to display time remaining, press again and section time will be shown, press again and section time remaining will be shown.
b. While Playing VCD / SVCD / CD press OSD keys (12) on remote control - program playing time will be shown, press again and program time remaining will be shown, press again and total time will be shown, press again and total time remaining will be shown, press again close. - Press Eject button (6) on DVD player or Eject Button (16) on remote controller to reject the disk, after 10 mins, disk will be automatically insert into DVD player.
- While playing press REV FWD (10)/(11) for reverse and forward. Press multiple times to go from X2 speed to X32. Press Prev button (3) on unit or PREV button (21) on remote control for playing previous song, or press FWD button (4) on DVD player or FWD button (22) on remote for next song in order.
- Press key(7) on DVD player or key(17) on remote controller, DVD player will under DVD/MP3 playing mode. Press (8) on DVD player or (2) on remote controller to enter the USB playing mode.
- When DVD player is selected and unit is on, but there is no disk in slot(1) or the disk is in incorrectly, NO DISC will show on DVD screen(12). Insert or replace the disk in the unit after cleaning and DVD player will jump to the last song or title automatically after the READING DISC flash 6 times.
- When system is on DVD amplifying status, or when system is on status of DVD, CD or VCD press audio key(18) for twice for left / right / stereo and mixing setting.
4. Specifications
4.1 Wireless Transmitter (built into handheld mic)
| Modulation Mode | FM |
| Oscillation Mode | PLL Synthesized |
| Channel Number | 1CH UHF - Approx. 800 MHz (806.25 MHz or 809.75 MHz) |
| Frequency Range | 0.0005% |
| Frequency Stability | 25K(3K) |
| Modulation Factor | 10dBm 0.5dB |
| Transmitting Power | 40dBm |
| Spurious Emission | 80Hz-18KHz(3dB) |
| Frequency Response | 85dB |
| SNR | 1% |
| Distortion | 3V & 9V |
| Power Source | 150mA 20mA&50mA 10mA |
| Current Consumption |
4.2 Wireless Receiver
| Modulation Mode | FM |
| Frequency Range | UHF Approx. 800 MHz (806.25 MHz or 809.75 MHz) |
| Frequency Stability | 0,0005% |
| Sensitivity | -95dB S/N 40dB |
| Adjacent Channel Rejection | 80dB |
| Image and Spurious Rejection | 80dB |
| AF Output | 450mV 50mV |
| SNR | 85dB |
| Distortion | 1% |
| Power Source | 12V |
| Current Consumption | 130mA 20mA |
4.3 Amplifi er System
| Power Output | Output Power With Battery 30W Output Power With DC 30W |
| Speaker | Speaker 8" 1PC(40W) |
| Recharge Battery | 12V /5A 1PC 6 volts 5.0 Amp Hours SLA |
| Distortion | 1% (at 10W) |
| Frequency Response | 80Hz-15KHz 3dB |
| Input | Wireless / Wired MIC IN AUX IN |
| Output | LINE OUT VIDEO OUT(DVD) |
| Recharging Time | 7-10Hours |
| Normal Run Time | 3-4 Hours |
| Current Consumption(Max ) | 5A |
PARTS DESCRIPTION PARTS DESCRIPTION
5. Parts Description
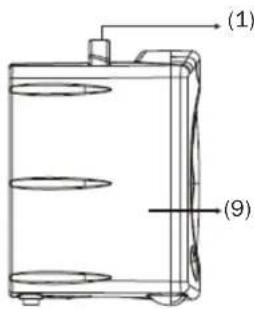
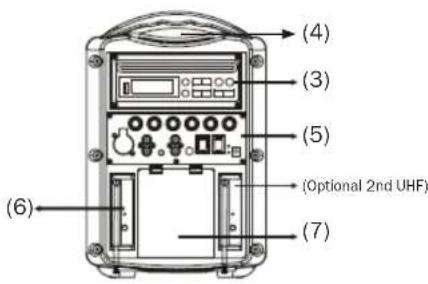
5.1 Main Unit
(1) Handle
(2) Metal Speaker Grill
(3) Slot-In DVD with USB
(4) iPod Dock
(5) Control Panel
(6) UHF Receiver
(7) Battery Compartment
(8) Tripod Mount
(9) Plastic Enclosure Cabinet
Top Of Unit
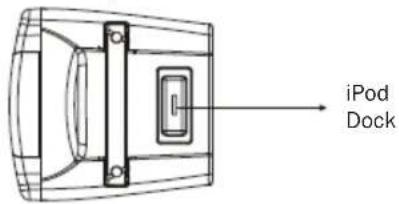
Front of Unit Side Of Unit
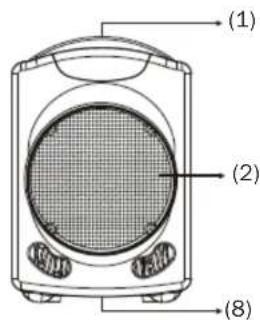
Back Of Unit
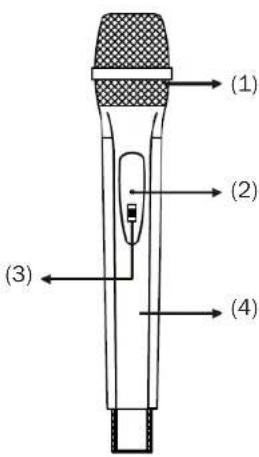
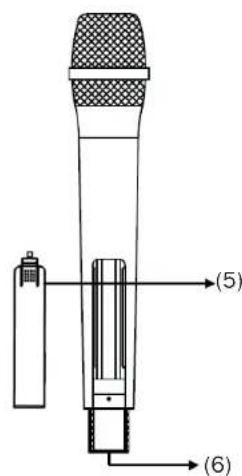
5.6 Handheld Microphone
(1) Mesh Windscreen
(2) Low Battery LED Indicator
(3) Power Switch
(4) Body
(5) Battery Compartment / Cover
(6) Colorful Frequency Recognition Tail
PARTS DESCRIPTION PARTS DESCRIPTION
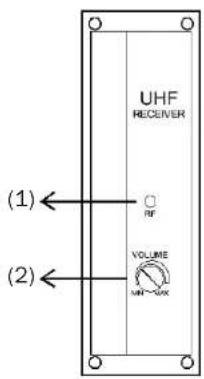
5.5 Receiver Module
UHF Single Channel
(1) RF Indicator
(2) Volume Control
Continued Next Page
5.2 Control Panel
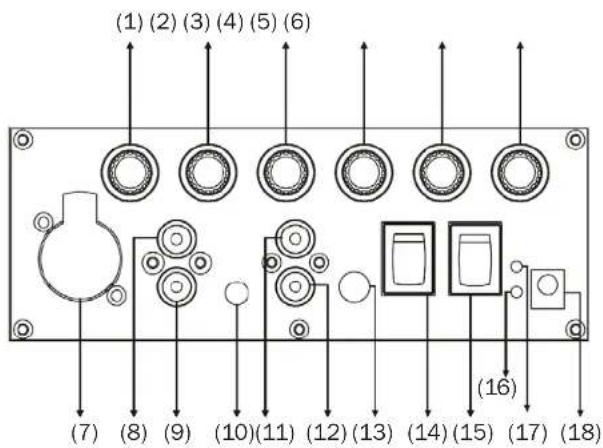
(1) Mic Volume
(2) AUX Volume - Volume Control of External Sound Source
(3) iPod / MP3 / DISC Volume Control
(4) Echo Control (Produces echo/reverb for better sounding vocals)
(5) Tone Control
(6) Master Control
(7) Microphone Input Jack
(8) Auxiliary In Jack for External Sound Source (R)
(9) Auxiliary In Jack for External Sound Source (L)
(10) Auxiliary In Jack for External Sound Source
(11) Line Out (R)
(12) Line Out (L)
(13) Video Out Jack (Disc) (Sends DVD Video Signal to external source -projector or television- via standard Video Cable- RCA Type)
(14) Voice Priority Switch (Mutes Music while speaking)
(15) Power Switch
(16) Battery Power LED Indicator
When Light is Red Battery Is Charging
When Light is Green Battery Is Fully Charged
(17) Power LED Indicator: When voltage is high, it lights green; When voltage is low, it lights red.
(18) DC Power Input Jack
PARTS DESCRIPTION PARTS DESCRIPTION
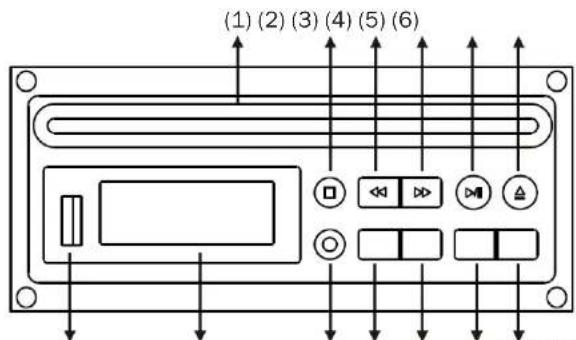
5.3 DVD USB Player
(1) Disc Slot
(2) Stop
(3) Fast Rewind/Backward
(4) Fast Forward
(5) Play/Pause
(6) Eject
(7) Disc
(8) USB Button
(9) File Forward
(10) File Backward
(11) Infrared Sensor
(12) LCD Display
(13) USB Port
(7)(8)(9)(10)(11)(12)
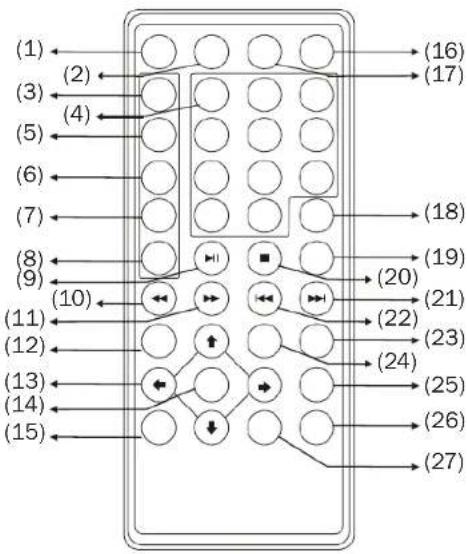
5.4 Remote Control
(1) Power Switch
(2) USB Play
(3) Audio Mute Key
(4) Numeric Key
(5) Volume Increase +
(6) Volume Decrease -
(7) Tune Up #
(8) Falling Tone B
(9) Pause Playback Key
(10) Fast Reverse Key
(11) Fast Forward Key
(12) Display
(13) Directional Key
(14) Confirm Menu Select
(15) Setup Menu
(16) Eject
(17) Disc Play
(18) Audio
(19) Subtitles/Language
(20) Stop Playback
(21) Skip to Previous Title
(22) Skip to Next Title
(23) Program
(24) Zoom In/Out
(25) Random Play
(26) Repeat
(27) Disk Menu Setting
- iPod WIRELESS PA SYSTEM
- CONTENTS
- Table of Contents
- BASIC SET & SYSTEM CONFIGURATION
- What Comes In The Box
- System Configuration
- USER'S GUIDE IMPORTANT SAFEGUARDS
- Remote Control Battery
- Battery Installation
- Changing The Battery
- Remote Control Operation Range
- Support I-Pod (Specialized player just with this function)
- Introduction
- Important Safeguards
- FEATURES USER'S GUIDE
- Features
- Slot-In DVD Player With USB - Continued
- USER'S GUIDE SPECIFICATIONS
- User's Guide
- Handheld Microphone Instructions
- Slot-In DVD Player With USB
- Specifications
- PARTS DESCRIPTION PARTS DESCRIPTION
- Parts Description
- Main Unit
- Handheld Microphone
- Receiver Module
- Control Panel
- DVD USB Player
- Remote Control
Brand : AmpliVox
Model : SW720
Category : Docking Station