
GFWPPO1BPC - Pizza oven GEORGE FOREMAN - Free user manual and instructions
Find the device manual for free GFWPPO1BPC GEORGE FOREMAN in PDF.


| Brand | George Foreman |
| Model | GFWPPO1BPC |
| Product Type | Electric Countertop Pizza Oven |
| Dimensions (H x W x D) | 12.5 x 16.5 x 14.5 inches |
| Weight | 18 lbs |
| Power | 1500 Watts |
| Voltage | 120 V / 60 Hz |
| Cooking Surface | 12-inch diameter stone baking surface |
| Temperature Range | Up to 500°F (260°C) |
| Main Functions | Bake, Broil, Keep Warm |
| Capacity | Fits up to a 12-inch pizza |
| Heating Elements | Top and bottom heating elements |
| Controls | Adjustable thermostat with timer |
| Indicator Lights | Power and preheat ready lights |
| Construction | Stainless steel exterior with cool-touch handle |
| Cleaning | Removable crumb tray and nonstick interior for easy cleaning |
| Safety Features | Automatic shut-off and overheat protection |
| Accessories Included | Pizza stone, baking pan, and instruction manual |
| Spare Parts Availability | Replacement pizza stone and baking pan available |
| Warranty | 1-year limited warranty |
Frequently Asked Questions - GFWPPO1BPC GEORGE FOREMAN
User questions about GFWPPO1BPC GEORGE FOREMAN
0 question about this device. Answer the ones you know or ask your own.
Ask a new question about this device
Download the instructions for your Pizza oven in PDF format for free! Find your manual GFWPPO1BPC - GEORGE FOREMAN and take your electronic device back in hand. On this page are published all the documents necessary for the use of your device. GFWPPO1BPC by GEORGE FOREMAN.
USER MANUAL GFWPPO1BPC GEORGE FOREMAN
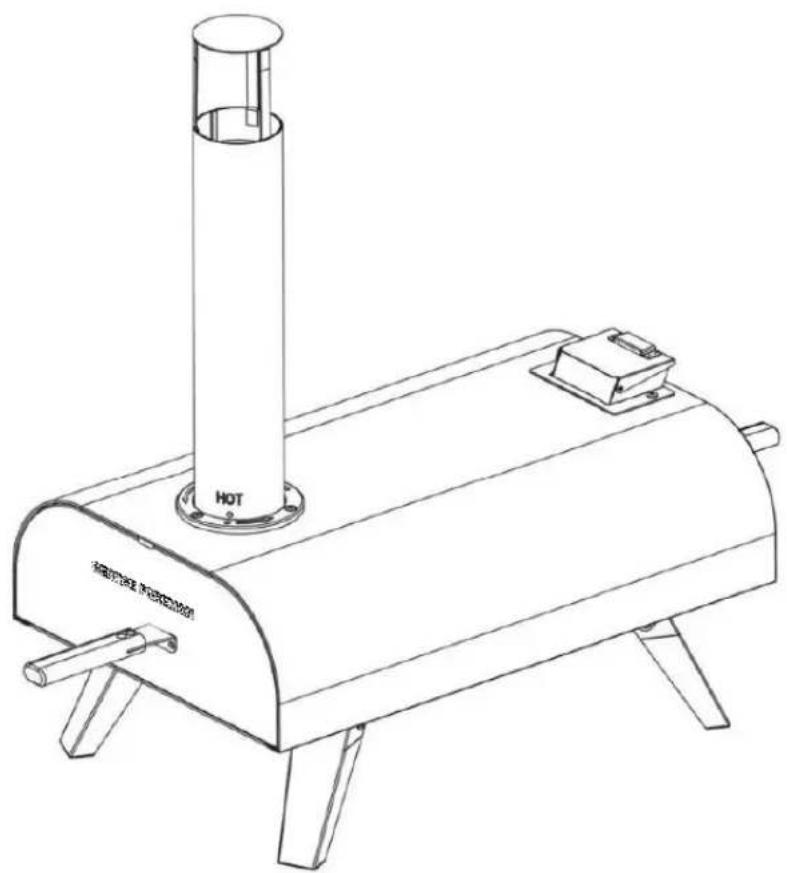
WOOD PELLET PIZZA OVEN GFWPPO1SSPC & GFWPPO1BPC
natural_image
Line drawing of a portable industrial machine with a vertical cylindrical top and base, labeled 'HOT' (no text or symbols on the device itself)
Please scan the QR code for step by step video assembly instructions. Alternatively, you can visit:
bbqs.georgeforeman.co.uk. From here, please select the product that you are looking to build and view the 'How To' video located at the bottom of the page.
WARNING: PLEASE ENSURE YOU HAVE READ THROUGH THE SAFETY AND OPERATING INSTRUCTIONS BEFORE USE.
PLEASE RETAIN INSTRUCTIONS FOR FUTURE REFERENCE
CONTENTS
| Page(s) | |
| Safety Instructions | 3 - 5 |
| Parts List & Feature Diagram | 6 |
| Pizza Oven Assembly | 7 - 18 |
| Lighting and Extinguishing Your Pizza Oven | 19 - 21 |
| Cooking with Your Pizza Oven | 22 - 23 |
| Cleaning Instructions | 24 |
| Troubleshooting | 25 - 26 |
| Guarantee and Customer Services | 27 |
SAFETY INSTRUCTIONS
WARNING: IMPORTANT SAFETY INSTRUCTIONS READ CAREFULLY AND KEEP FOR FUTURE REFERENCE
Before you start to build and use your pizza oven, please read these instructions thoroughly:
- Dispose of all plastic bags carefully and keep them away from children.
- Check all the parts provided against the list in this instruction manual to make sure you have all of the parts listed. If not, contact your local store who will be able to help you.
• Take a few moments to familiarize yourself with the contents and before starting, check all holes are clear of any paint residue. - When you are ready to start, make sure that you have plenty of space and a clean dry area for assembly.
- Important: Whilst every care is taken in the manufacture of this product, please exercise caution during assembly, as sharp edges may be present.
Please read and follow this advice when cooking on your grill:
- ALWAYS wash your hands before or after handling uncooked meat and before eating.
• ALWAYS keep raw meat away from cooked meat and other foods. - Before lighting your oven, ensure the pizza oven grill surfaces and tools are clean and free of old food residues.
• DO NOT use the same utensils to handle cooked and uncooked foods. - Ensure all meat is cooked thoroughly before eating.
- CAUTION: eating raw or under cooked meat can cause food poisoning (e.g. bacteria strains such as E.coli).
- To reduce the risk of under cooked meat, cut it open to ensure it is cooked all the way through internally before consuming.
-
CAUTION: If meat has been cooked sufficiently the meat juices should be clear in colour and there should be no traces of pink/red juices or meat colouring.
-
Pre-cooking of larger meat of joints is recommended before finally cooking in your pizza oven.
• After cooking with your pizza oven always clean the grill cooking surfaces and utensils.
Safety Warnings:
- WARNING: Pellet pizza ovens give off CARBON MONOXIDE when used, which is poisonous and can kill. DO NOT use the pizza oven indoors or in a tent, caravan or awning.
- WARNING: Do not use indoors! OUTDOOR USE ONLY. Do not use the pizza oven in a confined and/or habitable space e.g. houses, tents, caravans, motor homes, boats. Danger of carbon monoxide poisoning fatality.
• DO NOT use this product as a furnace. - Ensure that the product is positioned on a permanent, flat, level, heat resistant, and non-flammable surface always away from flammable items (i.e. wooden fences or overhanging trees).
- Make sure that the product has a minimum of 2 m overhead clearance and has a minimum of 2 m clearance from other surrounding items.
- WARNING! Do not use spirit or petrol for lighting or relighting! Use only firelighters complying to EN 1860-3!
• DO NOT handle or move the product whilst alight as it will become hot.
• NEVER leave a burning fire unattended. - Keep children and pets at a safe distance from the product when in use.
• DO NOT cook before the fuel has a coating of ash.
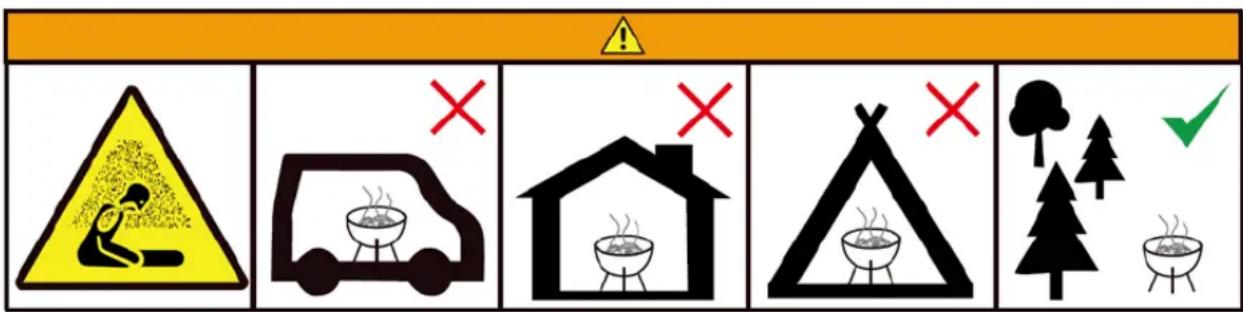
Carbon Monoxide
Poisoning Hazard
Do not use in
Motor Homes
Do Not Use
Indoors
Do Not Use in Tents
Use in open Spaces
- The pizza oven should be heated up and the fuel kept red hot for at least 15 minutes prior to the first cooking on the pizza oven.
- Always use heat resistant gloves when handling the product. Do not touch any metal parts while the pizza oven is in use; only touch the oven door, hopper assembly, pizza peel, and fire box assembly using the handles provided.
- Be careful when using the handles to operate the oven door, hopper assembly, pizza peel, and fire box, as metal parts of the pizza oven are likely to become hot.
- Ensure that the pizza oven has cooled down completely before removing ash.
- Keep a fine water sprayer at hand to extinguish any small flare-up. Otherwise, use baking powder or salt to extinguish if the fire increases in size.
- To extinguish the unit - stop adding fuel and allow the fire in the pizza oven to die or douse with water.
• To prolong the life of your pizza oven grill, do not leave it outside unprotected. Always use a suitable pizza oven cover when not in use.
• DO NOT store flammable materials near this product.
• DO NOT use aerosols near this pizza oven.
• DO NOT use coal in this product.
• DO NOT attempt to move the product when it is hot or in use.
This symbol means: CAUTION: Hot Surfaces
- Flames may blow outside of the metal in the ways noted below: A. At the back, where flames burn
B. From the top of hopper assembly when the lid is opened
C. From the front of the pizza oven when the door is opened
D. From the top of the chimney
- Modification of the pizza oven may be dangerous, is not permitted, and will nullify any warranty.
- Failure to follow the instructions in this manual could result in serious injury or property damage.
PARTS LIST & FEATURE DIAGRAM
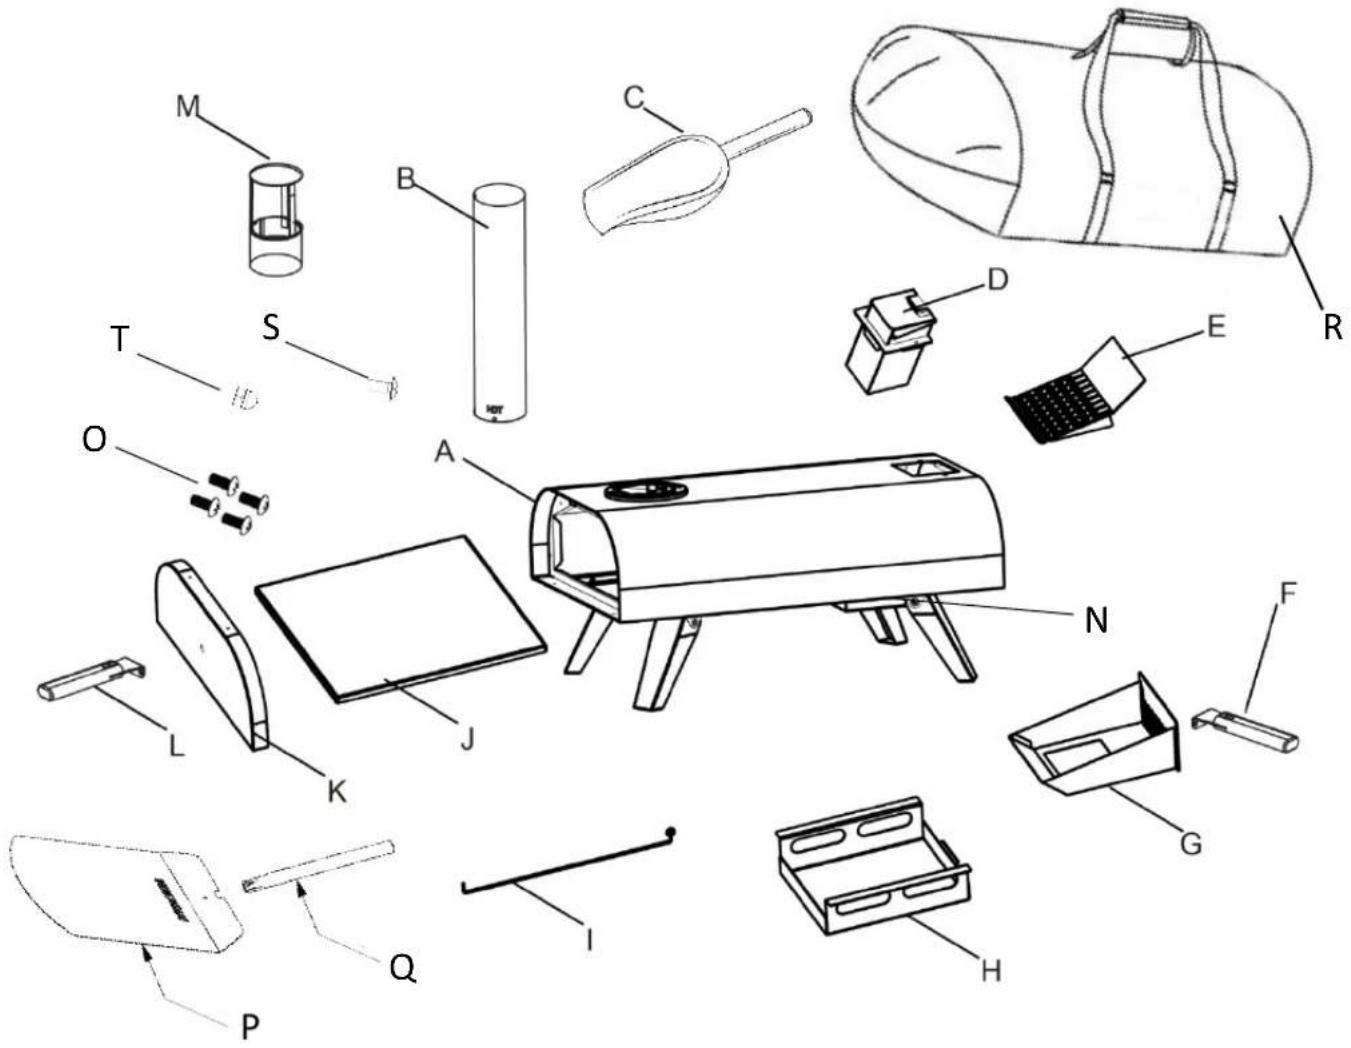
| PART DESCRIPTION QTY PART DESCRIPTION QTY | |||||
| A Pizza oven body assembly 1 K Oven door 1 | |||||
| B Chimney pipe 1 L Door handle 1 | |||||
| C | Hopper shovel | 1 | M | Chimney lid | 1 |
| D | Hopper assembly | 1 | N | Ash tray support brackets | 1 |
| E | Pellet grid | 1 | O | Screw (M4x10) | 4 |
| F | Fire box assembly handle | 1 | P | Pizza peel | 1 |
| G | Fire box assembly | 1 | Q | Pizza peel handle | 1 |
| H | Ash tray | 1 | R | Storage/Carry Bag | 1 |
| I | Poker | 1 S Screw (M6x16) | 1 | ||
| J | Pizza stone | 1 T Cap nut (M5) | 1 | ||
You will need:
PIZZA OVEN ASSEMBLY
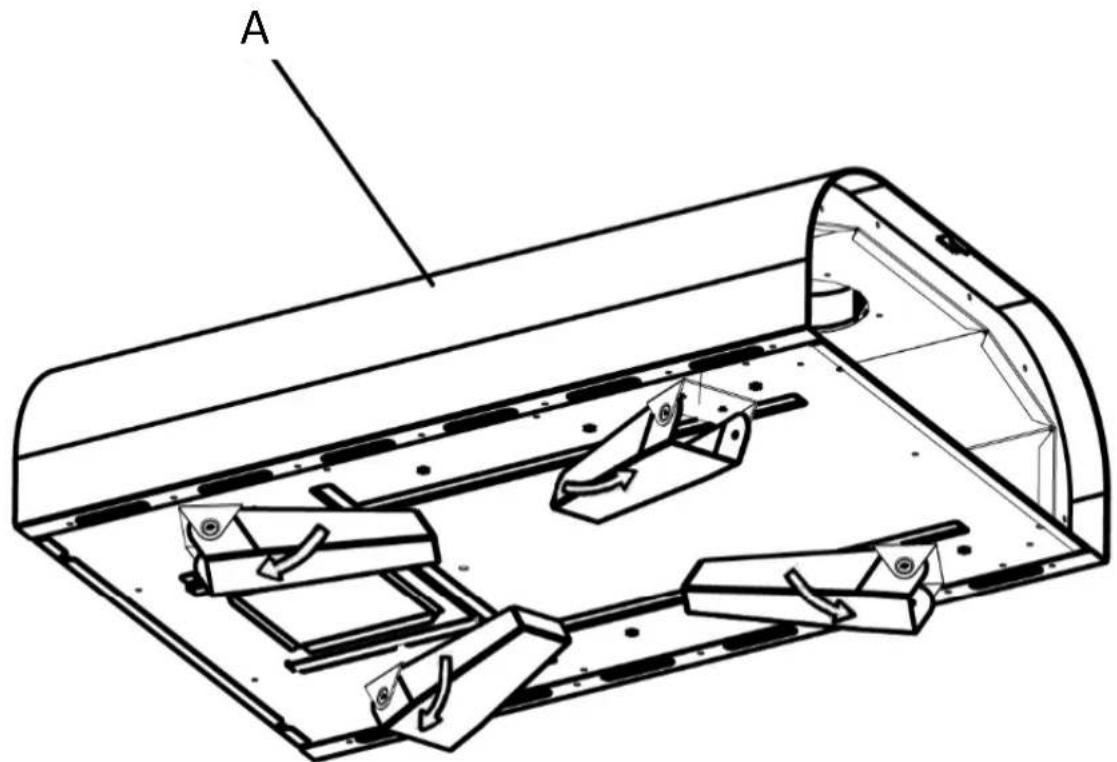
STEP 1 – Unfolding the legs
- With assistance, place the pizza oven body assembly (A) upside down on a soft, level surface.
- Then unfold all four legs (which come pre-assembled), as illustrated in the diagram below.
PIZZA OVEN ASSEMBLY
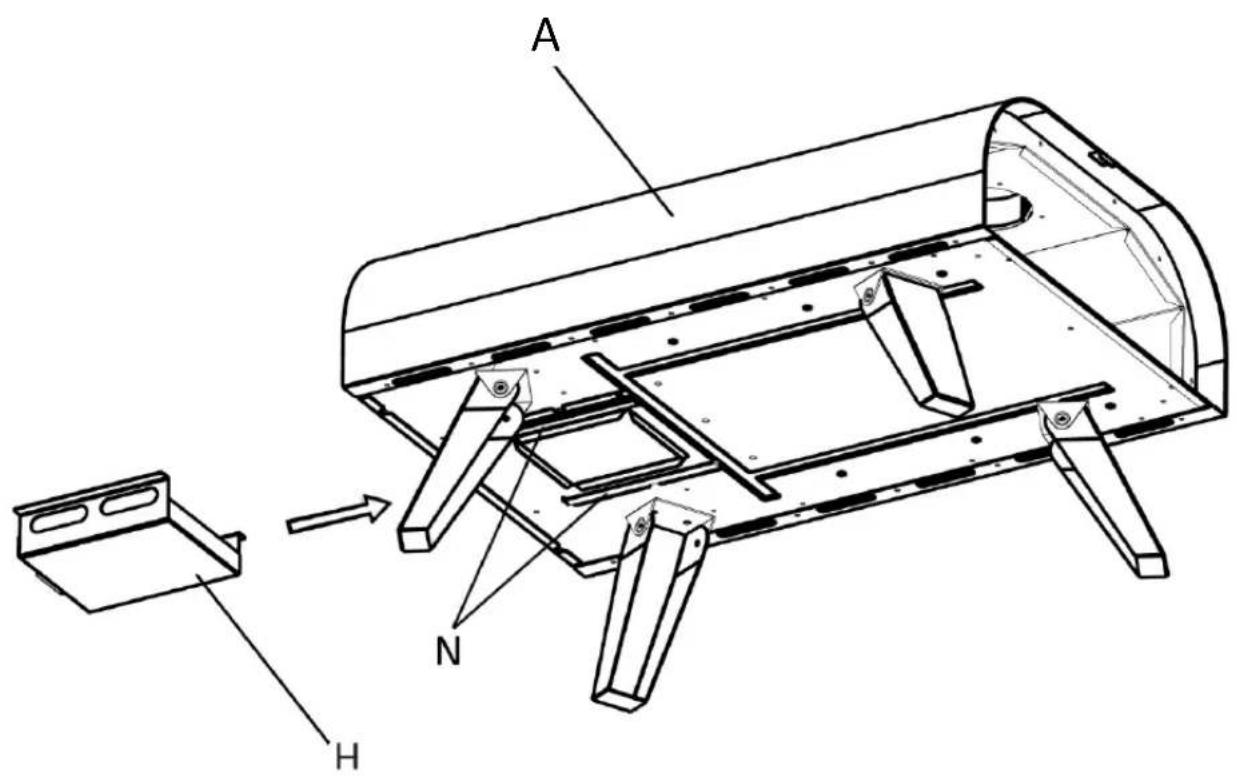
STEP 2 – Attaching the ash tray
- Attach the ash tray (H) to the pizza oven body assembly (A), by sliding it into the ash tray support brackets (N), as illustrated in the diagram below.
PIZZA OVEN ASSEMBLY
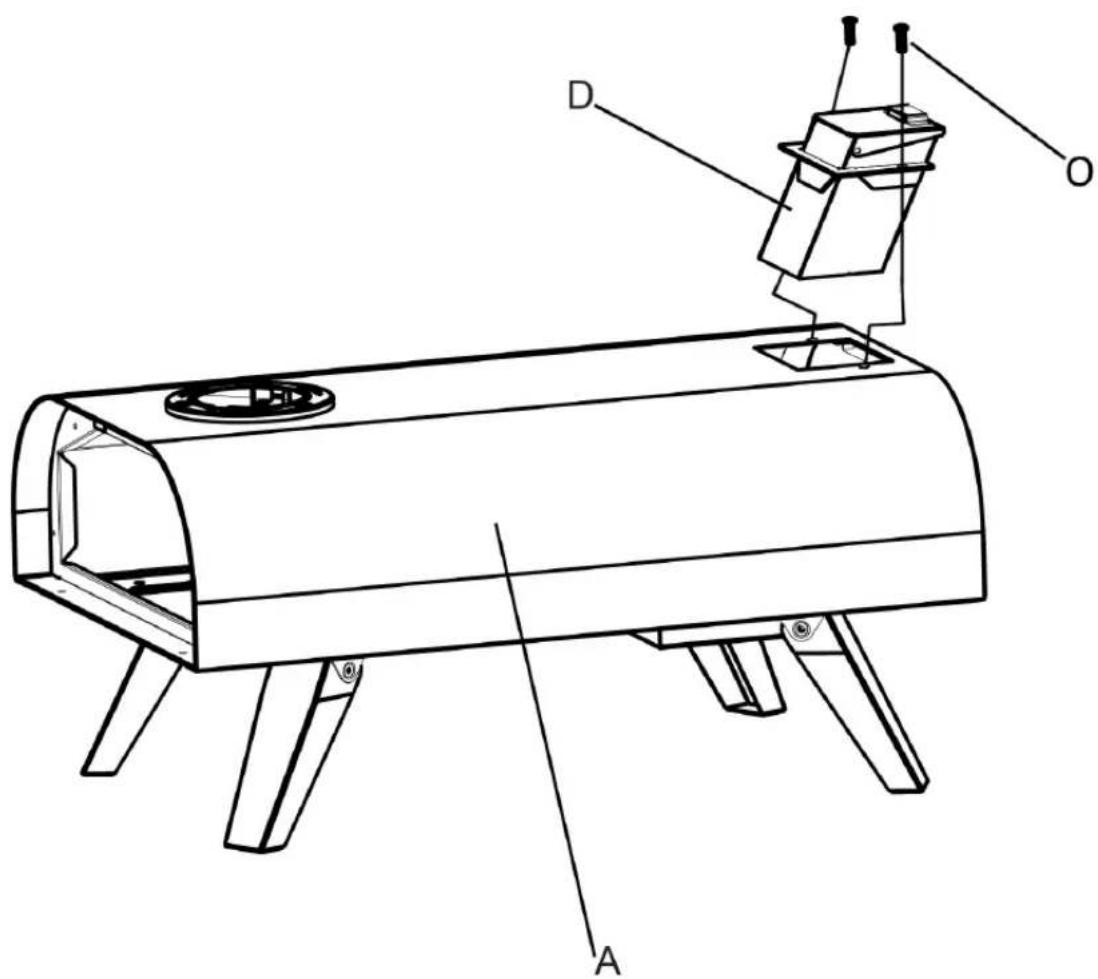
STEP 3 – Installing the hopper assembly
- Flip over the pizza oven body assembly (A), so that the legs are now placed on a flat level surface.
• Install the hopper assembly (D) to the pizza oven body assembly (A) with 2 of the screws (O) provided, as illustrated in the diagram below. - Tighten the screws with a screwdriver.

PIZZA OVEN ASSEMBLY
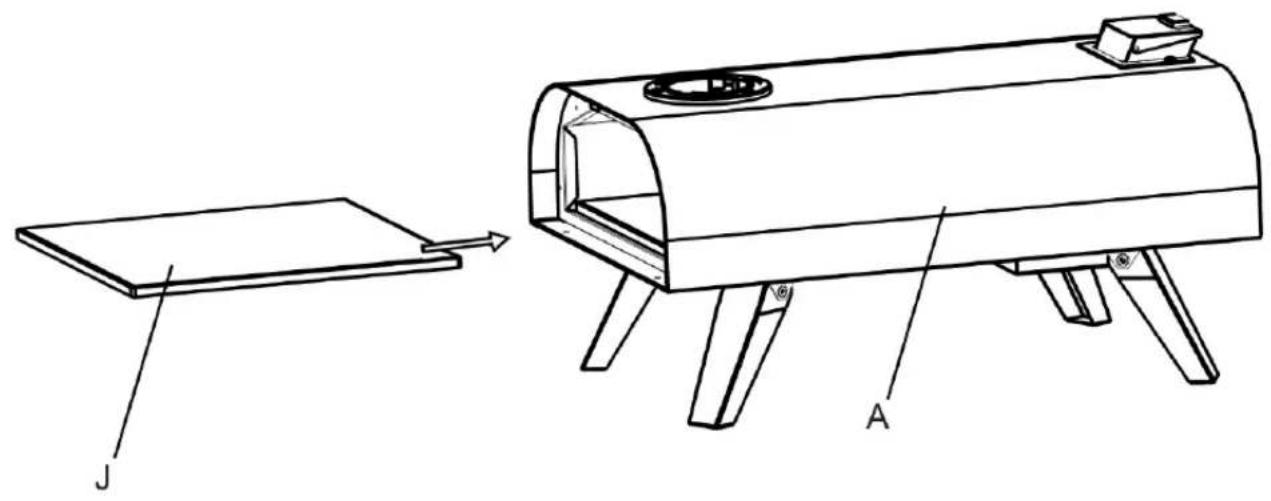
STEP 4 – Inserting the pizza stone
- Slide the pizza stone (J) into the pizza oven assembly (A) as illustrated in the diagram below.
PIZZA OVEN ASSEMBLY
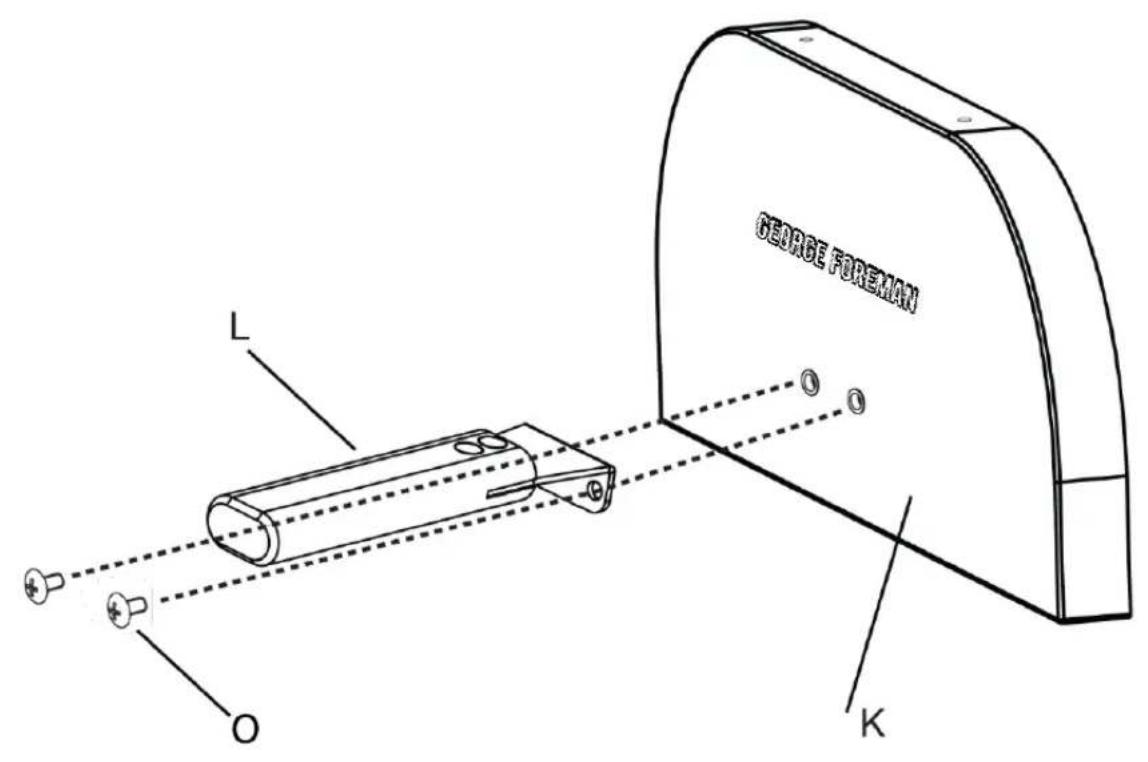
STEP 5 – Assembling the door
- Attach the door handle (L) to the oven door (K) with 2 of the screws (O) provided, as shown in the diagram below.
- Tighten the screws with a screwdriver..

PIZZA OVEN ASSEMBLY
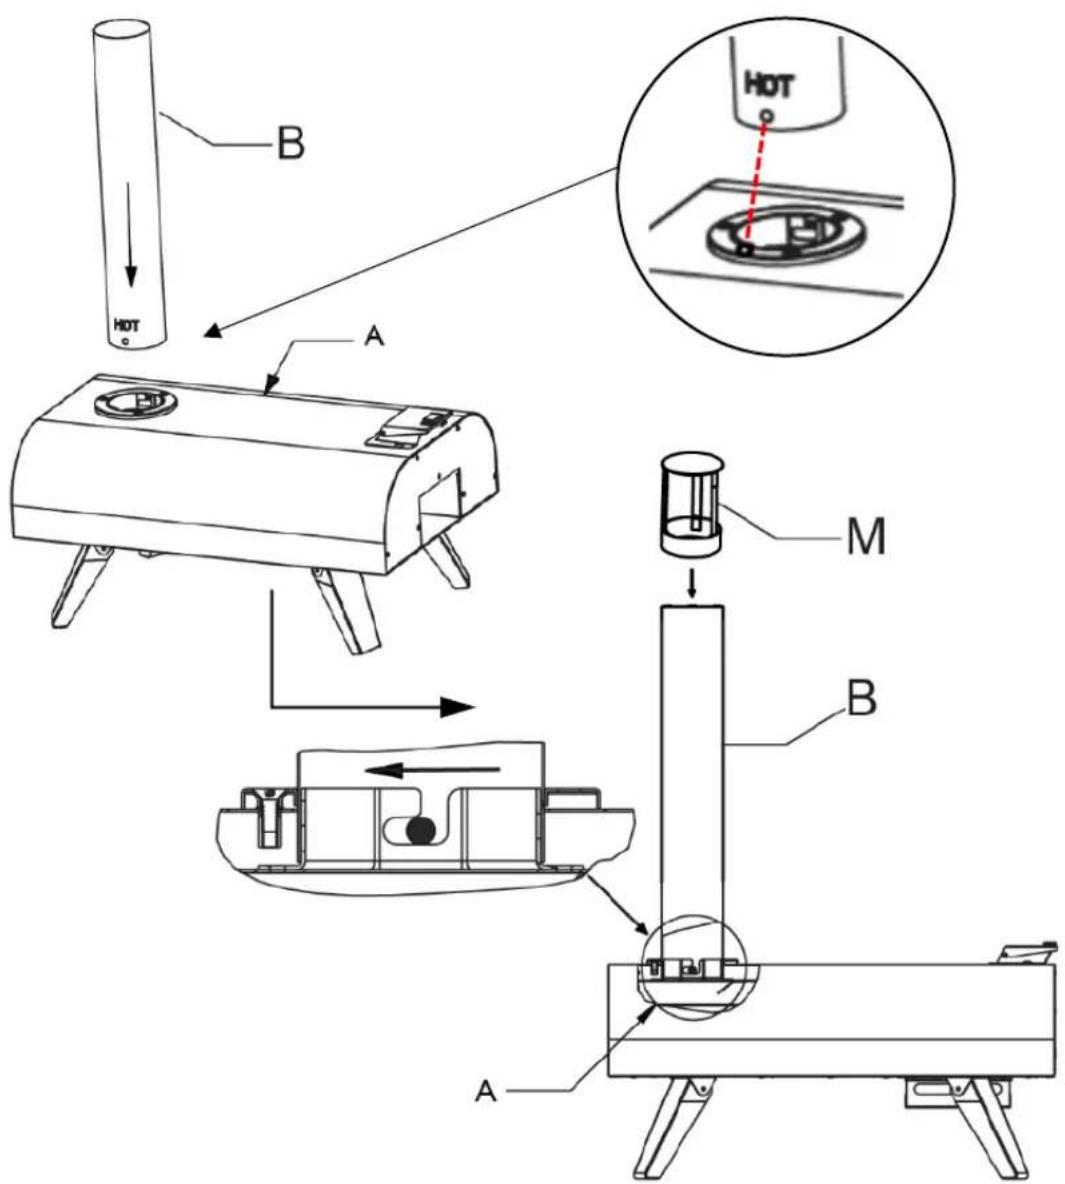
STEP 6 – Assembling the chimney pipe
- Place the chimney pipe (B) into the pizza oven body assembly (A), making sure the marker on the chimney pipe (B) is aligned with the marker on the pizza oven body assembly (A).
- Then by hand, turn the pipe anti-clockwise to secure it in position, as shown in the diagram below.
- Place the chimney lid (M) into the chimney pipe (B), pushing down to secure it. The bottom of the chimney lid (M) should be fully covered by the chimney pipe (B).
PIZZA OVEN ASSEMBLY
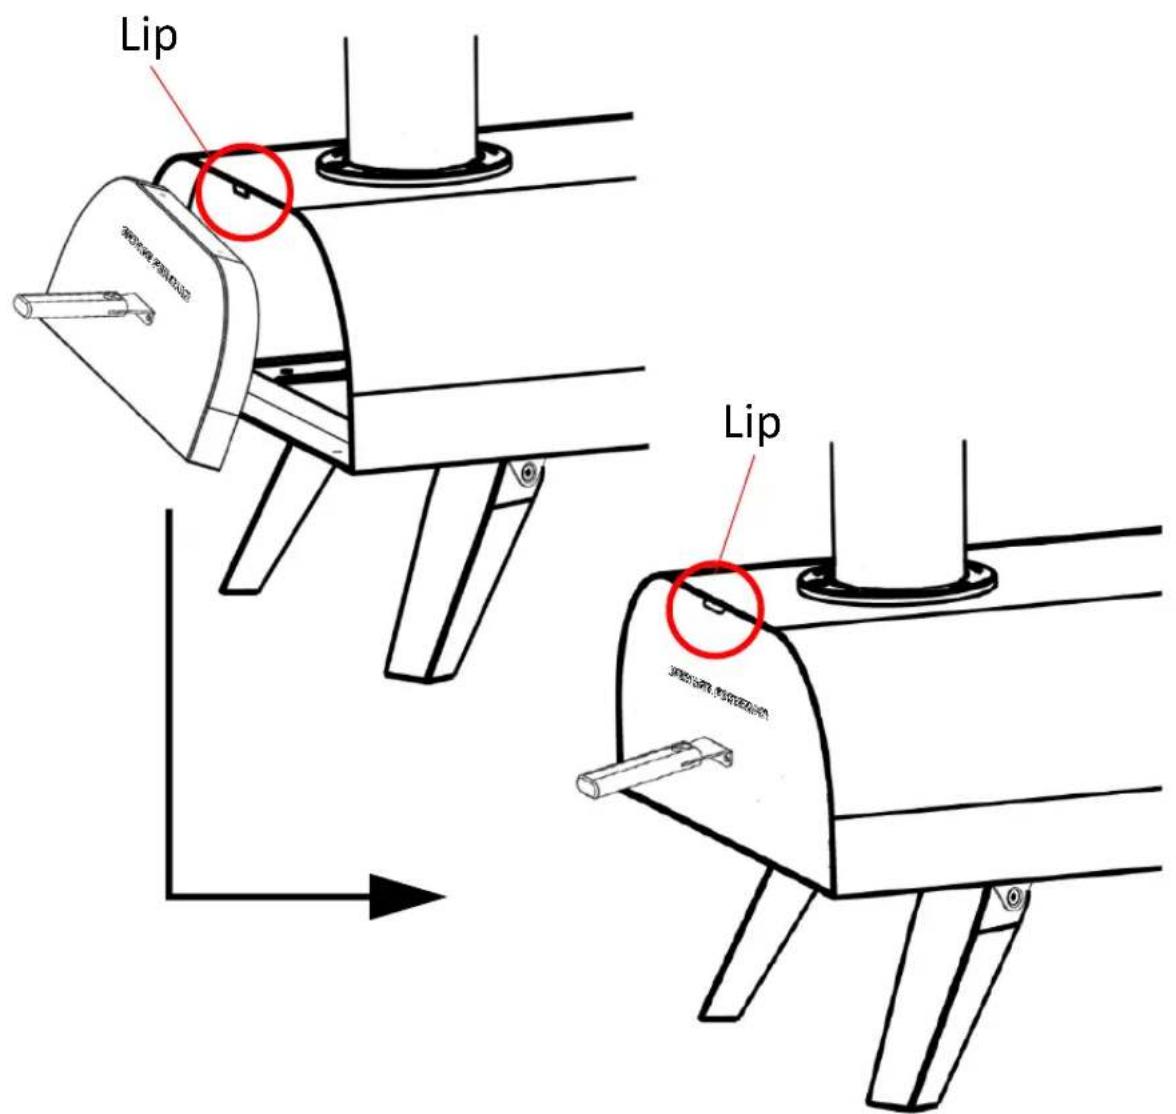
STEP 7 – Operating the oven door
- The pizza oven body assembly (A) has a lip at the top of the space where the oven door (K) is placed. This means that the oven door (K) must be inserted into the pizza oven body assembly (A) at an angle.
- Using the door handle (L) to operate the oven door (K), hook the oven door (K) behind the lip, and then push the bottom of the oven door (K) into place. This will secure the door shut.
- To remove the oven door (K), use the door handle (L) to pull the bottom of the door out first. The oven door (K) should now be able to be removed.
PIZZA OVEN ASSEMBLY
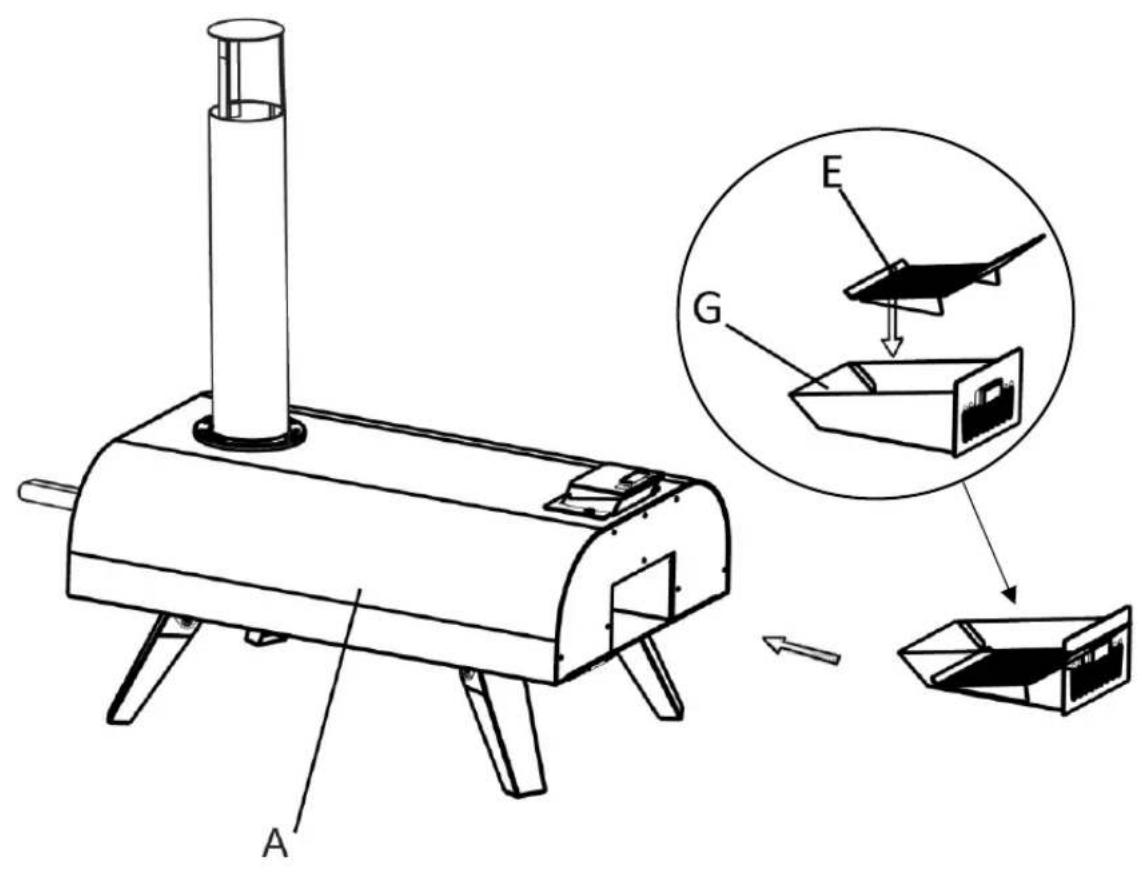
STEP 8 – Assembling the fire box
- Place the pellet grid (E) into the fire box assembly (G).
- Then slide the assembled fire box into the pizza oven body assembly (A), as illustrated in the diagram below.
PIZZA OVEN ASSEMBLY
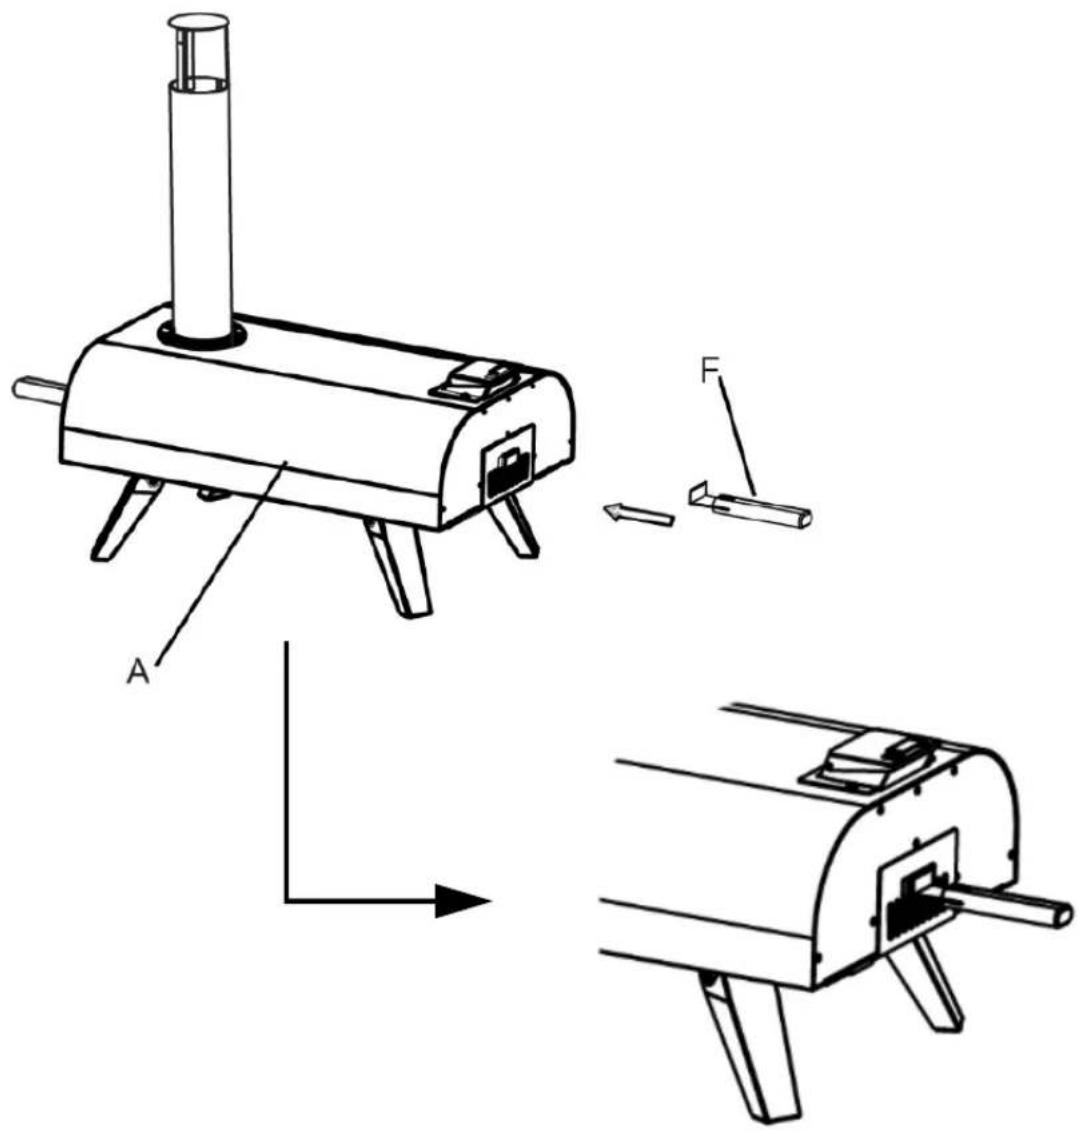
STEP 9 – Using the fire box assembly handle
- The fire box assembly handle (F) comes already assembled and ready to use.
- This can be done by hooking the metal end of the fire box assembly handle (F) into the bracket on the fire box assembly (G), the ash tray (H), or the lid of the hopper assembly (D).
- Do not leave the fire box assembly handle (F) attached to any of the locations mentioned above while the pizza oven is in use, as it may get hot.
PIZZA OVEN ASSEMBLY
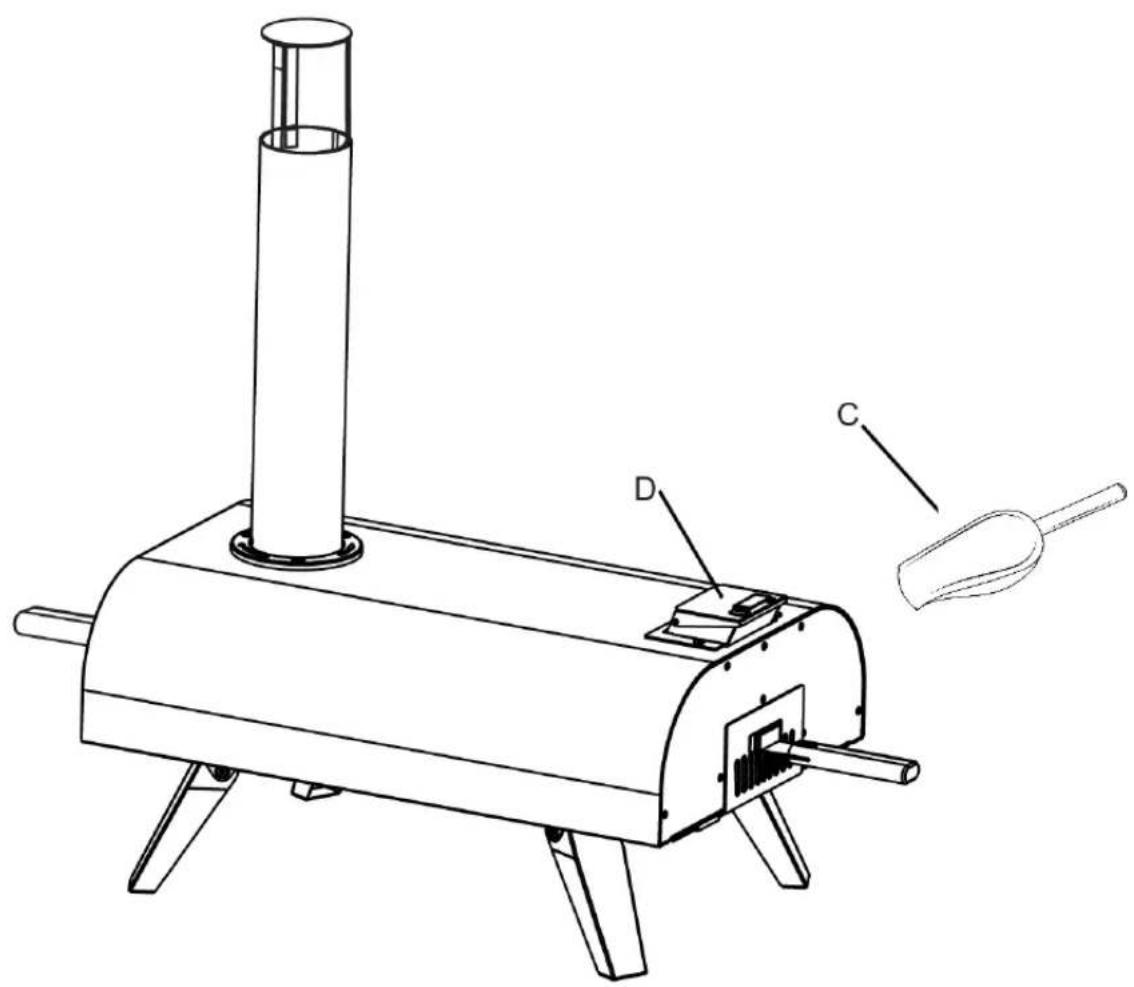
STEP 10 – Using the hopper shovel
- The hopper shovel (C) can be used to shovel wood chips into the hopper assembly (D), as illustrated in the diagram below.
PIZZA OVEN ASSEMBLY
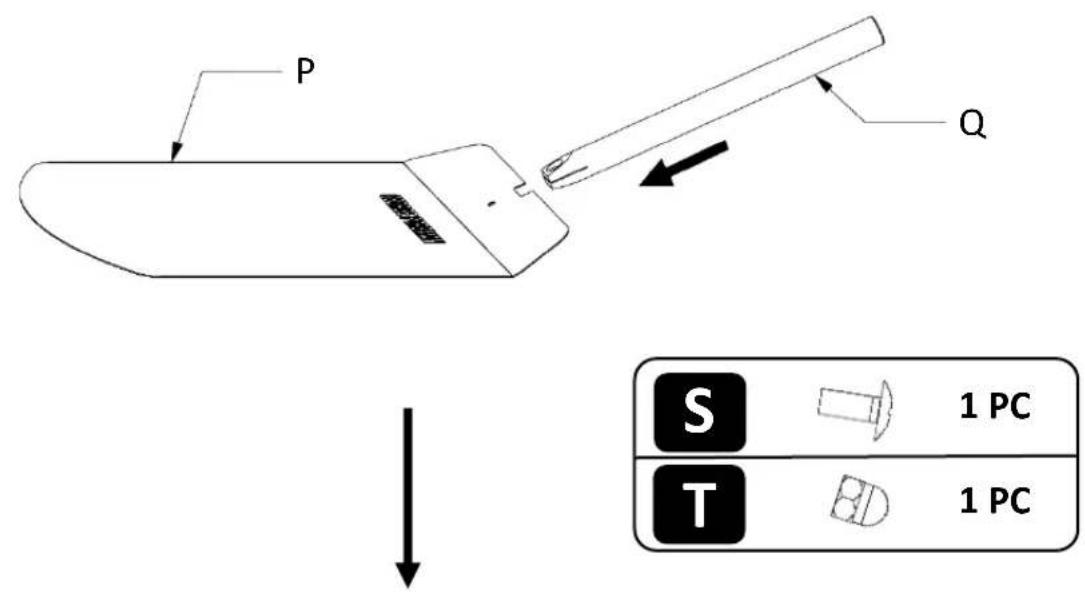
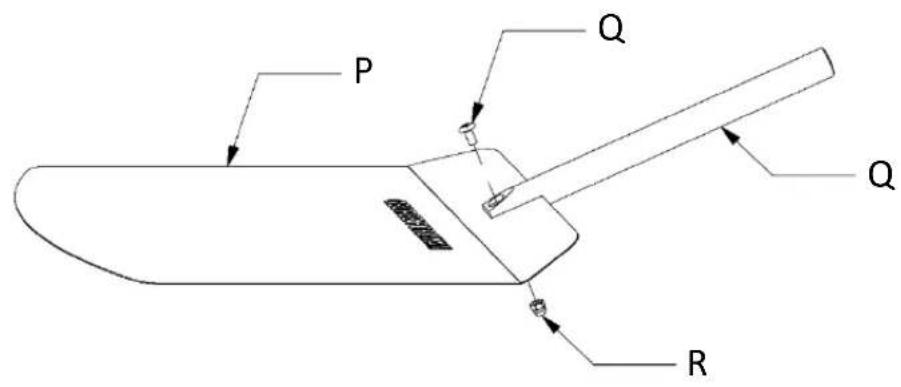
STEP 11 – Assembling the pizza peel
- Slide the pizza peel handle (Q) on to the pizza peel (P), as shown in the first diagram below.
- Then secure pizza peel handle (Q) to the pizza peel (P), with 1 of the screws (S) and the cap nut (T) provided, as shown in the second diagram below.
- Tighten the screw using a screwdriver.
PIZZA OVEN ASSEMBLY
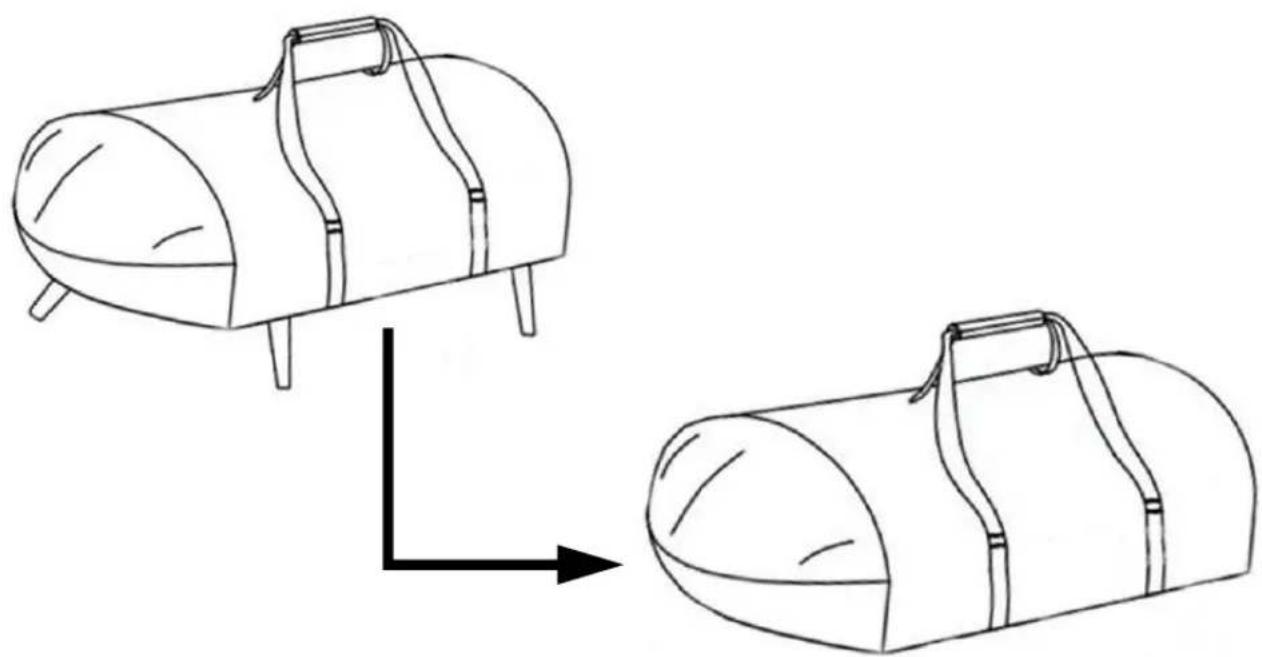
STEP 12 – Using the storage/carry bag
- The storage/carry bag (R) can be used to easily store and transport the pizza oven, as long as the pizza oven is completely cool.
- The pizza oven and all accessories should only be stored and transported once cooled and cleaned. Please see the 'Cleaning Instructions' page for further details on cleaning.
- To store the pizza oven, remove the chimney pipe (B) and chimney lid (M) and place them inside of the cooled pizza oven body assembly (A), along with the hopper shovel (C), fire box assembly handle (F), poker (I) and pizza peel (P). Ensure the oven door (K) is securely closed once all of the above are inside.
- Wrap the bag around the pizza oven as shown below.
- Flip over the pizza oven and fold the legs down. The straps can now be threaded and tightened to secure the pizza oven into the storage/carry bag (R).
- Flip the pizza oven back over, and use the carry handles on the storage/carry bag (R) to help transport and store the pizza oven.
natural_image
Line drawing of two cylindrical objects with straps, one being folded and the other lying down (no text or symbols)• Only wood pellets should be burnt in this pizza oven.
- Lightweight, and super efficient, cooking with pellets gives you a wood-fired experience with minimal fuss.
• You can use either softwood or hardwood pellets; both are fine.
- Pellets have a low moisture content and the result is a small amount of ash left over after you finish cooking.
• Always store your pellets in an airtight container. If left open, moisture from the atmosphere can be absorbed by the pellets which will affect their burn.
STEP 1
Make sure the chimney lid (M) is on top of the chimney pipe (B).
STEP 2
Place the oven door (K) into position and make sure to only take it off when adding or adjusting your food.
STEP 3
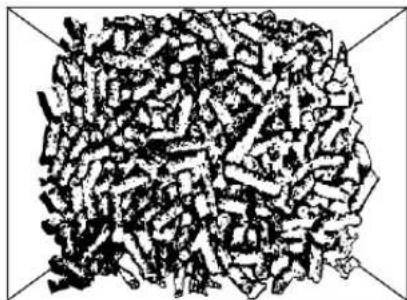
Take out the pellet grid and fire box assembly (E & G) with the handle (F), and use the hopper shovel (C) to place 100% natural wood pellets inside, to the level shown in the diagram below (approx. 300g).
STEP 4
Place the fire box assembly (G) onto an even and non-flammable surface. Ignite the hardwood pellets with an igniter or fire starter and wait for around 45-90 seconds to allow the fire to spread.
natural_image
Abstract black-and-white pattern with irregular geometric shapes and diagonal lines (no text or symbols)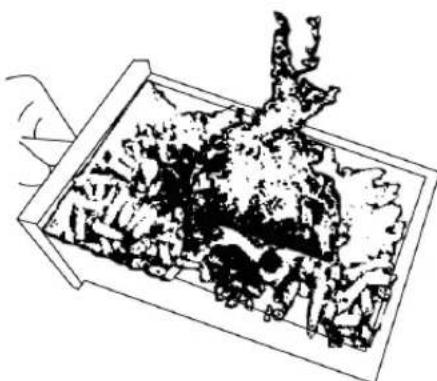
natural_image
Hand holding a tray containing a black-and-white sketch of a textured, organic object (no text or symbols visible)STEP 5
Put the pellet grid and fire box assembly (E & G) into the back of pizza oven using the handle (F), place the oven door (K) in position, and close the lid of the hopper assembly (D). Allow this to keep burning for around 18 minutes.
STEP 6
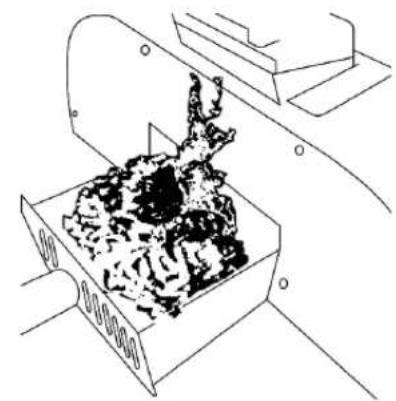
Open the lid of the hopper assembly (D) carefully with the handle (F), and add more hardwood pellets (approx. 450g) using the hopper shovel (C).
STEP 7
Close lid of the hopper assembly (D) with the handle (F), and wait for 2-3 minutes. When the flames appear at the top of the chimney pipe (B) again, the oven is now ready to cook your food! Proceed to follow the instructions featured on the 'Cooking with your pizza oven' page.
STEP 8
Ensure that you top up the pellets little and often so that they maintain the same level in the hopper assembly (D). Maintaining the same level throughout your cook allows for consistently high temperatures.
natural_image
Line drawing of a mechanical device with a textured component inside, no visible text or symbols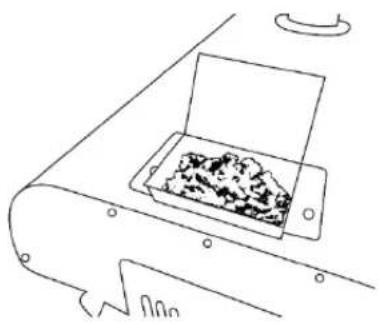
natural_image
Simple line drawing of a conveyor belt with an open box containing granular material (no text or symbols)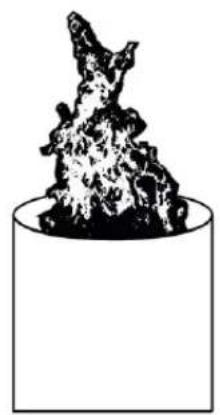
natural_image
Simple line drawing of a textured, irregular object placed inside a rectangular container (no text or symbols)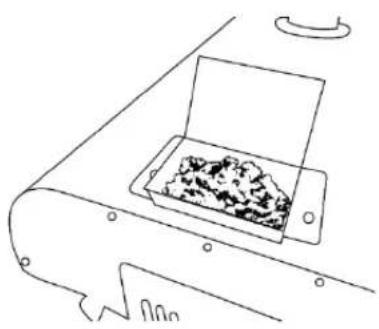
natural_image
Simple line drawing of a conveyor belt with an open lid containing granular material (no text or symbols)STEP 9
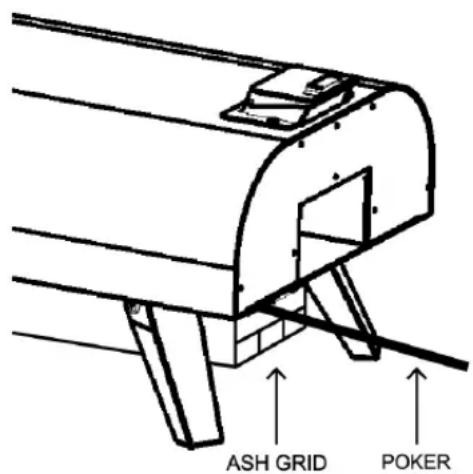
After the burning time exceeds 1 hour, please use the poker (I) to remove the ash/dust in the ash tray (H), so that the pellets can have appropriate air venting to continue to burning well.
TO EXTINGUISH
Let the pizza oven burn through any remaining pellets and allow the flames to come down naturally. Leave the pizza oven to cool completely and do not remove ashes until it has cooled completely. Once cool, follow the directions on the ‘Cleaning Instructions’ page.
WARNING: Pellets may still be warm so heat resistant gloves should be worn when disposing of ash.
WARNING: Do not use spirit or petrol for lighting or re-lighting. Use only fire-lighters complying to EN 1860-3.
COOKING WITH YOUR PIZZA OVEN
Baking Pizza
- Using a small amount of 00 flour, dust your pizza peel (P) and your hands to avoid your pizza sticking.
- Stretch out a ball of dough to a 9" circle and place the pizza dough onto the lightly floured pizza peel (P).
-
Construct your pizza with your desired add-ons.
-
Remove the oven door (K) and launch your pizza onto the pizza stone (J) using the pizza peel (P), then close the oven door (K) and bake for about 15 seconds.
-
After 15 seconds, rotate the pizza 90 degrees using the pizza peel (P) or other suitable heat resistant tools, then close the oven door (K) and bake for another 15 seconds. Repeat the same process until the pizza is rotated and baked 360 degrees.
-
Remove the oven door (K) and take out the pizza using the pizza peel (P). Now, enjoy your pizza!
Tips for launching your pizza:
- Use good quality 00 flour in your pizza dough recipe and for dusting. This will give your dough the perfect texture.
- Get your peel, dough and ingredients to room temperature. Cold dough will spring back on itself and stick while warm dough will stretch too far and tear. If you stretch your pizza on a warm peel, the dough will start to sweat, which will cause it to stick.
- Cover your hands and the surface you are working on with flour before you begin stretching.
- Check for holes in the pizza base before adding toppings – if sauce gets between the dough and peel it will have a gluey effect and your dough will stick.
- Before you add any toppings - stop and shake the peel to check that your dough is moving freely. If it's stuck, pick it up and add more flour to the peel. You have to do this before you add toppings!
Please note: Food must be thoroughly cooked before being consumed. Please note: After the first round of baking is complete, if you want to continue to cook another pizza, please change the baking time to around 10 seconds between each rotation as the temperature inside the oven will have increased, and can reach up to 350 degrees.
COOKING WITH YOUR PIZZA OVEN
Cooking Steak
- Place the marinated steak onto the pizza stone (J).
- Close the oven door (K) and cook for 20 seconds. After 20 seconds, open the oven door (K) and rotate the steak 180 degrees using cooking tools, then close the oven door (K) again and cook for another 20 seconds.
- Flip over the steak and repeat the above instructions for the other side of the steak.
- Completing step 2 and step 3 should take around 80 seconds, by which time you would have a medium steak.
- If you want medium to well steak, adjust each cooking time to 25 seconds, with a total cooking time of 100 seconds.
- Adjust the cooking time according to the actual temperature of the pizza oven and personal preferences.
You can use this pizza oven to cook more than pizza and steak. Please enjoy your cooking journey!
Please note: Cooking times may vary depending on personal preference.
Please note: Food must be thoroughly cooked before being consumed.
Reminder:
- When the pellet fuel in the pizza oven is burning, the oven door (K) must be closed unless food needs to be put in or taken out. This is to prevent too much air coming in from the oven door, which could cause heavy smoke inside the fire box assembly (E&G) and hopper assembly (D).
• Always operate the oven door (K) using the door handle (L).
CLEANING INSTRUCTIONS
WARNING: Ensure the appliance is cold before cleaning. WARNING: Pellets may still be warm so heat resistant gloves should be worn when disposing of ash.
- Once cool, the pizza peel (P) should be cleaned by soaking and washing in warm soapy water.
- Make sure all of the ash inside the whole pizza oven is carefully removed after each use, and disposed of. Heat resistant gloves should be worn as ash may still be warm.
- Tap the chimney pipe slightly to shake off any of the dust that the ash may have left there.
- The outside of the pizza oven can be wiped down with warm, soapy water and dried immediately. Make sure to avoid abrasive cleaning products or those with harsh chemicals.
- To clean the combustion chamber (where the food is placed inside) and pizza stone (J), run the pizza oven at top temperatures for 30 minutes to burn off any excess food and then wipe down with kitchen paper.
- CAUTION: The stone baking board is not dishwasher safe - do not use dish-washing liquid.
TROUBLESHOOTING
| PROBLEM POSSIBLE CAUSE PREVENTION/ SOLUTION | ||
| I can't light my pizza oven | You are using pellets that have been affected by moisture.The chimney cap is removed. | Keep pellets stored in an airtight container for best results.Review the lighting steps on pages 19-21.Ensure that the firelighter is placed at the front of the fuel tray. |
| The pizza oven is running too hot | You have added too much fuel.You have preheated for too long. | You will know that the pizza oven is too hot if your food is cooking too quickly and beginning to burn. If your pizza oven is running too hot, reduce your preheat time and add less fuel.If your bases are burning and the stone is too hot, rest a cast iron dish on it for around 30 seconds to absorb some of the heat. |
| The pizza oven is not hot enough | You have not allowed for the full preheat time.There are low ambient temperatures. | This pizza oven is designed to reach optimum temperatures in 18 minutes preheat time.Add an extra 10-15 minutes to this preheating time when accounting for low ambient temperatures.Ensure that you are using dry wood pellets and that you are following the lighting instructions on pages 19-21. |
| The pizza stone looks dirty | Excess food which has not yet been burnt off. | The stone baking board in your pizza oven may change colour but this will not affect performance.Excess food can be left to burn off under the high temperatures inside of the oven.Cleaning and care instructions for the stone baking board can be found on page 24. |
| My pizza is burning You have not rotated your pizza in the cooking process. | If you find that your pizza is burning, rotate the pizza more frequently and start rotating it sooner after placing it inside the oven.This pizza oven can cook at very high temperatures so it's important to keep an eye on your food while it does. | |
| My pizza isn't cooked through | ·The dough or toppings are too thick. | ·These pizzas will cook best when the toppings are light.·Follow the cooking instructions for pizza on page 22, and ensure that the dough is well spread out, and that the toppings are not overloaded. |
| I'm seeing smoke/There is soot in my oven | ·When any wood starts to burn, there will be smoke produced until it reaches optimum temperatures.·If you continue to see dark smoke, it may be that your pellets are not completely dry or that too many have been added at once. | ·It is normal for your pizza oven to have a light layer of soot after use.·Remember to follow the steps for lighting and maintaining temperatures in this guide on pages 19-21.·If you are seeing excess smoke or soot, add pellets gradually and make sure they are burning cleanly before you start to cook.·While it is not necessary, you can wipe down the inside of your pizza oven with dry paper towels after it has cooled. |
| My pizza oven chimney has changed colour | ·Parts of your pizza oven have been exposed to very high temperatures. | ·Stainless steel may change colour after exposure to temperatures of 1000°F (537°C) and some parts of your pizza oven will reach this temperature and above.·This will NOT affect the way that your pizza oven performs.·Some imperfections may be removed using a stainless steel cleaner. |
| I can see flames at the rear of my pizza oven | ·Flames may escape from the rear of your pizza oven when the flow of convection is broken e.g. when the door is taken off. | ·This is perfectly normal. Ensure that you have read through the safety instructions and that your pizza oven is positioned at least 3ft (1m) away from any buildings or structures.·Never use your pizza oven in high winds. |
GUARANTEE & CUSTOMER SERVICES
This product is guaranteed for 12 months from the date of the original purchase. If any defect arises due to faulty materials or workmanship, the faulty product must be returned to the place of purchase.
Refund or replacement is at the discretion of the retailer.
The following conditions apply:
- The product must be returned to the retailer with the original proof of purchase.
- The product must be installed and used in accordance with the instructions contained in this instruction guide and any other instructions for use which are supplied.
- It must be used for domestic purposes only and for its intended use.
- This warranty does not cover wear and tear, damage, misuse or consumable parts.
This does not affect your statutory rights.
Customer Services & Spare Parts:
| Region | Contact |
| UK & Northern Ireland | 0345 209 7461 |
| Ireland | 1 800 938982 |
| Rest of Europe | europe@productcaregroup.com |
GEORGE FOREMAN®
WOOD PELLET PIZZA OVEN GFWPPO1SSPC & GFWPPO1BPC
natural_image
Simple line drawing of a trash bin with crossed lines indicating no waste or discharge (no text or symbols)
Made by Product Care Trading Ltd, Unit 1, Green Bank Business Park, Swan Lane, Hindley Green, Wigan, WN2 4AY, United Kingdom / Product Care (Ireland) Ltd, Unit 3D North Point House, North Point Business Park, New Mallow Road, Cork, T23 AT2P, Ireland.
George Foreman is the registered trademark of Spectrum Brands (U.K.) Ltd.
- WOOD PELLET PIZZA OVEN GFWPPO1SSPC & GFWPPO1BPC
- CONTENTS
- SAFETY INSTRUCTIONS
- WARNING: IMPORTANT SAFETY INSTRUCTIONS READ CAREFULLY AND KEEP FOR FUTURE REFERENCE
- Safety Warnings:
- This symbol means: CAUTION: Hot Surfaces
- PARTS LIST & FEATURE DIAGRAM
- PIZZA OVEN ASSEMBLY
- STEP 1 – Unfolding the legs
- STEP 2 – Attaching the ash tray
- STEP 3 – Installing the hopper assembly
- STEP 4 – Inserting the pizza stone
- STEP 5 – Assembling the door
- STEP 6 – Assembling the chimney pipe
- STEP 7 – Operating the oven door
- STEP 8 – Assembling the fire box
- STEP 9 – Using the fire box assembly handle
- STEP 10 – Using the hopper shovel
- STEP 11 – Assembling the pizza peel
- STEP 12 – Using the storage/carry bag
- STEP 1
- STEP 2
- STEP 3
- STEP 4
- STEP 5
- STEP 6
- STEP 7
- STEP 8
- STEP 9
- TO EXTINGUISH
- COOKING WITH YOUR PIZZA OVEN
- Baking Pizza
- Tips for launching your pizza:
- Cooking Steak
- Reminder:
- CLEANING INSTRUCTIONS
- TROUBLESHOOTING
- GUARANTEE & CUSTOMER SERVICES
- The following conditions apply:
- This does not affect your statutory rights.
- GEORGE FOREMAN®
Brand : GEORGE FOREMAN
Model : GFWPPO1BPC
Category : Pizza oven