Lithe 3466 - Lighting Sonneman - Free user manual and instructions
Find the device manual for free Lithe 3466 Sonneman in PDF.


| Product Type | Lighting Fixture |
| Brand | Sonneman |
| Model | Lithe 3466 |
| Category | Indoor Lighting |
| Material | Aluminum, Acrylic |
| Dimensions (L x W x H) | 12\" x 12\" x 6\" |
| Weight | 2.5 lbs |
| Power Supply | 120V AC, 60Hz |
| Light Source | Integrated LED (Non-replaceable) |
| Wattage | 15W |
| Lumens | 1000 lm |
| Color Temperature | 3000K (Warm White) |
| Dimmable | Yes, TRIAC/ELV compatible |
| Mounting Type | Ceiling mount (hardwired) |
| Certifications | UL Listed |
| Care Instructions | Wipe with dry cloth; do not use liquids |
| Safety Warnings | Disconnect power before installation or maintenance |
| Spare Parts Availability | Contact Sonneman for replacement parts |
| Repairability | LED module serviceable by qualified electrician |
Frequently Asked Questions - Lithe 3466 Sonneman
User questions about Lithe 3466 Sonneman
0 question about this device. Answer the ones you know or ask your own.
Ask a new question about this device
Download the instructions for your Lighting in PDF format for free! Find your manual Lithe 3466 - Sonneman and take your electronic device back in hand. On this page are published all the documents necessary for the use of your device. Lithe 3466 by Sonneman.
USER MANUAL Lithe 3466 Sonneman
Product Information and Warnings
IMPORTANT
- Always disconnect the power before installing or replacing Luminaires and before cleaning or other maintenance.
- Consult a qualified, licensed electrician to ensure correct branch circuit conductor.
-
Consulter un électricien qualifié pour vous assurer que les conducteurs de la dérivation sont adéquats.
-
Please read all included assembly instructions and warnings carefully before installation. Contact Customer Service if you have any questions or concerns. Before installation, please confirm that the fixture is compatible with your supply voltage and dimming system, if present.
- LEDs are highly sensitive electronic devices, and must be treated with care. Do not open any factory sealed compartments, and avoid touching the LEDs with your hands or any object.
- Although all our fixtures are equipped with protective devices, LED electronic systems are vulnerable to power surges and supply variations. Do not install LED fixtures on the same circuit as any motors, appliances, or HVAC systems.
- Do not remove or bypass any LED Driver or Transformer that is provided with the fixture, and do not replace or substitute with another power supply.
- Fixtures must be wired in parallel on independent leads; do not "daisy chain" multiple fixtures together or wire them in series.
- All factory-made splices and connections must remain intact. LED circuits are carefully designed and built, and improper connections may damage the fixture.
- The ends of coaxial pendant cords have been precisely stripped and split at the factory and must not be field cut. Excess cord or cable should be neatly coiled and reserved in the fixture canopy.
-
Any mounting hardware is provided for your convenience and should be used with discretion. Always use the appropriate hardware for the mounting surface.
-
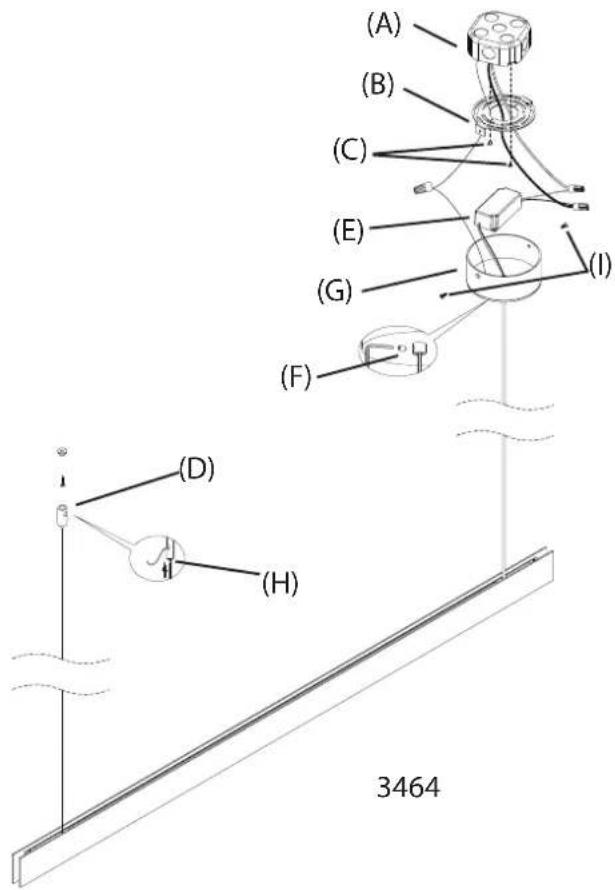
Shut off power to the outlet box (A).
- Attach the mounting plate (B) to the outlet box (A) with the outlet box screws (C).
-
Determine the location of the cable hanger (D) based on the desired orientation of the fixture and the distance between the hanging points. Attach the cable hanger base to the ceiling using appropriate hardware. Screw the main body of the cable hanger onto the base.
-
Make appropriate electrical connections to the power supply (E) using wire nuts:
a. Connect the power supply's live wire to the live supply wire.
b. Connect the power supply's neutral wire to the neutral supply wire.
c. Connect the fixture's ground wire (green or uncoated) to the ground supply wire. If no ground wire is present in the outlet box, connect the fixture's ground wire to the mounting plate (B) using the green screw (included).
- Determine height at which the fixture is to be hung.
a. Adjust the power cord to the desired length: Use the screwdriver to loosen the slotted set screw (F). Adjust length of power cord. Tighten the set screw to set. Reserve extra cord in the canopy (G).
b. Insert the steel cable into the cable hanger (D).
Adjust the steel cable to the desired height: To shorten the cable, push the cable up and it will lock automatically. To lengthen the cable, lift up on the cable and push up on the plunger lock (H). While keeping the plunger lock depressed, lower the cable to the desired length. Release the plunger lock to set.
-
Fit the canopy (G) over the mounting plate (B), tucking the power supply, power cord, and any loose wires inside. Use the two canopy screws (I) to fasten the canopy to the mounting plate.
-
If necessary, make any final adjustments to the hanging length of the power cord and/or steel cable. Once the position is final, trim the steel cable where it exits the cable hanger.
-
Restore power to the outlet box.
Note:
- This fixture is dimmable with Electronic Low Voltage (Trailing-Edge) type dimmers, Incandescent (Leading-Edge) type dimmers, and 0-10V type dimmers only.
Care Instructions:
Use a clean, dry cloth when dusting.
To protect the finish, avoid any harsh abrasives or chemicals.
Coax Splicing
FAILURE TO FOLLOW THESE INSTRUCTIONS WILL VOID THE WARRANTY

If field-cutting is required, please follow these instructions:
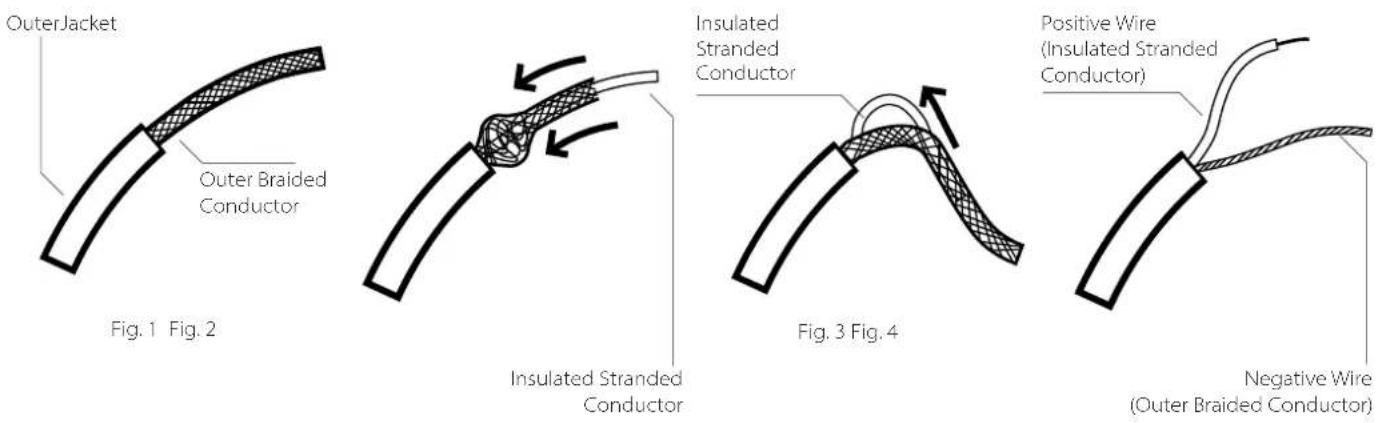
- Make a 1" slice along the length of the cord's outer jacket (Fig. 1). CAUTION: Do not cut through the outer braided conductor.
- Carefully strip the outer jacket of the cord and keep the outer braided conductors intact (Fig. 1).
- Slide the outer braided conductor back to create a bulge and reveal the inner stranded conductor (Fig. 2).
- Bend the cord to create an opening through the bunched-up portion of outer braided conductor, then pull out the inner stranded conductor (Fig. 3)
- Twist together the outer braided conductor to form the negative wire of the fixture, then strip 5/8" off the end of the inner stranded conductor to form the positive wire of the fixture (Fig. 4).
- Re-splice all power cords.
Brand : Sonneman
Model : Lithe 3466
Category : Lighting