
EEG75201 - Cooker Fotile - Free user manual and instructions
Find the device manual for free EEG75201 Fotile in PDF.


| Product Type | Freestanding Electric Cooker |
| Brand | Fotile |
| Model | EEG75201 |
| Energy Source | Electric |
| Number of Cooking Zones | 4 |
| Oven Type | Electric Fan Oven |
| Oven Capacity | 70 Liters |
| Width | 750 mm |
| Depth | 600 mm |
| Height | 850 mm |
| Weight | 55 kg |
| Power Supply | 230 V ~ 50 Hz |
| Maximum Power | 10.5 kW |
| Control Type | Touch Controls |
| Cleaning | Easy-clean enamel interior |
| Safety Features | Child lock, overheating protection |
| Spare Parts Availability | Contact Fotile customer service |
| Energy Efficiency Class | A |
Frequently Asked Questions - EEG75201 Fotile
User questions about EEG75201 Fotile
0 question about this device. Answer the ones you know or ask your own.
Ask a new question about this device
Download the instructions for your Cooker in PDF format for free! Find your manual EEG75201 - Fotile and take your electronic device back in hand. On this page are published all the documents necessary for the use of your device. EEG75201 by Fotile.
USER MANUAL EEG75201 Fotile
Please read this instruction manual carefully before using
Electric Hob
D6RW EEG30202 EEG60301 EEG75201

CONTENTS
PACKING LIST 1
WARNING AND SAFETY INSTRUCTIONS 2
CARING FOR THE ENVIRONMENT 4
BEFORE USING FOR THE FIRST TIME 5
CLEARING AND CARE 24
PROBLEM SOLVING GUIDE 25
ELECTRIC CIRCUIT FIGURE 25
PARTS NAME DIAGRAM 28
SPECIFICATION 30
PACKING LIST
Thanks for purchasing our product! Please read this handbook before using, and you will know the correct operation rules so that you can enjoy a completely new cooking.
Please pay attention to the amount of accessories, and make sure there is no scarcity or shatters.
-
Please contact the dealer when our company or the dealer is responsible for the above carelessness.
-
Please contact the nearest service center if the user should bear the responsibility
Integral Machine one
User's Handbook one
Warranty Card one
Rack one
Mat(D6RW) four
WARNING AND SAFETY INSTRUCTIONS

1 To avoid the risk of accidents and damage the appliance, please read these instructions carefully before using it for the first time. They contain important notes on its installation, safety, use and care.
2. This appliance is not intended for use by persons (including children) with reduced physical, sensory or mental capabilities, or lack of experience and knowledge, unless they have been given supervision or instruction concerning its use by a person being responsible for their safety.
3. Keep these instructions in a safe place for reference, and pass them on to any future user.
■ Technical safety
- The appliance must be installed and connected by a suitably qualified and competent person in strict accordance with current local and national safety regulations. The manufacturer cannot be pay for the damage caused by incorrect installation or connection.
- The electrical safety of this appliance can only be guaranteed when continuity is complete between it and an effective earthing system which complies with current local and national safety regulations. It is most important that this basic safety requirement is present and regularly tested, and where there is any doubt, the household wiring system should be inspected by a qualified electrician. The manufacturer cannot undertake the consequences of an inadequate earthing system (e.g. electric shock).
- Do not connect the appliance to the mains electricity supply by an extension lead. Extension leads do not guarantee the required safety of the appliance (e.g. danger of overheating).
- Never open the casing of the appliance. Tampering with electrical connections or components is highly dangerous to the user and can cause operational faults.
- If the supply cord is damaged, it must be replaced by the manufacturer, its service agent or similarly qualified persons in order to avoid a hazard.
- The connection must carried out with full-disconnection switch, of an adequate size for the current drawn and with minimum aperture between contracts of 3mm for disconnection in the case of emergency, cleaning or bulb exchange. Under no circumstances must the earth wire pass through this switch.
- In order to avoid a hazard due to inadvertent resetting of the thermal cut-out, this appliance must not be supplied through an external switching device, such as a timer, or connected to circuit that is regularly switched on and off by the utility.
Correct use
- For safety reasons this appliance must only be operated after it has been built in. This is necessary to ensure that all electrical components are shielded.
- This appliance is intended for household use only and is not to be used for commercial purposes.
- Do not leave the appliance unattended whilst it is in use. Pans that have boiled dry can cause damage to the ceramic surface for which the manufacturer cannot be held liable. Boiling fat or oil could ignite and cause a fire.
- Use this appliance for the preparation of food only. Any other use are at the owner's risk and could be dangerous. The manufacturer cannot be held liable for damage resulting from incorrect or improper use or operation.
- Do not use the appliance to heat up the room. Due to the high temperatures radiated, objects near the appliance could catch fire. The life of the appliance could also be reduced.
- During prolonged or intensive use of the appliance, the frame gets hot and the control panel can also become quite hot. This is quite normal and does not indicate a fault.
- The appliance is not intended to be operated by means of an external timer or separate remote-control system.
- Do not operate the hob through outer timer or independent remote control.
■ Safety with children
-
Use the safety lock to prevent children operating the appliance or altering the settings.
-
The appliance is only intended for use by adults who have read these instructions.
-
This appliance is not a toy! To avoid the risk of injury, keep children away, and do not allow them to play with it or use the controls. They will not understand the potential dangers posed by it. They should be supervised whenever you are working in the kitchen.
-
Older children may use the appliance only when its operation has been clearly explained to them and they are able to use it safely, recognising the dangers of misuse.
-
The appliance gets hot when in use and remains hot for quite a while after being switched off. To safeguard against burning, keep children well away from the appliance at all times.
-
Do not store anything which might arouse a child's interest in storage areas above or next to the appliance. Otherwise they could be tempted into climbing onto the appliance with the risk of burning themselves.
-
Keep all pans out of reach of children. Turn pan handles inwards away from the edge of the hob to avoid the danger of burning or scalding. Special hob guards are available from good retail outlets.
-
Packaging, e.g. cling film, polystyrene and plastic wrappings, must be kept out of the reach of babies and young children to avoid the danger of suffocation. Dispose of or recycle all packaging safely as soon as possible.
■ Protecting the appliance from damage
- Do not use pots and pans on the ceramic hob with bases with pronounced edges or ridges, e.g. cast iron pans. These could scratch or scour the hob surface permanently.
2 Never heat an empty pan unless the manufacturer of the pan expressly states that you can do so. This could damage the appliance.
- Keep the hob clean. Grains of salt, sugar and sand (e.g. from cleaning vegetables) can cause scratches.
4.Do not allow either solid or liquid sugar, or pieces of plastic or aluminium foil to get onto the cooking zones when they are hot. If this occurs, switch off the appliance, and carefully scrape off all the sugar, plastic or aluminium residues from the hob whilst they are still hot, using a shielded scaper blade. Take care not to burn yourself.
-
If residues are allowed to cool before being removed, the ceramic surface will be susceptible to pitting or even cracking. Once the residues have been removed, allow the cooking zone to cool down, and then clean with a suitable proprietary ceramic hob cleaner. To prevent the risk of spillages etc. burning on, remove any soiling as quickly as possible and ensure that pan bases are clean, dry and free of grease.
-
Do not drop anything on the ceramic surface. Even a light object could cause damage in certain circumstances.
-
Do not use a steam cleaner to clean this appliance. The steam could reach the electrical components and cause a short circuit. Pressurised steam could also cause permanent damage to the surface and to other components, for which the manufacturer cannot accept liability.
-
Never place hot pans on the area around the controls. This could damage the electronic unit underneath.
■ Appliance faults
-
In the event of damage or a defect, switch off the appliance immediately. Disconnect completely from the electricity supply. Contact the FOTILE Service center. Do not reconnect the appliance to the mains electricity supply until it has been repaired.
-
If there is any damage to the ceramic surface, the appliance must be disconnected from the mains electricity supply immediately, and not used until it has been repaired. Otherwise, there
will be a danger of electric shock.
-
Repairs may only be carried out by a suitably qualified and competent person in accordance with local and national safety regulations. Repairs and other work by unqualified persons could be very dangerous and could damage the appliance. The manufacturer cannot be held liable for unauthorised work.
-
While the appliance is under guarantee, repairs should only be undertaken by a service technician authorised by the manufacturer. Otherwise the guarantee will be invalidated.
■ Futher safety notes
-
When using an electric socket near the appliance, care should be taken that the cable of the electrical appliance does not come into contacting with the hot appliance. The insulation on the cable could become damaged, giving rise to an electric shock hazard.
-
Always ensure that food is sufficiently cooked or reheated. Many factors will affect the overall cooking time, including the size and amount of the food and its temperature. Some food may contain micro-organisms which are only destroyed by thorough cooking at a sufficiently high temperature for long enough. Therefore, when cooking or reheating food such as poultry, it is particularly important that the food is completely cooked through. If in doubt, select a longer cooking or reheating time.
-
Do not use plastic or aluminium foil containers. These melt at high temperatures, and could damage the ceramic surface and catch fire.
-
If a domestic animal gets onto the hob, a sensor could be touched and a cooking zone switched on. Keep pets away from the hob at all times.
-
Spray canisters, aerosols and other inflammable substances must not be stored in a drawer under the hob. Cutlery inserts must be heat-resistant.
-
If the surface is crack, switch off the appliance to avoid the possibility of electric shock.
-
Danger of fire: do not store any items on the hob surface. Unattend cooking on the hob with fat or oil can be dangerous and may result in fire. Never try to extinguish a fire with water, but switch off the appliance and then cover the flame e.g. with a lid or a fire blanket.
CARING FOR THE ENVIRONMENT
■ Disposal of the packing material
-
The transport and protective packing has been selected from materials which are environmentally friendly for disposal, and can normally be recycled.
-
Ensure that any plastic wrappings, bags, etc. are disposed of safely and kept out of the reach of babies and young children. Danger of suffocation!
-
Rather than just throwing these materials away, please ensure they are offered for recycling.
■ Disposal of your old appliance
-
Electrical and electronic appliances often contain materials which, if handled or disposed of incorrectly, could be potentially hazardous to human health and to the environment. They are, however, essential for the correct functioning of your appliance.
-
Please do not therefore dispose of it with your household waste.
-
Please dispose of it at your local community waste collection/recycling centre, and ensure that it presents no danger to children while being stored for disposal.
4 It should be disconnected from the mains electricity supply by a competent person
BEFORE USING FOR THE FIRST TIME
Please stick the extra data plate for the appliance supplied with this document in the space provided in the "After sales service" section of this booklet.
■ Cleaning for the first time
-
Remove any protective wrapping and stickers.
-
Before using for the first time, clean the appliance with a damp cloth only and then wipe dry.

Do not use washing up liquid to clean the ceramic surface as it can leave a blue sheen which may be difficult to remove.
- On hobs with bevelled glass edges, a small gap may be visible between the hob and the worktop during the first few days after installation. This gap will reduce with time as the appliance is used and will not affect the electrical safety of your appliance.
- Metal components have a protective coating which may give off a slight smell when heated up at the first time.
- The smell and any fumes given off do not mean that the appliance is defective or has been wrongly installed, and they are not harmful to health.
Single circle cooking zones have one heating element, whilst double circle (vario) cooking zones and extended zones have two. Depending on the model, the heating elements may be separated by an isolating ring. Each cooking zone has overheating protection (a temperature limiter), which stops the ceramic surface from becoming too hot. When a power level is selected, the heat switches on and the element can be seen through the ceramic surface. The temperature of the cooking zones depends on the power level selected, and is electronically regulated. This controls the "timing" of a cooking zone, switching the element on and off.
Single circle zone

Double circle zone

1. Overheating protection
2. Outer heating element
3. Inner heating element
INSTALLATION
■ Installation Requirements
- This hob should be kept away at least 150mm from the combustible and more than 100mm from the incombustible material.
- The rangehood should be fixed 650mm to 750mm away from the hob. If there is any other thing hanging above, please keep a distance of 1000mm.
- If parts of the base of the hob can still be touched after installation, an intermediate floor should be fitted. There should be a gap of at least 25 mm between the rearmost point of the hob and the mains connection.

Separate electrical outlet should be installed on the cabinet.
■ Safety instructions for installation
Fit the wall units and extractor hood before fitting the hob to avoid damaging the appliance.
- The veneer or laminate coatings of worktops (or adjacent kitchen units) must be treated with 100°C heat-resistant adhesive which will not dissolve or distort. Any backmoulds must be of heat-resistant material.
- This equipment may only be used in mobile installations such as ships, caravans, aircraft etc. if a risk assessment has been carried out by a suitably qualified engineer.
- The hob may not be built in over a fridge, fridge-freezer, freezer, dishwasher, washing machine or tumble dryer.
- After installing the hob, ensure that the connection cable cannot come into contact with the underside of the appliance. Make sure that there is no mechanical obstruction, such as a drawer, which could damage it.
- According to the table-board cutting template, make a hole in the cooking table-board, then fit the hob into the hole. And make 4 air inlet holes (R25) on the cabinet (see the fig.1)


Do not use any sealant unless expressly instructed to do so. The sealing strip under the edge of the top part of the hob provides a sufficient seal for the worktop.
Electrical connection
The installer must check that
- The voltage and cycles of the mains supply correspond to that indicated in the rating plate of the appliance.
- The electrical installation can stand the maximum power indicated in the rating plate of the appliances.
- The electrical connection has adequate earthing in accordance with regulations in force.
- The connection must be carried out with a full disconnection switch, of an adequate size for the current drawn and with a minimum aperture between contracts of 3mm for disconnection in the case of emergency, cleaning or bulb exchange. Under no circumstances must the earth wire pass through this switch.
After making the electrical connection, verify the correct working of all the electrical parts of the hob.
The manufacture is not liable for any direct or indirect damage caused by faulty installation operations are carried out by unqualified personnel or not complying with the local and general regulation in force.
(D8RW)
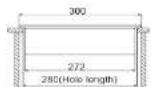


(EEG30202)
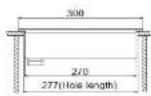

unit: mm
(EEG60301)

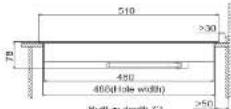
单位:mm
(EEG75201)

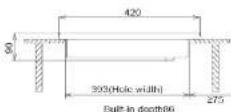
unitmm
(EEG75203)
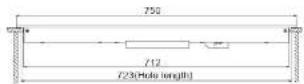

and non

Attention: The bottom of built-in table must have plate, and it has to keep at least 25mm away form the hob bottom.
OPERATION
Settings
| Cooking process | Settings* |
| standard factory settings | |
| Melting butter, chocolate etc. Dissolving gelatine Preparing yoghurt | 1 - 2 |
| Thickening sauces containing egg yolk and butter Warming small quantities of food/liquid Keeping warm food which sticks easily Cooking rice | 1 - 3 |
| Warming liquid and semi-solid foods Thickening sauces, e.g. Hollandaise Making porridge Preparing omelettes, lightly fried eggs Steaming fruit | 2 - 4 |
| Defrosting deep frozen foodSteaming vegetables, fishCooking dumplings, potatoes, pulsesCooking broths, pulse soups | 3-5 |
| Bringing to the boil and continuedcooking of large quantities of food | 5 |
| Gentle braising (without overheating the fat) ofmeat, fish,vegetables, fried eggs etc. | 6-7 |
| Frying pancakes etc. | 7-8 |
| Boiling large quantities of waterBringing to the boil | 8-9 |
| Frying rice, fish, steak etc. | 9-12(EEG75203) |
* These settings and figures, which envisage approx. 4 helpings, should only be taken as a guide. With deep pans, larger quantities or when cooking without a lid, a higher setting is required. For smaller quantities, select a lower setting.

Attention: Family power supply should be matched with product rated power.
Pans
-
Pans made of any materials can be used on a ceramic hob.
-
However, the best pans are those with a thick base which has slight concave when cold. When heated, the base flattens to rest evenly on the hob, optimising the conduction of the heat.
- Pans made of glass, ceramic or stoneware are less suitable, as they do not conduct the heat so well.
- Do not use pots and pans on the ceramic hob with bases with pronounced edges or or ridges, e.g. cast iron pans. These could scratch or scour the hob surface permanently.
- Lift pans into position on the hob. Sliding them into place will cause scuffs and scratches.
- Check that the diameter of the pan base is wide enough for the cooking zone so that heat is not lost unnecessarily. Please note that the maximum diameter quoted by manufacturers often refers to the diameter of the top rim of the pot or pan. The diameter of the base (generally smaller) is more important.
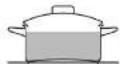
Cold

Hot
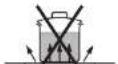
Too small

Suitable
Tips on saving energy
- Use a pan lid whenever possible to minimise heat loss.
- Select a smaller pan when cooking small quantities. A small pan on a small cooking zone uses less energy than a large, partially filled pan on a large cooking zone.
- Use as little water as possible to cook with, and reduce the power setting once the water has come to the boil or the oil is hot enough to fry in.
- When cooking for a long time, switch the cooking zone off about 5 to 10 minutes before the end of the cooking time. In this way, use is made of the residual heat.

Uncovered

Covered
D6RW

■ Startup the controller
- Touch the "power switch" for 3 seconds, the controller is on, "the display area" will be showed "0" and the radix point is lightened.
- You must do the next operation in 10 seconds, or the controller will be turned off.
■ Startup the cooking zone
- If you have turned the controller on, you can start up the cooking zone in 10 seconds. By touching the key "-" or "+" you can enact the power, the display area will show 0 to 9.
- If touch the key "+" at the "0" step, the power will raise into "4" step immediately; if touch the key "-" you can set up the power to "9" step quickly.
- If touch the key "+" or "-" long-playing, you can set up the step quickly.

Attention: On the time of the hob working, it is normal that the heating tray turn-on or off frequently, because the power's auto control is working or the temperature has reach the upper limit.
■ Turn off the cooking zone
-
Touch the "-" key until the display area shows.
-
Touch the key "1" and "-" at the same time, you can set-up the power to "0" step directly.
■ Remaining quantity of heat direction
When the temperature of the area exceeds 65°C, the display area will show "H" to warn the remaining heat of the panel, and please do not touch it.
■ Turn off the controller
Touch the "power switch" any time, you can turn off the controller.
■ Turn on the automatic heating up function
This function will make cooking easy, when cooking, the cooking zone will turn on automatically. Firstly, the hob will heat up to one time by the max power, and then drop down to the enactment power. (the time of the power heating see the list)
- Initialize the cooking zone to "9" step.
- Touch the key "+" again, and the display area will show the "A" and "9" by turns.
- Touch the key "-" of the firepower adjusting switch until the firepower reaches the required point (from 1 to 8 step) within 10 seconds.
| initialization | Time limits for working |
| power level | minutes |
| 1 | 520 |
| 2 | 400 |
| 3 | 320 |
| Initialization | Time limits for working |
| power level | minutes |
| 4 | 200 |
| 5 | 210 |
| 6 | 170 |
| Installation power level | Time limits for working minutes |
| 7 | 140 |
| 8 | 110 |
| 9 | 90 |
■ Turn off the auto heating function
After the auto heating function has availability for 10 seconds, you can touch the "-"key to turn off the auto heating function.
■ Turn on the Timing function
- When the cooking zone works (power level 1-9 steps), touch the timing switch, "00" appears on the displaying area. Touch the "+" or "-" keys of the firepower adjusting switch to set the working time. After 10 seconds, the function will start, the timing indication lamp light all the time, and the display area shows the currently heating step.
- Press the "+" or "-" key for a long time, you can input the heating time quickly.
■ Change the timing time
The timing time can change at anytime
1. Touch the timing switch, the timing time will show and the timing indication lamp will be flickered.
2. You can input the new time by touch the "+" or "-" key. Press the "+" or "-" key for a long time, you can input the heating time quickly.
■ Turn off the timing function
When the time is out, the cooking zone will be closed, and a warning sound will last 2 minutes, the timing indication lamp and the "00" in the display area will be flickered. You can touch any keys to close the warning sound in this 2 minutes.
Turn off the timing function ahead
1. Touch the timing key, then the timing time will show and the timing indication lamp will be fickered
2. Set the timing time to "00" by touch the "-" key, and now the timing function is turned off, but the cooking zone is working until turned off forced
Safety function
- The power supply will be cut off automatically
- 10 seconds after no key being pressed while the power is on
- 10 seconds after no key being pressed while the last cooking zone is powers off
- When systemic fault report appears safety switch-off.
- Your hob is fitted with a safety switch-off feature in case you forget to switch it off yourself.
- After Safety switch-off, the "H" displays and you can touch "-" or "+" key to reset the time.
■ Systemic fault report
When "F" appears on the firepower displaying area, it means "power switch" to reset the hob, turn to professionals for help when it dose not work

- Power
- Child lock
3.Power or timer level key + - Power or timer level key -
5.Timing - Double-circle controlling
- Double-circle indicator lamp
- Timing indication lamp
- Child lock indication lamp
■ Startup the controller
- Touch the "power" for 2 seconds, the controller is on, "the display area" will be showed "0".
- You must do the next operation in 10 seconds, or the controller will be turned off.

■ Startup the cooking zone
- If you have turned the controller on, you can start up the cooking zone in 10 seconds. By touching the key "-" or "+" you can set the power level, the display area will show 0 to 9.
- If touch the key "+" at the "0" power level, the power will raise into "4" power level immediately; if touch the key "-" you can set up the power to "9" power level quickly.
- If touch the key "+" or "-" long-playing, you can set-up the power level quickly.

Attention: On the time of the hob working, it is normal that the heating tray turn-on or off frequently because the power's auto control is working or the temperature has reach the upper limit.
■ Open double-circle heating function
When the upper cooking zone is working, touch double-circle controlling key to open or close double-circle heating function of cooking zone, then double-circle indicator light is on or off.

■ Turn off the cooking zone
- Touch the "-" key until the display area shows "0".
- Touch the key "+" and "-" in sequence quickly, you can set-up the power to "0" directly.
■ Turn off the controller
Touch the "power" any time, you can turn off the controller.
■ Turn on the automatic heating up function
This function will make cooking easy, when cooking, the cooking zone will turn on automatically. Firstly, the hob will heat up to certain time by the max power, and then drop down to the set power level. (the time of the power heating see the following table)
1. Initialize the cooking zone to "9".

- Touch the key "+" again, and the display area will show the "A" and "9" by turns.

- Touch the key "-" of the power adjusting switch until the power reaches the required point (from 1 to 8) within 10 seconds.

| Initialization | Time limits for working |
| power level | minutes |
| 1 | 400 |
| 2 | 300 |
| 3 | 270 |
| Initialization | Time limits for working |
| power level | minutes |
| 4 | 230 |
| 5 | 195 |
| 6 | 160 |
| Initialization | Time limits for working |
| power level | minutes |
| 7 | 120 |
| 8 | 90 |
| 9 | 60 |
(Time is table for reference only)
■ Automatic turn off power
The longest working time of every active cooking zone is inflexible. The longest working time depends on the chosen heating time (refer above to table). After arrive at the longest working time, the cooking zone will be turned off if it is not modified.
■ Turn off the automatic heating up function
- After the auto heating function has availability in 10 seconds, you can touch the "-"key to turn off the auto heating function.
- Turn off the cooking zone or set power "0" at automatic heating, the automatic heating function will be cancelled.
Attention: Press key "+" setting to the higher power at automatic heating. But once set to the highest power "9", the automatic heating function will be cancelled.
■ Turn on the timing function
- When the cooking zone works (power level 1-9), touch the timing switch, "00" appears on the displaying area. Touch the "+" or "-" keys of the power adjusting switch to set the working time (from 1\~99 minutes). After 10 seconds, the function will start, the timing indication lamp on all the time, and the display area shows the currently heating step.
- Press the "+" or "-" key for a long time, you can input the heating time quickly.


Attention:
- You can also set up the cooking time firstly then choose the power level, but please pay attention to the power level must be set within 1 minute after timing set, otherwise the timing will be canceled.
- Operate time function only at stand by or working mode.
■ Change the timing time
The timing time can chang at anytime.
- Touch the timing switch, the timing time will show and the timing indication lamp will be flickered.
2 You can input the new time by touch the "+" or "-" key. Press the "+" or "-" key for a long time, you can input the heating time quickly.
■ Turn off the timing function
-
When the time is out, the cooking zone will be closed, and a warning sound will last 15 seconds, the timing indication lamp and the "00" in the display area will be flickered. You can touch any keys to close the warning sound in this 15 seconds.
-
Turn off the timing function ahead.
- Touch the timing key, then the timing time will show and the timing indication lamp will be fickered.
- Set the timing time to "00" by touch the "-" key, and now the timing function is turned off, but the cooking zone is working until turned off forced.
■ Remaining quantity of heat direction
When the temperature of the cooking zone exceeds 65°C, the display area will show "H" to warn the remaining heat of the panel and please don't touch it.

Attention: The screen will represent heating function, key"+" and "-" recover heating set simultaneously.
■ Turn on the child lock function
- Press the child lock key at stand by or working mode can active the function, and the relative indicate lamp turns on. The controller keeps original state, but it has no reflection to any other keys except child lock and power key.
- The hob can still be turned off when the child lock function is on. When the hob is at stand by mode, the indicator light is off. If switch on the hob again, the child lock function remains until release the key.


Attention: The child lock couldn't be activated or released at off mode.
■ Turn off the child lock function
Press the child lock key two seconds again at stand by or working mode, child lock function will be released, and the indicator light turn off, all the keys can recover function again.
EEG60301
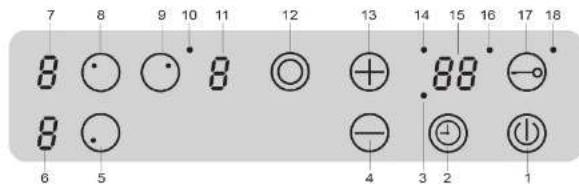
1.Power
2.Timing
3. Timer light of the left cooking zone ranking below
4. Power or timer level key -
5. Select button for the left cooking zone ranking below
6. Heart power indicator of the left cooking zone ranking below
7. Heart power indicator of the left cooking zone ranking above
8. Select button for the left cooking zone ranking above
9. Select button for the right cooking zone
- Double-circle indicator lamp
- Heart power indicator of the right cooking zone
- Double-circle controlling
- Power or timer level key
14 Timer light of the left cooking zone ranking above
15.Timing area - Timer light of the right cooking zone
- Child lock
- Child lock indication lamp
■ Startup the controller
- Touch the "power" to 2 seconds, the controller is on, the display area will be showed "0".
- You must do the next operation in 10 seconds, or the controller will be turned off.

■ Startup the cooking zone
- Touch the selection key to make the corresponding cooking zone be standby.
- In standby mode, one heating region can be activated by touching "+" or "-" unless the timer corresponding to the heating zone is being set.
- If touch the key "+" at the "0" power level, the power will raise into "4" power level immediately;
if touch the key "-" you can set up the power to "9" power level quickly.
4.If touch the key "+" or "-"long-playing, you can set-up the power level quickly.
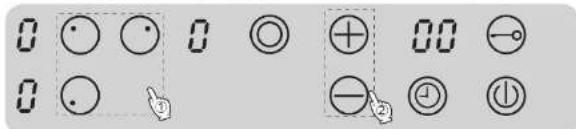

Attention: On the time of the hob working, it is normal that the heating tray turn-on or off frequently because the power's auto control is working or the temperature has reach the upper limit.
■ Open double-circle heating function
When the right cooking zone is working, touch double-circle controlling key to open or close double-circle heating function of cooking zone, then double-circle indicator light is on or off.

■ Turn off the cooking zone
-
Touch the "-" key until the display area shows "0".
-
Touch the key "+" and "-" in sequence quickly, you can set-up the power to "0" directly.
■ Turn off the controller
Touch the "power" any time, you can turn off the controller.
■ Turn on the automatic heating up function
This function will make cooking easy, when cooking, the cooking zone will turn on automatically. Firstly, the hob will heat up to one time by the max power, and then drop down to the set power level. (the time of the power heating see the following table)
1. Initialize the cooking zone to "9".
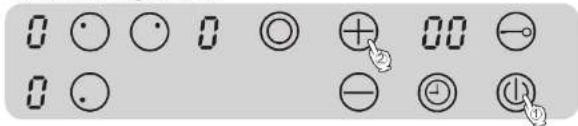
2. Touch the key "+" again, and the display area will show the "A" and "9" by turns.

3. Touch the key "-" of the firepower adjusting switch until the firepower reaches the required point (from 1 to 8) within 10 seconds.

| Initialization power level | Timelimits forwarding minutes | Initialization power level | Timelimits forwarding minutes | Initialization power level | Timelimits forwarding minutes |
| 1 | 400 | 4 | 250 | 7 | 120 |
| 2 | 380 | 5 | 195 | 8 | 90 |
| 3 | 270 | 6 | 160 | 9 | 60 |
(Time in table for reference only)
■ Automatic turn off power
The longest working time of every active cooking zone is inflexible. The longest working time depends on the chosen heating time (refer to above table). After arrive at the longest working time, the cooking zone will be turned off if it is not modified.
■ Turn off the automatic heating up function
- After the auto heating function has availability in 10 seconds, you can touch the "-"key to turn off the auto heating function.
- Turn off the cooking zone or set power "0" at automatic heating, the automatic heating function will be cancelled.

Attention: Press key "+" setting to the higher power at automatic heating. But once set to the highest power, the automatic heating function will be cancelled.
■ Turn on the Timing function
2. Press the "+" or "-" key for a long time, you can input the heating time quickly.
- Select the working area (power level 1-9), touch the timing switch, and then touch the "+" or "-" keys of the firepower adjusting switch to set the working time (from 1\~99 minutes). After 10 seconds, the function will start, the timing indication lamp light all the time, and the display area shows the currently heating step.
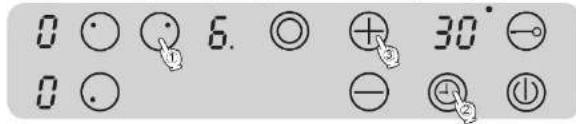

Attention: 1. You can also set up the cooking time firstly then choose the power level, but please pay attention to the power level must be set within 1 minute after timing set, otherwise the timing will be canceled. 2. Operate time function only at stand by or working mode.
■ Change the timing time
The timing time can change at anytime.
1. Touch the timing switch, the timing time will be flickered.
2. You can input the new time by touch the "+" or "-" key. Press the "+" or "-" key for a long time, you can input the heating time quickly.
■ Turn off the timing function
- When the time is out, the cooking zone will be closed, and a warning sound will last 15 seconds, the "00" in the display area will be flickered. You can touch any keys to close the warning sound in this 15 seconds.
- Turn off the timing function ahead.
- Touch the timing key, then the timing time will be flickered.
- Set the timing time to "00" by touch the "-" key, and now the timing function is turned off, but the cooking zone is working until turned off forced.
■ Remaining quantity of heat direction
When the temperature of the cooking zone exceeds 65°C, the display area will show "H" to warn the remaining heat of the panel and please don't touch it.

Attention: The screen will represent heating function, key ^+ and · recover heating set simultaneously, unless the key ^+ and key ^- are touched in 10 seconds.
■ Turn on the child lock function
- Press the child lock key at stand by or working mode can active the function, and the relative indicate lamp turns on. The controller keeps original state, but it has no reflection to any other keys except child lock and power key.
- The hob can still be turned off when the child lock function is on. When the hob is at stand by mode, the indicator light is off. If switch on the hob again, the child lock function remains until release the key.


Attention: The child lock couldn't be activated or released at off mode.
■ Turn off the child lock function
Press the child lock key two seconds again at stand by or working mode, child lock function will be released, and the indicator light turn off, all the keys can recover function again.
EEG75201
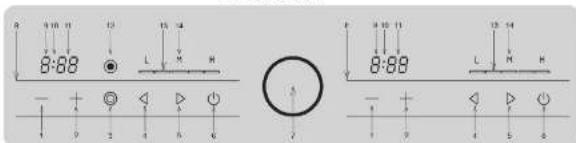
- Timer level key
- Timer level key +
- Outer-ring key
4.Power level key— - Power level key +
6.Single ON/OFF key
7.Start Ring key
8. Working condition display
9. Timer hour display
10. Timer colon display
- Timer minute display
- Outer-ring function display
- Power display strip
- Power level display
■ Startup the controller
Touch the start ring, the controller is on, and the appliance is stand by.

■ Startup the cooking zone
If you have turned the controller on, you can start up the heat up area in 10 second. By touching the left/right key, you can set the power and the display strip will change from "0" to "5".
- When in stand by, if touch the left key, at the "0" step, the power will raise into "3" step immediately; if touch the right key, you can set up the power to "5" step quickly
- After heating, you can touch the left key to raise power, the highest power is "5" and you also can touch the left key to reduce the power, the lowest power is "1".

- The left cooking zone is double-ring, they work at the same time in the acquiescent status, but you can touch the "outer-ring key" to turn off the "outer ring".


Attention: At the time of working, it is normal that the heating tray turn-on or off frequently, because the power's auto control is working or the temperature has reached the upper limit.
■ Turn off the cooking zone
- Touch the "left/right" key at the same time, you can set-up the power to "0" step directly.
- Touch the corresponding "Single ON/OFF" key, you can turn off the corresponding cooking zone, and the appliance stand by

■ Remaining quantity of heat direction
When the temperature of the cooking zone exceeds 65°C, the display area will show "H" to warn the remaining heat of the panel and please don't touch it.

■ Touch key
This electronic hob is operated by the touch key, every touch can be confirmed by the sound. When the power is on, all of the digital tube will light 1 second. Then the digital tube will extinguish, and the appliance is off.
■ Turn off the controller
Touch the "Power Switch" anytime, you can turn off the controller.

■ Turn on the timing function
- When the cooking zone works (firepower: 1-5 steps), touch the timing switch"-or" + "to adjust the time.
-
The first touching of "+"key, the timer will be 10 minutes; and the first touching of "-", the timer will be 1 hour.
-
Press the "+"key or "-"key for a long time, you can input the heating time quickly. Every touch will change the time 10 minutes by 10 minutes within 1 hour, and it will change 30 minutes by 30 minutes between 2 hours and 9 hours.


Attention: The longest working time is 9 hours and 59 minutes.
■ Change the timing time
The timing time can be change at anytime.
- Touch the "+" or "-" key to input the new heating time
- Touch the "+" or "-" key for a long time to input the heating time quickly.
■ Turn off the timing function
- When the time is out, the cooking zone will be closed, and a warning sound will last 2 minutes, the timing indication lamp and the "0:00" in the display area will be flickered. You can touch any keys to close the warning sound in this 2 minutes.
- Set the time to "0" by touching the "-"key, and the timing function is turned off at this time, or press the "-"and "+"key at the same time, the time function will be set to "0:00" quickly

Attention:
- The cooking zone is still working until turned off forcefully.
- When the ":" of the time turned off, the timing time turned off.
3.When the "of the time lighted, the timing time turned off.
Safety function
- The power supply will be cut automatically
- One minute after no touching while the power is on.
- One minute after all the cooking zones are turned off and no any keys are pressed.
- One key is pressed for more than 10 second.
- Safety switch-off
- The controller will be switched off automatically after 2 hours of working to avoid forgetting to switch off the appliance.
3. Overheating protection
- When the cooking zone or the inner circuit exceeds a certain temperature, it will take the measure to set to the lower step or switch off automatically.

4. Child lock
- Press the "start ring" (more than 3 seconds), and all the keys will be locked.
- Press the "start ring" for more than 3 second to release the lock


Attention: When the appliance is locked, you can switch off the controller by touching the "star ring" if the appliance is heating, while if it doesn't heat, you can't turn on the controller until the child lock is released.
The * : * shining means when the timer function is working, if you want to know the remaining timer time, you can touch the "+" or "-"
Caution
System error
When "E" appears, it means there is something wrong with the system.
- Please touch the "start ring" to reset the appliance.
- Reset the appliance after some time when the appliance is cool
- Contact the professional person.
- When there is some dirty thing on the surface of the crystal glass, please clean it by the cleaning shovel to avoid the sensitivity of the key.

1.Power
2. Child lock
3. Power or timer level key +
- Power or timer level key -
5.Timing -
Double-circle controlling
-
Double-circle indicator lamp
8.Timing indication lamp - Child lock Indication lamp
■ Startup the controller
- Touch the "power" for 2 seconds, the controller is on, "the display area" will be showed "0".
- You must do the next operation in 10 seconds, or the controller will be turned off.


■ Startup the cooking zone
- If you have turned the controller on, you can start up the cooking zone in 10 seconds. By touching the key "-" or "+" you can set the power level, the display area will show 0 to 12
- If touch the key "+" at the "0" power level, the power will raise into "5" power level immediately; if touch the key "-" you can set up the power to "12" power level quickly.
- If touch the key "+" or "-" long-playing, you can set-up the power level quickly.


Attention: On the time of the hob working, it is normal that the heating tray turn-on or off frequently, because the power's auto control is working or the temperature has reach the upper limit.
■ Open double-circle heating function
When the left cooking zone is working, touch double-circle controlling key to open or close double-circle heating function of cooking zone, then double-circle indicator light is on or off.


■ Turn off the cooking zone
- Touch the "-" key until the display area shows"0".
- Touch the key "+" and "-" in sequence quickly, you can set-up the power to "0" directly.
■ Turn off the controller
Touch the "power" any time, you can turn off the controller.
■ Turn on the automatic heating up function
This function will make cooking easy, when cooking, the cooking zone will turn on automatically. Firstly, the hob will heat up to certain time by the max power, and then drop down to the set power level. (the time of the power heating see the following table)
- Initialize the cooking zone to "12"


- Touch the key "+" again, and the display area will show the "A" and "12" by turns


- Touch the key "-" of the power adjusting switch until the power reaches the required point (from 1 to 11) within 10 seconds.


| Initialization | Time limits for working |
| power level | minutes |
| 1 | 400 |
| 2 | 300 |
| 3 | 270 |
| 4 | 230 |
| Initialization | Time limits for working |
| power level | minutes |
| 5 | 195 |
| 6 | 100 |
| 7 | 140 |
| 8 | 120 |
| Initialization | Time limits for working |
| power level | minutes |
| 9 | 105 |
| 10 | 99 |
| 11 | 75 |
| 12 | 60 |
(Time in table for reference only)
■ Automatic turn off power
The longest working time of every active cooking zone is inflexible. The longest working time depends on the chosen heating time (refer above to table). After arrive at the longest working time, the cooking zone will be turned off if it is not modified.
■ Turn off the automatic heating up function
1 After the auto heating function has availability in 10 seconds, you can touch the "-"key to turn off the auto heating function.
2. Turn off the cooking zone or set power ^0 at automatic heating, the automatic heating function will be cancelled.

Attention: Press key "+" setting to the higher power at automatic heating. But once set to the highest power "12", the automatic heating function will be cancelled.
■ Turn on the timing function
- When the cooking zone works (power level 1-12), touch the timing switch, "0:00" appears on the displaying area. Touch the "+" or "-" keys of the power adjusting switch to set the working time (from 0:00 to 9:59). After 10 seconds, the function will start, the timing indication lamp on all the time, and the display area shows the currently heating step.
- Press the "+" or "-" key for a long time, you can input the heating time quickly.


Attention:
- You can also set up the cooking time firstly then choose the power level, but please pay attention to the power level must be set within 1 minute after timing set, otherwise the timing will be canceled.
- Operate time function only at stand by or working mode.
■ Change the timing time
The timing time can chang at anytime.
-
Touch the timing switch, the timing time will show and the timing indication lamp will be flickered
-
You can input the new time by touch the "+" or "-" key. Press the "+" or "-" key for a long time, you can input the heating time quickly.
■ Turn off the timing function
-
When the time is out, the cooking zone will be closed, and a warning sound will last 15 seconds, the timing indication lamp and the "0.00" in the display area will be flickered. You can touch any keys to close the warning sound in this 15 seconds.
-
Turn off the timing function ahead.
- Touch the timing key, then the timing time will show and the timing indication lamp will be flickered.
- Set the timing time to "0:00" by touch the "-" key, and now the timing function is turned off, but the cooking zone is working until turned off forced.
■ Remaining quantity of heat direction
When the temperature of the cooking zone exceeds 65°C, the display area will show "H" to warn the remaining heat of the panel and please don't touch it.

Attention: The screen will represent heating function, key"+" and "-" recover heating set simultaneously.
■ Turn on the child lock function
- Press the child lock key at stand by or working mode can active the function, and the relative indicate lamp turns on. The controller keeps original state, but it has no reflection to any other keys except child lock and power key.
- The hob can still be turned off when the child lock function is on. When the hob is at stand by mode, the indicator light is off. If switch on the hob again, the child lock function remains until release the key.


Attention: The child lock couldn't be activated or released at off mode.
■ Turn off the child lock function
Press the child lock key two seconds again at stand by or working mode, child lock function will be released, and the indicator light turn off, all the keys can recover function again.
CLEANING AND CARE
- The appliance should be cleaned after each use. Allow the hob to cool down before cleaning. Wipe all coarse soiling off using a damp cloth. Stubborn soiling may need to be removed with a shielded scraper blade. Finally, clean the hob with a suitable proprietary ceramic hob cleaner applied with kitchen paper or a clean cloth. Do not apply cleaner whilst the hob is still hot, as this could result in marking. Please follow the manufacturer's instructions. Finally wipe the appliance with a damp cloth, and then dry it with a clean, soft cloth. Ensure that all cleaning agent residues are removed. Residues can burn onto the hob the next time it is used, and cause damage to the ceramic surface.
- Spots caused by limescale deposits, water and aluminium residues (which have a metallic appearance) can be removed using the ceramic hob cleaner. Should any sugar, plastic or aluminium foil spill or fall on to a hot cooking zone, first switch off the appliance. Then carefully scrape off all the sugar, plastic or aluminium residues from the hob whilst they are still hot using a shielded scraper blade. Take care not to burn yourself. Allow the cooking zone to cool down, and then clean as described above with a suitable proprietary ceramic hob cleaner. Appliances with aluminium frames (see data plate) are prone to scratching, alkali and acid damage.
- Take great care when cleaning the aluminium frame. Do not use cleaning agents for stainless steel or descaling agents on aluminium surfaces. Soiling should be wiped off as soon as possible after using the appliance. If the soiling is left for a long time it can have a damaging effect on the aluminium surfaces. Intensive cleaning with proprietary ceramic hob cleaners can cause the frame to take on a shiny appearance.

Attention: Do not use a steam cleaner to clean this appliance. The steam could reach electrical components and cause a short circuit.
- Only use proprietary cleaning products which are suitable for cleaning ceramic hobs. Never use cleaners containing sand, soda, alkalis, acids or chlorides, oven sprays, dishwasher detergents, nor steel wool, abrasive cleaning agents, hard brushes, scouring pads and cloths. You should also avoid using sponges etc. which have previously been used with abrasive cleaning agents, as this will damage the surface.
- Do not use washing up liquid to clean the ceramic surface, as it can leave a blue sheen which may be difficult to remove.
- Do not use sharp objects which may damage the seals between the ceramic surface and the frame or between the frame and the worktop.
- To prevent the risk of spillages burning on, remove any soiling as soon as possible, and ensure that pan bases are clean, dry and free of grease.
PROBLEM SOLVING GUIDE
| Problems | The cause of problem | Settlements for the problem |
| The hob or cooking zones can't be switched on | The safety lock is activated | Deactivate the safety lock |
| The mains fuse has blown | Contact a qualified electrician or the FOTILE Service Department | |
| The hob can be switched on and settings selected, but the cooking zones do not heat up | Set the demo-mode setting by mistake | Check whether you set the demo-mode setting by mistake |
| The food in the pan hardly heats up or does not heat up at all when the auto heat-up function is switched on | There is too much food in the pan. | Select a higher continued cooking setting next time, or start cooking at the highest setting |
| The pan is not conducting heat properly | Change the pan | |
| The heating switches on and off on the cooking zone | If the heating switches on and off at the highest setting, the overheating protection mechanism has been triggered | It is normal for the heating element to switch on and off.See "How the cooking zones work". |
| An r^2 or E appears in the display for the rear cooking zones, an r^2 or E appears in the display for the front cooking zones and numbers appear in the timer display | The controller is broken | Interrupt the power supply to the hob for approx. 1 minute. |
| If this does not solve the problem, please call the FOTILE Service department. |
ELECTRIC CIRCUIT FIGURE
D6RW

EEG30202

flowchart
graph TD
    A["Control Board"] -->|9| B["Power Board"]
    B --> C["RED1 RED RED3"]
    C --> D["Blue"]
    D --> E["Yellow & Green"]
    C --> F["Blue"]
    F --> G["PE Yellow & Green"]
    F --> H["L Brown"]
    F --> I["N Blue"]
    B --> J["BLUE1 BLUE2"]
    J --> K["Black 4a"]
    K --> L["Upper Stove"]
    L --> M["Thermostat"]
    M --> N["Double Circle Heating Element"]
    N --> O["Down Stove"]
    O --> P["Thermostat"]
    P --> Q["Single Circle Heating Element"]
    style A fill:#f9f,stroke:#333
    style B fill:#ccf,stroke:#333
    style C fill:#cfc,stroke:#333
    style D fill:#fcc,stroke:#333
    style E fill:#ffc,stroke:#333
    style F fill:#cff,stroke:#333
    style G fill:#ffc,stroke:#333
    style H fill:#ffc,stroke:#333
    style I fill:#ffc,stroke:#333
    style J fill:#ffc,stroke:#333
    style K fill:#cfc,stroke:#333
    style L fill:#cfc,stroke:#333
    style M fill:#cfc,stroke:#333
    style N fill:#cfc,stroke:#333
    style O fill:#cfc,stroke:#333
    style P fill:#cfc,stroke:#333
    style Q fill:#cfc,stroke:#333
EEG60301
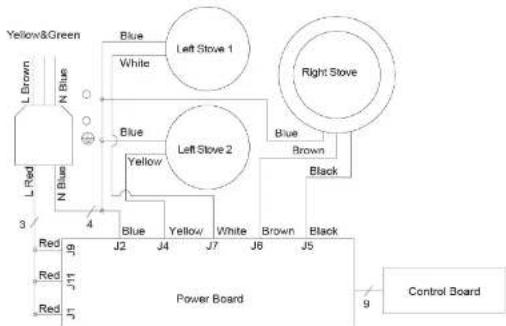
flowchart
graph TD
    A["Yellow&Green"] --> B["Blue"]
    A --> C["White"]
    A --> D["Left Stove 1"]
    A --> E["Right Stove"]
    F["L Brown"] --> G["N Blue"]
    F --> H["L Red"]
    I["N Blue"] --> J["N Blue"]
    K["Red"] --> L["J5"]
    M["Red"] --> N["J11"]
    O["Red"] --> P["J7"]
    Q["Control Board"] --> R["J9"]
    S["Power Board"] --> T["J2"]
    S --> U["J4"]
    S --> V["J7"]
    S --> W["J8"]
    S --> X["J5"]
    S --> Y["Brown"]
    S --> Z["Black"]
EEG75201

flowchart
graph TD
    A["Yellow&Green"] --> B["Control Board CON4 CON1"]
    B --> C["Left Stove"]
    C --> D["Right Stove"]
    D --> E["Power Board"]
    subgraph Control Board
        F["5 Red"] & G["H Red"] --> H["Blue S"]
        I["Blue H"] & J["Blue L Red"] --> K["Blue Black"]
    end
    subgraph Left Stove
        L["2 Orange"] & M["4a White"] --> N["Brown"]
        O["White"] --> P["Black"]
    end
    subgraph Right Stove
        Q["Yellow 4"] & R["2 Black"] --> S["Yellow"]
    end
    style Control Board fill:#f9f,stroke:#333
    style Left Stove fill:#ccf,stroke:#333
    style Right Stove fill:#cfc,stroke:#333
    style Power Board fill:#fcc,stroke:#333
EEG75203

flowchart
graph TD
    A["Power Board"] --> B["Control Board"]
    B --> C["Left Stove"]
    B --> D["Right Stove"]
    C --> E["Blue 2"]
    D --> F["Blue 2"]
    G["Red"] --> H["N Blue"]
    I["L Red"] --> J["N Blue"]
    K["L Brown"] --> L["Blue"]
    M["J1 J2"] --> N["J5 J4"]
    O["CON3"] --> P["J7"]

PARTS NAME DIAGRAM
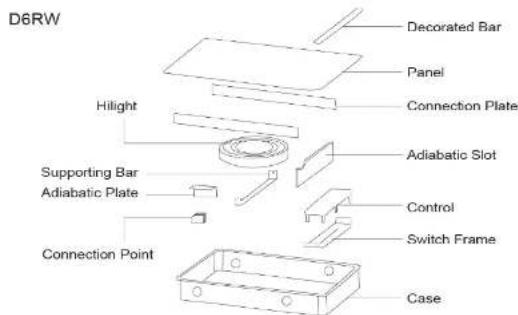

EEG60301
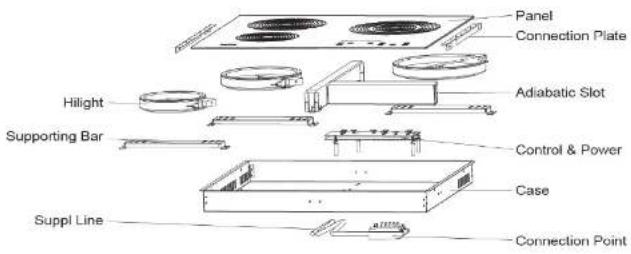
EEG75201

EEG75203

SPECIFICATION
| Model | Rated Voltage | Length of wire | Rated Power |
| D6RW | 220-240V/50Hz | 1.5m | 1800W |
| EEG30202 | 220-240V/50Hz | 1.5m | 2900W(Upper:1200W Down:700/1700W) |
| EEG60301 | 220-240V/50Hz | 1.8m | 5200W (Left Upper:1800W Right:1000/2200W Left Down:1200W) |
| FEG75201 | 220-240V/50Hz | 1.8m | 4500W(Left: 1000/2200W Right:2300W) |
| EEG75203 | 220-240V/50Hz | 1.8m | 4000W(Left: 1000/2200W Right:1800W) |
- Electric Hob
- CONTENTS
- PACKING LIST
- WARNING AND SAFETY INSTRUCTIONS
- ■ Technical safety
- Correct use
- ■ Safety with children
- ■ Protecting the appliance from damage
- ■ Appliance faults
- ■ Futher safety notes
- CARING FOR THE ENVIRONMENT
- ■ Disposal of the packing material
- ■ Disposal of your old appliance
- BEFORE USING FOR THE FIRST TIME
- ■ Cleaning for the first time
- INSTALLATION
- ■ Installation Requirements
- ■ Safety instructions for installation
- Electrical connection
- Pans
- Tips on saving energy
- ■ Startup the controller
- ■ Startup the cooking zone
- ■ Turn off the cooking zone
- ■ Remaining quantity of heat direction
- ■ Turn off the controller
- ■ Turn on the automatic heating up function
- ■ Turn off the auto heating function
- ■ Turn on the Timing function
- ■ Change the timing time
- ■ Turn off the timing function
- Safety function
- ■ Systemic fault report
- ■ Open double-circle heating function
- ■ Automatic turn off power
- ■ Turn off the automatic heating up function
- Attention:
- ■ Turn on the child lock function
- ■ Turn off the child lock function
- Initialize the cooking zone to "9".
- Touch the key "+" again, and the display area will show the "A" and "9" by turns.
- Touch the key "-" of the firepower adjusting switch until the firepower reaches the required point (from 1 to 8) within 10 seconds.
- Press the "+" or "-" key for a long time, you can input the heating time quickly.
- ■ Touch key
- Overheating protection
- Child lock
- Caution
- CLEANING AND CARE
Brand : Fotile
Model : EEG75201
Category : Cooker