
18V EasiBlowVac - Leaf blower FLYMO - Free user manual and instructions
Find the device manual for free 18V EasiBlowVac FLYMO in PDF.


| Product Type | Cordless Leaf Blower / Vacuum |
| Brand | Flymo |
| Model | 18V EasiBlowVac |
| Power Source | 18V Li-ion Battery (not included) |
| Motor Type | Brushed |
| Air Speed (max) | 180 km/h |
| Air Volume (max) | 400 m³/h |
| Vacuum Ratio | 10:1 |
| Collection Bag Capacity | 30 liters |
| Weight (with battery) | 2.5 kg |
| Dimensions (L x W x H) | 800 x 200 x 300 mm |
| Battery Voltage | 18 V |
| Battery Compatibility | Flymo 18V Power System |
| Sound Power Level (LwA) | 94 dB(A) |
| Vibration Level | 2.5 m/s² |
| Main Functions | Blow and Vacuum modes; variable speed control |
| Maintenance | Clean air vents after use; empty collection bag regularly |
| Safety Features | Double insulation; trigger lock-off; eye protection recommended |
| Spare Parts Available | Battery, charger, impeller, bag, tube |
| Repairability Index | 8.5 / 10 |
Frequently Asked Questions - 18V EasiBlowVac FLYMO
User questions about 18V EasiBlowVac FLYMO
0 question about this device. Answer the ones you know or ask your own.
Ask a new question about this device
Download the instructions for your Leaf blower in PDF format for free! Find your manual 18V EasiBlowVac - FLYMO and take your electronic device back in hand. On this page are published all the documents necessary for the use of your device. 18V EasiBlowVac by FLYMO.
USER MANUAL 18V EasiBlowVac FLYMO
natural_image
Technical line drawing of a mechanical device with articulated arms and base mount (no text or symbols)18V EasiBlowVac P4A (Kit) Art. 9707657-01 18V EasiBlowVac P4A (solo) Art. 9707658-01
en Operator's manual Battery Garden Blower-Vacuum
A1A2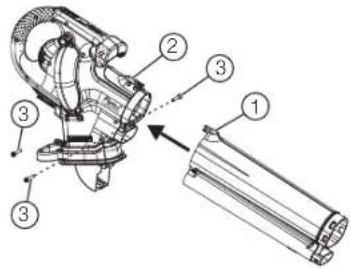 | 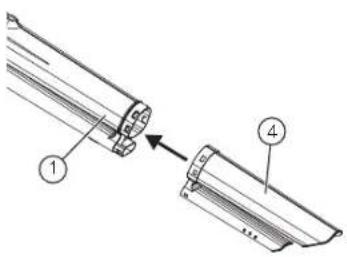 | A3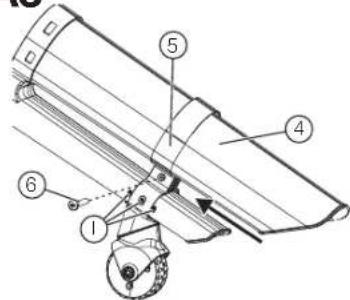 |
A4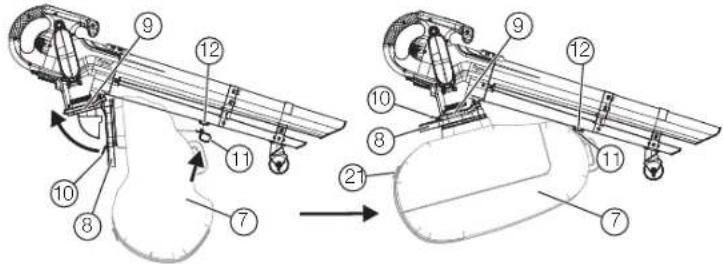 | A5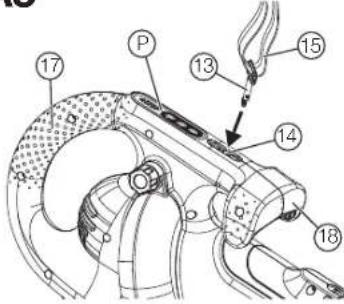 | |
C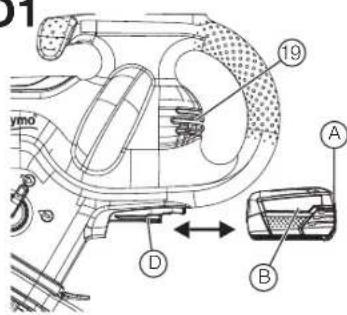 | O2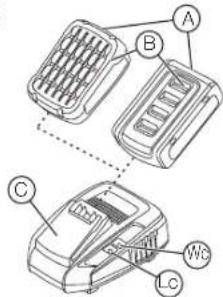 | O3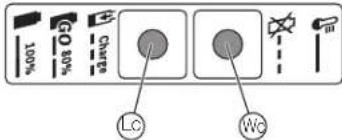 |
O4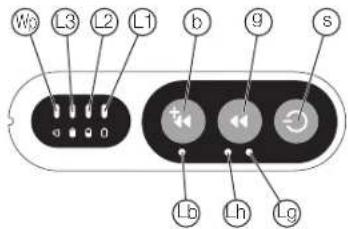 | O5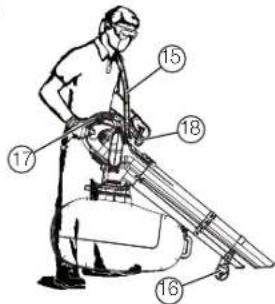 | O6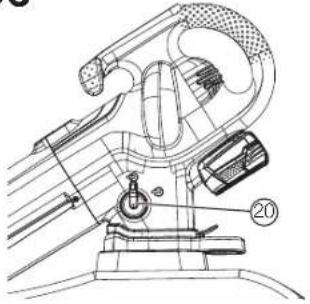 |
M*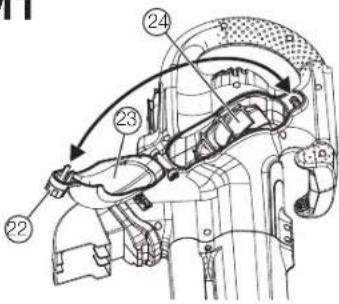 | ||
en
en Battery Garden Blower-Vacuum EasiBlowVac P4A
Original operator's manual
- SAFETY INSTRUCTIONS....4
- ASSEMBLY 6
- OPERATION....6
- MAINTENANCE....7
- STORAGE 8
- TROUBLESHOOTING 8
- TECHNICAL DATA 8
-
ACCESSORIES/SPARE PARTS 9
-
WARRANTY/SERVICE 9
-
DISPOSAL....9
-
ANNEX....9
1. SAFETY INSTRUCTIONS
1.1 Symbols on the product
→ Read operator's manual.

→ Keep bystanders at a distance.

→ Wear eye and hearing protection.

→ Do not expose to rain.
1.2 General safety instructions
1.2.1 General machine safety instructions
WARNING! Read all safety w
Read all safety warnings, instructions, illustrations and specifications provided with this machine.
Failure to follow all instructions listed below may result in electric shock, fire and/or serious injury.
Save all warnings and instructions for future reference.
The term "machine" used in the safety instructions refers to mains-operated (corded) or to battery-operated (cordless) machines.
1) Work area safety
a) Keep work area clean and well lit. Cluttered or dark areas invite accidents.
b) Do not operate machines in explosive atmospheres, such as in the presence of flammable liquids, gases or dust. Machines create sparks which may ignite the dust or fumes.
c) Keep children and bystanders away while operating a machine. Distractions can cause you to lose control.
2) Electrical safety
a) Machine plugs must match the outlet. Never modify the plug in any way. Do not use any adaptor plugs with earthed (grounded) machines. Unmodified plugs and matching outlets will reduce risk of electric shock.
b) Avoid body contact with earthed or grounded surfaces, such as pipes, radiators, ranges and refrigerators. There is an increased risk of electric shock if your body is earthed or grounded.
c) Do not expose machines to rain or wet conditions. Water entering a machine will increase the risk of electric shock.
d) Do not abuse the cord. Never use the cord for carrying, pulling or unplugging the machine. Keep cord away from heat, oil, sharp edges or moving parts.
Damaged or entangled cords increase the risk of electric shock.
e) When operating a machine outdoors, use an extension cord suitable for outdoor use. Use of a cord suitable for outdoor use reduces the risk of electric shock.
f) If operating a machine in a damp location is unavoidable, use a residual current device (RCD) protected supply. Use of an RCD reduces the risk of electric shock.
3) Personal safety
a) Stay alert, watch what you are doing and use common sense when operating a machine. Do not use a machine while you are tired or under the influence of drugs, alcohol or medication. A moment of inattention while operating machines may result in serious personal injury.
b) Use personal protective equipment. Always wear eye protection. Protective equipment such as dust mask, non-skid safety shoes, hard hat, or hearing protection used for appropriate conditions will reduce personal injuries.
c) Prevent unintentional starting. Ensure the switch is in the off-position before connecting to power source and/or battery pack, picking up or carrying the machine. Carrying machines with your finger on the switch or energising machines that have the switch on invites accidents.
d) Remove any adjusting key or wrench before turning the machine on. A wrench or a key left attached to a rotating part of the machine may result in personal injury.
e) Do not overreach. Keep proper footing and balance at all times. This enables better control of the machine in unexpected situations.
f) Dress properly. Do not wear loose clothing or jewellery. Keep your hair and clothing away from moving parts. Loose clothes, jewellery or long hair can be caught in moving parts.
g) If devices are provided for the connection of dust extraction and collection facilities, ensure these are connected and properly used. Use of dust collection can reduce dust-related hazards.
h) Do not let familiarity gained from frequent use of machines allow you to become complacent and ignore tool safety principles. A careless action can cause severe injury within a fraction of a second.
4) Machine use and care
a) Do not force the machine. Use the correct machine for your application. The correct machine will do the job better and safer at the rate for which it was designed.
b) Do not use the machine if the switch does not turn it on and off. Any machine that cannot be controlled with the switch is dangerous and must be repaired.
c) Disconnect the plug from the power source and /or remove the battery pack, if detachable, from the machine before making any adjustments, changing accessories, or storing machines. Such preventive safety measures reduce the risk of starting the machine accidentally.
d) Store idle machines out of the reach of children and do not allow persons unfamiliar with the machine or these instructions to operate the machine. Machines are dangerous in the hands of untrained users.
e) Maintain machines and accessories. Check for misalignment or binding of moving parts, breakage of parts and any other condition that may affect the machine's operation. If damaged, have the machine repaired before use. Many accidents are caused by poorly maintained machines.
f) Keep cutting tools sharp and clean. Properly maintained cutting tools with sharp cutting edges are less likely to bind and are easier to control.
g) Use the power tool, accessories and tool bits etc. in accordance with these instructions, taking into account the working conditions and the work to be performed. Use of the machine for operations different from those intended could result in a hazardous situation.
h) Keep handles and grasping surfaces dry, clean and free from oil and grease. Slippery handles and grasping surfaces do not allow for safe handling and control of the machine in unexpected situations.
5) Battery tool use and care
a) Recharge only with the charger specified by the manufacturer. A charger that is suitable for one type of battery pack may create a risk of fire when used with another battery pack.
b) Use machine only with specifically designated battery packs. Use of any other battery packs may create a risk of injury and fire.
c) When battery pack is not in use, keep it away from other metal objects, like paper clips, coins, keys, nails, screws or other small metal objects, that can make a connection from one terminal to another. Shorting the battery terminals together may cause burns or a fire.
d) Under abusive conditions, liquid may be ejected from the battery; avoid contact. If contact accidentally occurs, flush with water. If liquid contacts eyes, additionally seek medical help. Liquid ejected from the battery may cause irritation or burns.
e) Do not use a battery pack or tool that is damaged or modified. Damaged or modified batteries may exhibit unpredictable behavior resulting in fire, explosion or risk of injury.
f) Do not expose a battery pack or tool to fire or excessive temperature. Exposure to fire or temperature above 130 °C may cause explosion.
g) Follow all charging instructions and do not charge the battery pack or tool outside the temperature range specified in the instructions. Charging improperly or at temperatures outside the specified range may damage the battery and increase the risk of fire.
6) Service
a) Have your machine serviced by a qualified repair person using only identical replacement parts. This will ensure that the safety of the machine is maintained.
b) Never service damaged battery packs. Service of battery packs should only be performed by the manufacturer or authorised service providers.
1.2.2 Garden blower, garden vacuum and garden blower/vacuum safety warnings
a) Do not use the machine in bad weather conditions, especially when there is a risk of lightning. This decreases the risk of being struck by lightning.
b) Check the debris collector frequently for wear or deterioration. A worn or damaged debris collector may increase the risk of personal injury.
c) Wear eye protection and ear protection. Adequate protective equipment will reduce the risk of personal injury.
d) While operating the machine, always wear non-slip and protective footwear. Do not operate the machine when barefoot or wearing open sandals. This reduces the risk of injury to the feet.
e) Do not wear loose fitting clothing or articles such as scarves, strings, chains, ties, etc., that could get drawn into the air inlets. Tie back or
cover long hair to make sure it does not get drawn into the air inlets. If any of these items are drawn into the air inlets, it can increase the risk of personal injury.
f) Keep bystanders away while operating the machine. Thrown debris can increase the risk of personal injury.
g) Do not use in vacuum mode without the debris collector in place. Thrown objects can increase the risk of personal injury.
h) Never point the blower nozzle in the direction of people or pets or in the direction of windows. Use extra caution when blowing debris near solid objects, such as trees, automobiles and walls that can cause debris to ricochet. Thrown objects can damage property and increase the risk of personal injury.
i) Do not use the machine to pick up or blow anything that is burning or smoking, such as cigarettes, matches or hot ashes. These ignition sources may increase the risk of fire.
Do not vacuum water or other liquids or immerse any part of the machine in liquid. Water entering the machine may increase the risk of electric shock.
k) Do not vacuum stones, gravel, metal or broken glass. The fan wheel can get damaged and may increase the risk of personal injury.
Do not touch the fan while still in motion. Turn off the machine and wait until the fan stops before removing any part that may give access to the fan. This reduces the risk of injury from moving parts.
m) When clearing jammed material or servicing the machine, make sure the power switch is off. Unexpected starting of the machine while clearing jammed material or servicing may result in serious personal injury.
1.3 Additional safety instructions
1.3.1 Intended use
Use as a garden blower:
The FLYMO vacuum/blower is intended for blowing dirt particles and grass clippings from pavements, driveways, patios etc., for blowing grass clippings, straw and leaves together into piles or for removing dirt particles from comers, joints and gaps between bricks and wall stones.
Use as a leaf vac:
The FLYMO vacuum/blower is designed for vacuuming up dry material such as leaves, grass, small twigs and pieces of paper.
The product is not suitable for long-term use (professional operation).
The machine is intended to be used by the operator at ground level and not on ladders or any unstable support.
When wearing a shoulder strap, please be sure that no other wearable interferes with the release and removal of the shoulder strap.
Inspect the machine for damage if there appears to be excessive vibration.
When clearing blockages or jammed material in the machine, make sure the power switch is off and the battery is disassembled.
Keep any ventilation openings clear of debris.

DANGER!
Risk of injury!
→ Do not use the product to cut bushes, hedges, shrubs and perennials, to cut climbing plants or grass on roofs or on balconies, to crush branches and twigs, and to compensate for irregularities in the ground. Do not use the product on slopes with an inclination of more than 20".
1.3.2 Safety instructions for batteries and battery chargers:

Read all safety warnings and instructions. Failure to follow the warnings and instructions may result in electric shock, fire and/or serious injury.
→ Store these Instructions in a safe place. Only use the charger if you can fully evaluate all functions and carry them out without restrictions, or if you have received corresponding instructions.
→ Do not use the product in explosive atmospheres.
→ Supervise children during use, cleaning and maintenance. This will ensure that children do not play with the charger.
→ Only charge lithium-Ion batteries of the POWER FOR ALL system type PBA 18V with a capacity of 1.5 Ah or more (5 battery cells or more). The battery voltage must match the battery charging voltage of the charger. Do not charge any nonrechargeable batteries. Otherwise there is a risk of fire and explosion.

Only use the battery charger in closed rooms and keep it away from moisture. Water entering a power tool will increase the risk of electric shock.
→ Keep the battery charger clean. Dirt poses a risk of electric shock.
→ Always check the battery charger, cable and plug before use. Stop using the charger if you discover any damage. Do not open the charger yourself, and have it repaired only by a qualified specialist using only original replacement parts. Damaged chargers, cables and plugs increase the risk of electric shock.
→ Do not operate the battery charger on easily combustible surfaces (e.g. paper, textiles etc.) or in combustible environments. There is a risk of fire due to the charger heating up during operation.
→ If the connecting cable needs replacing, this must be carried out by FLYMO or by an authorised after sales service centre for FLYMO power tools to avoid safety hazards.
→ These safety instructions apply only to lithium-ion batteries of the POWER FOR ALL system PBA 18V.
→ Do not cover the battery charger's ventilation slots. The battery charger may otherwise overheat and no longer function properly.
→ Use only battery chargers that are recommended by the manufacturer to charge the batteries. A battery charger that is suitable for one type of battery may cause a fire hazard if used with other batteries.
→ Vapours may escape if the battery is damaged or used improperly. The battery can set allight or explode. Ensure the area is well ventilated and seek medical attention should you experience any adverse effects. The vapours may irritate the respiratory system.
→ If the battery is defective, liquid may leak out and wet adjacent objects. Check affected parts. Clean these parts or change them if necessary.
→ If used incorrectly or if the battery is damaged, flammable liquid may escape from the battery; Contact with this liquid should be avoided. If contact accidentally occurs, flush with water. If the liquid comes into contact with your eyes, seek additional medical attention. Liquid ejected from the battery may cause irritation or burns.
→ Only use the battery in POWER FOR ALL system partner products.
POWER FOR ALL-marked 18V batteries are fully compatible with the following products: all 18V POWER FOR ALL system partner products.
→ Observe the battery recommendations in the operator's manual for your product. This is the only way to operate the battery and the product safely and to protect the batteries from dangerous overloading.
→ Only charge the batteries using battery chargers recommended by the manufacturer or by POWER FOR ALL system partners. A battery charger that is suitable for a certain type of battery poses a fire hazard when used with other batteries (battery type: PBA 18V etc. / Compatible battery chargers: AL 18 etc.).
→ The battery is supplied partially charged. To ensure full battery capacity, fully charge the battery in the charger before using your power tool for the first time.
→ Keep batteries out of the reach of children.
→ Do not open the battery. There is a risk of short-circuiting.
→ Do not short-circuit the battery. When the battery is not in use, keep it away from paper clips, coins, keys, nails, screws or other small metal objects, that can make a connection from one terminal to another. A short circuit between the battery contacts may result in burns or fire.
→ The battery contacts can be hot after use. Be careful of hot contacts when removing the battery.
→ The battery can be damaged by sharp objects such as a nail or screw-driver or by external force. An internal short circuit may occur, causing the battery to burn, smoke, explode or overheat.
→ Never service damaged battery packs. Service of battery packs should only be performed by the manufacturer or authorised after sales service providers.

Protect the battery from heat, including prolonged exposure to sunlight, fire, dirt, water and moisture. There is a risk of explosion and short-circuiting.
→ Operate and store the battery only at an ambient temperature between -20°C and +50°C. Do not leave the battery in your car in the summer, for example. At temperatures <0°C, performance may be reduced depending on the device.
→ Charge the battery only at an ambient temperature between 0 °C and +35 °C. Charging outside of the temperature range can damage the battery and increase the risk of fire.
→ After use, allow the battery to cool down for at least 30 minutes before charging or storing it.
1.3.3 Additional electrical safety instructions

DANGER!
Risk of cardiac arrest!
This product generates an electromagnetic field during operation. This electromagnetic field may affect the functionality of active or passive medical implants (e.g. pacemakers), which may result in serious injury or death.
→ Consult your doctor and the manufacturer of your implant before using this product. Remove the battery when you are not using the product.
→ Disconnect the battery if the machine does not stop. Removing the battery stops the machine.
→ If the running wheel is blocked, stop and remove the battery.
There is a risk of injury if the machine starts up unintentionally.
→ Do not use the device near water or for pond maintenance. Water entering the battery can cause an electric shock and lead to personal injury.
1.3.4 Additional personal safety instructions

DANGER!
Risk of suffocation!
Smaller parts can be swallowed.
→ Keep toddlers away when you assemble the product.
→ Do not use to vacuum flour, sand or wood dust. This can create an explosive atmosphere.
→ Do not open the maintenance flap during use. Due to the small risk of a malfunction in the signalling switch, the running wheel may not stop automatically.
→ Cover long hair during use. Hair could be sucked into the air intake of the motor housing.
→ Do not use the product in potentially explosive atmospheres.
There is a risk of explosion.
→ Pay attention to your surroundings. Due to reduced hearing caused by noise and hearing protection, you may not hear hazards or other people approaching.
→ Recommendation: Wear a dust mask. Dust that is stirred up can otherwise be inhaled.
→ The product is only suitable for outdoor use. Using the machine indoors amplifies the noise of the machine.
2. ASSEMBLY

DANGER!
Risk of injury
Risk of injury if the product starts accidentally and hair, clothing or loose objects are sucked in. The product may only be operated with the vacuum/blower tube assembled.
→ Wait until the rotor blades have come to a standstill. Remove the battery before assembling the product.
2.1 Scope of supply
Art. 9707657-01 Art. 9707658-01
| Cordless vacuum/ blower | x | x |
| Battery charger x - | ||
| Battery (4.0 Ah) x - |
Operator's manual x x
2.2 Assembling the vac/blower tube [Fig. A1/A2]
![FLYMO 18V EasiBlowVac - Assembling the vac/blower tube [Fig. A1/A2] - 1](/content/2026/05/986914/images/eca5a8febd8b3e054933474c1b49e69ef0900b08b05fa9e4ab2a6699c89f699f.jpg)
DANGER!
Risk of injury
Risk of injury from the rotor blades if you reach into the housing opening with your hand. The product may only be operated with the vacuum/blower tube assembled.
→ Assemble the vacuum/blower tube before starting the vacuum /blower.
- Align the notch on the upper vacuum/blower tube① with the notch on the housing opening ②.
- Press the upper vacuum/blower tube① onto the housing opening as far as it will go ②.
- Screw the 3 screws③ into the 3 holes of the housing opening ② (fixation tourque = 1.4 - 1.6 Nm).
the upper vacuum/blower tube is now firmly connected to the housing. - Press the lower vacuum/blower tube④ onto the upper vacuum/blower tube ① until you hear the connections click into place.
2.3 Fitting the running wheel [Fig. A3]
There are 3 locks ① on the smaller blower tube of the vacuum/blower tube ④. The distance between the vacuum/blower tube ④ and the ground can be adjusted using the 3 locks ①.
- Slide the running wheel bracket⑤ onto the desired lock position of the lower vacuum/blower tube④.
- Screw the screw⑥ into the hole in the running wheel bracket ⑤ (fixation tourque = 1,4-1,6 Nm).
The running wheel is now fixed at the lock position.
2.4 Fitting the collecting bag [Fig. A4]
- Connect the collecting bag ⑦ with the bracket ⑧ on the inside of the ejector ⑨.
- Fold the bracket⑧ upwards until the lock⑩ on the ejector ⑨ snaps into place.
- Hang the hook⑪ in the bracket ⑫. The rubber band holds the collecting bag on the vacuum/blower tube.
2.5 Fitting the shoulder strap [Fig. A5]
The shoulder strap provides additional support when using the vacuum/blower. We recommend using the shoulder strap.
- Snap the hook ⑬ of the shoulder strap ⑮ into the bracket ⑭.
- Pull the shoulder strap ⑮ over one shoulder.
3. OPERATION

DANGER!
Risk of injury
Risk of injury if the product starts accidentally and hair, clothing or loose objects are sucked in. Wait until the rotor blades have come to a standstill. Remove the battery before making adjustments or transporting the machine.
→ The product may only be operated with the vacuum/blower tube assembled.
3.1 Charging the battery [Fig. O1/O2/O3]
![FLYMO 18V EasiBlowVac - Charging the battery [Fig. O1/O2/O3] - 1](/content/2026/05/986914/images/a5920c13c00b28afa65773b99c930c7d17b3a3c11328d4837f7d61e612db8dbe.jpg)
CAUTION!
Damage to property.
If the voltage of the power source does not match the specifications on the battery charger rating plate, the battery charger may be damaged.
→ Note the mains voltage.

DANGER!
Risk of injury.
You may trap your fingers when inserting the battery. → Mind your fingers.
Thanks to the intelligent charging process, the charge condition of the battery is automatically detected and then charged up with the optimal charge current depending on battery temperature and voltage. In this way, the battery is treated with care and remains permanently fully charged when it is stored in the charger.
- Press the release button ^A and remove the battery ^B from the battery holder ^D .
- Connect the battery charger© to a mains socket.
- Slide the battery ^⑧ onto the battery charger ^⑨ . When the battery charge indicator ^⑩ at the charger flashes green, the battery is being charged. When the battery charge indicator ^⑪ at the charger illuminates permanently green the battery is completely charged (charging time, see 7. TECHNICAL DATA).
- Examine the charge status regularly while you charge.
- When the battery ⑧ is fully charged, the battery ⑧ can be disconnected from the battery charger ⑨ .
3.2 Meaning of display elements
3.2.1 Battery charge indicator on the battery charger [Fig. O3]
| Flashing green light (fast) on battery charge indicator |
The fast charging procedure is indicated by fast flashing of the green battery charge indicator (Lc).
Note: Fast charging is only possible if the temperature of the battery is within the permissible charging temperature range; see "Technical data".
![FLYMO 18V EasiBlowVac - Battery charge indicator on the battery charger [Fig. O3] - 1](/content/2026/05/986914/images/1b3724bd530ff8031f3717850b710e90d4ba02c489a53a4d542f62f0902e01da.jpg)
| Flashing green light (slow) on battery charge indicator 10 |
When the battery level is approximately 80% the green battery charge indicator (Lc) flashes slowly. The battery can be removed for immediate use.
![FLYMO 18V EasiBlowVac - Battery charge indicator on the battery charger [Fig. O3] - 2](/content/2026/05/986914/images/629b0e60d2d0768a040679b2f747436a681d2e6d0546d6b89aee47d965c11b5a.jpg)
| Solid light of green battery charge indicator 1c |
The solid green light on the battery charging indicator ① indicates that the battery is fully charged.
![FLYMO 18V EasiBlowVac - Battery charge indicator on the battery charger [Fig. O3] - 3](/content/2026/05/986914/images/e16f7d397faa6f4187f516bc5a55d7f98796cf05757e57440858eb732a8b9954.jpg)
If the battery is not plugged in, the solid light of the battery charge indicator (C) signals that the mains plug is plugged into the wall socket and the charger is ready for operation.
| Solid light of red battery charge indicator ^Mk |
The solid light of the red battery fault indicator signals that the temperature of the battery is outside the permissible charging temperature range; see "Technical Data".
![FLYMO 18V EasiBlowVac - Battery charge indicator on the battery charger [Fig. O3] - 4](/content/2026/05/986914/images/1fecc500f0d4eead234a1731e679c9462d42a9bbca8a395a02880075cffe11c2.jpg)
As soon as the permissible temperature range is reached, the battery charger automatically switches to fast charging.
| Flashing red light of battery fault indicator ^TM |
The flashing light of the red battery fault indicator signals another fault in the charge cycle; see "Troubleshooting".
![FLYMO 18V EasiBlowVac - Battery charge indicator on the battery charger [Fig. O3] - 5](/content/2026/05/986914/images/3910a4836e44faeae1b5847f2663f6810a752ee0ee4b6f361c78d35be71a3c67.jpg)
3.2.2 Battery state of charge indicator on the product [Fig. A5 / O4]
After starting the machine, the battery state of charge indicator ^① is displayed on the control panel for 5 seconds.
Battery state of charge indicator Battery state of charge
| 11, 12 and 13 light up green | 67 – 100 % charged |
| 11 and 12 light up green | 34 – 66 % charged |
| 11 lights up green | 11 – 33 % charged |
| 11 flashes green | 0 – 10 % charged |
When the LED Ⓛ flashes green, the battery must be charged.
If the error LED Ⓞ is illuminated or flashing, see "6. TROUBLESHOOTING".
3.2.3 Buttons on the control panel Ⓟ [Fig. A5/O4]
On/Off button Ⓞ:
If the maintenance flap is open, the vacuum/blower cannot be started.
→ Press the On/Off button on the control panel.
The vacuum/blower starts and the battery state of charge indicator is displayed for 5 seconds.
→ Press the On/Off button on the control panel again.
The vacuum/blower stops.
Speed button ⑨:
The speed button can be used to adjust the speed of the motor to suit your requirements.
The low speed is ideal for blowing light leaves, for example on gravel. The high speed is ideal for large and wet leaves.
Speed Rotational speed LED display
| Low 8000 rpm No LED lights up | |
| Medium 11,500 rpm | 4 lights up |
| High 12,500 rpm | 9 and 10 light up |
Boost 14,500 rpm
⑬ also lights up
→ Press the speed button on the control panel.
Medium speed is activated and the LED ^⑩ lights up.
→ Press the speed button on the control panel again.
High speed is activated and the LEDs ^① and ^② light up.
→ Press the speed button on the control panel again.
Low speed is activated and no LED lights up.
Boost button ⓑ:
Boost mode temporarily increases the motor speed (for 15 seconds) for maximum vacuum/blowing power. Boost mode can be activated as often as required, but reduces the battery life.
→ Press the boost button on the control panel.
Boost mode is activated for 15 seconds and the LED Ⓤ lights up.
→ To end boost mode prematurely, press the boost button ⓑ on the control panel again.
Boost mode is disabled and the LED Ⓛ is not illuminated.
Boost mode is not possible with batteries < 4 Ah. Then Ⓦ lights up and Ⓗ flashes for 5 seconds.
3.3 Working position [Fig. O5/O6]
The collecting bag needs to be attached for blowing mode and vacuum mode.
3.3.1 Blowing mode
Use the vacuum/blower to blow dirt particles and grass clippings from pavements, driveways, patios etc., to blow grass clippings, straw and leaves together into piles or to remove dirt particles from corners, joints and gaps between bricks and wall stones.
→ Turn the switch to the Blow position

Use the speed control to increase or decrease the motor speed when using the machine with the blowing function.
You can regulate the airflow by directing the outlet opening of the tube more downwards or to one side.
When working, always move away from solid objects such as kerbs/pavements, large stones, vehicles and fences.
The best way to clean corners is to move outwards from the corner. This will prevent dirt from being blown into your face. Be careful when you work near plants. The force of the air flow could damage delicate plants.
3.3.2 Vacuum mode
Use your machine to vacuum up dry material such as leaves, grass, small twigs and pieces of paper.
→ Turn the switch to the Vacuum position
Boost mode can be used for optimum results when working with the vacuum function.
When vacuuming, move slowly forwards and backwards over the material. When working, avoid piles of dirt that can clog the device.
For optimum results, hold the vacuum tube of the machine about two centimetres above the ground.
3.4 Starting/stopping the vacuum/blower
3.4.1 Starting the vacuum/blower [Fig. A5/O1/O5]
We recommend using only 4 Ah batteries P4A PBA 18V/72 (Art. 14905) or larger.
- Insert the battery Ⓑ into the battery holder Ⓓ until you hear it click into place.
- Turn the switch to the desired position (see "3.3 Working position [Fig. 05/06]").
- Set the vacuum/blower on the running wheel ^16 and hold it with one hand on the rear handle ^17 and one hand on the front handle ^18 .
- Press the On/Off button ^⑤ on the control panel ①. The vacuum/blower starts and the battery state of charge indicator is displayed for 5 seconds.
3.4.2 Stopping the vacuum/blower
→ Press the On/Off button on the control panel again.
The vacuum/blower stops.
4. MAINTENANCE

DANGER!
Risk of injury
Risk of injury if the product starts accidentally and hair, clothing or loose objects are sucked in.
→ Wait until the rotor blades have come to a standstill. Remove the battery before servicing the product.
4.1 Cleaning the vacuum/blower

DANGER!
Risk of injury!
Risk of injury and risk of damage to the product.
→ Do not use water or a water jet (especially a high-pressure water jet) to clean the product. This can damage the product or allow water to penetrate the electrical components and cause corrosion or short circuits. Do not clean with chemicals, including petrol or solvents. Some can destroy critical plastic parts.
4.1.1 Cleaning the surface of the vacuum/blower [Fig. O1]
The airflow slots must always be clean.
- Clean the surface of the vacuum/blower with a damp cloth.
- Clean the ventilation slots ^⑲ with a soft brush (do not use sharp objects).
4.1.2 Cleaning the collecting bag [Fig. A4]
The collecting bag must be cleaned after each use.
The collecting bag must be emptied completely and cleaned to prevent ageing and blockage of the air flow.
- Pull the hanger ⑪ out of the bracket ⑫.
- Press the lock⑩ on the ejector⑨ and fold the bracket⑧ downwards.
- Remove the collecting bag⑦.
- Open the zip②1.
- Empty the collecting bag⑦.
- Turn the collecting bag⑦inside out.
- If the collecting bag is heavily soiled it can be cleaned with a wet brush.
- Hang the collecting bag⑦ up and allow it to dry completely before using it again.
- Install the collecting bag⑦ (see "2.4 Installing the collecting bag [Fig. A4]).
4.1.3 Cleaning the vacuum tube [Fig. A3]
- Carefully tap the vacuum tube④ to loosen any coarse dirt.
- Clean the inside of the vacuum tube④ e.g. with a wooden stick.
4.1.4 Cleaning the rotor chamber [Fig. M1]
The rotor chamber must be cleaned after each use.
To ensure full functionality, the rotor chamber must be free of dirt.
- Turn the lock screw@ anti-clockwise (approx. 10 turns).
- Open the maintenance flap②3.
- Clean the maintenance flap ^23 .
- Clean the rotor chamber and the rotor blades ^24 e.g. with a small bottle cleaning brush, especially behind the rotor.
- Clean the inside of the maintenance flap ^③ and pay particular attention to the screw joint of the safety screw ^② on the maintenance flap ^② .
-
Carefully clean the seal of the maintenance flap ②3
-
Close the maintenance flap ②3.
-
Tighten the locking screw ^② clockwise (approx. 5 turns).
A safety switch prevents starting when the maintenance flap is open or the locking screw is not tightened.
4.2 Cleaning the battery and the battery charger
The surface and contacts of the battery and of the battery charger must be clean and dry before connecting the battery to the battery charger.
→ Do not use running water.
4.2.1 Cleaning the battery
Do not use any chemical substances to clean the battery.
→ Use a soft, clean, dry brush to clean the ventilation slots and the contacts of the battery from time to time.
4.2.2 Cleaning the battery charger
→ Use a soft, dry cloth to clean the contacts and the plastic parts.
5. STORAGE
5.1 Shutting down
The product must be stored away from children.
- Remove the battery®.
- Charge the battery (see "3.1 Charging the battery [Fig. O1/O2/O3]).
- Empty the collecting bag and clean it (see "4.1.2 Cleaning the collecting bag [Fig. A4]).
- Clean the vacuum/blower, the batteries and the battery charger (see "4. Maintenance").
- Store the vacuum/blower, the batteries and the battery charger in a dry, enclosed and frost-proof place.
6. TROUBLESHOOTING

DANGER!
Risk of injury
Risk of injury if the product starts accidentally and hair, clothing or loose objects are sucked in. → Wait until the rotor blades have come to a standstill. Remove the battery before troubleshooting product errors.
6.1 Error table
Problem Possible Cause Remedy
| Loud noises, the vacuum/blower rattles. | Screws on the motor, the connections or the vacuum/blower arc loose. | → Have the screws tightened by an authorised specialist dealer or by FLYMO customer service. |
| The vacuum/blower runs unevenly or vibrates a great deal | Rotor blades are damaged or worn. | → Contact FLYMO customer service. |
| Screws on the vacuum/blower tube arc loose. | → Tighten the screws on the vacuum/blower tube. | |
| The rotor does not rotate freely | Dirt in the rotor chamber. | → Clean the rotor chamber. |
| Mechanical failure. → Contact FLYMO customer service. | ||
| Deterioration in suction performance | The collecting bag is full. | → Empty the collecting bag. |
| The collecting bag is dirty. | → Clean the collecting bag. | |
| Boost mode cannot be activated.Error LED lights up red, and LED flashes green for 5 seconds | Battery < 4 Ah. | → Use a 4 Ah battery or larger. |
| The vacuum/blower does not start, or it stops.LED flashes green [Fig. 04] | Battery is empty. → Charge the battery. | |
| The vacuum/blower does not start, or it stops.A lights up red [Fig. 04] | Battery temperature is outside the permissible temperature range. | → Wait until the battery temperature has dropped back to between 0°C and +45°C. |
| There are drops of water or moisture between the battery contacts. | → Remove the water drops or moisture using a dry cloth. | |
| Obstacle is blocking the motor. | → Remove the obstruction. | |
| The locking screw is not tightened. | → Tighten the locking screw. | |
Problem Possible Cause Remedy
| The vacuum/blower does not start, or it stops.Error LEDflashes red [Fig. 04] | The vacuum/blower is faulty. | → Contact FLYMO customer service. |
| The vacuum/blower does not start, or it stops.Error LEDdoesn't light up [Fig. 04] | Battery is defective. | → Replace the battery. |
| The vacuum/blower is faulty. | → Contact FLYMO customer service. | |
| Charging is not possible.Battery charge indicator lights up green continuously | The battery is not pushed onto the battery charger correctly. | → Push the battery onto the battery charger correctly. |
| Battery contacts are dirty | → Clean the battery contacts (e.g. by connecting and disconnecting the battery several times). Replace the battery if necessary.) | |
| Battery temperature is outside the permissible temperature range. | → Wait until the battery temperature has dropped back to between 0^ and +45^ . | |
| Battery is defective. | → Replace the battery. | |
| Charging is not possible.Battery charge indicator does not light up | The mains plug of the battery charger is not plugged in correctly. | → Insert the mains plug fully into the power outlet. |
| Socket outlet, mains cable or charger is defective. | → Check the mains voltage.→ Let the charger be checked if necessary, by an authorised specialist dealer or the FLYMO customer service. |
NOTE:
Repairs must only be done by FLYMO customer service departments or specialist dealers approved by FLYMO.
→ Please contact your FLYMO customer service centre in the event of other faults (see reverse).
- TECHNICAL DATA
| Cordless vacuum/blower | Unit | Value (Art. 9707657-01/ 9707658-01) | |
| Blow Mode | Vac Mode | ||
| Suction force | N | 5.4 | |
| Mulching ratio | 10.01 | ||
| Blowing speed | km/h | 250 | |
| Collecting bag volume | l | 30 | |
| Weight with collecting bag | kg | 3.56 | |
| Sound pressure level L_pA^1) | cB(A) | 80 | 82 |
| Uncertainty k_pA | cB(A) | 3 | 3 |
| Sound power noise level L_wR^2) :measured/guaranteed | cB(A) | 92 / 93 | 94 / 95 |
| Uncertainty k_wA | cB(A) | 1.0 | 0.9 |
| Hand/arm vibration a_vhw^1) | m/s^2 | <2.5 | <2.5 |
| Uncertainty k_vhw | 1.5 | 1.5 | |
Measurement methods according to: 1) EN IEC 62841-4-6 2) RL 2000/14/EC / S.I. 2001 No.1701
WARNING: The vibration and noise emissions during actual use of the machine can differ from the declared total value depending on the ways in which the machine is used; and need to identify safety measures to protect the operator that are based on an estimation of exposure in the actual conditions of use (taking account of all parts of the operating cycle such as the times when the machine is switched off and when it is running idle in addition to the trigger time).
| System battery | Unit | Value (PBA 18V 4.0Ah W-C) | |
| Battery voltage | V (DC) | 18 | |
| Battery capacity | Ah | 4.0 | |
| Number of cells (Li-Ion) | 10 | ||
| Appropriate POWER FOR ALL system battery chargers | AL 1810 CV / AL 1815 CV / AL 18V-20 / AL 1830 CV / AL 1880 CV / AL 18V-44 | ||
| System battery charger | Unit | Value (AL 1810 CV) | Value (AL 18V-20) |
| Mains voltage | V (AC) | 220 – 240 | 220 – 240 |
| Mains frequency | Hz | 50 – 60 | 50 – 60 |
| Rated Power | W | 26 | 50 |
System battery charger Unit Value (AL 1810 CV) Value (AL 18V-20)
| Battery charging voltage V (DC) 18 18 | |||
| Max. battery charging current mA 1000 2000 | |||
| Battery charging time (approx.) | |||
| PBA 18V 2.0Ah W-B | min. | 124 | 64 |
| PBA 18V 2.5Ah W-B | min. | 154 | 79 |
| PBA 18V 4.0Ah W-C | min. | 244 | 124 |
| Permitted charging temperature range | °C 0 - 45 0 - 45 | ||
| Weight g 170 | 210 | ||
| Protection class | ☐/II | ☐/II | |
| Suitable POWER FOR ALL system PBA 18V batteries | PBA 18V | PBA 18V | |
- ACCESSORIES/SPARE PARTS
| FLYMO Replacement Collecting Bag | As a replacement for a damaged collecting bag. | Art. 00054-78.773.02 |
| FLYMO System BatteryP4A PBA 18V/45P4A PBA 18V/72 | Battery for additional duration or for replacement. | Art. 14903Art. 14905 |
9. WARRANTY/SERVICE
9.1 Product registration
Please register your product at:
https://www.flymo.com/uk/c/support/warranty
9.2 Service
Please find the current contact information of our service on the back page and online:
https://www.flymo.com/uk/content/contact-us
10. DISPOSAL
10.1. Disposal of the product
(in accordance with Directive 2012/19/EU/S.I. 2013 No. 3113)

The product must not be disposed of to normal household waste. It must be disposed of in line with local environmental regulations.
IMPORTANT!
→ Dispose of the product through or via your municipal recycling collection centre.
10.2. Disposing of the battery

The battery contains lithium-ion cells that should not be disposed of with normal household waste at the end of its life.
Li-ion
IMPORTANT!
- Discharge the lithium-ion cells fully (contact FLYMO customer service about this).
- Ensure that the lithium-ion cell contacts do not short-circuit by placing tape over them.
- Dispose of the lithium-ion cells properly at or through your local recycling collection point.
11. ANNEX
11.1. EU - Declaration of Conformity
| CE The undersigned GARDENA Germany AB, PO Box 160 89,S-103 92, Stockholm, Sweden hereby certifies that, when leaving our factory, the unit(s) indicated below is/are in accordance with the harmonised EU guidelines, EU standards of safety and product specific standards.This certificate becomes void if the units are modified without our approval. | |
| Description of the unit: | Battery Garden Blower-Vacuum |
| Type: | 18V EasiBlowVac |
| Article number: | Art. 970765801 |
| EU directives: | 2006/42/EG2014/30/EU2011/65/EU2000/14/EG |
| Harmonised Standard: | EN ISO 12100EN 62841-1EN IEC 62841-4-6 |
| Noise level: measured / guaranteed: | Art. 970765801: 94 dB(A) / 95 db(A) |
| Conformity Assessment Procedure: | According to 2000/14/EC Art.14 Annex V |
| Deposited Documentation: | GARDENA Manufacturing GmbHTechnische Dokumentation,A. OchsHans-Lorenser-Str. 4089079 Ulm / Germany |
| Year of CE marking: | 2024 |
| Ulm, 16.11.2024 | Martin Lienhard,Senior Vice President,Business Unit Electric and Battery |
11.2. UKCA - Declaration of Conformity
| UKCA | Declaration of Conformity [only for UK]The manufacturer: GARDENA Germany AB, PO Box 160 89,S-103 92, Stockholm, Sweden hereby certifies that, when leaving our factory, the unit(s) indicated below is/are in accordance with the UK Regulations, designated standards of safety and product specific designated standards.This certificate becomes void if the units are modified without our approval. | |
| Description of the product: | Battery Garden Blower-Vacuum | |
| Type: | 18V EasiBlowVac | |
| Article number: | Art. 970765801 | |
| UK regulations: | S.I. 2008/1597S.I. 2016/1091S.I. 2012/3032S.I. 2001/1701 | |
| Designated standards: | EN ISO 12100EN 62841-1EN IEC 62841 4 6 | |
| Noise level: measured / guaranteed | Art. 970765801: 94 dB(A) / 95 db(A) | |
| Conformity Assessment Procedure: | According to S.I. 2001/1701Art. 11 Schedule 8 | |
| Dokumentation Deposited: | GARDENA Manufacturing GmbHTechnische DokumentationA. OchsHans-Lorenser-Str. 40D-89079 Ulm | |
| UK Importor:Authorised representative | Husqvarna UK LimitedPreston Road,Aycliffe, County DurhamUK DL5 6UP | |
| Ulm, 18.11.2024 | Martin LienhardSenior Vice PresidentBusiness Unit Electric and Battery | |

Flymo®
Service Address and
Importer to Great Britain
Husqvarna UK Ltd
Preston Road
Aycliffe Industrial Park
Newton Aycliffe
County Durham
DL5 6UP
customer.services@husqvarna.co.uk

52895-85.960.02/1124
Husqvama AB
Drottninggatan 2
SE-561 82 Huskvarna
Sweden
Our policy of continuous improvement means that the specification of products may be altered from time to time without prior notice.
Copyright © 2024 FLYMO S.A. All rights reserved.
Flymo ^® and other product and feature names are registered or unregistered trademarks of FLYMO S.A.
- en
- en Battery Garden Blower-Vacuum EasiBlowVac P4A
- Original operator's manual
- SAFETY INSTRUCTIONS
- Symbols on the product
- General safety instructions
- General machine safety instructions
- WARNING! Read all safety w
- Save all warnings and instructions for future reference.
- 1) Work area safety
- 2) Electrical safety
- 3) Personal safety
- 4) Machine use and care
- 5) Battery tool use and care
- 6) Service
- Garden blower, garden vacuum and garden blower/vacuum safety warnings
- Additional safety instructions
- Intended use
- Use as a garden blower:
- Use as a leaf vac:
- DANGER!
- Risk of injury!
- Safety instructions for batteries and battery chargers:
- Additional electrical safety instructions
- Risk of cardiac arrest!
- Additional personal safety instructions
- Risk of suffocation!
- ASSEMBLY
- Risk of injury
- Scope of supply
- Assembling the vac/blower tube [Fig. A1/A2]
- Fitting the running wheel [Fig. A3]
- Fitting the collecting bag [Fig. A4]
- Fitting the shoulder strap [Fig. A5]
- OPERATION
- Charging the battery [Fig. O1/O2/O3]
- CAUTION!
- Damage to property.
- Risk of injury.
- Meaning of display elements
- Battery charge indicator on the battery charger [Fig. O3]
- Battery state of charge indicator on the product [Fig. A5 / O4]
- Buttons on the control panel Ⓟ [Fig. A5/O4]
- On/Off button Ⓞ:
- Speed button ⑨:
- Boost button ⓑ:
- Working position [Fig. O5/O6]
- Blowing mode
- Vacuum mode
- Starting/stopping the vacuum/blower
- Starting the vacuum/blower [Fig. A5/O1/O5]
- Stopping the vacuum/blower
- MAINTENANCE
- Cleaning the vacuum/blower
- Cleaning the surface of the vacuum/blower [Fig. O1]
- The airflow slots must always be clean.
- Cleaning the collecting bag [Fig. A4]
- Cleaning the vacuum tube [Fig. A3]
- Cleaning the rotor chamber [Fig. M1]
- Cleaning the battery and the battery charger
- Cleaning the battery
- Cleaning the battery charger
- STORAGE
- Shutting down
- The product must be stored away from children.
- TROUBLESHOOTING
- NOTE:
- WARRANTY/SERVICE
- Product registration
- Service
- DISPOSAL
- Disposal of the product
- IMPORTANT!
- Disposing of the battery
- Li-ion
- ANNEX
- Flymo®
- Service Address and
- Importer to Great Britain
Brand : FLYMO
Model : 18V EasiBlowVac
Category : Leaf blower