Mobile - Logiciel photo/vidéo IDIS - Free user manual and instructions
Find the device manual for free Mobile IDIS in PDF.


| Product Type | Photo/Video Software for Mobile Devices |
| Brand | IDIS |
| Model | Mobile |
| Category | Photo/Video Software |
| Compatible OS | iOS and Android |
| Manual Format | PDF (16 pages) |
| Manual Language | English (original), multilingual translations available |
| User Rating | 9.5/10 |
| Main Functions | Photo capture, video recording, editing, playback, cloud integration |
| Security Features | User authentication, secure storage, data encryption |
| Maintenance | Regular updates via app store; clear cache as needed |
| Spare Parts & Repairability | Not applicable (software); reinstall if corrupted |
| Installation | Download from official app store (Google Play/App Store) |
| Supported File Formats | JPEG, PNG, MP4, MOV |
| Developer | IDIS (a Hanwha Techwin company) |
Frequently Asked Questions - Mobile IDIS
User questions about Mobile IDIS
0 question about this device. Answer the ones you know or ask your own.
Ask a new question about this device
Download the instructions for your Logiciel photo/vidéo in PDF format for free! Find your manual Mobile - IDIS and take your electronic device back in hand. On this page are published all the documents necessary for the use of your device. Mobile by IDIS.
USER MANUAL Mobile IDIS
Before reading this manual
IDIS Mobile for Android is an app for connecting to a device (NVR or network camera) using mobile device running on Android platform and remotely monitoring videos via a network connection.

Connecting to certain devices may not be supported depending on device's specifications and version.
System Requirements
| OS Google Android 4.1 ~ (JellyBean ~) | |
| Processor ARMv7 with NEON support compatible processor | |
| Display 480x320 pixels~ (320dp ~) | |
| Storage 150MB or more | |
| Network Wi-Fi or mobile network (3G or 4G) provided by the Android mobile device |
1 Open the Play Store (Google Play) on your Android device.
2 In Play Store (Google Play), enter IDIS Mobile in the search field.
3 Install IDIS Mobile and open it.
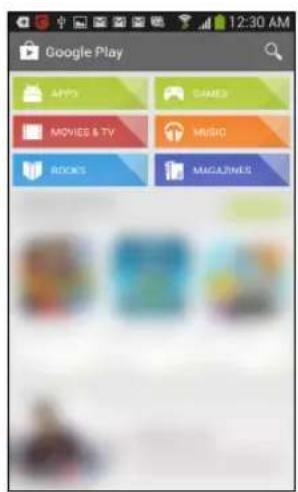

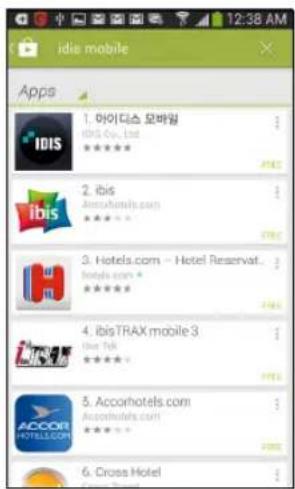

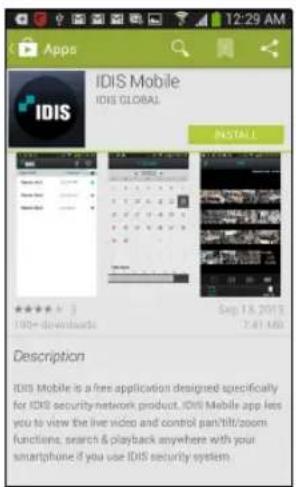

To uninstall IDIS Mobile, go to Settings → Applications → Manage applications. Select IDIS Mobile and press Uninstall.

This service requires heavy data traffic, and using a Wi-Fi connection is recommended. Using wireless internet (3G, LTE) may result in excessive data charges.
Launch IDIS Mobile. The following start-up screen will appear.
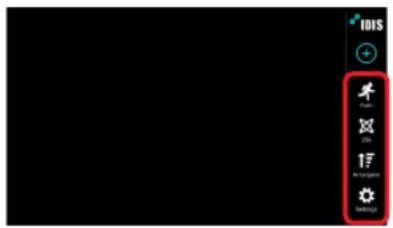
Menu Bar
(Push Message): For reading push messages.
(Two-factor Authentication): For checking two-factor authentication. For more details, refer to Two-factor Authentication below.
(Arrangement): Arranges the device list. For more details, refer to Arrangement below.
(Settings): Change settings of IDIS Mobile or view information.
Push Message
It is possible to receive device-event alerts on the mobile device as push messages. To enable push messages, configure IDIS Mobile as described below.

This feature is available only with devices that support push messaging and needs to be set up beforehand in order to function correctly. For more information, refer to the concerned device's operation manual.
1 Select a device on the device list. From the menu that appears, select Edit and then check the Use Push option to (On).

flowchart
graph LR
    A["TestSite 10.8.127.161"] --> B["View"]
    B --> C["View"]
    C --> D["Use Push"]
    D --> E["View"]
    E --> F["Use Push"]
    F --> G["View"]
    G --> H["Use Push"]
    H --> I["View"]
2 When a device event occurs, Push Message button will be shown on the menu bar on the right, along with Tap on the button to read the push message.
Two-factor Authentication
It is possible to register a user's mobile device as a Two-factor Authentication device. To register, configure IDIS Mobile as described below.

This feature is available only with devices that support the Two-factor Authentication and needs to be set up beforehand in order to function correctly. For more information, refer to the concerned device's operation manual.
1 Press the ☑(two-factor Authentication) button. Devices that support the Two-factor Authentication are displayed with the menu as below.
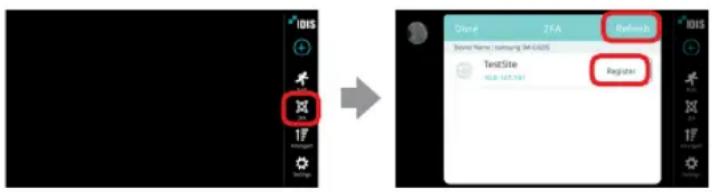
- Register: Press the Register button while the device is ready for the registration. The Register button changes into the Verification button when the mobile device is successfully registered.
- Refresh: Press the Refresh button on the menu bar to update the device list for Two-factor Authentication.
2 When the registration is complete, the menu changes as below.
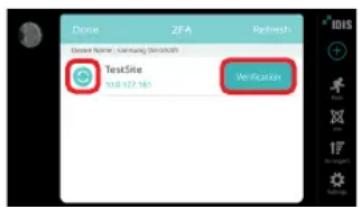
- Verification: Press the Verification button for the Two-factor Authentication.

(Reset): Resets the Two-factor Authentication status.

It only resets the Two-factor Authentication status on IDIS Mobile.
Setup
Press Settings on the menu bar on the right to check the settings of IDIS Mobile and make changes if necessary.
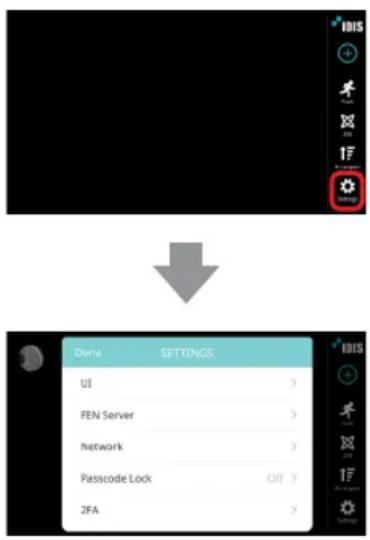
- UI: Changes the device list UI.
- FEN Server: If the device is using an additional FEN server, enter the FEN server information. (Default site: fen.idisglobal.com, Default port number: 10088)

For more details, contact your FEN server administrator.
- Network: Sets the cellular data use, bandwidth limit and auto logout time.
- Passcode Lock: Sets the lock on IDIS Mobile app and its passcode.
- 2FA: Sets a Two-factor Authentication device name.
- Push Messages: Sets a method of alert when receiving a push message.
- Decoder: Enable/disable HEVC H/W decoder use.
- Export Settings: Saves IDIS Mobile's settings as a file. The setting file will be sent via email, and email account should be set up in prior for this option to work.
Device Registration
1 Press the View Registration) button on the menu bar on the right. The following menu will appear.
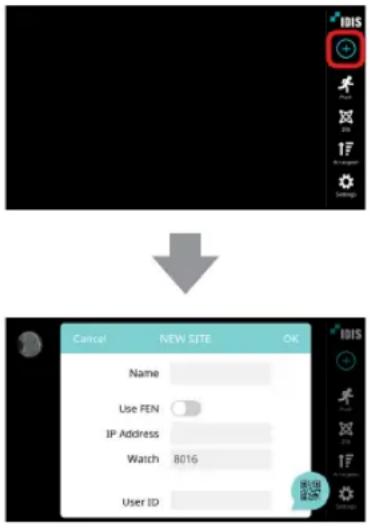
- Name: Enter a name of the device to be used in IDIS Mobile.
- Connection Info: Configure FEN, remote address, and remote port settings.

- Deselect the checkbox if FEN (For Easy Network Service) is not enabled on the device. If using a separate FEN server, tap 📋 (Settings) to configure FEN server settings (Default site: fen.idisglobal.com, Default port number: 10088). For more details, contact your FEN server administrator.
-
If FEN feature is not enabled on the device, deselect Use FEN checkbox and enter the device's IP address under Address. Default value is recommended for the Port setting.
-
Accounts: Enter the User ID and Password used to login to the device.
- QR Code: Scan a QR code to automatically enter the device information.

This function is supported only for the devices that support QR code.
2 To modify information about registered devices, select the device from the device list. When the menu appears, select Edit and modify the device information.
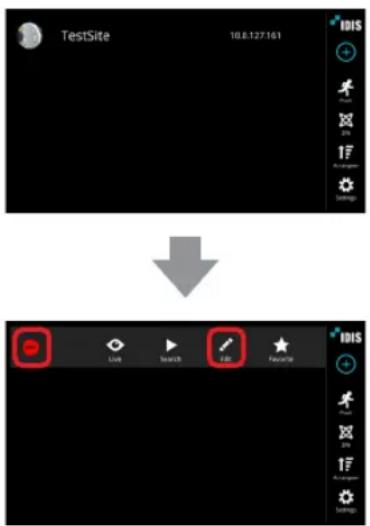
- (Delete): Delete a device.
Arrangement
Press Arrangement on the menu bar on the right to arrange the device list.
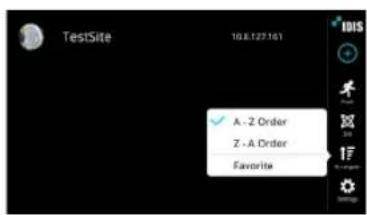
- A - Z Order: Arranges the list in ascending alphabetical order.
- Z- A Order: Arranges the list in descending alphabetical order.
- Favorite: Arranges the favorite devices on top of the list.
Grid UI
1 Select the site view mode UI between Grid and List.

flowchart
graph LR
    A["TestSite 16.8-127:161"] --> B["Device Settings"]
    B --> C["Device Uf Grid List"]
- Grid: Displays the remote devices as a grid UI.
- List: Displays the remote devices as a list UI.
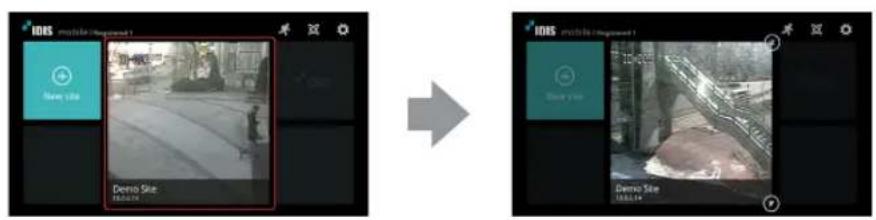
2 Press and hold a device on the device list to change into the modification mode, then the device will shake. In the modification mode, you can change size, and move the device. Tap once to go back to the normal mode.
![IDIS middle [ registered ] Demo Site 100.14 Demo Site 100.14](/content/2026/05/986843/images/d18530a922932342cbb5f6445383f13da9f9cd3e61855ea52a80a21ceee732aa.jpg)
- Size Change: To change the size, press the arrow button on the bottom right of the device in the modification mode.
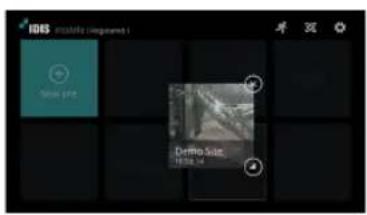
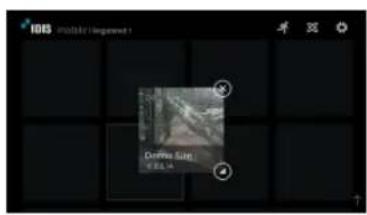
- Move: Drag and drop the device on a desired position in the modification mode.

Drag the device from top to bottom in the modification mode to scroll the list up and down.
- Delete: Press the Delete button on the top right corner of the device to delete it.
3 Select a device from the device list and press the favorite) button from the menu bar. Select a device from the Favorite list to display the menu below.
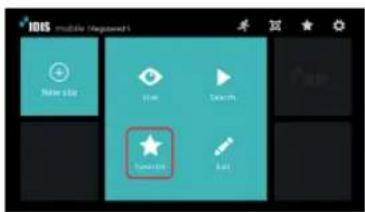
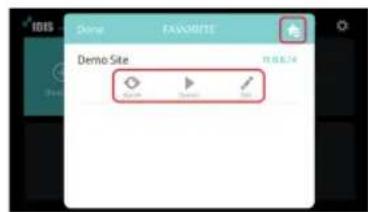
• Live: Go to Live.
• Search: Go to Search.
• Edit: Edit the device information.
• : Display the Disable Favorite button.
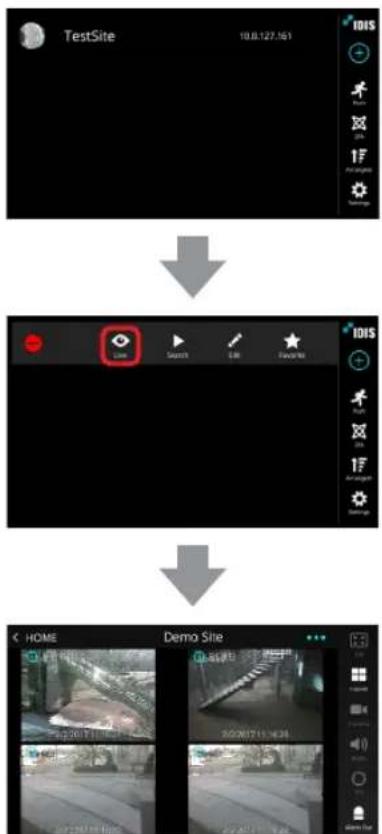
Select a device on the device list. When the menu appears on the screen, select Live. The live video from the selected device will be displayed on the screen.
flowchart
graph TD
    A["TestSite"] --> B["Search"]
    B --> C["Action"]
    C --> D["Favorite"]
    D --> E["Demo Site"]
- Screen: Tap the screen to view video from the current camera in 1x1 layout. See below for information on screen controls.
| Return to the previous screen | Tap the mobile device's Cancel button |
| Go to previous or next camera group | Drag the screen to up and down |
| Hide/show the camera's OSD (1x1 layout only) | Tap on camera screen. |
| Original Screen/Full Screen Repeatedly | tap twice on camera screen |
| Disconnect and return to startup menu | Tap ◀ (Back) on the menu bar on the right |
| Digital Zoom (1x1 layout only) | Press two points on the screen and drag to zoom in/out |
: Show camera in full screen view.

Only supported in 1x1 layout.
- : Change screen layout. Press the button to change to the next layout.
: Show list of camera channels. Press the desired channel to view videos from the selected camera.
: In PTZ Mode, you can control PTZ cameras.

- Only supported in 1x1 layout.
- This function is not supported if a PTZ camera was not configured on the device. The PTZ icon is displayed on the camera screen if PTZ mode is supported.
: Supports two-way audio communication with the device.

- Only supported in 1x1 layout.
- Layout or camera channel cannot be changed while in Two-way Audio mode. Changing the camera channel automatically disables two-way audio mode.
- Enable/disable alarm outs and beeps on devices that support alarm out.

Some functions may not be supported depending on the device specifications or version. If a function is not supported, buttons for unsupported functions are either not shown or deactivated.
From Live screen, press the ⋯ (Menu) button on your mobile device. This makes it possible to use Search and Capture and NVR Audio features.
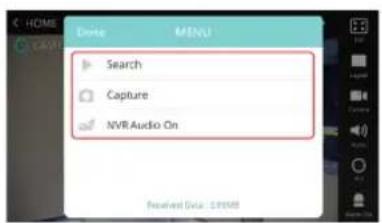
- Search: Switches over to the device's search screen.
- Capture: Captures the current frame. Captured frames are saved under /Pictures/IDIS Mobile/.
- NVR Audio: Supports two-way audio communication with a device.

- This feature is only available for the devices that support NVR Audio. - Tap to turn on the feature and tap again to turn off.
- Received Data: Displays the current connection's network usage.
PTZ Control
1 Tap the PTZ Mode, you can control PTZ cameras.
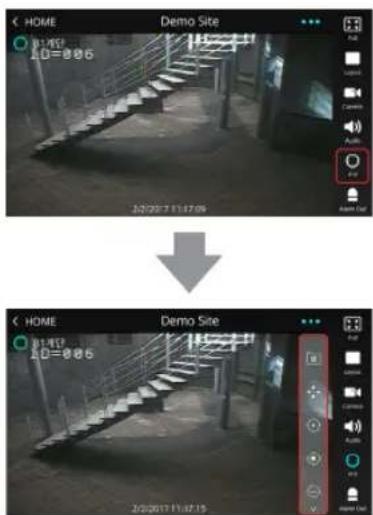
Pan): Displays 8 direction buttons. Touch the screen to move the camera screen when the Pan button is not selected.
(View Presets): Show list of device's presets. Press the preset to pan the PTZ camera to the preset position.
/ (Zoom In/Out): Zoom in or out on the video. Place two fingers on the screen and move them closer or farther apart to zoom in/out.
/ (Near/Far Focus): Change the camera's focus between near and far.
/ (Close/Open Aperture) Close or open aperture.
Fisheye Camera Control
Watch
Tap ☐ PTZ Mode, you can control Fisheye cameras. The original fisheye video is displayed at the right top of the screen and the rectangle indicates the currently monitored area.
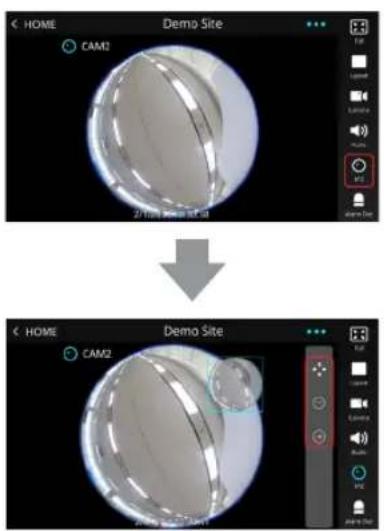
| Return to the previous screen Tap the mobile device's Cancel button | |
| Show/hide OSD on the subject camera Tap on camera a screen | |
| Disconnect and return to startup menu | Tap (Back) on the menu bar on the right |
| Digital Zoom | Press two points on the screen and drag to zoom in/out |
Event Query
You can search events by pressing a Search & Play modes. If the device is a network camera, only the events that occurred while video is recorded on SD Memory Card can be searched.    Event Query: Specify event-search parameters. To select cameras and events, press the Next button on the title bar. - From / To: Define the search range by specifying the starting and ending times and dates. To search the entire recording data, select the First and Last options. - Select Cameras: Designate the target camera. To designate all cameras, press the All button. - Select Event: Specify the type of the target event. To designate all events, press the All button.      Event: Events are displayed on the list. - Search: Enter the search query. Event-recording entries that match the query are shown. - Event List: Select an event from the list to play the corresponding recording. Tap Next at the bottom to see the next set of results (up to 100). - Refresh: To search again using the same parameters, tap Menu on the mobile device and then select Refresh.Calendar Search
You can search videos recorded from specific date and time by pressing Button in Search & Play modes.        1 Dates that contain recording data are displayed in the mint color. Select a date from the calendar and press the Next button to see a time graph of the available recording. 2 Press the time display and select the Hour/Minute/Second. 3 Press on the time graph to select the specific hour. 4 Press the Go to button. The video recordings for the selected time will be displayed on the screen.  IDIS Co., Ltd. For more information, please visit at www.idisglobal.com- Before reading this manual
- Menu Bar
- Push Message
- Two-factor Authentication
- Setup
- Device Registration
- Press the View Registration) button on the menu bar on the right. The following menu will appear.
- To modify information about registered devices, select the device from the device list. When the menu appears, select Edit and modify the device information.
- Arrangement
- Grid UI
- PTZ Control
- Fisheye Camera Control
- Watch
- Search
- Event Query
- Calendar Search
Brand : IDIS
Model : Mobile
Category : Logiciel photo/vidéo