PPCNET-D - Media player Allsee - Free user manual and instructions
Find the device manual for free PPCNET-D Allsee in PDF.


| Product Type | Digital Signage Media Player |
| Model | PPCNET-D |
| Brand | Allsee |
| Power Supply | DC 12V via included power adapter |
| Supported Video Formats | MP4, AVI, MPG (MPEG-1, MPEG-2, MPEG-4, XVID, H.264) |
| Supported Image Formats | JPEG (Baseline, RGB, max DPI 300) |
| Max Resolution | 1920x1080 (landscape), 1080x1920 (portrait) |
| Audio Support | AAC, MP3 |
| Connectivity | HDMI, LAN, USB (x2), USB OTG, Wi-Fi, 4G (via antenna), IR, Audio out |
| Storage | Internal memory, supports TF card and USB drives (FAT32, <16GB recommended) |
| Remote Control | Included with AAA batteries |
| Wi-Fi Antenna | Included |
| Playback Modes | Loop playback, scheduled playlists, manual control |
| Screen Rotation | 0°, 90°, 180°, 270° |
| Real Time Clock Display | Configurable (off, top-left, top-right, bottom-left, bottom-right) |
| Power Scheduling | Daily/weekly on/off timer |
| Volume Scheduling | Adjustable per time period |
| Sync Function | Host/slave mode for multi-screen synchronization |
| Content Management | Compatible with CMS (mysignageportal.com) and included playlist editor software |
| Cleaning | Unplug before cleaning; use soft dry cloth; avoid chemicals |
| Safety | Ventilation required; keep away from water and heat sources; unplug during storms |
Frequently Asked Questions - PPCNET-D Allsee
User questions about PPCNET-D Allsee
0 question about this device. Answer the ones you know or ask your own.
Ask a new question about this device
Download the instructions for your Media player in PDF format for free! Find your manual PPCNET-D - Allsee and take your electronic device back in hand. On this page are published all the documents necessary for the use of your device. PPCNET-D by Allsee.
USER MANUAL PPCNET-D Allsee
Model: PPCNET-D Media Player
Warning! Important Safety Instructions

Please take a moment to carefully read and understand the following safety instructions before using your digital screen:
Ventilation:
The slots and openings on the back or bottom of the screen is designed to provide necessary ventilation. To ensure the reliable operation of the device and prevent overheating, it is crucial that these slots and openings are never blocked or covered.
Avoid placing the screen in confined spaces like bookcases or built-in cabinets, unless proper ventilation is available.
Keep the screen away from radiators and heat registers
Water and Moisture:
Do not place vessels (such as vases) containing water on the screen, as this can result in fire or electric shock.
Avoid exposing the screen to rain or placing it near water sources like bathtubs, washbowls, kitchen sinks, laundry tubs, wet basements, or swimming pools. In case of accidental exposure to water, immediately unplug the device and contact an authorized dealer.
Electrical Safety:
Avoid overloading wall outlets, extension cords, or adapters beyond their capacity, as this can lead to fire or electric shock.
Ensure that power-supply cords are positioned in a way that prevents them from being walked on or pinched. Pay attention to cords at the plug end, wall outlets, and where they exit the device.
During lightning storms or when leaving the screen unused for extended periods, unplug it from the wall outlet and disconnect the antenna or cable system to prevent damage from lightning or power line surges.
Never touch the inside of the screen, as it may result in electric shock. Only qualified technicians should open the device.
Always firmly plug in the power cord and pull the plug, not the cord itself, when disconnecting from the wall outlet. Avoid touching the power cord with wet hands.
If the screen does not operate normally, emits unusual sounds or smells, immediately unplug it and contact an authorized dealer or service center.
Installation Considerations:
For information on installing the screen in environments with heavy dust, extreme temperatures, high humidity, or chemical substances, please contact customer service. Failure to do so may cause serious damage to the screen.
Use only properly grounded plugs and wall outlets to ensure safety and prevent electric shock or equipment damage (Class I Equipment only).
When turning off the screen completely, disconnect it from the wall outlet. Ensure easy access to the wall outlet and power plug for quick unplugging if needed.
Avoid dropping or striking the product. In case of damage, disconnect the power cord and contact customer service.
Cleaning and Maintenance:
Before cleaning, unplug the power cord from the wall outlet. Use a soft, dry cloth to wipe the product. Do not use chemicals like wax, benzene, alcohol, thinners, insecticides, air fresheners, lubricants, or detergents, as they can damage the panel's appearance or erase printing on the product.
Prevent exposure of the screen to dripping or splashing liquids.
Keep the display away from heat sources and place it in a stable, well-ventilated location.
Handle the product with care, as it contains glass.
The holes or openings on the display are designed for ventilation. Do not cover or block them with any objects.
Remove any protective covering from the screen before using the display.
Power supply must be shut off before cleaning. Use a soft, lint-free cloth for screen wiping. If needed, you may use a glass cleaner, but avoid spraying it directly onto the display surface. Refer to Section 7.10 for more details.
Do not attempt to repair the product yourself, as improper disassembly may void the warranty and pose potential dangers.
If you encounter a problem that cannot be resolved using the provided troubleshooting guidelines, please contact your supplier.
Attention:
For displays intended for installation in windows, it is crucial to mount the panel surface a minimum of 100mm away from the inside of the window. However, we strongly recommend maintaining a distance of 200mm to ensure adequate air circulation between the display and the window. Failure to comply with these guidelines may result in failure, which will be considered user damage.
Performing the initial setup
This section of the guide is to allow swift set up and use of the unit. Please refer to the main part of the User Guide for full information on use of the unit.
Please follow the steps detailed below:
- Unpack unit and place in desired location.
- Take the power lead from the accessories bag then connect the power lead into the media player (and into a mains outlet. The unit will power on automatically.
- Make sure the files you wish to play are supported by the unit as shown in the Supported Media Files table (Section 4.0)
- On a PC/Laptop copy the files you want to play onto an empty USB drive. These should be in the root directory (without putting them into a folder). Remove the USB from the PC once copied over.
- Insert the USB drive into the one of the USB ports located on the rear of the unit.
- The screen should indicate that it is copying the files onto the unit. Once completed, the screen will display a message to remove the USB drive.
- Remove the USB drive and the unit will play the stored files on a loop.
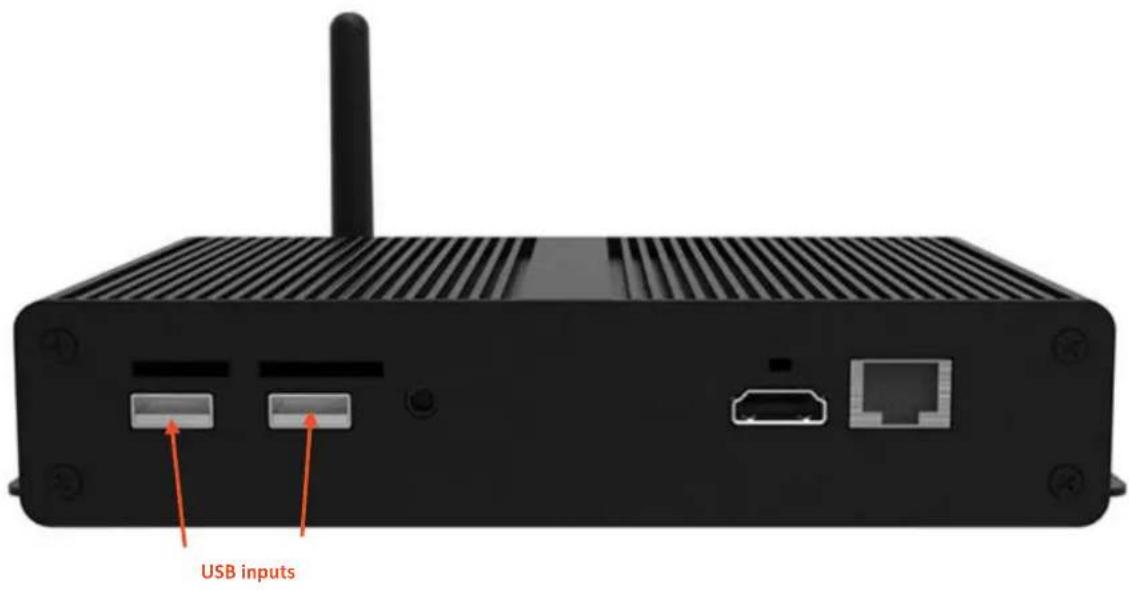
Figure 1 Position of USB ports
Table of Contents
Performing the initial setup....3
1. Introduction......7
1.1 Box Contents: 7
1.2 Remote Control 8
1.3 Replacing the Remote-Control Battery....9
Digital Signage Player Application....10
1.4 Home Screen.... 10
1.4.1 System Menu Operation 11
1.5 Settings – Basic 12
1.5.1 Screen Rotation.... 12
1.5.2 Server Setting.... 13
1.5.3 Date & Time 14
1.5.4 System 15
1.5.5 Exit.... 15
1.6 Main Menu – Senior 16
1.6.1 System.... 16
1.6.2 Screen Resolution.... 17
1.6.3 Real Time Clock 17
1.6.4 Display Language.... 18
1.6.5 Play Mode 18
1.6.6 Play Time 19
1.6.7 Machine Number 19
1.6.8 Machine ID 19
1.6.9 Machine Name.... 19
1.6.10 Play Log 20
1.6.11 USB 20
1.6.12 Scroll Text Setting 20
1.6.13 Touch Operation Tool 20
1.6.14 Auto Start 21
1.6.15 Sync Settings 21
1.6.16 Webview Settings.... 22
1.6.17 Content Storage 23
1.6.18 Restore To Factory Settings 23
1.6.19 Power 23
1.6.20 Strategy 25
1.6.21 WI-FI Setting.... 26
1.6.22 Server 27
1.6.23 File 28
1.6.24 Exit.... 28
-
Supported Media Files 29
-
Copying Files from a USB Drive.... 30
-
Advertising LCD Playlist Editor Software 32
4.1 Main Menu 32
4.2 Creating Playlists.... 33
4.2.1 Add Schedule 33
4.2.2 Add Selected Items 34
4.2.3 Saving 38
4.2.4 Editing Playlists.... 38
- F.A.Qs....39
5.1 Why is my screen displaying "Error (Screen Mode Mismatch)"? 39
5.2 How do I play PowerPoint presentations on my display? 40
5.3 Video Format Conversion 42
5.4 Connecting the screen to a PC.... 47
5.5 My media file does not fit properly on the screen. 47
5.6 My media file will not display or is missing from the playlist. 47
5.7 My media files will not update....47
5.8 How should I maintain and clean my screen?......Error! Bookmark not defined.
6. Other Information 48
6.1.1 Decreasing power consumption 48
6.1.2 Disposal 48
6.1.3 Warnings 48
1. Introduction
We would like to extend our congratulations on your recent purchase of our product. Before using it for the first time, we kindly request you to read the manual thoroughly and follow all provided instructions.
To ensure the proper functioning and longevity of the product, please take note of the following guidelines:
Avoid exposing the product to liquids in the form of dripping or splashing. It is essential to keep the product away from any objects that contain liquids, such as vases.
Attention:
Please refrain from making unnecessary changes to the default settings.
During both installation and use, it is crucial to keep the product away from water sources.
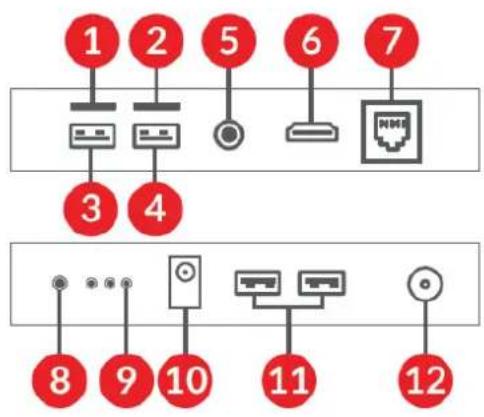
1.1 Box Contents:
1 x PPCNET-D Media Player
1 x Power Adapter
1 x Remote Control (with 2xAAA batteries)
1 x WI-FI Antenna
1 x QR Code for User Manual
1 TF Card
2 Sim Card
3 USB
4 USB OTG
5 Audio
6 HDMI
7 LAN
8 IR Extension
9 IR
10 DC 12V
11 USB x2
12 4G/Wifi
Figure 2 Inputs Overview
flowchart
graph TD
    A["1"] --> B["Server"]
    C["2"] --> D["Server"]
    E["5"] --> F["Switch"]
    G["6"] --> H["Router"]
    I["7"] --> J["Switch"]
    K["3"] --> L["4"]
    M["8"] --> N["Switch"]
    O["9"] --> P["Switch"]
    Q["10"] --> R["Switch"]
    S["11"] --> T["Switch"]
    U["12"] --> V["Switch"]
1.2 Remote Control
| Illustration | Icon | Definition |
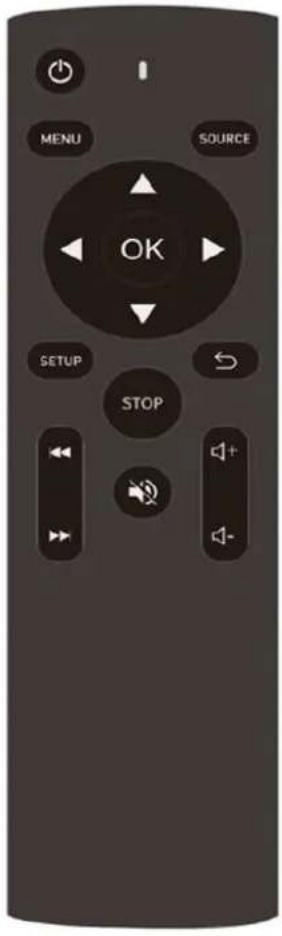 |  | Power on/off |
 | Display the screens menu | |
 | Input/Channel | |
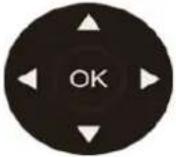 | Navigation and selection button | |
 | Digital Signage setup menu | |
 | Exit | |
 | Stop the current playlist | |
 | Mute the volume | |
 | Previous/Next Content | |
 | Volume Increase/Decrease |
Figure 3 Remote Control Overview
1.3 Replacing the Remote-Control Battery
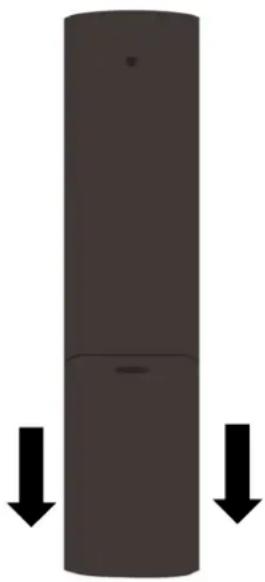
- Slide the battery cover off.
natural_image
Simple diagram of a vertical cylindrical object with two downward arrows indicating downward motion (no text or symbols)- Remove the used batteries.
- Insert the two new AAA batteries with their terminals corresponding to the indicators.
- Put the cover back on.
Figure 4 Changing Batteries
Digital Signage Player Application
1.4 Home Screen
The Home Screen has different areas which provide information about the screen status.
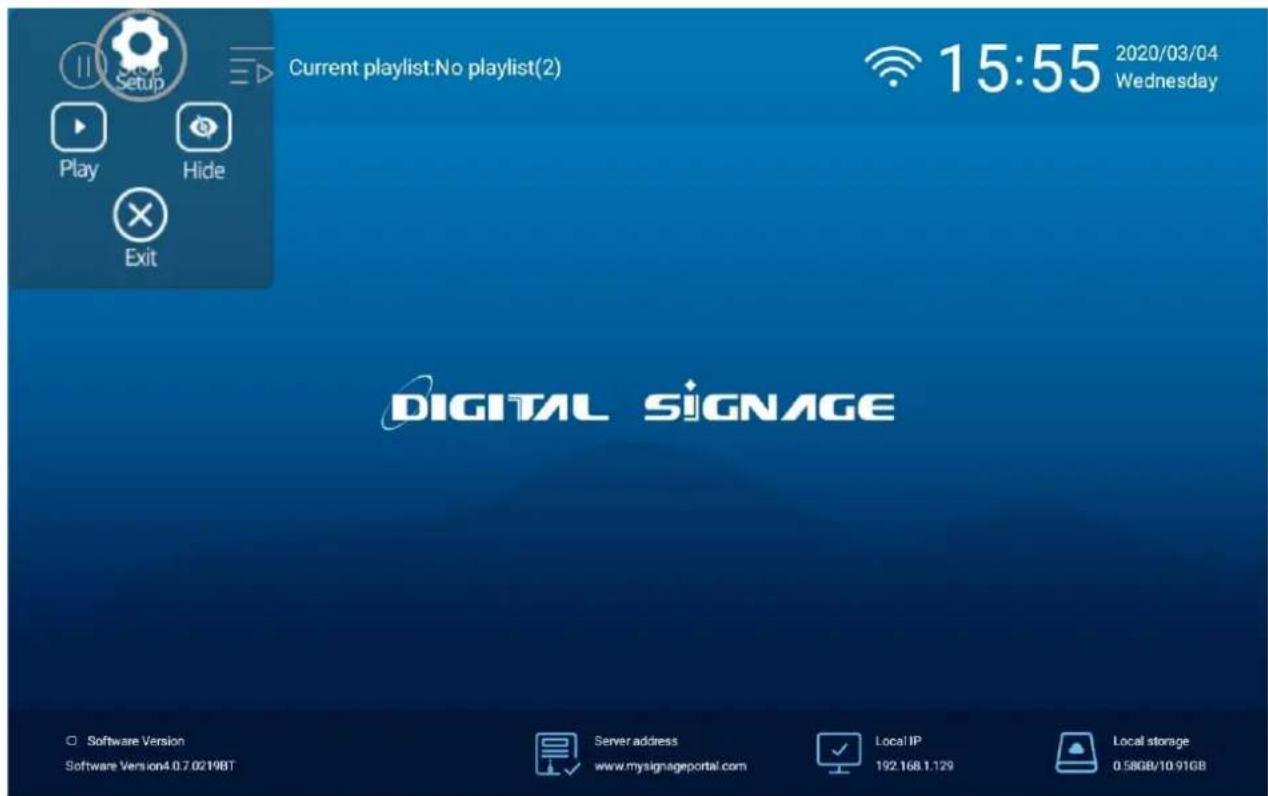

Please note: Press the Stop Button (■) on the remote control to go to the Home Screen If there's content currently playing.
1.4.1 System Menu Operation
To access the Main Menu from the Home Screen, simply tap the "SETUP" icon using your finger. The Main Menu offers several sub-menus, including Exit, System, Power, Strategy, Network, Screen rotation, Work mode, Server, and File.
To select a specific sub-menu, touch the corresponding icon with your finger. Should you wish to access additional settings and options, switch from "Basic" to "Senior" mode. This will grant you access to more comprehensive customization capabilities.
Basic:

Senior:

1.5 Settings - Basic
1.5.1 Screen Rotation
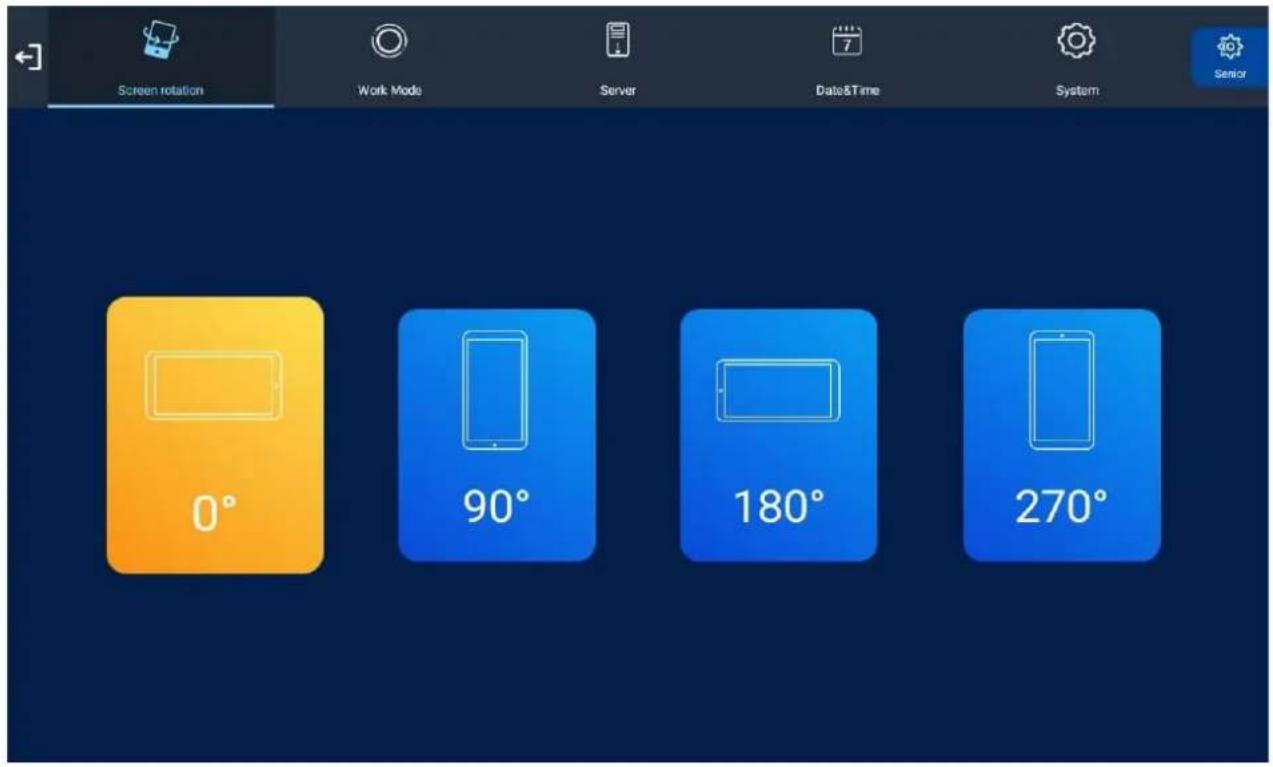
In this section, you have the option to adjust the screen's orientation to ensure proper alignment of the OSD and content display. Four options are available, as illustrated below:
- 0^ - Displays the content in landscape mode with the locker door on the right-hand side.
- 90^ (default portrait) - Displays the content in portrait mode with the locker door at the bottom.
- 180^ (default landscape) - Displays the content in landscape mode with the locker door on the left-hand side.
- 270^ - Displays the content in portrait mode with the locker door at the top.
Choose the orientation that best suits your requirements to optimize the display appearance.
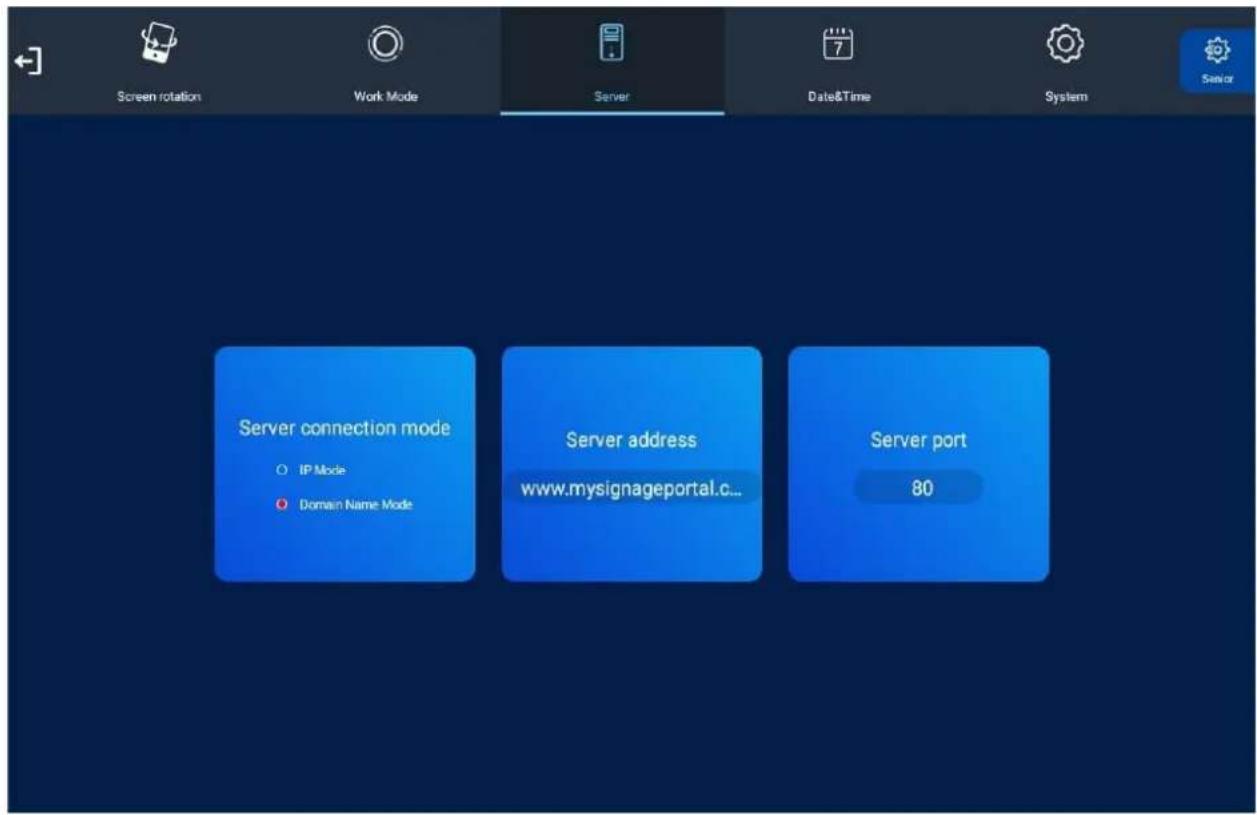
1.5.2 Server Setting
This section encompasses the essential information that facilitates seamless communication between the screen and the server. All settings within this section will be pre-configured before your goods are delivered. It is crucial not to alter any of these settings unless you possess sufficient technical expertise and support. The recommended configuration for these settings is as follows:
1.5.3 Date & Time
Within this sub-menu, you have the option to modify the time and date on the machine using either manual input or through your network via the "Sync Time Setting". Enjoy the flexibility to choose the method that best suits your preference and requirements for accurate time and date configuration.
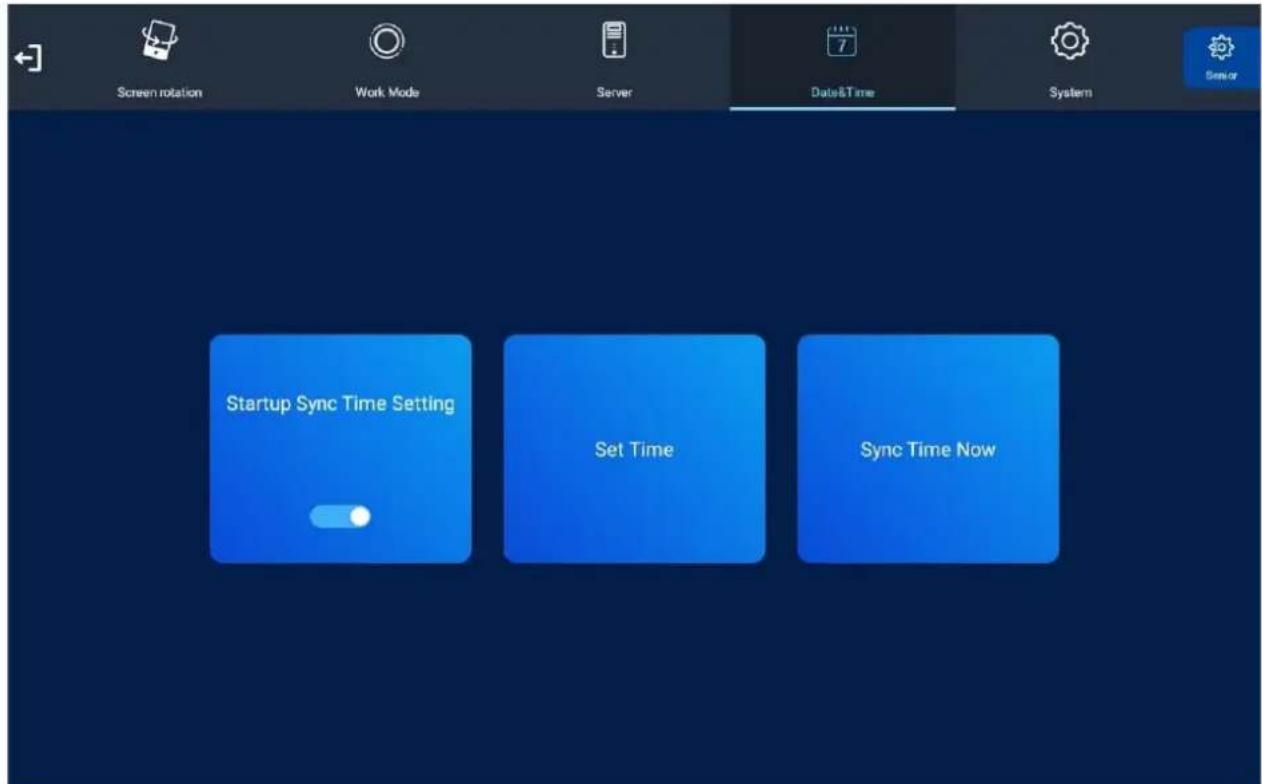
With this setup, you can enjoy accurate and automated timekeeping without the need for manual adjustments.
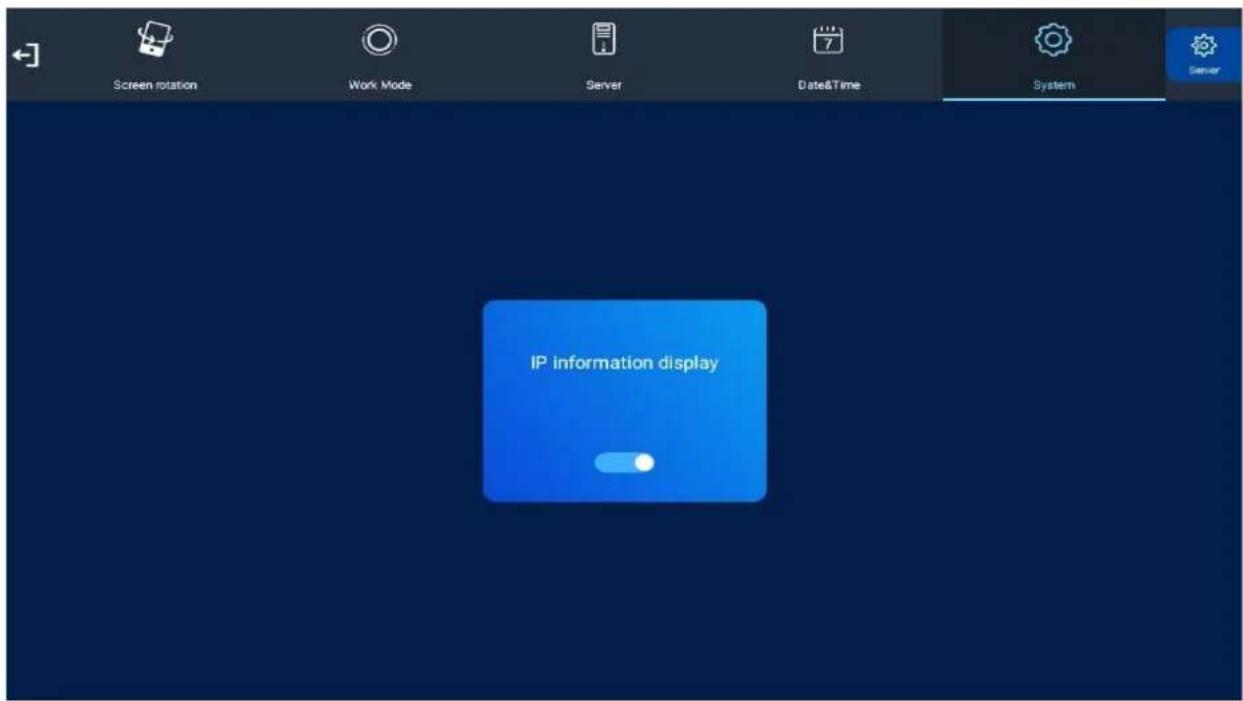
1.5.4 System
This section includes the sub-menu: "IP Information Display." To exit this sub-menu, simply tap the "Exit" navigation button on the screen, which can be found to the left of the main menu.
1.5.5 Exit
To exit the Main Menu, select this option by tapping it with your finger. If you have made any changes, the system will prompt you to reboot the screen to apply these modifications. In such a case, choose "YES" to ensure that the changes take effect successfully.
1.6 Main Menu - Senior
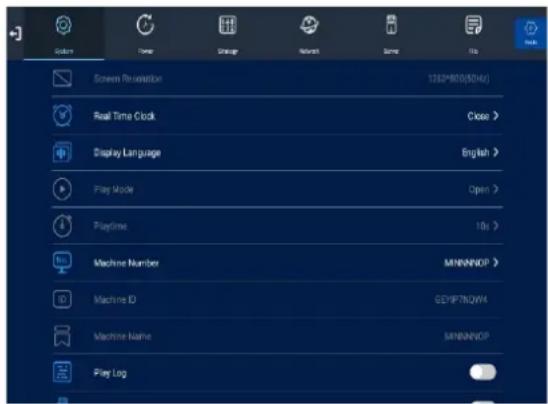
1.6.1 System
The System Menu comprises the following sub-menus for your convenience:
- Screen Resolution
- Real Time Clock
- Display Language
- Play Mode
- Playtime
- Machine Number
- Machine ID
- Machine Name
- Play Log
- USB
- Scroll Text Setting
- Auto Start
- Sync Setting
- WebView Setting
-
Storage
-
Touch Operation Tools
-
Restore to Factory Settings.
Explore these options to customize and optimize the performance of your system to suit your specific requirements.
1.6.2 Screen Resolution
With this option, you can modify the screen resolution according to your preferences and requirements.

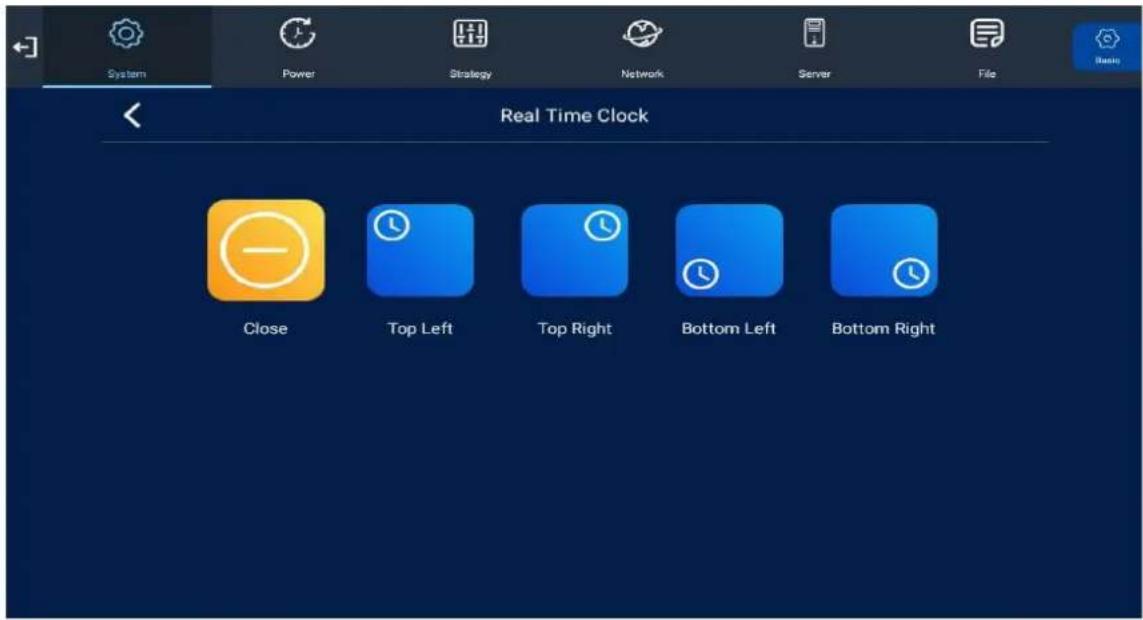
1.6.3 Real Time Clock
This option allows you to display a clock while content is playing. There are 5 options as pictured below:
- Close: The screen doesn't display time.
- Top Left: The time will be displayed on top left of the screen.
- Top Right: The time will be displayed on top right of the screen.
- Bottom Left: The time will be displayed on bottom left of the screen.
- Bottom Right: The time will be displayed on bottom right of the screen.
1.6.4 Display Language
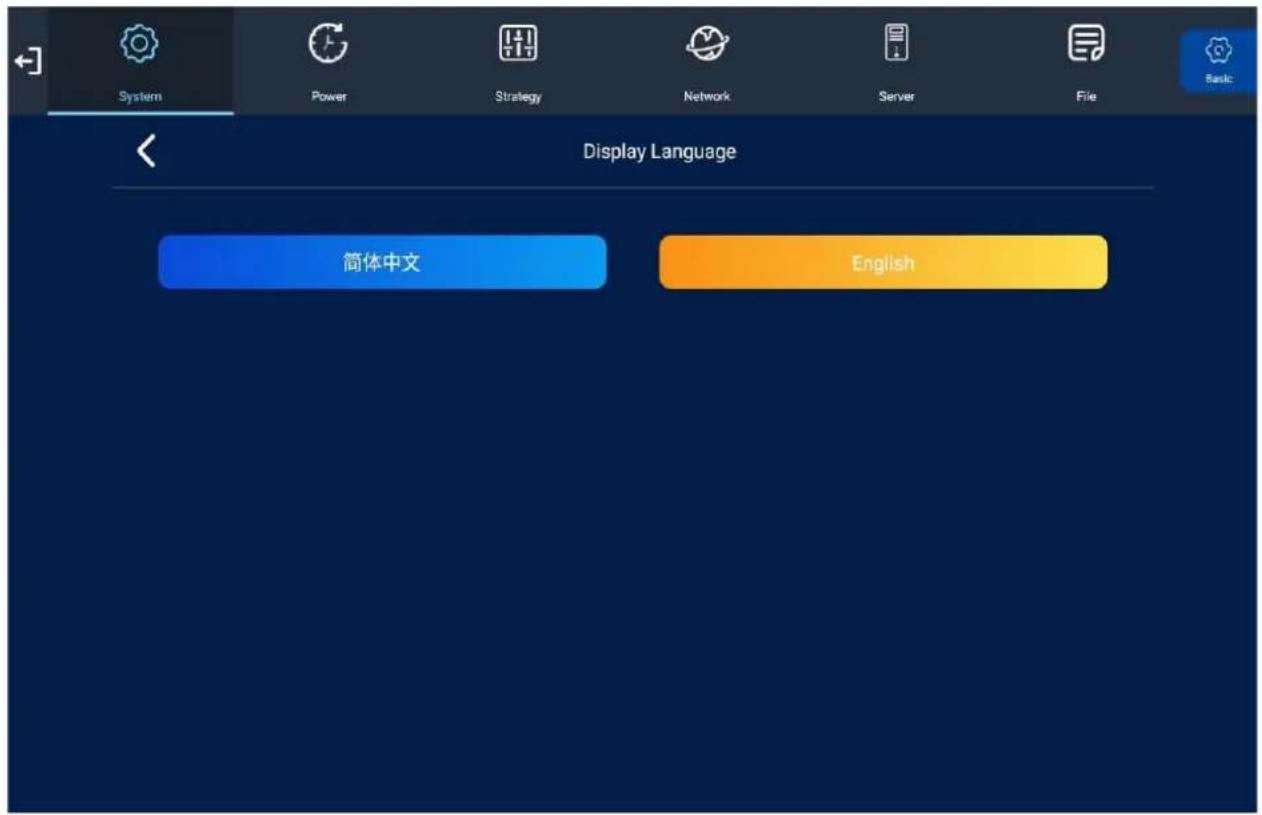
This feature provides the capability to adjust the language settings. You will find two options, as depicted below:
1.6.5 Play Mode
This particular option empowers you to modify the play mode. At present, it is set to the default: "Open." Feel free to select an alternative play mode that aligns better with your specific requirements and preferences.

1.6.6 Play Time
This option grants you the ability to adjust the playtime of the screen's content. Presently, it is configured with a default value of 10 seconds. Feel free to modify the playtime as needed to suit your desired display duration and enhance the overall viewing experience.

Playtime
10s>
1.6.7 Machine Number
This functionality will provide you with the information about your screen's name as registered on the CMS (Content Management System). Discover the designated name assigned to your screen for easy identification and management within the CMS platform.

Machine Number
MINNNNOP >
1.6.8 Machine ID
With this feature, you can access your screen's unique ID within the CMS (Content Management System). Discover the specific identification code assigned to your screen for easy tracking and management within the CMS platform.

Machine ID
GEYIP7NQW4
1.6.9 Machine Name
This functionality allows you to access and display your screen's name as recorded on the CMS (Content Management System). Discover the designated name assigned to your screen for convenient recognition and seamless management within the CMS platform.

Machine Name
MINNNNOP
1.6.10 Play Log
Once the slider is activated (indicated by turning blue), the screen will commence recording all media files that are displayed on it.

Play Log

1.6.11 USB
This feature permits you to enable or disable the USB port. If you wish to update the screen, kindly ensure that it is turned on (indicated by the colour blue).

USB

1.6.12 Scroll Text Setting
By using this option, you can enable or disable the Scroll Text Setting. When disabled, any content with subtitles created from the 'Advertising LCD Playlist' and Mysignageportal.com will cease to function. Conversely, when enabled, the subtitles created from the 'Advertising LCD Playlist' and Mysignageportal.com will operate as intended. Choose the appropriate setting based on your preferences and requirements for scroll text functionality.

Scroll Text Setting

1.6.13 Touch Operation Tool
With this feature, you can toggle the Touch Operation menu that appears on the screen. You have the option to enable or disable this menu according to your preferences and needs.

Touch Operation Tools

1.6.14 Auto Start
This feature enables your screen to automatically start playing the pre-loaded content right after it finishes booting up. For your convenience, it is highly recommended to enable this feature (indicated by the colour blue).

1.6.15 Sync Settings
This synchronization feature enables multiple screens to simultaneously display the same content.
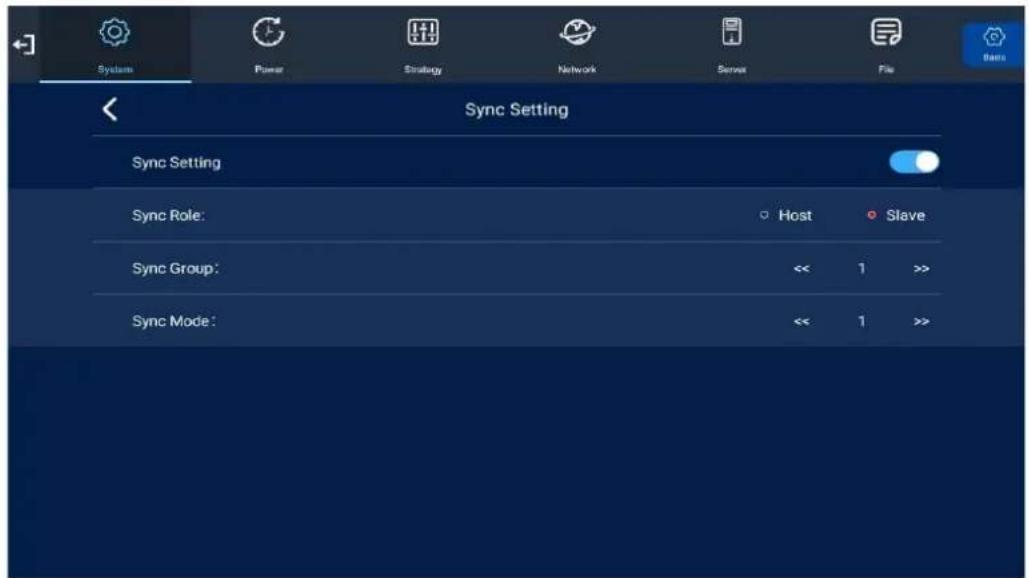
Sync Settings - This setting enables or disables the synchronization feature.
Sync Settings - Use this option to designate the role of the screen during synchronization.
Host - Set the screen as the unique host in the network, with other slave screens synchronizing their content from this host.
Slave - When set as a slave, the screen will play synchronized content with that of the host.
Sync Group - Choose a communication group for synchronization purposes.
Sync Mode - Select a communication delay for the synchronization of the screens.
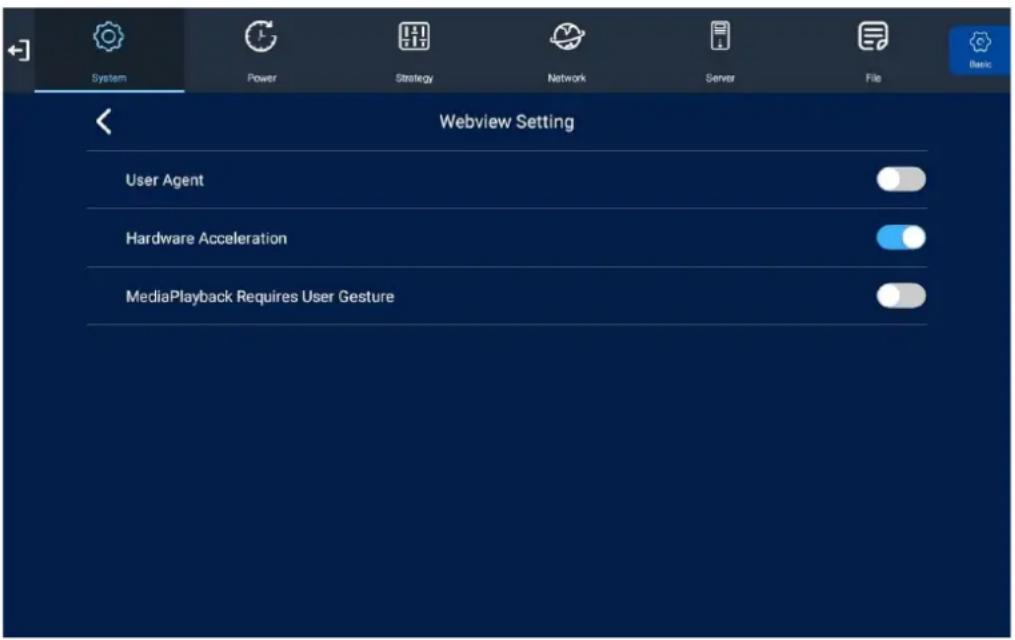
1.6.16 Webview Settings
This feature empowers the user to customize how the screen displays a web page via the CMS (Content Management System). Enjoy the flexibility to adjust the web page presentation according to your preferences and requirements.
- User Agent:
When utilizing mysignageportal.com to display a webpage, this feature allows you to switch between a mobile user interface or a PC user interface. The PC user interface displays the entire webpage but may require manual adjustment for proper visibility. On the other hand, the mobile interface automatically scales with size.
- Hardware Acceleration:
Enabling this option significantly improves web page loading time and enhances graphics performance.
• Media Playback Requires User Gesture:
This setting affects auto play behaviour for different types of HTML content. For instance, when opening a YouTube video, it determines whether the video will auto play or not. Please note that this behaviour may vary across different webpages.
1.6.17 Content Storage
This feature enables you to switch between different storage types. By default, it is set to "Internal Memory." Feel free to choose the storage type that best suits your needs and preferences.

Storage
Internal Memory >
1.6.18 Restore To Factory Settings
To restore factory settings, simply tap on "Yes." This action will reset all system settings to their default configurations.

Restore to Factory Settings
1.6.19 Power
With the CMS, you can conveniently configure your screens' on/off timer to automatically power on and off at specified times. If you prefer not to manually set the on/off times, you have the option to choose either "Daily" or "Weekly."
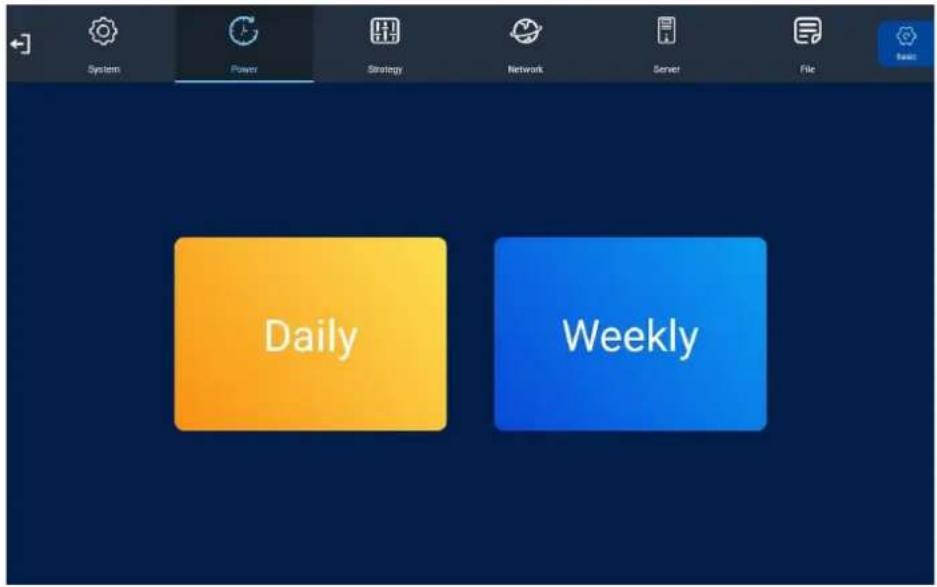
There are two "Setting Modes" available: "Daily," which allows you to set identical on/off times for each day of the week, and "Weekly," which enables you to set individual on/off times for each day.
To activate the on/off timer, set the "Control Mode" to "Timer." Then, choose the desired "Setting Mode" as either "Daily" or "Weekly." Using your finger, navigate to the timer fields and tap the values to assign the desired on and off times.
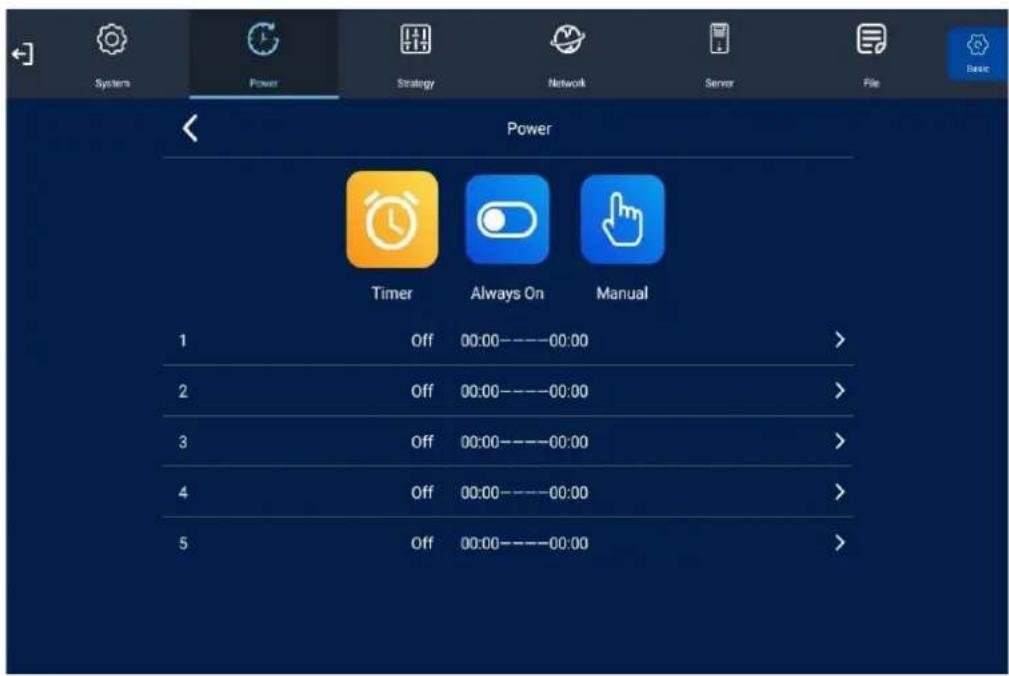
By utilizing these options, you can easily automate your screen's power schedule, ensuring hassle-free management and timely display activation.
1.6.20 Strategy
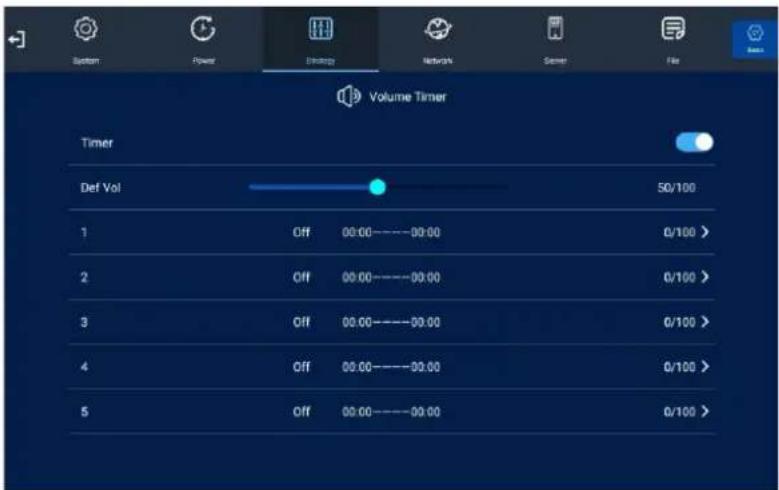
With this feature, you can schedule your screen to play at different volumes and switch to different AV inputs at specific times of the day. You have the convenience of achieving this remotely using the CMS. However, if you prefer to input these values manually, you also have the option to do so. Enjoy the flexibility of customizing your screen's audio volume and AV inputs based on your desired time intervals, whether through remote CMS management or manual settings.
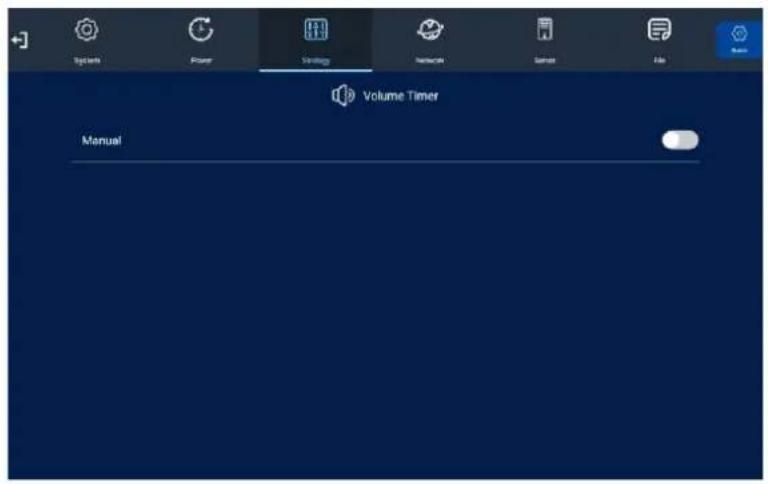
To activate the volume timer feature, simply slide the slider to turn it on (indicated by turning blue). Once enabled, new fields will appear, providing you with the option to set a default volume level and timer fields to configure different volume levels for various periods of the day. Enjoy the convenience of customizing your screen's audio volume based on your preferences and specific time intervals using this feature.
1.6.21 WI-FI Setting
This feature is exclusively available in "WIFI" mode. It enables you to choose your Wi-Fi network and input the network password. This information is saved, allowing the screen to automatically connect to your Wi-Fi network after rebooting.
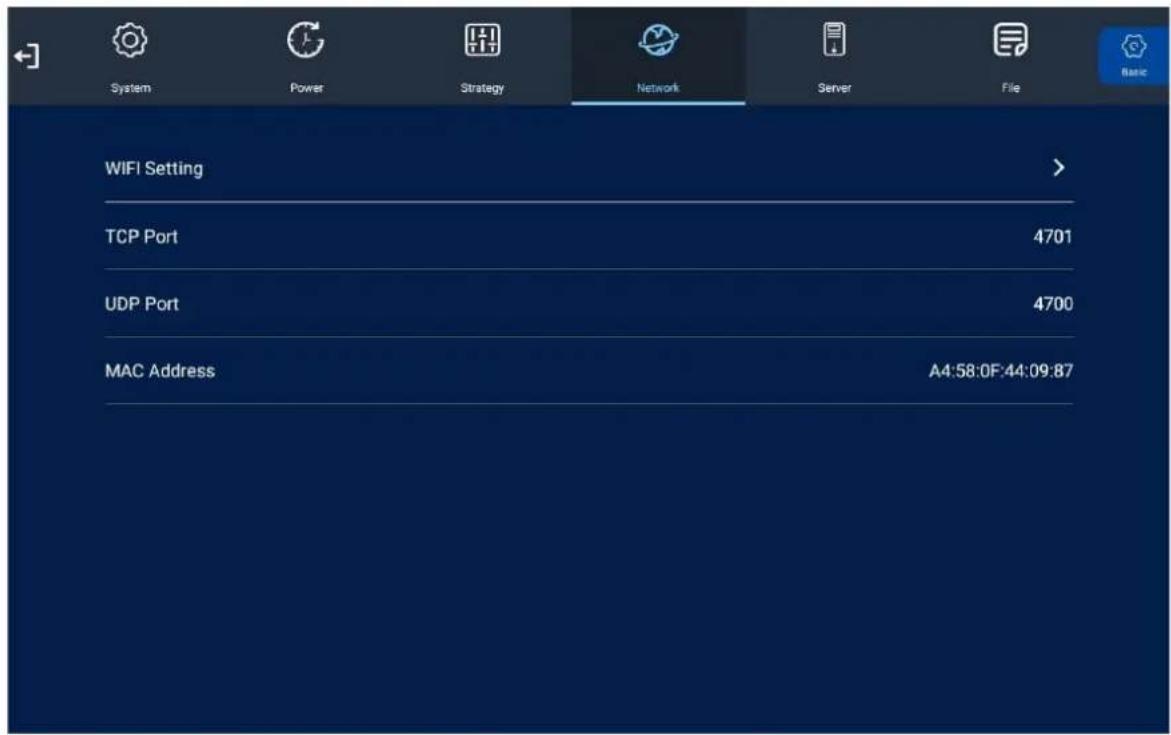
To connect to your Wi-Fi network, navigate to it from the list of available networks, and tap on it with your finger. If required, input your password by tapping on the password field, which will bring up an on-screen keyboard. After entering the password, highlight and tap "back" on the on-screen keyboard. Finally, tap on "Connect" to establish the connection.
TCP Port:
The TCP Port displayed is the default port for your screen, and it cannot be modified. It is pre-set for optimal functionality.
UDP Port:
Similar to the TCP Port, the UDP Port is also pre-set and cannot be changed. It serves as the default port for your screen.
MAC Address:
The MAC Address of your screen is pre-set and cannot be altered. It uniquely identifies your screen's network interface.
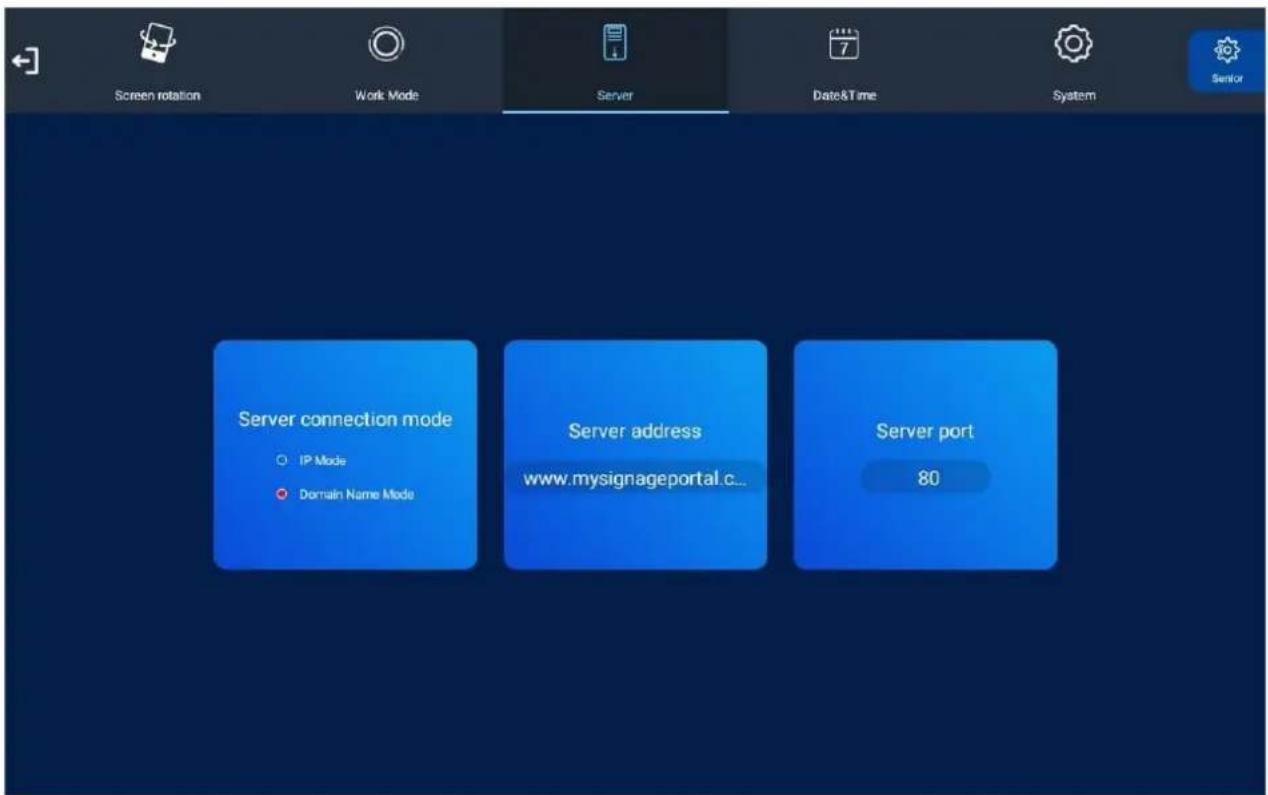
1.6.22 Server
Contained within this section is crucial information that enables seamless communication between the screen and the server. All settings within this section will be pre-configured before you receive your goods. We strongly advise against altering any of these settings unless you possess adequate technical support. The recommended configuration for these settings is as follows: [list the specific settings and their corresponding values]. Adhering to these pre-set configurations ensures optimal performance and smooth operation of the system.
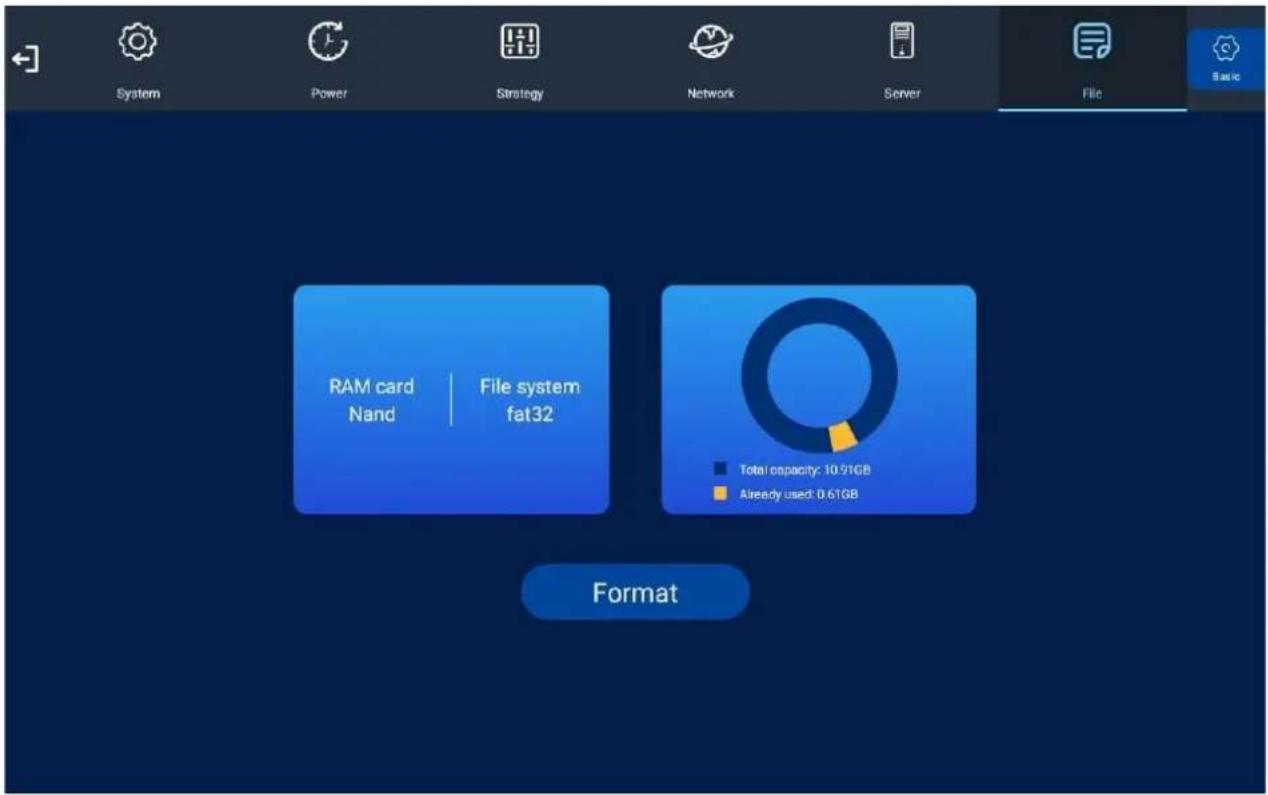
1.6.23 File
In this section, you can access storage information, including memory capacity, used space, and free space. Additionally, you have the option to format the disk. However, exercise extreme caution when performing formatting, as it will lead to a complete loss of data. Make sure to proceed with formatting only if you are certain about its necessity.
1.6.24 Exit
To exit the Main Menu, simply tap on this option with your finger. If you have made any changes, the system will prompt you to confirm whether you want to reboot the screen to apply these modifications. In such a case, select "YES" to ensure that the changes take effect successfully.
2. Supported Media Files
Required:
| Video | |
| Container | MP4, AVI, MPG |
| Codec | MPEG-1, MPEG-2, MPEG-4, XVID, H.264 |
| Width | 1920 (1080 for portrait) |
| Height | 1080 (1920 for portrait) |
| Audio | AAC or MP3 |
Recommended:
| Format Profile | Main@4.0 |
| Frame Rate | 30fps |
| Standard | PAL |
| Bitrate | 5000kbps |
| Bitrate Encoding | CBR |
| Field Order/Scan | Progressive |
| Audio | AAC or MP3 |
Required:
| Image | |
| Container | JPEG |
| Compression | Baseline |
| Colour Mode | RGB |
| Width | 1920 (1080 for portrait) |
| Height | 1080 (1920 for portrait) |
| Maximum DPI | 300 |
This unit does not support WMV or FLV video file types.

Please note: Video and image files should be a maximum of 1920x1080 resolution for Landscape orientated screens and a maximum of 1080x1920 resolution for portrait orientated screens.
3. Copying Files from a USB Drive
If the Error! Reference source not found. is set to USB (default with Plug and Play purchased screens) you can copy files directly from a USB drive onto the screen to play the content on a loop. Make sure to reference the Supported Media Files table (Section 4.0) for the correct formats and resolution of the content.
Step 1
Copy the files you want to play on the screen on to the USB Drive in the root directory. Do not put the files into folders, they must be in the main root directory.
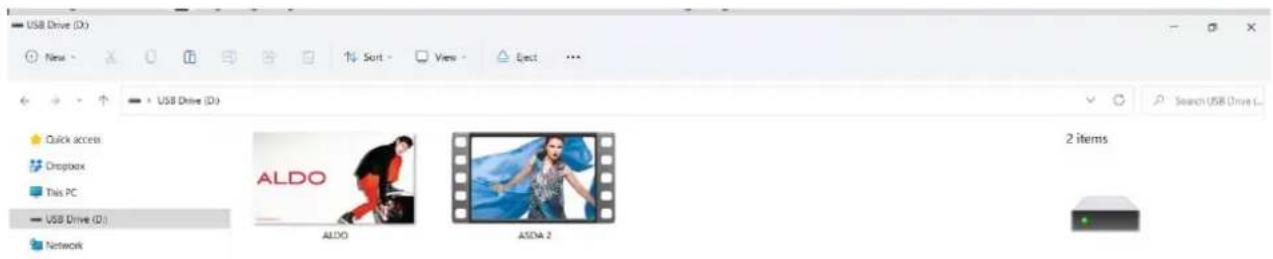

Please note: It is recommended to use a USB drive that is less than 16GB for the display screen to recognise the USB drive format (FAT32 format). This is usually the default format on USB drives less than 16GB.
Step 2
Insert the USB drive into a USB port (see Error! Reference source not found.).
Step 3
The files on the USB drive will then be copied to the internal storage on the screen.
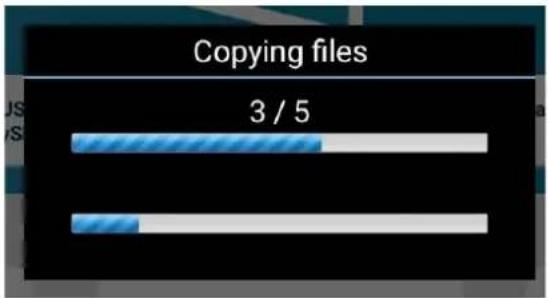
bar
Copying files | Category | Value | |---|---| | Blue Bar | 3 / 5 | | White Bar | 1 / 5 |Step 4
Remove the USB drive.
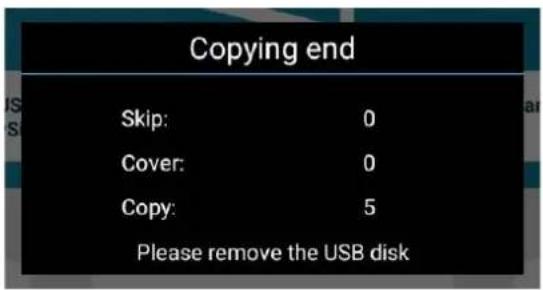
Step 5
The content on the USB drive will now play on the screen. If the content isn't playing or didn't copy over, please make sure to check the Supported Media Files table (Section 4.0).
4. Advertising LCD Playlist Editor Software
Although this unit can operate without using any additional software, for more advanced applications please download and install the Advertising LCD Playlist Editor software from the link below. This will allow you to create playlists and set up schedules without using My Signage Portal.
Advertising LCD Playlist Editor Software
Make sure to reference the Supported Media Files table (Section 4.0) for the correct formats and resolution of the content being used on the created playlists.
4.1 Main Menu
Start by opening the application to bring you to the Main Menu. The main menu will allow you to either create a new playlist or load and existing playlist from a USB drive.
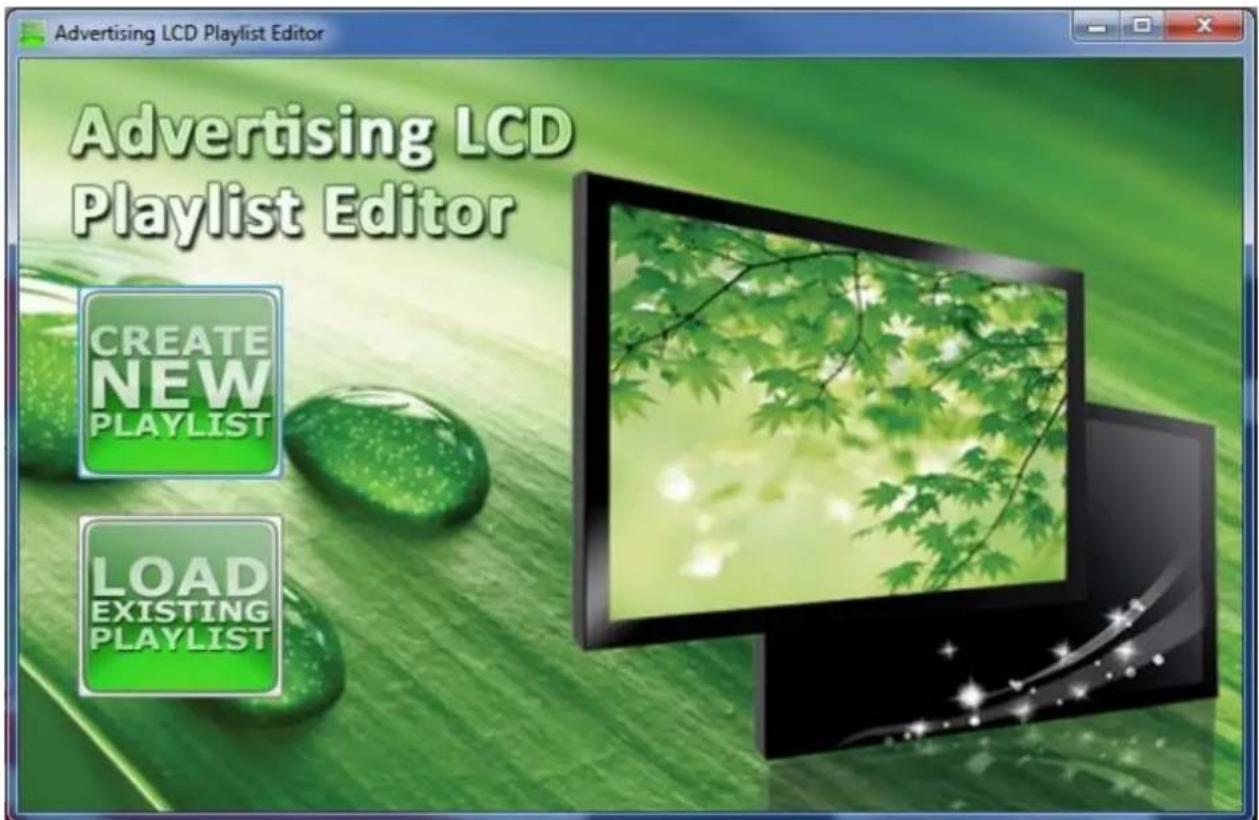
4.2 Creating Playlists
The Playlist Editor is laid out in a user-friendly way with the primary functions on the left-hand side in easy to follow steps.
4.2.1 Add Schedule
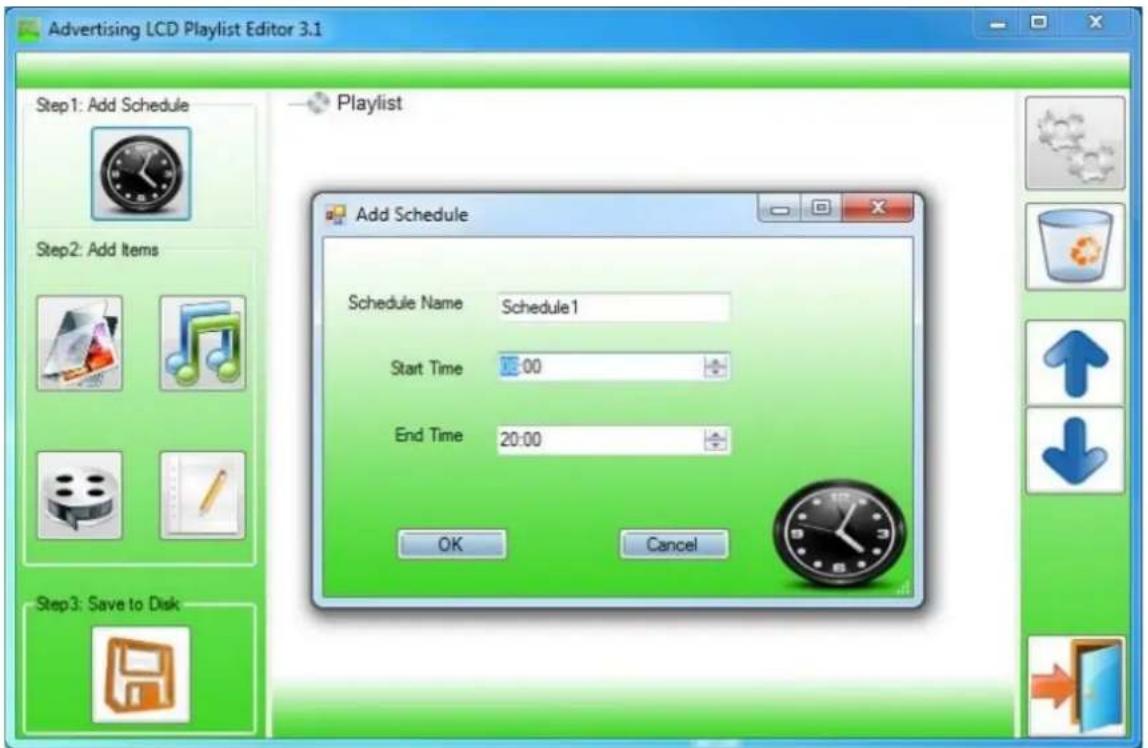
The schedule functions as a timer for the playlists, so you can have between one and eight playlists scheduled to start and end at different times of the day, with up to 50 files in each playlist.

Please note: If you enter more than one schedule ensure that the consecutive schedule times do not overlap.
- Click on the 'Add Schedule' Button.
- Type a Schedule name.
- Select preferred start time.
- Select preferred end time.
- Click 'OK'.
- The schedule will appear in the playlist.
Follow the same process to add multiple schedules.
4.2.2 Add Selected Items
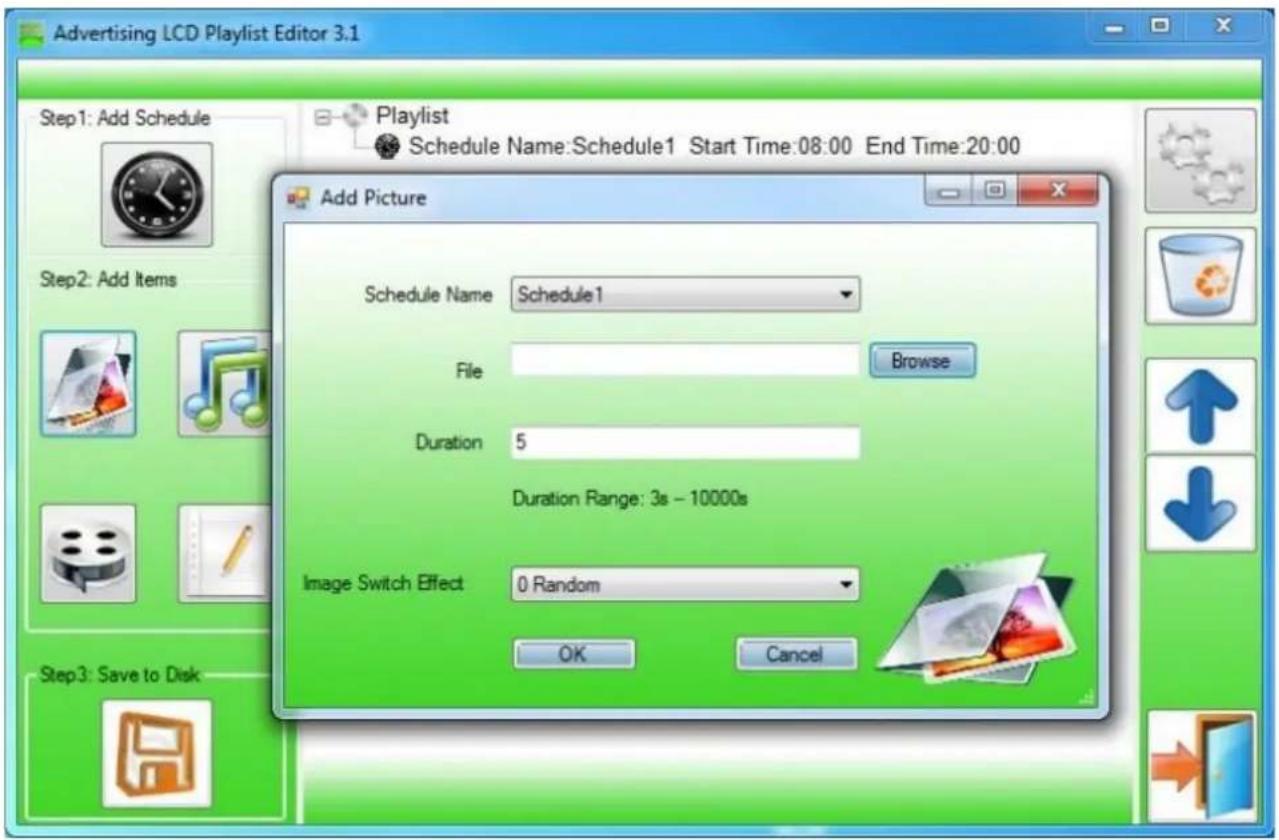
Adding Images
- Click the Add Image button.
- Select one of the schedules created from the Add Schedule section.
- Click 'Browse' and locate the image you wish to use.
- Enter a duration time of the image (this is the time it takes to transition to another image on the chosen schedule).
- Choose from the list of available transitions.
- Click 'OK' to add the image file to the chosen schedule.
You can select multiple image files at once to add to a schedule, you can also move each image up or down in the playlist by using the arrow buttons on the right-hand side.

Please note: Before adding a media file please ensure that it has a file name length of 11 characters or less and contains no special characters. For supported file formats please refer to Supported Media Files.
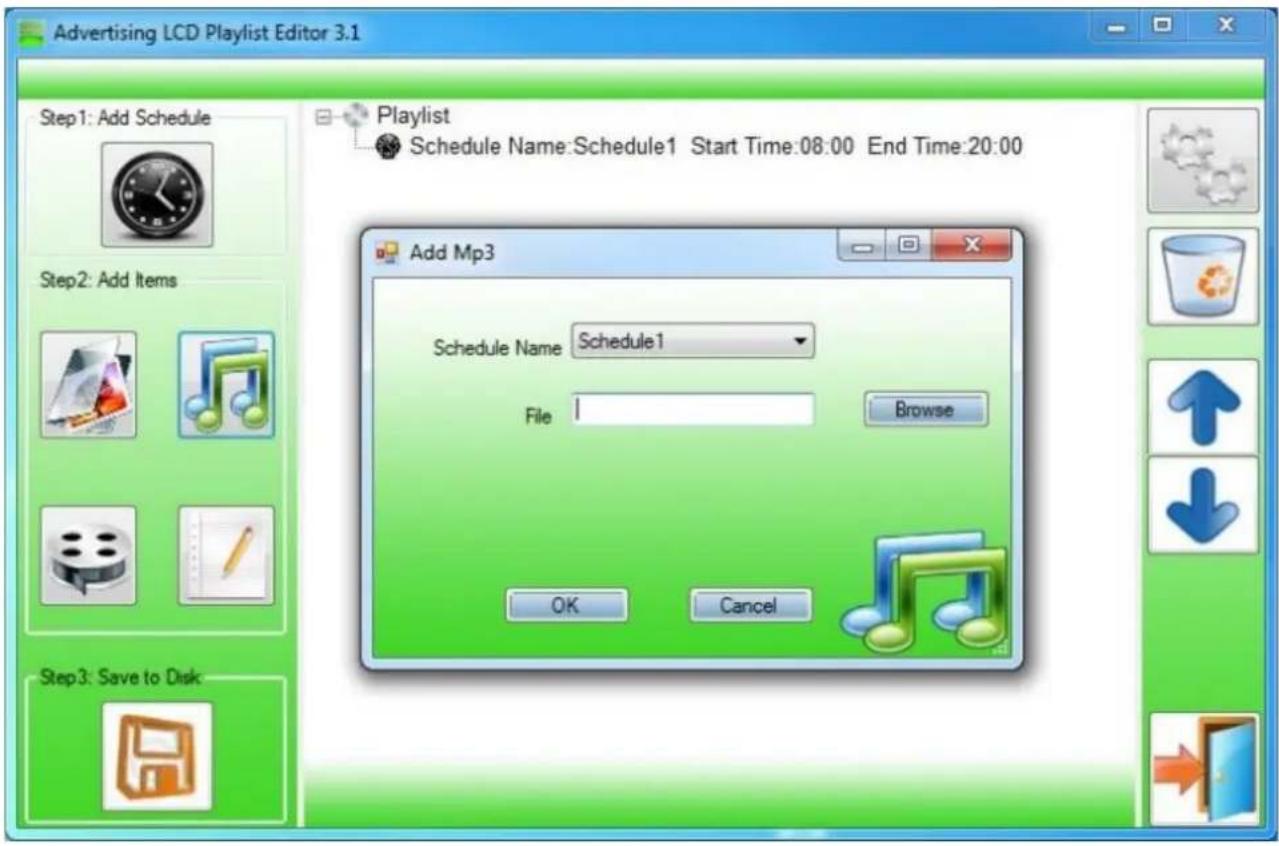
Adding Audio
- Click the Add MP3 button.
- Select one of the schedules created from the Add Schedule section.
- Click 'Browse' and select the desired MP3 file.
- Enter a volume level for the MP3 file.
- Click 'OK' to add the MP3 file to the chosen schedule.

Please note: Before adding a media file please ensure that it has a file name length of 11 characters or less and contains no special characters. You must also add audio files after adding image files.
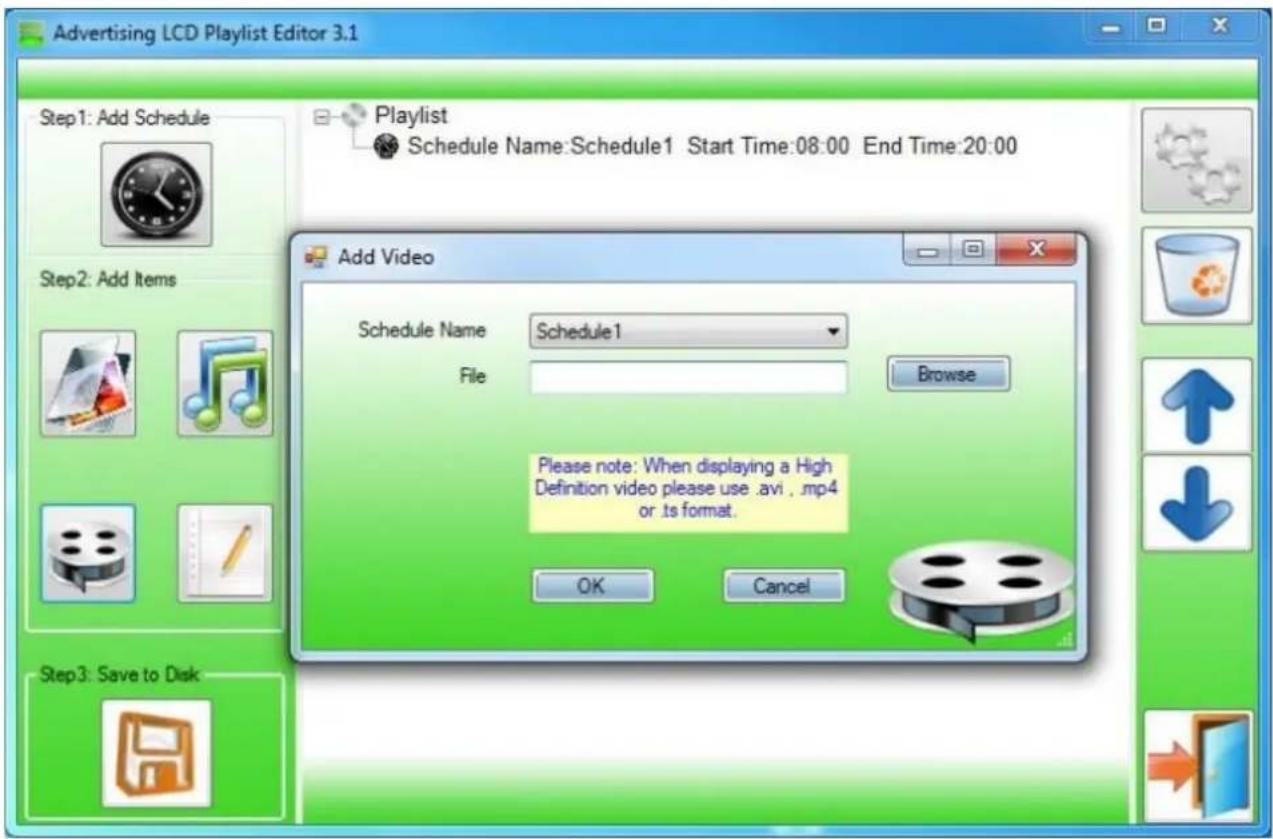
Adding Video
- Click the Add Video button.
- Select one of the schedules created from the Add Schedule section.
- Click 'Browse' and select the desired video file.
- Click 'OK' to add the video file to the chosen schedule.

Please note: Before adding a media file please ensure that it has a file name length of 11 characters or less and contains no special characters. You cannot add videos and MP3 audio files in the same schedule.
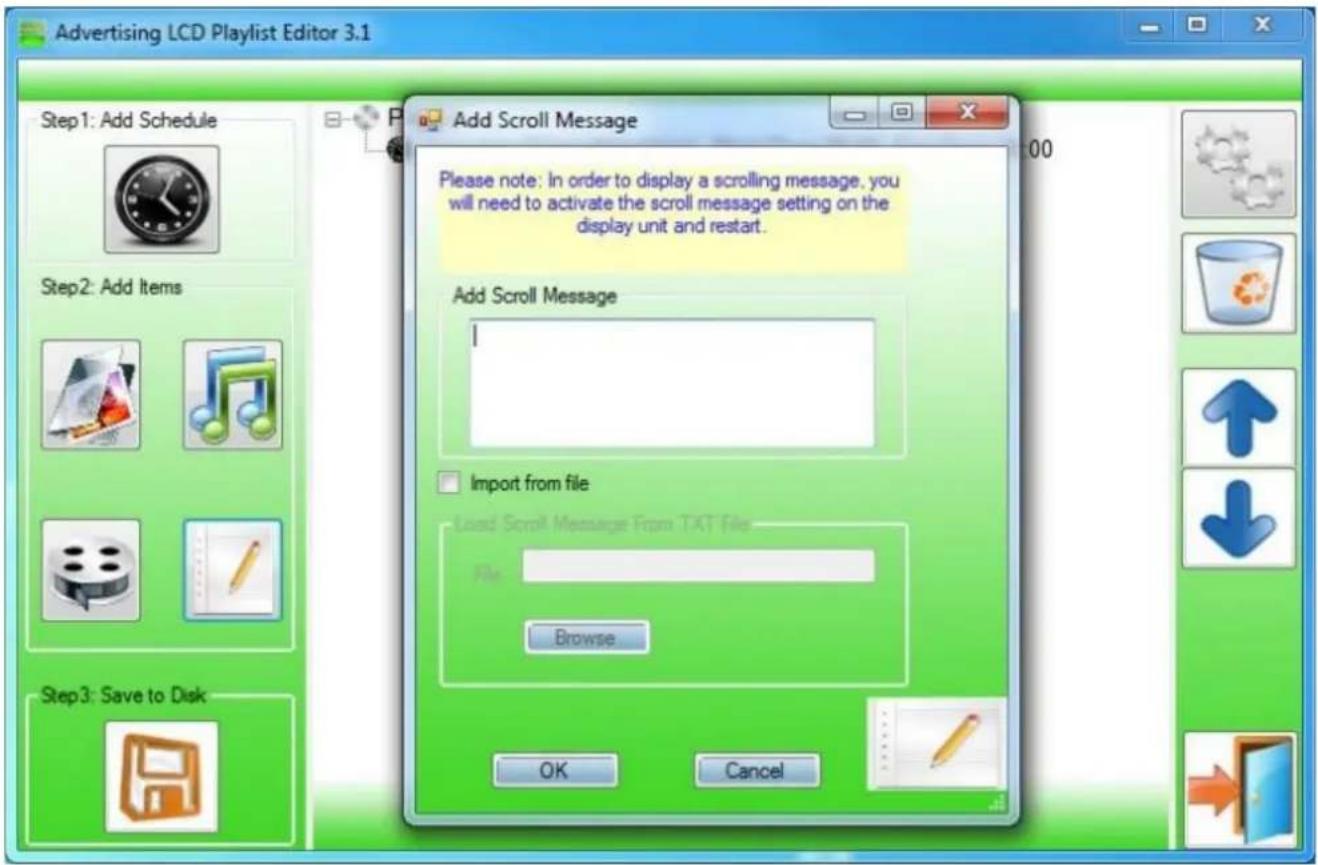
Adding Scrolling Text
- Click the Add Scroll Message button.
- Enter the message you would like to run across the bottom of the screen.
- Click 'OK' to add the desired message to the schedule.
If you have a pre-existing text file (.txt) containing your message, highlight the 'Import from file' checkbox and click 'Browse'. Locate and select the desired text file followed by clicking 'OK'.

Please note: You must ensure that Scrolling Text is activated on your display for this feature. You can do this by accessing the System Settings on the display screen being used (see Error! Reference source not found.).
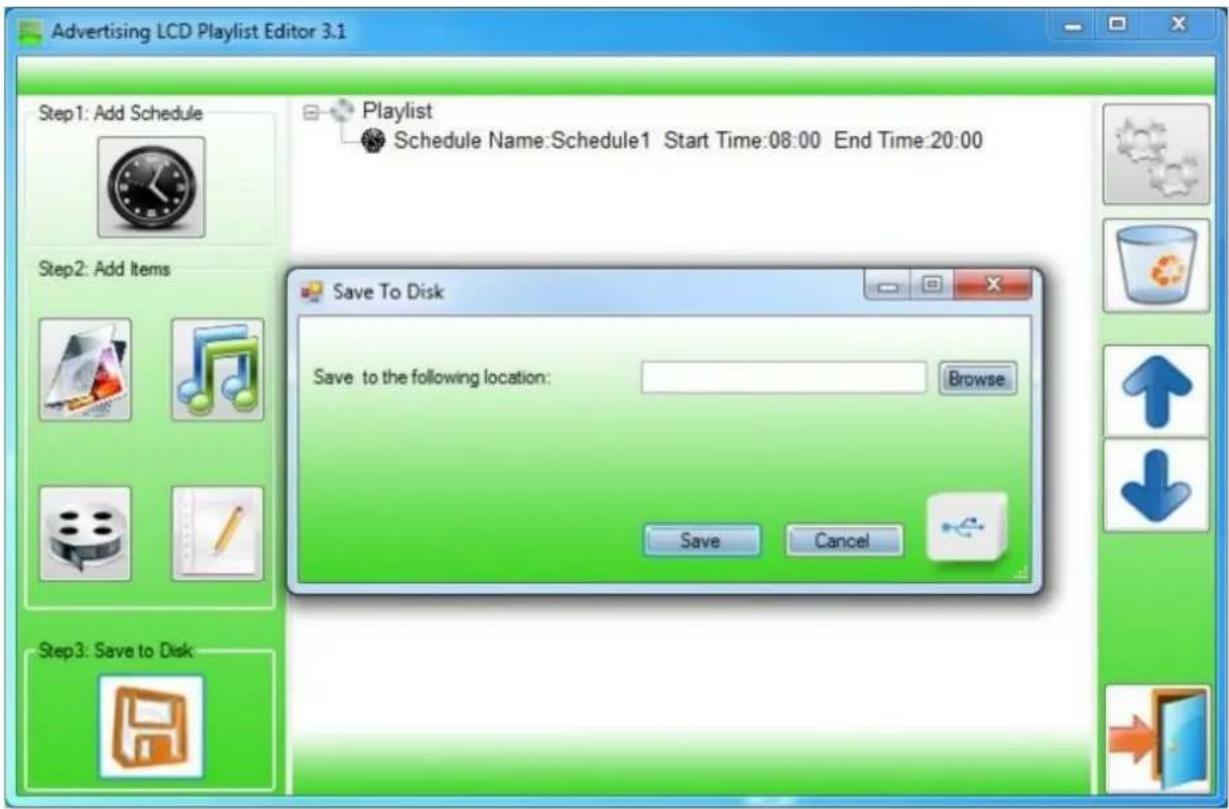
4.2.3 Saving
- Insert a USB drive into your PC and make sure there are no files showing on the drive.
- Click 'Step3: Save to Disk'.
- Click 'Browse' and select the USB drive as the location of the playlist and files.
- Click 'Save'.

Please note: It is recommended to use a USB drive that is less than 16GB for the display screen to recognise the USB drive format (FAT32 format). This is usually the default format on USB drives less than 16GB.
4.2.4 Editing Playlists
- From the main menu click 'LOAD EXISTING PLAYLIST'.
- Locate and select a playlist to edit.
- Select the item you wish to edit and click the 'Edit' button.
Deleting Items
To delete media files within a playlist, select the media file and click 'Delete' located on the right-hand side of the application. The media file will then be removed from the playlist.
5. F.A.Qs
5.1 Why is my screen displaying "Error (Screen Mode Mismatch)"?
If you encounter the message "Playlist: Error (Screen Mode Mismatch)" on your screen after publishing a playlist, it is likely due to a template with the wrong orientation being included in the playlist.
To resolve this issue, follow these steps:
- Check the orientation of your screen's blue "Home" screen. If it displays in Landscape orientation, your screen is in Horizontal mode (0° or 180°). If it appears in Portrait orientation, your screen is set to Vertical mode (90° or 270°). If the orientation is incorrect, you can change it from the Main Menu.
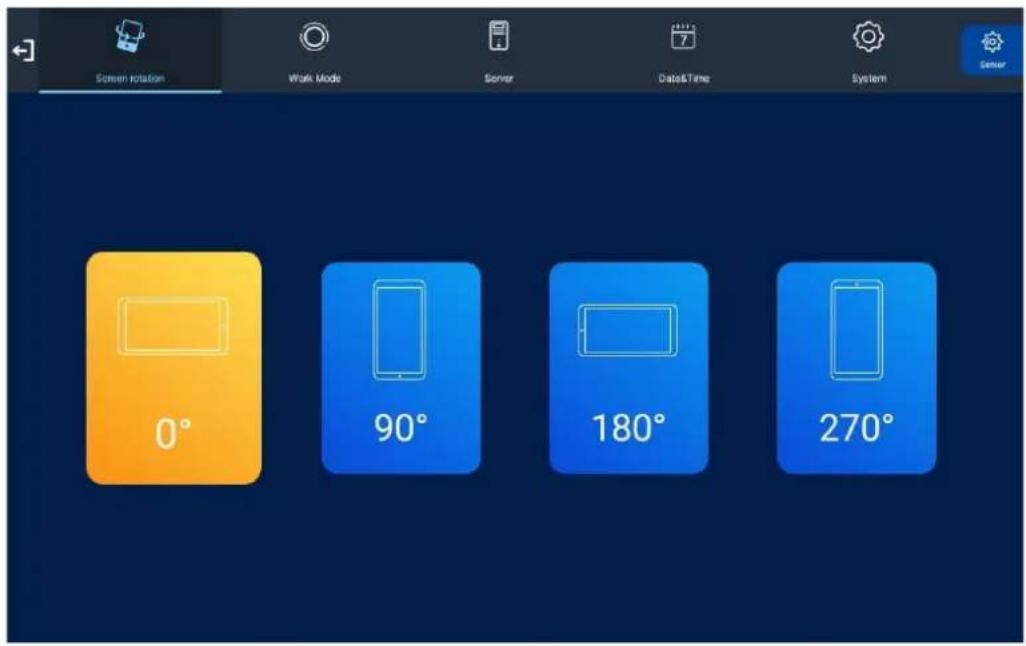
- If your screen is currently playing content, press "Stop" on your remote control to return to the "Home" screen. Then press "Setup" on your remote, navigate to "System Settings," and select "Switch Screen Mode." Choose the correct orientation for your screen from the available options.
- After selecting the correct orientation, go back and exit the main menu. The system will prompt you to reboot the screen to apply the changes; choose "YES."
- Once the screen restarts and the "Home" screen loads, it should now be in the correct orientation.
- Ensure that the template you use for this screen matches its orientation. For Landscape screens, use a horizontal template, and for screens in Portrait orientation, use a vertical template.
By following these steps, you can resolve the "Playlist: Error (Screen Mode Mismatch)" issue and ensure the correct orientation for your screen and playlist templates.
5.2 How do I play PowerPoint presentations on my display?
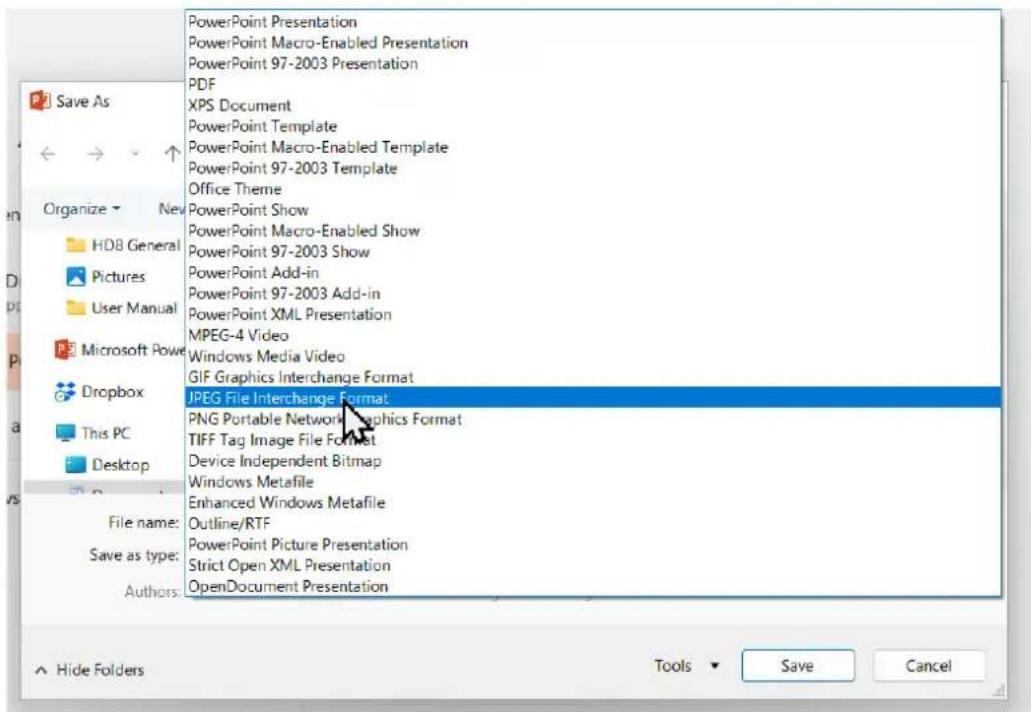
You can save a PowerPoint presentation as a JPEG File Interchange Format (.JPG) as recommended in Supported Media Files table (Section 4.0).
- Create or open a PowerPoint presentation.
- Click File > Save As.
-
Enter a File name.
-
Click on 'Save as type' scroll down and find the file extension 'JPEG file interchange format', as shown in the image below.
- Click Save.
- A message will appear asking if you would like to save all slides as JPEG's
- Once you have selected your option, The JPEG images will be saved and are ready to use within a playlist or to upload to a storage device.
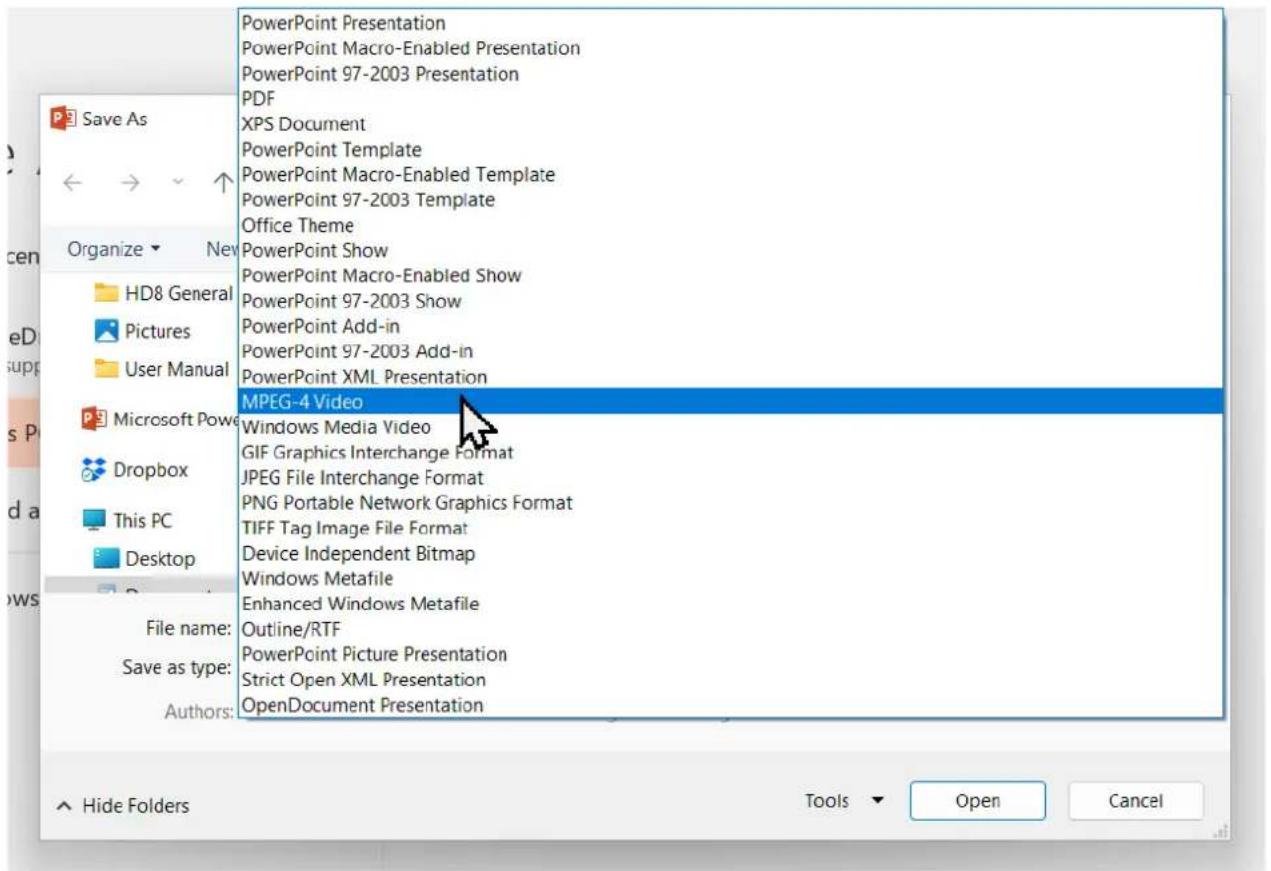
If you wish to use a PowerPoint Presentation with animations and transitions included you can save the file as an .MP4 and use this as a video instead.
For the best portrait resolution, you can use the following PowerPoint Page Setup:
- Width: 42.6cm
• Height: 24cm (16:9 Ratio)
5.3 Video Format Conversion
If the video file is not playing properly on the screen or it does not meet the requirements of the Supported Media Files table (Section 4.0), please use the following free Video Converter tool, Format Factory.
Step 1
Download and install the free Video Converter software for Windows Vista/7/8/10/11 named Format Factory.
https://format-factory.en.softonic.com/
Step 2
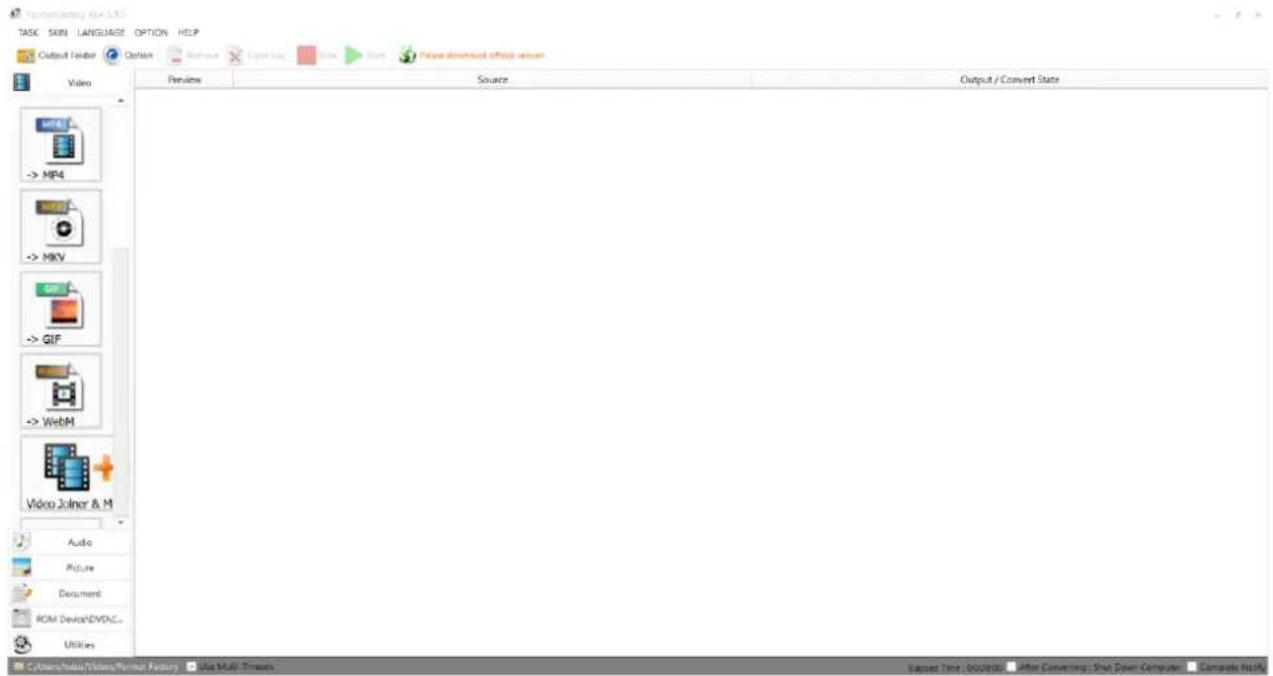
Open the Format Factory software once installed.
Step 3
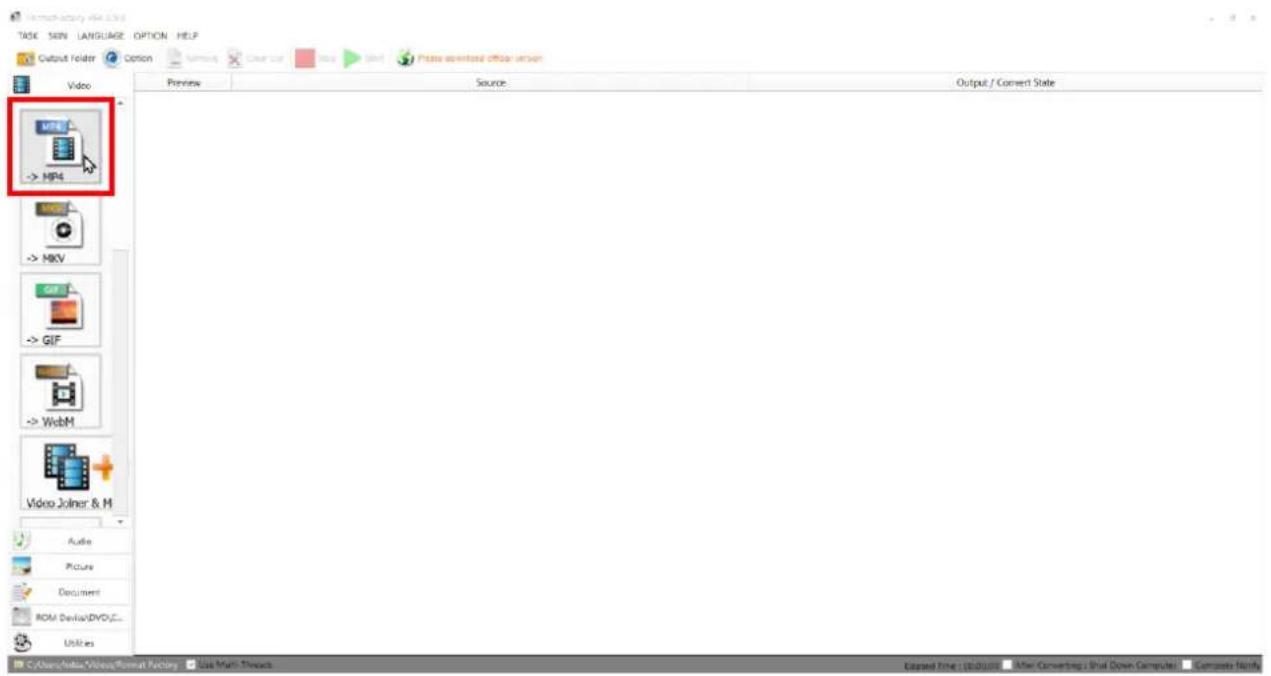
On the left-hand window pane select 'MP4'.
Step 4
Select the 'Add Files'.
![> MP4 Optimum quality and size Output Setting Preview Media Information Add Files Append setting name [Optimum quality and size] C:/Users/Icdsu/Videos/Format Factory Add Music Add Files OK](/content/2026/05/986808/images/1ccf391a2b08b6fc82bccca8c8a19a57666dbb14343551ed4d17480d3514e00a.jpg)
Step 5
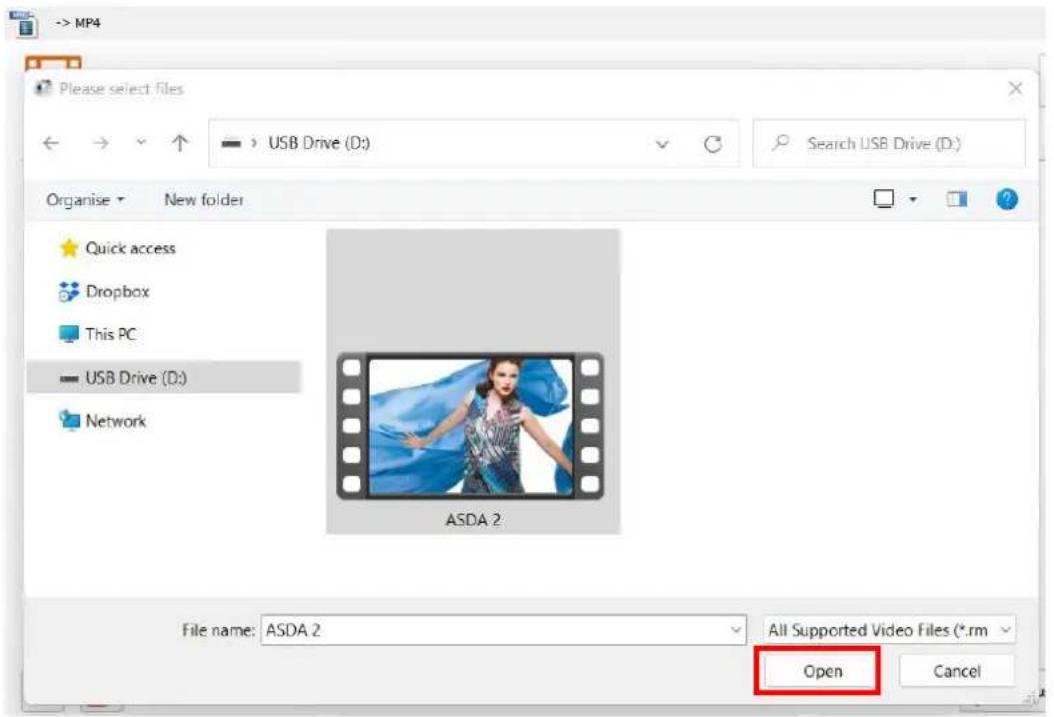
Select the file you wish to convert and press 'Open'.
Step 6
Click 'Output Setting'.
![Optimum quality and size Preview Media information ASDA 2.mp4 49.01M, 1920x1080, 6.90Mbps, 00:00:56 Output Setting Divide Option Add Files Append setting name [Optimum quality and size] C:/Users/icdau/Video/Format Factory Add Music Add Files OK](/content/2026/05/986808/images/27f50946d3fb24f96623d6e5c2d485422059502f4f7aa368c81ba08d5b994742.jpg)
Step 7
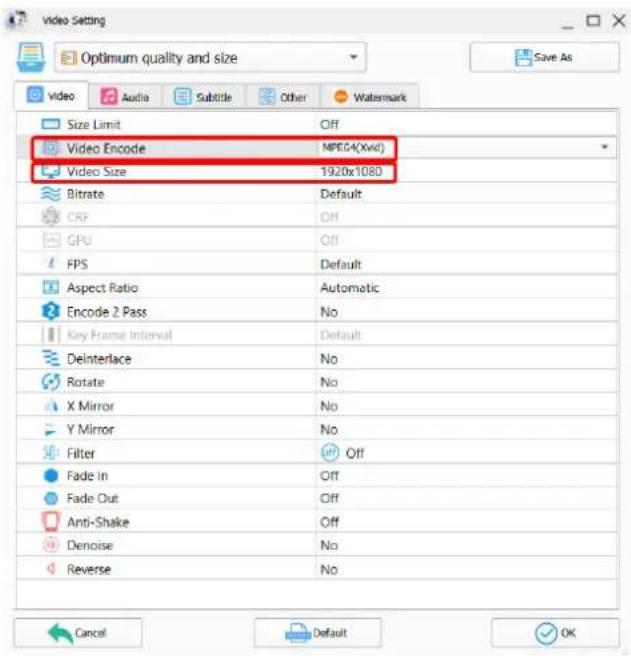
Make sure the 'Video Encode' is set as 'MPEG(Xvid)' for the best quality and to change the 'Video Size' to the recommended resolution is as shown on the Supported Media Files table (Section 4.0). For example, for a Landscape video this will need to be 1920 x 1080 whilst a Portrait video will be instead be 1080 x 1920.
Step 8
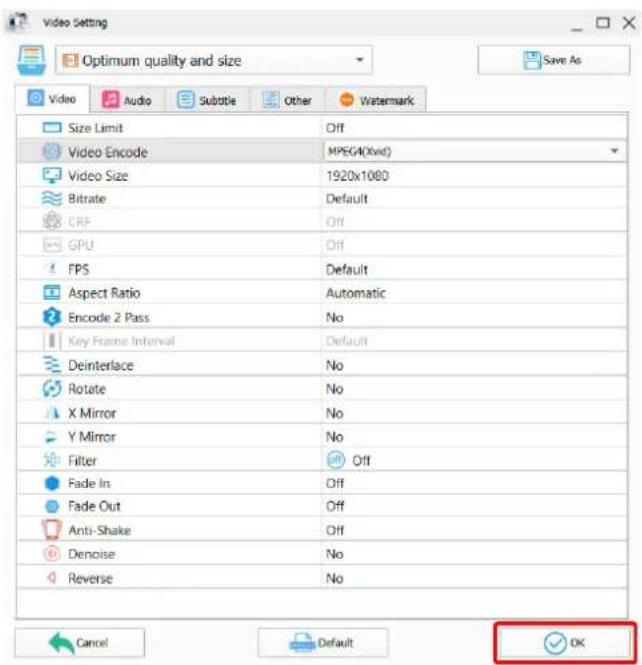
Select the 'OK' button once you are happy with this.
Step 9
Select the 'OK' button again.
![Optimum quality and size Preview Media information ASDA 2.mp4 49.91M, 1920x1080, 6.96Mbps, 00:00:56 Add Files Add Music Add Files Append setting name [Optimum quality and size] C:/Users/Idsu/Videos/Format Factory OK](/content/2026/05/986808/images/f1eeccee864af929a0154674220ab0860efd666c4a5f3a2ef22822c44edfcdc5.jpg)
Step 10
Select the 'Start' button to begin the conversion process.
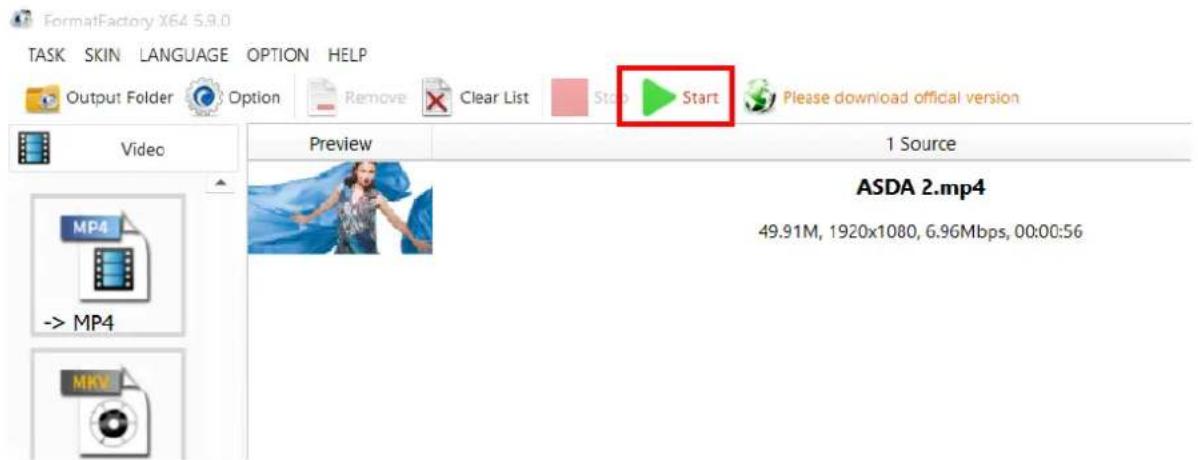
Step 11
Once the process is finished, select the folder icon to find your new converted video file.

5.4 Connecting the screen to a PC.
If your PC/Laptop has a HDMI output then you may connect this to your screen to use as an external display. Simply connect one end of a HDMI cable to the screens HDMI input (see Figure 2 and Figure 3) and the other to your PCs HDMI output port. Using this method will carry both your PCs visual and audio signals.
If you wish the audio signal from your PC to be sent to the screen as well, this can be achieved by using a male-to-male 3.5mm audio jack cable.
To change the input source of your screen, press the 'SOURCE' button located on the top right-hand corner of your remote control (see Figure 3 Remote Control Overview). Next, navigate to your desired source and press Play/Pause Button (▶II) on your remote control.
5.5 My media file does not fit properly on the screen.
If your media is being displayed with black edges please refer to the Supported Media Files table (Section 4.0). This has happened because the file does not have a 16:9 aspect ratio (1920x1080). Please resize file to 1920x1080 pixels and try loading the media onto the display once again.
5.6 My media file will not display or is missing from the playlist.
In this situation the first step to take is to start with a blank USB drive. Copy one supported picture file (see Supported Media Files table (Section 4.0) onto the blank USB drive and insert this into the unit. If this works there are most likely one or more unsupported files or folders on your original playlist.
In this case please check first that the media file is the correct size to fit the screen -1920x1080 pixels. If it is any bigger than this it is likely the media file will not display.
5.7 My media files will not update.
If you are having problems updating your display follow these steps to ensure it is not a technical issue.
1) Ensure that there are no additional unsupported files or folders stored on the USB drive.
2) Make sure the USB drive is firmly inserted into USB slot
3) Before contacting your supplier try another USB drive to be certain this is not the fault.
See section Supported Media Files table (Section 4.0) for more information.
6. Other Information
6.1.1 Decreasing power consumption
When you turn off the screen, it enters Standby mode, which still consumes a small amount of power. To minimize power consumption, it is recommended to unplug the power cord when the screen will not be used for an extended period.
6.1.2 Disposal
Correct Disposal of This Product (Waste Electrical & Electronic Equipment) (Applicable in countries with separate collection systems) This marking on the product, accessories or literature indicates that the product and its electronic accessories should not be disposed of with other household waste at the end of their working life. To prevent possible harm to the environment or human health from uncontrolled waste disposal, please separate these items from other types of waste and recycle them responsibly to promote the sustainable reuse of material resources. Household users should contact either the retailer where they purchased this product, or their local government office, for details of where and how they can take these items for environmentally safe recycling. Business users should contact their supplier and check the terms and conditions of the purchase contract. This product and its electronic accessories should not be mixed with other commercial wastes for disposal
6.1.3 Warnings
Image retention, commonly known as screen burn-in, can occur on most types of LCD panels if the same image is displayed continuously. The most common causes of image retention are logos that remain stationary on the LCD panel. To reduce this risk, avoid displaying still images for long durations and lower the brightness settings to decrease the intensity of the picture. Extended viewing of art in aspect ratios that are different from the aspect ratio of the panel may cause image retention. Always try to avoid black borders at the top or bottom by using correct image/video resolution. This will help eliminate the black borders and fit the picture to the entire area of the screen.
- Warning! Important Safety Instructions
- Ventilation:
- Water and Moisture:
- Electrical Safety:
- Installation Considerations:
- Cleaning and Maintenance:
- Attention:
- Performing the initial setup
- Table of Contents
- Performing the initial setup....3
- Introduction......7
- Digital Signage Player Application....10
- Other Information 48
- Introduction
- Box Contents:
- Remote Control
- Replacing the Remote-Control Battery
- Digital Signage Player Application
- Home Screen
- System Menu Operation
- Basic:
- Senior:
- Settings - Basic
- Screen Rotation
- Server Setting
- Date & Time
- System
- Exit
- Main Menu - Senior
- System
- Screen Resolution
- Real Time Clock
- Display Language
- Play Mode
- Play Time
- Machine Number
- Machine ID
- Machine Name
- Play Log
- USB
- Scroll Text Setting
- Touch Operation Tool
- Auto Start
- Sync Settings
- Webview Settings
- - User Agent:
- - Hardware Acceleration:
- • Media Playback Requires User Gesture:
- Content Storage
- Restore To Factory Settings
- Power
- Strategy
- WI-FI Setting
- TCP Port:
- UDP Port:
- MAC Address:
- Server
- File
- Exit
- Supported Media Files
- Copying Files from a USB Drive
- Step 1
- Step 2
- Step 3
- Step 4
- Step 5
- Advertising LCD Playlist Editor Software
- Main Menu
- Creating Playlists
- Add Schedule
- Add Selected Items
- Adding Images
- Adding Audio
- Adding Video
- Adding Scrolling Text
- Saving
- Editing Playlists
- Deleting Items
- F.A.Qs
- Why is my screen displaying "Error (Screen Mode Mismatch)"?
- How do I play PowerPoint presentations on my display?
- Video Format Conversion
- Step 6
- Step 7
- Step 8
- Step 9
- Step 10
- Step 11
- Connecting the screen to a PC.
- My media file does not fit properly on the screen.
- My media file will not display or is missing from the playlist.
- My media files will not update.
- Other Information
- Decreasing power consumption
- Disposal
- Warnings
Brand : Allsee
Model : PPCNET-D
Category : Media player