
ATAB7-0125 - Loudspeaker Bauhn - Free user manual and instructions
Find the device manual for free ATAB7-0125 Bauhn in PDF.


| Product Type | Portable Bluetooth Speaker |
| Model | ATAB7-0125 |
| Brand | Bauhn |
| Dimensions (W x H x D) | Approx. 17 x 6 x 6 cm |
| Weight | Approx. 320 g |
| Power Supply | Built-in rechargeable lithium-ion battery, 3.7V, 1200 mAh |
| Charging | Micro USB (5V, 1A) |
| Battery Life | Up to 8 hours at moderate volume |
| Connectivity | Bluetooth 5.0, AUX input (3.5mm) |
| Speaker Output | 5W RMS |
| Frequency Response | 80 Hz - 18 kHz |
| Main Functions | Wireless music streaming, hands-free calling, volume control, track skipping |
| Controls | Power, Play/Pause, Volume +/-, Next/Previous track, Bluetooth pairing button |
| Microphone | Built-in for hands-free calls |
| Water Resistance | Not specified (assumed none) |
| Cleaning and Maintenance | Wipe with a soft, dry cloth. Do not use abrasive cleaners or water immersion. |
| Safety Instructions | Do not disassemble. Keep away from heat sources and liquids. Use only supplied charger. |
| Spare Parts and Repairability | No user-replaceable parts. Contact manufacturer for service. |
| General Information | LED indicator for power and Bluetooth status. Includes micro USB cable and user manual. |
Frequently Asked Questions - ATAB7-0125 Bauhn
User questions about ATAB7-0125 Bauhn
0 question about this device. Answer the ones you know or ask your own.
Ask a new question about this device
Download the instructions for your Loudspeaker in PDF format for free! Find your manual ATAB7-0125 - Bauhn and take your electronic device back in hand. On this page are published all the documents necessary for the use of your device. ATAB7-0125 by Bauhn.
USER MANUAL ATAB7-0125 Bauhn
Congratulations on your purchase!
This manual tells you all you need to know about using your new BAUHN® product.
Please take special note of any important safety and usage information presented with the ⚠ symbol.
All products brought to you by BAUHN® are manufactured to the highest standards of performance and safety and, as part of our philosophy of customer service and satisfaction, are backed by our comprehensive 1 Year Warranty.
Domestic use only: This product is intended for indoor domestic use only. It is not suitable for commercial, industrial or outdoor use. Do not use this product for anything other that its intended purpose, and only use it as described in this manual.
We hope you will enjoy using your purchase for many years to come.
Contents
| Welcome 2 | |
| Product Overview 4 | |
| Operation 7 | |
| Settings 13 | |
| Parental Control 17 | |
| Troubleshooting 18 | |
| Specifications | 20 |
| Compliance and Responsible Disposal 21 | |
| Warranty Information 22 | |
| Repair and Refurbished Goods or Parts Notice 23 | |
| Support Information 24 | |
Product Overview
What's in the box:
A. 7" Kids Tablet
B. Protective Case with Stand
C. USB-C Cable
D. Card Tray Pin
E. Warranty Certificate
F. General Safety Warnings
G. User Manual


- USB-C Port
- TF/Micro SD slot
- Headphone Output
- Front Camera
- Volume Up/Down
- Power Button
- Reset Hole
- Rear Camera
- Speaker
- Microphone
Protective Case with Stand

natural_image
Front view of a light blue handheld device with a screen and abstract curved lines, no visible text or symbols.Portable Mode - Rear view
- Folded back

Stand Mode - Rear view
• Stand support angle 1 (watch mode)
• Stand support angle 2 (touch control mode)
Note: Slightly push the lock for changing the support angle or folding back.
Operation
Charging the Tablet
Before using your tablet for the first time, you need to fully charge the battery.
- Plug the supplied USB-C cable to the USB-C port on the tablet and the other end of a USB-A port on the computer or charger. Note: Please always use the USB-C to USB-A cable (included) for charging.
The tablet USB-C port doesn't support PD (Power Delivery) as the USB-C PD charger requests handshake before it can output 5V. If the tablet is extremely low on power when you begin to charge it, the screen display may be blank for up to 5 minutes before the charging image appears.
Power On/Off
- Press and hold the power button to turn the tablet on. Select the language and follow the start up guide to setup the tablet.
- Press and hold the power button, the power off/restart screen will be displayed on the tablet. Press the power off button to turn the tablet off. Press the restart button to restart the tablet.
- When the tablet is on, press the power button once to turn the tablet into sleep/standby mode. You can adjust the screen timeout by going to Settings > Display > Screen Timeout.
First Time Installation
- When you turn the tablet on for the first time, the first time setup menu will appear. Follow the prompts to select your preferences. You will be guided through:
-
Hello (Language and Vision setting)
-
Google services setting
-
Connect to Wi-Fi
-
Set a PIN
-
Copy apps and data
-
Skip Google Pay setting
-
Add your Google Account
-
A few more settings
Micro SD Card
Your tablet is compatible with Class 4 and higher Micro SD cards, up to 512GB in capacity (make sure the Micro SD card is using FAT32, exFAT format).
- Power off your tablet, then insert your Micro SD card into the Micro SD slot of the tablet, making sure the gold contacts are facing the rear of the tablet. Gently push it in until you feel a soft click.
- To remove the Micro SD card, power off the tablet then gently push the Micro SD card until you feel a soft click and the Micro SD card will eject.
Note: This model is using a hidden slot for the Micro SD card. Please use card tray pin for insert or push the Micro SD card and do not apply excessive force.
Tablet Screen Operations
| Tap / Press When using | the on-screen keyboard, opening an application or selecting items. |
| Press and Hold Press and | d hold for several seconds on an item (such as a text box or web page link) to display the action or submenu for an item, if available. |
| Swipe Swipe up, down, | left or right. |
| Drag | When dragging, you must hold the icon with your finger and continue to hold until it reaches the destination. |
| Display Rotation In many | applications, the content will change between landscape and portrait mode, according to the device orientation. |
Main Screen
Unlocking the Screen
- Swipe up from the bottom of the screen to unlock the screen (password is required if set in advance).
- After unlocking the screen, you will see the last item you had open or the main screen. You can view the pages by swiping left and right across the screen.
- To return to the main screen, press the circle icon in the lower centre of the screen.
Navigation Soft Buttons
The below buttons will always remain on the screen. You can return to the last page or main screen by using these buttons.
| Button Name Description | ||
| Return | Go to the previous page (even in another application). When you have returned to the main screen, you cannot go to the previous page again. | |
| Home Screen | Shortcut to the Home Screen. | |
| Recent applications | Display a list of recently used applications/background applications. | |

-
Back: press to go back
-
Home screen: press to return to home screen
-
Recent activities: press to view recent activities
NOTE: The screenshots used in this manual are for reference only, as they may be different from the actual software and settings.
Wallpapers, Home Settings and Screenshot

Changing Wallpaper
- Press and hold any blank area on the home screen.
- Select "Wallpaper and style" then choose the preferred image from Gallery or Wallpapers.
Widgets
• Press and hold any blank area on the home screen.
- Select "Widgets" then choose the preferred widget.
Home Settings
- Press and hold any blank area on the home screen.
- Select "Home settings" to enable/disable adding icons to the Home Screen. You can directly add installed Apps onto the home screen as a shortcut.
Lockdown, Power Off & Restart
- Press and hold the power button.
- A pop up menu with Lockdown, Power Off and Restart will display.
- Lockdown option is available after password is set.
- Select and confirm.
- To take a screenshot, press the volume down button and the power button simultaneously to capture the current screen.
App Management
Downloading and Installing Apps
- Tap on the Play Store on the home screen.
- Logging in with your Google Account, search and download + install desired apps.
Moving the Apps
- Tap and hold on the app, then slide into the screen/location.
Remove App from Home Screen
- Tap and hold on the app, then slide onto the "X" symbol to remove it from the home screen.
Uninstall an App
- To uninstall an app, swipe up from the home screen to display the list of all apps. Then, tap and hold the app, and slide it to the trash bin.
Internet Navigation
• Note: ensure you are connected to a Wi-Fi connection.
- Use the pre-installed Chrome browser for internet navigation, or you can download and install another browser from the Play Store.
Quick Settings
- Swipe down from the home screen to access quick settings where you can directly go to settings such as Wi-Fi (Internet), Bluetooth, Do no disturb and torch (light).
- Scroll down again to display more quick settings. Tap the icon to add/remove quick setting options. Hold and drag the options onto the quick settings.

OPERATION | 11
Camera
- The camera app has a photo-taking and video-recording functions. There are two cameras on the device. Press the camera icon to take photos and videos.
• To take a photo: press the camera icon - To view captured photos: press the small photo preview icon
- To exit: press the home screen button
- To switch to video recording: swipe from the left to right on the screen and choose Video
- To adjust camera settings: swipe right from the left side of the screen and press the bottom-right icon to access the camera settings menu
Connect with a Computer
Connect the tablet to a computer with the supplied USB-C cable. When connected, swipe down from the top to bring up the top menu. At the bottom, select Android System > Charging the device via USB and tap for more options, the USB menu will appear.
There are 4 options available to choose from.
- File transfer: use to transfer files to/from the connected computer.
- USB tethering
- PTP (transfer photos): for transferring photos only.
• No data transfer: for charging only.
NOTE: If the message does not appear when you connect the tablet to your computer with a USB-C cable, or if the device does not appear on your computer, try the following:
- Some devices or computers may only be able to detect the tablet if "USB Storage" is selected.
- Check and ensure that you have turned the tablet on. Check and ensure that your computer is turned on.
- Unplug the USB-C cable, then reconnect it to the same USB port.
• If your computer has USB ports on the rear, try connecting to one.
• Try a different USB-C cable.
Settings
• The Settings menu on the tablet is similar to a mobile phone and/or computer control panel.
- Swipe down twice from the home screen to display more quick settings, press the ⚙ button to access settings menu. You can also swipe up from the home screen to display all the app list, and tap the ⚙ settings icon.
- Some menu items will allow you to change settings or status by selecting them, others will open a new window to display all the options for that setting.
Network and Internet
- Press "Wi-Fi" to open the Wi-Fi function.
- At the top right of the screen is the button to enable and disable Wi-Fi.
- Press the On/Off button to turn the Wi-Fi function on or off.
- Select the network you wish to connect to.
Connecting to a Wi-Fi Network
When the Wi-Fi network is not secured, it will connect with the device automatically. For information security reasons, be careful when using unsecured Wi-Fi sources. When you press on a secured Wi-Fi network, a window will pop up to input a password.

Settings
Q Search settings
Network and internet WiFi hotspot
Connected devices Bluetooth, pacing
Apps Recent apps default appo
Notifications Notification history, conversations
Battery 9/8 - 1 hr, 1 min, left until full
Storage 14% used - 15.21 GB free
Sound and vibration Volume, vibration, Do Not Disturb
Display Dark theme, font size, brightness
Wallpaper Home, Lock, Screen
Accessibility Display, interaction, audio
Security and privacy App security device lock, permissions
Location On - 3 apps have access to location
Passwords and accounts Saved passwords, autofill, synced accounts
Digital Wellbeing and parental controls Screen time, app timers, bedtime schedules
G Google Services and preferences
System Languages, gestures, time, backup
About tablet
You can find the advanced Wi-Fi settings by choosing "Advanced options"; ensure the tablet is upright in portrait stance for the advanced options to be displayed.
If you experience problems when trying to connect to your Wi-Fi network, try the following troubleshooting steps:
- When entering your password, tick the "Show password" box to confirm you have entered it correctly.
- Try restarting your Wi-Fi Access Point device, then try connecting again.
- Ensure your Wi-Fi Access Point device does not have a MAC address or other restrictions enabled.
- Try updating the Firmware on your Wi-Fi access Point device to the latest available version.
- Try updating your Wi-Fi Access Point device's security settings to use WPA2 mode.
Connected Devices
- Turn Bluetooth on/off
- Pair with Bluetooth devices and check paired devices
• To connect to a Bluetooth device, first turn Bluetooth on for both the tablet and your device. - Tap "Pair new device" to search and display available nearby Bluetooth devices. The device will scan for all available Bluetooth enabled devices.
- Tap the Bluetooth enabled ID to pair. If it is password protected, enter the password on both devices.
Apps
- Check recently opened apps
• View all apps on the tablet - Special app access
Notification
• View notification history
• View notification conversations
Battery
- Display remaining battery power as percentage
- Enable/disable battery saver
Storage
• View and manage your storage space
Sound and vibration
• Set volume levels for media, alarm and notifications
- Set notification and alarm sound
- Turn screen locking sound, charging sounds and vibration, tap and click sounds on/off
Display
- Adjust screen brightness
- Adjust font size and display size
- Set screen saver
Wallpaper
• Change home screen wallpaper
• Change lock screen wallpaper
Accessibility
- For vision and hearing impaired users, manage settings for screen readers, captions, audio description etc.
Security and privacy
- App security
- Set screen lock pattern (i.e. password, PIN etc.)
- Device finders
- System and updates
- Privacy
Location
• Turn location services for specific apps on/off
Passwords & accounts
- Saved passwords
- Auto-fill
- Add/mange user accounts on tablet
System
- Set System languages
- Set App languages
• Set Regional preferences
Multiple users
- Add more users or profiles
• Set Regional preferences
Reset options
- Reset Bluetooth and Wi-Fi
- Reset app preference
- Erase all data (factory reset)
About tablet
- Check detailed information on the tablet
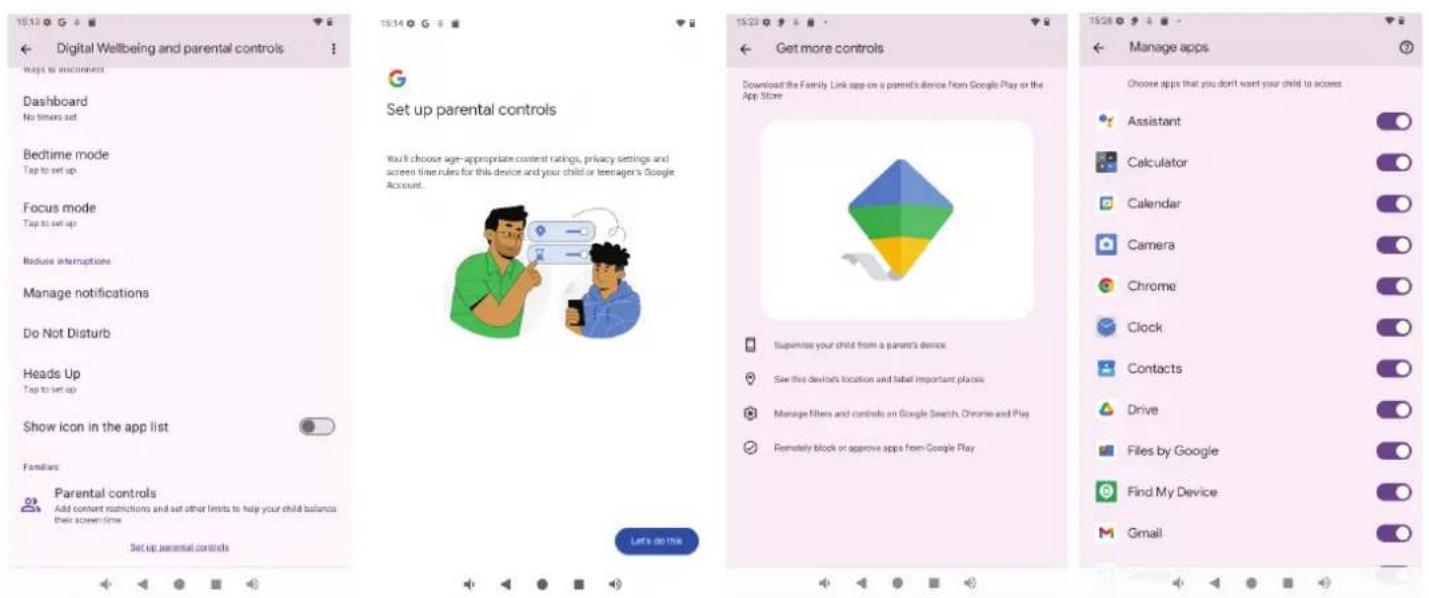
Digital Wellbeing and parental controls
- Set screen time, app timers, bedtime schedules.
- Add content restrictions and set other limits to help your child balance their screen time.
Troubleshooting
| Problem Solution | |
| Tablet won't turn on | Charge the tablet with the included USB-C cable for 3 hours and try again.It is normal for the capacity to slowly drop after a certain usage cycle. |
| Apps run slowly or don't display properly | Make sure the tablet hardware meets the requirement of the app, some apps (e.g. games) may require advanced hardware to run.Open the recently used app list (by the square icon on the bottom of the screen) and clear out all the apps, then try to run your app again.Restart the system and try to run the app again. |
| System runs very slowly | Restart the system.Open the recently used app list (by the square icon on the bottom of the screen) and clear out all the apps.Reset the tablet to factory state. Go to Settings > System > Reset options > Erase all data (factory reset).(This will erase all user data, so make sure you backup your personal data before doing the reset).Check for System Updates. Go to Settings > System > System update. |
| Tablet screen is black | Reset the system. Use a pointy object such as a toothpick to press the Reset button, which is located inside a hole on the tablet. |
| Insert or pull the micro SD card | This model is using a hidden slot for the Micro SD Card. Please use card tray pin for insert or push the Micro SD Card and do not apply excessive force. |
Problem Solution
| No sound from the tablet | Make sure the speaker outlet on the back of the tablet is not blocked.Unplug anything from the headphone port.Make sure the tablet or the app is not muted.Turn up the volume.Restart the system. |
| No sound when using the headphone port | Check that the plug is fully inserted into the headphone port.Make sure the tablet or the app is not muted.Turn up the volume by pressing the volume + button on the tablet. |
| Tablet won’t connect to a computer by USB-C cable | On the tablet, check that the USB mode is set to “file transfer”. (The default setting is “charging only”).Only use the cable that was included with the tablet. Some USB-C cables are designed for charging only, and do not support data transfer and thus cannot connect the tablet to a computer.Make sure that the cable connecting the tablet and computer is securely plugged in to either end.Make sure you have installed the necessary device drivers. |
Specifications
| Processor | RK3562 | |
| Operating System | Android 14 (64-bit) | |
| Display | 1024 x 600 IPS panel | |
| Memory | 3GB | |
| Internal Storage | 32GB | |
| External Storage | Micro SD supports up to 512GB | |
| Touch Screen | 10 point multi touch | |
| Wi-Fi | Yes | |
| Bluetooth® | Yes | |
| Camera | Front 2.0MP Fixed Focus | |
| Rear 5.0 MP Fixed Focus | ||
| Connections | Charging | 5V ≈ 2A, USB-C |
| Headphone Port 3.5mm audio jack | ||
| Battery | Li-ion 3.7V 2500mAh, 9.25Wh | |
| Sensors | Accelerometer | |
| Dimensions (L x W x H) | 188.8 x 108.5 x 9.9mm (tablet only) | |
| 202 x 122 x 21.1mm (tablet with protective case) | ||
| Weight | 254g (tablet only) | |
| 370g (tablet with protective case) | ||
For Technical and Warranty Support
1300 002 534
tempo.org/support
Distributed by Tempo (Aust) Pty Ltd,
PO BOX 6097, North Sydney NSW 2059
The Bluetooth® word mark and logos are registered trademarks owned by Bluetooth SIG, Inc. and any use of such marks by Hands (IP) Holdings Pty Ltd is under license. Other trademarks and trade names are those of their respective owners.
Google, Android, Google Play and other marks are trademarks of Google LLC.
Android™ 14 (64-bit).

Compliance and Responsible Disposal

Packaging
The packaging of your product has been selected from environmentally friendly
materials and can usually be recycled. Please ensure these are disposed of correctly. Plastic wrapping can be a suffocation hazard for babies and young children, please ensure all packaging materials are out of reach and are safely disposed of. Please recycle these materials rather than throwing them away.
Product
At the end of its working life, do not throw this product out with your household rubbish. An environmentally friendly method of disposal will ensure that valuable raw materials can be recycled. Electrical and electronic items contain materials and substances which, if handled or disposed of incorrectly, could potentially be hazardous to the environment and human health.
Compliance
This product complies with the Australian Safety Standard AS/NZS 62368.1 to ensure the safety of the product.

BAUHN®
Warranty Information
The product is guaranteed to be free from defects in workmanship and parts for a period of 12 months from the date of purchase. Defects that occur within this warranty period, under normal use and care, will be repaired, replaced or refunded at our discretion, solely at our option with no charge for parts and labour. The benefits conferred by this warranty are in addition to all rights and remedies in respect of the product that the consumer has under the Competition and Consumer Act 2010 and similar state and territory laws.
Our goods come with guarantees that cannot be excluded under the Australian Consumer Law. You are entitled to a replacement or refund for a major failure and to compensation for any other reasonably foreseeable loss or damage. You are also entitled to have the goods repaired or replaced if the goods fail to be of acceptable quality and the failure does not amount to a major failure.


BAUHN®
Repair and Refurbished Goods or Parts Notice
Unfortunately, sometimes faulty products are manufactured, which need to be returned to the supplier for repair.
Please be aware that if your product is capable of retaining user-generated data (such as files stored on a computer hard drive, telephone numbers stored on a mobile telephone, songs stored on a portable media player, games saved on a games console or files stored on a USB memory stick) during the process of repair, some or all of your stored data may be lost. We recommend you save this data elsewhere prior to sending the product for repair.
You should also be aware that rather than repairing goods, we may replace them with refurbished goods of the same type or use refurbished parts in the repair process.
Please be assured though, refurbished parts or replacements are only used where they meet ALDI's stringent quality specifications.
If at any time you feel your repair is being handled unsatisfactorily, you may escalate your complaint. Please telephone us on 1300 002 534 or write to us at:
Tempo (Aust) Pty Ltd ABN 70 106 100 252
PO Box 6097, North Sydney NSW 2059
Telephone: 1300 002 534 (Aust) Fax: (02) 8977 3765
Tempo Help Desk: 1300 002 534 (Aust)
(Operating Hours: Mon-Fri 8:30am-6pm; Sat 9am-6pm AEST)
Email: tempo.org/support
Online support
Visit bauhn.com.au for the latest User Manual for information on the updated features.
Warranty returns
Should you for any reason need to return this product for a warranty claim, make sure to include all accessories with the product.
Product does not work?
If you encounter problems with this product, or if it fails to perform to your expectations, please contact our After Sales Support Centre on 1300 002 534.

ALDI guarantees that our products are developed to our stringent quality specifications. If you are not entirely satisfied with this product, please return it to your nearest ALDI store within 60 days from the date of purchase for a full refund or replacement, or take advantage of our after sales support by calling the supplier's Customer Service Hotline.

- Contents
- Product Overview
- Protective Case with Stand
- Operation
- Charging the Tablet
- Power On/Off
- First Time Installation
- Micro SD Card
- Main Screen
- Unlocking the Screen
- Navigation Soft Buttons
- Wallpapers, Home Settings and Screenshot
- Changing Wallpaper
- Widgets
- Home Settings
- Lockdown, Power Off & Restart
- App Management
- Internet Navigation
- Quick Settings
- Camera
- Connect with a Computer
- Settings
- Network and Internet
- Connecting to a Wi-Fi Network
- Connected Devices
- Apps
- Notification
- Battery
- Storage
- Sound and vibration
- Display
- Wallpaper
- Accessibility
- Security and privacy
- Location
- Passwords & accounts
- System
- Multiple users
- Reset options
- About tablet
- Digital Wellbeing and parental controls
- For Technical and Warranty Support
- Compliance and Responsible Disposal
- Packaging
- Product
- Compliance
- BAUHN®
- Warranty Information
- Repair and Refurbished Goods or Parts Notice
- Online support
- Warranty returns
- Product does not work?
Brand : Bauhn
Model : ATAB7-0125
Category : Loudspeaker