
E-Swipe - Alarm system Godrej - Free user manual and instructions
Find the device manual for free E-Swipe Godrej in PDF.


| Product Type | Electronic Safe / Alarm System |
| Brand | Godrej |
| Model | E-Swipe |
| Dimensions (H x W x D) | 250mm x 455mm x 375mm |
| Power Supply | 4 x 1.5V AA Alkaline Batteries |
| Locking Mechanism | Motorised Steel Bolts |
| User Interfaces | Keypad, Display, Magnetic Card Swipe |
| Operating Modes | Home, Hotel, Safety |
| Personal Code Length | 3–6 digits (selectable) |
| Master Code | 6-digit (factory default 800000) |
| Lockout Delay | 0, 15, or 30 minutes after 4 wrong attempts |
| Audit Trail | Stores up to 100 lock/unlock records |
| Emergency Override | Mechanical key (provided) |
| Mounting Options | Floor, wall, or cabinet |
| Battery Level Test | Press LOCK(#) – shows bA-HI or bA-LO |
| Cleaning Instructions | Use a damp cloth only; avoid liquids on keypad |
| Package Contents | Safe, User Manual, Warranty Card, Allen Key, Override Keys, Anchoring Bolts, Interior Carpet |
| Warranty | Contact Godrej service (toll-free 1800 209 9955) |
Frequently Asked Questions - E-Swipe Godrej
User questions about E-Swipe Godrej
0 question about this device. Answer the ones you know or ask your own.
Ask a new question about this device
Download the instructions for your Alarm system in PDF format for free! Find your manual E-Swipe - Godrej and take your electronic device back in hand. On this page are published all the documents necessary for the use of your device. E-Swipe by Godrej.
USER MANUAL E-Swipe Godrej
Note: Home users may switch to home mode as per instructions given on page no 8
Be Intelligent. Be Safe.
E-SWIPE SAFE:
Attractive design, suitable for use in hotels, apartments, offices and homes. Utilising a proven and reliable electronic circuit with embedded technology.
Height x Width x Depth:250mm x 455mm x 375mm
Batteries: Four 1.5Volts AA Size Alkaline
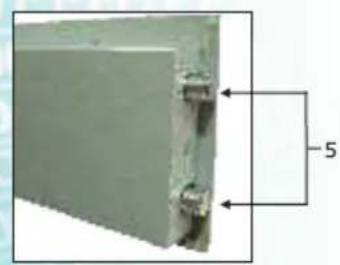
natural_image
Close-up of a rectangular panel with a small protrusion and dimension label '5' (no text or symbols on the panel itself)
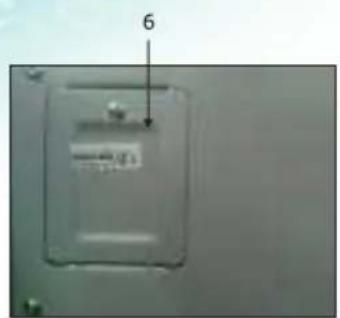

natural_image
Exterior view of a gray rectangular office or library cabinet (no visible text or symbols)FEATURES
- Display
- Keypad
- Magnetic Card Swipe
- Godrej Logo/Override Key
- Motorised Steel Bolts
-
Easy to access battery compartment
-
USB Port
- Enhanced Battery life
- Automatic lockout after four consecutive wrong password entries
- 3-6 digit personal code
PACKAGE CONTENTS
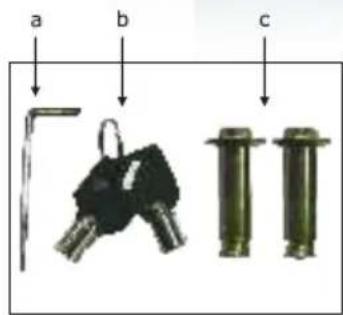
a. Allen Key for cover removal
b. Override Keys
c. Nut Bolts for anchoring
d. Warranty Card
e. User Manual
f. Interior Carpet
PACKAGE CONTENTS

natural_image
Simple illustration of a gray box with a digital keypad (no text or symbols)Safe

Warranty Card

User Manual

Allen Key

natural_image
Two gray screwdrivers with hexagonal nuts, no text or symbols presentAnchoring Bolts

Override Keys
TOOLS REQUIRED

Drill Machine

Sprit Leveler

Drill Bit

Mallet

Spanner
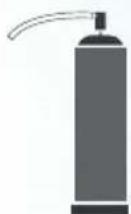
Adhesive
Note: Not included in the package contents
GROUTING PROCESS

Using sprit leveler, check if the safe is evenly placed on the ground or against the wall or inside the wardrobe (depending on where it is to be grouted). If not, choose a different location for grouting.

Sprit leveler lets you know precisely if the safe is evenly placed.

natural_image
Diagram showing two pencil tips projecting onto a 3D object with grid background (no text or symbols)Through the holes inside the safe, make markings on the ground or the wall or inside the wardrobe.

Drill holes into the ground or the wall or the inside of the wardrobe.

natural_image
Illustration of a gavel striking a surface with a tool, no text or symbols presentFix the safe by hammering the anchoring bolts (provided in the kit) through the holes.

natural_image
Illustration of a wrench securing a vertical pipe into a rectangular block (no text or symbols)Tighten the anchoring bolts with a spanner.
IMPORTANT INSTRUCTIONS
- Please keep this manual and override keys in a safe place (NOT INSIDE THIS SAFE)
• Make sure the safe is anchored properly as it can fall and hurt people and property
• DO NOT use any liquid while cleaning the keypad, you could use a damp cloth if required
• DO NOT place any liquid on top of the safe, a spill on the keypad may render the safe inoperable
• DO NOT overstuff the safe or you can damage the motor mechanism or the contents
• DO NOT open the back cover or try to repair the safe yourself. In case of any problem contact GSS call center at 1800 20 999 55

natural_image
Illustration of a transparent cube with arrows indicating force or movement, labeled 'ANCHORED' below (no other text or symbols)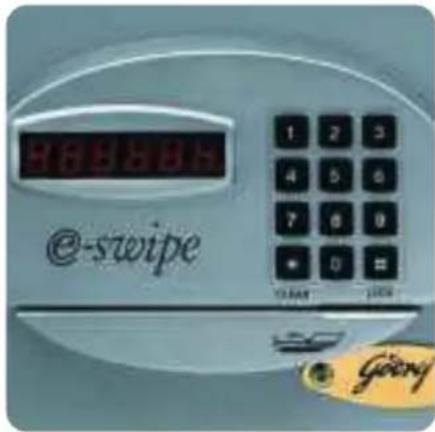
HOME MODE OPERATION
Suitable for private use.
- To open the safe: Enter personal code and slide the credit card if any. When the display shows "OPEN", the bolts will retract automatically. After bolts have fully retracted, the display will show "OPENED". Now, open the door by pulling from the bottom of the keypad.
- To lock the safe: Close the door and press LOCK(#) button. The display will show "CLOSE", the bolts will extend automatically.
Note: Master code can be used to unlock the safe.
TO CHANGE THE PERSONAL CODE IN HOME MODE
- Open the safe
- Press CLEAR(*) twice, display will show "PROG".
- Press 68 LOCK(#), display will show "NEU".
- Enter the new code and press LOCK(#) or slide the magnetic card instead. Safe will close.
Note: Default Personal Code is "1234"
Suitable especially for hotel use
-
To open the safe: Enter personal code and slide the magnetic card if any, which was entered while locking the safe. When the display shows "OPEN", the bolts will retract automatically. After bolts have fully retracted, the display will show "OPENED". Now, open the door by pulling from the bottom of the keypad.
-
To lock the safe: Close the door and Enter personal code and press LOCK(#) or slide the magnetic card instead. The display will show "CLOSE", the bolts will extend automatically.
Note: Master code can be used to unlock the safe
WARNING:
The safe can be unlocked only with the password entered during the last locking operation.
TO CHANGE THE PERSONAL CODE IN HOTEL MODE
In Hotel mode, every time you close the safe, you can enter a new personal code and press LOCK(#) or slide the magnetic card instead. The safe will open with the last entered personal code only.
Two systems together ensure the double security.
-
To open the safe: Enter personal code, the Display will show "GOOD". When "GOOD" disappears, then slide the magnetic card with the magnetic strip facing down, sliding from the buttons towards the opening edge of the door slowly. OR First slide the magnetic card, the display will show "GOOD". When "GOOD" disappears, then enter the personal code which was entered while locking the safe. The display will show "OPEN", the bolts will retract automatically. After bolts have fully retracted, the display will show "OPENED". Now, open the door by pulling from the bottom of the keypad.
-
To lock the safe: Close the door and press LOCK(#) button. The display will show "CLOSE", the bolts will extend automatically.
TO CHANGE THE PERSONAL CODE AND MAGNETIC CARD IN SAFETY MODE
- Open the safe.
- Press CLEAR(*) twice, display will show "PROG".
- Press 68 LOCK(#), display will show "NEU".
- Enter new personal code and press LOCK(#), the Display will show "GOOD". Then slide the magnetic card with the magnetic strip facing down. OR First slide the magnetic card, the display will show "GOOD". Then enter new personal code and press LOCK(#). The safe will close.
TO CHANGE THE MASTER CODE
- Open the safe
- Press CLEAR(*) key twice, display will show "PROG", then enter original master code (factory preset is 800000), display will show "NEU".
- Enter the 6 digit code you desire, the LED display shows "AGAIN", then enter the code again and press LOCK(#) key to confirm.
- The LED display will show "DONE" to indicate new master code has been setup successfully.
Note: Default Master Code "800000"
WARNING:
For security purposes, you should change the factory default code as soon as possible. Godrej Security Solution shall not be responsible for only theft caused by such negligence.
TO STOP YOUR CODE FROM BEING DISPLAYED
- Open the safe using your Personal Code.
- Press CLEAR(*) twice, the display will show "PROG".
- When "PROG" disappears, press 751019LOCK(#) within 5 seconds.
- 172131 will appear, with the first digit flashing, press (0) then press LOCK(#) thrice. The display will go blank.
- Close the safe (you will have to press your Personal code to lock door).
- By entering personal code, check if this feature is activated. You will see that “---” will appear instead of your personal code.
If your lock is set so that your code appears and you need it to not appear one time, you can press (0) then LOCK(#) key before your code. Only dashes will appear for that one time. The next time you press your code it will appear as usual.
Likewise, if your lock is set up so that your code does not appear, you can press (9) then LOCK(#) and your code will appear for that one time only.
This function applies to all modes (Home mode, Hotel mode & Safety mode).
TO ACCESS THE PROGRAMMING
- Open the safe
- Press CLEAR(*) twice, the display will show "PROG"
- Press 751019&LOCK(#) while the word "PROG" disappears.
• The current setup will appear with the first digit flashing - All 6 sections must be entered within 10 seconds. You can change all sections or as few as one section but all 6 sections must be entered if you are making any changes to section 1-6. To keep a section programmed as it is currently set, simply press the same numbers that are currently displayed for that section and press LOCK(#)
- The display will show the Date setup. Enter the correct date, then press LOCK(#)
- The display will show the Time setup. Enter the correct time, then press LOCK(#)
• The display will go blank
To set up the different features listed below, you must first decide how you want the safe to function.
Section 1 ( 1^st Digit) Code appearance on display
Press 0: If you DO NOT want your code to appear on the display (only dashes will appear) with beep sound when you press each key button. (Default)
Press 1: If you want your code to appear each time you press your code.
Section 2 ( 2^nd Digit) Preferred number of digits in your code
Press 3: To use a 3-digit code.
Press 4: To use a 4-digit code.
Press 5: To use a 5-digit code.
Press 6: To use a 6-digit code.
Press 7: To choose the length of code (3-6 digits) when you set the code. (Default)
Section 3(3rd Digit) Lockout Delay
If the wrong code is entered FOUR times in a row, The safe will be lockout for the length of time that you set. This is to deter someone from opening your safe by trying random numbers. You must pick one of these three options:
- Press 0: For no lockout delay
- Press 1: For 15 minute delay (Default)
- Press 2: For 30 minute delay
Section 4 ( 4^th Digit) Master code
The master code will open the safe if you lose the code and override keys. The master code is preset at the factory.
- Press 0: To turn OFF the master code feature.
- Press 1: To turn ON the master code feature. (Default)
Section 5 (5th Digit) Audit Trail Setting
The audit trail setting is to check when the safe was locked or unlocked
- Press 0: To record only the unlocking safe
- Press 1: To record both the locking and unlocking of the safe
Section 6 ( 6^th Digit) Operational mode
This feature allows you to change how the safe operates.
Press 1: To set for Home Mode. (Default)
Press 2: To set for Hotel Mode.
Press 3: To set for Safety Mode.
Press LOCK(#) thrice to exit Program mode
Note: The Factory default setting is "072131"
TO SET DATE AND TIME
- Open the safe
- Press CLEAR(*) twice, the display will show "PROG"
- Press 751019 & LOCK(#) while the word "PROG" disappears.
• The current setup will appear with the first digit flashing - Press LOCK(#) to enter Date setup
• Set Date in YYMMDD format
For Example:

Means: 10 ^th June 2013
- Press LOCK(#) to enter Time setup
• Set Time in HHMMSS format
For Example:
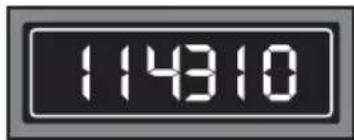
Means the Time is 11:43:10 AM
- Press LOCK(#) to exit the Program mode
AUDIT TRAIL
100 record of locking and unlocking can be tracked in this safe, including information of date, time and method of locking and unlocking the safe. The records can be displayed directly through the safe.
- Open the safe
- Press (CLEAR) twice and repeat. Monitor will display "PROG"
- Insert code 770626.
The program will enter the mode of locking & unlocking record tracking. Each record is displayed by 3 screens. The first screen displays the sequence of each records and lock/unlock operation, the second screen displays the date (DD/MM/YY), and the third screen displays the time (HH/MM/SS).
Example:
| Screen 1 | Sequence of records | lock / Unlock | Method | |||
| 1a | 1b | 1c | 1d | 1e | 1f | |
| 0 | 0 | 5 | 0 | 3 | ||
| Screen 2 | D | D | M | M | Y | Y |
| 2a | 2b | 2c | 2d | 2e | 2f | |
| 2 | 3 | 0 | 3 | 1 | 6 | |
| Screen 3 | H | H | M | M | S | S |
| 3a | 3b | 3c | 3d | 3e | 3f | |
| 1 | 0 | 0 | 5 | 3 | 8 | |
Instructions:
Position 1a, 1b, 1c: shows the sequence number of each record. Position 1d: blank.
Position 1e: "0" indicates unlocking, "1" indicates locking.
Position 1f: when 1e shows "0" (unlocking):
Display "1": Unlocking by User code
Display "2": Unlocking by Master Code
Display "3": Unlocking by CEU handheld device
Display "9": Unlocking using override key
MOUNTING
Mounting Through the Bottom of the Safe:
- Check the floor for what type it is (wood, tile, concrete)
• Get the appropriate anchors for the type of floor
• Check location on floor for concealed wires or pipes
• Mark the floor to drill for your anchor
• Drill the appropriate size hole for the anchors you have
• Mount the safe, making sure it is secure - For mounting to the top of a cabinet you may want to use carriage bolts through the top of the cabinet
- DO NOT mount to a shelf in a cabinet or closet without anchoring to wall behind the safe
Mounting Through the Back of the Safe:
- Check the wall or cabinet for structural Soundness
- For safety, have someone help to hold the safe during mounting
• Check location for concealed wires or pipes - Mark the surface to drill holes for the anchors you will be using
- Drill the appropriate size holes for the anchors you are using
• Having someone hold the unit, anchor the safe to the wall - Test the strength of the mounted safe so it will not fall of the wall or cabinet
- DO NOT place safe on a shelf without proper mounting into a wall

natural_image
Simple line drawing of a rectangular object with a left-pointing arrow inside, mounted on a base (no text or symbols)Mounting Tips:
• The safe may be mounted to a wall or the inside of a cabinet or on the floor
- When mounting to a wall or cabinet, be sure of the load bearing so as to hold the weight of the safe and the contents
(Failure to do so could result in the safe falling and damaging property and people)
TESTING AND REPLACING THE BATTERIES
Test battery level:
Battery levels can be tested either with the door opened or closed
Press LOCK(#) key. The display will show "bA-HI" or "bA-LO". "bA-LO" means that you need to replace the batteries.
Replacing the Batteries:
- Open the Safe using your personal code. If the batteries are dead, use the Emergency Override key.
- Remove the battery cover on the back panel by unscrewing the Phillips screw.
- Remove all four used batteries.
- Replace the batteries with four 1.5V AA size alkaline batteries.
- Put back the battery cover.
- Put back the Phillips screw to secure the battery cover.
- Keeping the door open, test the safe to make sure it works.
- Set Date and Time as mentioned above.
- Dispose the used batteries in an environment friendly way.

natural_image
Close-up of a metallic electrical outlet cover with a label (no readable text or symbols)EMERGENCY OVERRIDE KEY
- Using the supplied Allen key unscrew one of the screws holding the Godrej plate and rotate to expose key cylinder.
- Using one of the override keys, insert into the cylinder and turn clockwise to open the safe.
- While the door is open and the key is still turned, follow the instructions to set your personal code.
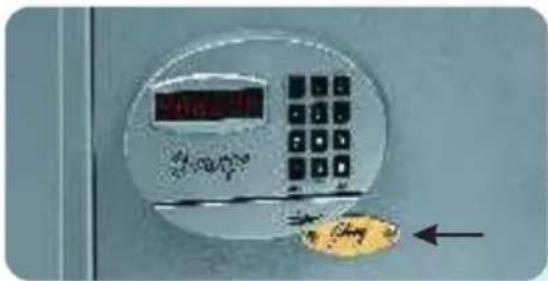
Note: When you set the new personal code, the key will rotate to the locked position. If you get an error message, wait until the motor stops moving and then turn the key back to locked position and remove it. Your new personal code will still remain.
WARNING:
Keep the override keys in a safe place other than inside this safe. These keys are to be used in emergencies.
ERROR MESSAGES
Listed below are error codes you might encounter:

This means that you have entered an incorrect personal code or magnetic card. Verify your personal code and try again. If you get this error four times consecutively, the keypad will lock out for 0/3/15 minutes.
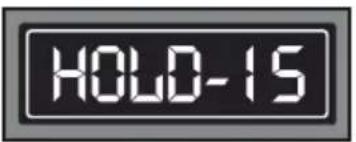
This means the safe has entered the lockout period. You will not be able to open the safe during the lockout period. By pressing any key during this period you can see how much time is left until the lockout is over. If your personal code still doesn't work, use the override keys to reset the safe.

This means that the bolts failed to retract fully. Press the door towards the inside while entering your personal code. If you still cannot open your safe then contact GSS call center on 1800 20 999 55
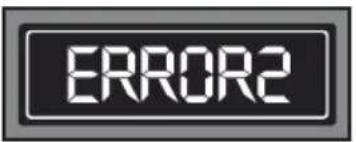
This could also mean that the bolts failed to extend fully. Most likely because the safe is too full. Press the door to close it fully while pressing your personal code. If you still cannot close your safe then contact the GSS call center on 1800 20 999 55.
INFORMATION ON E-WASTE HANDLING AND MANAGEMENT
Dear Customer,
The Ministry of Environment and Forests have published The E-waste (Management and Handling) Rules 2010 which comes in effect from 1 ^st May 2012.
E-waste is defined as any electrical or electronic component of products in whole or in part, or rejects from their manufacturing or repair process which are intended to be discarded.
These rules apply to every producer; consumer or bulk consumer involved in the manufacture, sale, and purchase and processing of electrical and electronic equipment or components as specified in Schedule 1 (please refer to our website www.godrej.com in the 'Good & Green' section of CSR module for more details).
Under these rules, specific roles and responsibilities are defined for producers, consumers and recyclers handling and managing e-waste.
E-waste is to be managed in an environmentally sound manner which means, taking steps to ensure that health and environment are protected from adverse effects of hazardous substance contained in such wastes.
Rule 6 of the E-waste (Management and Handling) Rules 2010 states that bulk consumers of electrical and electronic equipment shall be responsible for recycling of the e-waste generated by them. Bulk consumer means bulk users of electronic and electrical equipment such as Central Government or State Government Departments, public sector undertakings, banks, educational institutions, multinational organizations, international agencies, private companies that are registered under the Factories act 1948 and Companies act 1956. The bulk consumers have to ensure that the e-waste generated by them is channelized to authorized collection centers or is taken back by the producers. They shall maintain records of e-waste generated by them in Form 2 and make such records available for scrutiny by the State pollution control or the Pollution control Committee concerned.
All consumers of electrical and electronic equipment irrespective of their status as bulk consumers or not, shall ensure that e-waste generated by them is channelized to authorized collection center(s) or registered dismantler(s), or recycler(s) or is returned to the pick-up/take back services provided by the producers. (Please refer to our website www.godrej.com in the 'Good & Green' section of CSR module for more details).
All our products intended to be recycled under the category of e-waste (as defined above) carry a label or stamp of the WEEE symbol (A wheelie bin with a cross), which states that it falls under the hazardous waste category and is not to be disposed along with normal garbage.
We seek your support in ensuring environmentally sound management of e-waste and aid us in sustaining our earth's natural resources and maintaining the earth's green cover intact for the benefit of our future generations.
NOTES
NOTES
NOTES
NOTES
RECORD OF PURCHASE
Please fill your details below for future reference.
Date of purchase: ____
Product model: ____
Name & address of Distributor/Dealer: ____
Distributor phone number: ____
FOR SAFETY, PLEASE READ THIS MANUAL PRIOR TO USE.

SECURITY SOLUTIONS
Godrej & Boyce Mfg. Co. Ltd.
Godrej Security Solutions
Regd. Office: Plant No.17, Pirojshanagar, Vikhroli, Mumbai - 400 079.
Toll-free: 1800 209 9955 (Sales) 1800 209 5511 (Service)
Email: secure@godrej.com | Visit: www.godrejsecure.com
In view of the Godrej policy of continuous development and improvement, the dimensions and specifications may be changed without prior notice or obligation. The colours of the product in the leaflet may not match the actual colours due to printing limitations.
An ISO 9001:2015, ISO 14001:2015, ISO 45001:2018
Products Marketed and Serviced by Godrej and Boyce Mfg. Co. Ltd.
- E-SWIPE SAFE:
- FEATURES
- PACKAGE CONTENTS
- TOOLS REQUIRED
- GROUTING PROCESS
- IMPORTANT INSTRUCTIONS
- HOME MODE OPERATION
- TO CHANGE THE PERSONAL CODE IN HOME MODE
- Suitable especially for hotel use
- WARNING:
- TO CHANGE THE PERSONAL CODE IN HOTEL MODE
- TO CHANGE THE PERSONAL CODE AND MAGNETIC CARD IN SAFETY MODE
- TO CHANGE THE MASTER CODE
- TO STOP YOUR CODE FROM BEING DISPLAYED
- TO ACCESS THE PROGRAMMING
- Section 1 ( 1st Digit) Code appearance on display
- Section 2 ( 2nd Digit) Preferred number of digits in your code
- Section 3(3rd Digit) Lockout Delay
- Section 4 ( 4th Digit) Master code
- Section 5 (5th Digit) Audit Trail Setting
- Section 6 ( 6th Digit) Operational mode
- TO SET DATE AND TIME
- AUDIT TRAIL
- Instructions:
- MOUNTING
- Mounting Through the Bottom of the Safe:
- Mounting Through the Back of the Safe:
- Mounting Tips:
- TESTING AND REPLACING THE BATTERIES
- Test battery level:
- Replacing the Batteries:
- EMERGENCY OVERRIDE KEY
- ERROR MESSAGES
- INFORMATION ON E-WASTE HANDLING AND MANAGEMENT
- NOTES
- RECORD OF PURCHASE
- SECURITY SOLUTIONS
Brand : Godrej
Model : E-Swipe
Category : Alarm system