
StageBug SB-7 - Effect pedal Radial Engineering - Free user manual and instructions
Find the device manual for free StageBug SB-7 Radial Engineering in PDF.


| Product Type | Effect Pedal |
| Brand | Radial Engineering |
| Model | StageBug SB-7 |
| Power Supply | 9V DC (center negative), 100 mA |
| Dimensions (HxWxD) | 1.5" x 4.5" x 2.5" |
| Weight | 0.5 lb |
| Inputs | 1 x 1/4" TS unbalanced |
| Outputs | 1 x 1/4" TS unbalanced |
| Bypass Mode | True bypass with soft switching |
| LED Indicator | Blue LED for power/status |
| Circuit Type | Class-A discrete buffer with high headroom |
| Frequency Response | 20 Hz - 20 kHz (±0.1 dB) |
| Input Impedance | 1 MΩ |
| Output Impedance | 150 Ω |
| Maximum Input Level | +10 dBu |
| Noise Floor | -100 dBu (unweighted) |
| Construction | Steel chassis with powder coating |
| Warranty | 3 years limited warranty |
| Country of Design | Canada |
| Maintenance | Clean with dry cloth; avoid solvents |
| Safety | Do not expose to moisture or extreme temperatures |
| User-Serviceable Parts | None; refer to qualified technician |
Frequently Asked Questions - StageBug SB-7 Radial Engineering
User questions about StageBug SB-7 Radial Engineering
0 question about this device. Answer the ones you know or ask your own.
Ask a new question about this device
Download the instructions for your Effect pedal in PDF format for free! Find your manual StageBug SB-7 - Radial Engineering and take your electronic device back in hand. On this page are published all the documents necessary for the use of your device. StageBug SB-7 by Radial Engineering.
USER MANUAL StageBug SB-7 Radial Engineering
StageBug™ SB-7 EarMuff Headphone Silencer USER GUIDE
Thank you for purchasing your very own StageBug SB-7 EarMuff headphone silencer! We are excited about producing a personal device that can fit in your instrument case and be 'at the ready' anytime you need to record and monitor through headphones. Although the SB-7 is designed to be plug & play easy to use, please take a minute to read this short manual. It will give you insight on how to best use your SB-7 EarMuff.
OVERVIEW
The Radial StageBug SB-7 EarMuff is a passive headphone signal manager that enables the user to set the level of their headphones locally when multiple headphones are powered by a single amplifier. It is also able to sum the stereo mix to mono and mute one side of the headphones for artists that prefer to record with one ear open so that they can better hear the tonality of their instrument when recording. Muting the open earphone prevents it's sound from bleeding into the recording mic. The SB-7 is completely passive and will not introduce noise or distortion into the signal path.

CONNECTING
Before making connections, it is good practice to turn all levels down to ensure loud transients do not damage sensitive headphones. The SB-7 EarMuff does not require batteries or external power to work.
Connect the output from your headphone system to the SB-7's headphone input using a standard TRS to TRS cable. Next, connect your headphones to one of the EarMuff's outputs. The SB-7 is equipped with both 14 " and 3.5mm connections for standard headphones or ear buds.

GETTING STARTED
Set the EarMuff's headphone level to the 3 o'clock position so that you have some 'wiggle room' for fine tuning the headphone level later. Make sure both the mono and the left-off switches are in the outward position. This will enable you to test stereo connectivity to ensure everything is working.
Activate the playback track and adjust the level to a comfortable listening volume. Use the level control on the SB-7 to make volume adjustments on the fly.
USING THE EARMUFF AS A LOCAL VOLUME CONTROL
Larger recording studios generally employ a stereo power amplifier to drive several sets of headphones at the same time. The engineer will set the level to an arbitrary level, leaving the musicians in the studio to find a compromise with each other. Using the EarMuff as a simple attenuator enables each musician to set the level so that it is set to a comfortable listening level to better match their instrument and playing style. The resistive circuit inside enables each EarMuff to work independently without affecting the others.

flowchart
graph LR
    A["HEADPHONE CUE MIX"] --> B["POWER AMP"]
    B --> C["SB-7"]
    C --> D["SB-7"]
    D --> E["SB-7"]
    E --> F["SB-7"]
    F --> G["SB-7"]
USING THE EARMUFF WITH ONE EAR
Depressing the left-off switch will mute one side of the headphones. We chose to lift the left side as most folks are right handed. For left-handed players, one simply reverses the headphones to the alternate ear to suit. It is important to note that when one ear is removed, the perceived loudness will drop considerably. The EarMuff lets you compensate by using the level control to fine tune the headphone volume to suit.
USING THE EARMUFF AS A STEREO TO MONO SUM
Depress the mono switch. This will collapse the stereo image and bring all of the sounds to the middle. This ensures that when the artist removes one ear, he or she will hear all of the instruments in the mix. But this also enables the TRS output to be split into two identical mono signals that could feed another device. An example could be splitting the signal so that it feeds a recording channel and an effect at the same time.
ABOUT TRS CABLES
The standard wiring for stereo headphones and TRS cables is tip-left, ring-right, and the sleeve is the common ground. We recommend using a high quality cable to minimize loss, particularly as you extend the distance from the amplifier beyond 5 meters (15').

STANDARD 1/4" TRS HEADPHONE EXTENSION CABLE
To view the 3-year transferable warranty details and product specifications please visit www.radialeng.com

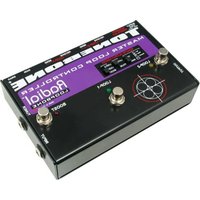
Brand : Radial Engineering
Model : StageBug SB-7
Category : Effect pedal