
UFX 12 - Modulator KATHREIN - Free user manual and instructions
Find the device manual for free UFX 12 KATHREIN in PDF.


| Product Type | Modulator |
| Brand | Kathrein |
| Model | UFX 12 |
| Dimensions | 210 x 160 x 45 mm |
| Weight | 0.6 kg |
| Power Supply | 12 V DC, 500 mA |
| Frequency Range | 47–862 MHz |
| Input Connector | F-type (female) |
| Output Connector | F-type (female) |
| Modulation Type | DVB-T/T2, QAM |
| Output Level | Adjustable, 80–100 dBµV |
| Operating Temperature | 0°C to 40°C |
| Storage Temperature | -20°C to 70°C |
| Humidity Range | 20%–80% non-condensing |
| Maintenance | Clean with dry cloth; avoid liquids |
| Safety | Use in dry, ventilated area; disconnect power before cleaning |
| Spare Parts | None user-serviceable; contact dealer |
| Repairability | Service by qualified technician only |
| Certifications | CE, RoHS compliant |
| Included Accessories | Power adapter, quick start guide |
Frequently Asked Questions - UFX 12 KATHREIN
User questions about UFX 12 KATHREIN
0 question about this device. Answer the ones you know or ask your own.
Ask a new question about this device
Download the instructions for your Modulator in PDF format for free! Find your manual UFX 12 - KATHREIN and take your electronic device back in hand. On this page are published all the documents necessary for the use of your device. UFX 12 by KATHREIN.
USER MANUAL UFX 12 KATHREIN
natural_image
Two black wireless equipment units labeled 'KOTHEIN' and 'WOTHEIN', showing ports, connectors, and ports (no readable text beyond labels)User Manual
TABLE OF CONTENT
1 GENERAL....2
1.1 Description ....2
1.2 Specifications....3
2 INSTALLATION ....4
2.1 What's in the Box....4
2.2 Connection....4
2.2.1 DEVICE Programming and Setup ....4
3 OPERATING INSTRUCTIONS ....5
3.1 Description of controls and components....5
3.2 Starting 6
3.2.1 Beginning Setup....6
3.2.2 Step 1: Login ....6
3.2.3 Step 2: Right Click and Select "Status"....7
3.2.4 Step 3: Setting Tab....8
3.2.5 Step 4: Local Save ....8
3.2.6 Step 5: IP Configuration Tab....9
3.2.7 Step 6: Save IP Configuration ....9
3.2.8 Step 7: Administration....9
4 Menu Tree....10
DIGITAL MODULATOR
1 GENERAL
1.1 Description
The UFX 12 module able to generate a signal in DVB-T/C format from HDMI input.
UFX 12 is H264 encoding, DVB-T/C modulation integrated device to convert HDMI signal to DVB-T/C RF out.
The UFX 12 module adjusts the compression rate to the available bandwidth, using the modulation DVB-T/C parameters.
1.2 Specifications
| INPUT | |
| Input Channel | 2 |
| Input Connectors | HDMI |
| Video System | 480i/p, 576i/p, 720p, 1080i/p |
| RF Input | RF Combiner |
| OUTPUT | |
| Frequency | DVB-T: 177-858 MHz, DVB-C: 105~858MHz |
| Output Level | 95 dBuV Min. |
| RF Level Adjustment | 0 ~ -30dB |
| Attenuation step | 1dB per step |
| MER | 35dB Min. |
| MODULATION | |
| Video Resolution | 1080p 25/30 Max |
| Video Compression | H.264 Baseline Profile Level4.0 |
| Video Bit Rate | 12Mbps Max |
| Audio Compression | MPEG-2/AAC |
| Audio Bit Rate | 192Kbit/s |
| Editable Field | Service Name , Provider Name , Service ID, LCN, NIT Version, TS ID , Network Name, Network ID , Original Net ID, Country |
| DVB-T | |
| Standard | DVB-T (ETSI EN 300 744) |
| Carrier (OFDM Mode) | 8K |
| Guard Intervals | 1/32 |
| Code Rate (FEC) | 7/8 |
| Constellations | 64QAM |
| Bandwidth | 6MHz, 7MHz, 8MHz, 7-8MHz |
| DVB-C | |
| Standard | DVB-C (ETSI EN 300 429 V1.2.1) |
| Constellation | 16,32,64,128,256QAM |
| Symbol rate | 2.0~6.96 Msymbols |
| Bandwidth | 7MHz, 8MHz |
| MANAGEMENT / CONTROL | |
| Configuration | 6 Local keys on Upper cover |
| Web Management | RJ-45 Ethernet port |
| GENERAL | |
| Display | LCD panel @ 2 x 16 characters (on front panel) |
| Power Supply | 12V ADAPTOR |
| Consumption | <10 W |
| Languages | English |
| Dimensions | 235 x 160 x 40 mm |
| Weight | 800g |
*Specifications subject to change without prior notice.
2 INSTALLATION
2.1 What's in the Box
One UFX 12 Modulator
One Power Adaptor
One Power Cable
2.2 Connection
The UFX 12 unit comes standard with HDMI inputs.
Use a quality 75Ω coaxial cable with "F" connectors from the unit's RF OUT jack to the distribution system or directly to a television.
Connect the power cord to an appropriately rated AC power outlet.
Once connected to power, the device turns on and it takes about 20 seconds to be operational. Then the message "Initial Please wait" appears on the display. After 60 seconds the message "Status (Enter) & IP Address 192.*.*." on the display.
| Status (Enter) |
| 192.168.1.100 |
2.2.1 DEVICE Programming and Setup
Connect an Ethernet cable directly (no Cross Over cable required) to the Ethernet Port on the rear panel of the modulator or connect the Ethernet cable to an Ethernet switch. Connect an Ethernet Cable to your PC.
3 OPERATING INSTRUCTIONS
3.1 Description of controls and components
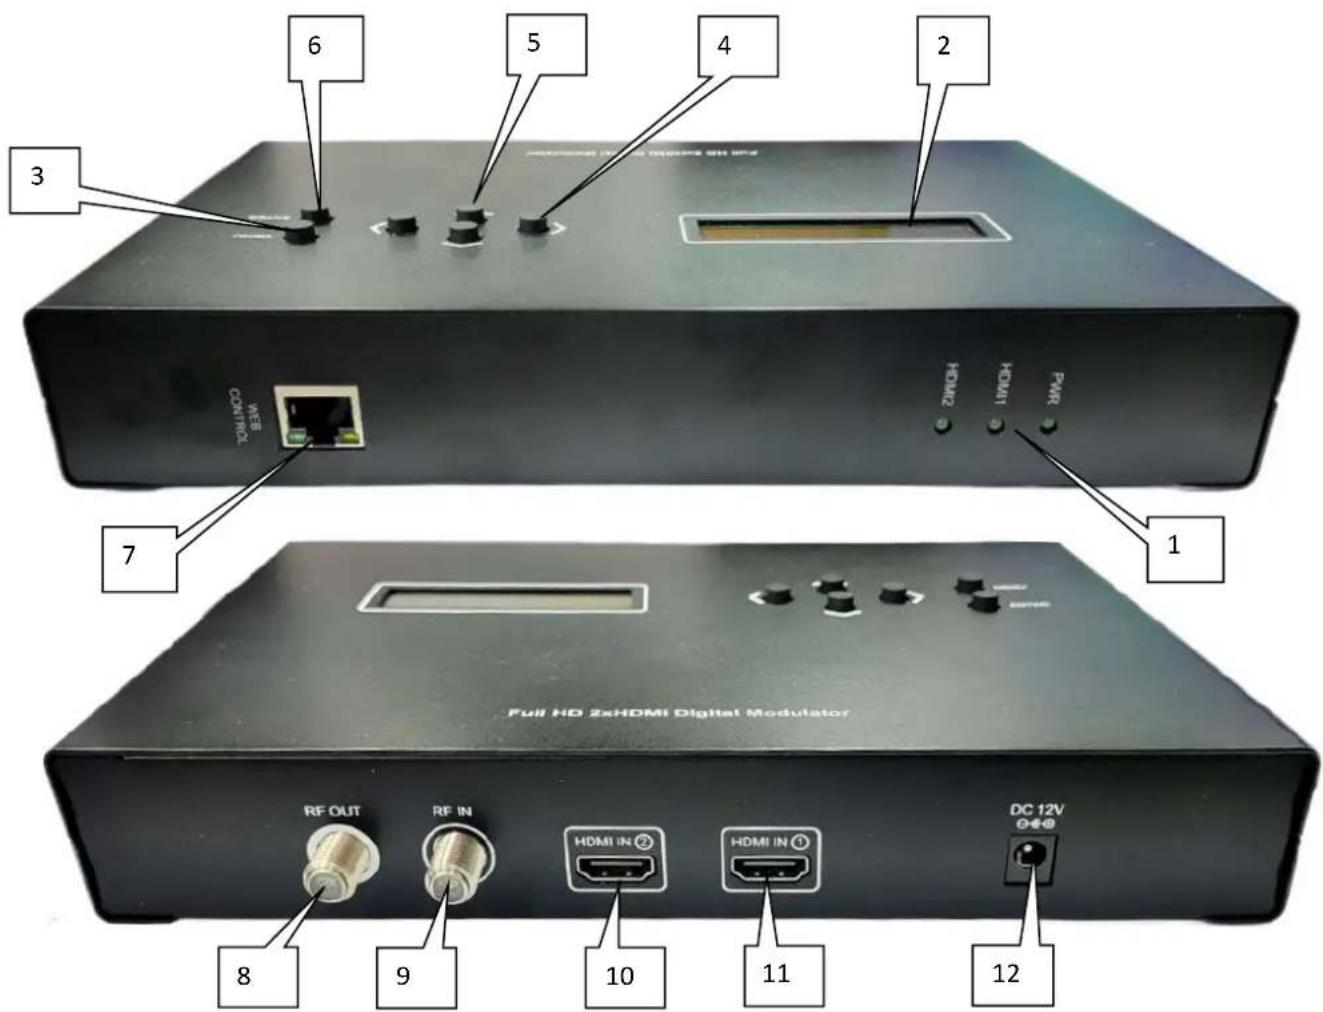
| 1 | LED | Power, HDMI 1, HDMI 2 indicator |
| 2 | LCD Display | Configuration and system status |
| 3 | Key PAD / Home | Return to start menu. |
| 4 | Key PAD / Left & Right | Move Right / Left between menu / characters. |
| 5 | Key PAD / Upper & Down | Increase / Decrease value of the figure / field. |
| 6 | Key PAD / Enter | Select parameter / menu. |
| 7 | Ethernet Port | RJ-45 |
| 8 | RF output | “F”-Female 75Ω |
| 9 | RF Input | RF Combiner |
| 10 | HDMI Input_2 | HDMI IN |
| 11 | HDMI Input_1 | HDMI IN |
| 12 | DC input | DC 12V |
3.2 Starting
3.2.1 Beginning Setup
DEVICE Programming and Setup
- Apply power.
- Connect Audio / Video source
Connecting to the GUI Interface:
- Connect an Ethernet cable directly to the Ethernet port on the rear panel of the modulator or connect the Ethernet cable to an Ethernet switch /router. Connect an Ethernet Cable to your PC.
- Using a Windows-based PC Select Windows Icon
- Check IP address from front panel display.
Initial… Please Wait…
Status (Enter) 192.168.1.100
- Key in the IP address in web browser.

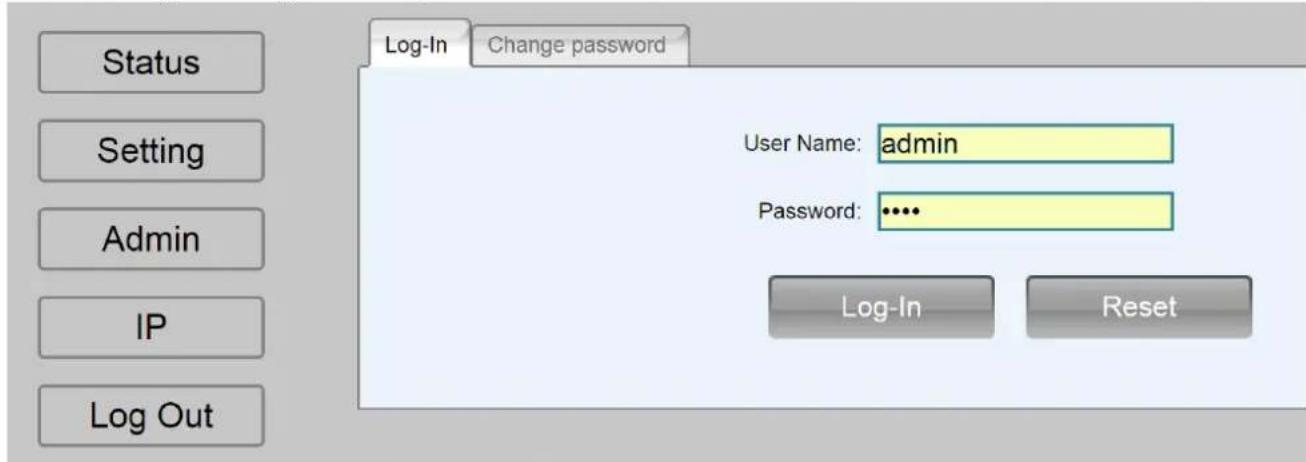
3.2.2 Step 1: Login
Login Password:
Default User Name: admin
Default Password: 0000
Encoder Programming and Setup via GUI Interface:

3.2.3 Step 2: Right Click and Select "Status"
Overview Page of Encoder of RF.
DVB-T Modulator
| RF Status | ||||||
| Frequency | Constellation | Guard Interval | Code Rate | FFT Carrier | Bandwidth | RF Level |
| CH5 178.75 MHz | 64QAM | 1/32 | 7/8 | 8K | 8 MHz | 00 dB |
Network Status
| Country | Original Net ID | Network ID | Network Name | TS ID | NIT Version |
| Other | 8350 | 13057 | Private Network | 128 | 0 |
Channel & Encode Status
| No. | Service Name | Service ID | LCN | ON/OFF | Video Output | Audio Output | Video Input | Input Video Type | Status |
| CH 1 | CH1 | 1 | 1 | ON | H.264 | MPEG-2 | HDMI | 1920X1080p 60Hz | |
| CH 2 | CH2 | 2 | 2 | ON | H.264 | MPEG-2 | HDMI | 1920X1080p 60Hz |
| No. | PMT | Video PID | Audio PID |
| CH 1 | 37 | 32 | 33 |
| CH 2 | 53 | 48 | 49 |
DVB-C Modulator
| RF Status | ||||
| Frequency | Constellation | Bandwidth | Symbol Rate(Kbps) | RF Level |
| 105 MHz | 64QAM | 8 MHz | 6900 | 00 dB |
Network Status
| Country | Original Net ID | Network ID | Network Name | TS ID | NIT Version |
| Other | 8350 | 13057 | Private Network | 128 | 0 |
Channel & Encode Status
| No. | Service Name | Service ID | LCN | ON/OFF | Video Output | Audio Output | Video Input | Input Video Type | Status |
| CH 1 | CH1 | 1 | 1 | ON | H.264 | MPEG-2 | HDMI | 1920X1080p 60Hz | |
| CH 2 | CH2 | 2 | 2 | ON | H.264 | MPEG-2 | HDMI | 1920X1080p 60Hz |
| No. | PMT | Video PID | Audio PID |
| CH 1 | 37 | 32 | 33 |
| CH 2 | 53 | 48 | 49 |
3.2.4 Step 3: Setting Tab
Use the Setting Setup Page to set the Network setting, and channel & encode setting, and RF setting.
DVB-T Modulator
| RF Setting | |||||||
| Frequency | Constellation | Guard Interval | Code Rate | FFT Carrier | Bandwidth | RF Level | |
| CH5 178.75 MHz | 64QAM | 1/32 | 7/8 | 8K | 8 MHz | 00 dB | |
Network Setting
| Country | Original Net ID | Network ID | Network Name | TS ID | NIT Version |
| Other | 8350 | 13057 | Private Network | 128 | 0 |
Channel & Encode Setting
| No. | Service Name | Service ID | LCN | ON/OFF | Video Output | Audio Output | Video Input | Input Video Type |
| CH 1 | CH1 | 1 | 1 | ON | H.264 | MPEG-2 | HDMI | 1920X1080p 60Hz |
| CH 2 | CH2 | 2 | 2 | ON | H.264 | MPEG-2 | HDMI | 1920X1080p 60Hz |
| No. | PMT | Video PID | Audio PID |
| CH 1 | 37 | 32 | 33 |
| CH 2 | 53 | 48 | 49 |
DVB-C Modulator
| RF Setting | ||||
| Frequency | Constellation | Bandwidth | Symbol Rate(Kbps) | RF Level |
| 105 MHz▼ | 64QAM▼ | 8 MHz▼ | 6900 | 00 dB▼ |
Network Setting
| Country | Original Net ID | Network ID | Network Name | TS ID | NIT Version |
| Other | 8350 | 13057 | Private Network | 128 | 0 |
Channel & Encode Setting
| No. | Service Name | Service ID | LCN | ON/OFF | Video Output | Audio Output | Video Input | Input Video Type |
| CH 1 | CH1 | 1 | 1 | ON | H.264 | MPEG-2 | HDMI | 1920X1080p 60Hz |
| CH 2 | CH2 | 2 | 2 | ON | H.264 | MPEG-2 | HDMI | 1920X1080p 60Hz |
| No. | PMT | Video PID | Audio PID |
| CH 1 | 37 | 32 | 33 |
| CH 2 | 53 | 48 | 49 |
3.2.5 Step 4: Local Save
Perform apply once all parameters are set.
Changes made to an individual setup tab may require the installer to perform a apply to the device if you are only making changes to one parameter of the encoder.
Channel & Encode Setting
| No. | Service Name | Service ID | LCN | ON/OFF | Video Output | Audio Output | Video Input | Input Video Type |
| CH 1 | CH1 | 1 | 1 | ON * | H.264 * | AAC * | HDMI * | 1920X1080p 60Hz * |
| CH 2 | CH2 | 2 | 2 | ON * | H.264 * | MPEG-2 * | HDMI * | 1920X1080p 60Hz * |
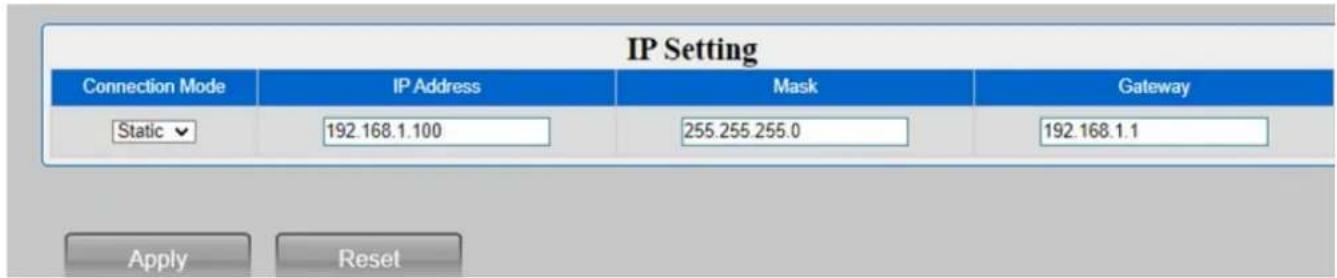
3.2.6 Step 5: IP Configuration Tab
Use the IP Setup Tab to configure the device's IP address, Mask, Gateway,
3.2.7 Step 6: Save IP Configuration
Perform apply once all parameters are set.
3.2.8 Step 7: Administration
Use the Admin Setup Tab to set the device's reboot, configuration, software update, password change,

| Administration Page Functions | Actions |
| Reboot | Reboot device. All unsaved settings will be lost. |
| Configuration | User can upload the file with pre-saved configuration settings to device. |
| Software update | Upload a saved firmware file |
| Password Change | Create and save new password for GUI |
To upload a configuration file- simply click "Choose File" then locate the file you want to upload. Click "Upload" to install the configuration files. This function is helpful to the installer when installing a large number of encoders in a single system.
4 Menu Tree
| DVB-T Setting | NO | Layer 1 | Default value | Layer 2 |
| Network Edit | 1 | Country | Other | AUSTALIA,CROATIA,CZECH,DENMARK,ESTONIA,FINLAND,FRANCE,IRELAND,ITALY,LATVIA,NETHERLANDS,NEWZEALAND ,NROWAY,POLAND,PORTUGAL,SLOVAK, SWEDEN, UK, Other |
| 2 | Original Network ID | 8350 | 1 – 65535 | |
| 3 | Network ID | 13057 | 1 – 65535 | |
| 4 | Network Name | Private Network | ||
| 5 | TS ID | 128 | 1 – 65535 | |
| 6 | NIT Version | 0 | 0 – 31 | |
| CH&Enc Edit | 1 | CHX Service Name | CH 1 | |
| 2 | CHX Service ID | 1 | 1 – 65535 | |
| 3 | CHX LCN | 1 | 1 – 1023 | |
| 4 | CHX ON/OFF | ON | ON,OFF | |
| 5 | CHX Video Output | H.264 | ||
| 6 | CHX Audio Output | MPEG-2 | MPEG-2/AAC | |
| 7 | CHX Video Input | HDMI | ||
| 8 | CHX Input Video | No SIGNAL IN | ||
| 9 | CHX Status | Running | ||
| 10 | CHX PMT | 37 | ||
| 11 | CHX Video PID | 32 | ||
| 12 | CHX Audio PID | 33 | ||
| RF Edit | 1 | Frequency | 178.75MHz | 177.00 MHz – 858.00 MHz |
| 2 | Constellation | 64QAM | ||
| 3 | Guard Interval | 1/32 | ||
| 4 | Code Rate | 7/8 | ||
| 5 | FFT Carrier | 8K | ||
| 6 | Bandwidth | 8 MHz | 6, 7, 8, 7 – 8 MHz | |
| 7 | RF Level | 00 dB | 00 ~ -30 dB | |
| DVB-C Setting | NO | Layer 1 | Default value | Layer 2 |
| Network Edit | 1 | Country | Other | AUSTALIA,CROATIA,CZECH,DENMARK,ESTONIA,FINLAND,FRANCE,IRELAND,ITALY,LATVIA,NETHERLANDS,NEWZEALAND ,NROWAY,POLAND,PORTUGAL,SLOVAK, SWEDEN, UK, Other |
| 2 | Original Network ID | 8350 | 1 – 65535 | |
| 3 | Network ID | 13057 | 1 – 65535 | |
| 4 | Network Name | Private Network | ||
| 5 | TS ID | 128 | 1 – 65535 | |
| 6 | NIT Version | 0 | 0 – 31 | |
| CH&Enc Edit | 1 | CHX Service Name | CH 1 | |
| 2 | CHX Service ID | 1 | 1 – 65535 | |
| 3 | CHX LCN | 1 | 1 – 1023 | |
| 4 | CHX ON/OFF | ON | ON,OFF | |
| 5 | CHX Video Output | H.264 | ||
| 6 | CHX Audio Output | MPEG-2 | MPEG-2/AAC | |
| 7 | CHX Video Input | HDMI | ||
| 8 | CHX Input Video | No SIGNAL IN | ||
| 9 | CHX Status | Running | ||
| 10 | CHX PMT | 37 | ||
| 11 | CHX Video PID | 32 | ||
| 12 | CHX Audio PID | 33 | ||
| RF Edit | 1 | Frequency | 105.00 MHz | 105.00 MHz – 858.00 MHz |
| 2 | Constellation | 64QAM | 16, 32, 64, 128, 256 QAM | |
| 3 | Bandwidth | 8 MHz | 7, 8 MHz | |
| 4 | Symbol Rate(Kbps) | 6900 | 2000 – 6900 | |
| 5 | RF Level | 00 dB | 00 ~ -30 dB | |
| IP Edit | 1 | Connection Mode | Static | Static,DHCP |
| 2 | IP Address | 192.168.001.100 | ||
| 3 | Mask | 255.255.255.000 | ||
| 4 | Gateway | 192.168.001.001 | ||
| Load Default 1 | Load Default?Yes No | |||
| Change to DVB-T 1 | Change to DVB-TYes No | |||
| Change to DVB-C 1 | Change to DVB-CYes No | |||
| Change Password 1 | New Password0000 |
- TABLE OF CONTENT
- GENERAL....2
- INSTALLATION ....4
- OPERATING INSTRUCTIONS ....5
- Menu Tree....10
- DIGITAL MODULATOR
- GENERAL
- Description
- INSTALLATION
- What's in the Box
- Connection
- DEVICE Programming and Setup
- OPERATING INSTRUCTIONS
- Starting
- Beginning Setup
- Step 1: Login
- Step 2: Right Click and Select "Status"
- Step 3: Setting Tab
- Step 4: Local Save
- Step 5: IP Configuration Tab
- Step 6: Save IP Configuration
- Step 7: Administration
Brand : KATHREIN
Model : UFX 12
Category : Modulator