
SA202-II - Receiver SoundTube - Free user manual and instructions
Find the device manual for free SA202-II SoundTube in PDF.


| Product Type | Receiver |
| Brand | SoundTube |
| Model | SA202-II |
| Dimensions (H x W x D) | 3.5 x 17 x 12 inches |
| Weight | 8.5 lbs |
| Power Supply | AC 110-120V, 60Hz |
| Power Output | 100W per channel (stereo) |
| Frequency Response | 20Hz - 20kHz |
| Signal-to-Noise Ratio | >90dB |
| Total Harmonic Distortion | <0.05% |
| Audio Inputs | 4x RCA, 1x Coaxial, 1x Optical, 1x AUX (3.5mm) |
| Audio Outputs | 2x Speaker pairs, 1x Subwoofer, 1x Headphone (1/4") |
| Radio Tuner | FM/AM with 30 presets |
| Speaker Impedance | 4-16 ohms |
| Remote Control | Included |
| Standby Power Consumption | <1W |
| Maintenance | Clean with dry cloth; avoid liquids |
| Safety | Do not block ventilation; unplug during storms |
| Spare Parts | Contact SoundTube support for replacement parts |
Frequently Asked Questions - SA202-II SoundTube
User questions about SA202-II SoundTube
0 question about this device. Answer the ones you know or ask your own.
Ask a new question about this device
Download the instructions for your Receiver in PDF format for free! Find your manual SA202-II - SoundTube and take your electronic device back in hand. On this page are published all the documents necessary for the use of your device. SA202-II by SoundTube.
USER MANUAL SA202-II SoundTube
Install Instructions For:
Compact 20 Watt Stereo Amplifier
SA202-II and SA202-II-RDT
Box Contents
1 Amplifier
3.5
- Good-prim Eurozone connections
1 three-pin
1 High-level input wiring harness
1 Mounting bracket
2 Mounting screws

Front

Rear

1.435.647.9555 | 800.647.TUBE | www.soundtube.com
© 2009 SoundTube Entertainment, Inc. All rights reserved. PN INS-SA202-II Rev2.07.22

Warning
SoundTube products must be installed by a professional audio installer/contractor. For safety and for optimum audio performance, installer must follow all directions issued by SoundTube Entertainment.
The Ground Truth image displays a single, solid horizontal line, which is a stylistic or background element (like a rule line on paper). According to Rule 2, such lines must be ignored by the OCR result. The provided OCR content is "____", which consists of underscores. Underscores are not equivalent to a horizontal line in this context; they represent placeholder blanks, not stylistic lines. Since the OCR output incorrectly rendered a stylistic line as underscores (which should be ignored), this violates the rule that stylistic lines must be transcribed. Therefore, the OCR result is inconsistent with the Ground Truth.
SA202-11
Install Instructions For: SA202-II and SA202-II-RDT
1. Unpack amplifier.

2. Attach mounting bracket to secure mount point using screws or metal strapping.

3. Connect speaker wires to 4-pin Euroblock connector using polarity shown above (or refer to diagram on amplifier).

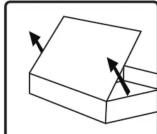
4. To attach mounting bracket, remove all faceplate screws. Lift faceplate and set aside.

5. Slide mounting bracket into groove on bottom of amplifier enclosure.

6. Replace faceplate and screws.

7. The SA202-II can be powered either by the hard-wired Euroblock connector (see diagram below or via barrel connector. The SA202-II-RDT includes a power supply which attaches to the barrel connector.

8. Connect power and speakers.

9a. The SA202-II accepts audio sources via RCA jacks, mini jack or the high-level input located on the rear of the unit. Connect audio source to one of the three inputs (mini jack shown).

9b. If using the high-level (amplified) inputs, wire the source leads to the high-level input wiring harness as shown and insert the terminal block into the high-power input on the back of the amplifier.

10. Use high-pass filter to remove low-end frequencies and increase intelligibility when using small speakers.

11. Adjust volume with dial on front of amplifier.
Euroblock power connections

If the amp is being run without using the external trigger, simply connect the positive lead from the power supply to both the + V input and the remote (REM) input.
Without external trigger With externa
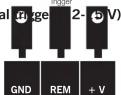
If the amp is being run using the external trigger, connect the power to the ground and + V input, and run the trigger wire from the outside source into the remote (REM) input.

Brand : SoundTube
Model : SA202-II
Category : Receiver