
Ampero Pink Limited Edition - Audio effect pedal Hotone - Free user manual and instructions
Find the device manual for free Ampero Pink Limited Edition Hotone in PDF.


| Product Type | Multi-Effects Processor & Amp Modeler |
| Brand | Hotone |
| Model | Ampero Pink Limited Edition |
| Color | Pink (Limited Edition) |
| Display | 4.3-inch Color Touchscreen |
| Effects | Over 200 Effects (Dynamic, Distortion, Modulation, Delay, Reverb, etc.) |
| Amp Modeling | Built-in amp models and cabinet simulations (IR) |
| Presets | Over 200 Factory Presets |
| User Presets | Up to 100 User Presets |
| Audio Inputs | 1 x 1/4" Instrument, 1 x 1/8" Aux In |
| Audio Outputs | 2 x 1/4" (L/Mono, R), 1 x 1/8" Headphone |
| MIDI I/O | USB MIDI, 5-pin MIDI In/Out (via TRS adapter) |
| USB | USB-C for Audio/MIDI & Firmware Updates |
| Expression Pedal | Built-in expression pedal |
| Looper | Built-in looper (up to 80 seconds) |
| Tuner | Built-in chromatic tuner |
| Sampling Rate | 48 kHz / 24-bit |
| Signal Processing | Dual-core DSP |
| Dimensions | Approx. 200 x 140 x 50 mm (7.9 x 5.5 x 2.0 in) |
| Weight | Approx. 1.0 kg (2.2 lbs) |
| Power Supply | 9V DC (center negative, 500 mA) or USB-C (5V/1A) |
| Software Editor | Compatible with Hotone Edit (macOS/Windows) |
| Included Accessories | USB cable, quick start guide |
Frequently Asked Questions - Ampero Pink Limited Edition Hotone
User questions about Ampero Pink Limited Edition Hotone
0 question about this device. Answer the ones you know or ask your own.
Ask a new question about this device
Download the instructions for your Audio effect pedal in PDF format for free! Find your manual Ampero Pink Limited Edition - Hotone and take your electronic device back in hand. On this page are published all the documents necessary for the use of your device. Ampero Pink Limited Edition by Hotone.
USER MANUAL Ampero Pink Limited Edition Hotone
Amp Modeler / Effects Processor
Pink Limited Edition
USER'S MANUAL
For Firmware V3.3B

natural_image
Line drawing of a device casing with multiple cylindrical components and mounting points (no text or symbols)HOTONE
DESIGN INSPIRATION
The contents of this manual are subject to change without notice.
Contents
Welcome 1
Notice 1
Definitions 2
Panel 2
Getting Started....3
Main Display Screen 4
Using the Screen 4
Touch Operation 4
Quick Access Knobs 4
Main Knob 4
Ampero Tools....5
Tuner 5
Drum 5
Looper 6
EXP Pedal 7
Customizing your Ampero 7
Edit 7
Patch Edit Menu 7
Module Edit Menu 8
Control Settings 9
Current Settings 9
CTRL Target 10
Tap Tempo and Tap Divide....1 1
Quick Access Knobs....1 1
EXP Settings 12
SAVE....14
GLOBAL 14
I/O 15
USB Audio 15
Footswitch 15
EXP 2/FS 16
MIDI Channel 16
Display 16
Global EQ....16
About 16
Factory Reset 17
Ampris (Pink Limited Version Only) 17
Suggested Setups 18
Using with your instrument and amp 18
Connecting to your amp's RETURN or Power Amp (Loudster) INPUT 18
Connecting your mixer, interface, headphones, and other equipment 19
Connecting to your computer as an audio interface 20
Using the AUX IN line 20
Included Software 21
Effects List 22
Effect Models List 22
Drum Machine Rhythms 40
MIDI Control Information List 43
Troubleshooting 44
Technical Specifications 44
Welcome
Thank you for purchasing a Hotone product.
Please read this manual carefully to get the most out of your Ampero.
Please keep this manual to use for further reference.
Notice
Please read this manual carefully. It contains information regarding the proper use of this product and other important information.
Warning
- Do not open the casing or attempt to modify the product or power supply. Hotone will not be responsible for product damage or bodily harm should the product be tampered with.
- To reduce the risk of hearing damage, do not use headphones at high volume for an extended period of time. Should you notice discomfort, discontinue use and see a medical professional immediately.
• Children using this product should be accompanied by an adult.
Environment
Avoid using the unit in any of the following conditions that could cause malfunction:
- Extreme environment (extremely hot or cold places, near heaters and other heat sources, under strong sunlight, etc.)
- Sandy or dusty places
- Places that are extremely humid or exposed to splashing water
- Places with lots of vibrations
Power Supply Safety
- Always use a DC 18V center negative adapter. Use of an adapter other than that specified could damage the unit or cause malfunction and pose a safety hazard.
- Always connect the adapter to an outlet that supplies the rated voltage required by the adapter.
- When disconnecting the adapter from an outlet, always pull the adapter itself. Pulling the cable will cause damage to the unit. Make sure to separate the power adapter and store in a safe place.
- During lightning storms or when not using the unit for an extended period, disconnect the adapter from the outlet.
- Make sure your hands are dry when plugging in the adapter.
Operation Safety
- Never put objects filled with liquids on the unit as this could cause electric shock.
- Never place candles and other burning objects on top of the Ampero. Doing so could cause a fire.
- Ampero is a precision device. Do not apply excessive force to the switches and other controls. Do not expose the unit to strong impact or drop it.
- Do not apply excessive force to the touchscreen or casing, which
may cause malfunction.
- Do not place foreign objects (liquid or solid) into the product.
- The unit and power supply will become warm with extended use; this is normal.
Connections and Interference
- Turn off Ampero and all other connected devices before connecting any cables to it.
- Disconnect the power supply and other line connections before moving Ampero to another location.
- Ampero is designed to resist external electromagnetic interference, but may produce static in some cases of strong electromagnetic interfere (e.g. high power transformers or wireless TV/phone equipment). Turn off any nearby electromagnetic equipment when using, if possible.
- Like all digital devices, Ampero may experience malfunction and/or loss of data if exposed to strong electromagnetic interference. Please use caution.
Cleaning
Use a soft cloth to clean the panels if they become dirty. If necessary, slightly moisten the cloth. Never use cleansers, wax, or solvents such as paint thinner, benzene or alcohol.
Malfunction
- If the unit should malfunction, disconnect the power adapter and turn the power OFF immediately. Then, disconnect all other connected cables. For:
-Power adapter malfunction
-The unit or power supply emits an odor
-Liquids or foreign objects entered the unit
-The unit has other obvious signs of malfunction (e.g. won't turn on, knobs won't work, won't produce sound, etc.)
Prepare information including the model name, serial number, specific symptoms related to the malfunction, your name, address and telephone number and contact the store where you bought the unit.
Definitions
Module
Ampero supports the simultaneous use of up to 9 effects. Each is called an "effects module", or simply "module". There are several effects available in each module.
Parameter
Variables that determine the application of an effect are called "parameters". If we imagine each module as a separate effect pedal, then each parameter would be a knob on that pedal.
Patch
The ON/OFF status of each module and the parameter settings are stored in units called "patches". These are your "tones". Use patches to recall, edit, and save your favorite tones.
Bank
A set of 3 patches is called a "bank". Ampero has a total of 66 banks, including 33 editable player (user) banks and 33 factory banks (F01-F33), which can be adjusted by not saved.
Panel
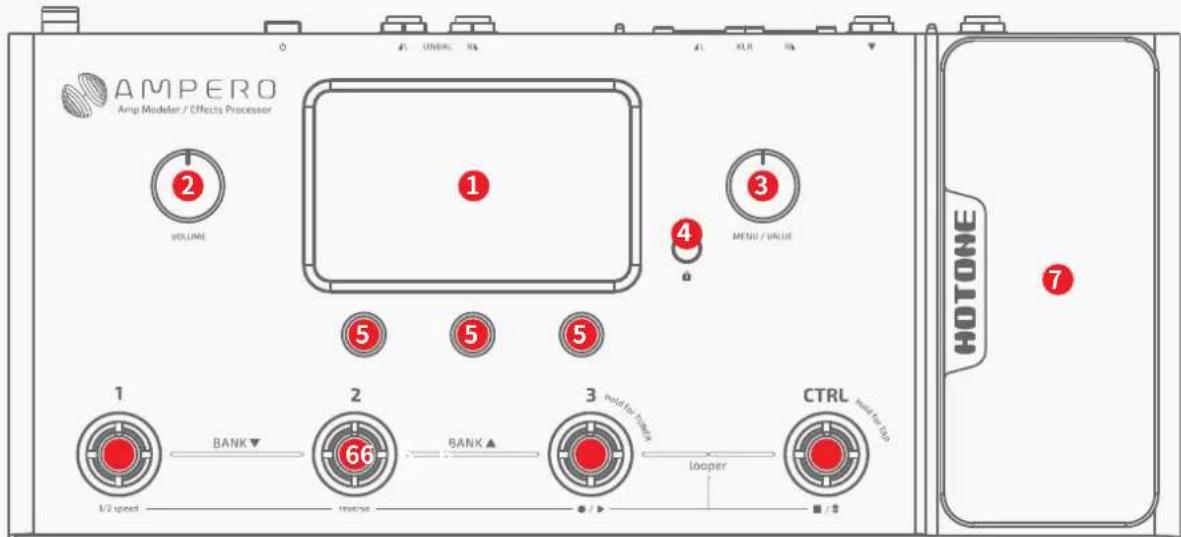
- Display Screen: Displays Ampero's current status. Use the touchscreen to select effects, edit patches, and make tone adjustments.
- Volume Knob: Adjusts the overall volume of all output connections.
-
MENU/VALUE Knob (Main Knob): Turning or pressing this knob allows you to change menus and adjust parameters.
4.Device Lock Button: Used to lock or unlock the device (excl. volume knob, footswitches and expression pedal). -
Quick Access Knobs: Use to adjust parameters on the lower part of the screen. Each knob will vary in function according to the parameter on the display.
6.Footswitch: Use to change patches, turn on/off effects, set tap tempo, etc. - Expression Pedal: Use to control the parameter of one or several effects, including output volume.
Panel

-
EXP 2/FS: 1/4" TRS input, for connecting an external expression pedal/footswitch controller. Perfect for Hotone Soul Press or Bass Press.
-
Input Mode: Selects between input modes optimized for different instruments.
a. E.GT: Electric guitar or bass
b. A.GT: Acoustic guitar or other acoustic instrument
c. LINE: Keyboard or synthesizer
-
INPUT: 1/4" Mono input connection for guitar or other instrument.
-
BALANCED OUTPUT: Balanced stereo XLR output connections to mixer or audio interface. For mono output, use only the left balanced output.
-
GND LIFT Switch: Turn the GND LIFT switch ON to cut off the ground connection of the two XLR connectors (Ground Lift) to avoid noise caused by the Ground Loop. Turned OFF, the XLR line will be ground normally.
-
AUX IN: 1/8" stereo input for connecting external devices (phone, MP3 player) for practice and jamming.
- PHONES: 1/8" stereo output for connecting headphones.
- UNBALANCED OUTPUT: Unbalanced 1/4" TS stereo output connections to amplifiers or other equipment. For mono output, use only the left unbalanced output.
- USB: USB 2.0 Type-B connects to your computer for use with Ampero software, or as a USB audio interface.
- Power Switch: Turns power on/off.
- MIDI IN: Standard 5-pin MIDI IN for connecting a MIDI controller. Perfect for Hotone Cybery.
- Power Supply Connection: Power supply input (18V DC center negative).
Getting Started
- Connecting your Device
Plug your guitar in to the Ampero input jack and run a cable from UNBALANCED OUTPUT L to your amp. Please remember:
(1) Keep your amp volume down.
(2) Connect your cable to the amp's FX Loop Return if it has one.
See page 18.
(3) Make sure to select the correct input mode based on what kind of instrument you have: E.GT for electric guitar or bass, A.GT for acoustic instruments, LINE for keyboards.
- Turn the Ampero volume knob all the way down, then connect the power supply and turn Ampero ON.
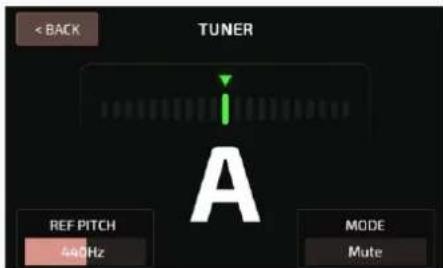
- Calibrate the strings. Press and hold footswitch 3 until the TUNER comes on the display screen. .See page 5
Pluck each string and tune until the pitch reaches the middle of the screen and turns green, as below:
When finished, tap the footswitch again to exit the tuner.
- Select a patch:
Tap footswitch 1, 2, or 3 to choose a patch you like. Tap footswitches 1 and 2 together to move backward through the banks. Tap footswitches 2 and 3 together to move forward through the banks.
Main Display Screen
When Ampero is turned on it will display the main screen, as shown below:
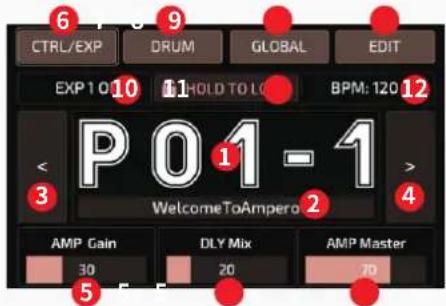
- Current patch number
- Current patch name
- Patch selection back button
- Patch selection forward button
- Effects parameters controlled by sliding on the screen. Pressing the parameter name allows you to change the parameter you're controlling. See page 9.
- CTRL/EXP gives you access to control settings. See page 9.
- DRUM opens the drum machine settings. See page 5.
- GLOBAL opens the global settings page. See page 14.
- EDIT allows you to edit the current patch. See page 7.
- Indicates the status of the built-in expression pedal (lit up when on, gray when off)
- Hold to lock the device
- Indicates the current patch tempo
After you hold the lock icon on the screen or press the lock button on the device, Ampero will be locked. The screen will display like this.
The device is unlocked after you press the lock button again. If you enter other pages (Tuner, Looper etc) by pressing the footswitches, the device is also unlocked.

Using the Screen
Touch operation
Changing patches and editing settings can all be done with the touchscreen.
Quick Access Knobs
The quick access knobs allow you to change the values of the three parameters directly above on the touch screen.

Main Knob
Turning the main knob lets you select the object you want to control. That object will light up when selected, then press the knob to confirm the selection.
- If the object selected is a button, it will respond as if you'd touched the button on the touchscreen.
- If the object selected is a parameter, you can use the main knob to adjust the parameter value. Pressing the main knob again will take you back to selection mode.
Reminder: The details of Ampero's use and programming may slightly vary under certain operational circumstances. Please read this manual carefully to get all the necessary information.
Ampero Tools
Ampero is equipped with some great tools to expand your playing experience: a tuner, drum machine, looper, and expression pedal.
TUNER
In default mode, pressing footswitch 3 will open the tuner.

On the upper part is a scale that indicates your pitch. Left of center is flat, and right of center is sharp. As you tune your instrument towards the middle, the color of the scale will change from red (out of tune) to yellow (near pitch) to green (in tune).
Quick access knob 1 adjusts the pitch calibration (REF PITCH), ranging from 432Hz to 447Hz. Standard pitch is set at 440Hz.
Quick access knob 3 lets you select the tuner mode from Bypass (for dry signal through), Thru (for effect signal through) or Mute (for silent tuning).
You can exit the tuner either by pressing any footswitch or by pressing the Back button on the touchscreen.
DRUM
Select DRUM on the main screen to access the drum machine.
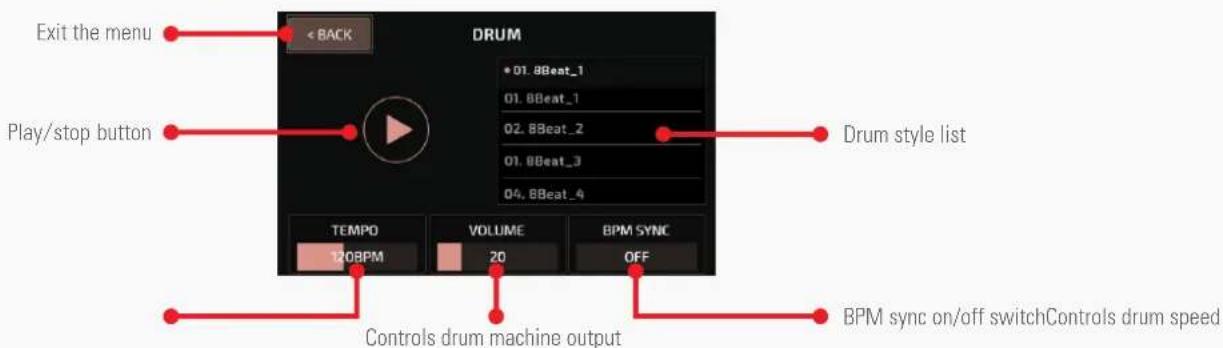
Use the style list to scroll between genre styles. Ampero has 100 drum styles. See page 40.
Use TEMPO to adjust the drum tempo, ranging from 40BPM-250BPM.
Use VOLUME to adjusts the drum volume from 0-100.
Turn on BPM SYNC switch if you need to set drum tempo by Tap
Tempo function. In this case, the drum tempo will be the same as
patch tempo.
Exit the drum machine menu by pressing BACK at the top left. Exiting the menu will not stop the drums from playing.
Reminder: Setting the drum tempo will affect patch tempo if you turn BPM SYNC ON.
Ampero Tools
LOOPER
In default mode, pressing footswitch 3 and the CTRL footswitch together will open the looper menu.

The progress bar at the top will be shown in red during recording and overdubbing. It will be shown in green in play mode.
Footswitch 1 controls half speed playback. Footswitch 2 controls reverse playback. These footswitch controls correspond with the 1/2 SPD and REV buttons on the touchscreen.
When you record phrases with drum rhythms, you can sync drum rhythms to your loop phrase by turning on drum sync switch. Please note that some unusual operations (e.g. randomly play/stop looping/drum machine or change drum style/tempo) may break the sync status. Switching 1/2 SPD and REV on/off won't affect this.
REC LEVEL adjusts the loop recording level from 0-99.
PRE/POST selects the position of looper in the effects chain.
- In Pre mode, the looper will record mono audio without any effects, up to 100 seconds.
- In Post mode, the looper will record stereo audio with effects, up to 50 seconds.
LOOP LEVEL adjusts the loop playback volume from 0-99.
Exit the looper by pressing BACK on the upper left of the screen.
Default Looper operation and status modes:
| Operation | Function/Status | LED Color (FS 3) | LED Color (CTRL) |
| On with no data | Stop | None | None |
| Stop | Stop | Flashing green | Flashing green |
| Tap footswitch 3 when there's no data | Record | Steady red | None |
| Tap footswitch 3 while recording, overdubbing, or paused | Play | Steady green | Steady Green |
| Tap footswitch 4 while loop is playing | Stop | Flashing green | Flashing green |
| Tap and hold CTRL footswitch | Clear | Quickly flashing green | Quickly flashing green |
| Each time a recorded loop plays from the beginning | Play | Single flash | Single flash |
You can use "Footswitch X" (X=1-4, corresponding to FS 1,2,3 and CTRL) to assign function of footswitch in looper page. The function includes the following:
Rec/Play: Tap to recording, then tap again to start playback
Drum Rec/Play: Start drum when starting to record
Stop/Clear: Tap to stop recording and hold to clear
Drum Stop/Clear: Stop drum when stop recording
FX: Tap to toggle 1/2 speed function. Hold to toggle reverse function.
(Violet LED on)
1/2 SPD: On (Yellow LED on)/Off (Yellow LED off)
REV: On (White LED on)/Off (White LED off)
Drum: On (Green LED on)/Off (Green LED off)
Looper Exit: Exit looper page

Reminder:
- When the loop recording reaches it's time limit, the looper will automatically stop the recording and begin playback.
- When the looper is in Post mode, changing patches will not change already recorded loop phrases.
- Half-speed and Reverse functions will affect all recorded loop phrases.
- If the looper is switched to a different position while it's running, the loop will automatically stop and be erased.
Ampero Tools
EXP Pedal
You can either use the built in expression pedal (EXP 1) or connect your own (EXP 2) to control various Ampero paramaters.
Some of Ampero's preset patches have been set up to use the built in expression pedal. These can be used without any further setup. For more on expression pedal settings. See page 12.
To turn the built-in expression pedal on, press the pedal all the way forward so it clicks. When the built-in expression pedal is on, the LED under the pedal will turn green, and this icon will show up on the Main Display screen to indicate it is on:
EXP 1 ON
Reminder:
- When the built in expression pedal is off, it continues to work as a volume pedal for Ampero. For more on volume pedal settings, see page 12.
- You can use CTRL footswitch to switch built in expression pedal on/off. See page 9.
- If your external expression pedal has an off switch and is turned off, it will not function.
- If you use an external expression pedal, the display won't show any message when it is connected. As soon as you connect and turn on an external expression pedal, it will function to control the effects parameter determined by the current patch. If the current patch does not have any effects controllable by expression pedal, the pedal will not function. See page 13.
Customizing Your Ampero
This section will show you how to customize your Ampero's settings, edit patches, setup the expression pedal, and change other features to your taste.
EDIT
Edit your patches to get the tone you want.
Remember that turning the modules on/off and adjusting parameters will change the current patch. If you switch patches or turn Ampero off before saving your changes, the changes will be lost.
Make sure to press SAVE on the upper right of the display screen to save your settings.
Patch Edit Menu
Select a patch from the main menu by using the forward/backward arrows on the screen.
You can also select a stored patch by pressing any of the three numbered footswitches. Scroll back (press 1 and 2 together) or forward (press 2 and 3 together) through patches using the footswitches.
Next, select EDIT to enter the patch edit menu:
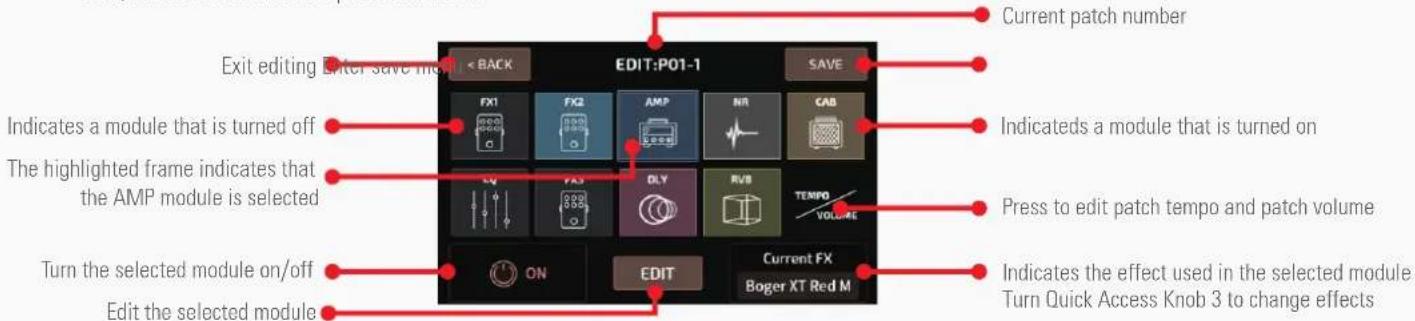
The menu is made of ten icon squares representing Ampero's nine effects modules and a volume/tempo module. The default signal chain is ordered like this:
Fx1 (select one)-FX2 (select one)-AMP (amp simulator)-NR (noise reducer)-CAB (cabinet simulator)-EQ (equalization)-FX3 (select one)-DLY (delay)-RVB (reverb)
FX1, FX2, and FX3 will hold effects of your choosing.
Customizing Your Ampero
Press a square to select that module, then use quick access knob 1 or the on/off button to turn that module on or off. Press EDIT to enter the module edit menu.
You can also use the main knob: turn it to select a module, then press and click it to turn the module on or off. Press and hold the knob to enter the module edit menu.
Quick access knob 3 can also adjust the effect on the current module.
When you select patch volume, use quick access knob 3 to adjust the patch output volume from 0-99.
To move a square to a different position, press a square twice (or turn main knob to select a square and press it twice) to pick it up:
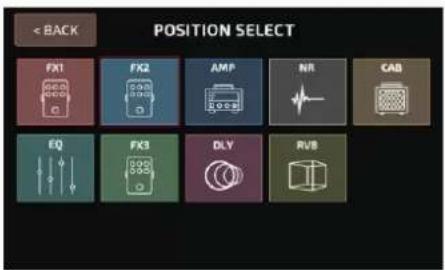
Press another square (or turn main knob to select a square and press) to insert into the selected position:

flowchart
graph TD
    A["Position Select"] --> B["UNIT"]
    A --> C["FX2"]
    A --> D["IMP"]
    A --> E["RAB"]
    A --> F["CAB"]
    G["EDIT:P01-1"] --> H["UNIT"]
    G --> I["AMP"]
    G --> J["RAB"]
    G --> K["CAB"]
    L["Current FX Affinity Boost"] --> M["ON"]
    L --> N["EDIT"]
    O["Position Select"] --> P["UNIT"]
    O --> Q["FX2"]
    O --> R["IMP"]
    O --> S["RAB"]
    O --> T["CAB"]
    U["EDIT:P01-1"] --> V["UNIT"]
    U --> W["AMP"]
    U --> X["CAB"]
    Y["Current FX Fast Gate"] --> Z["ON"]
    Y --> AA["EDIT"]
Reminder: The VOLUME/TEMPO square is fixed at the end.
Module Edit Menu

Use the module control panel to edit or turn the current module on/off.
Select an effect from the effects list.
The parameter panel shows the adjustable parameters of the effect selected.
If the selected effect has more than three adjustable parameters, there will be an arrow at the right of the parameter panel. Press the arrow to see the other parameters.
Use the three quick adjust knobs to adjust the parameters directly above the knobs. If there are no parameters corresponding to a certain knob, turning that knob will have no effect.
For more information on modules, effects, and parameters. See page 22.
Reminder: In some extreme cases the signal processor may become overloaded and display a "System Overload" caution.
Customizing Your Ampero
Control Settings
Use the control settings to determine the CTRL footswitch and quick access knob targets, setup the expression pedal parameters, and calibrate the expression pedal.
Remember that all the control settings will change as you change patches. If you switch patches or turn Ampero off before saving your changes, the changes will be lost.
Make sure to press SAVE on the upper right of the display screen to save your settings.
Press CTRL on the main menu to enter the control menu.

Make selections from the right and left panels.
Like the effects module parameter menu, the selection panel features three adjustable options. These options will change according to the current menu option.
If the selected menu has more than three adjustable options, there
will be an arrow at the right of the selection panel. Press the arrow to see the other options.
Use the three quick adjust knobs to adjust the options directly above the knobs. If there are no options corresponding to a certain knob, turning that knob will have no effect.
Current Settings
Pressing Current Settings allows you to see the CTRL footswitch function for the current patch, the quick access knobs targets, and the expression pedal target.

Customizing Your Ampero
CTRL Settings
Use the CTRL Settings menu to assign a function to CTRL footswitch or select which modules of the current patch will be controlled by the CTRL footswitch.

- Function
Under the Function option you can assign a function to CTRL footswitch. There are three FUNCTION selections:

Module/Tap: For controlling module on/off or tap tempo
Tap Tempo: For tap tempo only
EXP 1 On/Off: For switching built in expression pedal on/off or tap tempo
When Module/Tap or EXP 1 On/Off is assigned to CTRL footswitch, you can use CTRL footswitch to switch module/built-in expression pedal on/off or tap tempo. You can press and hold CTRL footswitch to switch between the two functions:
- Module on/off switch
Repeatedly pressing the CTRL footswitch will turn it on or off, with green and red LED lights to show the on/off status respectively. The modules it controls will be affected when switching CTRL switch on/off. The CTRL footswitch is set on (green) by default. To set target modules, see Module/Tap Target section below for detailed info.
- EXP 1 on/off switch
Repeatedly pressing the CTRL footswitch will turn the built-in expression pedal on or off, with green and red LED lights to show the on/off status respectively.
- Tap Tempo
When Tap Tempo engaged, the footswitch LED will turn blue and will flash with the tempo set. Set the tempo by repeatedly tapping the footswitch. This tempo will apply to the delay time and other effects with adjustable speed parameters.
- Module/Tap Target
Use the Module/Tap Target menu to select which modules of the current patch will be controlled by the CTRL footswitch:

The 9 Ampero effects modules are listed in the panel, with yes and no below each module to show if the CTRL footswitch is activated or not. In the example image above, FX1, FX2 and AMP modules are controlled by the CTRL footswitch.
Use the quick access knobs to change between yes/no, and press the arrows on the right/left to scroll through the modules.
Customizing Your Ampero
Tap Tempo and Tap Divide
To use tap tempo function you can:
(1) Hold the footswitch when Module/Tap or EXP 1 On/Off function is assigned to CTRL footswitch
(2) Assign Tap Tempo function to CTRL footswitch
When in Tap Tempo, the footswitch LED will turn blue and will flash with the tempo set. Set the tempo by repeatedly tapping the footswitch. This tempo will apply to the delay time and other effects with adjustable speed parameters.
If you want a certain effect to be controlled by tap tempo, go into the patch settings, select an effect, then select SYNC. When you do this, the time will sync to the tap tempo value.

flowchart
graph TD
    A["Time 600ms"] --> B["Sync OFF"]
    C["Time 1/4"] --> D["Sync ON"]
You can also opt to use tap divide rather than time-based tempo. The default tap divide is set to quarter notes (1/4).
Tap divide values in relation to their musical beats are shown below:
| Time Value | Beats(Quarter note as 1) | Display |
| Whole note | 4 | 1/1 |
| Half note | 2 | 1/2 |
| Dotted half note | 3 | 1/2D |
| Half note triplet | 4/3 | 1/2T |
| Quarter note (no divide) | 1/1 | 1/4 |
| Dotted quarter note | 3/2 | 1/4D |
| Quarter note triplet | 2/3 | 1/4T |
| Eighth note | 1/2 | 1/8 |
| Dotted eighth note | 3/4 | 1/8D |
| Eighth note triplet | 1/3 | 1/8T |
| Sixteenth note | 1/4 | 1/16 |
Quick Access Paras
This menu allows you to set the parameter targets for the three Quick Access Knobs under the current patch. The parameter targets can also be the effects parameters of the current effects module, patch volume and patch tempo.
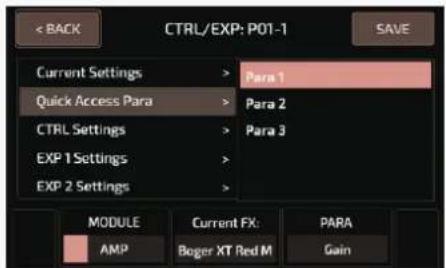
Use quick access knob 1 to select the target module. If you don't want the quick access knob on, select OFF to turn its function off. When a quick access knob is off, the parameter panel will display the status as shown:

The effect the current module is using will show up in the center of the selection panel. If the current module is off, the effects name will be grayed out.

Use quick access knob 3 to select the parameter you want to control. The controllable parameters will vary with the different modules and effects.
Refer to Effects List for more on the controllable parameters of different modules and effects. See page 22.
You can hold any parameter on the selection panel of the main menu to change a quick access knob control target in the pop-up menu. Tap on a parameter to change (this must be done on touch screen).

Customizing Your Ampero
EXP Settings
From this menu, you can control the settings of or calibrate your built-in or external expression pedal. Here, EXP 1 refers to the built-in pedal, and EXP 2 refers to your external expression pedal.

- EXP 1 Settings
There are four options within this menu: Target, Expression Range, Volume Range, and Calibrate.
- Target
Under the Target option, you can set the pedal's control target. You can set up a maximum of four effects parameters for the built-in expression pedal to control.

In the selection panel, MODULE X (X standing for 1-4 controllable targets) represents the effects module in play. EFFECT X displays the actual effect name, and PARA X shows the effect's controllable parameter.
Use quick access knob 1 to select the module placement. Use quick access knob 3 to select the effects parameter. Touch the right or left arrows to flip through the panel.
You can also turn the expression pedal off by turning selecting OFF in the settings panel.
- Expression Range
Under the Expression Range option, you can set the expression pedal expression range and sweep curve. There are four adjustable targets to change these settings.

In the selection panel, MIN X (X standing for 1-4 controllable targets) represents the lowest range value. This is the value the pedal will have when pushed all the wayup. MAX X represents the highest range value, when the pedal is pushed all the way down. CURVE X represents the curve line the pedal will follow when pushed from all the way up to all the way down.
The MIN and MAX range is 0-100, and the MIN value can be greater than the MAX value.
There are three CURVE types:
Line follows a straight line.
Exp follows an exponential line from slow to fast.
Log follows a logarithmic line that changes as the pedal moves.

Customizing Your Ampero
- Volume Range
When the built in expression pedal is off, it continues to work as a volume pedal for Ampero. Under the Volume Range option, you can set the volume pedal range and sweep curve.
Same as Expression Range section, MIN and MAX represent the lowest/highest volume range value. The MIN and MAX range is 0-100, and the MIN value can be greater than the MAX value.
There are also three CURVE types like expression settings: Line, Exp and Log.

- Calibrate
The Calibrate option helps you calibrate your expression pedal. It is important to calibrate the expression pedal if you find the sweep has very little or too much change in the effect you've set.

Press Calibrate on the selection panel, and these instructions will appear:

Bring the pedal all the way up (back) and press NEXT.

Then press the pedal all the way down and press NEXT.
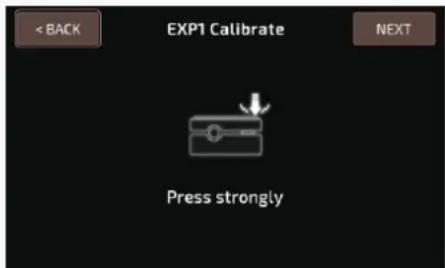
Then, strongly press the pedal toe down and press NEXT. The calibration will be set, and this message will appear:

Press BACK to return to the previous menu. If the calibration fails, this message will appear. Press REPEAT to begin the calibration process again. Or press BACK to exit the calibration process and return to the previous menu.

- EXP 2 Settings
There are three options within this menu: Target, Expression Range, and Calibrate. These settings are the same as the built-in expression pedal settings. You don't need to "Press strongly" while calibrating external expression pedal.
Customizing Your Ampero
SAVE
In the SAVE menu, you can save the changes your made to your effects parameters, control information, and other editable targets. It is very important to save the changes you made to your tone and control settings!
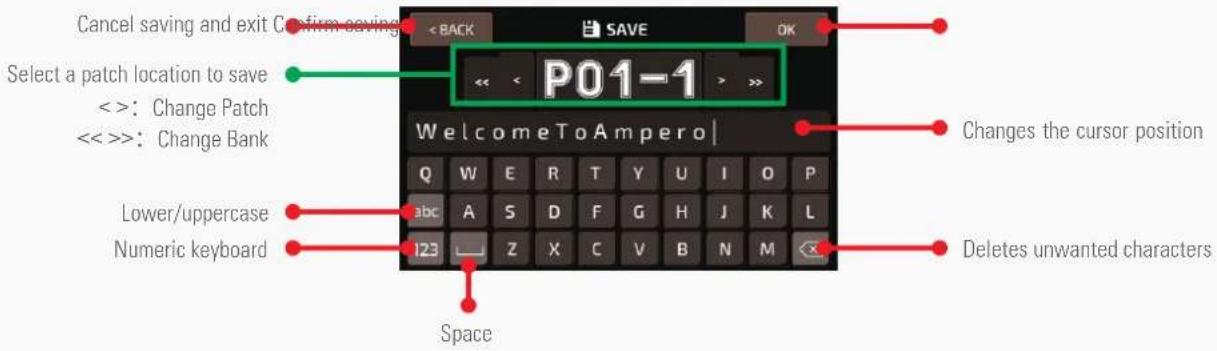
GLOBAL
Use the GLOBAL menu to set Ampero's global functions, including I/O and MIDI channel settings. You can also return to factory settings from this menu.
Global settings will affect Ampero's overall working status. These will override any other settings made to your patches. Any changes made in Global setting will be automatically saved and immediately operational.
In the main menu, press GLOBAL to enter the global settings menu. The screen will look like this:
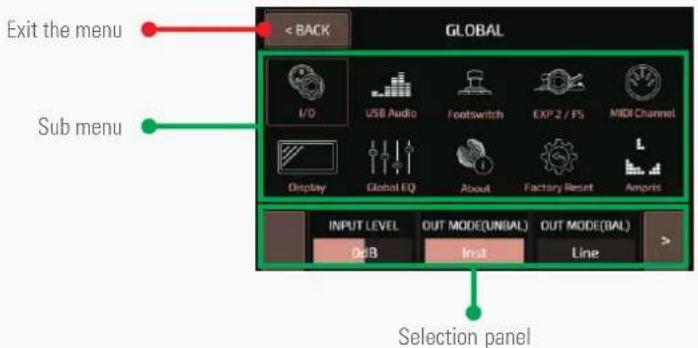
You can either use the touchscreen or turn the main knob to scroll through the menu targets. As you select your menu target, buttons will appear in the selection panel.
The selection panel will display the adjustable options of the target you select. These will vary according to the selection. If there are
more than three options in the current selection, use the arrows to the right and left to scroll through the options.
Note: If there is no option in the panel above a certain quick access knob, moving that knob will have no effect.
Customizing Your Ampero
I/O
Set the global input/output levels and modes in the I/O menu. Adjust the optimal Input Level for the instrument or other input you're using. Adjustable range is from -20dB to +20dB. Default is set to 0dB. Out Mode lets you set up the unbalanced 1/4" out (UNBAL) and balanced 1/4" out (BAL) mode. The selections for these are the same: instrument output (Inst) and line output (Line). Use the instrument line out for connecting to amplifiers or other effects equipment. Use the line output for connecting to mixers or audio interfaces.


No Cab Mode is for connecting to instrument amplifiers without changing saved presets. Turning this on will bypass the CAB module for Ampero's L/R output channels ignoring preset settings. You can apply different settings on L/R output channels for different scenarios. Default is set to Off.

USB Audio
Use this menu to set up USB audio settings when using Ampero as a USB audio interface.
The Rec Mode options allow you to select USB recording input sources on left (L) and right (R) input channels. The selections for these are same: dry signal (Dry) and wet signal (Effect).
When recording, adjust the optimal Rec Level and Monitor Level according to the instrument or other devices you're using.
Rec Level: range: -20dB to +20dB, default: 0dB
Monitor Level: range: -20dB to +6dB, default: 0dB


Footswitch
Use the footswitch menu to set up the way Ampero's four footswitches work independently and together with each other. The menu includes FSX TAP, FSX HOLD (X from 1-4 refers to footswitches 1, 2, 3, and CTRL), FS1+2, FS2+3, FS3+4.
For footswitch functions:
FSX TAP: Function when you tap footswitch X
FSX HOLD: Function when you tap and hold footswitch X
FS1+2: Function when you tap footswitches 1 and 2 together
FS2+3: Function when you tap footswitches 2 and 3 together
FS3+4: Function when you tap footswitches 3 and 4 together


These can be set up as follows:
Patch X (X=1-3): Assign one of three patches to come up in your current bank
Patch+/Patch-: Change patches by toggling up or down
Bank+/Bank-: Change banks by toggling up or down
CTRL: CTRL function depending on patch settings
Tap Tempo: Enable/disable tap tempo function
Drum Menu: Enter/exit drum menu
Tuner: Enter/exit tuner
Looper Menu: Enter/exit looper menu
FX1, FX2, AMP, NR, CAB, EQ, FX3, DLY, RVB control: Turn on/off each effect
None: No function
Function, Color, and Function Assignable Range are listed below:
| Function | Color | Assignable Range |
| Patch X | Cyan | All |
| Patch+/Patch- | Cyan | All |
| Bank+/Bank- | Red | All |
| CTRL | Red/Blue | Only FSX TAP |
| Tap Tempo | Flashing Blue | Only FSX HOLD |
| Drum | Blue | All |
| Tuner | White | All |
| Looper | Purple | All |
| None | - | All |
| FX 1 ON/OFF | Red | Only FSX TAP or HOLD |
| FX 2 ON/OFF | Green | Only FSX TAP or HOLD |
| AMP ON/OFF | Blue | Only FSX TAP or HOLD |
| NR ON/OFF | White | Only FSX TAP or HOLD |
| CAB ON/OFF | Yellow | Only FSX TAP or HOLD |
| EQ ON/OFF | Cyan | Only FSX TAP or HOLD |
| FX 3 ON/OFF | Green | Only FSX TAP or HOLD |
| DLY ON/OFF | Purple | Only FSX TAP or HOLD |
| RVB ON/OFF | White | Only FSX TAP or HOLD |
Reminder:
- If you assign Patch+/- or Bank+/- to FSX HOLD, holding down the footswitch will allow to you quickly scroll through the patches or banks.
- When you assign CTRL function to FSX TAP, the FSX HOLD of the current footswitch will be fixed to Tap Tempo.
Customizing Your Ampero
EXP 2/FS
You can also connect external footswitches to EXP2/FS jack for further control. This menu allows you to set up the working mode of EXP 2/FS jack and the functions of external footswitches. The menu includes MODE, FS5 TAP, FS6 TAP, BANK SEL MODE.


Select a mode from EXP (connect to expression pedal). Single FS (single footswitch controller) and Dual FS (dual footswitch controller). The MODE selection affects available options in this menu:
EXP: all other options are unavailable
Single FS: FS6 TAP is unavailable
Dual FS: all other options are available
FS5 TAP and FS6 TAP can be set up as follows:
Loop Rec/Play: Record/play loop phrases
Loop Stop: Stops looper playback
Looper Menu: Enter/exit looper menu
Drum On/Off: Drum rhythm play/stop
Drum Menu: Enter/exit drum menu
Tuner: Enter/exit tuner
Tap Tempo: Tap tempo function
Patch+/Patch-: Change patches by toggling up or down
Bank+/Bank-: Change banks by toggling up or down
EXP1 on/off: Switching built-in expression pedal on/off

You can select Ampero's bank select mode when using external footswitches as a bank switcher. This works for external footswitches only.
Bank Sel Mode lets you select from two modes: Initial and Wait. In Initial mode, Ampero will jump to a new patch immediately after switching a bank.
In Wait mode, when switching banks, the patch you're using won't be changed (footswitch LEDs on Ampero will keep flashing) until you tap a footswitch again to confirm your selection.
MIDI Channel
This menu allows you to set up Ampero's MIDI channels, ranging from Omni (all channels) to Channels 1-16. Default is set to Omni. See page 43.


Display
This menu setup the display and language of Ampero.


Use DISPLAY MODE to switch two display modes in Main Display screen. Mode 1 stresses patch number, and Mode 2 stresses patch name. Default is set to Mode 1.
Use LANGUAGE to switch system language between Chinese and English.
Use DISPLAY TIME to set how long screen display lasts for energy saving. Selections are Always On, 1min, 5min, 10min, 20min, 30min, 40min, 50min, 60min. Default is set to 30min. After screen display goes out, any operation on Ampero (incl. touching the screen/pressing footswitches or exp pedal) will wake up the screen.
Global EQ
This menu setup the global EQ for overall tonal sculpting.
Use ON/OFF to switch global EQ on/off. Default is set to off.
Use LOW/HIGH FREQ and LOW/HIGH GAIN to set low/high shelf filter frequency and gain.
Use MID FREQ/MID Q to set mid peak filter center frequency and filter sharpness (Q value, ranging from 0.1-10, the higher value, the sharper). Use MID GAIN to set mid filter gain.
Use VOLUME to set output volume from 0-100.
All frequency and gain ranges are the same:
Frequency range: 20Hz-999Hz (1Hz steps) - 1.0kHz-20.0kHz (0.1kHz steps)
Gain range: -12dB to +12dB
Default EQ parameters and ranges:
LOW FREQ: 100Hz
LOW GAIN: 0dB
MID FREQ: 1.0kHz
MID Q: 0.7
MID GAIN: 0dB
HIGH FREQ: 5.0kHz
HIGH GAIN: 0dB
VOLUME: 50


About
About will show you information about Ampero's firmware.


Customizing Your Ampero
Factory Reset
Use this menu to perform a factory reset. Remember, resetting Ampero will delete all of your saved changes and personal settings. Once it is executed, it cannot be undone, so please back up your settings before performing a factory reset.

Press Factory Reset on the screen.

This display will come up with a warning.
Pressing YES will perform the factory reset. Pressing NO will return to the previous menu. After continuing with the factory preset, this screen will appear showing that reset is in progress. Do not disconnect the power supply while the reset is in progress. Disconnecting the power supply may cause Ampero to malfunction.
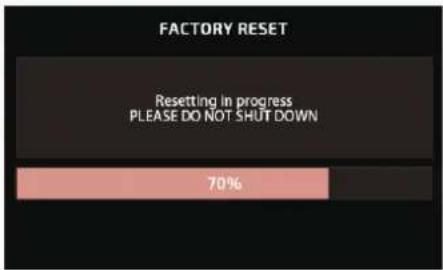
When the factory reset is complete, this message will appear. Press OK to return to the main menu.

Ampris (Pink Limited Version Only)

Press to launch Ampris game menu:

Press on the selections for gameplay or game settings. You can also use footswitch 1/2 to move down/up the cursor, use CTRL footswitch to confirm, use footswitch 3 to cancel.
The selections are:
START: Start gameplay.
OPTIONS: Set difficulty level, BGM volume and sound FX volume.
HELP & CREDITS: Check game controls, records and credits.
EXIT: Exit game and go back to Global menu.
Use touch screen or footswitches for game control:
| Operation | Touch Screen | Footswitches |
| Move Left | Fs1 | |
| Move Right | FS2 | |
| Soft Drop | FS3 | |
| Hard Drop | Hold | FS3 Hold |
| Turn | FS CTRL | |
| Pause | FS1+FS2 |
Suggested Setups
Here are some common setups to get the most out of Ampero.
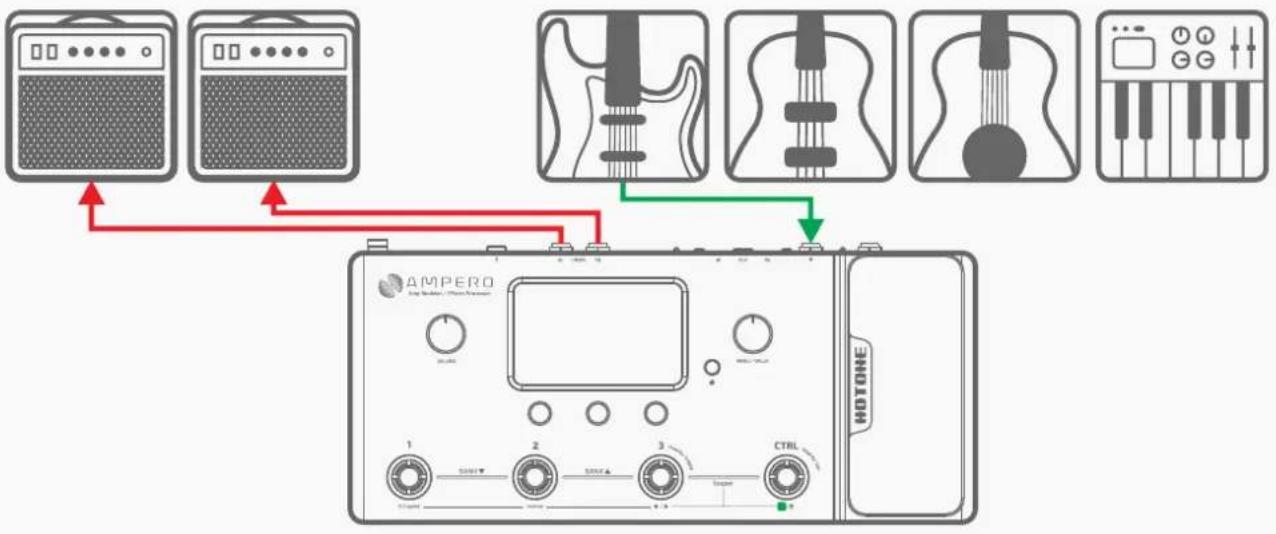
Using with your instrument and amp
Plug your instrument into the Ampero instrument IN jack, and run a cable (or two) from the unbalanced OUT to your amplifier(s). If you have one amp, run the cable from the left output.
For best results, turn off the AMP and CAB modules on Ampero.
flowchart
graph TD
    A["Ampero"] -->|Red arrow| B["Switch"]
    C["Keyboard"] -->|Red arrow| B
    D["Guitar"] -->|Green arrow| B
    E["Keyboard"] -->|Green arrow| B
    F["Keyboard"] -->|Green arrow| B
    G["Keyboard"] -->|Green arrow| B
    H["Switch"] --> I["Ampero"]
    J["Switch"] --> K["Ampero"]
    L["Switch"] --> M["Ampero"]
    N["Switch"] --> O["Ampero"]
    P["Switch"] --> Q["Ampero"]
    R["Switch"] --> S["Ampero"]
    T["Switch"] --> U["Ampero"]
    V["Switch"] --> W["Ampero"]
    X["Switch"] --> Y["Ampero"]
    Z["Switch"] --> AA["Ampero"]
    AB["Switch"] --> AC["Ampero"]
    AD["Switch"] --> AE["Ampero"]
    AF["Switch"] --> AG["Ampero"]
    AH["Switch"] --> AI["Ampero"]
    AJ["Switch"] --> AK["Ampero"]
    AL["Switch"] --> AM["Ampero"]
    AN["Switch"] --> AO["Ampero"]
    AP["Switch"] --> AQ["Ampero"]
    AR["Switch"] --> AS["Ampero"]
    AT["Switch"] --> AU["Ampero"]
    AV["Switch"] --> AW["Ampero"]
    AX["Switch"] --> AY["Ampero"]
Connecting to your amp's RETURN or Power Amp (Loudster) INPUT
Connect the unbalanced outputs to your amp's FX Loop Return input or post amp input. If you have one amp, run the cable from the left output. For best results, turn off the CAB module on Ampero.

flowchart
graph TD
    A["AMPERO"] -->|1| B["Switch 1"]
    A -->|2| C["Switch 2"]
    A -->|3| D["Switch 3"]
    A -->|CTRL| E["Switch 4"]
    F["Ampero"] --> G["Switch 5"]
    F --> H["Switch 6"]
    F --> I["Switch 7"]
    F --> J["Switch 8"]
    F --> K["Switch 9"]
    F --> L["Switch 10"]
    style A fill:#f9f,stroke:#333
    style F fill:#ccf,stroke:#333
    style B fill:#dfd,stroke:#333
    style C fill:#dfd,stroke:#333
    style D fill:#dfd,stroke:#333
    style E fill:#dfd,stroke:#333
    style F fill:#dfd,stroke:#333
    style G fill:#dfd,stroke:#333
    style H fill:#dfd,stroke:#333
    style I fill:#dfd,stroke:#333
    style J fill:#dfd,stroke:#333
    style K fill:#dfd,stroke:#333
    style L fill:#dfd,stroke:#333
Suggested Setups

flowchart
graph TD
    A["AMPERO"] -->|Red Line| B["Amplifier"]
    B --> C["Audio Amplifier"]
    C --> D["Audio Transformer"]
    D --> E["Handheld Piano"]
    E --> F["MOTONE"]
    F --> G["Control Panel"]
    style A fill:#f9f,stroke:#333
    style B fill:#ccf,stroke:#333
    style C fill:#cfc,stroke:#333
    style D fill:#fcc,stroke:#333
    style E fill:#cff,stroke:#333
    style F fill:#ffc,stroke:#333
    style G fill:#cfc,stroke:#333
Connecting your mixer, interface, headphones, and other equipment
Connect Ampero's balanced or unbalanced outputs to your mixer or audio interface's corresponding inputs. Use the balanced outputs for optimal signal to noise ratio. If you want to send a mono signal out, use Ampero's left output channel. To prevent damage to your equipment, make sure the mixer or interface channel's volume is muted before making any connections.
If you experience unwanted noise when using the balanced outputs, it is likely produced by the ground loop. In this case, turn on Ampero's GND LIFT switch.
Turn the Ampero output volume all the way down before connecting headphones to prevent harm to your ears. Ampero's headphones out comes with hi-fi stereo sound.
For best results with headphones, turn on Ampero's AMP and CAB modules.
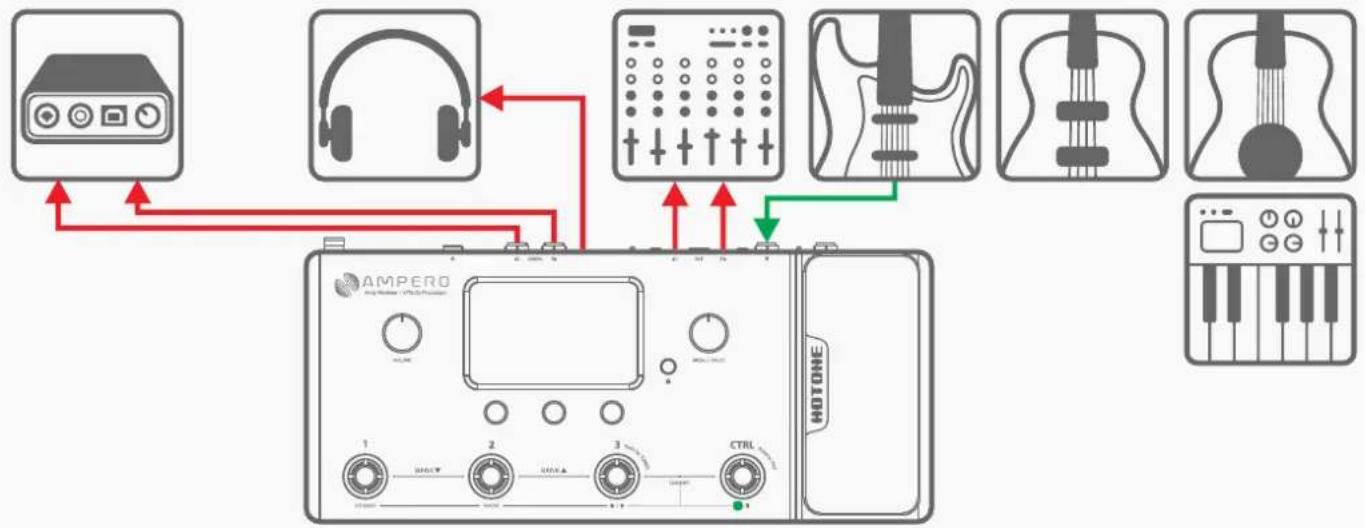
flowchart
graph TD
    A["Audio Input"] --> B["Ampero Display"]
    C["Headphones"] --> B
    D["Controller"] --> B
    E["Keyboard"] --> B
    F["Handheld Piano"] --> B
    G["Handheld Piano"] --> B
    H["Handheld Piano"] --> B
    I["Handheld Piano"] --> B
    J["Handheld Piano"] --> B
    K["Handheld Piano"] --> B
    L["Handheld Piano"] --> B
    M["Handheld Piano"] --> B
    N["Handheld Piano"] --> B
    O["Handheld Piano"] --> B
    P["Handheld Piano"] --> B
    Q["Handheld Piano"] --> B
    R["Handheld Piano"] --> B
    S["Handheld Piano"] --> B
    T["Handheld Piano"] --> B
    U["Handheld Piano"] --> B
    V["Handheld Piano"] --> B
    W["Handheld Piano"] --> B
    X["Handheld Piano"] --> B
    Y["Handheld Piano"] --> B
    Z["Handheld Piano"] --> B
    AA["Handheld Piano"] --> B
    AB["Handheld Piano"] --> B
    AC["Handheld Piano"] --> B
    AD["Handheld Piano"] --> B
    AE["Handheld Piano"] --> B
    AF["Handheld Piano"] --> B
    AG["Handheld Piano"] --> B
    AH["Handheld Piano"] --> B
    AI["Handheld Piano"] --> B
    AJ["Handheld Piano"] --> B
    AK["Handheld Piano"] --> B
    AL["Handheld Piano"] --> B
    AM["Handheld Piano"] --> B
    AN["Handheld Piano"] --> B
    AO["Handheld Piano"] --> B
    AP["Handheld Piano"] --> B
    AQ["Handheld Piano"] --> B
    AR["Handheld Piano"] --> B
    AS["Handheld Piano"] --> B
    AT["Handheld Piano"] --> B
    AU["Handheld Piano"] --> B
    AV["Handheld Piano"] --> B
    AW["Handheld Piano"] --> B
    AX["Handheld Piano"] --> B
    AY["Radio Input"] --> AZ["AMPERO Display"]
    AZ --> BA["AMPERO Display"]
    BA --> BB["AMPERO Display"]
    BB --> BC["AMPERO Display"]
    BC --> BD["AMPERO Display"]
    BD --> BE["AMPERO Display"]
    BE --> BF["AMPERO Display"]
    BF --> BG["AMPERO Display"]
    BH["Motor"]
Suggested Setups
Connecting to your computer as an audio interface
Connect a USB cable (not included) from Ampero to your computer. For PC systems, you'll need to set up the driver. Ampero is plug and play for macOS. Run line out cables to your monitors, or use headphones.

flowchart
graph TD
    A["AMPERO Audio Controller"] -->|Red arrow| B["Computer Monitor"]
    A -->|Red arrow| C["Speaker Headset"]
    A -->|Red arrow| D["Headset Headset"]
    A -->|Red arrow| E["Handheld Piano"]
    A -->|Red arrow| F["Handheld Piano"]
    A -->|Green Arrow| G["Handheld Piano"]
    A --> H["Handheld Piano"]
    A --> I["Handheld Piano"]
Using the AUX IN line
Connect a male-to-male 1/8" stereo cable from your audio source (phone or MP3 player) to Ampero's AUX IN jack. This line will be unaffected by Ampero's internal effects. Note: if you are running a mono line out, you will only hear a mono version of your AUX source.

flowchart
graph TD
    A["Ampero Test Member / Hertz/Power"] -->|Red arrow| B["Radio"]
    C["Headphones"] -->|Red arrow| B
    D["Smartphone"] -->|Red arrow| B
    E["Guitar"] -->|Green arrow| B
    F["Handheld Piano"] -->|Green arrow| B
    G["Handheld Keyboard"] -->|Green arrow| B
    H["MHz"] --> I["Control knob"]
    I --> J["1"]
    I --> K["2"]
    I --> L["3"]
    I --> M["4"]
    I --> N["5"]
    I --> O["6"]
    I --> P["7"]
    I --> Q["8"]
    I --> R["9"]
    I --> S["10"]
    I --> T["11"]
    I --> U["12"]
Included Software
Connect Ampero to your computer and access the free software to manage your Ampero device, adjust tonal settings, transfer files, update firmware, restore settings, and upload third party IR files. Ampero software is compatible with Windows and macOS platforms. Log on to www.hotoneaudio.com/support to download the free software.

Effect List
Effect Models List
| Fx1, FX2, Fx3 (71) | ||
| Dynamic (9) | ||
| FX Title | Description | Parameters & Ranges |
| Compresso | Based on the legendary RossTM Compressor | Sustain (0~100) Controls the compression amountOutput (0~100) Controls the effect output volume |
| Comparoma 4 | Based on the Keeley®C4 4-knob compressor* | Sustain (0~100) Controls the compression amountAttack (0~100) Controls how soon the compressor starts to process the signalOutput (0~100) Controls the effect output volumeClipping (0~100) Controls the input sensitivity |
| Blue Sustainer | Based on a legendary3-knob VCA blue compressor/sustainer | Sustain (0~100) Controls the compression amountAttack (0~100) Controls how soon the compressor starts to process the signalOutput (0~100) Controls the effect output volume |
| Squeezer | Flexible, fully adjustable compressor effect | Threshold (0~100) Controls the compression thresholdRatio (0~100) Controls the compression ratioOutput (0-100) Controls the effect output volumeAttack (0~100) Controls how soon the compressor starts to process the signalRelease (0~100) Controls how soon the compressor starts to release the signal level back to normal after the level drops below the thresholdTone (0~100) Controls the effect tone brightness |
| Affinity Boost | Based on famous Xotic®AC Booster* pedal | Gain(0~100) Controls the gain amountVolume(0~100) Controls the effect output volumeBass(0~100) Controls the low frequency amountTreble(0~100) Controls the high frequency amount |
| Beefy Boost | Based on famous Xotic®BB Preamp* pedal | |
| Pristine Boost | Based famous on Xotic®RC Booster* pedal | |
| FET Boost | Based on legendary green clip-on FET Preamp | Bass(0~100) Controls the low frequency amountTreble(0~100) Controls the high frequency amountVolume(0~100) Controls the effect output volumeLow Cut(Off/On) Switches the low cut (-6dB/oct @200Hz) filter on/off |
| Enhancer | Based on famous Xotic®EP Booster* pedal | +3dB(Off/On) Switches min. boost amount from 0dB to +3dBBright(Off/On) Switches extra brightness on/offVolume(0~100) Controls the effect output volume |
| Forest Boost | Based on the Fortin ®Grind* booster pedal, providing a max. +20dB boost amount. It helps tighten up your tone while adding some aggressive edges. | Gain (0~100) Controls the effect output/boost amount |
| Frequency (18) | ||
| Acoustic Refiner | Designed for acoustic instruments, bringing you a more natural "woody" acoustic sound | Shape(0~100) Controls the detailed sound character |
*The manufacturers and product names mentioned above are trademarks or registered trademarks of their respective owners. The trademarks were used merely to identify the sound character of the products.
Effect List
Effect Models List
| AC Sim | Acoustic guitar simulator designed for guitars | Body(0~100) Controls the body resonanceTop(0~100) Controls the upper harmonicsVolume(0~100) Controls the effect outputMode(Standard/Jumbo/Enhanced/Piezo) Switches from 4 modes:STANDARD: Simulates a standard acoustic guitarJUMBO: Simulates a jumbo acoustic guitarENHANCED: Simulates an acoustic guitar with enhanced attackPIEZO: Simulates the sound of a piezo pickup |
| Dynamic Basso | A special envelope filter (a.k.a. touch wah) designed for bassists, provides a natural, smooth sound full of analog feel | Sens (0~100) Controls the sensitivityRes (0~100) Controls the filter resonanceDecay (0~100) Controls how fast the filter goes back to the resting point |
| Toucher | A wide ranged envelope filter (a.k.a. touch wah) designed for guitarists and bassists that is touch-sensitive and flexible | Sens (0~100) Controls the sensitivityRange (0~100) Controls the filter center frequency rangeQ (0~100) Controls the filter QMix (0~100) Controls the wet/dry signal ratioMode (Guitar/Bass) Switches from guitar/bass modes |
| Crier | Providing a variable auto wah effect for both guitars and basses | Depth (0~100) Controls the effect depthRate (0~100) Controls the effect speedVolume (0~100) Controls the effect outputLow (0~100) Controls the filter low frequency rangeQ (0~100) Controls the filter QHigh (0~100) Controls the filter high frequency rangeSync (Off/On) Switches Tap Tempo sync on/off |
| Voxy Wah | Based on legendary VOX®V846* wah pedal | Range (0~100) Controls the filter frequency rangeQ (0~100) Controls the filter QVolume (0~100) Controls the effect outputTo use expression pedal as a wah pedal, assign Range as control target; you'll hear the difference by switching the pedal on and moving back and forth |
| Cry Wah | Based on legendary Dunlop®CryBaby ®wah pedal | |
| Petrus Wah | Based on famous Dunlop®CryBaby JP95* wah pedal | |
| Soul Press | Based on Hotone Soul Press (WAH mode) | |
| Bass Press | Based on Hotone Bass Press (WAH mode) | |
| Clean Octa | Provides polyphonic octave effect | Low Oct (0~100) Controls the lower octave volumeHigh Oct (0~100) Controls the higher octave volumeDry (0~100) Contols the dry signal level |
| Dirty Octa | Provides distorted polyphonic octave effect with distortion | Oct 1 (0~100) Controls the lower octave volumeOct 2 (0~100) Controls the higher octave volumeDry (0~100) Contols the dry signal level |
| Harmony | Polyphonic pitch shifter/harmonizer based on Hotone Harmony | Hi Pitch (0~+24) Controls the lower pitch by half notesLow Pitch (0~-24) Controls the higher pitch by half notesDry (0~100) Controls the dry singal levelHi Volume (0~100) Controls the high pitch volumeLow Volume (0~100) Controls the low pitch volume |
| Telephone Line | Simulates vintage telephone effect | Noise (0~100) Controls the background noise amountShake (0~100) Controls the sound vibration |
*The manufacturers and product names mentioned above are trademarks or registered trademarks of their respective owners. The trademarks were used merely to identify the sound character of the products.
Effect List
Effect Models List
| Satisfaction | Vintage tape saturation simulator providing analog warmth and natural distortion | Saturation (0~100) Controls the gain amountMix (0~100) Controls the wet/dry signal ratioOutput (0~100) Controls the effect outputHigh Cut (0~100) Controls the effect high cut amount |
| Path Filter | A 4-step auto filter machine for creating synth-like sounds | Step 1/Step 2/Step 3/Step 4 (0~100)Controls filter center frequency of 4 filters (steps)Rate (0~100) Controls the effect speedSync (0~100) Switches Tap Tempo sync on/off |
| Bit Krusher | Provides bitcrushing/sample reducing effect with musical fashion | Mix (0~100) Controls the wet/dry signal ratioKrush (0~100) Controls the downsampling rateBit (0~100) Controls the bit depthHi Cut (0~100) Controls the high cut amountLo Cut (0~100) Controls the low cut amount |
| Ring Mod | A ring modulator for creating interesting inharmonic frequency spectra (like bells and chimes) | Mix (0~100) Controls the wet/dry signal ratioFreq (0~100) Controls the modulation frequencyFine (-50-0~+50) Fine tune the modulation frequency by 1HzTone (0~100) Controls the tone brightness |
| Overdrive/Distortion (22) | ||
| Green Drive | Based on legendary Ibanez®TS-808 Tube Screamer®overdrive pedal | Gain (0~100) Controls the gain amountTone (0~100) Controls the tone brightnessVolume (0~100) Controls the effect output volume |
| Yellow Drive | Based on the legendary 2-knob yellow overdrive pedal with thick, cream like sound character, one of the earliest dirt pedals | Gain (0~100) Controls the gain amountVolume (0~100) Controls the effect output volume |
| Swarm Drive | Based on Providence®SOV-2 Stampede OD* overdrive pedal, delivering natural overdrive tone without affecting the sound character of your guitar | Gain (0~100) Controls the gain amountTone (0~100) Controls the tone brightnessVolume (0~100) Controls the effect output volume |
| Super Drive | Based on the legendary 3-knob yellow overdrive pedal, reproducing the thick, warm sound produced by asymmetric overdrive circuitry | |
| Screamood | Classic overdrive Inspired by legendary TS-style overdrive served with its most enduring modification | Gain (0~100) Controls the gain amountTone (0~100) Controls the tone brightnessVolume (0~100) Controls the effect output volumeFat (Off/On) Switches extra resonance on/offAir (Off/On) Switch extra presence on/off |
| Dr. Blues | Based on an legendary 3-knob Blues overdrive pedal providing full-range overdriven sound, great for both guitars and basses | Gain (0~100) Controls the gain amountTone (0~100) Controls the tone brightnessVolume (0~100) Controls the effect output volume |
| Force Drive | Based on legendary Fulltone®OCD ®V3 overdrive pedal | Gain (0~100) Controls the gain amountTone (0~100) Controls the tone brightnessVolume (0~100) Controls the effect output volumeMode (LP/HP) Selects from two sound characters:LP: Neutral mode with natural response HP: High Peak mode with more distortion |
*The manufacturers and product names mentioned above are trademarks or registered trademarks of their respective owners. The trademarks were used merely to identify the sound character of the products.
Effect List
Effect Models List
| Tube Clipper | Based on legendary B. K. Butler®Tube Driver®real tube overdrive pedal | Gain (0~100) Controls the gain amountVolume (0~100) Controls the effect output volumeBass (0~100) Controls the low frequency amountTreble (0~100) Controls the high frequency amount |
| Zen Garden | Based on legendary Hermida®Zendrive®overdrive pedal | Gain (0~100) Controls the gain amountTone (0~100) Controls the tone brightnessVolume (0~100) Controls the effect output volumeVoice (0~100) Controls the upper harmonics character |
| Direct Touch | Based on Barber®Direct Drive* overdrivewith flat and natural response | Gain (0~100) Controls the gain amountTone (0~100) Controls the tone brightnessVolume (0~100) Controls the effect output volumeHarmonics (Off/On) Switches extra harmonics on/off |
| Big Pie | Based on legendary Electro-Harmonix®Big Muff Pi®fuzz/distortion pedal | Sustain (0~100) Controls the gain amountTone (0~100) Controls the tone brightnessVolume (0~100) Controls the effect output volume |
| Face Fuzz | Based on legendary Dallas-Arbiter®Fuzz Face®fuzz pedal | Fuzz (0~100) Controls the gain amountVolume (0~100) Controls the effect output volume |
| Bend Fuzz | Based on legendary Sola Sound®Tone Bender®Mkll* fuzz peal | |
| Black Tail | Based on legendary ProCoTM The Rat* distortion(early LM308 OP-amp version) | Gain (0~100) Controls the gain amountFilter (0~100) Conterclockwize controls the tone brightnessVolume (0~100) Controls the effect output volume |
| Plustortion | Based on MXR®M104 Distortion +*, reproducing the legendaryGermanium-powered soft clipping distortion | Gain (0~100) Controls the gain amountVolume (0~100) Controls the effect output volume |
| Smooth Dist | Based on the legendary3-knob orange distortion released in late 1970s | Gain (0~100) Controls the gain amountTone (0~100) Controls the tone brightnessVolume (0~100) Controls the effect output volume |
| Governor | Based on Marshall®Guv'Nor* distortion pedal | Gain (0~100) Controls the gain amountVolume (0~100) Controls the effect output volumeBass (0~100) Controls the low frequency amountMiddle (0~100) Controls the mid frequency amountTreble (0~100) Controls the high frequency amount |
| Crunchist | Based on MI Audio®Crunch Box®distortion peal,providing classic UK-style high gain stack sound | Gain (0~100) Controls the gain amountTone (0~100) Controls the tone brightnessVolume (0~100) Controls the effect output volume |
| Purple Plexi | Based on Wampler®Plexitortion®distortion pedal thatinspired by UK Plexi-style amps | Gain (0~100) Controls the gain amountMode (Vintage/Modern) Selects from two different soundcharacters: Vintage/ModernVolume (0~100) Controls the effect output volumeBass (0~100) Controls the low frequency amountMiddle (0~100) Controls the mid frequency amountTreble (0~100) Controls the high frequency amount |
| Panama Lead | A tight, thick, raw distortion inspiredby the legendary "Brown Sound" | Gain (0~100) Controls the gain amountTone (0~100) Controls the tone brightnessVolume (0~100) Controls the effect output volumeTight (0~100) Controls the bottom resonance |
*The manufacturers and product names mentioned above are trademarks or registered trademarks of their respective owners. The trademarks were used merely to identify the sound character of the products.
Effect List
Effect Models List
| Bass Crusher | Based on a yellow bass overdrive pedal with wide tonal range | Gain (0~100) Controls the gain amountBlend (0~100) Controls the wet/dry signal ratioVolume (0~100) Controls the effect output volumeBass (0~100) Controls the low frequency amountTreble (0~100) Controls the high frequency amount |
| Solid Steel | A bass drive with rich, solid sound and flexible tonal range | Gain (0~100) Controls the gain amountTone (0~100) Controls the tone brightnessVolume (0~100) Controls the effect output volumeMode (Normal/Scoop/Edge) Selects from 3 different modes: Normal: Neutral mode /Scoop: Mid-scooped mode/Edge: A mode with boosted highsBlend (0~100) Controls the wet/dry signal ratio |
| Blues Butter | Based on the Marshall Bluesbreaker * overdrive pedal, this low-mid-gain overdrive will add sweetness (and a little wildness) to your guitar sound. | Gain (0~100) Controls the gain amountTone (0~100) Controls the effect toneVolume (0~100) Controls the effect output |
| Precise Attack | Based on the famous Horizon Devices Precision Drive*. Designed by Misha Mansoor, this pedal is an everything solution for progressive musicians. | Gain (0~100) Controls the overdrive amountTone (0~100) Controls the effect toneVolume (0~100) Controls the effect outputAttack (1/2/3/4/5/6) 6-mode selector; dial clockwise for a tighter, more aggressive soundGate (0~100) Controls the built-in noise gate threshold |
| Magic T | Based on the legendary Paul Cochrane Timmy *® overdrive (V2) pedal – one of the first transparent overdrive pedals. | Gain (0~100) Controls the gain amountVolume (0~100) Controls the effect outputBass/Treble (0~100) 2-band EQ that controls the effect tone (counterclockwise, same as original)Mode(1/2/3)Selects from three clipping modes:I: asymmetrical clippingII: symmetrical clippingIII: symmetrical clipping with more compression feel |
| Modulation(22) | ||
| Aozora Chorus | Based on legendary Arion®SCH-1* stereo chorus pedal, producing classic 1980s chorus tone that loved by Clapton and Landau | Depth (0~100) Controls the chorus depthRate (0~100) Controls the chorus speedTone (0~100) Controls the tone brightnessSync (Off/On) Switches Tap Tempo sync on/off |
| Grand Choruium | Based on the legendary huge ensemble chorus pedal born in late 1970s (chorus mode), producing rich, shimmering vintage analog chorus tone | Depth (0~100) Controls the chorus depthRate (0~100) Controls the chorus speedVolume (0~100) Controls the output volumeSync (Off/On) Switches Tap Tempo sync on/off |
| Liquid C | Based on a legendary 4-button purple stereo chorus pedal, providing detailed rich chorus tone that expands sonic dimensions | Mode (1/2/3/4) Selects from 4 sound characters |
*The manufacturers and product names mentioned above are trademarks or registered trademarks of their respective owners. The trademarks were used merely to identify the sound character of the products.
Effect List
Effect Models List
| Aquaria M | A multi-dimensional chorus pedal producing rich surrounding chorus sound, better playing with stereo sound systems | Mix (0~100) Controls the wet/dry signal ratioRate (0~100) Controls the chrous speedFilter (0~100) Controls the tone brightnessDepth L (0~100) Controls the chorus depth of left channelDepth C (0~100) Controls the chorus depth of center channelDepth R (0~100) Controls the chorus depth of right channelSync (Off/On) Switches Tap Tempo sync on/off |
| Choruium B | Based on the famous ensemble chorus unit tuned for bassists | Depth (0~100) Controls the chorus depthRate (0~100) Controls the chrous speedE.Level (0~100) Controls the effect output volumeSync (Off/On) Switches Tap Tempo sync on/off |
| Detune | Combines a slightly pitch shifted signal with original sound, producing chorus-like tone | Range (-50 Cents~+50 Cents) Controls the detune amounts by 1 centWet (0~100) Controls the effect output volumeDry (0~100) Controls the dry signal level |
| Jetter | Classic flanging effect that is rich and natural | Depth (0~100) Controls the flanger depthRate (0~100) Controls the effect speedPre Delay (0~100) Controls the pre delay timeFeedback (0~100) Controls the feedback amountSync (Off/On) Switches Tap Tempo sync on/off |
| Jetter B | Classic flanging effect tuned for basses | |
| Jetter N | A flanger with negative feedback,producing "underwater" style sound | |
| Trem Jet | Combines flanger and tremolo in one | Flg Depth (0~100) Controls the flanger depthFlg Rate (0~100) Controls the flanging speedFeedback (0~100) Controls the feedback amountTrm Depth (0~100) Controls the tremolo depthTrm Rate (0~100) Controls the tremolo speedFlg Sync (Off/On) Switches flanger Tap Tempo sync on/offTrm Sync (Off/On) Switches tremolo Tap Tempo sync on/off |
| Pulser | Based on a BBD-based blue vibrato pedal,producing natural analog vibrato sound | Depth (0~100) Controls the vibraro depthRate (0~100) Controls the vibrato speedSync (Off/On) Switches Tap Tempo sync on/off |
| Grand Vibrato | Based on the legendary huge ensemble chorus pedal born in late 1970s (vibrato mode), producing rich,shimmering vintage analog vibrato tone | Depth (0~100) Controls the vibrato depthRate (0~100) Controls the vibrato speedE.Level (0~100) Controls the output volumeSync (Off/On) Switches Tap Tempo sync on/off |
| Shiver | A classic vibrato effect with wide adjustable range | Depth (0~100) Controls the vibrato depthRate (0~100) Controls the vibrato speedOutput (0~100) Controls the output volumeSync (Off/On) Switches Tap Tempo sync on/off |
| Shiver T | A special vibrato with touch-sensitive dynamicdepth control | Sens (0~100) Counterclockwise controls the effect sensitivityRate (0~100) Controls the effect speedOutput (0~100) Controls the output volumeSync (Off/On) Switches Tap Tempo sync on/off |
| 90 Phaser | Based on legendary MXR®M101 Phase 90* | Rate (0~100) Controls the phaser speedSync (Off/On) Switches Tap Tempo sync on/off |
*The manufacturers and product names mentioned above are trademarks or registered trademarks of their respective owners. The trademarks were used merely to identify the sound character of the products.
Effect List
Effect Models List
| Green Phaser | Based on a legendary 2-knob green phaser with sharp sound character | Depth (0~100) Controls the phaser depthRate (0~100) Controls the phaser speedSync (Off/On) Switches Tap Tempo sync on/off |
| Twirl N | A highly flexible phaser effect with 3 adjustable notch filters | Depth (0~100) Controls the phaser depthRate (0~100) Controls the phaser speedLevel (0~100) Controls the output volumeNotch 1/Notch 2/Notch 3 (0~100)Controls the center frequency of 3 notch filersSync (Off/On) Switches Tap Tempo sync on/off |
| Twirl P | A special, subtle phaser combines tremolo/pan variations | Phaser Depth (0~100) Controls the phaser depthPhaser Rate (0~100) Controls the phaser speedPan Depth (0~100) Controls the tremolo/pan depthPan Rate (0~100) Controls the tremolo speed (mono) or panning speed (stereo)Phs Sync (Off/On) Switches phaser Tap Tempo sync on/offPan Sync (Off/On) Switches tremolo/pan Tap Tempo sync on/off |
| Minivibe | Based on Voodoo Lab®Micro Vibe* | Depth (0~100) Controls the effect depthRate (0~100) Controls the effect speedSync (Off/On) Switches Tap Tempo sync on/off |
| Revolver | Based on legendary Shin-ei®Uni-Vibe® | Depth (0~100) Controls the effect depthRate (0~100) Controls the effect speedVolume (0~100) Controls the output volumeMode (Chorus/Vibrato) Selects from two sound characters: Chorus/VibratoSync (Off/On) Switches Tap Tempo sync on/off |
| Helicopter | Based on legendary Demeter®TRM-1 Tremulator*, offering classical opto tremolo sound | Depth (0~100) Controls the tremolo depthRate (0~100) Controls the tremolo speedSync (Off/On) Switches Tap Tempo sync on/off |
| Custom Trem | A custom tremolo with 4 different waveforms and super wide tonal range | Depth (0~100) Controls the tremolo depthRate (0~100) Controls the tremolo speedVolume (0~100) Controls the output volumeColor (0~100) Controls the effect toneShape (Sine/Triangle/Square/Sawtooth) Selects from sine/triangle/square/sawtooth tremolo waveformsBias (0~100) Controls the waveform offset amountSync (Off/On) Switches Tap Tempo sync on/off |
| AMP(63) | ||
| Clean(14) | ||
| Tweed Lux | Based on Fender®Tweed Deluxe*(bright channel, 5E3 version) | Volume (0~100) Controls the amp pre gainTone (0~100) Controls the tone brightnessOutput (0~100) Controls the amp output volume |
*The manufacturers and product names mentioned above are trademarks or registered trademarks of their respective owners. The trademarks were used merely to identify the sound character of the products.
Effect List
Effect Models List
| Baseman Norm | Based on Fender®59 Bassman ®(normal channel) | Volume (0~100) Controls the amp pre gainPresence (0~100) Controls the amp presenceOutput (0~100) Controls the amp output volumeBass (0~100) Controls the amp low frequency responseMiddle (0~100) Controls the amp mid frequency responseTreble (0~100) Controls the amp high frequency response |
| Black Twin | Based on Fender®65 Twin Reverb ® | Gain (0~100) Controls the amp pre gainMaster (0~100) Controls the amp output volumeBass (0~100) Controls the amp low frequency responseMiddle (0~100) Controls the amp mid frequency responseTreble (0~100) Controls the amp high frequency responseBright (Off/On) Switches extra brightness on/off |
| Voxy 30HW Norm | Based on VOX®AC30HW* (normal channel) | Volume (0~100) Controls the amp pre gainTone Cut (0~100) Counterclockwise controls the tone brightnessMaster (0~100) Controls the amp output volumeBright (Off/On) Switches extra brightness on/off |
| Superb Dual Clean | Based on Supro®Dual-Tone 1624T*(clean tone) | Volume(0~100) Controls the amp output volumeTone(0~100) Conterclockwise controls the tone brightness |
| Jazz Clean | Based on the legendary“Jazz Chorus”solid state combo | Volume (0~100) Controls the amp output volumeBright (0~100) Switches extra brightness on/offBass (0~100) Controls the amp low frequency responseMiddle (0~100) Controls the amp mid frequency responseTreble (0~100) Controls the amp high frequency response |
| Emperor Clean | Based MatchlessTM Chieftain 212 combo*(clean tone) | Gain (0~100) Controls the amp pre gainPresence (0~100) Controls the amp presenceMaster (0~100) Controls the amp output volumeBass (0~100) Controls the amp low frequency responseMiddle (0~100) Controls the amp mid frequency responseTreble (0~100) Controls the amp high frequency response |
| Superstar Clean | Based on Mesa/Boogie®Lone StarTM (CH1) | |
| Glacian Clean | Based on Bogner ®Shiva*(20th Anniversary version, Ch1) | Gain (0~100) Controls the amp pre gainPresence (0~100) Controls the amp presenceMaster (0~100) Controls the amp output volumeBass (0~100) Controls the amp low frequency responseTreble (0~100) Controls the amp high frequency responseBright (Off/On) Switches extra brightness on/off |
| Dr. 38 Clean | Based on Dr. Z® Maz 38 Sr.* combo (clean sound) | Gain (0~100) Controls the amp pre gainTone Cut (0~100) Conterclockwise controls the tone brightnessMaster (0~100) Controls the amp output volumeBass (0~100) Controls the amp low frequency responseMiddle (0~100) Controls the amp mid frequency responseTreble (0~100) Controls the amp high frequency response |
*The manufacturers and product names mentioned above are trademarks or registered trademarks of their respective owners. The trademarks were used merely to identify the sound character of the products.
Effect List
Effect Models List
| Pendragon Clean | Based on Grindrod®Pendragon PG20C*(Normal channel, bright off) | Gain (0~100) Controls the amp pre gainVolume (0~100) Controls the amp output volumeBass (0~100) Controls the amp low frequency responseMiddle (0~100) Controls the amp mid frequency responseTreble (0~100) Controls the amp high frequency response |
| Pendragon Clean+ | Based on Grindrod®Pendragon PG20C*(Normal channel, bright on) | |
| Hot Kitty Clean | Based on Bad Cat®Hot Cat 30* (clean channel) | Gain (0~100) Controls the amp pre gainPresence (0~100) Controls the amp presenceMaster (0~100) Controls the amp output volume |
| Soloist 100 Clean | Based on Soldano®SLO100*(normal channel, clean sound) | Gain (0~100) Controls the amp pre gainPresence (0~100) Controls the amp presenceMaster (0~100) Controls the amp output volumeBass (0~100) Controls the amp low frequency responseMiddle (0~100) Controls the amp mid frequency responseTreble (0~100) Controls the amp high frequency response |
| Drive(19) | ||
| Baseman Bright | Based on Fender®'59 Bassman ® (bright channel) | Volume (0~100) Controls the amp pre gainPresence (0~100) Controls the amp presenceOutput (0~100) Controls the amp output volumeBass (0~100) Controls the amp low frequency responseMiddle (0~100) Controls the amp mid frequency responseTreble (0~100) Controls the amp high frequency response |
| Voxy 30HW TB | Based on VOX®AC30HW* (Top Boost channel) | Volume (0~100) Controls the amp pre gainTone Cut (0~100) Conterclockwise controls the tone brightnessMaster (0~100) Controls the amp output volumeBass (0~100) Controls the amp low frequency responseTreble (0~100) Controls the amp high frequency responseChar (Cool/Hot) Selects from 2 gain ranges |
| Superb Dual Drive | Based on the Supro®Dual-Tone 1624T*(CH1+2, dirty tone) | Volume 1 (0~100) Controls the output volume of CH1Tone 1 (0~100) Controls the tone brightness of CH1Volume 2 (0~100) Controls the output volume of CH2Tone 2 (0~100) Controls the tone brightness of CH2 |
| Emperor Drive | Based on MatchlessTM Chieftain 212 combo*(dirty tone) | Gain (0~100) Controls the amp pre gainPresence (0~100) Controls the amp presenceMaster (0~100) Controls the amp output volumeBass (0~100) Controls the amp low frequency responseMiddle (0~100) Controls the amp mid frequency responseTreble (0~100) Controls the amp high frequency response |
| Dr. 38 Drive | Based on Dr. Z®Maz 38 Sr* combo (dirty tone) | Volume (0~100) Controls the amp pre gainTone Cut (0~100) Conterclockwise controls the tone brightnessMaster (0~100) Controls the amp output volumeBass (0~100) Controls the amp low frequency responseMiddle (0~100) Controls the amp mid frequency responseTreble (0~100) Controls the amp high frequency response |
*The manufacturers and product names mentioned above are trademarks or registered trademarks of their respective owners. The trademarks were used merely to identify the sound character of the products.
Effect List
Effect Models List
| Superstar Drive | Based on Mesa/Boogie®Lone StarTM (CH2) | Gain (0~100) Controls the amp pre gainDrive (0~100) Controls the amp drive amountMaster (0~100) Controls the amp output volumeBass (0~100) Controls the amp low frequency responseMiddle (0~100) Controls the amp mid frequency responseTreble (0~100) Controls the amp high frequency response |
| Marshell 45 | Based on Marshall®JTM45* (normal channel) | Volume (0~100) Controls the amp pre gainPresence (0~100) Controls the amp presenceOutput (0~100) Controls the amp output volumeBass (0~100) Controls the amp low frequency responseMiddle (0~100) Controls the amp mid frequency responseTreble (0~100) Controls the amp high frequency response |
| Marshell 45+ | Based on Marshall®JTM45* (High Treble channel) | |
| Marshell 45 Jump | Based on Marshall®JTM45* ("Jump" connection) | Gain (0~100) Controls the amp pre gainPresence (0~100) Controls the amp presenceOutput (0~100) Controls the amp output volumeBass (0~100) Controls the amp low frequency responseMiddle (0~100) Controls the amp mid frequency responseTreble (0~100) Controls the amp high frequency response |
| Marshell 50 | Based on Marshall®JMP50* (normal channel) | Volume (0~100) Controls the amp pre gainTone Cut (0~100) Controls the amp presenceMaster (0~100) Controls the amp output volumeBass (0~100) Controls the amp low frequency responseMiddle (0~100) Controls the amp mid frequency responseTreble (0~100) Controls the amp high frequency response |
| Marshell 50+ | Based on Marshall®JMP50* (High Treble channel) | |
| Marshell 50 Jump | Based on Marshall®JMP50* ("Jump" connection) | Gain (0~100) Controls the amp pre gainPresence (0~100) Controls the amp presenceOutput (0~100) Controls the amp output volumeBass (0~100) Controls the amp low frequency responseMiddle (0~100) Controls the amp mid frequency responseTreble (0~100) Controls the amp high frequency response |
| Hot Kitty Drive | Based on Bad Cat®Hot Cat 30* (drive channel) | Gain (0~100) Controls the amp pre gainPresence (0~100) Controls the amp presenceMaster (0~100) Controls the amp output volumeBass (0~100) Controls the amp low frequency responseMiddle (0~100) Controls the amp mid frequency responseTreble (0~100) Controls the amp high frequency response |
| Messe IIC+ 1 | Based on Mesa/Boogie®Mark II C+TM (Lead channel) with 3 different onboard switch combinations | |
| Messe IIC+ 2 | ||
| Messe IIC+ 2 | ||
| Soloist 100 Crunch | Based on Soldano®SLO100* (normal channel, dirty sound) | |
| Marshell 800 | Based on Marshall®JCM800* | |
| Pendragon Drive | Based on Grindrod®Pendragon PG20C* (Drive channel) | Gain (0~100) Controls the amp pre gainVolume (0~100) Controls the amp output volumeBass (0~100) Controls the amp low frequency responseMiddle (0~100) Controls the amp mid frequency responseTreble (0~100) Controls the amp high frequency response |
*The manufacturers and product names mentioned above are trademarks or registered trademarks of their respective owners. The trademarks were used merely to identify the sound character of the products.
Effect List
Effect Models List
| Fryman B1 | Based on the famous"Brown Eye"UK-style boutique amp head (BE channel) with 2 different onboard switch combinations | Gain (0~100) Controls the amp pre gainPresence (0~100) Controls the amp presenceMaster (0~100) Controls the amp output volumeBass (0~100) Controls the amp low frequency responseMiddle (0~100) Controls the amp mid frequency responseTreble (0~100) Controls the amp high frequency response |
| Fryman B2 | ||
| Glacian Drive | Based on Bogner®Shiva* (20th Anniversary version, Ch2) | |
| HiGain(22) | ||
| Marshell 900 | Based on Marshall®JCM900* (Model 4100, channel B) | Gain (0~100) Controls the amp pre gainPresence (0~100) Controls the amp presenceMaster (0~100) Controls the amp output volumeBass (0~100) Controls the amp low frequency responseMiddle (0~100) Controls the amp mid frequency responseTreble (0~100) Controls the amp high frequency response |
| Dizzle VH B | Based on Diezel®VH4* (CH3, blue version) | |
| Dizzle VH S | Based on Diezel®VH4* (CH3, silver version) | |
| Engle Saga 1 | Based on ENGL®Savage 120 E610* (CH4, contour off) | |
| Engle Saga 2 | Based on ENGL®Savage 120 E610* (CH4, contour on) | |
| Powerengle Lead | Based on ENGL®Powerball II E645/2* (CH4) | |
| Fryman HB | Based on the famous"Brown Eye"UK-style boutique amp head (HBE channel) with 2 different onboard switch combinations | |
| Fryman HB+ | ||
| Eddie 51 | Based on Peavey®5150 (LEAD channel) | |
| Soloist 100 Lead | Based on Soldano®SLO100* (overdrive channel) | |
| Messe IV Lead 1 | Based on Mesa/Boogie®Mark IVTM (Lead channel) with 3 different onboard switch combinations | |
| Messe IV Lead 2 | ||
| Messe IV Lead 3 | ||
| Tangerine R100 | Based on Orange®Rockerverb 100TM* (Dirty channel) | Gain (0~100) Controls the amp pre gainMaster (0~100) Controls the amp output volumeBass (0~100) Controls the amp low frequency responseMiddle (0~100) Controls the amp mid frequency responseTreble (0~100) Controls the amp high frequency response |
| Rector Dual V | Based on Mesa/Boogie®Dual Rectifier (CH3, vintage mode) | Gain (0~100) Controls the amp pre gainPresence (0~100) Controls the amp presenceMaster (0~100) Controls the amp output volumeBass (0~100) Controls the amp low frequency responseMiddle (0~100) Controls the amp mid frequency responseTreble (0~100) Controls the amp high frequency response |
| Rector Dual M | Based on Mesa/Boogie®Dual Rectifier (CH3, modern mode) | |
| Dizzle VH+B | Based on Diezel®VH4* (CH4, blue version) | |
| Dizzle VH+S | Based on Diezel®VH4* (CH4, silver version) | |
| Boger XT Blue V | Based on Bogner®Ecstasy* ("Blue" channel, Vintage mode) | |
| Boger XT Blue M | Based on Bogner®Ecstasy* ("Blue" channel, Modern mode) | |
| Boger XT Red V | Based on Bogner®Ecstasy* ("Red" channel, Vintage mode) | |
| Boger XT Red M | Based on Bogner®Ecstasy* ("Red" channel, Modern mode) | |
| Bass(5) | ||
| Alchemy Pre | Based on AlembicTM F-2B* preamp | Volume (0~100) Controls the amp output volumeBright (Off/On) Switches extra brightness on/offBass (0~100) Controls the amp low frequency responseMiddle (0~100) Controls the amp mid frequency responseTreble (0~100) Controls the amp high frequency response |
*The manufacturers and product names mentioned above are trademarks or registered trademarks of their respective owners. The trademarks were used merely to identify the sound character of the products.
Effect List
Effect Models List
| Ampage Classic | Based on Ampeg®SVT* bass amp | Gain (0~100) Controls the amp pre gainBass (0~100) Controls the amp low frequency responseMiddle (0~100) Controls the amp mid frequency responseMidrange (220Hz/450Hz/800Hz/1.6kHz/3kHz)Selects from 5 mid frequency rangesTreble (0~100) Controls the amp high frequency responseMaster (0~100) Controls the amp output volume |
| Ampage Flip | Based on Ampeg®B-15* "Flip Top" bass amp | Volume (0~100) Controls the amp output volumeBass (0~100) Controls the amp low frequency responseTreble (0~100) Controls the amp high frequency response |
| Voxy Bass | Based on vintage VOX® AC-100* bass amp | |
| Messe Bass 400 | Based on Mesa/Boogie®Bass 400* amp | Volume (0~100) Controls the amp pre gainMaster (0~100) Controls the amp output volumeBass (0~100) Controls the amp low frequency responseMiddle (0~100) Controls the amp mid frequency responseTreble (0~100) Controls the amp high frequency response |
| Acoustic(2) | ||
| Acoustic Preamp 1 | Based on AER®Colourizer 2* acoustic preamp with 2 different onboard switch combinations | Volume (0~100) Controls the output volumeTone (0~100) Controls the tone brightnessBalance (0~100) Controls the tone control balance;turn to 0 to disable tone controlEQ Freq (0~100) Controls the EQ center frequency from 90Hz to 1.6kHzEQ Q (0~100) Controls the EQ bandwidthEQ Gain Controls the EQ boost/cut amount |
| Acoustic Preamp 2 | Volume (0~100) Controls the output volumeTone (0~100) Controls the tone brightnessBalance (0~100) Controls the tone control balance;turn to 0 to disable tone controlEQ Freq (0~100) Controls the EQ center frequency from 680Hz to 11kHzEQ Q (0~100) Controls the EQ bandwidthEQ Gain Controls the EQ boost/cut amount | |
| NR(3) | ||
| All effects in this module are also available in FX1 and FX2 modules | ||
| Smart Gate | Based on famous ISP®DecimatorTM* noise gate pedal | Threshold (0~100) Controls the noise gate threshold |
| Fast Gate | A 2-mode noise gate with fast response | Threshold (0~100) Controls the noise gate thresholdMode(I/II) Selects from two modes:Mode I: responds faster Mode II: responds smoother |
| Custom Gate | Flexible noise gate with attack and release control | Threshold (0~100) Controls the noise gate thresholdAttack (0~100) Controls how fast the noise gate start to process signalRelease (0~100) Controls the noise gate release time when signal level reaches the threshold |
*The manufacturers and product names mentioned above are trademarks or registered trademarks of their respective owners. The trademarks were used merely to identify the sound character of the products.
Effect List
Effect Models List
| CAB/IR(70) | |
| All effects in this module (include user IRs) share the same parameters: Mic Type: Selects (or turn off) the different microphone simulations Volume: Controls the output volume Position X/Y/Z: Controls the mic mosition simulations; X/Y controls the microphone horizontal/vertical position, set X=Y=0 to set the microphone on axis; Z controls the distance between microphone and speaker cap | |
| Factory Cab(60) | |
| FX Title | Description |
| Super Zep 1x6 | Supro® 1x6" cabinet with oval speaker |
| Tweed Chap 1x8 | Vintage Fender®Champ* 1x8" cabinet |
| Tweed Prince 1x10 | Vintage Fender®Princeton* 1x10" cabinet |
| Black Lux 1x12 | Vintage Fender®Deluxe* 1x12" cabinet |
| Black Vint 1x12 | Vintage Fender®Vibrolux* 1x12" cabinet |
| Routine 1x12 | Carr®Rambler* 1x12" cabinet |
| Glacian 1x12 | Bogner®Shiva* 1x12" cabinet |
| Bad Kitty 1x12 | Black Cat®Hot Cat* 1x12" cabinet |
| Voxy 1x12 | Vintage VOX®AC15* 1x12" cabinet |
| Dark Star 1x12 | Mesa/Boogie®Lonestar* 1x12" cabinet |
| Atom Open 1x12 | Swart®Atomic Space* 1x12" cabinet |
| Tweed Lux 1x12 | Fender®Tweed Deluxe* 1x12 cabinet |
| US Studio 1x12 | 1980's Mesa/Boogie® 1x12" cabinet |
| Ace 20 1x12 | Morgan®AC-20 Deluxe* 1x12 cabinet |
| UK G12M 1x12 | Marshall® 1x12" cabinet |
| Voxy 2x12 | Vintage VOX®AC30* 2x12" cabinet |
| Emperor 2x12 | Matchless®Chieftain* 2x12" cabinet |
| Jazz Twin 2x12 | Legendary "Jazz Chorus" 2x12" cabinet |
| Black Twin 2x12 | Vintage Fender®65 Twin Reverb* 2x12" cabinet |
| UK Green 2x12 | Marshall®2550* 2x12" cabinet |
| Tweed Super 2x10 | A custom Fender®Tweed* 2x10" cabinet |
| Boutique 2x12 | A unique custom 2x12" cabinet |
| Baseman 2x12 | Vintgae Fender® "Piggyback" Bassman® 2x12" cabinet |
| Superb 2x12 | Supro® 1624T* 2x12 cabinet" |
| Match Twin 2x12 | Matchless® 2x12" cabinet |
| Superstar 2x12 | Mesa/Boogie®Lonestar* 2x12" cabinet |
| Freedom 2x12 | Fryette®Deliverance* 2x12" cabinet |
| Black Custom 2x12 | Custom modified Fender® 2x12" cabinet |
| Twin Rock 2x12 | Two-Rock® 2x12" cabinet |
| Bluesky 2x12 | A custom 2x12" cabinet with Celestion®Alnico Blue* speakers |
| Baseman 4x10 | Fender®59 Bassman®4x10" cabinet |
| UK Lead 4x12 | Marshall®1960AV* 4x12" cabinet |
| UK Trad 2x12 | 68 Marshall®Basketweave* 4x12" cabinet |
| UK Modern 4x12 | Custom modified Marshall® 4x12" cabinet |
| UK Green 4x12 | Vintage Marshall®4x12" cabinet with Celestion Greenback * speakers |
| Eddie 4x12 | Peavey®6505* 4x12" cabinet |
| Rector 4x12 | Mesa/Boogie®Rectifier®4x12" cabinet |
*The manufacturers and product names mentioned above are trademarks or registered trademarks of their respective owners. The trademarks were used merely to identify the sound character of the products.
Effect List
Effect Models List
| Boger 4x12 | Bogner® 4x12" cabinet | |
| Engle 4x12 | ENGL® 4x12" cabinet | |
| Urban 4x12 | Bogner®Uberkab* 4x12" cabinet | |
| Soloist 4x12 | Soldano® 4x12" caninet | |
| Tang 4x12 | Orange®PPC412* 4x12" cabinet | |
| Hiway 4x12 | Vintage Hiwatt®SE4123* 4x12" cabinet | |
| UK Black 4x12 | 1968 Marshall® 4x12" cabinet | |
| The Way 4x12 | Vintage WEM® 4x12" cabinet | |
| Dumbell 4x12 | Dumble® 4x12" cabinet | |
| Dizzle 4x12 | Diezel® 4x12" cabinet | |
| Triple 4x12 | Hughes & Kettner®Triamp* 4x12" cabinet | |
| UK T75 4x12 | Marshall® 4x12" cabinet with Celestion ©12T-75" speakers | |
| US King 4x12 | Mesa/Boogie®Road King ®4x12" cabinet | |
| Adam 1x15 | David Eden® 1x15" bass cabinet | |
| Worker 1x15 | SWR® 1x15" bass cabinet | |
| Flip Top 1x15 | Ampeg®PF-115HE* 1x15" bass cabinet | |
| US Bass 2x10 | Mesa/Boogie® 2x10" bass cabinet | |
| Mark 2x10 | Mark Bass® 4x10" bass cabinet | |
| Adam 4x10 | David Eden® 4x10" bass cabinet | |
| Ampage 4x10 | Ampeg®SVT-410HE* 4x10" bass cabinet | |
| Worker 4x10 | SWR®Workingman's* 4x10" bass cabinet | |
| Hacker 4x12 | Hartke® 4x12" bass cabinet | |
| Ampage 8x10 | Ampeg SVT-810E* 8x10" bass cabinet | |
| Factory Acoustic Cab(10) | ||
| Dreadnought 1 | Dreadnought guitar simulation 1 | |
| Dreadnought 2 | Dreadnought guitar simulation 2 | |
| Orchestal | Simulates an OM type acoustic guitar | |
| Jumbo | Simulates a jumbo acoustic guitar | |
| Hum Bird | Simulates the iconic "H-Bird" acoustic guitar | |
| Auditorium | Simulates a GA type acoustic guitar | |
| Classical | Simulates a classical guitar | |
| Mandolin | Simulates a mandolon | |
| Fretless Bass | Simulates a fretless acoustic bass | |
| Double Bass | Simulates a double bass | |
| User IR | ||
| User IR (71-80) | For loading 3rd party IR files; the output will be muted when switched to an empty User IR slot | |
| Mic Type | ||
| Name | Based On | Type |
| OFF | N/A | N/A |
| Dyn 57 | Shure®SM57* | Dynamic |
| Dyn 58 | Shure®SM58* | Dynamic |
| Dyn 421 | Sennheiser®MD421* | Dynamic |
| Dyn 16 | Electro-Voice RE16* | Dynamic |
| Dyn 112 | AKG®D112* | Dynamic |
| Dyn 609 | Sennheiser®e609* | Dynamic |
*The manufacturers and product names mentioned above are trademarks or registered trademarks of their respective owners. The trademarks were used merely to identify the sound character of the products.
Effect List
Effect Models List
| Mic Type | ||
| Name | Based On | Type |
| Con U67 | Neumann®U67* | Condenser |
| Con 87A | Shure®Beta 87A* | Condenser |
| Con U87 | Neumann®U87* | Condenser |
| Rib 121 | Royal®R121* | Ribbon |
| EQ(7) | ||
| FX Title | Description | Parameters & Range |
| Guitar EQ 1 | Equalizer designed for guitars | 125Hz (-50~+50) Boosts/cuts the frequency band400Hz (-50~+50) Boosts/cuts the frequency band800Hz (-50~+50) Boosts/cuts the frequency band1.6kHz (-50~+50) Boosts/cuts the frequency band4kHz (-50~+50) Boosts/cuts the frequency bandVolume (0~100) Controls the output volume |
| Guitar EQ 2 | 100Hz (-50~+50) Boosts/cuts the frequency band500Hz (-50~+50) Boosts/cuts the frequency band1kHz (-50~+50) Boosts/cuts the frequency band3kHz (-50~+50) Boosts/cuts the frequency band6kHz (-50~+50) Boosts/cuts the frequency bandVolume(0~100) Controls the output volume | |
| Bass EQ 1 | Equalizer designed for basses | 50Hz (-50~+50) Boosts/cuts the frequency band120Hz (-50~+50) Boosts/cuts the frequency band400Hz (-50~+50) Boosts/cuts the frequency band800Hz (-50~+50) Boosts/cuts the frequency band4.5kHz (-50~+50) Boosts/cuts the frequency bandVolume (0~100) Controls the output volume |
| Bass EQ 2 | Equalizer designed for basses | 125Hz (-50~+50) Boosts/cuts the frequency band400Hz (-50~+50) Boosts/cuts the frequency band800Hz (-50~+50) Boosts/cuts the frequency band1.6kHz (-50~+50) Boosts/cuts the frequency band4kHz (-50~+50) Boosts/cuts the frequency bandVolume (0~1O0) Controls the output volume |
| Para EQ | 4-band parametric EQ with low/high shelving filters suitable for any instrument | Band 1 (50Hz-400Hz) Controls the band 1 center frequencyQ 1 (0.1-10) Controls the band 1 Q bandwidthGain 1 (-12dB~+12dB) Boosts/cuts band 1 by ±12dB Band 2 (200Hz-2.0kHz) Controls the band 2 center frequencyQ 2 (0.1-10) Controls the band 2 Q bandwidthGain 2 (-12dB~+12dB) Boosts/cuts band 2 by ±12dB Band 3 (1.0kHz-10.0kHz) Controls the band 3 center frequencyQ 3 (0.1-10) Controls the band 3 Q bandwidthGain 3 (-12dB~+12dB) Boosts/cuts band 3 by ±12dB Band 4 (5.0kHz-16.0kHz) Controls the band 4 center frequencyQ 4 (0.1-10) Controls the band 4 Q bandwidthGain 4 (-12dB~+12dB) Boosts/cuts band 4 by ±12dB Lo Shelf Controls the low shelf filter boost/cut range by ±12dB Hi Shelf Controls the high shelf filter boost/cut range by ±12dB Volume Controls the output volume |
*The manufacturers and product names mentioned above are trademarks or registered trademarks of their respective owners. The trademarks were used merely to identify the sound character of the products.
Effect List
Effect Models List
| Graphic EQ | 10-band graphic EQ suitable for any instrument | 31Hz (-12dB~+12dB) Boosts/cuts the frequency band63Hz (-12dB~+12dB) Boosts/cuts the frequency band125Hz (-12dB~+12dB) Boosts/cuts the frequency band250Hz (-12dB~+12dB) Boosts/cuts the frequency band500Hz (-12dB~+12dB) Boosts/cuts the frequency band1kHz (-12dB~+12dB) Boosts/cuts the frequency band2kHz (-12dB~+12dB) Boosts/cuts the frequency band4kHz (-12dB~+12dB) Boosts/cuts the frequency band8kHz (-12dB~+12dB) Boosts/cuts the frequency band16kHz (-12dB~+12dB) Boosts/cuts the frequency bandVolume (0~100) Controls the output volume |
| V-EQ | Based on the 5-band EQ module on Mesa/Boogie® amps | 80Hz (-50~+50) Boosts/cuts the frequency band240Hz (-50~+50) Boosts/cuts the frequency band750Hz (-50~+50) Boosts/cuts the frequency band2.2kHz (-50~+50) Boosts/cuts the frequency band6.6Hz (-50~+50) Boosts/cuts the frequency band |
| DLY(20) | ||
| Sweetie | Based on the legendary 3-knob BBD analog delay pedal with "REPEAT RATE" control | Mix (0~100) Contols the wet/dry signal ratioFeedback (0~100) Controls the feedback amountTime (20ms-4000ms) Controls the delay timeSync (Off/On) Switches Tap Tempo sync on/offTrail (Off/On) Switches effect trail on/off |
| Recaller | Based on legendary Electro-Harmonix® Deluxe Memory Man® | |
| Pure Eko | Produce pure, precised delay sound | |
| Analog Eko | Producing warm delay sound with analog feel | |
| Ekopress 80 | Based on Maxor® AD80 Analog Delay*(early MN3005 version) with great dynamics (due to 18V power supply) and slightly lo-fi'd repets | Mix (0~100) Contols the wet/dry signal ratioFeedback (0~100) Controls the feedback amountTime (20ms-4000ms) Controls the delay timeSync (Off/On) Switches Tap Tempo sync on/offTrail (Off/On) Switches effect trail on/off |
| Mag Eko | Simulates solid-state tape echo sound | |
| Tube Eko | Simulates tube-driven tape echo sound | |
| Ekopress 900 | Based on Maxon®AD900 Analog Delay*, providing warm, accurate delay sound | |
| Ekopress 999 | Based on Maxon®AD999 Analog Delay* with slightly overdriven delay sound | |
| Backmask | Producing a special delay effect with reversed feedback | |
| Dual Eko | Producing a pure dual delay effect with separated L/R channel signal processing | Mix A (0~100) Contols the delay A wet/dry signal ratioFB A (0~100) Controls the feedback amount of delay A Time A (20ms-4000ms) Controls the delay time of delay AMix B (0~100) Contols the delay B wet/dry signal ratioFB B (0~100) Controls the feedback amount of delay B Time B (20ms-4000ms) Controls the delay time of delay BA Sync (Off/On) Switches delay A Tap Tempo sync on/offB Sync (Off/On) Switches delay B Tap Tempo sync on/offTrail(Off/On) Switches effect trail on/off |
*The manufacturers and product names mentioned above are trademarks or registered trademarks of their respective owners. The trademarks were used merely to identify the sound character of the products.
Effect List
Effect Models List
| Ping Pong | A ping-pong delay producing stereo feedback bounces back and forth between left and right channels | Mix (0~100) Contols the wet/dry signal ratioFeedback (0~100) Controls the feedback amountTime (20ms-4000ms) Controls the delay timeSync (Off/On) Switches Tap Tempo sync on/offTrail (Off/On) Switches effect trail on/off |
| Multi Head | A multi tap delay that simulates a huge 4-head tape echo machine | Mix (0~100) Contols the wet/dry signal ratioFeedback (0~100) Controls the feedback amountTime (20ms-4000ms) Controls the delay timeTone (0~100) Controls the effect tone brightnessMode (1-12) Selects from 12 different head variationsSync (Off/On) Switches Tap Tempo sync on/offTrail (Off/On) Switches effect trail on/off |
| Slapback | Simulates the classic slapback echo effect | Mix (0~100) Contols the wet/dry signal ratioFeedback (0~100) Controls the feedback amountTime (20ms-300ms) Controls the delay timeTrail (Off/On) Switches effect trail on/off |
| Vintage Rack | Reproduces the sound of a vintage 1980's rack-mount delay machine with slightly sample-reduced feedback | Mix (0~100) Contols the wet/dry signal ratioFeedback (0~100) Controls the feedback amountTime (20ms-4000ms) Controls the delay timeMod (0~100) Controls the modulation amountTone (0~100) Controls the modulation brightnessSync (Off/On) Switches Tap Tempo sync on/offTrail (Off/On) Switches effect trail on/off |
| Sweep Eko | Producing a delay effect with sweeping filter modulated repeats | Mix (0~100) Contols the wet/dry signal ratioFeedback (0~100) Controls the feedback amountTime (20ms-4000ms) Controls the delay timeSweep Depth (0~100) Controls the sweeping depthSweep Rate (0~100) Controls the sweeping speedSwp Sync (Off/On) Switches sweeping Tap Tempo sync on/offTime Sync (Off/On) Switches delay Tap Tempo sync on/offTrail (Off/On) Switches effect trail on/off |
| Trem Eko | Producing a delay effect with tremolo altered repeats | Mix (0~100) Contols the wet/dry signal ratioFeedback (0~100) Controls the feedback amountTime (20ms-4000ms) Controls the delay timeTrem Depth (0~100) Controls the tremolo depthTrem Rate (0~100) Controls the tremolo speedTrem Sync (Off/On) Switches tremolo Tap Tempo sync on/offTime Sync (Off/On) Switches delay Tap Tempo sync on/offTrail (Off/On) Switches effect trail on/off |
*The manufacturers and product names mentioned above are trademarks or registered trademarks of their respective owners. The trademarks were used merely to identify the sound character of the products.
Effect List
Effect Models List
| Lofi Eko | Producing a delay effect with lo-fi'd repeats | Mix (0~100) Controls the wet/dry signal ratioFeedback (0~100) Controls the feedback amountTime (20ms-4000ms) Controls the delay timeBit (0~100) Controls the effect bit depthKrush (0~100) Controls the effect downsampling rateSync (Off/On) Switches Tap Tempo sync on/offTrail (Off/On) Switches effect trail on/off |
| Ring Eko | Producing a delay effect with ring modulated repeats | Dly Mix (0~100) Controls the delay wet/dry signal ratioFeedback (0~100) Controls the feedback amountTime (20ms-4000ms) Controls the delay timeRing Mix (0~100) Controls the modulation wet/dry signal ratioFreq (0~100) Controls the ring modulation frequencyTone (0~100) Controls the ring modulation toneSync (Off/On) Switches Tap Tempo sync on/offTrail (Off/On) Switches effect trail on/off |
| Ekoverb | Combines delay and reverb in one | Dly Mix (0~100) Controls the delay wet/dry signal ratioFeedback (0~100) Controls the feedback amountTime (20ms-4000ms) Controls the delay timeRvb Mix (0~100) Controls the reverb wet/dry signal ratioHi Cut (0~100) Controls the reverb high cut amountDecay (0~100) Controls the reverb decay timeSync (Off/On) Switches Tap Tempo sync on/offTrail (Off/On) Switches effect trail on/off |
| RVB(10) | ||
| Room | Simulates the spaciousness of a room | Mix (0~100) Controls the wet/dry signal ratioPre Delay (0ms-100ms) Controls the pre delay timeDecay (0~100) Controls the reverb decay timeTrail (Off/On) Switches effect trail on/off |
| Hall | Simulates the spaciousness of a performance hall | |
| Church | Simulates the spaciousness of a church | |
| Plate | Simulates the sound character produced bya vintage plate reverberator | Mix (0~100) Controls the wet/dry signal ratioDecay (0~100) Controls the reverb decay timeHigh Damp (0~100) Controls the high cut amountTrail (Off/On) Switches effect trail on/off |
| Spring | Simulates the sound character produced bya vintage spring reverberator | Mix (0~100) Controls the wet/dry signal ratioDecay (0~100) Controls the reverb decay timeTone (0~100) Controls the effect tone brightnessTrail (Off/On) Switches effect trail on/off |
| Izumi | Special-tuned reverb effect with liquid-like decays and deep low ends | Mix (0~100) Controls the wet/dry signal ratioDecay (0~100) Controls the reverb decay timeTrail (Off/On) Switches effect trail on/off |
| Northstar | Special-tuned reverb effect with lush, bright decays | |
| Oceandeep | Special-tuned reverb effect with huge, deep decays | |
*The manufacturers and product names mentioned above are trademarks or registered trademarks of their respective owners. The trademarks were used merely to identify the sound character of the products.
Effect List
Effect Models List
| Sweet Space | Produces a modulated reverb effect that is lush and sweet | Mix (0~100) Controls the wet/dry signal ratioPre Delay (0ms-100ms) Controls the pre delay timeDecay (0~100) Controls the reverb decay timeLo End (-50~+50) Controls the effect low frequency amountHi End (-50~+50) Controls the effect high frequency amountTrail (Off/On) Switches effect trail on/off |
| Shimmer | Produce a rich, shimmering reverb effect | Mix (0~100) Controls the wet/dry signal ratioPre Delay (0ms-100ms) Controls the pre delay timeDecay (0~100) Controls the reverb decay timeLo End (-50~+50) Controls the effect low frequency amountHi End (-50~+50) Controls the effect high frequency amountTrail (Off/On) Switches effect trail on/off |
*The manufacturers and product names mentioned above are trademarks or registered trademarks of their respective owners. The trademarks were used merely to identify the sound character of the products.
Drum Machine Rhythms
| Type | Number | Name | Time Signature |
| 8 Beat Rhythms | 0 | 8-Beat 1 | 4/4 |
| 1 | 8-Beat 2 | 4/4 | |
| 2 | 8-Beat 3 | 4/4 | |
| 3 | 8-Beat 4 | 4/4 | |
| 4 | 8-Beat 5 | 4/4 | |
| 5 | 8-Beat 6 | 4/4 | |
| 6 | 8-Beat 7 | 4/4 | |
| 7 | 8-Beat 8 | 4/4 | |
| 8 | 8-Beat 9 | 4/4 | |
| 9 | 8-Beat 10 | 4/4 | |
| 16 Beat Rhythms | 10 | 16-Beat 1 | 4/4 |
| 11 | 16-Beat 2 | 4/4 | |
| 12 | 16-Beat 3 | 4/4 | |
| 13 | 16-Beat 4 | 4/4 | |
| 14 | 16-Beat 5 | 4/4 | |
| 15 | 16-Beat 6 | 4/4 | |
| 16 | 16-Beat 7 | 4/4 | |
| 17 | 16-Beat 8 | 4/4 | |
| 18 | 16-Beat 9 | 4/4 | |
| 19 | 16-Beat 10 | 4/4 |
Effects List
Drum Machine Rhythms
| Type | Number | Name Time Signature | |
| 4 Beat Rhythms | 20 | 4-Beat 1 | 4/4 |
| 21 | 4-Beat 2 | 4/4 | |
| 22 | 4-Beat 3 | 4/4 | |
| 23 | 4-Beat 4 | 4/4 | |
| 24 | 4-Beat 5 | 4/4 | |
| 25 | 4-Beat 6 | 4/4 | |
| 26 | 4-Beat 7 | 4/4 | |
| 27 | 4-Beat 8 | 4/4 | |
| 28 | 4-Beat 9 | 4/4 | |
| 29 | 4-Beat 10 | 4/4 | |
| Rock | 30 | Roots | 4/4 |
| 31 | Classic Rock | 4/4 | |
| 32 | Pop Rock | 4/4 | |
| 33 | Slow Rock | 4/4 | |
| 34 | Rock Shuffle | 4/4 | |
| 35 | Rock Ballad | 4/4 | |
| 36 | Punk | 4/4 | |
| 37 | New Wave | 4/4 | |
| 38 | Hard Rock | 4/4 | |
| 39 | Metal | 4/4 | |
| Funk | 40 | Funk | 4/4 |
| 41 | Funk Rock | 4/4 | |
| 42 | Electro Funk | 4/4 | |
| 43 | Soul | 4/4 | |
| 44 | R&B | 4/4 | |
| Jazz | 45 | Jazz | 4/4 |
| 46 | Big Band | 4/4 | |
| 47 | Fusion | 4/4 | |
| 48 | Swing | 4/4 | |
| 49 | Dixieland | 4/4 | |
| Blues | 50 | Blues | 4/4 |
| 51 | Country | 4/4 | |
| 52 | Folk | 4/4 | |
| 53 | Rockabilly | 4/4 | |
| 54 | Bluegrass | 2/4 | |
| Latin | 55 | Bossa nova | 4/4 |
| 56 | Rumba | 4/4 | |
| 57 | Samba | 4/4 | |
| 58 | Cha Cha | 4/4 | |
| 59 | Tango | 4/4 | |
| 60 | Reggae | 4/4 | |
| 61 | Beguine | 4/4 | |
| 62 | Latin Pop | 4/4 |
Effects List
Drum Machine Rhythms
| Type | Number | Name Time Signature | |
| Latin | 63 | Latin Rock | 4/4 |
| 64 | Latin Dance | 4/4 | |
| Electronic | 65 | Hip Hop | 4/4 |
| 66 | Trip Hop | 4/4 | |
| 67 | Techno | 4/4 | |
| 68 | Break Beat | 4/4 | |
| 69 | Drum n' Bass | 4/4 | |
| World | 70 | Waltz | 3/4 |
| 71 | Polka | 4/4 | |
| 72 | March | 4/4 | |
| 73 | 6/8 March | 6/8 | |
| 74 | Army March | 4/4 | |
| 75 | Mazurka | 3/4 | |
| 76 | Musette | 3/4 | |
| 77 | Ska | 4/4 | |
| 78 | New Age | 4/4 | |
| 79 | World | 4/4 | |
| Various Beat | 80 | 3/4 Beat1 | 3/4 |
| 81 | 3/4 Beat2 | 3/4 | |
| 82 | 6/8 Beat1 | 6/8 | |
| 83 | 6/8 Beat2 | 6/8 | |
| 84 | 5/4 Beat | 5/4 | |
| 85 | 6/4 Beat | 6/4 | |
| 86 | 7/4 Beat | 7/4 | |
| 87 | 9/8 Beat | 9/8 | |
| 88 | 10/8 Beat | 10/8 | |
| 89 | 11/8 Beat | 11/8 | |
| Metronome | 90 | Metronome 1/4 | 1/4 |
| 91 | Metronome 2/4 | 2/4 | |
| 92 | Metronome 3/4 | 3/4 | |
| 93 | Metronome 4/4 | 4/4 | |
| 94 | Metronome 5/4 | 5/4 | |
| 95 | Metronome 6/4 | 6/4 | |
| 96 | Metronome 7/4 | 7/4 | |
| 97 | Metronome 6/8 | 6/8 | |
| 98 | Metronome 7/8 | 7/8 | |
| 99 | Metronome 9/8 | 9/8 |
Effects List
MIDI Control Information List
| CC# | Value Range | Comments |
| 0 | 0-1 | Bank MSB:User Patch: CC 0=1, PC=0-98Factory Patch: CC 0=0, PC=0-98 |
| 7 | 0-100 | Patch Volume |
| 11 | 0-127 | EXP 1 |
| 13 | 0-127 | EXP 1 on/off:0-63: off64-127: on |
| 16 | 0-127 | Quick Access Knob 1 MSB |
| 17 | 0-127 | Quick Access Knob 1 LSB |
| 18 | 0-127 | Quick Access Knob 2 MSB |
| 19 | 0-127 | Quick Access Knob 2 LSB |
| 20 | 0-127 | Quick Access Knob 3 MSB |
| 21 | 0-127 | Quick Access Knob 3 LSB |
| 22 | 0-127 | Bank Back |
| 23 | 0-127 | Bank Forward |
| 24 | 0-127 | Patch Back |
| 25 | 0-127 | Patch Forward |
| 26 | 0-127 | Bank Back (Wait Mode) |
| 27 | 0-127 | Bank Forward (Wait Mode) |
| 48 | 0-127 | Fx1 Module on/off:0-63: off64-127: on |
| 49 | 0-127 | Fx2 Module on/off:0-63: off64-127: on |
| 50 | 0-127 | AMP Module on/off:0-63: off64-127: on |
| 51 | 0-127 | NR Module on/off:0-63: off64-127: on |
| 52 | 0-127 | CAB Module on/off:0-63: off64-127: on |
| 53 | 0-127 | EQ Module on/off:0-63: off64-127: on |
| 54 | 0-127 | FX3 Module on/off:0-63: off64-127: on |
| 55 | 0-127 | DLY Module on/off:0-63: off64-127: on |
| CC# | Value Range | Comments |
| 56 | 0-127 | RVB Module on/off:0-63: off64-127: on |
| 57 | 0-127 | Tuner on/off:0-63: off64-127: on |
| 58 | 0-127 | Drum Machine Menu on/off:0-63: off64-127: on |
| 59 | 0-127 | Drum Machine Play/Stop0-63: Stop64-127: Play |
| 60 | 0-99 | Drum Machine Rhythm Type |
| 61 | 0-100 | Drum Machine Volume |
| 62 | 0-127 | Looper on/off:0-63: off64-127: on |
| 63 | 0-127 | Looper Record |
| 64 | 0-127 | Looper Play/Stop0-63: Stop64-127: Play |
| 65 | 0-127 | Looper Tempo0-63: Half-speed64-127: Normal Speed |
| 66 | 0-127 | Looper Playback Status0-63: Reverse64-127: Normal |
| 68 | 0-127 | Delete Loop |
| 69 | 0-99 | Looper Recording Volume |
| 70 | 0-99 | Looper Playback Volume |
| 71 | 0-127 | Looper Placement0-63: Rear64-127: Front |
| 72 | 0-127 | CTRL Footswitch |
| 73 | 0-1 | Tempo MSB |
| 74 | 0-127 | CC73=0, CC74=40-127:40BPM-127BPMCC73=1, CC74=0-122:128BPM-250BPM |
| 75 | 0-127 | Tap Tempo |
| 76 0-127 | Device lock/unlock0-63: lock64-127: unlock |
Troubleshooting
Device won't turn on
- Make sure the power supply is properly connected and the device is switched on.
- Check if the power adapter is working properly.
- Check if you're using the correct power adapter.
No sound or slight sound
- Make sure your cables are connected properly.
- Make sure the volume knob is adjusted properly.
- When the expression pedal is used for volume control, check it's position and volume settings.
- Check the effects module volume settings.
- Check the patch volume settings.
- Make sure your input device is not muted.
Noise
- Make sure your cables are connected properly.
- Check your instrument output jack.
- Check if you're using the correct power adapter.
- When using the balanced outputs, try switching the GND LIFT on.
- If the noise is coming from your instrument, try using the noise reduction
module to adjust it.
Sound problems
- Make sure your cables are connected properly.
- Check your instrument output jack.
- If you're using an external expression pedal to control distortion or other similar
parameters, check to see if the expression pedal is set up properly. - Check your effects parameter setup. If effects are set to extremes, Ampero may only emit noise.
Problems with expression pedal
- Check your expression pedal on/off settings.
• Try calibrating the pedal. - When using an external expression pedal, make sure you're using a 1/4" male-to-male TRS cable. the adapter from the outlet.
• Make sure your hands are dry when plugging in the adapter.
Technical Specifications
Digital Audio Signal Processing: 24-bit depth, 44.1kHz sample rate
SNR: 120dB
Effects: 242
Effects Modules: Total of 9 simultaneous
Patches: 198 (99 user patches, 99 factory patches)
Looper Time: Mono 100 seconds, Stereo 50 seconds
Internal Drum Machine: 100 Rhythm Patterns
Inputs:
One 1/4" Tip Sleeve (TS) Instrument jack, with three way input mode selection One 1/8" Stereo Auxiliary In (Aux In) jack One 1/4" Tip Ring Sleeve (TRS) Expression Pedal input jack One Standard 5 pin MIDI input jack
Outputs:
Two 1/4" Tip Sleeve (TS) Unbalanced Stereo output jacks Two XLR Balanced stereo output jacks, with ground lift switch One 1/8" Stereo headphones output jack
Input resistance:
Unbalanced Output: 3.2kΩ Balanced Output: 2kΩ Headphones: 66Ω
Screen: 4" 800 x 480 Color Dynamic Display Touch Screen
USB Port: USB 2.0 Type-B port, supports USB Audio 2.0
Impulse Response/IR processing: Supports 24-bit/44.1kHz Mono WAV files, 1024 points
Power Requirements: 18V DC Center Negative
Current Consumption: 500mA Max
Dimensions: 320mm (W) x 147mm (D) x 46mm (H)
Weight: 1408g
- USER'S MANUAL
- Contents
- Welcome
- Notice
- Warning
- Environment
- Power Supply Safety
- Operation Safety
- Connections and Interference
- Cleaning
- Malfunction
- Definitions
- Module
- Parameter
- Patch
- Bank
- Panel
- Getting Started
- Main Display Screen
- Using the Screen
- Touch operation
- Quick Access Knobs
- Main Knob
- Ampero Tools
- TUNER
- DRUM
- LOOPER
- Reminder:
- EXP Pedal
- EXP 1 ON
- Customizing Your Ampero
- EDIT
- Patch Edit Menu
- Module Edit Menu
- Control Settings
- Current Settings
- CTRL Settings
- Tap Tempo and Tap Divide
- Quick Access Paras
- EXP Settings
- - Volume Range
- - Calibrate
- - EXP 2 Settings
- SAVE
- GLOBAL
- I/O
- USB Audio
- Footswitch
- EXP 2/FS
- MIDI Channel
- Display
- Global EQ
- About
- Factory Reset
- Ampris (Pink Limited Version Only)
- Suggested Setups
- Using with your instrument and amp
- Connecting to your amp's RETURN or Power Amp (Loudster) INPUT
- Connecting your mixer, interface, headphones, and other equipment
- Connecting to your computer as an audio interface
- Using the AUX IN line
- Included Software
- Effect List
- Effect Models List
- Effects List
- Troubleshooting
- Device won't turn on
- No sound or slight sound
- Noise
- Sound problems
- Problems with expression pedal
- Technical Specifications
- Inputs:
- Outputs:
- Input resistance:
Brand : Hotone
Model : Ampero Pink Limited Edition
Category : Audio effect pedal