
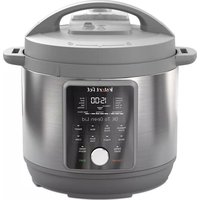
Pot 7.4QT St - Blender Instant - Free user manual and instructions
Find the device manual for free Pot 7.4QT St Instant in PDF.


| Product Type | Blender |
| Model | Pot 7.4QT St |
| Brand | Instant |
| Capacity | 7.4 quarts (7 liters) |
| Dimensions (H x W x D) | 17.5 x 9.5 x 9.5 inches (approx.) |
| Weight | 12.5 lbs (approx.) |
| Power | 1200 watts |
| Voltage | 120V ~ 60Hz |
| Speed Settings | Variable speed with pulse function |
| Main Functions | Blending, pureeing, crushing ice, mixing smoothies, soups, sauces |
| Jar Material | BPA-free Tritan plastic |
| Blade Material | Stainless steel |
| Dishwasher Safe Parts | Jar and lid are top-rack dishwasher safe |
| Cleaning | Hand wash base with damp cloth; do not immerse in water |
| Safety Features | Non-slip feet, safety lock lid, overload protection |
| Warranty | 1 year limited warranty |
| Repairability | Spare parts available via manufacturer; user-replaceable jar and blade assembly |
| Cord Length | 3 feet |
Frequently Asked Questions - Pot 7.4QT St Instant
User questions about Pot 7.4QT St Instant
0 question about this device. Answer the ones you know or ask your own.
Ask a new question about this device
Download the instructions for your Blender in PDF format for free! Find your manual Pot 7.4QT St - Instant and take your electronic device back in hand. On this page are published all the documents necessary for the use of your device. Pot 7.4QT St by Instant.
USER MANUAL Pot 7.4QT St Instant
to your new Instant Stand Mixer Pro!
This Instant Stand Mixer Pro makes all your mixing tasks easy, from breads and batters to egg whites and whipped cream. We hope you fall in love with Instant mixing and enjoy it in your kitchen for years to come!
Get started with your new Stand Mixer Pro!

CONTENTS
What's in the box 5
Initial setup 6
Using your Stand Mixer Pro 7
Mixing tips 11
Learn more 16
Warranty 17
Notes 19

IMPORTANT SAFEGUARDS
WARNING
Failure to adhere to safety instructions may result in personal injury and/or property damage and may void your warranty.
READ ALL INSTRUCTIONS
Before using your Instant Stand Mixer Pro, please read all instructions, including the Safety Information below. Keep this manual for reference.
Placement
- DO always operate the appliance on a stable, non-combustible, level surface.
- DO NOT place the appliance on or close to a hot gas or electric burner, or a heated oven.
- DO NOT use the appliance near water or flame.
- DO NOT use outdoors. Keep out of direct sunlight.
General Use
- DO keep hands, hair, clothing away from the mixing attachments while they are in rotation.
• DO NOT touch any moving parts. - DO NOT insert anything into the mixing attachments while they are in rotation.
- DO NOT move the appliance while it is in use.
- DO NOT allow children or persons with reduced physical, sensory or mental capabilities to operate this appliance. Close supervision is necessary when any appliance is used by or near children and persons with reduced physical, sensory or mental capabilities. Children should not play with this appliance.
- DO NOT use the appliance for anything other than household use. It is not intended for commercial use.
WARNING
• DO NOT leave the appliance unattended while in use.
- DO use only Instant brand attachments and accessories designed for this appliance.
- The operation of appliance, intended for use with various attachments, at speeds exceeding those recommended by the manufacturer results in a risk of injury. These instructions indicate the recommended speeds of operation.
- Container must be properly in place before operating appliance.
- DO remove beaters/attachments from mixer before washing
Care and Storage
- DO NOT store any materials in the unit when not in use.
- DO NOT place any combustible materials in the unit, such as paper, cardboard, plastic, Styrofoam or wood.
Power Cord
A short power-supply cord is used to reduce the risk resulting from it being grabbed by children, becoming entangled in, or tripping over a longer cord.
WARNING: Keep appliance and cord away from children. Never drape cord over edge of counter, never use outlet below counter, and never use with an extension cord.
- DO NOT let the power cord touch hot surfaces or open flame, including the stovetop.
- DO NOT use with power converters or adapters, timer switches or separate remote-control systems.
• DO NOT let cord hang over edge of table or counter.
This appliance has a 3-prong grounding plug. To reduce the risk of electric shock:
• ONLY plug the power cord into a grounded electrical outlet.
• DO NOT remove ground.
WARNING
Electrical Warning
The unit contains electrical components that are an electrical shock hazard. Failure to follow these instructions may result in electric shock.
To protect against electrical shock:
- To disconnect, turn off the unit, then remove plug from power source. Always unplug when not in use, as well as before adding or removing parts or accessories, and before cleaning. To unplug, grasp the plug and pull from the outlet. Never pull from the power cord.
• DO regularly inspect the appliance and power cord. - DO NOT operate the appliance if the power cord or plug is damaged, or after the appliance malfunctions or is dropped or damaged in any manner. For assistance, contact Customer Care by email at support@instanthome.com.
- DO NOT attempt to repair, replace or modify components of the appliance, as this may cause electric shock, fire, personal injury and/or property damage, and will void the warranty.
- DO NOT tamper with any of the safety mechanisms, as this may result in personal injury or property damage.
- DO NOT immerse power cord, plug or the appliance in water or other liquid.
- DO NOT use the appliance in electrical systems other than 120 V \~ 60 Hz for North America.
SAVE THESE INSTRUCTIONS
WARNING
Failure to adhere to safety instructions may result in personal injury and/or property damage and may void your warranty.
WHAT'S IN THE BOX
Stand Mixer Pro
Mixing Attachments

Illustrations are for reference only and may differ from the actual product.
INITIAL SETUP
Remember to recycle!
We designed this packaging with sustainability in mind. Please recycle everything that can be recycled where you live. Be sure to keep this Manual for reference.
Unpack
- Remove your new mixer from the box.
- Remove all of the packaging material from in and around the mixer.
- Remove the Pouring Shield from the paper tray packed around the mixer.
- The Dough Hook, Beater, and Whisk are packed inside the mixing bowl. When removing the attachments, place your hand on top of the mixer head before lifting. The mixer head tilt mechanism is spring assisted, and you'll want to hold it in place while lifting.
- Make sure to remove the Dough Hook, Beater and Whisk from the Bowl and the Pouring Shield from the Paper Tray.
- Don't remove the safety warning stickers or the rating label from the mixer.
- Wash the mixing bowl and attachments before using for the first time.
Placement
- Place your mixer on a stable, level surface, away from combustible material and external heat sources. Do not place your mixer on top of another appliance.
Turn on
- Plug the mixer into an electric outlet. The Power button will flash and the unit enters Ready mode.
USING YOUR STAND MIXER PRO
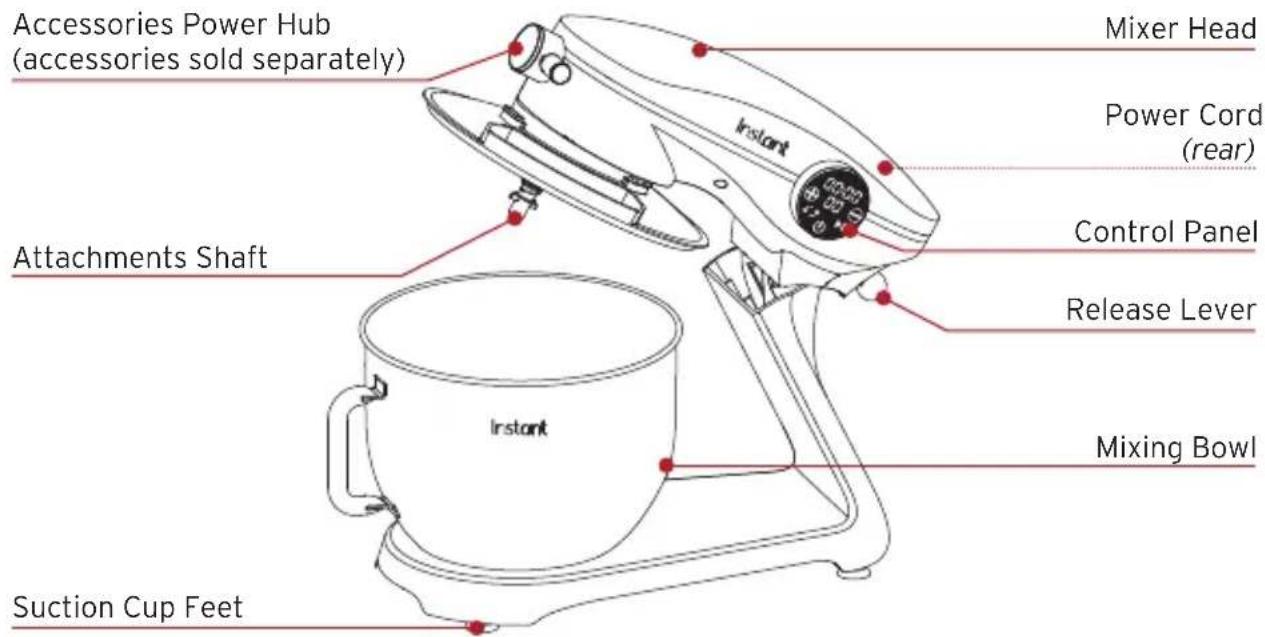
Control panel
We've designed the control panel to be simple to use and easy to read.

Opening and closing the mixer
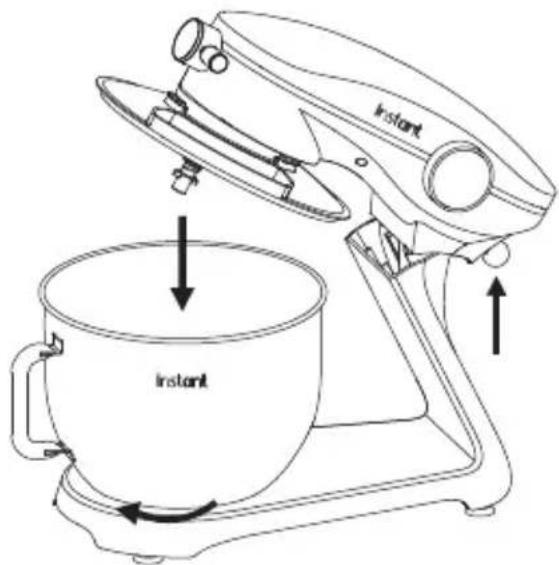
The Mixer Head is easy to operate and designed to stay in place whether open or closed.
To open
-
Place one hand on top of the Mixer Head and use the other hand to pull down on the Release Lever.
-
The Mixer Head will spring upward; make sure it locks into the open position.

To close
-
Pull down on the Release Lever.
-
Push the Mixer Head down until it locks in the closed position.
8 User Manual
Using the Pouring Shield
The Pouring Shield can help keep ingredients in the bowl during mixing and has a pouring chute for adding ingredients during mixing.
To place the Shield on the Bowl
- Make sure the Mixer is turned off and unplugged.
- Slide the Pouring Shield onto the Mixer Head. Ensure that all 4 silicone pads on the Pouring Shield are full seated around the Mixer Head.
- Placing the Mixing Bowl onto the Mixer.
To remove the Shield
- Turn off and unplug the Mixer.
- Remove the Mixing Bowl from the Mixer.
- Pull the Pouring Shield off the Mixer Head.
Mixing ingredients
The Instant Stand Mixer can mix ingredients in two ways:
Mixing with a counter: counts up from 0:00 to show how long the mixer has been operating.
Mixing with a timer: set a time for mixing, and the mixer automatically stops when complete.
How to mix
Prep
- Ensure the mixer is not plugged in.
- Lift the Mixer Head to the OPEN position.
- Select the mixing attachment you want to use and place the opening over the mixing attachment shaft. Align the cutouts on the attachments with the pin on the shaft. Push in to compress the spring and rotate clockwise until the pin is securely seated in the slot of the mixing attachment.
-
Place your ingredients into the mixing bowl.
-
Place the mixing bowl in the mixer base and turn the bowl clockwise to lock in place.
- Return the Mixing Head to the CLOSED position.
- Plug in mixer into outlet.
Mixing with a counter
- Press Power to start the mixer.
- Press + and - buttons to set the speed.
You can adjust the speed at any time by pressing the + and - buttons.
- Press Start/Pause to start mixing.
The timer will start counting up to show you how long you've been mixing. - When you are done mixing, press Start/Pause to stop the mixer.
You can restart and stop mixing at any point by pressing the Start/Pause button or by lifting the head. - Once the unit has fully stopped, you can remove the mixing bowl.
Mixing with a timer
- Press Power to start the mixer.
- Press + and - buttons to set the speed.
You can adjust the speed at any time by pressing the + and - buttons.
- Press the Set ↙ button. The time indicators will flash to indicate that you can now set the mixing time.
Press + and - buttons to set the mixing time.
- Press Start/Pause to start mixing.
The timer will start counting down to show mixing progress.
- When the mixing time is done, the mixer will stop.
You can restart and stop mixing at any point by pressing the Start/Pause button.
- Once the unit has fully stopped, you can lift the Mixing Head to the OPEN position and remove the mixing bowl.
MIXING TIPS
The Instant Stand Mixer handles any types of mixing. Here are some guidelines for speed and capacity.
Speed guidelines
Speeds shown are general recommendations. Use your own judgement or the recipe instructions.
| Speed Attachment Action | ||
| 1 Dough Hook Folding in ingredients | ||
| Beater Stirring dry ingredients | ||
| Whisk Starting whipped creams and egg whites | ||
| 2-3 Dough Hook Kneading | bread dough | |
| Beater Slowly mix heavy batter | ||
| Beater Cutting butter | ||
| 4-5 Beater Mashing potatoes | ||
| Beater Mixing cookie dough | ||
| Whisk Beating eggs | ||
| 6-7 Beater Creaming butter | ||
| Beater Beating frosting | ||
| 8-9 Beater Finish mashing potatoes | ||
| Beater Finishing batter | ||
| Whisk Whipping for meringue | ||
| 10 Whisk Fast whipping small | amounts of egg whites | |
Max capacity
Overfilling the mixing bowl will cause problems when mixing. Here are some sample maximum amounts of ingredients.
| Attachment Maximum capacity | |
| Dough hook 1500 g of all-purpose flour | 800 g of whole wheat flour |
| Beater 10 dozen cookies | (about 23 g of dough per cookie or roughly a rounded tablespoon) |
| Whisk 24 large egg whites |
For large batches or dense ingredients like wheat and rye flour, do not operate the mixer continuously for over 15 minutes to prevent overheating.
CLEANING
Clean your Instant Stand Mixer Pro after use. Always unplug the unit before cleaning. Before use or storing, make sure all surfaces are dry.
WARNING
DO NOT immerse power cord, plug or the appliance in water or other liquid, which may result in electric shock.
| Part Cleaning instructions | |
| Exterior of unit • Clean with | a soft, damp cloth or sponge.Wipe dry. |
| Mixing attachments • Dishw | washer safe, top rack.Or clean with a damp cloth and mild dish soap.Allow the mixing attachments to dry completely before storing. |
| Mixing attachment shaft | The mixing attachment shaft may produce small amounts of black residue due to high speed and friction when the machine is working. After each use, please clean it thoroughly and keep the area dry.To clean, use a damp cloth to wipe around the outside of the shaft.Use care when cleaning due to the sharp edges. |
| Mixing Bowl • Dishwasher safe. | Or clean with a damp cloth and mild dish soap.Allow the mixing bowl to dry completely before storing. |
| Mixing BowlPouring Shield | Clean with damp cloth and mild soap. |
| Power cord • Use a barely-damp cloth to wipe any particles off cord. | |
TROUBLESHOOTING
If you run into problems operating your Instant Stand Mixer Pro, start here to see if we have a solution. If you can't resolve the
| Problem Cause Solution | ||
| The mixer suddenly stops working during use. | The mixer has been running continuously for 30 minutes or the motor temperature has gotten too high. | 1. Reset the speed to “O”.2. Unplug the power.3. Wait for the mixer to return to room temperature (generally 15-30 minutes).4. Try restarting the process. |
| The mixer does not run when you try to mix. | The electrical cord has come unplugged from the socket. | Verify that the power plug is plugged into the outlet. |
| Power is off. Wait for power before operating. | Power is off. Wait for power before operating. | |
| Mixer Head isn't locked into place. | Make sure the mixer head is locked into the CLOSED position. | |
| The mixer makes excessive noise when running. | The mixer is louder at high speeds than low speeds. | Choose the right speed to mix food according to the recommendations on page 11 of this manual. |
| There is too much food in the bowl and the mixer is overwhelmed. | Reduce the amount of food. | |
| The mixer has been mixing for too long. | Stop the mixer and allow it to cool down for a while before using. | |
| Mixing speed slows unexpectedly or is uneven. | The room temperature is low, causing the lubricant in the mixer to harden. | Remove the mixing bowl and let the mixer idle for 5 minutes to soften the lubricant. |
| The food being mixed is too hard or overloaded, and the mixer cannot keep up. | Reduce the amount of food in the bowl. | |
| Mixer sways and shakes when working. | The foot pads on the base are off. | Replace the foot pads. |
| The mixer is placed on an uneven surface. | Ensure the mixer is on a smooth and flat surface. | |
| The Mixer Head won’t return to the closed position after inserting the mixing bowl with the pouring shield. | The pouring shield is blocking the Mixer Head. | Rotate the Mixing Bowl Pouring Shield on the mixing bowl and make sure it is tightly fitted. |
Product Specifications
| Model Wattage Vol | Voltage Vol | Volume Weight Dimensions | ||
| SM3700 600 W 120 | V/60Hz | 7.4 Quarts7.0 Liters | 18.9 lb8.6 kg | in: 14.9 L x 9.6 W x 13.6 H(Mixer + Bowl)cm: 37.9 L x 24.4 W x 34.7 H(Mixer + Bowl) |
LEARN MORE
There's a whole world of Instant Stand Mixer Pro information and help just waiting for you. Here are some of the most helpful resources.
Register your product
Instanthome.com/register
Contact Consumer Care
In the Instant Brands Connect App
Instanthome.com/customer-care-center
support@instanthome.com
Instant Brands® Connect App
Instanthome.com
iOS and Android app stores
Replacement parts and accessories
Instanthome.com
Join the community

WARRANTY
One (1) Year Limited Warranty
This One (1) Year Limited Warranty applies to purchases made from authorized retailers of Instant Brands LLC (“Instant Brands”) by the original appliance owner and is not transferable. Proof of original purchase date and, if requested by Instant Brands, return of your appliance, is required to obtain service under this Limited Warranty. Provided the appliance was used in accordance with the use & care instructions, Instant Brands will, in its sole and exclusive discretion, either: (i) repair defects in materials or workmanship; or (ii) replace the appliance. In the event that your appliance is replaced, the Limited Warranty on the replacement appliance will expire twelve (12) months from the date of receipt. Failure to register your product will not reduce your warranty rights. The liability of Instant Brands, if any, for any allegedly defective appliance or part will not exceed the purchase price of a comparable replacement appliance.
What is not covered by this warranty?
- Products purchased, used, or operated outside of the United States and Canada.
- Products that have been modified or attempted to be modified.
- Damage resulting from accident, alteration, misuse, abuse, neglect, unreasonable use, use contrary to the operating instructions, normal wear and tear, commercial use, improper assembly, disassembly, failure to provide reasonable and necessary maintenance, fire, flood, acts of God, or repair by anyone unless directed by an Instant Brands representative.
- Use of unauthorized parts and accessories.
- Incidental and consequential damages.
- The cost of repair or replacement under these excluded circumstances.
EXCEPT AS EXPRESSLY PROVIDED HEREIN AND TO THE EXTENT PERMITTED BY APPLICABLE LAW, INSTANT BRANDS MAKES NO WARRANTIES, CONDITIONS OR REPRESENTATIONS, EXPRESS OR IMPLIED, BY STATUTE, USAGE, CUSTOM OF TRADE OR OTHERWISE WITH RESPECT TO THE APPLIANCES OR PARTS COVERED BY THIS WARRANTY, INCLUDING BUT NOT LIMITED TO, WARRANTIES, CONDITIONS, OR REPRESENTATIONS OF WORKMANSHIP, MERCHANTABILITY, MERCHANTABILITY, FITNESS FOR A PARTICULAR PURPOSE OR DURABILITY.
Some states or provinces do not allow for: (1) the exclusion of implied warranties of merchantability or fitness; (2) limitations on how long an implied warranty lasts; and/or (3) the exclusion or limitation of incidental or consequential damages; so these limitations may not apply to you. In these states and provinces, you have only the implied warranties that are expressly required to be provided in accordance with applicable law. The limitations of warranties, liability, and remedies apply to the maximum extent permitted by law. This limited warranty gives you specific legal rights, and you may also have other rights which vary from state to state or province to province.
Product Registration
Please visit www.instanthome.com/register to register your new Instant Brands appliance. Failure to register your product will not diminish your warranty rights. You will be asked to provide the store name, date of purchase, model number (found on the back of your appliance) and serial number (found on the bottom of your appliance) along with your name and email address. The registration will enable us to keep you up to date with product developments and recipes and contact you in the unlikely event of a product safety notification. By registering, you acknowledge that you have read and understand the instructions for use, and warnings set forth in the accompanying instructions.
Warranty Service
To obtain warranty service, please contact our Consumer Care Department by email to support@instanthome.com. You can also create a support ticket online at www.instanthome.com. If we are unable to resolve the problem, you may be asked to send your appliance to the Service Department for quality inspection. Instant Brands is not responsible for shipping costs related to warranty service. When returning your appliance, please include your name, mailing address, email address, phone number, and proof of the original purchase date as well as a description of the problem you are encountering with the appliance.
NOTES
NOTES
NOTES
In Canada, distributed by
Instant Brands Inc.
495 March Road, Suite 200
Kanata, Ontario, Canada K2K 3G1
In U.S., distributed by
Instant Brands LLC
3025 Highland Parkway, Suite 700
Downers Grove, IL 60515 U.S.
instanthome.com
© 2023 Instant Brands Holdings Inc.
140-1560-01
Art release date
02/23/2023
INSTANT and INSTANT BRANDS
are registered trademarks of
Instant Brands Holdings Inc.
- CONTENTS
- IMPORTANT SAFEGUARDS
- WARNING
- READ ALL INSTRUCTIONS
- Placement
- General Use
- Care and Storage
- Power Cord
- Electrical Warning
- SAVE THESE INSTRUCTIONS
- WHAT'S IN THE BOX
- Stand Mixer Pro
- Mixing Attachments
- INITIAL SETUP
- Remember to recycle!
- Unpack
- Turn on
- USING YOUR STAND MIXER PRO
- Control panel
- Opening and closing the mixer
- To open
- To close
- Using the Pouring Shield
- To place the Shield on the Bowl
- To remove the Shield
- Mixing ingredients
- How to mix
- Prep
- Mixing with a counter
- Mixing with a timer
- MIXING TIPS
- Speed guidelines
- Max capacity
- CLEANING
- TROUBLESHOOTING
- LEARN MORE
- Register your product
- Contact Consumer Care
- Instant Brands® Connect App
- Replacement parts and accessories
- Join the community
- WARRANTY
- One (1) Year Limited Warranty
- What is not covered by this warranty?
- Product Registration
- Warranty Service
- NOTES
Brand : Instant
Model : Pot 7.4QT St
Category : Blender