
Castor Pro K631 - Keyboard Redragon - Free user manual and instructions
Find the device manual for free Castor Pro K631 Redragon in PDF.


| Product Type | Gaming Mechanical Keyboard |
| Brand | Redragon |
| Model | Castor Pro K631 |
| Layout | Compact 60% (61 keys) |
| Switch Type | Mechanical (Red/Blue/Brown options) |
| Backlight | RGB per-key backlight with multiple modes |
| Connectivity | Wired USB-C |
| Cable | Detachable USB-C to USB-A braided cable, 1.8m |
| Polling Rate | 1000 Hz |
| Keycap Material | ABS double-shot |
| Compatibility | Windows, macOS, Linux |
| Dimensions (approx.) | 290 x 100 x 40 mm |
| Weight (approx.) | 600 g |
| Power | USB powered (5V, 500mA) |
| Software | Redragon software (downloadable from official site) |
| Key Rollover | N-key rollover with anti-ghosting |
| Hot-Swappable | Yes, compatible with 3-pin and 5-pin switches |
| Package Contents | Keyboard, USB cable, keycap puller, switch puller, user manual |
| Maintenance | Clean with compressed air; avoid liquids |
| Safety | Low voltage device; use only provided cable |
| Spare Parts & Repairability | Replacement keycaps and switches available; standard Cherry MX stem compatible |
Frequently Asked Questions - Castor Pro K631 Redragon
User questions about Castor Pro K631 Redragon
0 question about this device. Answer the ones you know or ask your own.
Ask a new question about this device
Download the instructions for your Keyboard in PDF format for free! Find your manual Castor Pro K631 - Redragon and take your electronic device back in hand. On this page are published all the documents necessary for the use of your device. Castor Pro K631 by Redragon.
USER MANUAL Castor Pro K631 Redragon
Thank you for choosing REDRAGON product. To protect your rights and for better customer service, please read the following warranty rules carefully. 1. Within 18 months of purchase date, repair is guaranteed for failure due to electrical circuit problems. Other damages, such as disassembly, hard impacts, submersion into water, plugging into improper current or voltage, and damage caused by natural disasters such as fire, flood, or earthquake are not included. 2. Consumable parts (such as foot pads) and spare parts replacement are not included in our warranty.
OS Support
How to connect the keyboard with multiple devices
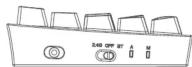
Wired Connection
Slide the 2.4G/OFF/BT switch on OFF. Take out the USB A to USB Type C cable in the package and connect the keyboard with your computer. The computer will recognize and configure the keyboard automatically. Once the keyboard is connected in wired mode, the side M indicator will be Red when the keyboard is charging and in Green when it's fully charged.
2.4G Wireless Connection
- Slide the 2.4G/OFF/BT switch on left side of keyboard to 2.4G.
- Press 【FN】(FN1) + 【R】 for about 3 seconds the side M indicator will flashing in Green, plug the USB receiver into any available USB port on your computer within 20 seconds. The computer will recognize and configure the keyboard automatically.
- Under this mode, it is available with charging by USB cable plug-in, will be in Red and turn to green after charge completed.
2
Bluetooth Connection
- Slide the 2.4G/OFF/BT switch on left side of keyboard to BT.
-
Press [FN1]+[Q BT1/W BT2/E BT3] for about 3 seconds, flashes in Blue(BT1) or Cyan(BT2) or Purple(BT3) quickly. Turn on Bluetooth and scan for available devices on your computer or smart phone. It will find "BT3.0 Keyboard or BT5.0 KB" device. Select one of them to get connected with it automatically.
-
To switch the bluetooth connection between BT1 /BT2/BT3, press FN1+Q/W/E.
Function Introduction
- With standard USB and 2.4G/8T connections, the keyboard can be used on computer without any software or driver installation.
- There are 20 backlight effects, switch by press FN=PGUP.
- Commands of key combinations with [FN] key FN1: F1 FN1: F2 FN1: F3 FN4: F4 FN5: F5 FN6: F6 FN7: F7 FN8: F8 FN9: F9 FN10: F10 FN1+: "F11 FN1+: "F12 FN1+: "HOME FN1+: "END FN1+: "PRTSC
How to recharge the keyboard
The LED indicator of baterry will turn to red when keyboard is out of battery. Find the USB A to USB type C cable in the packaging, plug the keyboard and connect it with computer for charging.
Macro recording function
- Press FN2+ (MR)7 to start recording, now 1-6 keys light up in Red, 7 key light up in white, CAPS key light up and flash quickly in Red color indicate its ready for recording.
- press one of kye from (G1-G6) 1-6 key, the key will light up and flash quickly in Red.
- Record the desired keys.
- Press FN2+ (MR)7 key to complete recording (MR key lights OFF). For example: FN2+7→1→ABC→FN2+7
How to play Macro FN2+(1-6)key For example :FN2+1→G1(ABC)
How to delete Macro EN2+DEL to delete all Marco
4
FAQ
- If the keyboard doesn't respond, please check if the keyboards USB cable is correctly inserted into the corresponding USB port on the computer, or try another USB port on the computer.
If you spill liquid on the keyboard, please remove keyboards USB cable from the computer immediately. Wipe up excess liquid and put the keyboard in a warm place (for instance, under a lamp) to let the keyboard dry naturally before using again.

5
FCC Statement
Changes or modifications not expressly approved by the party responsible for compliance could void the user's authority to operate the equipment. This device has been tested in order to perform a Class 8 digital device, pursuant to Part 15 of the FCC Rules. These limits are designed to provide reasonable protection against harmful interference in a residential installation. This equipment generates users and can radiate radio frequency energy and, if not installed in the instructions, may cause harmful interference due to communication. However, there is no guarantee that interference will not occur in a particular installation. If this equipment does cause harmful interference to radio or magnetic interference, it may be carried by turning the equipment off and on, the user is encouraged to try to correct the interference by one or more of the following measures: - Reorient or relocate the receiving antenna - Inful use the separation between the equipment and receiver. - Connect the equipment into an outlet on a circuit different from that to which the receiver is connected. - Consult the dealer on an experienced radio/TV technician for help This device complies with part 15 of the FCC sales. Operation is subject to the following two conditions (1) this device may not cause harmful interference, and (2) this device may not cause harmful interference received, including interference that may cause undesired operation.
California Proposition 65
WARNING: Risk of Cancer from [Name of one or more chemicals known to cause cancer] And Reproductive Harm From [Name of one or more chemicals known to cause reproductive toxicity] Exposure - www.P65Warnings.ca.gov
6


Mechanical Gaming Keyboard Operating Instructions
Brand : Redragon
Model : Castor Pro K631
Category : Keyboard