
NTS-2 - Measurement KORG - Free user manual and instructions
Find the device manual for free NTS-2 KORG in PDF.


| Product Type | Multifunctional Utility Kit / Digital Oscilloscope |
| Brand | Korg |
| Model | NTS-2 |
| Dimensions (W × D × H) | 129 × 78 × 39 mm (5.08" × 3.07" × 1.54") |
| Weight | 130 g (4.59 oz) |
| Power Source | USB bus power (500 mA max) or 2 AAA batteries (alkaline 1.5 V or NiMH 1.2 V) |
| Current Consumption | 400 mA or less |
| Display | 2.8" RGB LCD |
| Input Jacks | INPUT 1, 2 (3.5 mm TRS mini phone jack, stereo) |
| Thru Jacks | THRU 1, 2 (3.5 mm TRS mini phone jack) |
| Output Jacks | OUTPUT 1, 2 (3.5 mm TS mini phone jack, mono) |
| USB Port | Type-C (for power and data) |
| Main Functions | Oscilloscope (SCOPE), Function Generator (WAVE), Spectrum Analyzer (FFT), Tuner (TUNER) |
| Oscilloscope Mode | Up to 4 ch; vertical 10 mV–10 V/div, horizontal 50 µs–1 s/div; trigger: auto, rise, fall, single |
| Function Generator Mode | Waveforms: Oscillator, LFO, Noise, Pulse, Envelope; frequency 0.01 Hz–10 kHz; output level up to 10 Vpp |
| Spectrum Analyzer Mode | FFT based; input mono (1L, 1R, 2L, 2R); frequency range 0 Hz–20 kHz |
| Tuner Mode | Needle or horizontal meter; detection range E0–G8; reference pitch A4=410–480 Hz; accuracy ±0.1 cents |
| Auto Power-Off | Yes (default 1 hour; configurable to infinite, 5/15/30 min when on USB or battery) |
| Battery Type Selection | Alkaline or Ni-MH (configured in Global mode) |
| Included Items | USB cable, assembly instructions |
| Maintenance | Keep dry, avoid extreme temperatures, use soft cloth for cleaning; no user-serviceable parts inside |
| Safety | Do not disassemble, use only specified power source, avoid liquid contact, stop use if damaged |
Frequently Asked Questions - NTS-2 KORG
User questions about NTS-2 KORG
0 question about this device. Answer the ones you know or ask your own.
Ask a new question about this device
Download the instructions for your Measurement in PDF format for free! Find your manual NTS-2 - KORG and take your electronic device back in hand. On this page are published all the documents necessary for the use of your device. NTS-2 by KORG.
USER MANUAL NTS-2 KORG
© 2022 KORG INC. www.korg.com
Published 06/2022
Table of Contents
Introduction....2
Main features of this unit....2
Part names and functions....2
Making connections and turning on the power ......2
Turning the power on/off 2
Auto power-off function 2
Four operating modes ......2
Oscilloscope mode (SCOPE)....2
Function generator mode (WAVE)....2
Spectrum analyzer mode (FFT)....2
Tuner mode (TUNER)....2
Basic operations....3
Oscilloscope mode (SCOPE) 3
Explanations of each parameter ....3
Function generator mode (WAVE) 3
Button 1 (button 3): explanations of each parameter.....3
Button 2 (button 4): explanations of each parameter .....3
CATEGORY = Oscillator....3
CATEGORY = LFO....3
CATEGORY = Noise....3
CATEGORY = Pulse ....3
CATEGORY = Envelope....3
Spectrum analyzer mode (FFT)....3
Explanations of each parameter ....3
Tuner mode (TUNER)......4
Explanations of each parameter ....4
Global mode....4
1: Input 4
2: SETTINGS....4
3: SETTINGS....4
Specifications....4
En
Introduction
Thank you for purchasing the Multifunctional Utility Kit for the Nu:Tekt NTS-2 Oscilloscope Kit. To help you get the most out of your purchase, please read this manual carefully.
Main features of this unit
This product is an assembly kit that you can use to build a digital oscilloscope. Aside from letting you view audio output waveforms and CV signals, this oscilloscope functions as a spectrum analyzer, offers a built-in tuner for tuning analog synthesizers, and lets you output LFO, CV and other signals with its function generator.
Part names and functions
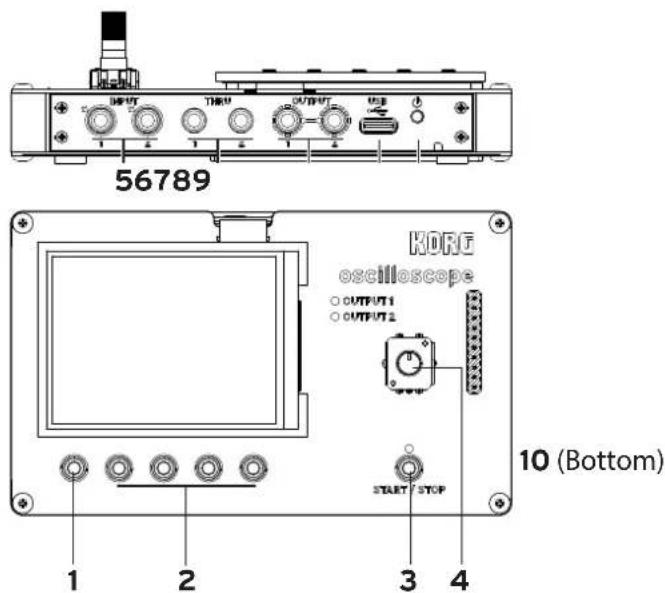
1. Mode button
Use this button to switch between operating modes. Each time you press the button, the mode changes.
a. Oscilloscope (SCOPE)
b. Function generator (WAVE)
c. Spectrum analyzer (FFT)
d. Tuner (TUNER)
e. Global (GLOBAL)
2. Buttons 1-4
The functions assigned to these buttons differ, depending on the operating mode.
3. START/STOP button
Starts and stops measurement. In function generator mode, this is also used to output waveforms to an external device.
4. Value knob
Press to select a sub-menu, and turn to edit the selected parameter.
5. INPUT 1, 2 jacks
Connect a stereo (or mono) mini cable here to input the signal you wish to measure. This lets you monitor the audio output from your musical instrument or input a CV signal.
6. THRU 1, 2 jacks
Used as a thru out for the signal input from the INPUT 1 and 2 jacks.
7. OUTPUT 1, 2 jacks
Outputs the function generator signal.
Connect these jacks to your device with monaural mini plugs.
8. USB (Type-C) port
Use the included USB cable to connect this unit to the USB port on your computer or to a commercially available USB standards-compliant AC adapter (at least 5 V DC 550 mA).
9. Power button
Turns the power on and off. Hold this button down for approximately one second to turn the power off.
10. Battery compartment
Making connections and turning on the power
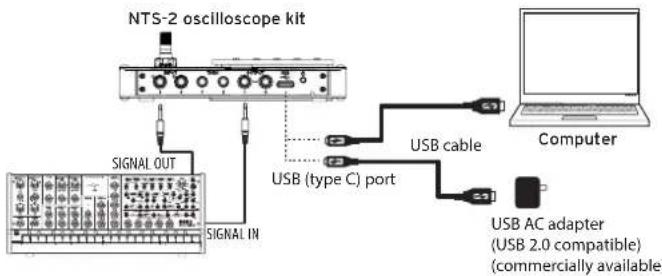
Use the included USB cable to connect this unit to the USB port on your computer or to a commercially available USB standards-compliant AC adapter (at least 5 V DC 550 mA).
Make sure to use the included USB cable.
Use a cable that's no more than 3 m long when connecting your peripherals to this unit.
Make sure to use an AC adapter that's compliant with USB 2.0 standards. Note that some standards-compliant USB AC adapters might not operate correctly.
Turning the power on/off
Long-press the power button to turn on the unit.
Long-press the power button again to turn the unit off.
Auto power-off function
The Nu:Tekt NTS-2 features an auto power-off function that automatically turns the unit off after one hour has elapsed without the knob, switches, buttons or other controls being operated. The auto power-off function is enabled by factory default.
Auto power-off can be disabled using the steps below.
- Use the mode button to enter global mode.
- Press button 4 (SETTINGS: Power) a number of times to select "Auto Power Off(USB)" or "Auto Power Off(Battery)".
- Turn the value knob to change the value to "infinite".
Four operating modes
Oscilloscope mode (SCOPE)
You can view the waveforms from up to four input sources. The functions below are assigned to buttons 1–4.
1: D I S P L A Y: Switches between input signals.
2: VERTICAL: Sets the display range for the vertical screen direction (voltage).
3: HORIZONTAL: Sets the display range for the horizontal screen direction (time).
4: TRIGGER: Sets which change in input signal causes the display to update.
Function generator mode (WAVE)
In this mode, signal is output from the OUTPUT 1 and 2 jacks. These outputs can be used even while an input signal is being received. You can use the START/STOP button to turn the waveform output on/off, continuously output the waveform by holding down the button, or output only one cycle of the waveform (one-shot) by just pressing the button. The functions below are assigned to buttons 1–4.
1: CATEGORY: Selects the waveform for OUTPUT 2, sets the level and so forth.
2: EDIT: Configures the detailed settings for the OUTPUT 2 waveform.
3: CATEGORY: Selects the waveform for OUTPUT 1, sets the level and so forth.
4: EDIT: Configures the detailed settings for the OUTPUT 1 waveform.
Spectrum analyzer mode (FFT)
This mode lets you observe the frequency characteristics of the input signal, by using a spectrum analyzer that employs an FFT (fast Fourier transform) algorithm. The functions below are assigned to buttons 1–4.
1: INPUT: Switches between input signals.
2: VERTICAL: Sets the display range for the vertical screen direction (voltage).
3: HORIZONTAL: Sets the display range for the horizontal screen direction (time).
4: TRIGGER: Sets which change in input signal causes the display to update. Nor mally, this is set to AUTO.
Tuner mode (TUNER)
This mode measures the pitch of the input signal from the oscillator of an analog synthesizer or other source. You can select between a horizontal meter and a needle-type (VU) meter view. The functions below are assigned to buttons 1–4.
1: DISPLAY: Selects the tuner display mode.
2: INPUT: Switches between input signals to measure.
3: CALIB: Adjusts the pitch lower or higher than the reference pitch of A=440 Hz.
You can adjust the pitch within a range of 410–480 Hz.
4: SCOPE: Switches the oscilloscope display on/off.
Basic operations
- Each time you press buttons 1–4, the parameter assigned to the button in question changes one at a time and is shown in the popup screen in the display.
- Once the desired parameter is shown, turn the value knob to edit the value.
- Measurement starts/stops with each press of the START/STOP button.
This product is a multi-tool intended for use with musical instruments. Do not use this product for anything under than its intended purpose, such as for calibrating measurement devices and so on.
Oscilloscope mode (SCOPE)
Oscilloscope mode lets you monitor the input signals coming from the four input sources (INPUT 1, 2 L/R).
Use VERTICAL to set the voltage range for the vertical screen direction. For example, a "5V" setting will display a 5 V voltage for each mark on the vertical axis.
Use HORIZONTAL to set the time scale in the horizontal screen direction.
Use the DISPLAY setting to select the inputs shown on the oscilloscope, display multiple inputs separately or stacked on top of each other, or to display two inputs as an image for comparing two different signals. To compare two signals with each other, set the vertical and horizontal directions to the same setting.
Use TRIGGER to set the timing at which the scope measures the signal input.
Explanations of each parameter
| Button#/NAME | Pop Up | Enc. Push | Enc. Value |
| 1: DISPLAY | Overlay | 1 ch mode | 1L, 1R, 2L, 2R |
| 2 ch mode 1L-1R, 1L-2L, 1R-2R, 2L-2R | |||
| 4 ch mode --- | |||
| Separate-2 2 ch | mode 1L-1R, 1L-2L, 1R-2R, 2L-2R | ||
| 4 ch mode --- | |||
| Separate-4 --- — | |||
| X-Y XY 1L-1R, 1L-2L, 1R-2R, 2L-2R | |||
| XY-TY overlay 1L-1R, 1L-2L, 1R-2R, 2L-2R | |||
| 2: VERTICAL | 1L | Input mode (DC↔AC) | Vertical range: 10 mV–10 V/div (10 m, 20 m, 50 m, 0.1, 0.2, 0.5, 1, 2, 5, 10) |
| 1R | |||
| 2L | |||
| 2R | |||
| 3: HORIZONTAL | Sec/Div | --- | Horizontal range: 50 us–1 s/div (50, 100, 200, 500, 1 m, 2 m, 5 m, 10 m, 20 m, 50 m, 100 m, 200 m, 500 m, 1) |
| Position | Set position to zero | Change center position | |
| 4: TRIGGER | Auto | Set trigger level to zero | Set trigger level: -5.00 V–5.00 V (0.01 V step) |
| Rise | |||
| Fall | |||
| Rise single | |||
| Fall single | |||
| START/STOP | --- | --- | Oscilloscope RUN/STOP |
* Buttons 1–4 + value knob (when the popup is shown): edits the popup item.
* Button 4 + value knob: push to edit what is triggered.
* START/STOP button: controls the run/stop and single mode standby.
Function generator mode (WAVE)
Use this mode to output oscillator /noise signals that can be handled as audio, or to output LFO/PULSE/envelope signals that can be handled as CV signals. OUTPUT 1 and 2 are completely independent, and different categories can be selected and used for each.
Button 1 (button 3): explanations of each parameter
| Button#/NAME | Pop Up | Enc. Push | Enc. Value |
| 1 (3): CATEGORY | CATEGORY | --- | Oscillator |
| LFO | |||
| Noise | |||
| Pulse | |||
| Envelope | |||
| VOLUME | Vpp dBu | Set Output Level | |
| CYCLE MODE | --- | Cont. | |
| 1-Shot | |||
| Push | |||
| INPUT MONITOR | --- | Off | |
| Input 1L | |||
| Input 1R | |||
| Input 2L | |||
| Input 2R |
Button 2 (button 4): explanations of each parameter
CATEGORY = Oscillator
| Button#/NAME | Pop Up | Enc. Push | Enc. Value |
| 2: EDIT | WAVE TYPE | --- | Sine, Square, Tri, Saw-Rise, Saw-Fall |
| PITCH Frequency | Note | 0.01–10.00 kHz / C-0 – G9 | |
| SHAPE | Set shape to 50% | 0–100% | |
| PHASE | Set phase to 0° | -180 - +180^ |
CATEGORY = LFO
| Button#/NAME | Pop Up | Enc. Push | Enc. Value |
| 2: EDIT | WAVE TYPE | -- | Sine, Square, Tri, Saw-Rise, Saw-Fall |
| FREQUENCY | Frequency BPM | 0.01–10.00 kHz / 0.5–600.0 BPM | |
| DIRECTION | Set direction to ± | -, ±, + | |
| PHASE | Set phase to 0° | -180 – +180° |
CATEGORY = Noise
| Button#/NAME | Pop Up | Enc. Push | Enc. Value |
| 2: EDIT | WAVE TYPE | --- | White, Pink |
| TIME | Period BPM 1 ms–1 | 0.0 s / 0.5–600.0 BPM | |
| --- | --- | --- | |
| DUTY | Set duty to 100% | 0–100% |
CATEGORY = Pulse
| Button#/NAME | Pop Up | Enc. Push | Enc. Value |
| 2: EDIT | WAVE TYPE | --- | Positive, Negative |
| TIME | Period BPM 1 ms-1 | 0.0 s / 0.5–600.0 BPM | |
| --- | --- | --- | |
| DUTY | Set duty to 50% | 0–100% |
CATEGORY = Envelope
| Button#/NAME | Pop Up | Enc. Push | Enc. Value |
| 2: EDIT | WAVE TYPE | --- | Linear, Exp. |
| TIME | Period BPM 1 ms-1 | 0.0 s / 0.5–600.0 BPM | |
| SHAPE | Set shape to 50% | 0–100% | |
| DUTY | Set duty to 100% | 0–100% |
Spectrum analyzer mode (FFT)
Spectrum analyzer mode uses an FFT (fast Fourier transform) function that lets you monitor the reference waveform along with a frequency spectrogram of the input signal. This is useful for seeing where the effects of a filter or the changes you make to a waveform appear in the frequency bands.
Explanations of each parameter
| Button#/NAME | Pop Up | Enc. Push | Enc. Value |
| 1: INPUT -- Input mode: AC ↔DC | 1L, 1R, 2L, 2R | ||
| 2: VERTICAL | INPUT 1L Input mode: AC ↔DC | VERTICAL RANGE:10 mV–10 V/div (10 m,20 m, 50 m, 0.1, 0.2, 0.5, 1,2, 5, 10) | |
| INPUT 1R | |||
| INPUT 2L | |||
| INPUT 2R | |||
| 3: HORIZONTAL | Sec/Div | --- | Time range (50 us–1 s/div) |
| Position | Set position to zero | Change center position | |
| FFT Range | --- | FFT max Range(1 k–20 kHz) | |
| FFT Position | --- | FFT min Range (0–19 kHz) | |
| 4: TRIGGER | AUTO,Rise, Fall | Set trigger level to zero | Set trigger level:–5.00 V–5.00 V (0.01 V step) |
| START/STOP -- | FFT RUN/STOP | ||
* Buttons 1-4 + value knob (when the popup is shown): edits the popup item.
* START/STOP button: controls the run/stop and single mode standby.
Tuner mode (TUNER)
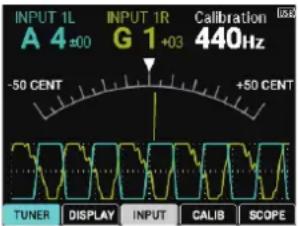
Use the tuner to tune one of the four input signals. Both a horizontal meter and a needle-type (VU) meter view are available.
DISP: NEEDLE
DISP: METER
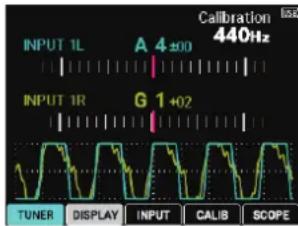
You can set the reference pitch to a value other than 440 Hz (this is also called “concert pitch,” meaning a range from middle C to the A below that). With this function, you can tune multiple oscillators at the same time by transmitting the same pitch (note) and adjusting the pitch while monitoring.
Explanations of each parameter
| Button#/NAME | Pop Up Enc. Push Enc. Value | |
| 1: DISP | NEEDLE | --- --- |
| METER | ||
| 2: INPUT | INPUT 1L --- --- | |
| INPUT 1R --- --- | ||
| INPUT 2L --- --- | ||
| INPUT 2R --- --- | ||
| INPUT 1L INPUT 1R | --- --- | |
| INPUT 2L INPUT 2R | --- --- | |
| 3: CALIB --- Set C | CALIB to 440 Hz A4 CALIB (410–480 Hz) | |
| 4: SCOPE SCOPE | VIEW On, Off --- --- |
* The vertical range and horizontal range settings for scope view can be configured in scope mode.
Global mode
Used for configuring the overall unit.
1: Input
| Parameter | Display | Notes | |
| Scope Trigger | INPUT 1L, INPUT 1R, INPUT 2L, INPUT 2R | Configures what is triggered in scope mode. | |
| INPUT 1L | Coupling | DC, AC | Sets the coupling for the input signal. When this is set to AC mode, the DC signal is cut. |
| Filter | Off, On | ||
| INPUT 1R | Coupling | DC, AC | |
| Filter | Off, On | ||
| INPUT 2L | Coupling | DC, AC | Reduces high-frequency noise included in the input signal. |
| Filter | Off, On | ||
| INPUT 2R | Coupling | DC, AC | |
| Filter | Off, On |
2: SETTINGS
| Parameter | Display | Notes | |
| Display | Brightness | 0, 10, 20, ...80, 90, 100% | Sets the display brightness. |
| Off time (USB) | 1 min, 5 min, 10 min, 15 min, infinite | Sets how much time elapses before the display is turned off when the unit is connected to a USB power source. | |
| Off time (Battery) | 1 min, 5 min, 10 min, 15 min, infinite | Sets how much time elapses before the display is turned off when the unit is running on battery power. | |
| Popup disp | Off, On | Sets popups (aside from the main popups) to show or hide. | |
| Scope slow mode | Fixed, Scroll | Selects the display method for scope mode, when “Sec/Div” is set to a unit of 100 ms or greater.When this is “Fixed”, the screen is cleared after the signal is displayed up to the right edge of the screen, and the signal begins displaying again from the left side.When this is “Scroll”, the signal is scrolled to the left and displayed once the display reaches the position set in “Position”. (To show the signal over the entire screen, move the “Position” all the way to the right edge.) |
3: SETTINGS
| Parameter | Display | Notes | |
| Power | Battery Type | Alkaline, Ni-MH | Selects the battery type. |
| Auto Power Off (USB) | 5 min, 15 min, 30 min, 1 hour, infinite | Sets the amount of time before auto power-off is enabled, when this unit is connected to a USB power supply. | |
| Auto Power Off (Battery) | 5 min, 15 min, 30 min, 1 hour, infinite | Sets the amount of time before auto power-off is enabled, when this unit is operating on batteries. |
Text in boldface indicates the factory default setting.
Specifications
| Display: | 2.8" RGB LCD |
| Input/Output jacks: | INPUT' 1, 2 jack (3.5 mm TRS mini phone jack), THRU 1, 2 jack (3.5 mm TRS mini phone jack), OUTPUT 1, 2 jack (3.5 mm TS mini phone jack), USB port (type C) |
| Power source: | USB bus power (500 mA max.) or 2 AAA batteries (2 × alkaline 1.5 V or 2 × NiMH 1.2 V) |
| Current consumption: | 400 mA or less |
| Dimensions (W × D × H): | 129 × 78 × 39 mm / 5.08" × 3.07" × 1.54" |
| Weight: | 130 g / 4.59 oz |
| Included items: | USB cable, assembly instructions |
| Input/output jacks: | |
| INPUT 1, 2 (stereo × 2) | Input impedance: 1MΩ typ.Maximum input voltage: -10 V to +10 V |
| THRU 1, 2 (stereo × 2) | |
| OUTPUT 1, 2 (mono × 2) | Output impedance: 47Ω typ.Maximum output voltage: -5 V to +5 V |
| Oscilloscope: | |
| Display modes: | Single, stereo (INPUT 1L-INPUT 1R, INPUT 1L-INPUT 2L, INPUT' 1R-INPUT' 2R, INPUT' 2L-INPUT' 2R), 4 ch |
| Vertical | 10 mV–10 V/div, switchable between AC/DC modes |
| Horizontal 50 us–1 s/div | |
| Trigger: | auto, rise, fall, single (rise), single (fall) |
| Function generator: | |
| Waveforms: Oscillator, LFO, Noise, Pulse, Envelope | |
| Frequencies: | switchable between 0.01 Hz–10 kHz, Hz, NOTE and BPM modes |
| Output level: | 10 Vpp max, switchable between V/dB modes |
| FFT: | |
| Input: | mono (1L, 1R, 2L, 2R) |
| Frequency range: | 0 Hz–20 kHz |
| Tuner : | |
| Display modes: | needle meter (VU), horizontal meter |
| Inputs: | mono, stereo (INPUT 1L-INPUT 1R, INPUT 2L-INPUT 2R) |
| Tuning: | 12-note equal temperament |
| Detection range: | E0 (20.60 Hz)-G8 (6,272 Hz), when inputting sine waves |
| Reference pitch range: | A4 = 410–480 Hz (1 Hz steps) |
| Measurement accuracy: | ±0.1 cents |
* Specifications and appearance are subject to change without notice for improvement.
- Table of Contents
- En
- Introduction
- Main features of this unit
- Part names and functions
- Mode button
- Buttons 1-4
- START/STOP button
- Value knob
- INPUT 1, 2 jacks
- THRU 1, 2 jacks
- OUTPUT 1, 2 jacks
- USB (Type-C) port
- Power button
- Battery compartment
- Making connections and turning on the power
- Turning the power on/off
- Auto power-off function
- Four operating modes
- Oscilloscope mode (SCOPE)
- Function generator mode (WAVE)
- Spectrum analyzer mode (FFT)
- Tuner mode (TUNER)
- Basic operations
- Button 2 (button 4): explanations of each parameter
- Global mode
Brand : KORG
Model : NTS-2
Category : Measurement