AT-OME-SW32 - Network switch Atlona - Free user manual and instructions
Find the device manual for free AT-OME-SW32 Atlona in PDF.


| Product Type | Network Switch |
| Model | AT-OME-SW32 |
| Brand | Atlona |
| Ports | 32 Gigabit Ethernet ports |
| PoE Support | PoE+ (802.3at) on all ports |
| PoE Budget | 370W total |
| Management | Managed Layer 2 / Layer 3 |
| VLAN Support | 802.1Q VLAN, up to 256 VLANs |
| Dimensions (W x D x H) | 440 x 250 x 44 mm (1U rackmount) |
| Weight | 3.5 kg |
| Power Supply | Internal AC 100-240V, 50/60Hz |
| Power Consumption | Max 400W |
| Cooling | Built-in fans, front-to-back airflow |
| Operating Temperature | 0°C to 40°C |
| Storage Temperature | -20°C to 70°C |
| Humidity | 5% to 90% non-condensing |
| Mounting | Rackmount kit included |
| LED Indicators | Power, Link/Activity, PoE status |
| Certifications | CE, FCC, RoHS |
| Warranty | Limited lifetime |
Frequently Asked Questions - AT-OME-SW32 Atlona
User questions about AT-OME-SW32 Atlona
0 question about this device. Answer the ones you know or ask your own.
Ask a new question about this device
Download the instructions for your Network switch in PDF format for free! Find your manual AT-OME-SW32 - Atlona and take your electronic device back in hand. On this page are published all the documents necessary for the use of your device. AT-OME-SW32 by Atlona.
USER MANUAL AT-OME-SW32 Atlona
for HDMI and USB-C with HDMI Outputs
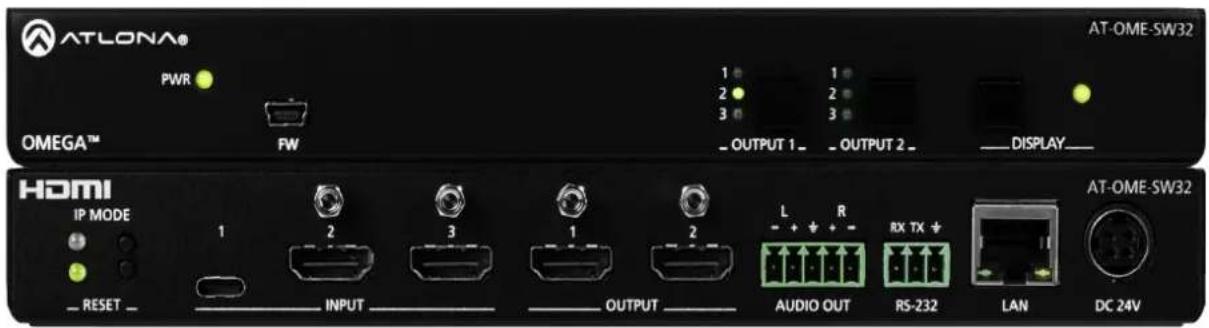
AT-OME-SW32
Atlona Manuals
Switchers
Version Information
| Version Release Date Notes | |
| 6 Jul 2024 new color format |
Sales, Marketing, and Customer Support
Main Office
Atlona Incorporated
70 Daggett Drive
San Jose, CA 95134
United States
Office: +1.408.962.0515 (US/International)
Sales and Customer Service Hours
Monday - Friday: 6:00 a.m. - 4:30 p.m. (PST)
https://atlona.com/
International Headquarters
Atlona International AG
Tödistrasse 18
8002 Zürich
Switzerland
Office: +41 43 508 4321
Sales and Customer Service Hours
Monday - Friday: 09:00 - 17:00 (UTC +1)
Operating Notes

IMPORTANT: Visit http://www.atlona.com/product/AT-OME-SW32 for the latest firmware updates and User Manual.
Warranty

To view the product warranty, use the following link or QR code:
https://atlona.com/warranty/.
Important Safety Information
CAUTION
RISK OF ELECTRIC SHOCK
DO NOT OPEN
CAUTION: TO REDUCT THE RISK OF
ELECTRIC SHOCK
DO NOT OPEN ENCLOSURE OR EXPOSE
TO RAIN OR MOISTURE.
NO USER-SERVICEABLE PARTS
INSIDE REFER SERVICING TO
QUALIFIED SERVICE PERSONNEL.

The exclamation point within an equilateral triangle is intended to alert the user to the presence of important operating and maintenance instructions in the literature accompanying the product.

The information bubble is intended to alert the user to helpful or optional operational instructions in the literature accompanying the product.
- Read these instructions.
- Keep these instructions.
- Heed all warnings.
- Follow all instructions.
- Do not use this product near water.
- Clean only with a dry cloth.
- Do not block any ventilation openings. Install in accordance with the manufacturer's instructions.
- Do not install or place this product near any heat sources such as radiators, heat registers, stoves, or other apparatus (including amplifiers) that produce heat.
- Do not defeat the safety purpose of a polarized or grounding-type plug. A polarized plug has two
blades with one wider than the other. A grounding type plug has two blades and a third grounding prong. The wide blade or the third prong are provided for your safety. If the provided plug does not fit into your outlet, consult an electrician for replacement of the obsolete outlet.
- Protect the power cord from being walked on or pinched particularly at plugs, convenience receptacles, and the point where they exit from the product.
- Only use attachments/accessories specified by Atlona.
- To reduce the risk of electric shock and/or damage to this product, never handle or touch this unit or power cord if your hands are wet or damp. Do not expose this product to rain or moisture.
- Unplug this product during lightning storms or when unused for long periods of time.
- Refer all servicing to qualified service personnel. Servicing is required when the product has been damaged in any way, such as power-supply cord or plug is damaged, liquid has been spilled or objects have fallen into the product, the product has been exposed to rain or moisture, does not operate normally, or has been dropped.


FCC Compliance
FCC Compliance and Advisory Statement: This hardware device complies with Part 15 of the FCC rules. Operation is subject to the following two conditions: 1) this device may not cause harmful interference, and 2) this device must accept any interference received including interference that may cause undesired operation. This equipment has been tested and found to comply with the limits for a Class A digital device, pursuant to Part 15 of the FCC Rules. These limits are designed to provide reasonable protection against harmful interference in a commercial installation. This equipment generates, uses, and can radiate radio frequency energy and, if not installed or used in accordance with the instructions, may cause harmful interference to radio communications. However there is no guarantee that interference will not occur in a particular installation. If this equipment does cause harmful interference to radio or television reception, which can be determined by turning the equipment off and on, the user is encouraged to try to correct the interference by one or more of the following measures: 1) reorient or relocate the receiving antenna; 2) increase the separation between the equipment and the receiver; 3) connect the equipment to an outlet on a circuit different from that to which the receiver is connected; 4) consult the dealer or an experienced radio/TV technician for help. Any changes or modifications not expressly approved by the party responsible for compliance could void the user's authority to operate the equipment. Where shielded interface cables have been provided with the product or specified additional components or accessories elsewhere defined to be used with the installation of the product, they must be used in order to ensure compliance with FCC regulations.
Copyright, Trademark, and Registration
© 2024 Atlona Inc. All rights reserved. "Atlona" and the Atlona logo are registered trademarks of Atlona Inc. Pricing, specifications and availability subject to change without notice. Actual products, product images, and online product images may vary from images shown here.

The terms HDMI, HDMI High-Definition Multimedia Interface, HDMI trade dress and the HDMI Logos are trademarks or registered trademarks of HDMI Licensing Administrator, Inc.
Dolby, Dolby Atmos, and the double-D symbol are registered trademarks of Dolby Laboratories Licensing Corporation.
For DTS patents, see http://patents.dts.com. Manufactured under license from DTS, Inc. DTS, the Symbol, DTS and the Symbol together, and Digital Surround are registered trademarks and/or trademarks of DTS, Inc. in the United States and/or other countries. © DTS, Inc. All Rights Reserved.
All other trademark(s), copyright(s), and registered technologies mentioned in this document are the properties of their respective owner(s).
Table of Contents
Introduction 6
Features 6
Package Contents 6
Panel Description 7
Installation 8
Captive Screw Connections 8
RS-232 8
Audio 8
Mounting Instructions 9
Connection Instructions 10
IP Modes 10
Connection Diagram 11
WebGUI 12
Audio/Video Settings 13
Display 15
RS-232 17
EDID 17
Config 18
System 19
Appendix 20
Configuration and Setup Guide 20
Installation 20
Connection 20
Configuration 21
Control 22
Specifications 25
Introduction
The Atlona AT-OME-SW32 is a 3×2 matrix switcher with HDMI and USB-C inputs, and HDMI outputs. It is HDCP 2.2 compliant and supports 4K HDR and 4K/60 4:4:4 at HDMI data rates up to 18 Gbps. The USB-C input is ideal for AV interfacing with newer Mac®, Chromebook™, and Windows® PCs, as well as smartphones and tablets. Additionally, 4K downscaling to 1080p is available on HDMI output 1 when connected to an HD sink. Depending on the intended application, the OME-SW32 can be set to specific switching modes that include mirrored outputs (default), one of the outputs fixed to an input, or unrestricted matrix switching.
For additional integration convenience, the OME-SW32 features automatic input selection, automatic display control, balanced audio de-embedding (linked to HDMI output 1), control via TCP/IP and RS-232, and remote management with AMS (Atlona Management System). This versatile, compact matrix switcher is ideal for under-table mounting in meeting spaces, to serve applications with side-by-side displays, videoconferencing, interfacing with OmniStream networked AV systems, secondary switching into a larger AV system, and more.
Features
• Three selectable switching modes
• Supports resolutions up to 4K/UHD 60Hz @ chroma sub-sampling 4:4:4, 4K HDR, Dolby Vision, and HLG
• HDCP 2.2 compliant
• EDID learning for multiple display EDIDs
• Built in internal EDIDs provide 12 unique EDIDs to ensure compatibility
- Multiple control options such as RS-232, TCP/IP, webGUI, and front panel
- Multi-channel audio pass through up to Dolby Digital Plus, Dolby TrueHD, DTS-HD Master Audio, and Dolby Atmos
• 2Ch audio de-embedding using the analog audio port
Package Contents
1 x AT-OME-SW32
1 x Captive screw connector, 5-pin
1 x Captive screw connector, 3-pin
1 x USB-C cable
4 x Mounting screws
1 x Pair rack mount ears
1 x 24V DC power supply
1 x IEC power cord
1 x Installation Guide
Panel Description
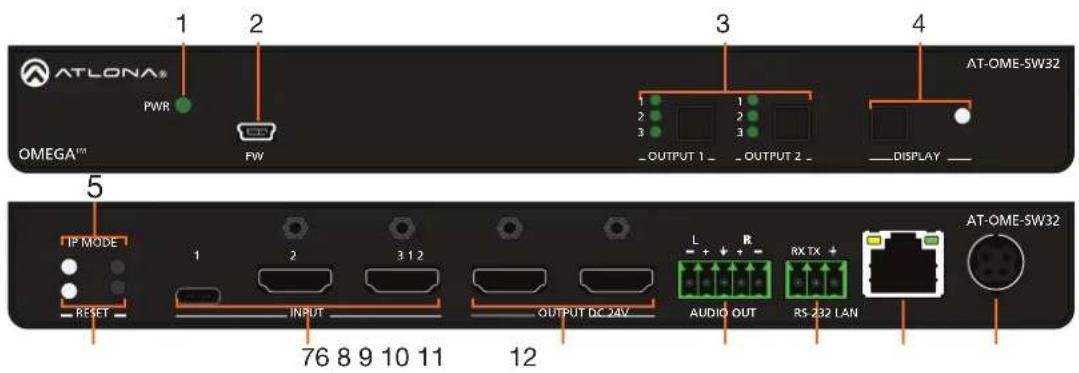
1 PWR LED
Illuminates green when receiving power.
2 FW port
Connect a mini USB cable from this port to a PC to firmware update the unit.
3 OUTPUT 1 & OUTPUT 2
Use the button to switch between sources, the LEDs will illuminate to show the selected source.

NOTE: Output two button and LED will only be functional in Matrix Mode.
4 DISPLAY button and LED
Press the display button to trigger an on/off command for the display. The LED will blink while the command is being sent. By default, the display button will mute the video output of the HDMI ports.
5 IP MODE button and LED
Press and hold the button for 5 seconds until the LED blinks to switch the IP mode between DHCP and Static IP modes. The LED will blink 2 times for DHCP and 4 times for static IP.
6 RESET button and LED
Press and hold the button for 5 seconds until the unit resets. The LED will blink as the unit resets to factory default settings.
7 INPUT
Connect the USB-C or HDMI sources to these ports.
8 OUTPUT
Connect HDMI cables from these ports to HDMI displays.
9 AUDIO OUT
Connect to an audio DSP, amplifier, or other audio distribution devices.
10 RS-232
Use for device or display control.
11 LAN
Connect an Ethernet cable from this port to a Local Area Network (LAN).
12 DC 24V
Connect the included DC 24V power supply to this port.
Installation
Captive Screw Connections
RS-232
Connect to a control system for unit switching or to a display for power and audio display control.

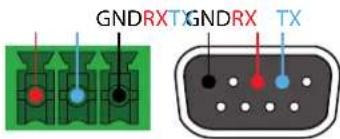
Pin out will be determined by the RS-232 cable and connect as RX (receive), TX (transmit) and ± (Ground).
Audio
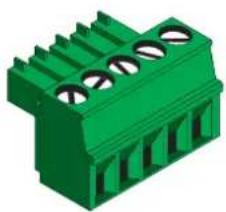
De-embeds audio from HDMI Output 1 to send to an audio DSP, amplifier, or other audio distribution devices.
natural_image
Green 3D component with multiple circular slots, no visible text or symbols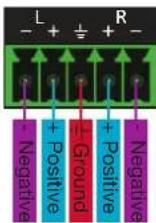
Balanced
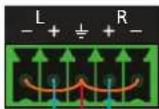

Unbalanced
Use a jumper between the negative and ground pins when using an unbalanced connection.
Mounting Instructions
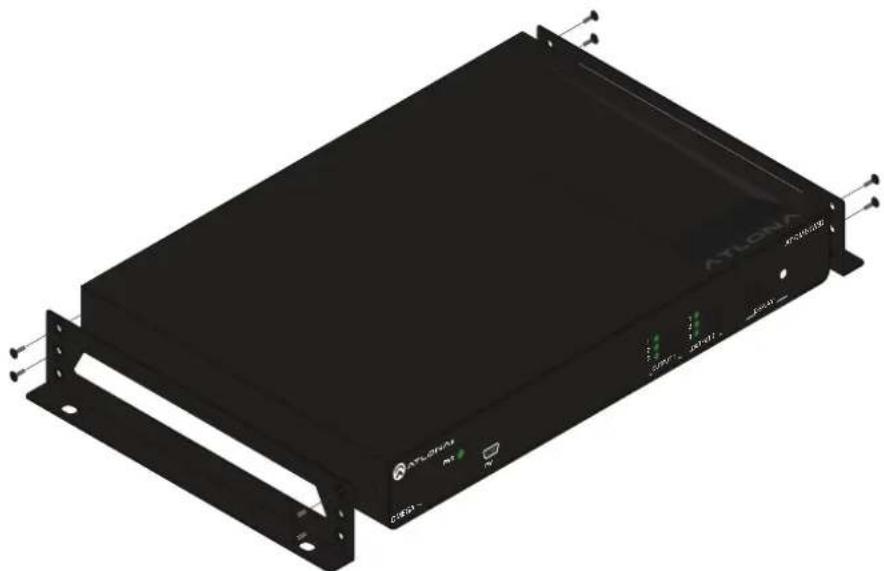
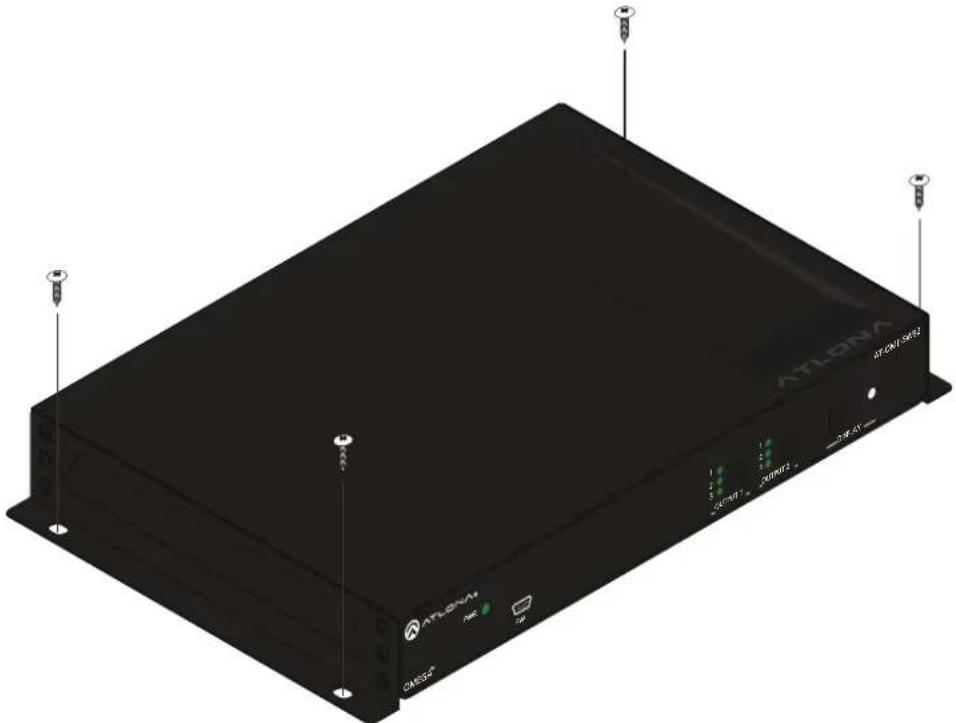
The AT-OME-SW32 includes two mounting brackets and four mounting screws, which can be used to attach the units to any flat surface.
-
Remove the top 2 case screws on the side of the unit.
-
Align the mounting brackets to the side of the units.
-
Use the previously removed case screws to secure the mounting bracket to the enclosure.
-
Repeat the steps for the other side of the unit.
natural_image
Exterior view of a black ATLONAM network device with ventilation slots and mounting brackets (no readable text or symbols)- Mount the unit using the oval-shaped holes, on each mounting bracket. If using a drywall surface, a #6 drywall screw is recommended.

NOTE: Mounting brackets can also be inverted to mount the unit under a table or other flat surface.
natural_image
3D rendering of a black rectangular electronic device labeled ATLONA, showing ports, cables, and connectors (no readable text beyond labels)Connection Instructions
- Connect HDMI and USB-C Sources to the inputs.
- Connect up to two HDMI displays to the outputs.
- Connect the 2CH analog AUDIO OUT ports to a DSP, or audio amplifier (e.g. AT-GAIN-60).
- *Optional* For control, connect to the 3-pin captive screw RS-232 port.
- *Optional* Connect a network switch to the LAN port, for IP control, system configuration, or Ethernet routing.
- Connect the included DC 24V power supply to the power port.
- Connect the included IEC power cord from the power supply to a compatible power outlet.
IP Modes
DHCP
By default, the AT-OME-SW32 is set to DHCP mode. In this mode, when the AT-OME-SW32 is connected to the Local Area Network (LAN), it will automatically be assigned an IP address by the DHCP server (if available).
Static
If no DHCP server is available, or a static IP is required, the SW32 can be set to static IP mode using the IP MODE button or webGUI.
- Press and hold the IP MODE button for 5 seconds to switch to static IP MODE, the LED will blink 4 times when it goes into Static IP mode. In this mode, the AT-OME-SW32 will be set to the following:
IP address: 192.168.1.254
Subnet mask: 255.255.0.0
Gateway: 192.168.1.1
- To switch back to DHCP, press and hold the IP MODE button for 5 seconds. The LED will blink 2 times when successfully put into DHCP mode.
Installation
Connection Diagram
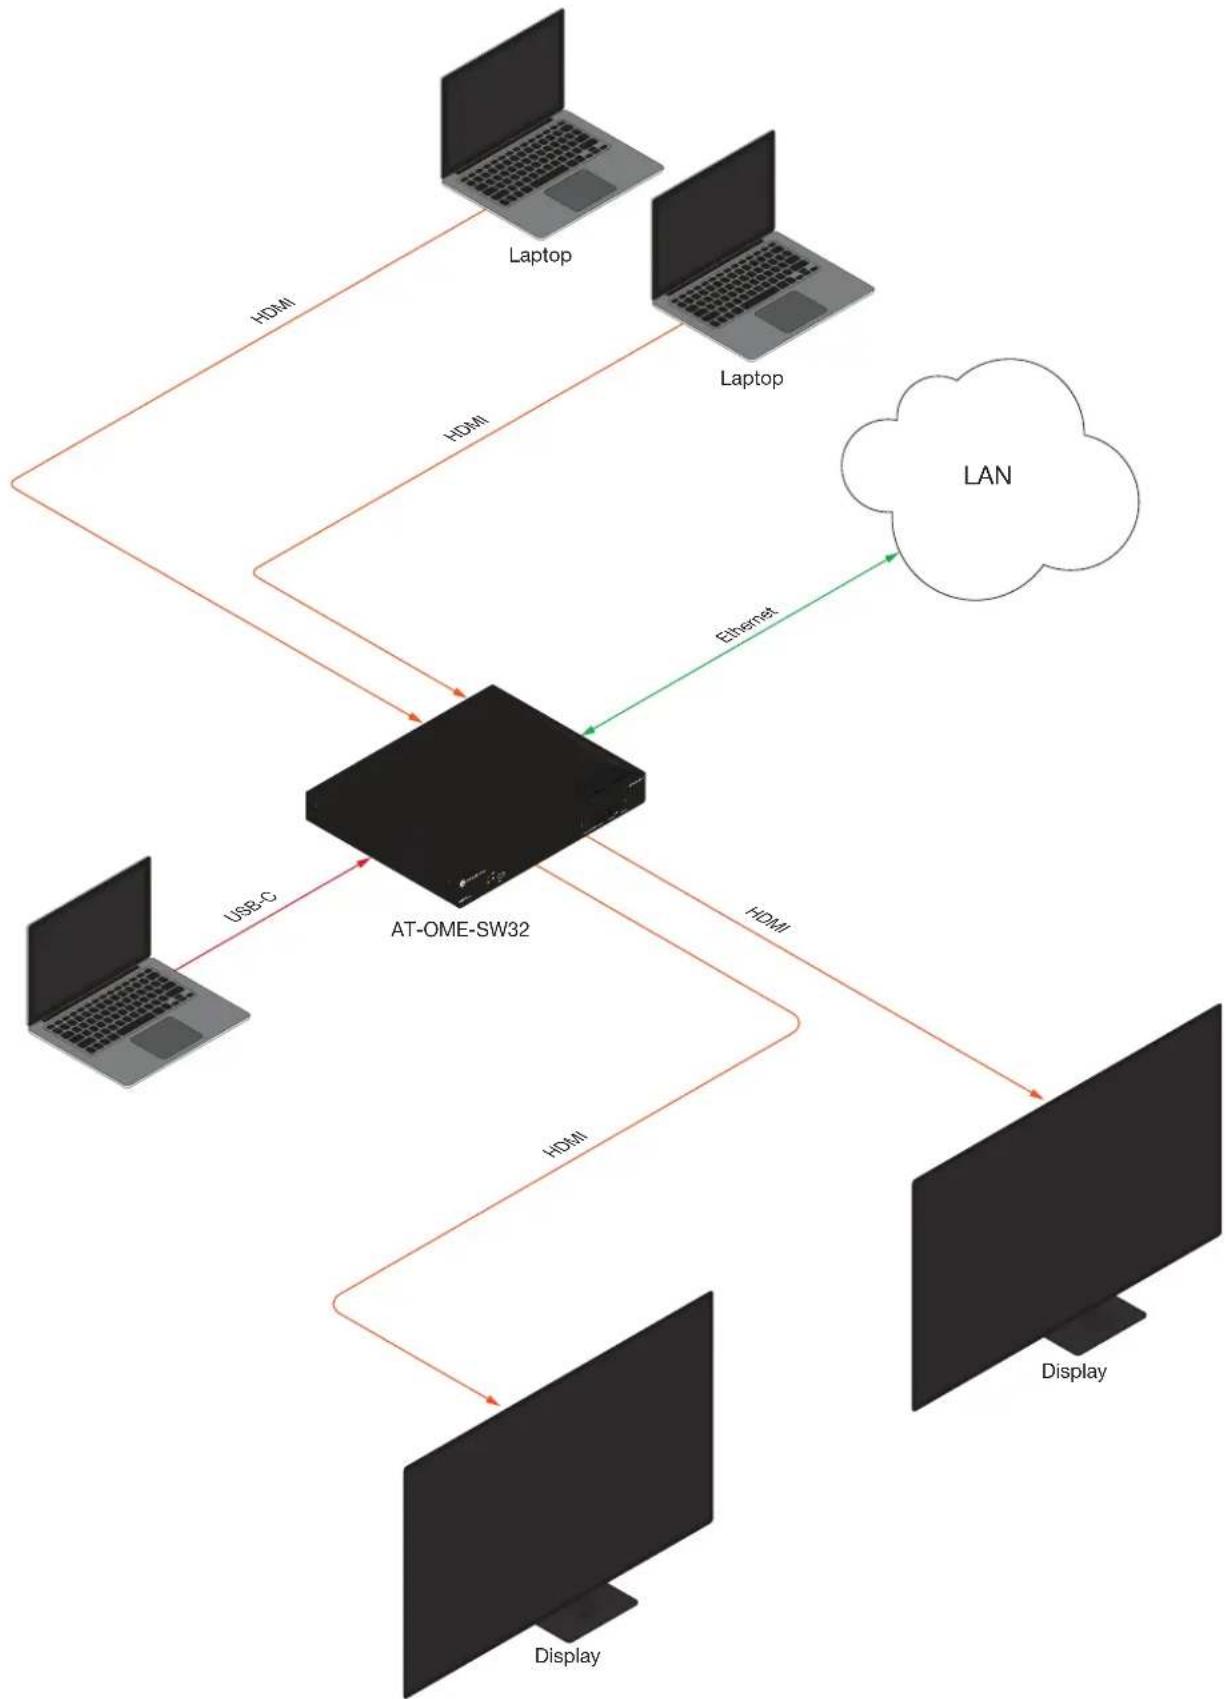
flowchart
graph TD
    A["AT-OME-SW32"] -->|HDMI| B["Laptop"]
    A -->|HDMI| C["Laptop"]
    A -->|Ethernet| D["LAN"]
    A -->|USoC| E["Display"]
    A -->|HDMI| F["Display"]
WebGUI
The AT-OME-SW32 includes a built-in webGUI, which allows easy remote management and control of all features. Follow the instructions below to access the webGUI.
- Make sure that an Ethernet cable is connected between the LAN port on the AT-OME-SW32 and the network.
- Use an IP scanner to determine the IP address of the unit.
- Launch a web browser and enter the IP address in the address bar.
- The AT-OME-SW32 Login page will be displayed.
- Enter the following information on the Login page.
Login: admin
Password: Atlona
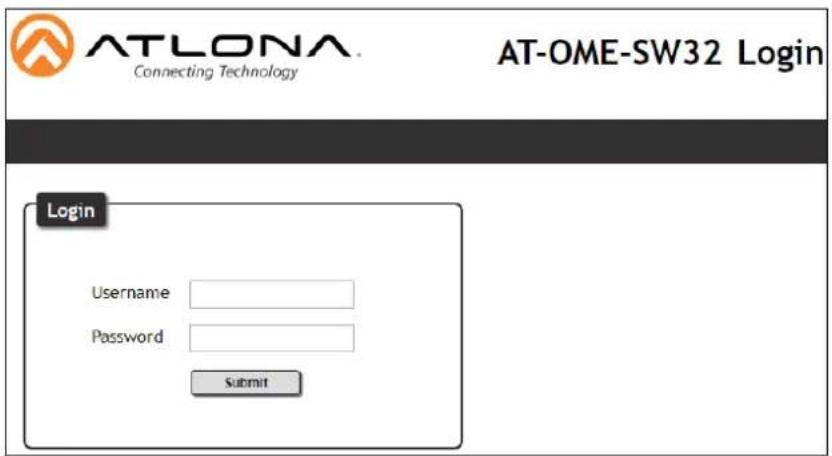
- Click the Login button. The info page will display, giving all the general information of the AT-OME-SW32.
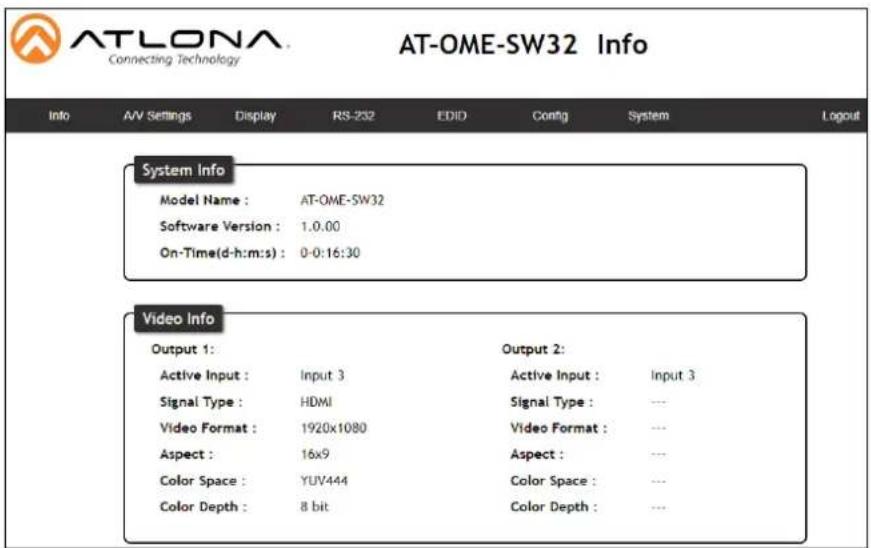
Audio/Video Settings
Select A/V Settings from the top navigation to adjust routing and video settings.
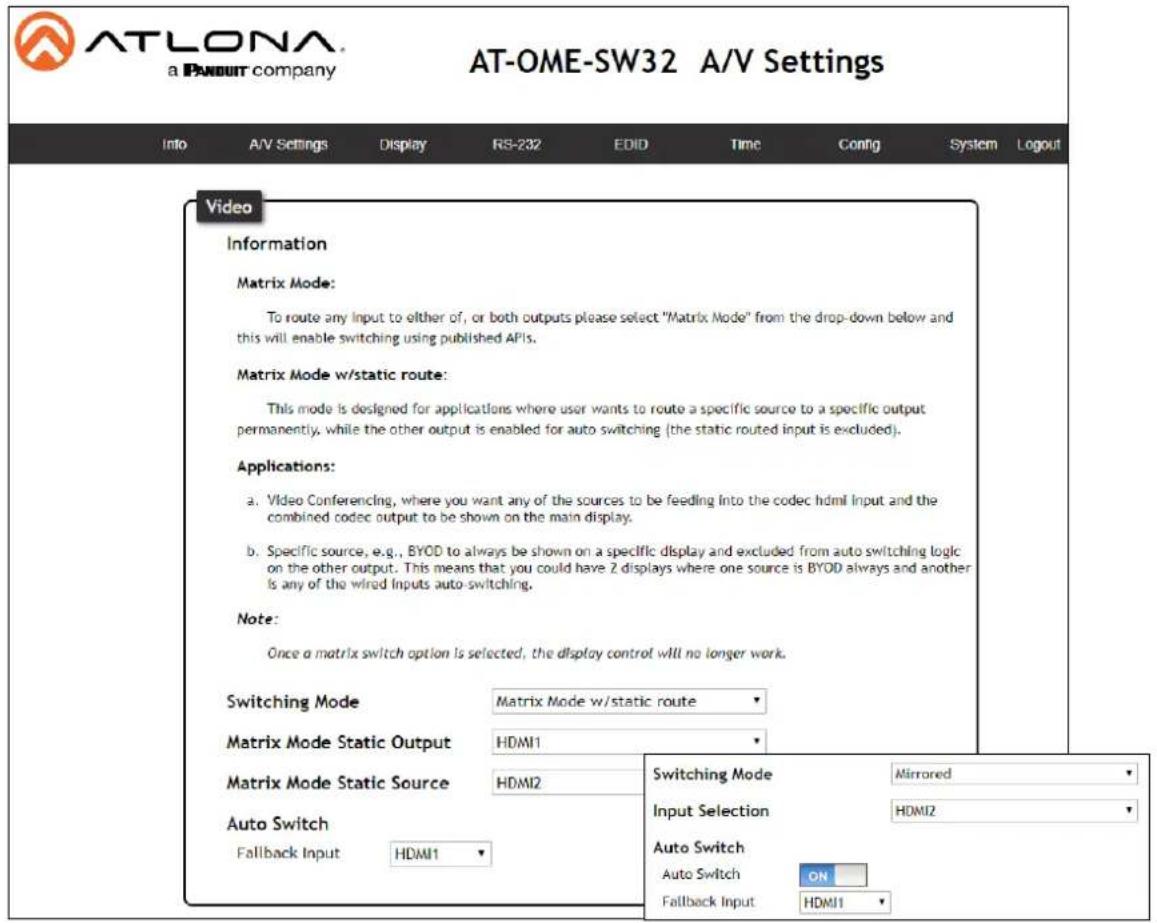
Switching Mode
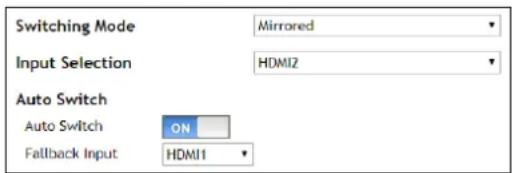
Mirrored - When selected from the drop down menu, both HDMI outputs will pass source signal from the same selected source. This mode is selected by default.
Matrix Mode - When selected, each HDMI Output will route source signals independently.
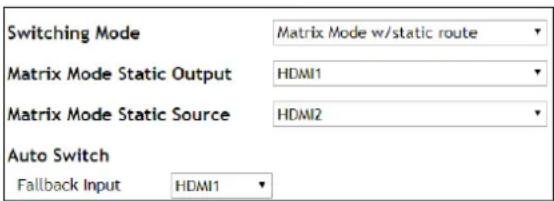
Matrix Mode w/static route - Selecting this will enable the second output to auto route input signals while the first output will stay fixed to the chosen input.

NOTE: When Matrix Mode is selected, display control becomes inoperable and the Display tab will be unaccessible in the webGUI.
Matrix Mode Static Output (Matrix Mode w/static route)
HDMI 1 or HDMI 2 - Choose which port will be set to the static source. This output will not auto switch.
Matrix Mode Static Source (Matrix Mode w/static route)
USB-C, HDMI 1 or HDMI 2 - Select which source will be routed to the static output.
Input Selection (Mirrored Mode)
Mirrored - Manually select the input that will be routed to the outputs.
Auto Switch
Auto Switch (mirrored mode) - Enable (ON) or disable (OFF) auto switch mode, this will switch inputs whenever a new source signal is activated or when the current input signal is lost or turned off.
Fallback Input - Select which input the unit will fall back to when the current signal is lost or turned off.
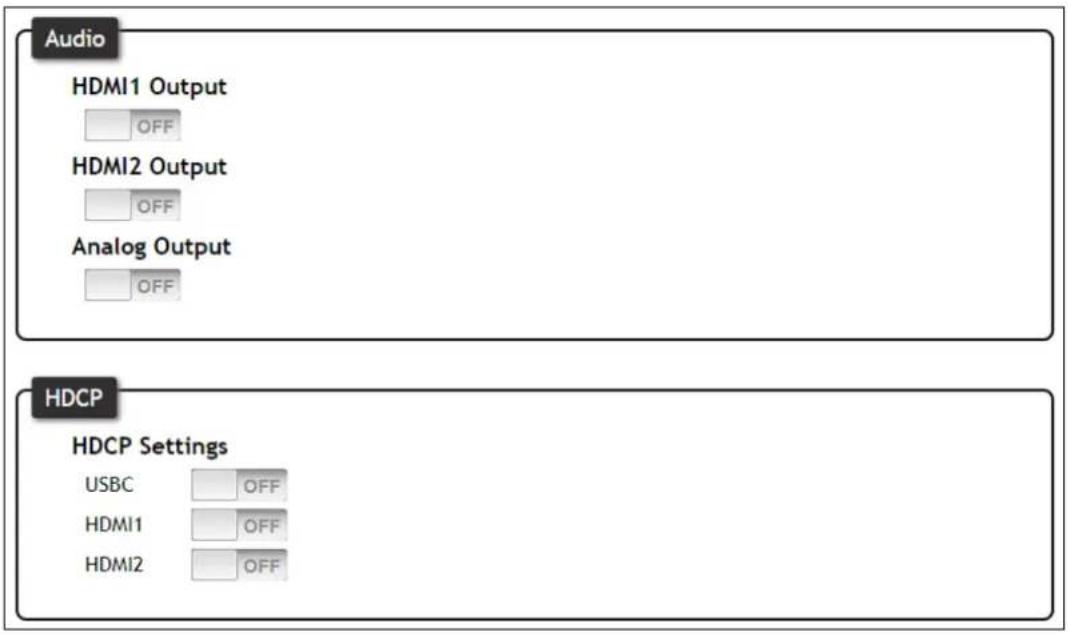
Audio
On - Unmutes the audio output signal, allowing audio to pass through the output.
Off - Mutes the audio output signal of the selected port. No audio will pass when selected.

NOTE: Analog audio output is de-embedded from HDMI output port 1.
NOTE: Audio must be 2 channel to de-embed and is not downmixed from multichannel.
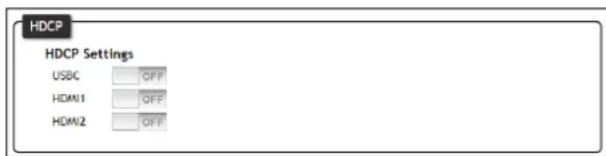
HDCP Settings
On - Sets the HDCP of the unit to auto, allowing HDCP to switch between compliant and non-compliant according to the source and display HDCP status.
Off - Sets the unit to HDCP non-compliant. No HDCP compliant source signals will pass in this mode.

NOTE: Some sources flag all content as protected, by selecting HDCP off the source device may send only user created content. In some cases, the source must be configured to send content to non-HDCP devices (e.g. HDCP must be turned off within a PS4's settings to pass unprotected content).
Display
Select Display from the top navigation to adjust display control settings.

NOTE: The Display page is only available when in mirrored or matrix switching w/static mode.
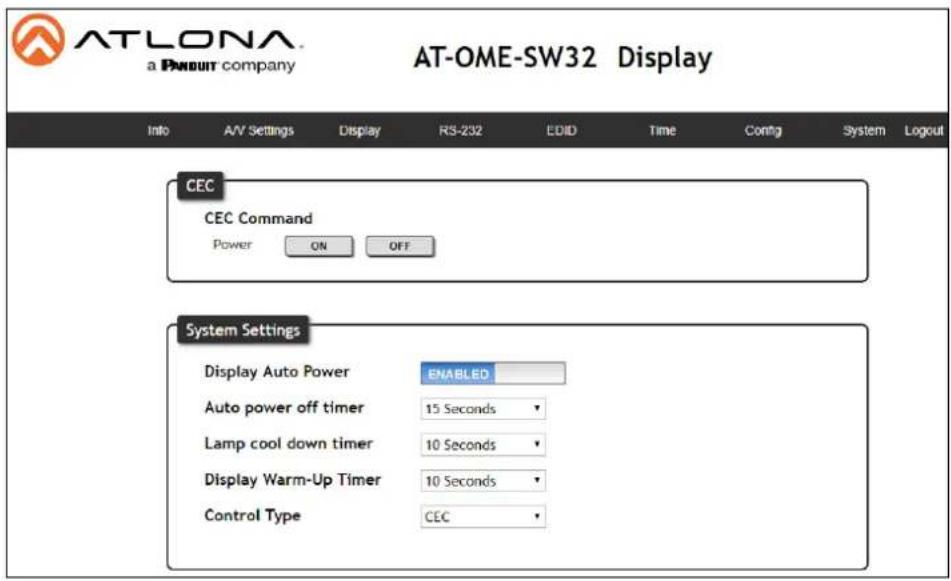
CEC
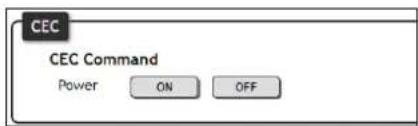
Command: Power - Press to send the CEC power on or off command out through the HDMI ports.
System Settings
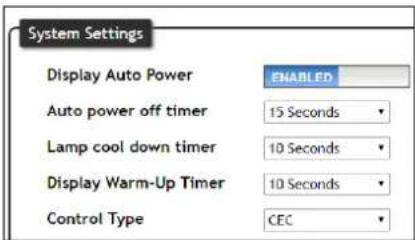
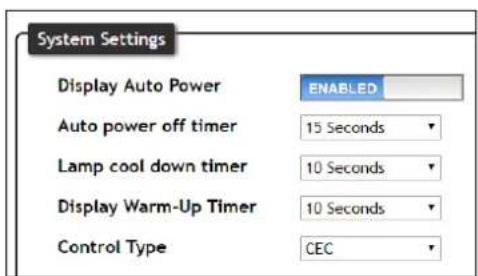
Display Auto Power - Sets the unit to send the display power on/off command to the output.
Auto Power Off Timer - Sets the unit to send the display power off command to the output when signal is no longer received for the set auto power off time.
Lamp cool down timer - Sets the time between when the display is turned off and when the next command can be sent.
Display Warm-Up Timer - Sets the amount of time between when the display is turned on to when the unit sends any commands.
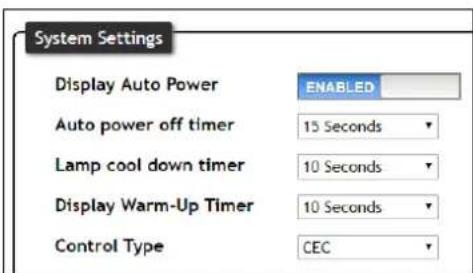
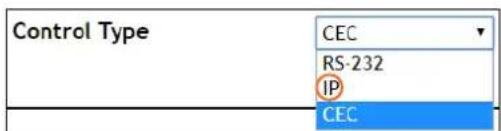
Control Type - Selects which command type is used to send commands and what type of control signal is sent when the display button is pressed. Options are CEC, TCP/IP or RS-232.
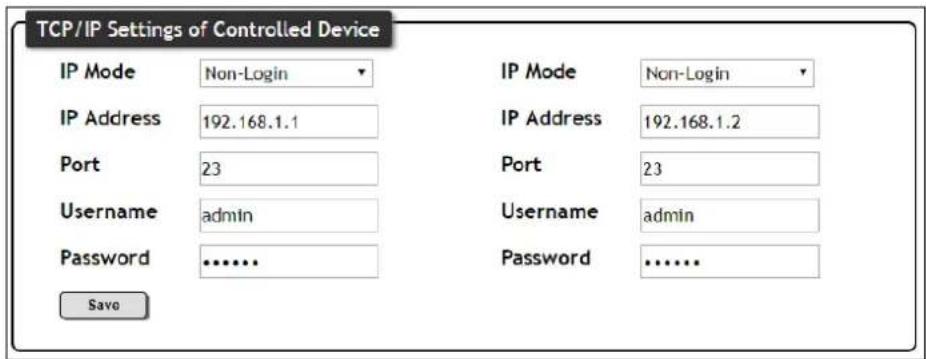
TCP/IP Settings of Controlled Device (only available when IP is selected)
IP Mode - Toggle telnet login mode between Non-Login and Login. If set to Login, a username and password will be required to control the controlled device via TCP/IP.
IP Address - Sets to the IP of the controlled device/display.
Telnet Port - Set the telnet port of the controlled device for control. Default is 23.
Username & Password - Sets the username and password that is required when login mode is enabled.

NOTE: Currently only the first column is used. The second column will be for a future feature update.
![R5232/IP commands Manufacturer Generic Products Generic Model Generic Display Commands [Please use \x as a delimiter for HEX values] Repeat Command Status DISABLED Times 2 ON PW 1 Send OFF PW 0 Send Volume+ VOL+ Volume- VOL- Mute MUTE Send Mute On MUTE ON Send Mute Off MUTE OFF Send Save Revert](/content/2026/05/985711/images/0e56bf6f9e2b6a4853dcc7b31224721977c57a9bafc0cd1531066dc6b4b16b12.jpg)
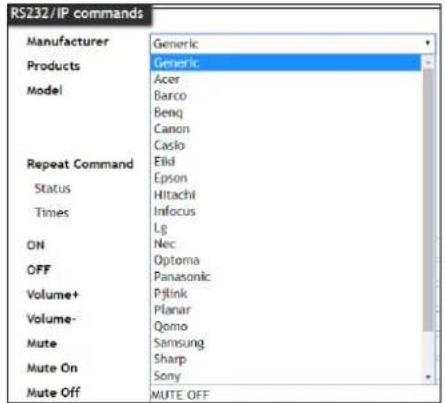
![R5232/IP commands Manufacturer Panasonic Products Panasonic Projector Model Panasonic Projector Panasonic TV Panasonic TV (Copy) [Please use \x as a delimiter for HEX values]](/content/2026/05/985711/images/5ad5fd9ba51749fd43029ca848d4df5f957924922c4846300ea2c1d9231b8ee5.jpg)
RS-232 / IP Commands
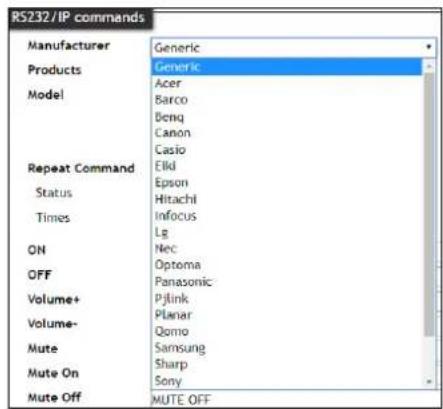
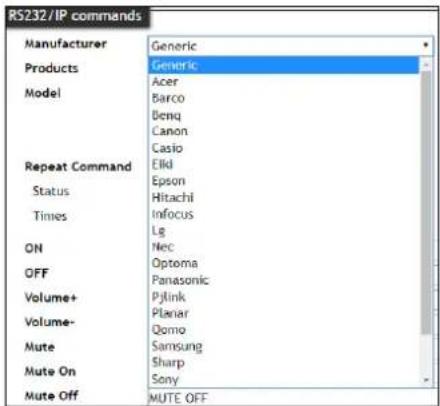
Manufacturer, Products, Models - Select the make and model of the display for control. Commands have been programmed into the unit for a wide range of products. If the current display is not found within the database, use generic and manually adjust the command fields.
Repeat Command - Enable Status to repeat the commands. Default repeat number is 2 and can be adjusted from 2 to 4 times.
Commands: On/Off/Volume/Mute - These fields will automatically be filled with the correct command when selecting a manufacturer and product from the drop down menus. If manually entering the commands, type them into the fields next to the command name.
Send - Use this button to send the command to the display, this can be used while manually typing the commands to ensure the commands are correct.
Save - Save the commands to the webGUI. Manufacturer, products, and Model will revert to Generic but the commands will be saved from the previously selected and saved Manufacturer, products, and model selection.
Revert - Sets the commands back to the previously saved settings.
RS-232
Select RS-232 from the top navigation to adjust the zone control parameters for the RS-232 port.
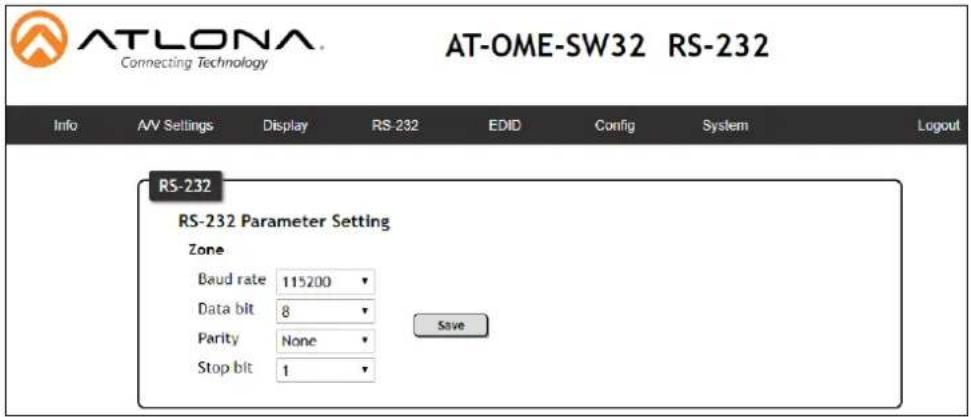
RS-232 Parameter Setting
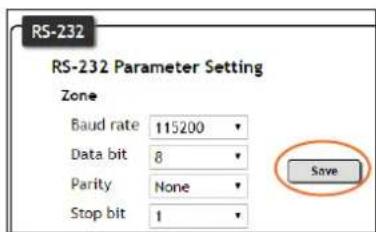
Zone - Select the baud rate, data bit, parity, and stop bit to match the display's parameters. Defaults are 115200, 8, None, and 1.
EDID
Select EDID from the top navigation to save/load EDIDs.
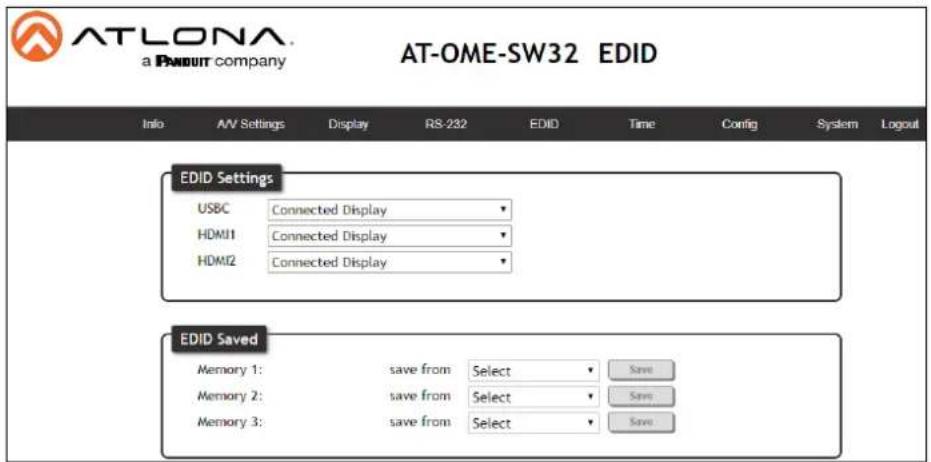
EDID
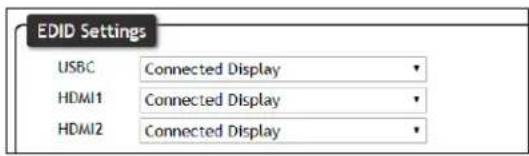
EDID Settings - Use the drop down menu to select between EDID choices.
| EDID Selections | |||
| Connected Display Chooses the highest common resolution between source and display | |||
| Internal 3840x2160 2CH w/ HDR | 1600x900 2CH | 1280x800 2CH | |
| 1920x1200 2CH | 1440x900 2CH | 1280x720 2CH | |
| 1920x1080 2CH | 1366x768 2CH | 1024x768 2CH | |
| Saved 3 Memory slots | |||
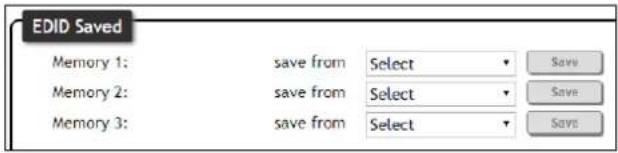
EDID Saved - The ID field will display the memory # and currently saved EDID name, select the output from the drop down menu to be saved. Once the output is selected, press the save button to make it available in the EDID settings drop down menus.

NOTE: Output 1 provides automatic 4K to 1080p scaling unless another EDID is selected.
Config
Select Config from the top navigation to update the admin password.
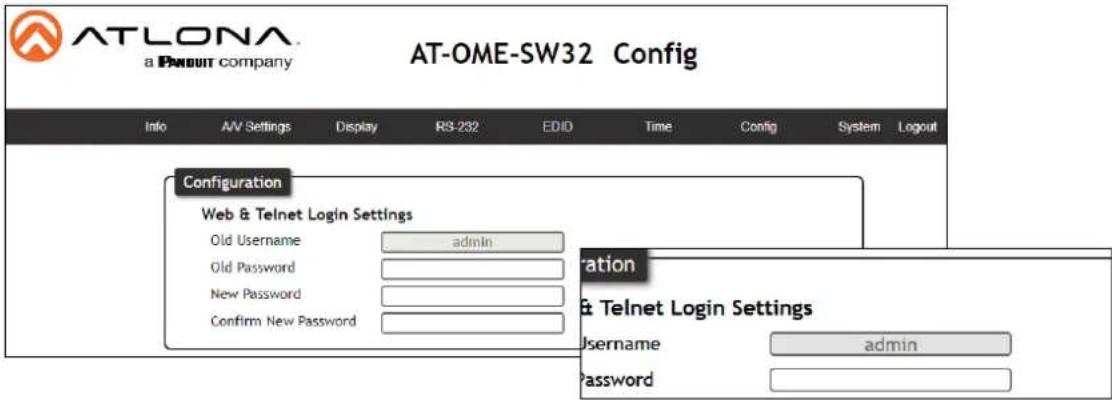
Users
Admin Password - Update the admin password for the switcher. Only the admin password may be changed, the username will remain admin.

NOTE: The passwords cannot contain any special characters. e.g. !@#\%/^&$ ?+-;";
Once the new password has been entered, press the Save button to make the password live. The user will be logged out and must log back in with the new password.
System
Select System from the top navigation to adjust network and system options.
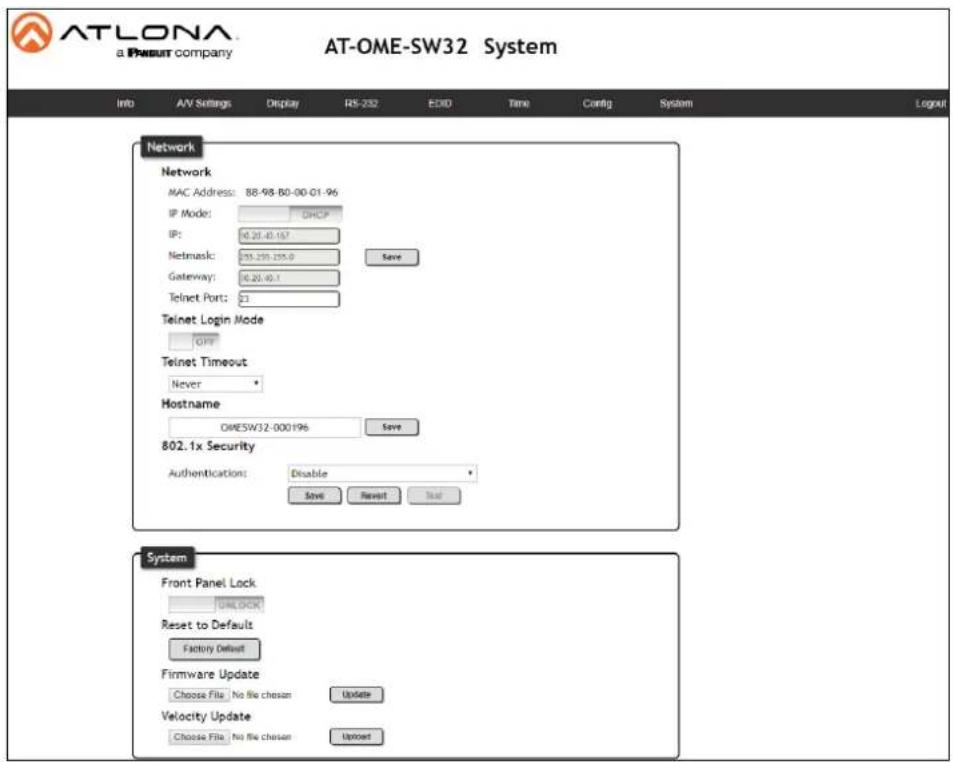
Network
MAC Address - Displays the MAC address of the unit.
IP Mode - Switch between static and DHCP IP modes.
IP, Netmask, Gateway - This will display the unit's current DHCP IP settings. When set to static, fill in the IP address, netmask, and gateway.
Telnet Port - Set the telnet port if needed for control. Default port is 23.
Telnet Login Mode - Toggle telnet login mode on and off. If on, a username and password will be required to control the unit via telnet.
Telnet Timeout - Set the amount of time between actions before the current user is logged out. Default is 10000 seconds.
Hostname - Set the name for the matrix, this will show up in network discovery.
802.1x Security - Select between Disable, Protected EAP (PEAP), TLS, and Tunneled TLS security options.
System
Front Panel Lock - Lock or unlock the front panel buttons.
Reset to Default- Press the Factory Default button to set the unit back to all factory settings, including IP mode.
Firmware update - Use the choose file button to search the local PC for the firmware file. Once selected, press the update button to start the firmware update.

NOTE: Firmware updates and release notes can be found at https://atlona.com/product/AT-OME-SW32/.
Appendix
Configuration and Setup Guide
This section will provide a step by step guide for basic set up and configuration for A/V routing and control.
Installation
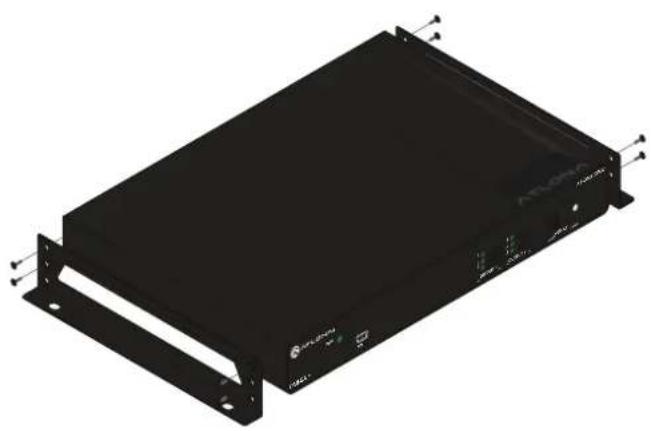
The AT-OME-SW32 includes two mounting brackets and four mounting screws, which can be used to attach the units to any flat surface.
- Remove the top 2 case screws on the side of the unit.
- Align the mounting brackets to the side of the units.
- Use the previously removed case screws to secure the mounting bracket to the enclosure.
- Repeat the steps for the other side of the unit.
- Mount the unit using the oval-shaped holes, on each mounting bracket. If using a drywall surface, a #6 drywall screw is recommended.

NOTE: Mounting brackets can also be inverted to mount the unit under a table or other flat surface.
natural_image
Black rectangular electronic device with mounting flanges and a small indicator light (no visible text or symbols)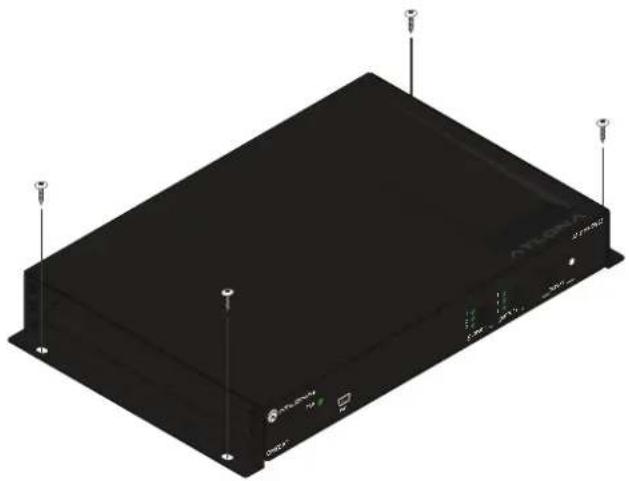
natural_image
3D rendering of a black rectangular electronic device with mounting points and indicator lights (no visible text or symbols)Connection
- Connect the sources to the input ports.
- Connect up to two HDMI displays to the outputs.
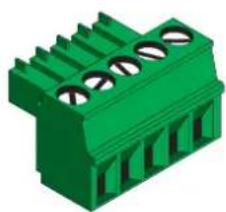
- *Optional* Connect the 2CH analog AUDIO OUT ports to a DSP, or audio amplifier (e.g. AT-GAIN-60).
natural_image
Green 3D connector pinout diagram (no text or symbols)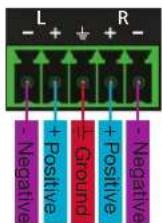
Balanced
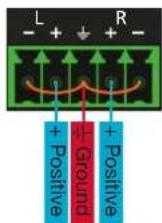
Unbalanced
Use a jumper between the negative and ground pins when using an unbalanced connection.
- *Optional* For RS-232 control, connect to the 3-pin captive screw RS-232 port.

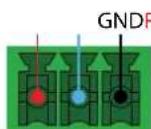
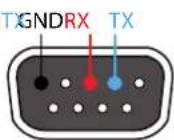
Pin out will be determined by the RS-232 cable and connect as RX (receive), TX (transmit) and 12 (Ground).
Appendix
- Connect a network switch to the LAN port, for IP control, system configuration, or Ethernet routing.
- Connect the included DC 24V power supply to the power port.
- Connect the included IEC power cord from the power supply to a compatible power outlet.
Configuration
Configuration will be done through the webGUI.
By default the unit will be set to DHCP mode and receive an IP address from the network switch. If the server doesn't allow DHCP connections, press and hold the IP MODE button for 5 seconds. The LED will blink 4 times when set to static. The PC connecting to the unit will need to be set to the same IP range as the unit.
IP address: 192.168.1.254
Subnet mask: 255.255.0.0
Gateway: 192.168.1.1
- Launch a web browser and enter the IP address in the address bar.
- The AT-OME-SW32 Login page will be displayed.
- Enter the following information on the Login page.
Login: admin
Password: Atlona
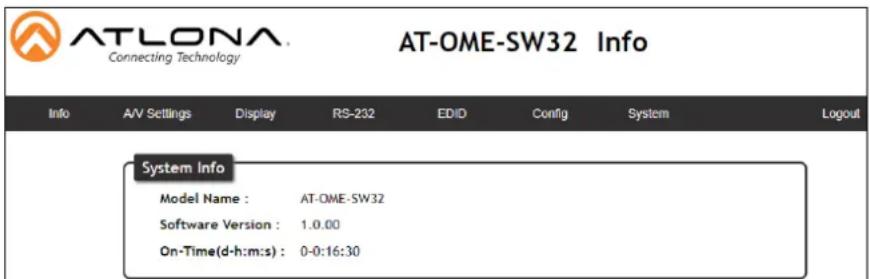
- By default, the SW32 will be in Mirrored Mode, with Auto switching enabled. Change this on the A/V Settings page to the needed mode.
a. Select A/V Settings from the top menu.
b. Select the switching mode from the drop down menu. Mirrored Mode and Matrix Mode w/Static Route are the only modes with auto switching available. Auto switching will only work on the non-static output.
- By default, the SW32 will have HDCP on auto. Change this within the A/V Settings page if needed.
a. Select A/V Settings from the top menu.
b. Select the slider next to the port to switch between auto (ON) and non-compliant (OFF) HDCP.

NOTE: Some sources flag all content as protected, by selecting HDCP off the source device may send only user created content. In some cases, the source must be configured to send content to non-HDCP devices (e.g. HDCP must be turned off within a PS4's settings to pass unprotected content).
Appendix
- The SW32 will have EDID on pass through, with Output 1 downscaling 4K signal to 1080p automatically. To change the settings on this, go to the EDID page.
a. Select EDID from the top menu.
b. Select the internal or saved EDID from the drop down menu next to the corresponding port.
c. If no EDIDs have been saved, select the display from the EDID Saved Memory drop down and press the Save button.
| EDID Selections | |||
| Connected Display Chooses the highest common resolution between source and display | |||
| Internal 3840x2160 2CH w/ HDR | 1600x900 2CH | 1280x800 2CH | |
| 1920x1200 2CH | 1440x900 2CH | 1280x720 2CH | |
| 1920x1080 2CH | 1366x768 2CH | 1024x768 2CH | |
| Saved 3 Memory slots | |||
Control
The SW32 has the ability to control the display with CEC, RS-232, and TCP/IP. Each can be triggered through the webGUI, RS-232 commands, and IP commands.
- By Default, CEC will be set as the control type.
a. Select Display from the top menu.
b. Set the Auto power on/off parameters. Defaults are set to turn the display on/off after 15 seconds of signal loss or gain and to wait 10 seconds between on and off commands being sent after an on/off event.
c. Power on and off can be triggered through the webGUI by pressing the ON or OFF.
d. Power on and off can also be triggered by an RS-232 or TCP/IP command being sent to the unit. View the AT-OME-SW32 API found at https://atlona.com/pdf/AT-OME-SW32_API.pdf to see commands.
- The SW32 will have RS-232 zone control parameters automatically set. If using RS-232 control, ensure these parameters match the controlled device.
a. Select RS-232 from the top menu.
b. Select the Baud rate, Data bit, Parity, and Stop bit from the drop down menus to match the device.
c. Press the Save button.
Appendix
d. Select Display from the top menu.
e. Set the Auto power on/off parameters. Defaults are set to turn the display on/off after 15 seconds of signal loss or gain and to wait 10 seconds between on and off commands being sent after an on/off event.
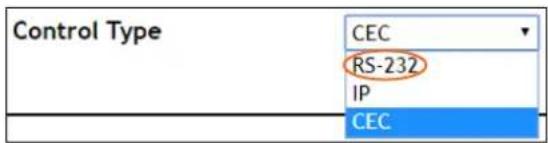
f. Select RS-232 from the Control Type drop down menu. New options will appear below the System Settings.
![R5232/IP commands Manufacturer Generic Products Generic Model Generic Display Commands [Please use \x as a delimiter for HEX values] Repeat Command Status DISABLED Times 2 ON PW 1 Send OFF PW 0 Send Volume+ VOL+ Volume- VOL- Mute MUTE Send Mute On MUTE ON Send Mute Off MUTE OFF Send Save Revert](/content/2026/05/985711/images/482707f4d2d7b39b6aa621e0c4225c842491d42d6d5f8ccc76e9e743b855bff3.jpg)
f. The commands are built in for a large variety of displays. Select the manufacturer, product type, and model from the drop down menus. Commands have been programmed into the unit for a wide range of products. If the current display is not found within the database, use generic and manually adjust the command fields.
g. Press the Save button.
![RS232/IP commands Manufacturer Panasonic Products Panasonic Projector Model Panasonic Projector Panasonic TV Panasonic TV (Copy) [Please use \x as a delimiter for HEX values]](/content/2026/05/985711/images/32a1fb8285c97cd63838d6554d711c66d1de3c39a326bdbc69799be8f5a9e6a8.jpg)
- The SW32 has the ability to control the display by TCP/IP commands. These commands can be triggered from the webGUI.
a. Select Display from the top menu.
b. Set the Auto power on/off parameters. Defaults are set to turn the display on/off after 15 seconds of signal loss or gain and to wait 10 seconds between on and off commands being sent after an on/off event.
c. Select IP from the Control Type drop down menu. New options will appear below the System Settings.
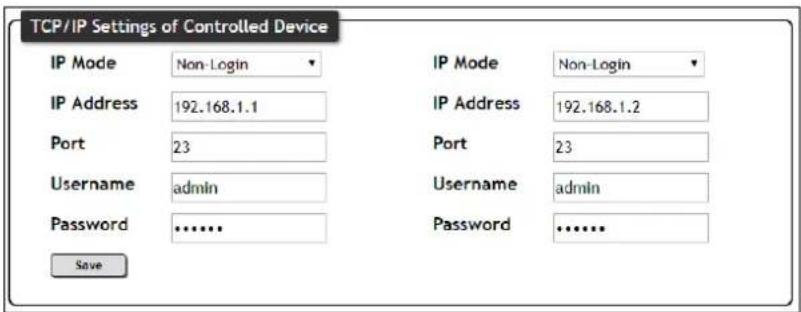

NOTE: Currently only the first column is used. The second column will be for a future feature update.
d. Set the IP information and mode to match the display's current settings. IP Mode will be default Non-Login, but can be set to login mode which will require the Username and Password to be entered in the corresponding fields to match the display's parameters. IP address and Port will be needed to send IP commands to the display.
e. The commands are built in for a large variety of displays. Select the manufacturer, product type, and model from the drop down menus. Commands have been programmed into the unit for a wide range of products. If the current display is not found within the database, use generic and manually adjust the command fields.
f. Press the Save button.
![RS232/IP commands Manufacturer Panasonic Products Panasonic Projector Model Panasonic Projector Panasonic TV Panasonic TV (Copy) [Please use \x as a delimiter for HEX values]](/content/2026/05/985711/images/2158873f9f8e964d8598e877209976bcf74cd0668589680cdcc11b28886f03f7.jpg)
Specifications
| Connectors, Controls, and Indicators | |
| HDMI IN 2 - Type A, 19-pin female | |
| HDMI OUT 2 - Type A, 19-pin female | |
| USB-C IN 1 - USB Type-C v3.1, 24-pin female, AV input (Alternate Mode) | |
| FW 1 - Mini-USB, 5-pin female | |
| AUDIO OUT 1 - 5-pin captive screw, balanced / unbalanced 2-channel | |
| RS-232 1 - 3-pin captive screw (bidirectional) | |
| LAN 1 - RJ45 | |
| DC 24V 1 - 4-pin, locking | |
| PWR indicator 1 - LED, green | |
| LINK indicator 1 - LED, amber | |
| Control Buttons: | |
| INPUT, DISPLAY, IP MODE, RESET 4 - momentary, tact-type | |
| Input Indicators: | |
| USB-C, HDMI IN 1, HDMI IN 2 3 - LED, green | |
| Video | ||
| UHD/HD/SD | 4096x2160@60*/30/25/24Hz, 3840x2160@60*/30/25/24Hz, 1080p@60/59.9/50/30/29.97/25/24/23.98Hz, 1080i@30/29.94/25Hz, 720p@60/59.94/50Hz, 576p@50Hz, 576i@50Hz, 480p@60/59.96Hz, 480i@30Hz | |
| VESA @ 60Hz | 2560x1600, 2048x1536, 1920x1200, 1680x1050, 1600x1200, 1440x900, 1400x1050, 1280x1024, 1280x800, 1366x768, 1360x768, 1152x864, 1024x768, 800x600, 640x480 | |
| Scaler(HDMI output 1 only) | IN | OUT |
| 4K @ 24 Hz | 1080p @ 24 Hz | |
| 4K @ 30 Hz | 1080p @ 30 Hz | |
| 4K @ 60 Hz, 4:2:0 | 1080p @ 60 Hz (YUV/RGB, 4:4:4) | |
| USB-C | Up to 4K/UHD @ 60Hz | |
| Color Space | YUV, RGB | |
| Chroma Subsampling | 4:4:4, 4:2:2, 4:2:0 | |
| Color Depth 8-bit, 10-bit, 12-bit | ||
| HDR | HDR10, Hybrid-Log Gamma (HLG), and Dolby® VisionTM @ up to 60Hz | |
| Audio | |
| HDMI Pass-Through Formats P | CM 2.0, LPCM 5.1, LPCM 7.1, Dolby® Digital, Dolby Digital PlusTM, Dolby TrueHD, Dolby Atmos®, DTS® Digital SurroundTM, DTS-HD Master AudioTM, and DTS:X® |
| Analog Audio Format PCM 2.0 | |
| Sample Rate | 32 kHz, 44.1 kHz, 48 kHz, 88.2 kHz, 96 kHz, 176.4 kHz, 192 kHz |
| Bit Rate | 24 Mbits/s max |
| Resolution / Distance | 4K/UHD - Feet / Meters | 1080p - Feet / Meters | HDR - Feet / Meters | |||
| HDMI IN/OUT | 15 | 5 | 30 | 10 | 10 | 3 |
| Signal | ||||
| HDMI | HDMI 2.0 | |||
| CEC Support | Yes | |||
| HDCP | 2.2 | |||
Appendix
| Temperature Fahrenheit Celsius | ||
| Operating 32 to 122 0 to 50 | ||
| Storage -4 to 140 -20 to 60 | ||
| Humidity (RH) 20% to 60%, non-condensing | ||
| Power | ||
| Operational 6.98 W | ||
| Idle 2.85 W | ||
| BTU/h 23.80 (Operational) / 9.72 (Idle) | ||
| Supply Input: 100 - 240 V AC, 50/60 HzOutput: 24 V / 2.7A DC | ||
| Dimensions Inches Millimeters | ||
| H x W x D 1.02 x 8.62 x 5.98 | 26 x 219 x 152 |
| Weight Pounds | Kilograms | |
| Device | 1.87 | 0.85 |
| Certification | ||
| Device | CE, FCC, UL | |
| Compliance | ||
| NDAA-889 | Yes | |
| TAA | Yes | |
| Warranty | ||
| 3 years | View the full warranty information here:https://atlona.com/warranty | |
- for HDMI and USB-C with HDMI Outputs
- Version Information
- Sales, Marketing, and Customer Support
- Main Office
- International Headquarters
- Operating Notes
- Warranty
- Important Safety Information
- CAUTION
- FCC Compliance
- Copyright, Trademark, and Registration
- Table of Contents
- Introduction
- Features
- Package Contents
- Panel Description
- PWR LED
- FW port
- OUTPUT 1 & OUTPUT 2
- DISPLAY button and LED
- IP MODE button and LED
- RESET button and LED
- INPUT
- OUTPUT
- AUDIO OUT
- RS-232
- LAN
- DC 24V
- Installation
- Captive Screw Connections
- Mounting Instructions
- Connection Instructions
- IP Modes
- DHCP
- Static
- WebGUI
- Audio/Video Settings
- Switching Mode
- Auto Switch
- Audio
- HDCP Settings
- Display
- CEC
- System Settings
- RS-232 / IP Commands
- RS-232
- RS-232 Parameter Setting
- EDID
- Config
- Users
- System
- Network
- Appendix
- Configuration and Setup Guide
- Connection
- Configuration
- Control
Brand : Atlona
Model : AT-OME-SW32
Category : Network switch