BG-N22 - Uncategorized Vello - Free user manual and instructions
Find the device manual for free BG-N22 Vello in PDF.


| Product Type | Battery Grip |
| Model | BG-N22 |
| Brand | Vello |
| Compatible Cameras | Nikon D7000, D7100, D7200 (and similar models) |
| Power Source | 6x AA batteries or 1x EN-EL15 rechargeable Li-ion battery |
| Dimensions (W x H x D) | 130 mm x 110 mm x 70 mm |
| Weight | Approximately 300 g (without batteries) |
| Material | High-quality plastic and metal |
| Functions | Vertical shutter release, AE lock, AF start, multi-selector |
| Mounting | Attaches via camera's battery compartment and tripod mount |
| Maintenance | Wipe with a soft, dry cloth; avoid liquids |
| Safety Precautions | Do not disassemble; keep away from water and extreme temperatures |
| Spare Parts | Contact Vello support for battery covers or screws |
| Warranty | 1-year limited warranty |
Frequently Asked Questions - BG-N22 Vello
User questions about BG-N22 Vello
0 question about this device. Answer the ones you know or ask your own.
Ask a new question about this device
Download the instructions for your Uncategorized in PDF format for free! Find your manual BG-N22 - Vello and take your electronic device back in hand. On this page are published all the documents necessary for the use of your device. BG-N22 by Vello.
USER MANUAL BG-N22 Vello
BG-N22
BATTERY GRIP
Designed for the
Nikon Z 6II and Z 7II
Mirrorless Cameras

VELLO®
Thank you for choosing Vello
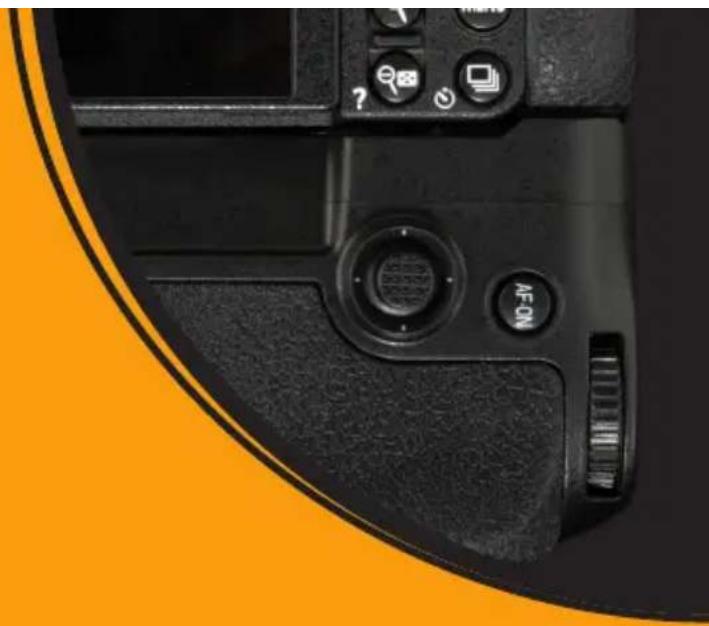
The Vello BG-N22 battery grip offers extended shooting time and comfort when shooting in a vertical (portrait) orientation. The grip is compatible with the Nikon Z 6ll and Z 7ll mirrorless cameras, and it accepts up to two Nikon EN-EL15c/EN-EL15b rechargeable batteries. You can charge the batteries inside the grip without removing them, and hot swap a battery while shooting video. The BG-N22 offers an alternate shutter release, multi-selector, and additional buttons, making the grip ideal for shooting in portrait mode. The convenient control lock switch disables all the controls, preventing unwanted exposures.
natural_image
Close-up of a black DSLR camera's side panel showing adjustment knobs and a circular dial (no readable text or symbols)Please read through this entire manual before using the BG-N22 battery grip.
Precautions
- The BG-N22 should be used only with the compatible devices specified in this manual.
- Use only with the batteries and battery holders recommended in this manual.
- If you notice smoke, noise, or an unusual smell from the battery pack, discontinue use immediately. Remove the batteries, and take the device to a Vello authorized reseller.
-
The battery level may not display properly if batteries are installed before mounting the grip.
-
Remove batteries from the grip when not in use.
- Do not attempt to disassemble.
- Avoid exposing this product to water or extreme humidity, and keep it in a cool, dry place.
- Keep out of reach of children.
- All images are for illustrative purposes only.
Overview
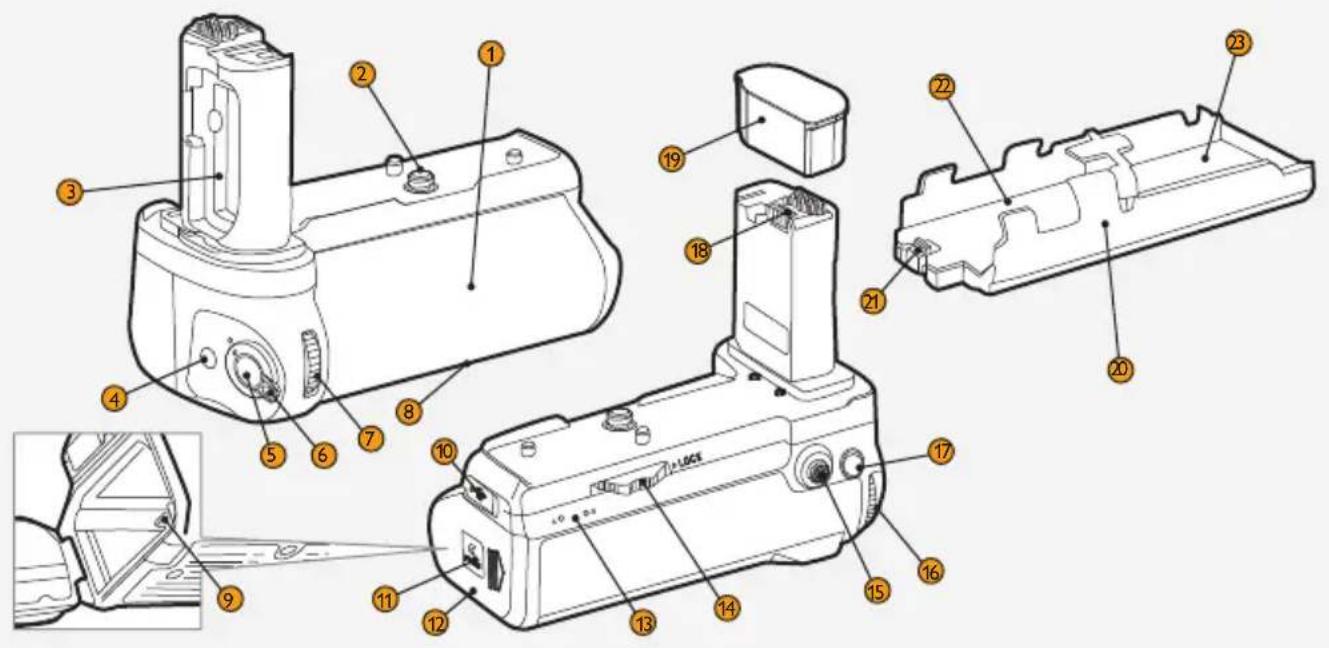
① Nonslip grip
② Mounting screw
③ Camera battery door holder
④ Fn button
⑤ Shutter release button
6 Control lock
⑦ Sub-command dial
⑧ Tripod socket
⑨ Battery tray release
10 USB-C™ port (charging only)
11 Door release button
⑫ Battery compartment door
13 Battery status LEDs
14 Rear thumbwheel
15 Multi selector
16 Main command dial
17 AF-ON
18 Power contacts
19 Contact cover
20 Battery tray
21 Battery A release
② Battery A compartment
23 Battery B compartment
Attaching the Battery Grip
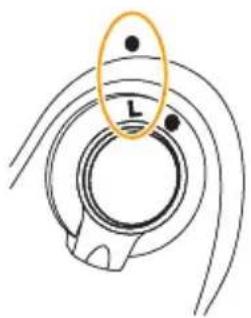
- Ensure that the camera power is turned off, and the grip's control lock is in the locked position.
natural_image
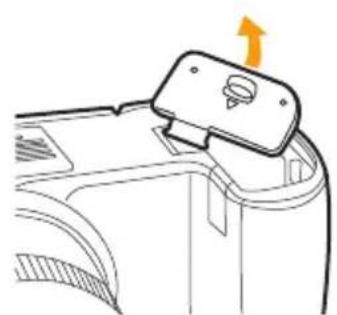
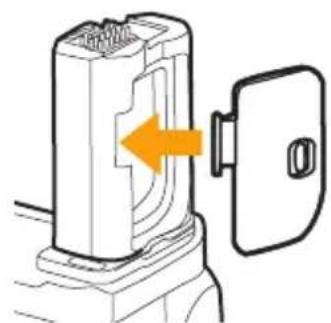
Diagram of a device's top panel with an orange arrow indicating direction (no text or symbols)- Remove the camera's battery chamber door. Pull gently at a 45° angle until the door detaches.
natural_image
Diagram of a device with a highlighted switch and internal components (no text or symbols)- Slide the chamber door into the BG-N22's camera battery door holder for safekeeping.
natural_image
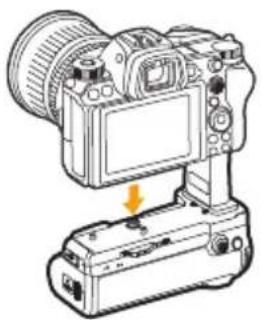
Line drawing of a DSLR camera with an attached case, showing no text or symbols- Insert the battery grip's power contacts into the camera's battery chamber.
natural_image
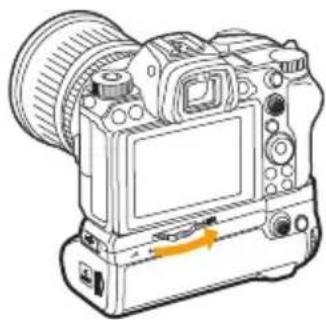
Line drawing of a DSLR camera with lens and screen (no text or symbols)- Rotate the rear thumbwheel counterclockwise until the grip is secured to the camera.
Inserting the Batteries
- Turn off the camera's power, and make sure the grip's control lock switch is in the locked position.
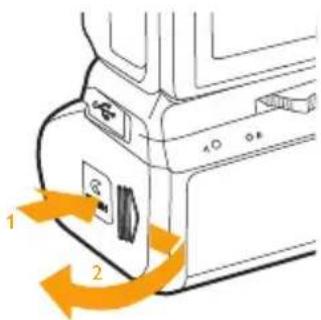
- Press the battery door release button and slide the battery compartment door open.
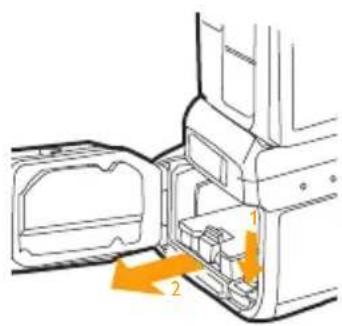
- Press the battery tray release, and slide out the battery tray.
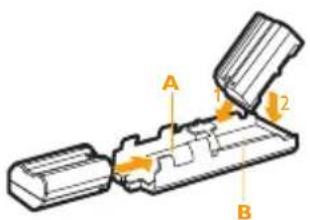
- Insert a battery into compartment A until it clicks in place. Insert a battery into compartment B, pushing inward and down into the compartment.
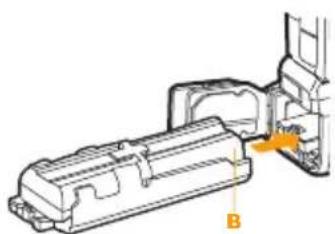
natural_image
Technical line drawing of a mechanical component with labeled part B (no text or symbols present)- Insert the battery tray with compartment B first.
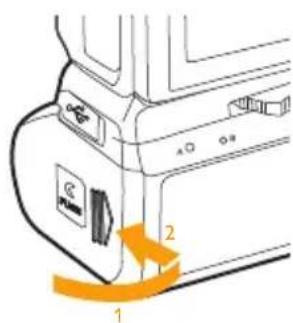
- Close the compartment door, and slide it to the front of the grip until it clicks.
natural_image
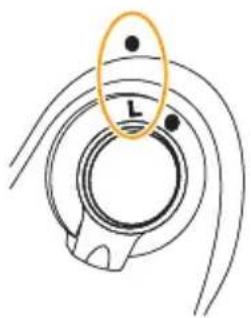
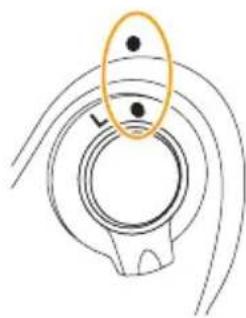
Diagram of a mechanical component with concentric rings and a highlighted circular feature (no text or symbols)- Turn on the camera power, and make sure the grip's control lock switch is in the unlocked position.
Note: When removing the grip, turn off the camera's power, lock the grip's control lock switch, and then remove the batteries.
Removing the Batteries
natural_image
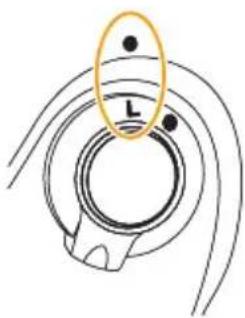
Diagram of a mechanical component with concentric rings and a labeled point 'L' (no text or symbols beyond the label)- Turn off the camera's power, and make sure the grip's control lock switch is in the locked position.
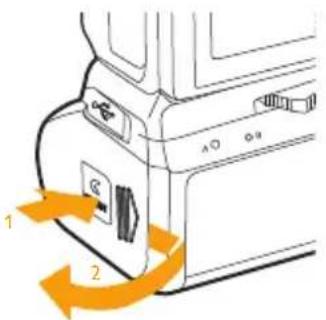
- Press the battery door release button and slide the battery compartment door open.
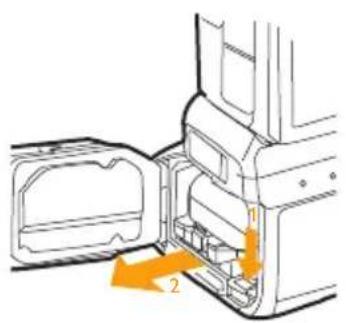
- Press the battery tray release, and slide out the battery tray.
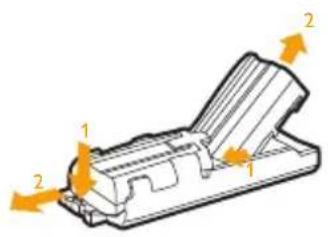
- Press battery compartment A's release and slide the battery out. For battery B, press the battery in and lift it out of the compartment.
Hot Swapping Battery A
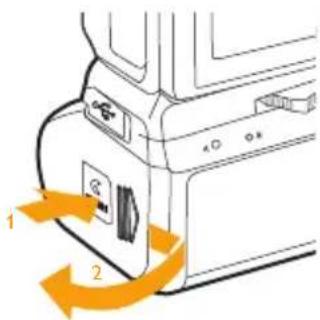
If both batteries are installed in the grip, you swap out battery A without turning off the camera.
- Press the door release button on the battery compartment and slide the door to the rear of the grip, following the arrow. Open the compartment door.
natural_image
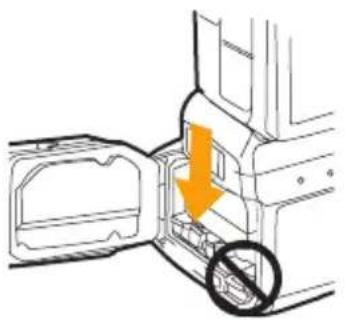
Diagram showing a door opening with an orange arrow and a prohibition symbol (no text or labels)- Press battery compartment A's release and slide the battery out of the tray. Be careful not to press the battery tray's release while removing battery A.
In-Grip Battery Charging
You can charge the batteries without removing them from the grip, using the grip's USB Type-C port (cable not included) and a USB power source. Make sure you turn off the camera to begin charging. If there are two batteries in the grip, the one in compartment B will charge first.
The LEDs will glow orange when charging, and turn off when fully charged.
Specifications
| Power source | Up to two Nikon EN-EL15c/EN-EL15b/EN-EL15a/EN-EL15 rechargeable Li-ion batteriesNikon EP-5B Power Supply Connector with Nikon EH-5d AC Adapter |
| In-grip charging compatibility | Nikon EN-EL15c/EN-EL15b |
| USB port | USB-C |
| Operating temperature | 32°F to 104°F (0°C to 40°C) |
| Dimensions (H × W × D) | 2.2 × 5.5 × 2.9 in. (5.6 × 13.9 × 7.3 cm) |
| Weight 8.9 oz. (254 g) without batteries |
ONE-YEAR LIMITED WARRANTY
This VELLO product is warranted to the original purchaser to be free from defects in materials and workmanship under normal consumer use for a period of one (1) year from the original purchase date or thirty (30) days after replacement, whichever occurs later. The warranty provider's responsibility with respect to this limited warranty shall be limited solely to repair or replacement, at the provider's discretion, of any product that fails during normal use of this product in its intended manner and in its intended environment. Inoperability of the product or part(s) shall be determined by the warranty provider. If the product has been discontinued, the warranty provider reserves the right to replace it with a model of equivalent quality and function.
This warranty does not cover damage or defect caused by misuse, neglect, accident, alteration, abuse, improper installation or maintenance. EXCEPT AS PROVIDED HEREIN, THE WARRANTY PROVIDER MAKES NEITHER ANY EXPRESS WARRANTIES NOR ANY IMPLIED WARRANTIES, INCLUDING BUT NOT LIMITED TO ANY IMPLIED WARRANTY OF MERCHANTABILITY OR FITNESS FOR A PARTICULAR PURPOSE. This warranty provides you with specific legal rights, and you may also have additional rights that vary from state to state.
To obtain warranty coverage, contact the Vello Customer Service Department to obtain a return merchandise authorization (“RMA”) number, and return the defective product to Vello along with the RMA number and proof of purchase. Shipment of the defective product is at the purchaser’s own risk and expense.
For more information or to arrange service, visit www.vellogear.com or call Customer Service at 212-594-2353.
Product warranty provided by the Gradus Group.
www.gradusgroup.com
VELLO is a registered trademark of the Gradus Group. © 2023 Gradus Group LLC. All Rights Reserved.

VELLO®
www.vellogear.com

VELLO*
A Gradus Group Brand
All other trademarks are the property of their respective owners
Brand : Vello
Model : BG-N22
Category : Uncategorized