T27032 - Sandwich Toaster Tower - Free user manual and instructions
Find the device manual for free T27032 Tower in PDF.


| Product Type | Deep Fill Snack Maker (3-in-1) |
| Model | T27032 (All Colour Variants) |
| Rated Voltage | 220-240V~ |
| Frequency | 50/60Hz |
| Power Consumption | 900W |
| Cooking Functions | Sandwich, Panini, Waffle |
| Plate Sets Included | 3 sets: Waffle, Panini, Sandwich |
| Plate Material | Non-stick coating |
| Removable Plates | Yes |
| Dishwasher Safe | Yes (plates only) |
| Indicator Lights | Power (red), Ready (green) |
| Safety Features | Locking latch, cool touch handle, automatic thermostat |
| Handle Type | Cool touch |
| Earthing Required | Yes (Class I) |
| Guarantee | 12 months |
| Recommended Cooking Time | 3-6 minutes per sandwich |
| Preheating Time | Approximately 5 minutes |
| Cleaning Method | Wipe exterior with damp cloth; remove plates for dishwasher or hand wash |
| User-Serviceable Parts | None; refer to qualified personnel for repairs |
Frequently Asked Questions - T27032 Tower
User questions about T27032 Tower
0 question about this device. Answer the ones you know or ask your own.
Ask a new question about this device
Download the instructions for your Sandwich Toaster in PDF format for free! Find your manual T27032 - Tower and take your electronic device back in hand. On this page are published all the documents necessary for the use of your device. T27032 by Tower.
USER MANUAL T27032 Tower
over 100 YEARS of quality
T27032 All Colour Variants
3-IN-1
DEEP FILL SNACK MAKER
SANDWICH | PANINI | WAFFLE
EXTRA LARGE
COOKING PLATES FOR LARGER, DEEPER, EXTRA FILLED SNACKS
FAST HEAT UP
900W FOR QUICK AND EFFICIENT GRILLING
3 NON-STICK REMOVABLE PLATES EASY CLEAN DISHWASHER SAFE
natural_image
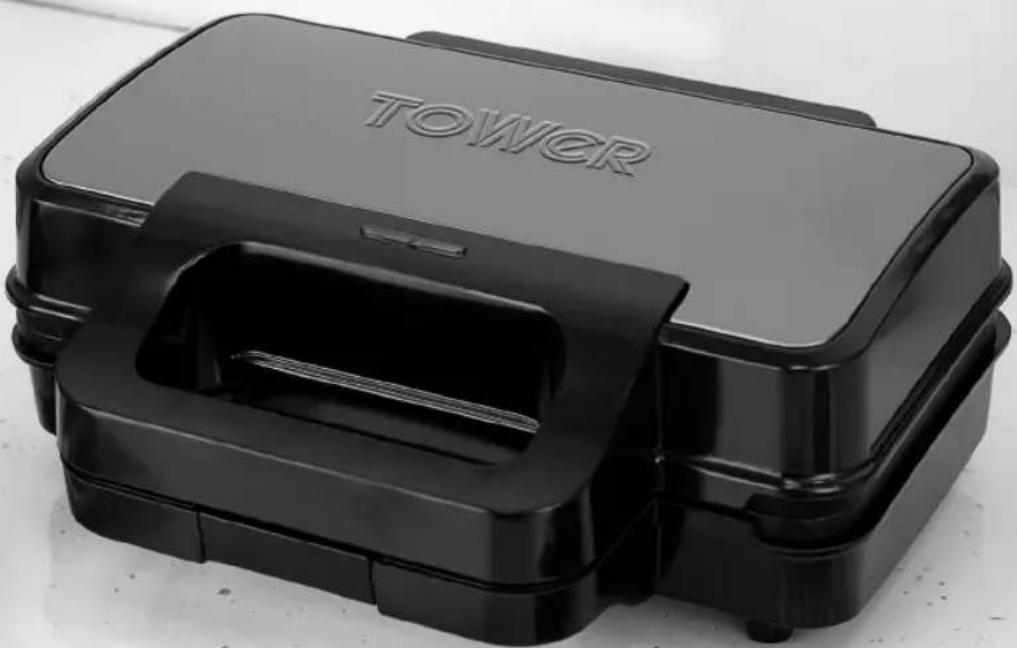
Black TOWER portable device with open lid and handle (no visible text or symbols on body)
SAFETY AND INSTRUCTION MANUAL
PLEASE READ CAREFULLY
Specifications:
This box contains:
Instruction Manual
2 Slice Deep Snack Maker
3 x Sets Non-stick plates:
(Waffle Plates)
(Panini Plates)
(Sandwich Plates)
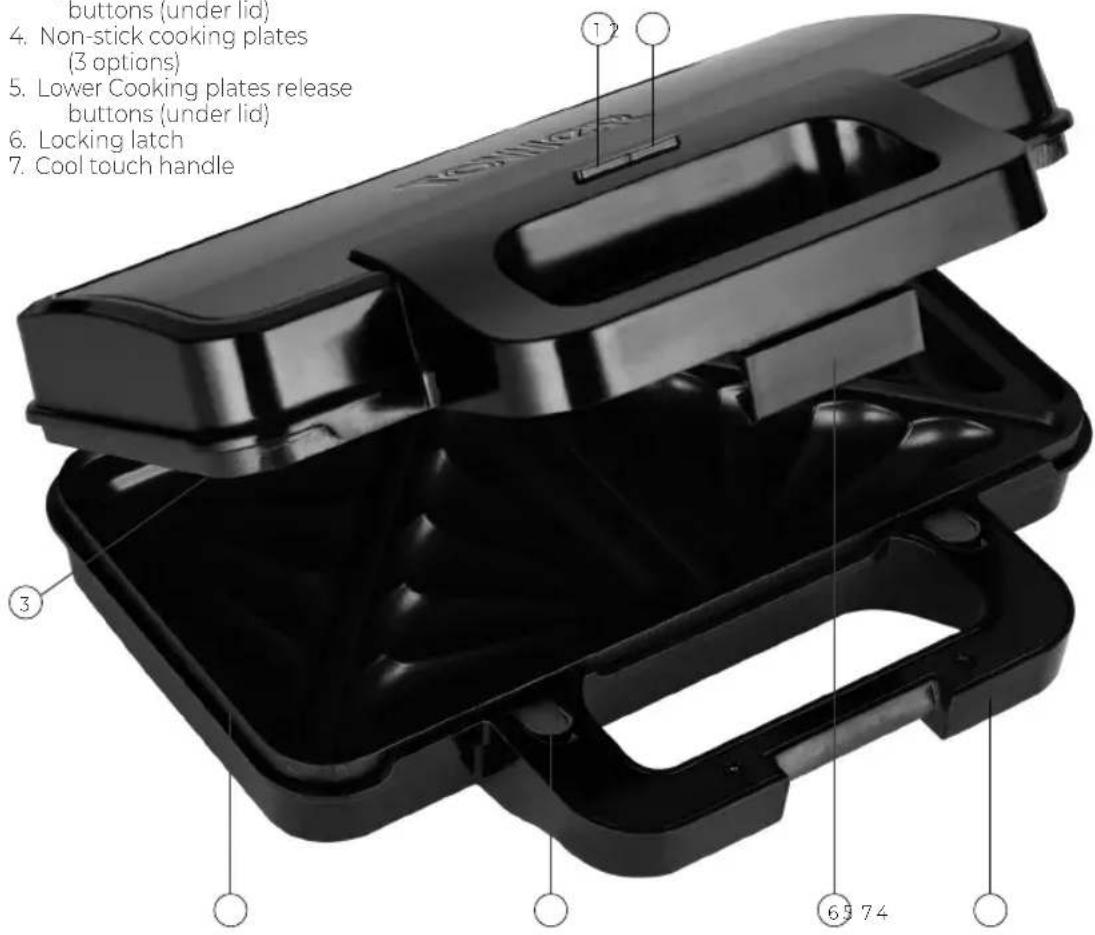
- Power light
- Ready light
- Upper Cooking plates release buttons (under lid)
- Non-stick cooking plates (3 options)
- Lower Cooking plates release buttons (under lid)
- Locking latch
- Cool touch handle
Technical Data:
Description: Deep Fill Snack Maker
Model: T27032 All Colour Variants
Rated Voltage: 220-240V\~
Frequency: 50/60Hz
Power Consumption: 900W
Wiring Safety for UK Use Only
IMPORTANT
As the colours in the mains lead of this appliance may not correspond with the coloured markings identifying the terminals in your plug, please proceed as follows:
The wires in the mains lead are labelled in accordance with the following code:
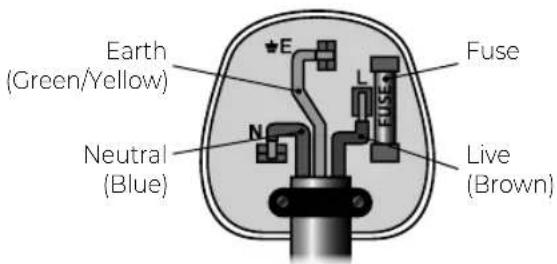
Blue neutral [N] Brown live [L] Green/Yellow [EARTH]
Plug Fitting Details (Where Applicable).
The wire labelled blue is the neutral and must be connected to the terminal marked [N].
The wire labelled brown is the live wire and must be connected to the terminal marked [L].
The wire labelled green/yellow must be connected to the terminal marked with the letter [E].
On no account must either the brown or the blue wire be connected to the [EARTH] terminal.
Always ensure that the cord grip is fastened correctly.
The plug must be fitted with a fuse of the same rating already fitted and conforming to BS 1362 and be ASTA approved.
If in doubt consult a qualified electrician who will be pleased to do this for you.
Non-Rewireable Mains Plug.
If your appliance is supplied with a non-rewireable plug fitted to the mains lead and should the fuse need replacing, you must use an ASTA approved one (conforming to BS 1362 of the same rating).
If in doubt, consult a qualified electrician who will be pleased to do this for you.
If you need to remove the plug - disconnect it from the mains - then cut it off of the mains lead and immediately dispose of it in a safe manner. Never attempt to reuse the plug or insert it into a socket outlet as there is a danger of an electric shock.
WARNING:
This appliance MUST be earthed!
DISPOSAL OF THE UNIT
Appliances bearing the symbol shown here may not be disposed of in domestic rubbish. You are required to dispose of old electrical and electronic appliances like this separately.
Please visit www.recycle-more.co.uk or www.recyclenow.co.uk for access to information about the recycling of electrical items.
Please visit www.weeeireland.ie for access to information about the recycling of electrical items purchased in Ireland.
The WEEE directive, introduced in August 2006, states that all electrical items must be recycled, rather than taken to landfill.
Please arrange to take this appliance to your local Civic Amenity site for recycling, once it has reached the end of its life.
Important Safety Information:
Please read these notes carefully BEFORE using your Tower appliance
- Check that the voltage of the main circuit corresponds with the rating of the appliance before operating.
- If the supply cord or appliance is damaged, stop using the appliance immediately and seek advice from the manufacturer, its service agent or a similarly qualified person.
- Do not let the cord hang over the edge of a table or counter or let it come into contact with any hot surfaces.
- Do not carry the appliance by the power cord.
- Do not use any extension cord with this appliance.
- Do not pull the plug out by the cord as this may damage the plug and/or the cable.
- Switch off at the wall socket then remove the plug from the socket when not in use or before cleaning.
- Close supervision is necessary when any appliance is used by or near children.
• Children should not play with the appliance.
- This appliance can be used by children aged from 8 years and above and persons with reduced physical, sensory or mental capabilities or lack of experience and knowledge if they have been given supervision or instruction concerning use of the appliance in a safe way and understand the hazards involved.
• Cleaning and user maintenance should not be undertaken by children without supervision.
• Take care when any appliance is used near pets.
- Do not use this product for anything other than its intended use.
• This appliance is for household use only.
- Please ensure that the appliance is used on a stable, level, and heat resistant surface.
- Do not immerse cords, plugs or any part of the appliance in water or any other liquid.
- Do not use the appliance outdoors.
• High temperatures are present during operation. - Only touch the handles on the unit.
- This appliance can produce steam as part of the cooking process. Avoid contact with steam escaping from the appliance.
- The appliance is not intended to be operated by means of an external timer or separate remote control system.
• Extreme caution must be used when moving an appliance that produces hot oil or other hot liquids from the cooking process. -
Bread, oil, and other foods may burn. Don't use the Sandwich Maker near or below curtains or other combustible materials, and watch it while in use.
-
Don't wrap food in plastic film, polythene bags, or metal foil. You'll damage the Sandwich Maker, and you may cause a fire hazard.
- Keep the Sandwich Maker and the cable away from hotplates, hobs or burners.
- Don't use the Sandwich Maker for any purpose other than toasting sandwiches/making toasties.
• In the unlikely event the appliance develops a fault, stop using it immediately and seek advice from the Customer Support Team: +44 (0) 333 220 6066
Before First Use:
Read all instructions and safety information carefully before first use. Please retain this information for future reference.
- Carefully unpack the appliance. Remove all packaging materials.
- Place the appliance on a flat, level surface. Open the snack maker lid.
- Wipe the cooking plates with a damp cloth so that they are clean.
Note: Use a small amount of cooking oil to season the cooking plates, and wipe off any excess with a dry cloth. This only needs to be done once.
- Wipe the outside of the housing with a soft damp cloth. NEVER immerse the power cord and plug in water or any other liquid.
- Close the appliance.
- Plug into the wall outlet and pre-heat. The appliance is ready for use once the green indicator goes out. This will take approximately 5 minutes.
Note: During this initial phase some smoke may be emitted from the snack maker. This is normal.
Preparing sandwiches:
- Butter the bread on the outer surfaces and place desired fillings within.
- Lift safety catch and open the snack maker. Place sandwiches on the heating plates.
- Close the casing to ensure that the sandwich is placed evenly.
- Lock the safety catch.
- Normal cooking times will be 3-6 minutes for each sandwich. The red light will turn on and off, as the thermostat keeps the snack maker at the proper baking temperature.
CAUTION! The appliance is not to be operated in the open position.
CAUTION! The cooking surface is hot; handle with care.
Serving your sandwiches:
- Remove the sandwiches from the heating plates with a plastic or wooden spatula.
- Be careful with your sandwiches, the fillings will be quite hot.
- Allow to cool for a few minutes before enjoying.
Heating a Panini:
- Place the panini plates onto the snack maker and turn on the unit. Once the green light goes out the appliance is ready to cook.
- Prepare your Panini with your chosen ingredients and turn on the unit. Close the lid while the plates heat.
- Once the green indicator goes out, open the snack maker and place the Panini into the centre.
- Press the top down with a little pressure upon the Panini and then allow it to cook for 3-6 minutes according to your preference.
Making Waffles:
- Place the waffle plates onto the snack maker and turn on the unit. Once the green indicator light goes out the appliance is ready to cook.
- Once you have prepared your favourite waffle mix and it is at the correct consistency, pour slowly and evenly, making sure liquid doesn't overflow, into the waffle plates.
- Waffle cooking times will vary according to the consistency of your mix, we recommend no less than 2 minutes, and that cooking until golden brown offers an ideal result.
- Once cooked to your satisfaction, carefully remove with tongs and add your favourite toppings.
Tips:
• Always preheat your snack maker fully.
- Ensure the lid of the snack maker is down whilst preheating.
- Butter, margarine and olive oil can all be used to coat the outside of your bread.
• Light/Low fat versions of margarines are not recommended as they do not withstand heat.
- Fillings: Try to use canned or pre-cooked fruit as fresh fruit may give off excessive juices when heated. Be careful when biting into toasted sandwiches containing fillings such as cheese and tomato or jam as they retain heat and can burn if eaten too quickly.
- Processed cheeses tend to 'run' under higher temperatures.
- Pat moist ingredients (such as sliced tomatoes and fruits) dry before adding to your sandwich.
- Allow hot sandwiches to rest for 2-3 minutes after removing them from the snack maker. This helps the fillings cool slightly and means they will run less.
Inserting and Removing the Cooking Plates:
- Insert the cooking plate into the underside of the lid. Place the 2 wide pins into the hinge slots. Push the locking pin at the top right of the plate in to the aligned hole in the lid, pressing to ensure that the plate clicks into place.
- Insert the cooking plate into the bottom of the unit. Place the 2 wide pins into the hinge slots. Push the locking pin at the bottom left of the plate in to the aligned hole in the base, pressing to ensure that the plate clicks into place.
- To remove the plates, open the lid and press the corresponding plate release buttons on the sides of the unit to release the plates.
Note: Always unplug the appliance and allow it to cool before removing cooking plates.
Troubleshooting:
| Questions Answers | |
| Do the indicator lights show when my sandwich is done? | No. The indicator lights only indicate power, and that the snack maker has reached the correct temperature. Ensure you do not leave the snack maker unattended during use. |
| How long will it take to make a toasted sandwich? | We recommend toasting your sandwiches for around five minutes. Generally the sandwiches will be ready approximately 2-4 minutes after adding them to the snack maker, depending on your preference. |
| Why are my fillings spilling over during cooking? | You may have added too many fillings to your sandwiches. Ensure that no fillings are 'overflowing' when you add the sandwich to the snack maker. Fillings such as cheese and jam reach very high temperatures when heated and can spill over. |
Cleaning & Care:
- This appliance requires little maintenance. It contains no user serviceable parts. Do not try to repair it yourself. Refer it to qualified personnel if servicing needed. Always unplug this snack maker from power source and wait until it cool down before cleaning.
- There is no need to take your snack maker apart for cleaning. Dry with a paper towel to absorb excess oil. Brush crumbs from the grooves, and wipe with damp cloth and mild soap.
- The cooking plates can be removed and washed in warm soapy water or placed in a dishwasher.
- Never immerse the unit in water or any other liquid.
- Avoid using abrasive cleaners, scratching or sharp utensils, as they will damage the non-stick surface.
- Do not use cleansers or oven cleaners on the heating plates.
• To clean handles and other parts, use a damp cloth with mild soap. Should any filling be difficult to remove, pour a little cooking oil onto the plate and wipe off after 5 minutes, when the filling has softened.
IMPORTANT! After cleaning, allow the appliance to dry fully before using again.
Do not use the appliance if damp. Ensure the appliance is completely clean and dry before storing.
Storage:
To store your appliance:
-
Unplug the power cord from the power outlet and clean as above.
-
Allow the appliance to dry fully.
-
Store on a flat, dry, level surface, preferably in its original packaging, and out of reach of children.
Fillings:
Savoury:
Ham, Cheese and Tomato
Tuna Melt - Tuna, Mayonnaise and Cheese
Roast Pork and Apple Sauce
• Turkey, Stuffing and Cranberry
• Cheese, Beans and Sausage
BLT - Bacon, Lettuce and Tomato
Brie, Cranberry Sauce and Rocket
Sweet:
• Chocolate Spread and Banana
• Toffee and Apple
Cherry Pie Filling
• Apple and Blackcurrant
• Apple and Sultanas
Weights & Measures
Check these charts for basic imperial to metric conversions of weights.
| Metric Imperial US cups | |
| 250ml 8 floz 1 cup | |
| 180ml 6 floz 3/4 cup | |
| 150ml 5 floz 2/3 cup | |
| 120ml 4 floz 1/2 cup | |
| 75ml 2 1/2 floz 1/3 cup | |
| 60ml 2 floz 1/4 cup | |
| 30ml 1 floz 1/8 cup | |
| 15ml 1/2 floz 1 tablespoon |
| Imperial | Metric |
| 1/2 oz | 15g |
| 1 oz | 30g |
| 2 oz | 60g |
| 3 oz | 90g |
| 4 oz | 110g |
| 5 oz | 140g |
| 6 oz | 170g |
| 7 oz | 200g |
| 8 oz | 225g |
| 9 oz | 255g |
| 10 oz | 280g |
| 11 oz | 310g |
| 12 oz | 340g |
| 13 oz | 370g |
| 14 oz | 400g |
| 15 oz | 425g |
| 1 lb | 450g |
Food Allergies
Important Note: Some of the recipes contained in this document may contain nuts and/or other allergens. Please be careful when making any of our sample recipes that you ARE NOT allergic to any of the ingredients. For more information on allergies, please visit the Food Standards Agency's website at: www.food.gov.uk
Prosciutto and Fresh Mozzarella
Makes 2 sandwiches
Ingredients
4 slices of bread 6 slices of prosciutto 55g fresh mozzarella (approximately 2 to 3 slices per sandwich)
Method
- Plug in your Sandwich Maker to preheat.
- Place two slices of bread on your work surface and butter them.
- Turn the bread butter side down and evenly place the prosciutto and mozzarella slices on to the bread.
- Butter the remaining two slices of bread and place on top, butter side up, creating your sandwich.
- Once the sandwich maker has preheated, place the sandwiches in the heated plates and close the lid.
- Toast for approximately 5 minutes, or until the bread is evenly toasted.
- Cut the sandwiches along the perforated edges and serve.
Smoked Salmon and Cream Cheese
Makes 2 sandwiches
Ingredients
4 slices of bread Smoked salmon Cream cheese
Method
- Plug in your Sandwich Maker to preheat.
- Place two slices of bread on your work surface and butter them.
- Turn the bread butter side down and evenly spread the cream cheese and place the smoked salmon on to the bread.
- Butter the remaining two slices of bread and place on top, butter side up, creating your sandwich.
- Once the sandwich maker has preheated, place the sandwiches in the heated plates and close the lid.
- Toast for approximately 5 minutes, or until the bread is evenly toasted.
- Cut the sandwiches along the perforated edges and serve.
Traditional Grilled Cheese
Makes 2 sandwiches
Ingredients
4 slices of bread 4-6 slices of Cheddar cheese (or your favourite cheese)
Method
- Plug in your Sandwich Maker to preheat.
- Place two slices of bread on your work surface and butter them.
- Turn the bread butter side down and add the slices of cheese.
- Butter the remaining two slices of bread and place on top, butter side up, creating your sandwich.
- Once the sandwich maker has preheated, place the sandwiches in the heated plates and close the lid.
- Toast for approximately 5 minutes, or until the bread is evenly toasted.
- Cut the sandwiches along the perforated edges and serve.
Breakfast Sandwich
Makes 2 sandwiches
Ingredients
4 slices of bread 1 tomato, sliced 4 bacon strips 2 thick slices of cheese
Method
- Pre-cook your bacon.
- Plug in your Sandwich Maker to preheat.
- Place two slices of bread on your work surface and butter them.
- Turn the bread butter side down and place the cooked bacon, tomato slices and cheese inside.
- Butter the remaining two slices of bread and place on top, butter side up, creating your sandwich.
- Once the sandwich maker has preheated, place the sandwiches in the heated plates and close the lid.
- Toast for approximately 5 minutes, or until the bread is evenly toasted.
- Cut the sandwiches along the perforated edges and serve.
Your Own Recipes:
TOWER®
over 100 YEARS of quality
thank you!
We hope you enjoy your appliance for many years.
This product is guaranteed for 12 months from the date of original purchase. If any defect arises due to faulty materials of workmanship, the faulty products must be returned to the place of purchase.
Refund or replacement is at the discretion of the retailer.
The Following Conditions Apply:
The product must be returned to the retailer with proof of purchase or a receipt. The product must be installed and used in accordance with the instructions contained in this instruction guide.
It must be used only for domestic purposes.
It does not cover wear and tear, damage, misuse or consumable parts.
Tower has limited liability for incidental or consequential loss or damage.
This guarantee is valid in the UK and Eire only.

1220.VI
- 3-IN-1
- DEEP FILL SNACK MAKER
- Specifications:
- This box contains:
- Technical Data:
- IMPORTANT
- Plug Fitting Details (Where Applicable).
- Non-Rewireable Mains Plug.
- WARNING:
- DISPOSAL OF THE UNIT
- Important Safety Information:
- Before First Use:
- Preparing sandwiches:
- Serving your sandwiches:
- Heating a Panini:
- Making Waffles:
- Tips:
- Inserting and Removing the Cooking Plates:
- Cleaning & Care:
- Storage:
- Fillings:
- Sweet:
- Weights & Measures
- Food Allergies
- Prosciutto and Fresh Mozzarella
- Ingredients
- Method
- Smoked Salmon and Cream Cheese
- Traditional Grilled Cheese
- Breakfast Sandwich
- TOWER®
- thank you!
- The Following Conditions Apply:
Brand : Tower
Model : T27032
Category : Sandwich Toaster