USER MANUAL TrueSimmer KFX3000X Kucht

WE TRANSFORM A SIMPLE KITCHEN INTO A PRO ONE.
THIS IS WHY WE CARE ABOUT MAKING VERY HIGH PERFORMANCE
RANGES AND HOODS, TO MAKE YOU FEEL LIKE A PRO AND STYLISH COOKER.

FOR MORE DETAILS AND INFORMATION, PLEASE VISIT OUR WEBSITE WWW.KUCHT.COM

INSTALLATION GUIDE AND USER MANUAL
WELCOME TO THE KUCHT FAMILY
This manual contains instructions on how to properly install and set up your new range, as well as insights into many of the unique features that our product offers. Please keep this manual for future reference, as it contains the answers to questions that you might have as you begin to cook.
! WARNING
If the information in this manual is not followed exactly, a fire or an explosion may result causing property damage, personal injury or even death.
Do not store or use gasoline, liquid propane cylinder or other flammable vapors and liquids in the vicinity of this appliance.
What to do if you smell gas?
Do not try to light any appliance.
Do not touch any electrical switch.
Do not use any phone in your residence.
Immediately call your gas supplier from a neighbor's phone. Follow the gas supplier's instructions.
If you cannot reach your gas supplier, call the fire department.
For installation and service of your range product, it must be performed by a licensed installer, an approved service agency or your gas supplier.
CA PROPOSITION 65 The burning of gas cooking fuel generates some chemical by-products which are on the list of substances known by the state of California to cause cancer, birth defects and/or reproductive harm. To minimize exposure to these substances, always operate this unit according to the Owners Manual, ensuring to provide proper ventilation.
INSTALLATION GUIDE AND USER MANUAL
Warranty and Product Registration
Kucht is not responsible for incidental or consequential damages. Under no circumstances will Kucht's liability exceed the cost that you paid for the product. Some provinces/states do not allow the exclusion or limitation of incidental or consequential damages, so the above limitation or exclusion may not apply to you.
This warranty gives you specific legal rights, and you may also have other rights that vary from state to state.
Remember to register your product at www.kucht.com

30
Contents
Safety Instructions 4-5
Unpackage instruction 6
Safety Instructions 7
Installation Instructions 8-17
Cooktop Operation 18\~20
Oven Operation 21-22
Broiler Operation 23
Griddle Operation 24
Care & Cleaning 25-26
Troubleshooting 27
Warranty & Product Registration 28-30
INSTALLATION GUIDE AND USER MANUAL
SAFETY INSTRUCTIONS
Definitions
This is a safety alert symbol. It will alert you to potential personal or property safety hazards. Obey all safety messages to avoid any property damage, personal injury or death.

WARNING indicates a potentially hazardous situation which, if not avoided, could result in serious injury or death.
CAUTION
CAUTION indicates a moderate hazardous situation which, if not avoided, could result in minor or moderate injury.
CAUTION
CAUTION – when used without the safety alert symbol, indicates a potentially hazardous situation which, if not avoided, could result in property damage.
IMPORTANT
IMPORTANT used for installation, operation and maintenance information that are not related to safety.
If the information in this manual is not followed exactly, a fire or an explosion may result causing property damage, personal injury or even death.
Do not store or use gasoline, liquid propane cylinder or other flammable vapors and liquids in the vicinity of this appliance.
Save this manual for future references.
To Arrange for Service:
Approval from Customer Service is required prior to start the service.
To initiate a service claim please Submit a Ticket or contact KUCHT for assistance on how to initiate a service claim.
Please have your original bill of sale and Serial Number of the unit available so our customer service representative is able to quickly arrange for service.
Contact our Customer Service team by:
Phone: 866-685-8248
Online: www.kucht.com
INSTALLATION GUIDE AND USER MANUAL
Manufacture's Limited Warranty
a. Warranty does not cover failure as result of: misuse, abuse, rust or corrosion, spilled liquids or foreign objects found inside the unit; repair of damage caused by accident, theft, fire, flood, external causes such as, but not limited to, blow fuses, inadequate electrical power, water and gas lines beyond the equipment, or any use of the product not authorized by the manufacturer.
b. The maximum liability of the warranty for product replacement or repair shall not exceed the original purchase price of the product.
c. KUCHT reserves the right to repair or replace the covered product with a comparable feature model of like kind.
d. Warranty does not cover deterioration of the appearance of the product, any cosmetic part such as paint, porcelain, glass, dents, scratches, chips, rust or peeling.
c. Any damage resulting from unauthorized replacement parts, improper service or modifications made to the covered product are not covered.
1. KUCHT is released from all liability due to indirect, consequential or incidental damages.
Limit of Liability
Our Liability is limited to the original price of the covered equipment
SAFETY INSTRUCTIONS
What to do if you smell gas?
• Do not try to light any appliance.
- Do not touch any electrical switch.
• Do not use any phone in your residence.
- Immediately call your gas supplier from a neighbor's phone. Follow the gas supplier's instructions.
• If you cannot reach your gas supplier, call the fire department.
IMPORTANT
The installation and service of your range product must be performed by a licensed installer, an approved service agency or your gas supplier.

WARNING


UNPACKING AND HANDLING

WARNING
Extremely Heavy.
Proper equipment and adequate manpower when move the range to avoid personal injury or damage to the unit or the floor. The unit is heavy and rests on adjust able steel legs.
Failure to follow this advice may result in damage or personal injury.
DO NOT lift range by the oven door handles !!
INSTALLATION GUIDE AND USER MANUAL
Troubleshooting
Before you call for service, please review the potential problem/possible causes and remedies shown in the table below.
| Nothing works | Oven is not connected to the electrical powerPower supply is not energized | Have oven connected to a properly sized electrical power supply by a qualified electrician.Have an electrician check the power supply, including the house circuit breaker, wiring and fuses |
| Top burners do not light or do not burn evenly | Plug on range is not completely inserted in the electrical outlet.Burner holes on the side of the burner may be clogged. | Make sure the unit is properly connected to the power supplyRemove the burner heads and clean them. Check the electrode area for burned-on food or grease. |
| Burner flames very large and yellow. | Burner bezel ports are clogged.Burner ports or burner caps are not positioned properly.Cooktop is being operated with the wrong type of gas.Regulator is not installed, is faulty, or is set for the wrong type of gas. | Clean burner bezel ring ports with straightened paper clip, needle, or wire.Remove and carefully re-install burner bezel and caps.Ensure that the type of cooktop matches the natural gas supply.Check installation, replace regulator, or set regulator for proper gas. |
| Sparking but no flame ignition. | Gas shut-off valve is in the 'OFF' position. | Turn shut-off valve to the 'ON' position. |
| Igniters spark continuously after flame ignition. | Power supply polarity is reversed.Igniters are wet or dirty. | Have polarity corrected.Dry or clean igniters. |
| Burner flame goes out at low setting. | Low gas supply pressure.Air intake holes around knobs are obstructed. | Contact gas company.Remove obstruction. |
| Oven will not heat | Oven settings are not corrected | Follow mode selection and clock settings as specified in Oven Operation section of the manual. |
| Foods over-cooked or under-cooked | Incorrect cooking time or temperature. | Adjust time, temperature, or rack position. |
| 'Cracking' or 'Popping' sound. | This is the sound of metal heating and cooling. | This is normal. |
Care and Cleaning
• Wash with soap and water, glass cleaner, or mild liquid sprays.
Plastic Finishes
- When control panel trim and end caps are cool, clean with soap and water, rinse and dry.
• Use a glass cleaner and soft cloth.
Oven Racks
- Clean oven racks with solution of detergent and hot water. To clean heavy soil, use a scouring pad such as steel wool with plenty of water.
Oven Frame
- Clean with hot water, soap-filled steel-wool pads or cleaners. Rinse well with clean water and dry.
Oven Gasket
• Do not clean the gasket. The fiberglass material of the oven door gasket cannot withstand abrasion.
• It is necessary for the gasket to remain intact.
Replacing the Oven Light
• Turn off the power at the main power supply.
- Remove the lens cover from the housing by pulling straight out.
• To prevent electrical shock or personal injury, make sure the oven and light bulb are cool and power to the oven has been turned off before replacing the light bulb. Make sure the lens cover is in place when using the oven.
Outer Oven Door
- Use soap and water to thoroughly clean the top, sides and front of the oven door. Rinse well. You may also use a glass cleaner to clean the glass on the outside of the door.
• Do not use oven cleaners, cleansing powders of harsh abrasives on the outside of the door.
Inner Oven Door
• Do not allow excess water to run into any holes or slots in the door. Any soap left on the liner causes additional stains when the oven is heated.
• Before you call for service, please review the potential problem/possible causes and remedies shown in the table below.
26
SAFETY INSTRUCTIONS

WARNING
Do not store or use gasoline, liquid propane cylinder or other flammable vapors and liquids in the vicinity of this appliance.
The installation and service of your range must be performed by a qualified installer, an approved service agency or the gas supplier.
Gas appliances can cause minor exposure to four of these substances, namely benzene, carbon monoxide, formaldehyde and soot, caused primarily by the incomplete combustion of natural gas fuel. When operating your range on natural gas, the flames from the burners should be blue in color. In addition, the flames should be stable, free of yellow tipping, excessive noise and lifting. However, this yellow tipping should be restricted to the primary flame kernels only. Properly adjusted burners, indicated by a bluish rather than a yellow flame, will minimize incomplete combustion. Exposure to those substances can be minimized by venting with an open window or use of a ventilation fan or hood.
ELECTRICAL GROUNDING INSTRUCTIONS
IMPORTANT
This indoor cooking appliance is equipped with a three-prong (grounding) plug for your protection against shock hazard and should be plugged directly into a properly grounded three-pronged receptacle. DO NOT cut or remove the grounding prong from this plug.
7
INSTALLATION AND OPERATION INSTRUCTIONS
To ensure proper and safe operation, read all instructions before using the product. Install or locate the product only in accordance with the provided Installation Instructions.

WARNING
• All servicing should be performed to a qualified technician.
- Do not attempt to adjust, repair, service or replace any part of your appliance unless it is specifically recommended in this guide.
- Do not use the range for warming or heating the room.
- Do not leave children alone or unattended in the area where the range is in use. Never allow them to sit or stand on any part of the range. Do not let children play with the range.
- Have the technician show you the location of the gas shut off valve and how to shut it off in an emergency situation.
• Always disconnect power to appliance before any type of servicing.
- Do not use abrasive or caustic cleaners or detergents on this appliance. They may cause permanent damage to the surface.
- When cooking, set the burner controls so that the flame heats only the bottom of the utensil and does not overlap at the sides of the utensil.
- Utensils (pots and pans) that conduct heat slowly, i.e. glass pots, should be used in conjunction with burner flames at a low or medium setting.
- Turn off all controls and wait for appliance parts to cool down before touching them. Do not touch the burner grates or surrounding areas until cool.
- Do not use water on grease fires.
• Clean appliance with caution.
- Always turn pot handles to the side or back of the range. Do not turn handles towards the area where they can be easily burned. Handles should not extend over the adjacent burners.
- Use the range only for cooking tasks as outlined in this manual. When using the range, do not touch the grates, burner caps, burner bases, or any other parts in proximity to the flame. These components may be hot enough to cause burns.
- Use dry pot holders. Moist or damp pot holders on hot surfaces may result in burns from steam.
- Remove pot holder away from hot surface areas.
- Do not use a towel or other bulky cloth.
- Do not heat unopened food containers. Build up of pressure may cause the container to explode and result in injury.
- During and after use, do not touch interior surfaces of the oven until cool.
Care and Cleaning
Cooktop
• To avoid electrical shock or burns turn off all controls and ensure the cooktop is cool before cleaning.
• Before cleaning the cooktop, ensure that all burners are turned off and that all components are cool enough to safely touch.
- Do not use harsh or abrasive cleaning agents, waxes, polishes, or commercial cooktop cleaners to clean the cooktop.
• Use only a sponge, soft cloth, fibrous or plastic brush, and nylon pad for cleaning.
• Always dry components completely before using the cooktop.
Control Panel, Door Handle, Control Housing
- Clean the control panel, door handle and control housing with a solution of mild detergent and warm water.
• Do not use abrasive cleaners or scrubbers; They will permanently damage the finish.
• Dry the components with a soft, lint-free cloth.
Oven Window
- Clean all glass surfaces with a solution of mild detergent and hot water. Use a mild glass cleaner to remove fingerprint or smears.
• Dry completely with a soft, lint-free cloth.
Porcelain Surfaces
- Clean oven interior and inner door liners with a solution of mild detergent and hot water. Rinse and dry with a soft cloth. Do not use abrasives or commercial oven cleaners.
Stainless Steel Surfaces
• Do not use any cleaning product containing chlorine bleach.
• Do not use a steel-wool pad; it will scratch the surface.
• Use a hot, damp cloth with a mild detergent. Use a clean, hot, damp cloth to remove soap. Dry with a dry, clean cloth.
Griddle Operation
Before Using the Griddle
- Clean the griddle thoroughly with warm,soapy water to remove dust or any protective coating.
- Rinse with clean water and wipe off to dry with soft, clean, lint-free towel/cloth.
- A stainless steel cover that is sized to fit on top of the surface when the griddle is not being used is provided. Please note – the cover must be removed before turning the griddle on.
- Make sure the grease tray is under the front edge of the griddle. Position the tray under the griddle overhang to catch grease or food residue.
Use of the Griddle
- Push and turn the control knob counter-clockwise to the preferred cooking temperature.
- Preheat the griddle for 10-12 minutes
- When the griddle is preheated to the desired temperature, the indicator light will turn on.
- Butter or cooking oil can be added for more flavor, then place the food to cook.
CAUTION:
The surface of the griddle is hot after use. Please allow sufficient time for the griddle to cool prior to cleaning.
When using the appliance or the first time, the oven and broiler burners should be turned on the burn off the manufacture oils. Turn the oven on the 450°F [230 °C for 20 to 30 minutes, then turn the oven control knob to "Broil" for the same length of time. It is recommended to turn on the ventilator above the range at this time

WARNING
Before Baking or Broiling the oven and broiler should be turned on to burn off the manufacturing oils. Turn the oven on to 450°F (230°C) for 20 to 30 minutes; then turn the broiler to "Broil" for the same length of time. You may wish to turn on the ventilator above your range at this time.
INSTALLATION INSTRUCTIONS
IMPORTANT
Keep appliance area clear and free from combustible materials, gasoline, and other flammable vapors.
Gas Supply Requirements
Installation of this range must conform with local codes, or in the absence of local codes, the National Fuel Gas Code, ANSI Z223.1 / NFPA 54. In Canada, installation must conform to the current natural Gas Installation /code, CAN 1-1.1-M81 and with local codes where applicable. This range has been design-certified according to ANSI Z21.1-2016/CSA 21.1-2016 latest edition.
A statement of the maximum gas supply pressure in accordance with the inlet pressure rating of the gas appliance pressure regulator supplied.
MINIMUM GAS SUPPLY PRESSURE TO APPLIANCE FOR LP GAS---14.0 IN.W.C. MINIMUM GAS SUPPLY PRESSURE TO APPLIANCE FOR NG --- 6 IN.W.C. APPLIANCE REGULATOR IS SET AT 5.0 IN. W.C. OUTLET PRESSURE.
Do not obstruct the flow of combustion air into the range and ventilation air away from the range.
Ventilation: it is recommended that the unit be operated with an oven head, vented exhaust hood of sufficient size and capacity.
Before installing the range, you must locate and secure the included anti-tip bracket to the wall for your range.
CAUTION
The use of cabinets for storage above the appliance may result in a potential fire hazard. Combustible items may ignite, metallic items may become hot and cause burns. If a cabinet storage is to be provided, the risk can be reduced by installing a range hood that projects horizontally a minimum of 5" (12.7cm) beyond the bottom of the cabinets.

WARNING
The appliance shall not be used for space heating. This information is based on safety considerations. All openings in the wall behind the appliance and in the floor under the appliance shall be sealed.
INSTALLATION GUIDE AND USER MANUAL
INSTALLATION INSTRUCTIONS
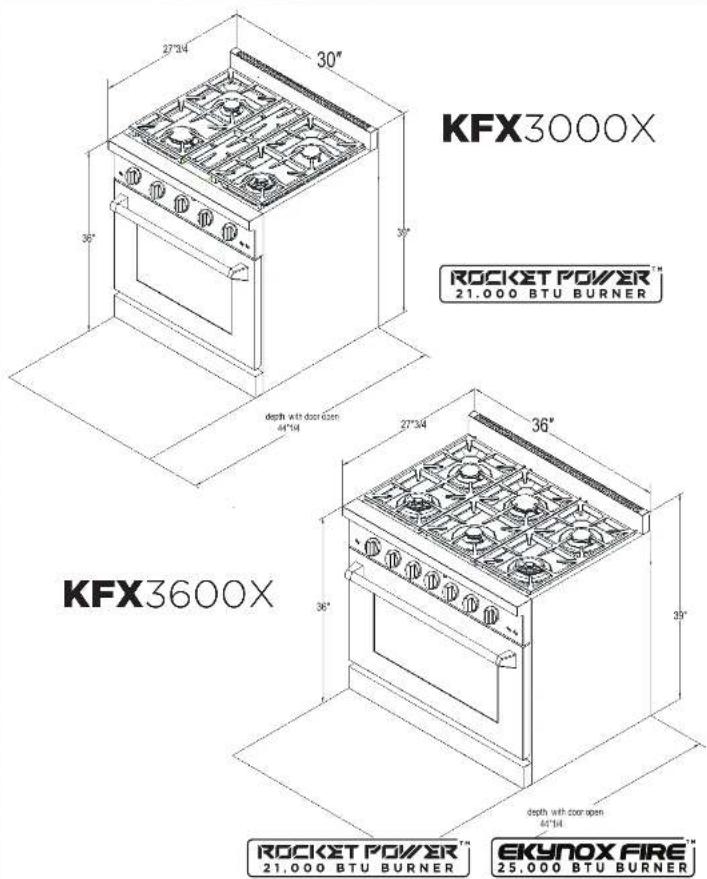
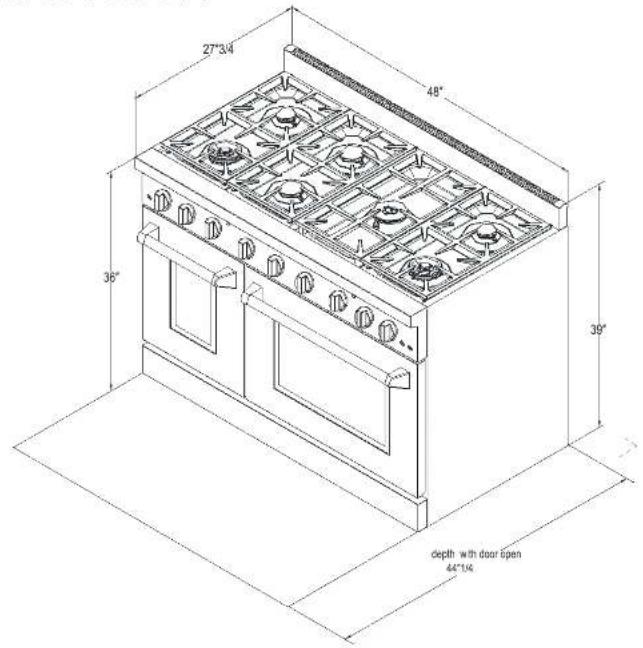
Dimensions and Clearances
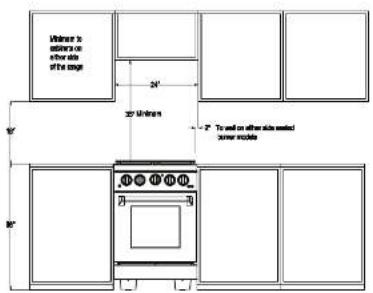
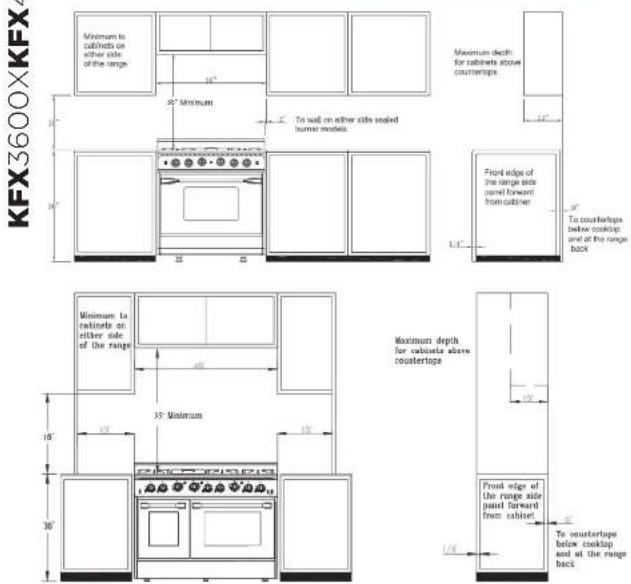
The range may be installed flush to the rear wall. You may install a non-combustible material on the rear wall above the range and up to the vent hood. It is not necessary to install non-combustible materials behind the range below the counter top height.
The minimum distance from the side of the range above the counter top to combustible sidewalls must be at least 10 inches.
INSTALLATION INSTRUCTIONS

Broiler Operation
Note: Door must be closed during broiling operation.
Broiling is a method of cooking tender cuts of meat directly under the infrared broiler in the oven. Broiling in the oven is accomplished with the oven door closed. It is normal and necessary for some smoke to be present to give the food a broiled flavor.
Preheating
Preheating is suggested when searing rare steaks (Remove the broiler pan before preheating with the infrared broiler. Foods will stick on hot metal). To preheat, turn the "Oven" selector knob to the "Broil" position. Wait for the burner to become hot, approximately 2 minutes. Preheating is not necessary when broiling meat well-done.
To Broil
Broil one side until the food is browned; turn and cook on the second side. Season and serve. Always pull the rack out to the "stop" position before turning or removing food.
Setting Broil
The "Oven" selector knob controls the Broil feature. When broiling, heat radiates downward from the oven broiler for even coverage. The Broil feature temperature is 500ircF (260°C).
The broil pan and insert used together allow dripping grease to drain and be kept away from the high heat of the oven broiler. DO NOT use the broil pan without the insert. DO NOT cover the broil pan insert with foil. The exposed grease could catch fire.
To set the oven to Broil:
- Place the broiler pan insert on the broiler pan. Then place the food on the broiler pan insert
- Arrange the interior oven rack and place the broiler pan on rack. Be sure to center the broiler pan and position directly under the broil burner. If preheating the broil burner first, position the broiler pan after the broil burner is preheated.
- Turn selector knob to Broil.
The oven indicator light will remain on until the selector knob is turned to the off position or the temperature control cycles off.
INSTALLATION GUIDE AND USER MANUAL
Convection Roast
The convection fan circulates the heated air evenly over and around the food. Using the cover and broiler pan provided, heated air will be circulated over the around the food being roasted. The heated air seals in juices quickly for a moist and tender product, while at the same time creating a rich golden brown exterior. When convection roasting, it is important that you use the broiler pan for best convection roasting results. The pan is used to catch grease spills and has a cover to prevent grease splatters.
Preheating
Preheat the oven to the temperature stated in the recipe before most baking.
Depending on the temperature and the size of the oven, preheating will take around
15-20 minutes.
Convection Defrost
With temperature control off, the motorized fan in the rear of the oven circulates air. The fan accelerates natural defrosting of the food without heat. To avoid illness and food waste, do not allow defrost food to remain in the oven for more than two hours without being cooked.
Convection Dehydrate
With the temperature control on 175irc F, warm air is radiated from the bake burners in the bottom of the oven cavity and is circulated by a motorized fan in the rear of the oven. Over a period of time, the water is removed from the food by evaporation. Removal of water inhibits growth of microorganisms and retards the activity of enzymes.

WARNING
BEFORE BAKING OR BROILING
The oven and broiler should be turned on to burn off the manufacturing oils. Turn the oven on to 450°F (230°C) for 20 to 30 minutes; then turn the oven knob to "Broil" for the same length of time. You may wish to turn on the ventilator above your range at this time
22
11
FOR MORE DETAILS AND INFORMATION, PLEASE VISIT OUR WEBSITE WWW.KUCHT.COM
KFX4800X


INSTALLATION GUIDE AND USER MANUAL
Oven Operation

WARNING
Never cover any slots, holes or passages in the oven bottom or cover an entire rack with materials such as aluminum foil. Doing so blocks air flow through the oven and may cause carbon monoxide poisoning. Aluminum foil lining may also trap heat, causing a fire hazard. Do not use Aluminum Foil on any porcelain surface. Doing so will damage the porcelain
Oven Function Natural Airflow Bake occurs when heat is transferred into the oven from the bake burners in the bottom of the oven cavity. Heat is then circulated by natural airflow. This is a traditional bake setting.
Infrared Broil
The broil burner is located at the top of the oven. This burner heats the metal screen until it glows. The glowing screen produces the infrared heat, searing the outside of broiled foods and sealing in juices.

Convection Bake

Heat is transferred from the bake burners in the bottom of the oven cavity to the oven cavity itself. The convection fan in the rear of the oven then circulates it. This convection process provides more even heat distribution throughout the oven cavity. Multiple rack use is possible for the large baking jobs. Convection cooking is faster, can be accomplished at lower temperatures and provides more even temperatures than regular cooking.
Without oven bottom cover replace oven bottom cover before using oven


21
INSTALLATION GUIDE AND USER MANUAL
Cooktop Operation
Oven Vent
- Do not block the ducts at the rear of the range when cooking in the oven. It is important that the flow of hot air from the oven and fresh air into the oven burner never be interrupted. Avoid touching the vent opening or nearby surfaces during oven or broiler operation – they may become hot.

WARNING
FOOD SAFETY
According to the United States Department of Agriculture: DO NOT hold foods at temperatures between 40°F to 140°F more than 2 hours. Cooking raw foods below 275°F is not recommended.

WARNING
Never use this appliance as a space heater to heat or warm the room. Doing so many result in carbon monoxide poisoning and overheating of the oven. Never use this appliance as a storage space and storage cabinet areas

WARNING
Never use this appliance doors or drawers such as stepping.
Leaning or setting on the doors or drawers, may result in hazards and injuries
Burner Grates
- The grates must be properly positioned before cooking. Improper installation of the grates may result in scratching of the cooktop and / or poor combustion.
- Do not operate the burners without a pan or utensil on the grates

natural_image
Close-up of a gas stove burner with blue flames (no visible text or symbols)
natural_image
Close-up of a stainless steel pot on a black gas stove (no visible text or symbols)
20
Dimensions and Clearances
INSTALLATION INSTRUCTIONS
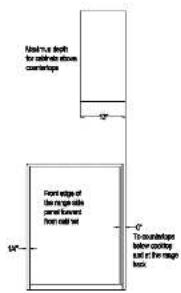
The maximum depth of cabinets installed above cooking tops be 13 in(330mm) or a great specified by the manufactures as tested by the certification agency.

13
FOR MORE DETAILS AND INFORMATION, PLEASE VISIT OUR WEBSITE WWW.KUCHT.COM
Electric Power Supply Requirements
Your range must be electrically grounded in accordance with local codes or, in the absence of local codes, in accordance with the National Electrical Code (ANSI/NFPA 70, latest edition). In Canada, electrical grounding must be in accordance with the current CSA C22.1 Canadian Electrical Code Part 1 and/or local codes. A copy of this standard may be obtained from National Fire Protection Association, 1 Batterymarch Park, Quincy, Massachusetts 02269-9101.
The power supply must be the correct polarity. Reverse polarity will result in continuous sparking of the electrodes, even after flame ignition. If there is any doubt as to whether the power supply has the correct polarity or grounded, have it checked by a qualified electrician.
Use 120V,60Hz, and properly grounded branch circuit protected by a 15-amp or 20-amp circuit breaker or time delay fuse.
14
INSTALLATION GUIDE AND USER MANUAL
Cooktop Operation
Simmer and Boil
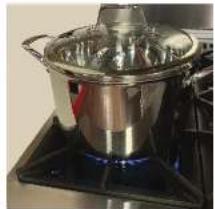
- A smaller flame will give the best simmer results. Small flames offer precise cooking performance for delicate foods, keeping food warm, melting chocolate or butter, and for cooking that need to cook over low heat for a long time.
- The highest (larger) flame settings provide the maximum heat that is available on your range. This setting should be used for heavy cooking loads such as water boiling and pasta cooking.
Flame Size
- When you select the flame size, watch the flame when you turn the knob.
• Any flame larger than the bottom of the cookware is wasted.
• The flame should be steady and blue in color. Foreign material in the gas line may cause an orange flame during initial operation.

Power Failure
• If the gas does not ignite within four seconds, turn off the valve and allow at least five minutes for any gas to dissipate. Repeat the lighting procedure.
- If the power fails, the surface burners can be lighted manually. Hold a lighted match near a burner and turn knob counterclockwise to "HI". After burner lights, turn knob to setting.
Cooktop
• To prevent the cooktop from discoloring or staining, clean cooktop after each use, and wipe up acidic or sugary spills as soon as the cooktop has cooled.
- The sealed burners of your range are not secured to the cooktop and are designed to be removed. Boil overs or spills will not seep underneath the cooktop. The burners should be cleaned after each use.
19
INSTALLATION GUIDE AND USER MANUAL
COOKTOP OPERATION
Surface Burner Ignition
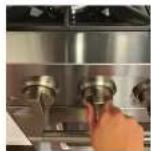
Make sure the knob indicate on the off position, then Push to release gas.

Turn to Ignite and 'Hi' position.

Adjust to appropriate flame height.
To light the surface burners, push and turn the appropriate control knob counter clockwise to a "Hi" position. You will hear a clicking noise – the sound of the electric spark igniting the burner.
Once burner ignition has been achieved, turn the burner control knob to adjust the flame size. If the knob stays at "Hi", it will continue to click.
NOTE: When one burner is turned to the "Hi" position, all the burners will spark. Do not attempt to disassemble or clean around any burner while another burner is on. Do not touch any burner cap, burner base, or igniter while the igniters are sparking.
Heat Settings:
| Hi | Ignites the burners. |
| Simmer | Melting small quantities, steaming rice, warming food, melting chocolate or butter. |
| Low | Melting large quantities. |
| Low-Medium | Low-temperature frying, simmering large quantities, heating milk, cream sauces, gravies. |
| Medium | Sautéing and browning, braising, pan-frying, maintaining slow boil on large quantities. |
| Medium - Hi | High-temperature frying, pan boiling, maintaining slow boil on large quantities. |
| Hi | Boiling liquid quickly, deep frying. |
18


WARNING
Electrical Grounding Instructions: this indoor gas cooking appliance is equipped with a three-prong (grounding) plug for your protection against shock hazard and should be plugged directly into a properly grounded three-pronged receptacle.
Do Not cut or removes the grounding prong from the plug.
Caution Label all wires prior to disconnection when servicing controls. Wiring errors can cause improper and dangerous operation. Verify proper operation after servicing.
INSTALLATION INSTRUCTIONS
Grounding
- The power cord is equipped with a three-prong (grounding) plug which mates with a standard three-prong grounding wall receptacle to minimize the possibility of electrical shock hazard from the range.
- All cord connected appliance shall include instructions relative to location of the wall receptacle and a warning to the user to disconnect the electrical supply before serving the appliance.
- Where a standard two-prong wall receptacle is encountered, it is the responsibility and obligation of the customer to have it replaced with a properly grounded three-prong wall receptacle. Do not cut or remove the grounding prong from the power cord.
Connect Range to Gas Supply
• Install a manual gas line shut-off valve in the gas line in an easily accessed location outside the range in the gas piping external to the appliance for the purpose of turning on or shutting off gas to the appliance.
- Install male 12 " flare union adapter to 12 " NPT internal thread elbow at inlet of regulator. On models equipped with standard twin burners, install the male pipe thread end of the 12 " flare union adapter to the 12 " NPT internal thread at inlet of pressure regulator. Use a wrench on the regulator fitting to avoid damage.
- Install male 12 or 34 flare union adapter to the NPT internal thread of the manual shut-off valve, taking care to secure the shut-off valve to keep it from turning.
- The gas supply pressure for checking the regulator setting is 6in (Natural Gas) and 11inch (LP gas) connect flexible gas line connector to the regulator on the range. Position range to permit connection at the shut-off valve.
- When all connections have been made, check that all range controls are in the "off" position and turn on the main gas supply valve.
- Leak testing of the appliance shall be conducted according to the manufacture's instructions. Use some soap water (50% water and 50% soap) or a leak detector at all joints and connections to check for leaks in the system. Do not use a flame to check for gas leaks.
- The appliance must be isolated from the building's gas supply piping system by closing its individual manual shut-off valve during any pressure testing of the gas supply piping system at test pressure equal to or less than 12 psig (3.5kPa).
Hood/Composite Overlay Install

The bottom of the hood should be 35" min. to 36" above the counter top. This would typically result in the bottom of the hood being 66" to 72" above the floor. These dimensions provide safe and efficient operation of the hood.
After Installation:
Check ignition of cooktop burners.
Check the air shutter adjustment – sharp blue flame, with no yellow tipping or lifting flames.
Check ignition of oven burner.
Visually check tubular burner (oven burner) re-ignition to be sure both rows of burner ports are relighting each time.
Check for gas leaks at all gas connections (using a gas detector, never a flame).
Check oven bake and convection bake function.


