
Master X HD Native - Software TC ELECTRONIC - Free user manual and instructions
Find the device manual for free Master X HD Native TC ELECTRONIC in PDF.


| Product Type | Mastering Plugin (Software) |
| Brand | TC Electronic |
| Model | Master X HD Native |
| Category | Audio Software |
| Operating Systems | Windows 7+ (64-bit), macOS 10.9+ (64-bit) |
| Plugin Formats | AAX Native, AU, VST2, VST3 |
| Bit Depth | 64-bit floating point processing |
| Sample Rate Support | Up to 192 kHz |
| System Requirements (Windows) | Intel Core i5 or higher, 8 GB RAM, 1 GB free disk space |
| System Requirements (macOS) | Intel Core i5 or Apple Silicon (Rosetta 2), 8 GB RAM, 1 GB free disk space |
| License Type | Native (no hardware required) |
| Activation | Serial number or iLok account (optional) |
| Key Features | Multiband compression, look-ahead limiting, phase-correction EQ, stereo enhancement |
| Presets | Over 50 factory presets for mastering |
| Version | HD (High Definition) series |
| Manual Language | English |
| Manual Pages | 26 |
| Warranty | 1 year (software) |
| Intended Use | Mastering and final mix processing |
| Copy Protection | Pace iLok (machine-based or iLok dongle) |
| Standalone | No (requires DAW host) |
Frequently Asked Questions - Master X HD Native TC ELECTRONIC
User questions about Master X HD Native TC ELECTRONIC
0 question about this device. Answer the ones you know or ask your own.
Ask a new question about this device
Download the instructions for your Software in PDF format for free! Find your manual Master X HD Native - TC ELECTRONIC and take your electronic device back in hand. On this page are published all the documents necessary for the use of your device. Master X HD Native by TC ELECTRONIC.
USER MANUAL Master X HD Native TC ELECTRONIC
MASTER X HD NATIVE / MASTER X HD-DT
Multiband Dynamics Processor Plug-In with Optional Hardware Desktop Controller
EN
Table of Contents
Important Safety Instructions .... 3
Legal Disclaimer....3
Limited warranty....3
1. Introduction......4
2. Plug-in Installation....4
2.1 Installation on a PC....4
2.2 Installation on a Mac 5
3. Activate your MASTER X HD ....
iLok license 5
3.1 Activation when you have purchased the NATIVE version....5
3.2 Get a Free Demo License....5
4. Connection and Setup 6
4.1 Connecting the MASTER X HD-DT Desktop Controller (optional) 6
4.2 Operating the MASTER X HD 6
4.3 Insert vs Aux Effect....6
4.4 Mono/Stereo Operation....6
4.5 Plug-in and Hardware Controls....7
4.6 Connection Status to the Hardware Unit....7
5. User Interface......8
5.1 Bypass On/Off 9
5.2 Main Display....9
5.3 Meters....9
5.4 Static Response View 10
5.5 Target Curve And Target Factors.... 10
5.6 Expander....12
5.7 Compressor....13
5.8 Limiter....14
5.9 Crossover Frequencies and Band Gains.... 15
5.10 Soft Clip.... 15
5.11 Mix....16
5.12 S/C, IO, Mix Controls.... 16
6. Navigating the MASTER X HD Desktop Controller (optional)....17
7. Dynamics Processing In-Depth ...... 18
7.1 Compressor 18
7.2 Limiter....19
7.3 Gate/Expander....19
7.4 Modern Mastering, Loudness and True-Peaks....20
8. Presets 22
8.1 Factory Presets....22
8.2 User Presets 22
8.3 Presets and the optional hardware unit .....23
8.4 Favorite Presets....23
8.5 Make Current Preset Default 23
8.6 Reveal User Preset Folder in Explorer ......23
9. Software Updates ...... 24
9.1 Hardware Unit Software Updates (optional) .....24
10. Specifications....24
EN
Important Safety Instructions


Terminals marked with this symbol carry electrical current of sufficient magnitude to constitute risk of electric shock.
Use only high-quality professional speaker cables with 14 " TS or twist-locking plugs pre-installed. All other installation or modification should be performed only by qualified personnel.

This symbol, wherever it appears, alerts you to the presence of uninsulated dangerous voltage inside the
enclosure - voltage that may be sufficient to constitute a risk of shock.

This symbol, wherever it appears, alerts you to important operating and maintenance instructions in the
accompanying literature. Please read the manual.

Caution
To reduce the risk of electric shock, do not remove the top cover (or the rear section).
No user serviceable parts inside. Refer servicing to qualified personnel.

Caution
To reduce the risk of fire or electric shock, do not expose this appliance to rain and
moisture. The apparatus shall not be exposed to dripping or splashing liquids and no objects filled with liquids, such as vases, shall be placed on the apparatus.

Caution
These service instructions are for use by qualified service personnel only.
To reduce the risk of electric shock do not perform any servicing other than that contained in the operation instructions. Repairs have to be performed by qualified service personnel.
- Read these instructions.
- Keep these instructions.
- Heed all warnings.
- Follow all instructions.
- Do not use this apparatus near water.
- Clean only with dry cloth.
- Do not block any ventilation openings. Install in accordance with the manufacturer's instructions.
-
Do not install near any heat sources such as radiators, heat registers, stoves, or other apparatus (including amplifiers) that produce heat.
-
Do not defeat the safety purpose of the polarized or grounding-type plug. A polarized plug has two blades with one wider than the other. A grounding-type plug has two blades and a third grounding prong. The wide blade or the third prong are provided for your safety. If the provided plug does not fit into your outlet, consult an electrician for replacement of the obsolete outlet.
- Protect the power cord from being walked on or pinched particularly at plugs, convenience receptacles, and the point where they exit from the apparatus.
- Use only attachments/accessories specified by the manufacturer.

natural_image
Silhouette of a person pushing a cart with a box, enclosed in a circular frame (no text or symbols)- Use only with the cart, stand, tripod, bracket, or table specified by the manufacturer, or sold with the apparatus. When a cart is used, use caution when moving the cart/apparatus combination to avoid
injury from tip-over.
- Unplug this apparatus during lightning storms or when unused for long periods of time.
- Refer all servicing to qualified service personnel. Servicing is required when the apparatus has been damaged in any way, such as power supply cord or plug is damaged, liquid has been spilled or objects have fallen into the apparatus, the apparatus has been exposed to rain or moisture, does not operate normally, or has been dropped.
- The apparatus shall be connected to a MAINS socket outlet with a protective earthing connection.
- Where the MAINS plug or an appliance coupler is used as the disconnect device, the disconnect device shall remain readily operable.

- Correct disposal of this product: This symbol indicates that this product must not be disposed of with household waste, according to the WEEE Directive (2012/19/EU) and your national law. This product
should be taken to a collection center licensed for the recycling of waste electrical and electronic equipment (EEE). The mishandling of this type of waste could have a possible negative impact on the environment and human health due to potentially hazardous substances that are generally associated with EEE. At the same time, your cooperation in the correct disposal of this product will contribute to the efficient use of natural resources. For more information about where you can take your waste equipment for recycling, please contact your local city office, or your household waste collection service.
- Do not install in a confined space, such as a book case or similar unit.
-
Do not place naked flame sources, such as lighted candles, on the apparatus.
-
Please keep the environmental aspects of battery disposal in mind. Batteries must be disposed-of at a battery collection point.
- This apparatus may be used in tropical and moderate climates up to 45°C.
LEGAL DISCLAIMER
Music Tribe accepts no liability for any loss which may be suffered by any person who relies either wholly or in part upon any description, photograph, or statement contained herein. Technical specifications, appearances and other information are subject to change without notice. All trademarks are the property of their respective owners. Midas, Klark Teknik, Lab Gruppen, Lake, Tannoy, Turbosound, TC Electronic, TC Helicon, Behringer, Bugera, Auratone and Coolaudio are trademarks or registered trademarks of Music Tribe Global Brands Ltd. © Music Tribe Global Brands Ltd. 2020 All rights reserved.
LIMITED WARRANTY
For the applicable warranty terms and conditions and additional information regarding Music Tribe's Limited Warranty, please see complete details online at musictribe.com/warranty.
EN
1. Introduction
Congratulations on the purchase of your MASTER X HD.
MASTER X HD is a supreme 3 band Expander/Compressor/Limiter that is specially designed for audio professionals in the studio or using modern live setups. Combining award-winning multiband compression technology with a fast and intuitive user interface, as well as a super smooth expander, the MASTER X HD is made for the uncompromising sound engineer. The optional Desktop Controller adds intuitive and exciting hands-on control, while providing ways to optimize your workflow. This new take is highly refined and optimized, while staying true to the award-winning legacy of TC Electronic multiband technology featured in products like Finalizer, Master X3 and C400XL.
Multiband Dynamics Technology
MASTER X HD uses advanced TC Electronic multiband dynamics technology to compress and adapt to any source - from vocals and percussion, to guitars and even keyboards. Due to the perfectly split- and recombining crossover filters the inherent transparency of the multiband compressor brings out the qualities of the source material, yet secures a firm and consistent level at all times. The optimized and super-fast expander offers smooth and high precision expansion of any source. The MASTER X HD is equally aimed for channel, sub-mix and master bus insert.
Three Strikes and you're in!
MASTER X HD stands out in three distinct areas that make it the ideal unit for demanding use in the studio or in modern live setups:
- Sound quality – this quality is ensured by proven and optimized source-based multiband compression, limiting, and smooth expansion.
- Versatility – decide on expansion, compression, limiting, or a combination, adaptable to any source, and the MASTER X HD is up for the task.
- Intuitive – the fast and intuitive user interface and a mix knob for parallel compression, makes for a fast, professional product.
Intuitive – yet advanced
The refined user interface features extremely fast and easy tuning of the many parameters in a complex multi-band multi-dynamic processor. The overall processing characteristics are controlled via a "Target Curve" that simplifies the handling by providing a global processing style for all bands in all processing blocks. The interaction between the bands can be fine-tuned by applying "Target Factors" which determine the frequency focus of each processing block, significantly reducing the number of required user parameters to set this complex process up.
Additionally, MASTER X HD features a 'Mix' knob allowing parallel compression without complicated routing schemes. The unique Parallel compression will lift hidden details in every vocal or drumkit track.
Last but not least, MASTER X HD features a new take on Softclipping that includes emphasis, which optimizes use on bass dominated material.
For enhanced precision in modern mastering, the TC Electronic Brickwall HD plug-in features top shelf True Peak limiting and is perfect in combination with Master X HD.
About this manual
Read this manual to learn how to install and use your TC Electronic MASTER X HD multi-band dynamics processor unit. This manual is only available in PDF format from the TC Electronic website. To get the most from this manual, please read it from start to finish, or you may miss important information.
To download the most current version of this manual, visit the web page: www.tcelectronic.com/Categories/c/Tcelectronic/Downloads
If you still have questions about your TC Electronic product after reading its manual, please get in touch with TC Support: www.tcelectronic.com/brand/tcelectronic/support
2. Plug-in Installation
The combined MASTER X HD plug-in installer for both the NATIVE and DT Desktop Controller products can be downloaded from the following page:
www.tcelectronic.com/masterxhd-dt/support
The MASTER X HD plug-in requires an active PACE iLok license to work. See Chapter 3.
Using the Desktop Controller is optional, and all parameters are available in the plug-in.
Save the installer file (.pkg or .msi file) in a convenient location on your hard drive.
2.1 Installation on a PC
Double click the installer (.msi file). If you get a security warning, click 'Run'.
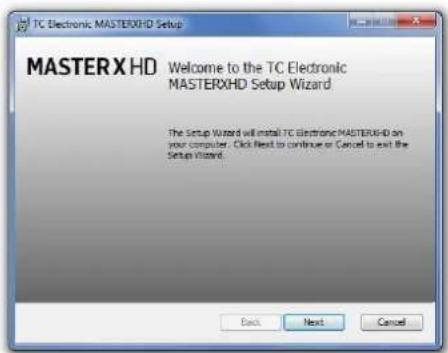
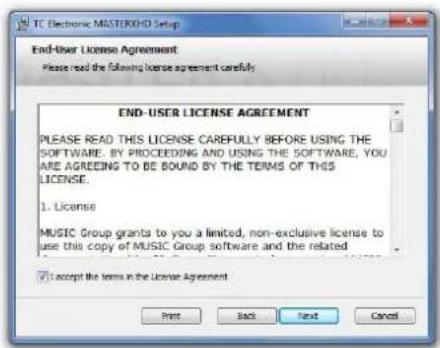
Accept the license agreement and click 'Next'.
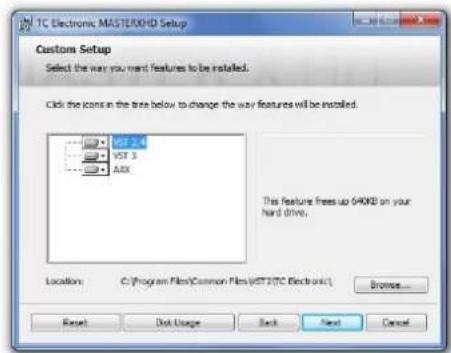
Select which VST and/or AAX components you want to install. Pro Tools uses AAX and most other DAW programs use VST. The installer will offer a default location to save the file, but you can choose another location by clicking the 'Browse' button.
Click 'Next' to begin the installation. When installation is complete, click 'Finish'.
Note: If your DAW fails to detect the newly installed plugin, this can often be fixed by adding the following paths to the Plug-in Manager (or similar) of the DAW. The default paths on a PC are "C:\Program Files\Common Files\VST2" and "C:\Program Files\Common Files\VST3" for VST2 and VST3, respectively.
2.2 Installation on a Mac
Double click the installer (.pkg) file.
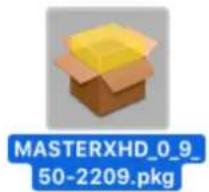
Proceed through the prompts to begin installation.
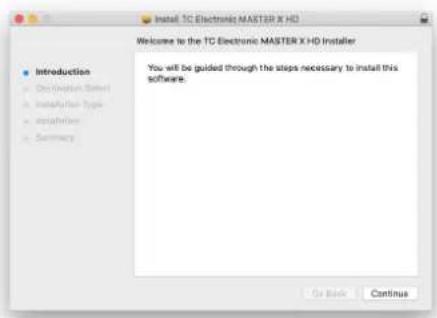
Click 'Continue.'
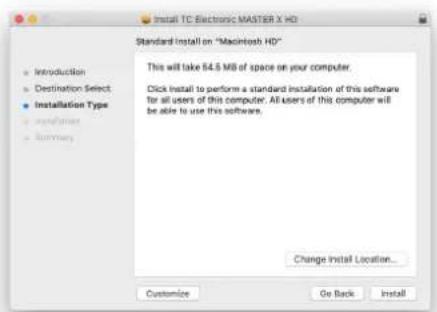
A default location will be selected for installation, or you can select another folder manually. If you have administrator authorization in place, you will need to enter your password before beginning installation.
Click 'Close' when done.
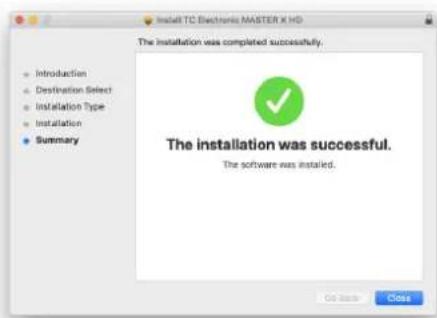
3. Activate your MASTER X HD iLok license
3.1 Activation when you have purchased the NATIVE version
Step 1: Install iLok
The first step is to create an iLok user account at www.iLok.com and install the PACE iLok License Manager on your computer if it's your first time using iLok.
Step 2: Activation
In the received mail (when buying the NATIVE version) or on the rear cover of the printed quick start guide (when you have bought the DT Desktop Controller version) you will find your personal Activation Code. To activate your software, please use the "Redeem an Activation Code" feature in the PACE iLok License Manager.

3.2 Get a Free Demo License
Make use of this hassle-free offer to try out our plug-ins before you buy.
• 14-Day Trial Period
- Fully Functional
- No Feature Limitations
- No Physical iLok Key Needed
Step 1: Install iLok
The first step is to create a free iLok user account at www.iLok.com and install the PACE iLok License Manager on your computer if it is your first time using iLok.
Step 2: Get your free license
Go to:
www.tcelectronic.com/brand/tcelectronic/free-trial-masterxhd-native
and enter your iLok User ID.
Step 3: Activation
Activate your software in the PACE iLok License Manager.
EN
4. Connection and Setup
4.1 Connecting the MASTER X HD-DT Desktop Controller (optional)
Getting the Desktop Controller up and running couldn't get any easier. Plug the included USB cable into the unit's rear micro-USB port, and connect the other end to a free USB port on your computer. The Desktop Controller is bus powered, so no other power cables are necessary, and no additional drivers need to be manually installed.
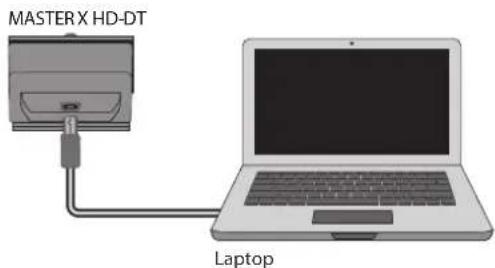
The Desktop Controller will light up upon successful connection. You can now apply the plug-in to a channel in your DAW to begin using the effect. This process may vary slightly depending on your software, but generally should require these steps:
- Select a channel or bus in your DAW to which you would like to add the effect. Access the mixer page where you should see a section dedicated to effect slots
- Open the menu where you can select from a list of effect types, which probably includes many stock plugins that are included with the DAW. There should be submenu to view general VST/AU/AAX options.
- The plug-in will likely be found in a dedicated TC Electronic folder. Select the MASTER X HD and it will now be added to the signal chain.
Double click on the effect slot that contains the MASTER X HD to view the plug-in UI. There should be a green link icon at the bottom, and text that indicates successful connection between the plug-in and the Desktop Controller.
4.2 Operating the MASTER X HD
After you have installed the plug-in, activated the iLok license and optionally connected the MASTER X HD-DT Desktop Controller via USB, you can begin inserting the plug-in to your tracks.
Adjustments to the effect are done in two ways. Either by using the plug-in user interface or via the physical Desktop Controller.
4.3 Insert vs Aux Effect
The MASTER X HD is intended for insertion directly into an effect slot on a single channel, sub mix bus or master bus, which passes the entire signal through the effect. Should you prefer to have some of the original signal passed through the plug-in, please use the built-in MIX parameter, which is ideal for that purpose.
Be careful if using MASTER X HD on an auxiliary bus, as mixing the output of MASTER X HD with the original track sound will potentially create a phasing issue depending on your DAW's ability to correctly compensate for latency in plug-ins. Mixing of signal from before and after the MASTER X HD is best and most reliably done using the built-in MIX parameter.
4.4 Mono/Stereo Operation
The MASTER X HD can be used both as a mono instance on mono tracks and a stereo instance on stereo tracks.
In the case of a mono out instance, the output signal is made by outputting the left plug-in channel only. In this case, panning should not be used.
4.5 Plug-in and Hardware Controls
After you have installed the plug-in, activated the iLok license, and optionally connected the MASTER X HD DT desktop controller hardware unit via USB, you can begin using it.
The controls of the plug-in and desktop controller are described in more detail later in this manual.
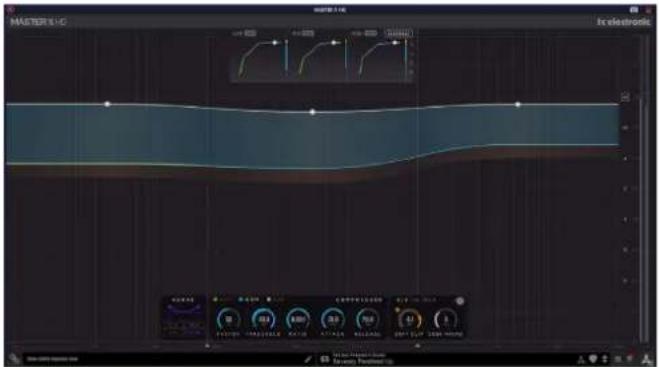
Plug-in User Interface:
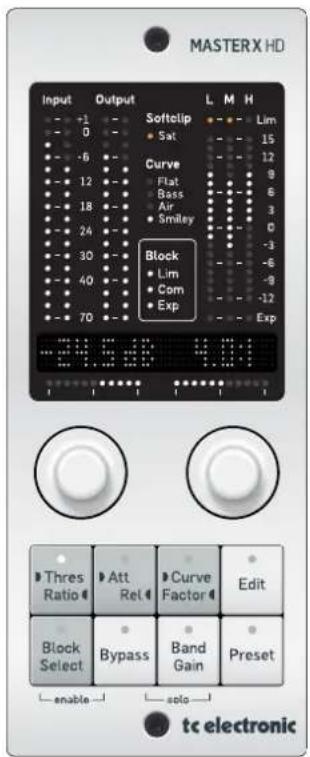
Optional Desktop Controller Hardware Unit:
4.6 Connection Status to the Hardware Unit
The TC Icon family all use the same method to show the connection status between the plug-in and the hardware unit.
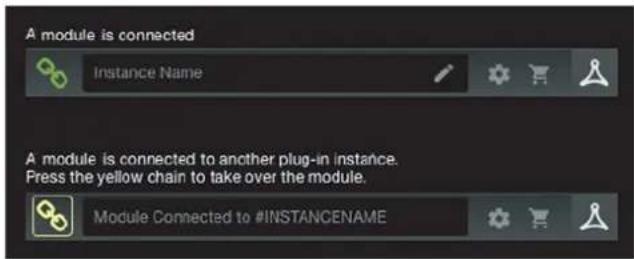
Connection status is indicated on the lower left side of the plug-in window. Successful connection is indicated with a green chain icon. The Tooltips area will show the plug-in instance name that the hardware unit is currently connected to. This is often the DAW channel name. If your DAW does not support this, you may enter a name for the instance. This may be especially convenient when using DAW project templates.

When using the NATIVE version only, this chain icon will remain grey:

If another instance of the plug-in already exists on another track, the chain icon will appear yellow, and the text box will notify you where the plug-in is currently active. Click the chain icon to connect the hardware unit to the new plug-in location.

To summarize the connection status possibilities:
Most DAWs offer the ability to move or drag plug-ins from one track/bus to another, and MASTER X HD supports this as well.
Most DAWs also feature an on/off switch for plug-ins, accessible inside the plug-in window and/or the track itself. Muting the plug-in will make the effect inaudible, but will not shut down the connection to the hardware unit.
EN
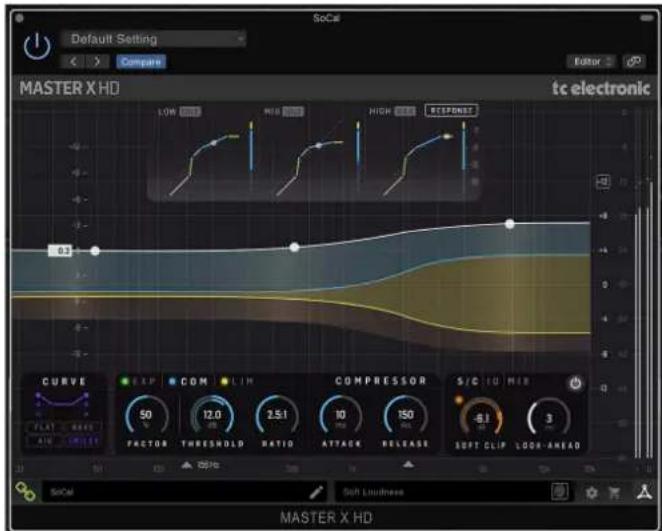
5. User Interface
Control of the MASTER X HD is done in the plug-in, or using the optional hardware unit (when you have purchased the DT version).
Overview
As a general note, the parameters, controls, and graphs are color-coded as follows:
- Expander: Green
- Compressor: Blue
- Limiter: Yellow
c • Softclip: Orange - Curve: Purple (Use the overall Curve selection and an amount of Factor for each of the Expander, Compressor, Limiter, to dial in the low and high frequency band relative to the mid band)
For an example of the use of colour: anything coloured blue concerns the Compressor controls, actions, and effect
Controls
- Any of the circular controls can be adjusted either by dragging on the dials, or by double-clicking and entering a numeric value in the box.
- Threshold controls and Soft Clip also show the current signal level as an inner-ring, as a guide to setting the controls
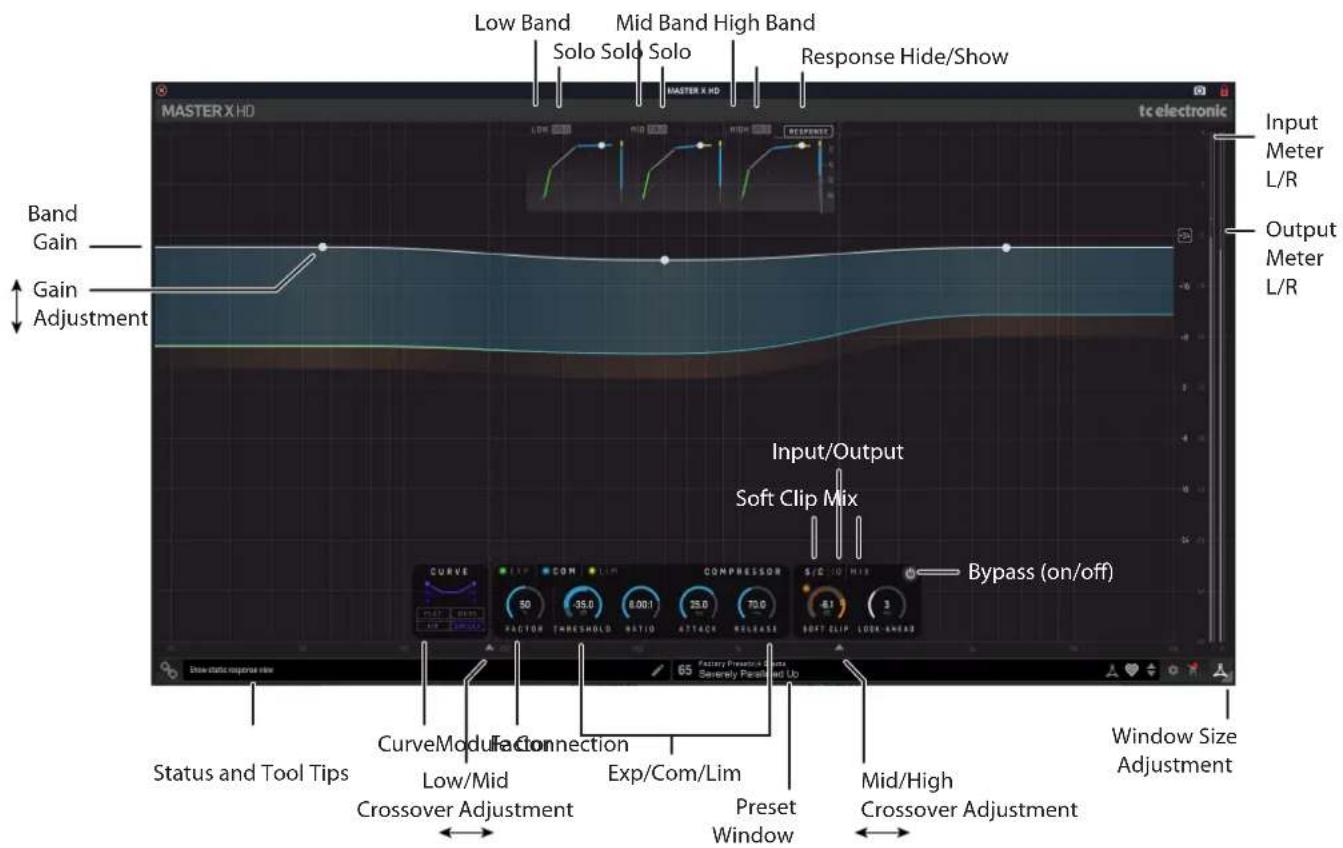
The main display shows the Frequency, Band Gains and the amount of Gain Reduction in each band for each of the Expander, Compressor and Limiter.
- The gain of each band can be adjusted by vertically moving the white node in the center of each band on the main display. Note that the Band Gain sits before the Compressor
- The crossover frequency of each band can be adjusted by horizontally moving the 2 arrows shown below the main frequency axis
The top part of the display:
- Three Static Response graphs (Low/Mid/High), each with a combination display of the Expander/Compressor/Limiter performance
- Individual gain reduction meters for Expander/Compressor/Limiter in each band
• Each band can be auditioned individually by pressing the SOLO button
• This display can be hidden or shown, by clicking in this area
The controls section at the bottom includes:
• Curve, overall setting
• Factor, individual setting for Expander/Compressor/Limiter. This applies an amount of the Curve setting to Low/High band relative to Mid band
- The main controls of either the Expander, Compressor, or Limiter, are shown - depending on whether COM, EXP, LIM is selected.
- Expander on/off/focus, Compressor on/off/focus, Limiter on/off/focus
• Expander/Compressor/Limiter adjustment
• Softclip on/off/ threshold, look ahead
• Input gain, output gain
• Mix on/off and adjustment, balance
• Bypass on/off
At the right hand edge:
• Input meter and Output meter
At the bottom left:
- Connection status "Chain" icon
- Connection status message and Tool Tips
At the bottom middle/right:
- Preset number, preset name, factory or user, favorite, preset up/down
Setup - Shopping cart
At the bottom right corner:
- User Interface size adjustment
The controls and features are described in more detail below.
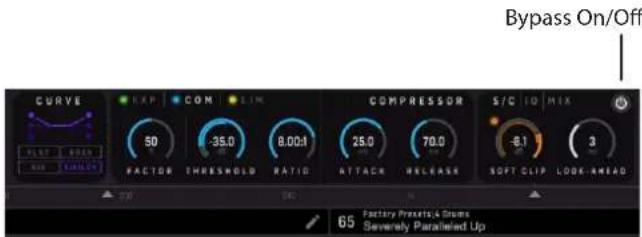
5.1 Bypass On/Off
Press this very important button to bypass or engage the MASTER X HD. This makes it easy for you to listen and compare the overall effect of your awesome work.
5.2 Main Display
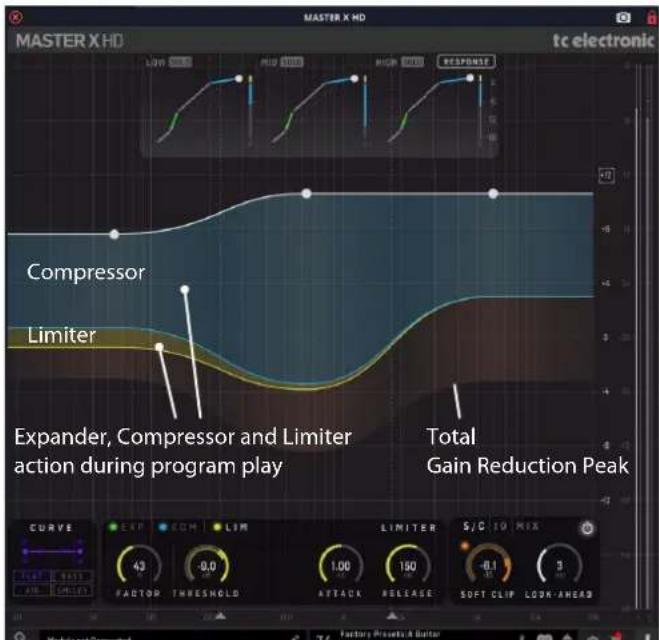
The main display has a linear vertical dB scale, horizontal frequency scale, and we show the auto-makeup gain.
The linear dB scale is informative because it is possible to read the gain reduction while also seeing the auto makeup gain from the compression. It is also possible to see that if the gain reduction curves hit "0 dB" you will have close to 0 dB gain though the plug-in, assuming the Input and Output gain are set to 0 dB.
The dB scale can be varied (zoomed) between 12 / 24 dB, and this setting is saved with the preset. The display will show the overall band gain across the three bands, as a white line with three white nodes at the center of each band.
In operation, the display will show the variation caused by the operation of the Expander (in green), Compressor (in blue), and Limiter (in Yellow). The total (Compressor/Limiter) gain-reduction peak reached, is shown as a faint low-signal mark.
5.3 Meters
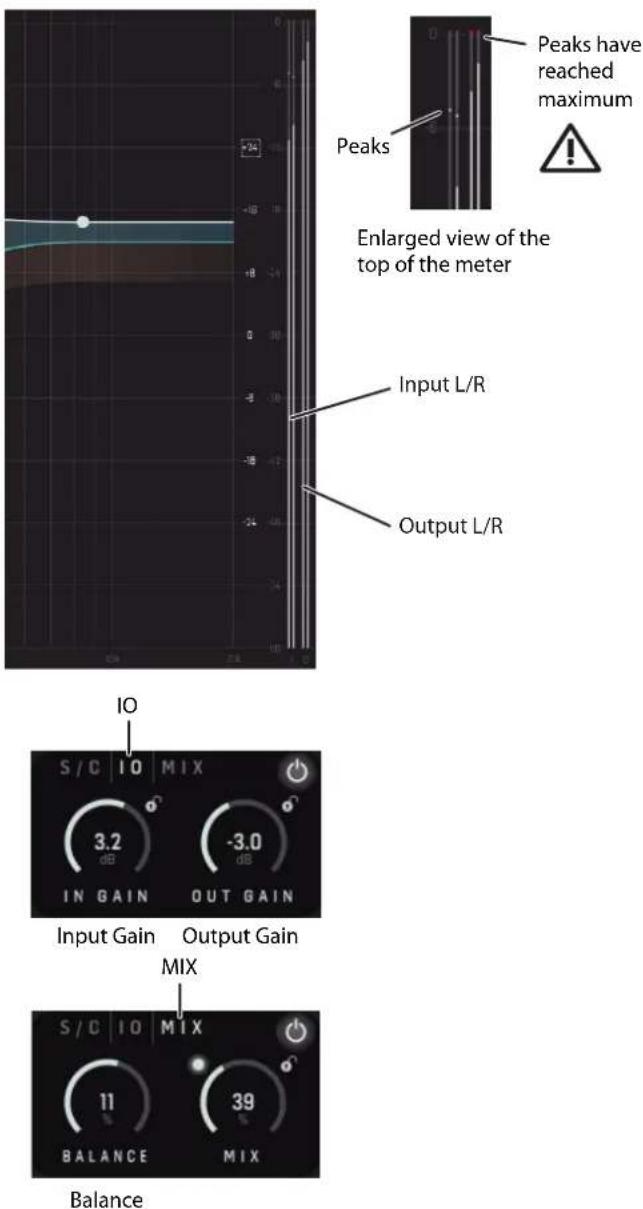
The PPM meters (Peak Program Meters) at the far right include a very accurate Peak-Hold function.
- Use the input and output gain controls in the IO area to adjust the levels if required.
- Use the Balance control in the MIX area to adjust the L/R balance if required.
CAUTION: If the MASTER X HD sits as the final insert on the Master Bus, you must ensure that no peaks exceed 0dBFS. These peaks will be shown in red for a short time, before decaying.
Note: For enhanced precision in modern mastering, the TC Electronic Brickwall HD plug-in features very high quality True Peak limiting, and is perfect in combination with Master X HD.
EN
5.4 Static Response View
Low, Mid, High Band
The top section of the display shows three Static Response graphs, one for each frequency band.
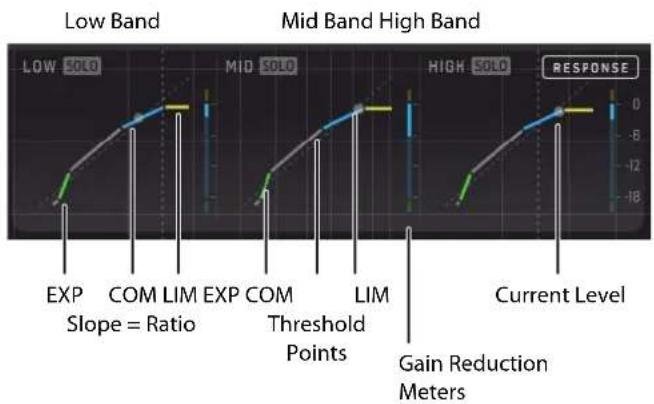
The Static Response display give you a visual feedback of the static in-to-out gain response of the Expander, Compressor, Limiter processing applied to each band.
Each band can be soloed using the SOLO buttons, so you can listen to each band and the effect of your processing selections and adjustments. This is true even when using Mix for parallel compression techniques.
Note: You can see how the overall Curve setting and the individual Factor setting for each processing blocks (Expander, Compressor, Limiter) affects the behavior of the MASTER X HD.
line
| Category | Value | | -------------- | ----- | | EXP | -18 | | COM | -12 | | LIM | -6 | | EXP | 0 | | COM | 0 | | LIM | 0 | | Current Level | 0 |- The graphic representation of each band shows the Expander, Compressor, and Limiter's Threshold and Ratio.
- The vertical gain reduction meters show yellow at the top, if the Limiter is engaged, green at the bottom if the Expander is engaged, and a moving blue bar shows the Compressor's amount of gain reduction in a simplified way. Exact readings can be done in the main view.
- The white node on each graph shows the current music program level in each frequency band.
- Press the SOLO button to audition each band separately and judge the effect of the settings. Note that SOLO will stay on, even if you change to a different preset. So if something sounds odd, check that a SOLO button has not been left on.
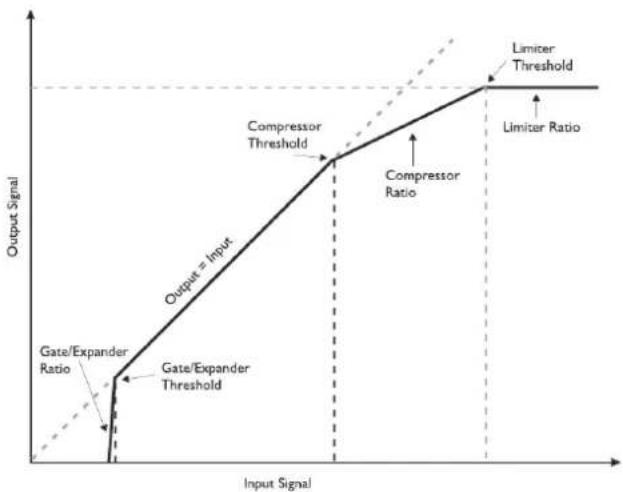
line
| Input Signal | Output Signal | Annotation | | ------------ | ------------- | ----------------------- | | Low | Low | Gate/Expander Ratio | | Low | High | Compressor Threshold | | High | High | Limiter Threshold | | High | Low | Limiter Ratio |5.5 Target Curve And Target Factors
One of the very strong features of the MASTER X HD is to simplify the many settings of the 3-Band Expander, Compressor, Limiter, so that each one presents only one set of parameters, and not one set per frequency band.
The Target Curves and Target Factors simplify the handling of the Master X HD by reducing the amount of parameters necessary to control the plug-in by approximately 2/3. Thanks to these innovative parameters, you can easily keep an overview of all relevant settings at all times – and quickly achieve great results!
Overview
Although this is a 3-Band solution, there are only one set of parameters for each (Expander, Compressor, Limiter) processing block. This is possible due to the combined use of the Target Curve and Target Factor:
- The displayed numeric values such as Threshold, Ratio, Attack, and Release, always refer to the MID band only
- Choose a CURVE to define the basic "focus" (Air, Bass, Flat, or Smiley) as displayed by the small curve in the Target Curve display
• The Expander, Compressor, Limiter each use the same chosen Curve - The Expander, Compressor, Limiter can each have a different Target Factor setting
- Use Target Factor to apply an amount of the selected Curve to each of the Expander, Compressor and Limiter
5.5.1 Target Factor
The Target Factor allows fast and intuitive adjustment of the complex relation between the 3 bands, and it does this separately for the Expander, Compressor, and Limiter processing blocks.
For example: With just one move of the Target Factor in the Limiter block, you can increase the focus of the Limiter block on the high frequency spectrum.
In the 0% position:
- The Target Factor is deactivated and has no effect – the Low and High bands will be processed with the same Mid band parameter settings you see on screen
- For example, if the Compressor has a 0% Factor, then the Low band and High band Compressor parameters are the same as the Mid band Compressor parameters shown
In the 100% position:
- The selected Target Curve will be applied to the maximum
- For example, if the Compressor has a 100% Factor, then the Low band and High band Compressor parameters will be different than the displayed Mid band Compressor parameters, depending on the Curve you choose
So in a way you could say: The Target Factor determines the amount of differences between the Low, Mid, and High bands.
5.5.2 Target Curves
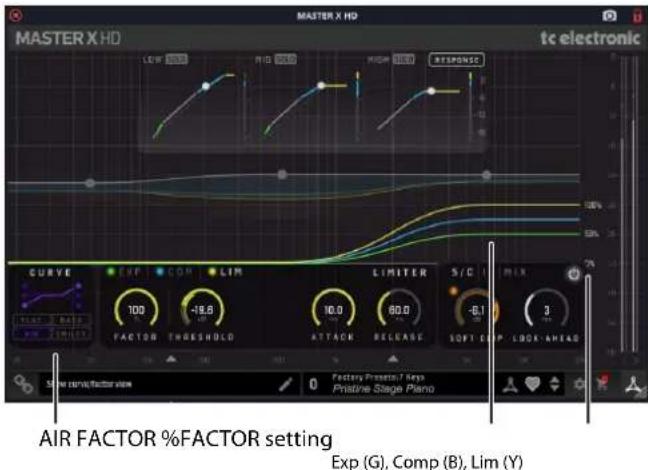
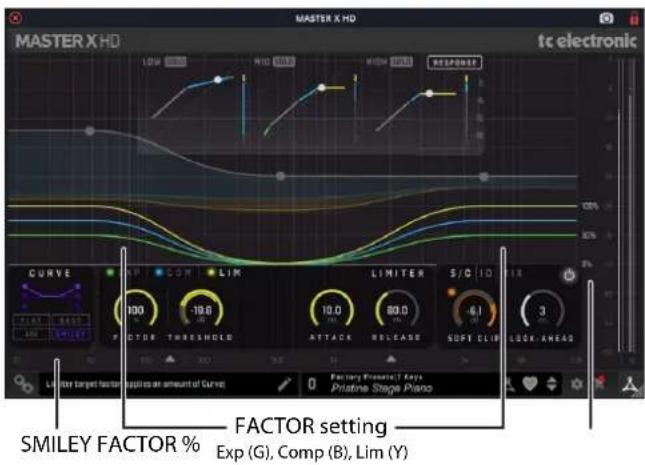
The Curve setting determines how the 3 bands work together.
When you mouse-over the Curve or Factor area, three contour lines appear, that show the factor setting for the Expander, Compressor, and Limiter.
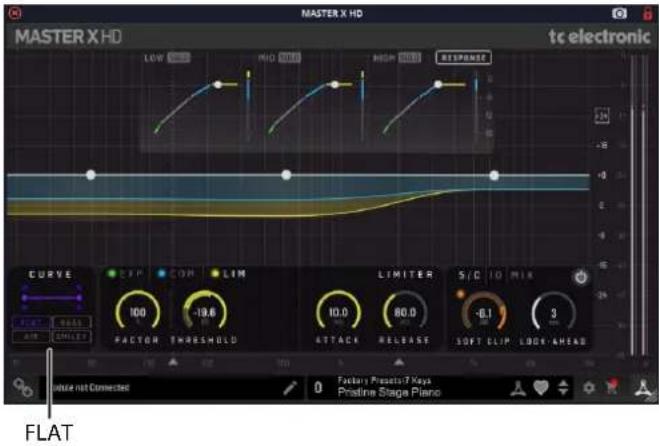
Flat
All 3 bands are processed equally. So in this case, the parameters of the Low and High Band are the same as those shown for the Mid Band. The Target Factor has no effect. (Imagine the frequency characteristics of white noise.)
Note that when the Curve is set to Flat, the three static response graphs at the top are identical for Low, Mid, and High.
Bass
The High band will be processed less. (Imagine the frequency characteristics of pink noise.)
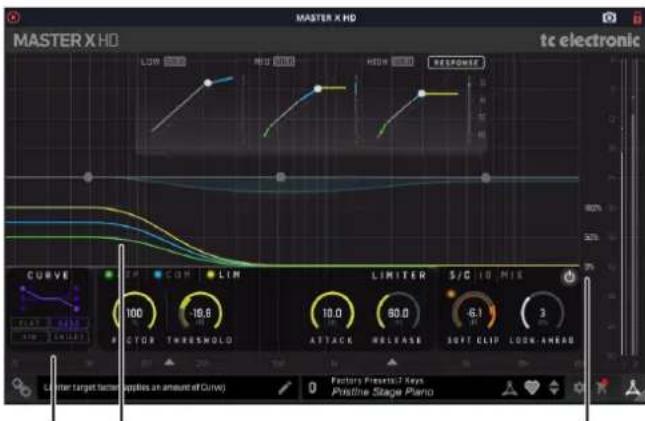
BASS FACTOR %FACTOR setting
Exp (G), Comp (B), Lim (Y)
Air
The High band will be processed more.
Smiley
The Low band and High band are processed more.
EN
5.6 Expander
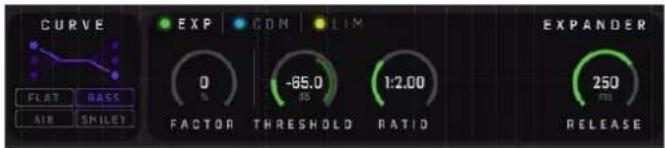
The following examples show a Curve of "BASS" and a different Factor set for each Expander/Compressor/Limiter
Expander Example:
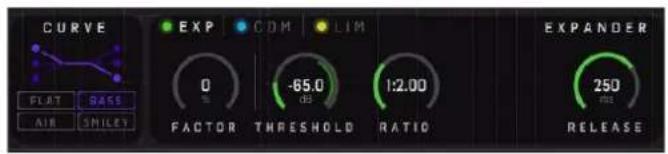
- Curve is set to BASS (for all EXP/COM/LIM)
-
Expander controls are GREEN
-
Factor for the Expander is 0% (and so all bands have the same Expander settings as the Mid band settings)
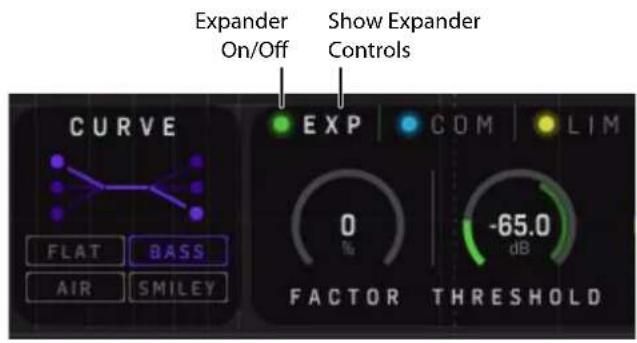
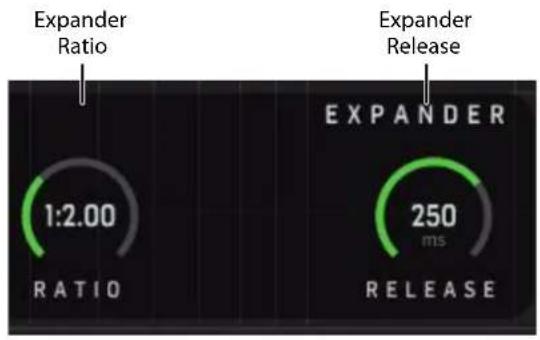
- Mid Band Expander settings are: Threshold -65.0, Ratio 1:2.00, Release time 250 ms. Only the Mid Band values are ever shown here
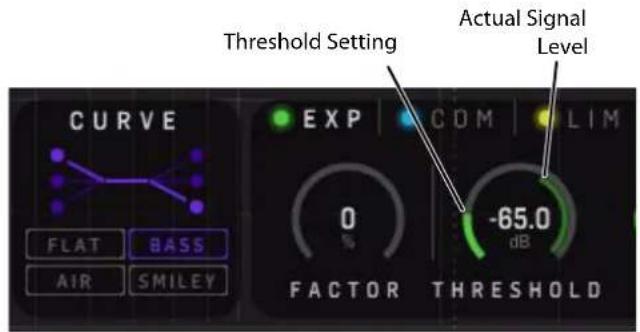
- The Threshold inner-ring shows the average level of the currently-playing program. The outer-ring shows the current Threshold setting
- Click on the green light next to "EXP" to turn the Expander on/off
- Click on "EXP" to highlight the text and show the Expander controls
- Click on "COM" or "LIM" to show the Compressor or Limiter controls
Enable-Switch
3-Band Expander on/off
Threshold
Sets the Expander's Threshold. Values below the Threshold will be lowered in volume according to the Ratio setting.
Note how the Threshold can be easily set by viewing the inner-ring level meter inside the Threshold parameter outer-ring. A highlighted overlap between the signal level and threshold rings will indicate that the Expander is in action and is reducing the gain.
Ratio
The Ratio determines how much the output signal will be lowered in proportion to the original signal. The MASTER X HD's Ratio parameter is a combined Ratio and Range control, and you can see the max Expander action (Range) in the main view at stopped DAW Playback.
Release
Release determines the time the Expander takes to return to the original signal level. This parameter only has an effect, when the Threshold and Range parameters are set in a way that the Expander is actually active.
gauge
| Metric | Value | | --------------- | --------- | | Expander Ratio | 1:2.00 | | EXPANDER | 250 ms | | RELEASE | (no label) |5.7 Compressor
Compressor Example:
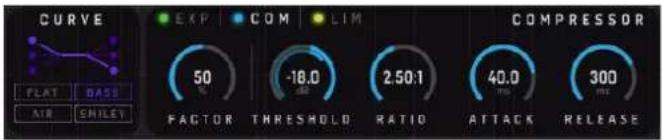
• Curve is set to BASS (for all EXP/COM/LIM)
• Compressor controls are BLUE
• Factor for the Compressor is 50%
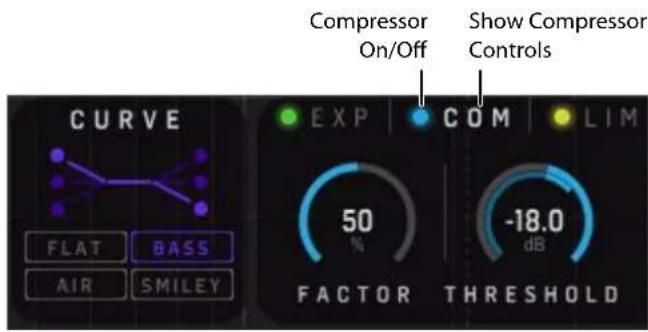
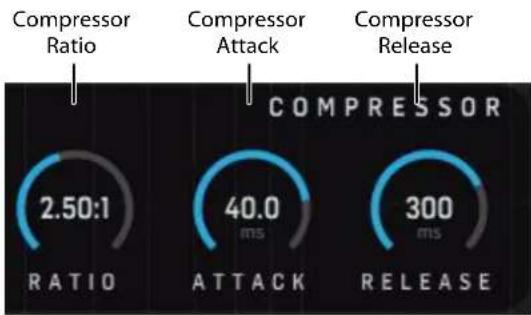
- Mid Band Compressor settings are: Threshold -18.0, Ratio 2.50:1, Attack time 40.0 ms, Release time 300 ms
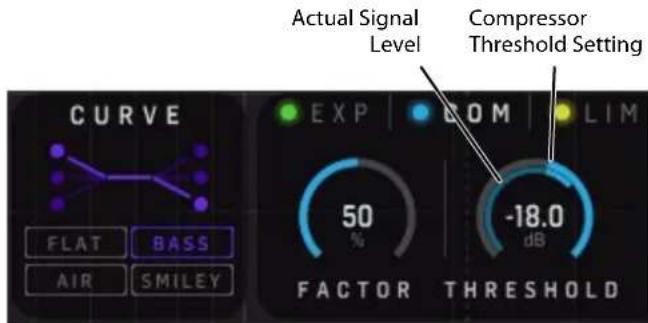
- The Threshold inner-ring shows the average level of the currently-playing program. The outer-ring shows the current Threshold setting
- Click on the blue light next to "COM" to turn the Compressor on/off
- Click on "COM" to highlight the text and show the Compressor controls
- Click on "EXP" or "LIM" to show the Expander or Limiter controls
Enable-Switch
3-Band Compressor on/off
Threshold
Sets the Compressor's threshold, above which level it starts processing. Levels exceeding the threshold will be compressed.
Note: Due to the auto-makeup of the Compressor, you may find it suitable to adjust the Input Gain in combination especially with the Compressor Threshold, in order to balance the coloring and amount of compression in each frequency band, otherwise defined by Compressor Threshold, Ratio, Curve, Factor and Band Gains.
Note: The Threshold can be easily set by using the level meter inside the Threshold parameter ring. A highlighted overlap between the signal level and threshold rings will indicate that the Compressor is in action and is reducing the gain.
Ratio
Determines the amount of compression, the higher the ratio the "stronger" the processing and the lower the output dynamics range.
Attack
The Compressor's attack time determines how fast the compressor will react on signals exceeding the threshold. Shorter attack times will compress harder but might introduce a "pumping" sound. Note: You may want to increase the Look Ahead Delay in order to better catch transients.
Release
The Release time determines how fast the compressor returns to not compressing, whenever the level falls below the set Threshold.
gauge
| Metric | Value | | ---------------- | --------- | | Ratio | 2.50:1 | | Attack | 40.0 ms | | Release | 300 ms |EN
5.8 Limiter
Limiter Example:
• Curve is set to BASS (for all EXP/COM/LIM)
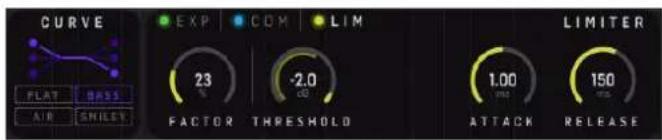
• Limiter controls are YELLOW
c • Factor for the Limiter is 23%
- Mid Band Limiter settings are: Threshold -2.0, Attack time 1.00 ms, Release time 150 ms
- The Threshold inner-ring shows the peak level of the currently-playing program. The outer-ring shows the current Threshold setting
- Click on the yellow light next to "LIM" to turn the Limiter on/off
- Click on "LIM" to highlight the text and show the Limiter controls.
- Click on "EXP" or "COM" to show the Expander or Compressor controls
Enable-Switch
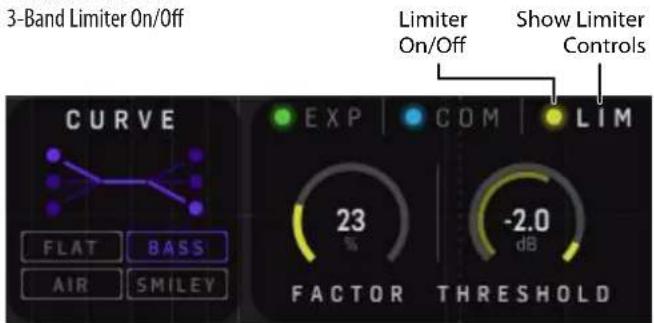
Threshold
When the signal exceeds the set Threshold, the Limiter processes it with a ratio of "infinite-to-one" to limit the possible maximal level.
Note how the Threshold can be easily set by viewing the inner-ring level meter inside the Threshold parameter outer-ring. A highlighted overlap between the signal level and threshold rings will indicate that the Limiter is in action and limiting the signal.
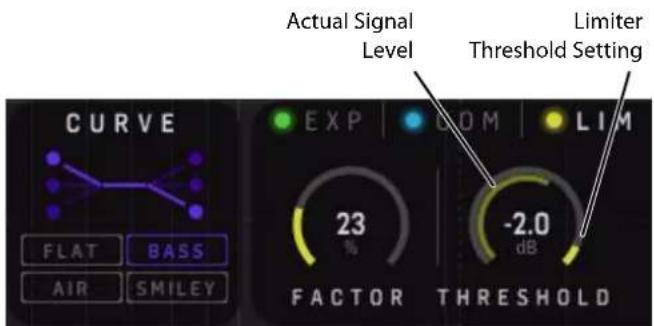
Attack
The Limiter's attack time determines how fast the limiter will react on signals exceeding the threshold.
Note: You may want to increase the Look Ahead Delay in order to better catch transients.
Release
The Release time determines how fast the limiter returns to not limiting, whenever the level falls below the set Threshold.
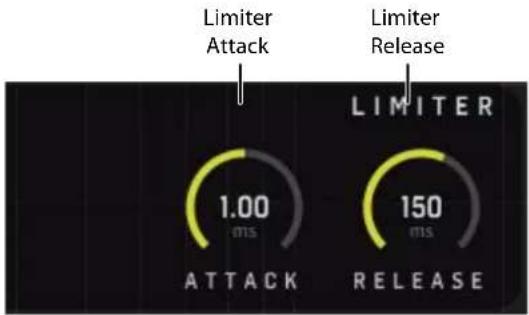
gauge
| Event Type | Value | | ---------------- | --------- | | Limiter Attack | 1.00 ms | | Limiter Release | 150 ms |5.9 Crossover Frequencies and Band Gains
MASTER X HDs crossover filters are designed to not introducing any split- and recombination filter anomalies, unlike many other multiband compressors on the market, and is therefore ideal as both channel, submix-bus or master-bus insert.
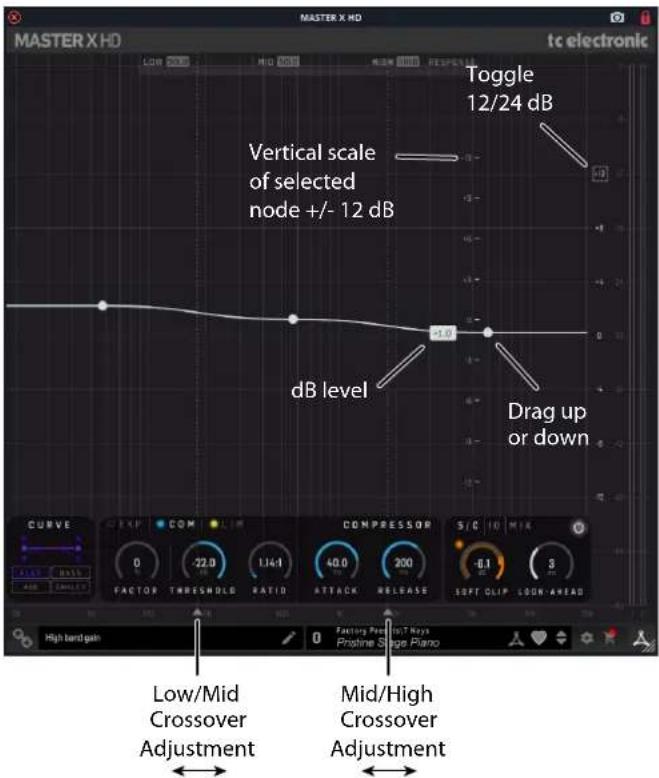
You set the crossover frequencies for the 3 bands using the arrows underneath the controls boxes and the band gains using the control balls. Both can be typed in as well after double clicking the control handles.
You can set both the crossover frequency and band level of a band by holding Ctrl + mouse drag. The minimum bandwidth of a band is one octave. The exact gain is displayed numerically next to the band gain controls.
Note that the band gains are applied on the compressor input and are therefore affected by the amount of compression. Higher gain leads to more compression. This way, the amount of compression in the 3 bands can thereby be relaxed or increased.
The level of each band can be adjusted by either:
- Selecting the white node in the center of each band, and dragging it up and down. A vertical scale appears at the node position, showing the adjustment level +/- 12 dB from level.
- Selecting the white node and clicking on the pop-up text box, and entering a dB level from +12 to -12 dB.
- The vertical scale and the current dB level appear when the mouse is on the node.
- Note: It is possible to change the zoom level on the Y-axis in case the main view graphs have reached the current view limits due to less-subtle processing settings. The vertical scale can be changed by clicking on the +12 on the top right edge scale to change it to +24 dB. Click again to return to +12.
The frequency of the Low/Mid and Mid/High crossover points can be adjusted by either:
• Drag the two arrows left or right at the bottom of the display.
- Alternatively, click on the numeric value that appears when the mouse is over the "arrow," and then type in the new value.
5.10 Soft Clip
The analog-style softclipper sits at the output of the Master X HD, after the Limiter and Mix, but before the Output Gain.
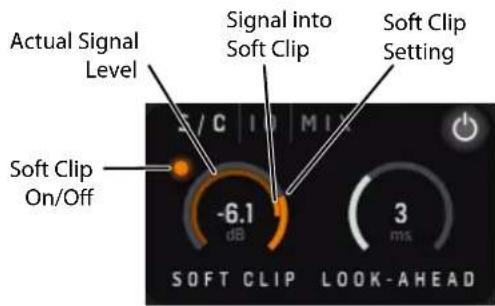
When the signal exceeds the set Threshold, the softclipper starts soft-clipping the transients with a smooth and refined curve.
Note how the Soft Clip threshold value can be easily set by viewing the level meter inside the Soft Clip parameter ring. A highlighted overlap between the signal level and threshold rings will indicate that the softclipper is in action and soft clipping the signal.
Note that the Soft Clip features low-frequency de-emphasis/emphasis filtering, which makes it suitable for a wider variety of content, including bass-dominant signals.
Using the Soft Clip Enable button you can easily check if the current setting is to your liking on your specific audio content.
EN
5.11 Mix
The Mix feature is new to the MASTER X HD, compared to MASTER X3 for Pro Tools/Powercore. It enables parallel compression, where the Dry signal is mixed with the Compressed signal, and the two signals are time-aligned perfectly within the MASTER X HD, eliminating any potential phase issues. This is something that can be a challenge in some DAWs, and makes the MASTER X HD perfectly suited for placing as an insert on either a channel, a sub-mix bus or the master bus output.
Note that the "WET" signal chain includes all three processing blocks, Expander, Compressor and Limiter.
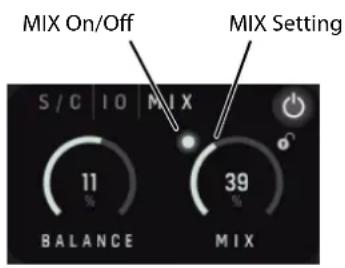
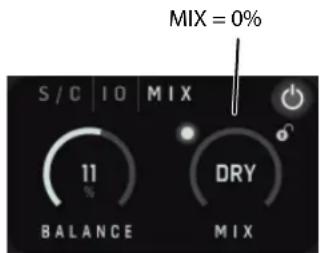
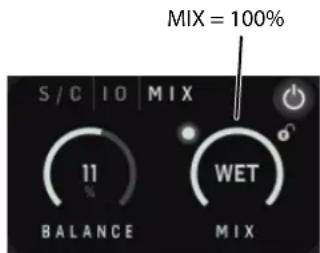
Parallel compression, sometimes called New York compression, or upward compression, reduces the dynamic range of your content by bringing up the softest parts, enhancing the details while preserving the transients. Sometimes, upward and downward compression is used in series for less audible "compression" or for really "heavy compression." A setup with two instances of MASTER X HD is ideal for this trick and there are suitable presets "pairs" located in the Preset - Tools menu for this purpose.
The only processing done after MIX is Soft Clipping, Output Gain, and Balance.
Using the Mix Enable On?Off button, you can easily check if the current setting is to your liking on your specific audio content.
More details can be found in the Dry/Wet Mix or Parallel Compression chapter.
5.12 SoftClip/IO/MIX controls
Click on the S/C, IO, or MIX text to view or hide three pairs of controls. The settings of these controls are saved with each preset.
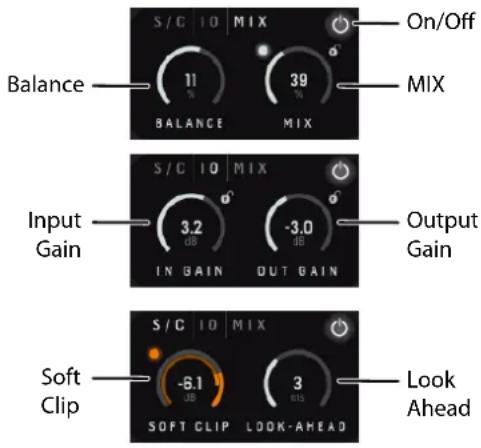
Input Gain
Use this control to adjust the input levels to suit, dependent upon where the MASTER X HD is used, on a channel, a bus, or the master bus. Observe the input level meters.
Note: Due to the auto-makeup of the Compressor, you may find it suitable to adjust the Input Gain in combination, especially with the Compressor Threshold, in order to balance the coloring and amount of compression in each frequency band, otherwise defined by Compressor Threshold, Ratio, Curve, Factor and Band Gains.
Output Gain
Use this control to adjust the output levels to suit, dependent upon where the MASTER X HD is used, on a channel, a bus, or the master bus. Observe the output level meters. The gain control sits on the output of MASTER X HD.
CAUTION: If the MASTER X HD sits as the final insert on the Master Bus, you must ensure that no peaks exceed 0dBFS. Observe the output level meters and make sure the peaks do not go into the red.
Balance
Use this control to adjust the output left/right balance. It sits before the Soft Clip.
Look-Ahead Delay
Master X HD can "look into the future" and in this way, be prepared for sudden peaks in your material, thus ensuring a much better quality processing. Increase the setting to better catch transients, or decrease the setting to add some Compressor/Limiter punch.
6. Navigating the MASTER X HD Desktop Controller (optional)
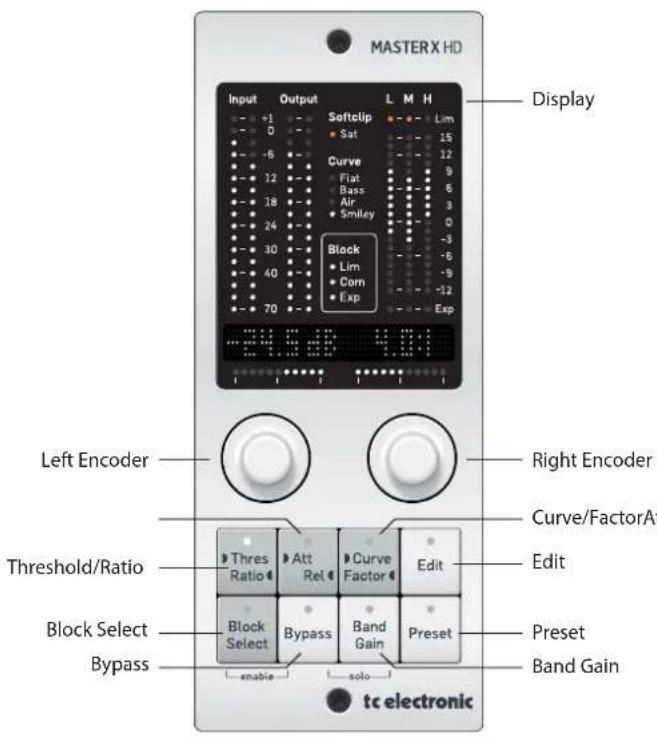
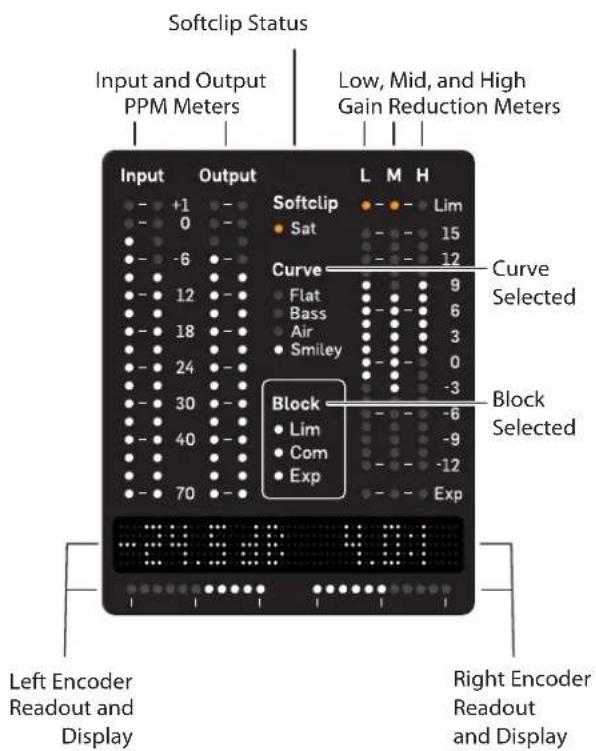
Note that the Compressor meter is a +/- Iniear scale like in the plugin that show both gain reduction and makeup gain.
Block Select Button
Selects between editing the Expander, Compressor, or Limiter.
Each block can be enabled/disabled by holding Block Select and Bypass.
The individual Block LEDs in the display will light up when a Block is enabled and be turned off when disabled. The selected Block will blink. If the selected Block is disabled, the red LED in the Block Selected button will also blink.
Thres/Ratio Button
For the selected block, the Thres/Ratio button will assign Threshold to the left encoder and the Ratio to the right encoder.
The value for each parameter will be shown in the display above, and the LED bar will show the value setting in the value range. This is similar to the circles in the plugin.
Attack/Release Button
For the selected block, the Attack/Release button will assign Attack time to the left encoder, and Release time to the right encoder.
kThe release for each parameter will be shown in the display above, and the LED bar will show the value setting in the value range.
Curve/Factor Button
For the selected block, the Curve/Factor button will assign Curve to the left encoder and the Factor to the right encoder.
The value for each parameter will be shown in the display above, and the LED bar will show the value setting in the value range.
Note that Curve is an overall setting, while Factor is individual for the expander, compressor, limiter.
Edit Button
This allows adjustment of overall parameters such as Softclip, Mix, In/Out Gain, Balance, Look Ahead Delay, and Cross Over Frequencies.
Parameter selection is assigned to the left encoder, and the individual parameter's setting is adjusted on the right encoder.
Band Gain Button
The Band Gain button assigns the Band selection to the left encoder, and the selected Band's Gain to the right encoder.
SOLO the selected band by pressing Band Gain + Bypass.
While in SOLO mode, you can select other bands. Exit the SOLO mode by pressing the Band Gain button again.
Preset Button
Press the Preset button to browse through the available presets. Either of the encoders will browse to new presets, and while browsing, the Preset button LED will blink. When a desired preset is reached, it can be loaded by pressing the Preset button again, whereby the button LED stops blinking. An edited preset is marked "xx." in the module display.
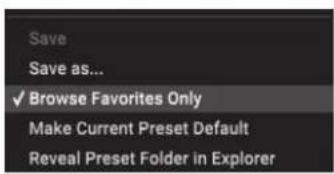
Note: It is possible to browse all presets, or browse the favorite presets only. The choice of browsing method is done in the plugin.
EN
7. Dynamics Processing In-Depth
The multi-band compressor splits the signal gently into 3 overlapping bands - the low, mid, and high frequencies. It will then compress each band somewhat independently. Thereby, for example, a powerful kick-drum will not modulate the processing of the lead vocals. After compressing/expanding, the 3 bands are combined again. Although each "band" thus has its own compressor/expander, the Curve/Factor and Threshold/Ratio provide a powerful means of controlling them together.
7.1 Compressor
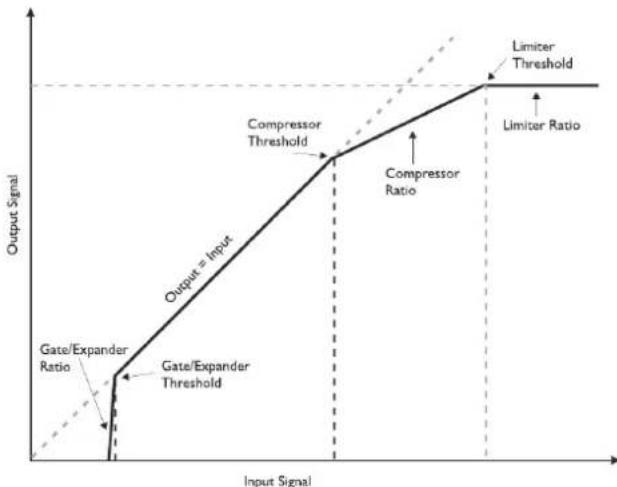
The very basis of compression can be reduced to "controlling the dynamic content" of an audio signal. This basically means turning down the loudest parts of the source material and raising the volume of the parts with low level content. But how this is done, and how this is applied in audio production, is slightly more elaborate.
Keep an eye on the illustration below and let us look at the basic compression parameters:
line
| Input Signal | Output Signal | Annotation | | ------------ | ------------- | ----------------------- | | Low | Low | Gate/Expander Ratio | | High | High | Limiter Ratio | | Middle | Medium | Compressor Ratio | | Upper | Maximum | Limiter Threshold |Threshold
The Threshold parameter sets the limit where the compressor kicks-in/releases its grip of the signal. As soon as the level is above the set threshold the compressor is active. When below - it is not.
Ratio
The Ratio sets the amount of gain reduction applied when the signal exceeds the threshold. In the illustration above, the Ratio is the steepness of the curve after the compressor threshold.
Attack
The Attack time is the time it takes for the compressor to reach the compression amount specified by the set ratio.
Release
The Release time is the time it takes for the compressor to release the signal after the input signal is below the threshold point again. How each of these parameters are set is very important, and only the correct combination gives the desired result.
Examples of Compressor Threshold, Ratio, Curve, and Factor
Let us look into setting the Threshold and Ratio. In many cases, you would use a low threshold, in combination with a small ratio and vice-versa. Let us choose a low threshold of -23 dB and a small compression ratio of 2.5:1.
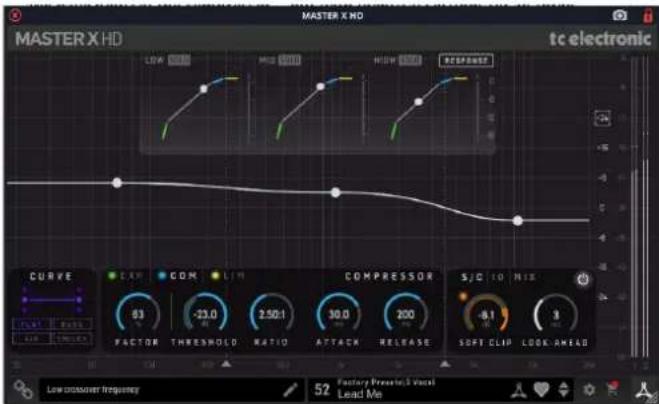
We have now set the compressor – but with identical settings for all three bands, assuming the Curve is Flat or the compressor factor is 0. With identical settings, we are not taking full advantage of the multiband capabilities. This is where the convenient Target Curves and the Target Factor come in.
The overall Target Curve setting creates different settings for each of the three bands. The displayed values for each parameter are always the mid-band settings. If the Target Curve is set to "Flat" (or if the Target Factors are set to "0"), the values will be identical for all three bands. If you select the "Air" curve, for example, the high band will be compressed more and become more pronounced than the others.
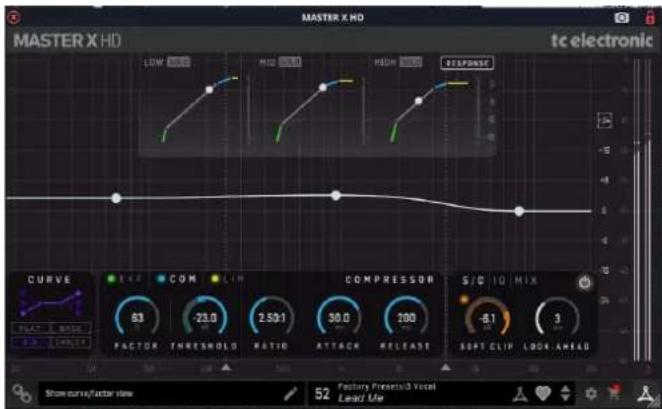
The Target Factor setting defines how much of the selected Target Curve characteristics will influence the high or low band. To set the Target Curve and Factor properly, we recommend that you compare the processed signal with the uncompressed, because you can use it to change the overall sound impression — a lot. Does your channel or track lack treble? Use the "Air" curve and adjust the target factor to your liking. Too bright? Select "Bass" and adjust the target factor. Not enough treble and bass? Go for "Smiley".
Examples of Attack, Release and Crossover frequencies Let us look into how to set the Attack and Release Times.
We start with small values for both parameters. If the attack time is too short, we may remove some nice transients or "kick" from the material. This may not be what we want, so we could try a greater value instead. Heavy peaks can be smoothed using the limiter section.
If the release-time is too fast, it may result in a "pumping" effect, because the compressor returns to the uncompressed signal immediately whenever the signal falls below the compressor's threshold setting. If so, we could increase the value of the release time until we are satisfied with the result.
You could start with an Attack time of 1ms and a Release time of 0.2s.
If you do not get the desired result, you could also try some different crossover frequencies. Keep in mind that you have three independent bands – why should a bass drum signal affect the mid and high bands when its peak is in the low end? You could start out by using 125 Hz and 2.5 kHz if applied on drums, or 315 Hz and 3.15 kHz if applied on a full range mix.
Note: Sometimes it is easier to adjust the Attack and Release times and the Crossover frequencies by using extreme values for Threshold and Ratio during setup. This will make the effect of your settings much easier to hear. Additionally, the band SOLO-Function helps to focus on a single band. Keeping Mix set to 100% WET will also help making the processing audible.
Band Gains
The Band Gains in the main display supply you with an additional tool for easily adjusting the sound of your mix. You may want to use them like a low, mid, treble EQ.
Note that the band gains are applied to the input of the compressor, so they affect to what extent the individual bands are compressed. Higher gain leads to more compression.
7.2 Limiter
The Limiter is actually yet another compressor. It uses a very fast attack time and has a ratio of 1 to infinity. But why is the Limiter necessary?
For the compressor to be used as a musical tool, the set attack times are relatively long (from 1 to 100ms). This gives the disadvantage that certain peaks can pass. Therefore a limiter with an attack time of as little as 0.1ms and a ratio of 1 to infinity prevents nearly all overshoots.
You may want to use the Limiter carefully, as a limiter is always a somewhat "drastic" tool to apply to your audio. If on a full mix, just a couple dB should be enough to limit strong peaks. If on a channel, feel free to sculpt your sound but beware that the more compressed and limited it is, then the less "life" and more "ear-fatiguing" it will most likely sound.
As an example, you could chose a threshold of -6 dB. The Attack time could be short (0.2 ms), so the Limiter is capable of catching transients. The release time could be set to a value that could avoid unwanted pumping (0.3 s).
Set the target factor in the same way you set the compressor. The higher Factor value, the more pronounced the Curve setting will be on the material.
7.3 Gate/Expander
By compressing the signal, we made it sound louder due to the auto make-up gain in the compressor. An unwanted side effect is that the ground floor level is also brought up. The noise will be most evident in the pauses.
The Expander is one possible cure for this, as it will reduce audible noise when applied to vocal tracks, for example.
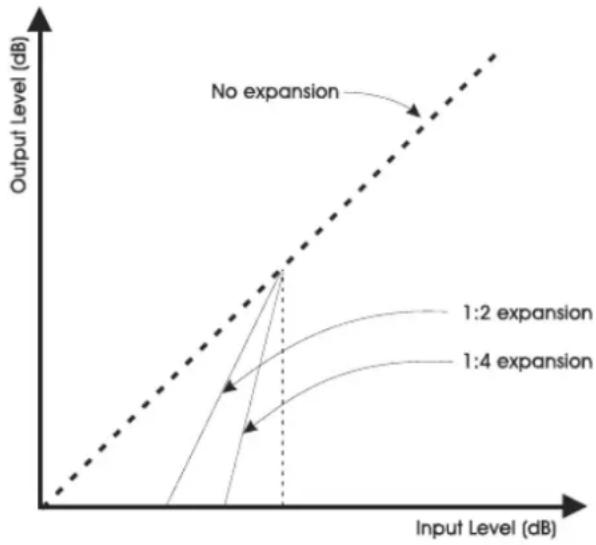
line
| Input Level (dB) | Output Level (dB) - No expansion | Output Level (dB) - 1:2 expansion | Output Level (dB) - 1:4 expansion | | ---------------- | -------------------------------- | --------------------------------- | --------------------------------- | | Low | Low | Low | Low | | Medium | Medium | Medium | Medium | | High | High | High | High |Noise, whether it is hiss, hum or just background noise, is always a parameter to evaluate and deal with. Initially, noise must of course be reduced to a minimum from the source, but with a Gate/expander it is also possible to reduce the noise on channels when no significant signal is present.
A Gate - or downward expander, - is used to attenuate the signal when the signal is below a certain threshold. When talking about attack and release times in reference to a noise gate: - the attack time is the time is takes for the gate to "open" when the signal rises above the threshold and the release time is the time it takes for the gate to reach the specified attenuation.
Use the Expander carefully. The modulated noise, due to the Expander shifting between opening up and reducing the noise, of the ground floor level is much more audible than a higher ground floor level without such modulation.
The Expander's threshold must be lower than the compressor's threshold. If you raise it too much, you might cut into low parts of the signal, such as reverb tails.
The Expander's Ratio parameter determines the width of the level range.
Note: The Attack time is a critical parameter for an expander. A short Attack time will be suitable for transient content like drums, but may create audible artefacts if applied to less transient content like drone synth sounds.
Note: A rather seamless way to reduce noise by using a gate or expander, is to turn down the treble, then the mids and then the bass. This is possible by setting the Target Curve to "Air" and apply some Target Factor to the Expander. Choosing the "Bass" curve will do the opposite.
EN
7.4 Modern Mastering, Loudness and True-Peaks
The MASTER X HD is a multi-band dynamics-multi-tool, highly suitable for the mastering process, with many ways to make your mix sound better, but if not used wisely, there are many ways of making it sound worse!
There is a risk of becoming speed-blind in the tuning process, and at first prefer an over-compressed and loud-sounding track. This is a situation that can be avoided by:
- Knowing your music genre deeply
• Using relevant reference tracks for comparison
• Ensuring calibrated monitoring levels - Using an optimized monitoring environment
The resulting Loudness and Dynamic Compression are two of the most important properties of a track, adjusted finally in mastering. These two properties can be regarded as counterparts to each other. In other words, it is important to:
• Decide how loud your tracks should be
• Design the dynamic profile of your music
Due to the fixed 0 dBFS ceiling, louder tracks have less dynamics, and "weaker" tracks will potentially have more dynamics.
We recommend that you do not hyper-compress and limit your tracks to the extreme in the mastering process, in order to achieve a loud track. If you overdo it, it will reduce the audio quality of your work. And often, there is even a penalty in playback stages so your loud track may end up sounding weaker, rather than louder.
74.1 Loudness
The Loudness approach to music mastering is based upon similar methods introduced more than a decade ago by the industry producing audio for TV.
Loudness measures how loud we actually hear audio, which is different from "level" PPM meters that look at transients only. The Loudness method includes K-filtering that emulates human hearing, where bass affects the perceived loudness level less, and where frequencies from approximately 2 kHz and up affect the perceived loudness level more.
Loudness is a modern, but still well-rehearsed reference method, which is standardized in BS-1770, and many music streaming services refer to this standard, or similar proprietary methods.
Loudness is measured on the LUFS metering scale. LUFS stands for "Loudness Units Full Scale." The scale does not measure sound as a dB meter or a VU meter would. Rather, it accounts for how the human ear (and brain) perceives the loudness of a track. That is also why there is only one loudness value or level, instead of one per channel.
Loudness examples: Some Streaming Services will aim for -16 LUFS loudness when they play back music tracks with "Sound Check" enabled. The AES community recommend streaming music between -20 and -16 LUFS. Often you will see songs that measure -14, -12, -10 or even -8 LUFS and it will vary for example by music genre.
7.4.2 True Peak
Often, there can be small peaks of sound in-between digital samples, inter-sample peaks, that go undetected in digital tools including our MASTER X HD. Where traditional peak meters and conventional peak limiters fail to read those true peaks of sound, a True Peak meter will provide the mastering engineer with the actual reading.
Without a True Peak meter and True-Peak Limiter especially, a mastered track could go into digital clipping when converted to a lossy format like MP3 or AAC or when being Digital-to-Analog converted in normal playback systems. This can happen, even if no distortion is heard when monitoring the final master.
For a modern, versatile and trustworthy mastering chain, we recommend the BRICKWALL HD True-Peak Limiter is inserted after the MASTER X HD to ensure elimination of the potential and problematic inter-sample peaks in your final master track.
7.43 Beware of The Loudness Wars
An important note on loudness, is that there has been a trend in mastering toward making songs appear louder and louder. Since you can never exceed the 0dBFS digital ceiling, applying a brickwall Limiter at the final stage, the result often has been to apply very aggressive settings on dynamics tools such as multiband compressors, so-called 'loudness optimizers', as well as the final Brickwall Limiter itself. This phenomenon has been referred to as 'The Loudness Wars'.
This escalated because we naturally perceive a louder version of a song to be better than a softer version, when you compare them directly. Another cause is that record industry people would compare an 'airplay' version of one track to a newly mastered CD track, where the former tended to sound louder and fatter due to FM broadcast processing – leading to a request to make the master louder, with more cowbell. Well, the 'wars' may have peaked, but it is still something that you should be aware of and pay attention to. And while we say that they may have peaked, they are not completely over...
Further, if you apply extreme amounts of compression, distortion occurs, which may lead to listening fatigue for you as well as your audience. Of course, the amount of compression that you can use in order to fit a certain music genre can vary, but just stay aware of how it affects your music, and act accordingly.
It is also very important that you always listen to your own mastering project and your reference library at the same loudness level when you compare them. There is no doubt that while a heavily compressed song – dynamically speaking – may sound more impactful at first, you will sacrifice detail and nuance.
Finally and as mentioned above, keep in mind that the current trend in music streaming is a target loudness of approximately -16 LUFS, so if you deliver a significantly louder song, it will get turned down automatically if the listener chooses to apply the 'normalization' feature such as 'SoundCheck' or 'Same Level' that aligns the loudness of the songs in the library. And if that happens, your very loud song may well end up sounding much less impressive than the competition!
7.4.4 Compress-O-Meter - Master Analyser
TC Electronic has launched a free on-line service at the following address:
https://finalizer.com/analyzer
This analyzer can help you investigate and decide the suitable loudness level and amount of dynamics processing for your music, when you compare it to your preferred reference tracks, or pre-analyzed giant hits through the history.
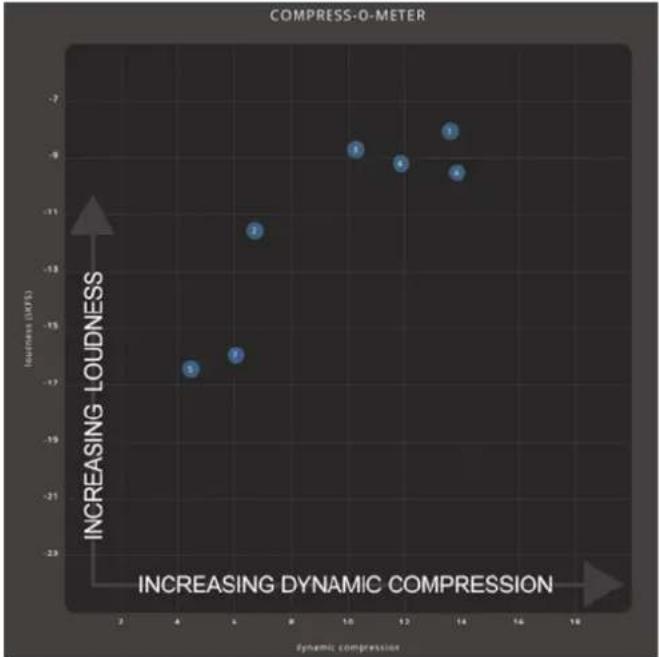
A central part of this service is the Compress-O-Meter:
scatter
| Dynamic compression | Increase (MPE) | Label | | ------------------- | --------------- | ----- | | 4.5 | -16.8 | 3 | | 5.0 | -16.5 | 7 | | 10.5 | -9.0 | 1 | | 12.0 | -9.2 | 4 | | 13.5 | -8.8 | 1 | | 14.0 | -9.5 | 2 | | 14.5 | -9.8 | 3 |The X-axis is the amount of Dynamic Compression. It is unit-less, so you should not add "dB", "ratio", or similar, when thinking about it.
The Dynamic Compression is based on the track's Peak-to-Loudness (PLR) value and a measurement of the micro-dynamics of the track.
- Very dynamic music with lots of transients and loud and soft passages, will have a low Dynamic Compression value, to the left in the Compress-O-Meter.
- Very dense music with little transients, will have a high Dynamic Compression value and show up to the right.
The Y-axis is the full track Loudness value, shown in LUFS (Loudness Units Full Scale).
7.45 Modern Mastering
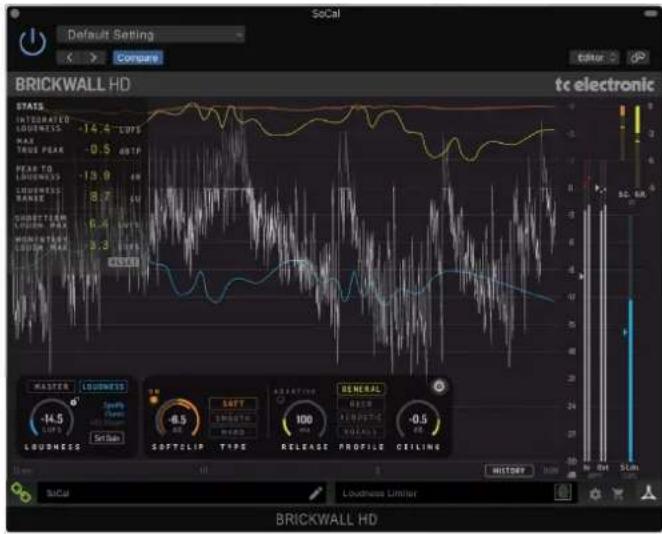
Another highly-relevant combination of processing can be carried out with MASTER X HD and the TC Electronic BRICKWALL HD limiter in series, as the last step before bouncing your mix or master.
The BRICKWALL HD will add True-Peak limiting and Loudness awareness to your chain, which will ensure a solid master audio file that will comply with any play back system or streaming service.
There are suitable presets "pairs" located in the Preset menus of the two plug-ins as an aid to using the two plug-ins together.
EN
8. Presets
The MASTER X HD offers a collection of factory presets, as well as the option to create and save your own custom settings as user presets and favourites.
Note that most DAWs have a built-in preset function that appears on every plug-in, which is often found at the top of the plug-in window.
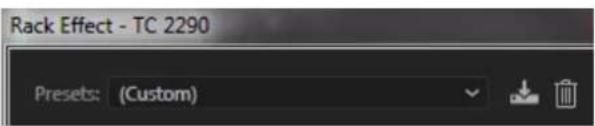
It is not recommended to use this as your primary method of saving presets, as it has limited functionality and does not allow the saved presets to be transferred easily to other DAWs. Instead, we suggest using the Preset section at the bottom right corner of the user interface window:

A single click on this PRESET window brings up a menu with several preset-related options. You can recall a factory or user preset from the libraries, save the current preset, or create a new user preset with the 'Save as' option.
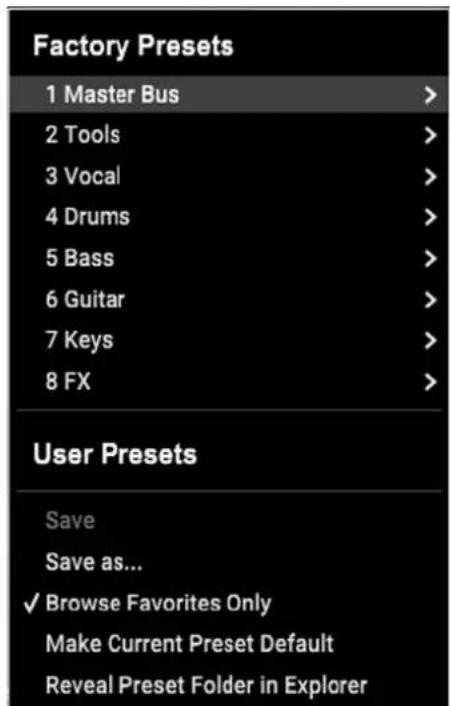
The presets menu is divided into Factory Presets and User Presets.
8.1 Factory Presets
Factory presets are built into the plug-in and cannot be overwritten, so if a factory preset is modified and you want to keep the changes, you need to save it as a User preset. User presets can be edited and organized as you like.
When recalling a Factory preset or saved User preset, the name will appear in plain text as shown below.
50
Factory Presets\3 Vocal De-Ess
8.2 User Presets
If you make an alteration to any of the parameters in the current preset, the preset name changes to italics as a reminder that something has changed from the original factory preset.
50
Factory Presets\3 Vocal De-Ess
To save this new setting as a User preset, click in the PRESET window, then select the Save As option. Save it with an appropriate name.
To discard the changes without saving, simply navigate away from that preset.
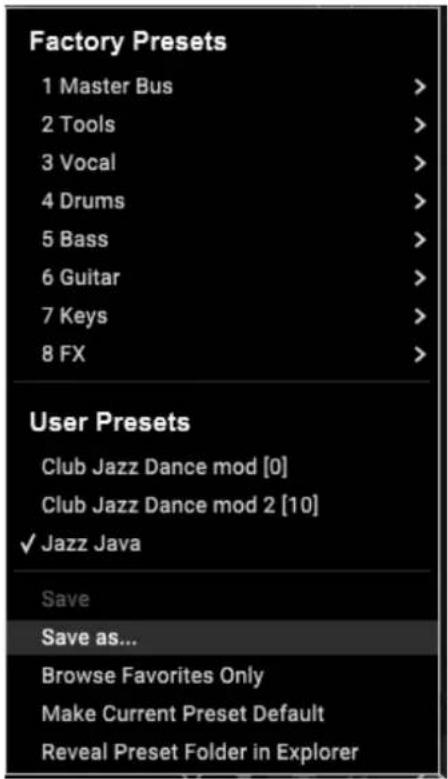
The altered preset will be saved as a user preset, with your new name for it, and its name will appear in the presets window.
\*\*
User Presets Jazz Java
If you modify a saved user preset, you have the option to "Save" (rewriting over the existing user preset) or "Save As" (save as a new user preset).
If you modify a factory preset, then only "Save As" is available (to save as a new user preset). Factory presets cannot be overwritten.
User presets are not given a number unless you first assign them as favourites. (See Favourite Presets below.)
You can use your computer's keyboard to enter a specific preset number, followed by the ENTER button.
8.3 Presets and the optional hardware unit
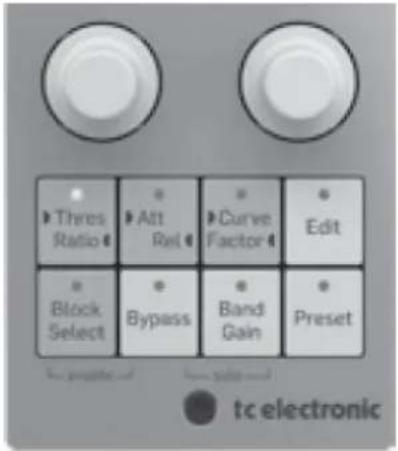
Presets can also be recalled from the hardware unit by pressing the PRESET button. Rotate the hardware knob to scroll through presets one slot at a time.
8.4 Favorite Presets
Creating your own presets will make them accessible from the Preset menu, but they will only appear in the list of 100 presets in the plug-in or hardware unit if you set them as a favorite. This is done by assigning a favorite slot number to the preset using the Favorite menu.
Click the FAVORITE (heart-shaped) button in the preset window, then select one of the 10 banks. Assign one of your custom presets to a favorite slot, then save the preset.

![[0] Club Jazz Dance [1] Less Brilliance [2] Loudness Soft [3] Not Assigned [4] Not Assigned [5] Not Assigned [6] Not Assigned [7] Not Assigned [8] Not Assigned [9] Not Assigned Assign Favorite 0 > 10 > 20 > 30 > 40 > 50 > 60 > 70 > 80 > 90 > Remove assignment](/content/2026/05/985153/images/af5401ab6e877708105483136b6092fa801854246ecd8757551e28e2bb96bd81.jpg)
When a preset is assigned a favorite slot number:
- The preset is part of the 100 presets that can be recalled on the hardware unit
- The favorite number will be displayed on the hardware unit when recalled
- The favorite number will be locked so that two presets cannot be assigned to the same favorite slot number. This is shown in the Favorite menu by graying out the number in question.
- The favorite number will be displayed in brackets when you browse the presets menu
You can remove the favorite assignment by selecting the "Remove Assignment" feature in the Favorite menu, then saving the preset.
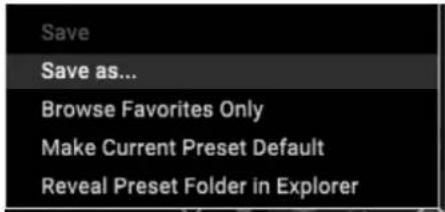
Browse Favorites Only
The 'Browse Favorites Only' option in the preset menu allows the UP/DOWN arrows in the bottom bar of the plug-in, or via the hardware unit, to scroll only through the favorites list. Otherwise, scrolling goes through all presets.
8.5 Make Current Preset Default
Selecting 'Make current preset default' will cause this preset to appear every time a new instance of the plug-in is created.
8.6 Reveal User Preset Folder in Explorer
To change the name of a preset, select 'Reveal User Preset Folder in Explorer' and modify the file name. This will open a Finder (Mac) or Explorer (PC) window where the user presets are stored. You can rename as well as delete, copy and paste presets. This allows you to share presets with other users online, simply pasting the new ones in this folder.
EN
9. Software Updates
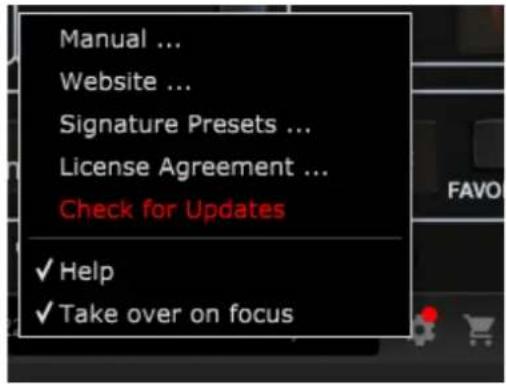
New versions of the software may be released to add new features and improve performance. Updates can be detected from the plug-in directly and can be installed after download from the website. See Chapter 2 for plug-in installation.
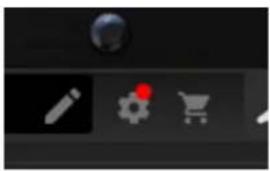
If the 'Automatically check for updates' option is checked inside the update menu, the red dot will appear on the settings icon when a new plug-in is available.
natural_image
User interface toolbar with icons for pen, gear, shopping cart, and mouse (no text or symbols)Click the gear icon and select "Check for Updates" to perform a scan.
9.1 Hardware Unit Software Updates (optional)
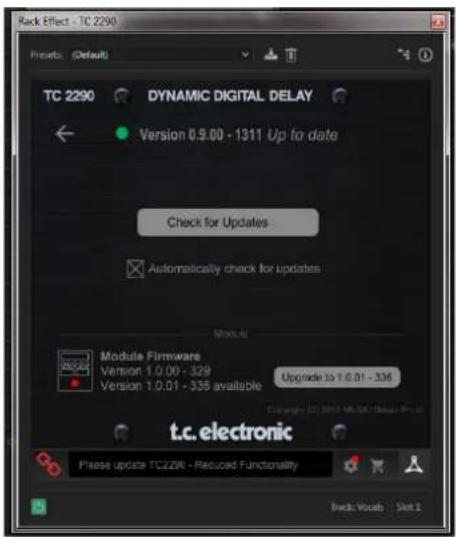
The hardware unit firmware will be included in each plug-in update.
After you have installed a new plug-in, the system will detect mismatched firmware and indicate a need for update via a small red dot on the gear icon.
Click the "Upgrade to x.x.xx" field to start the update. Progress will be indicated in the plug-in, and the Feedback LED on the hardware unit will flash. (This example shows a TC2290 plug-in.)
10. Specifications
Sound
Processing 3 Band expansion/compression/ limiting, softclip, and mix
Sample rates 44.1, 48, 88.2, 96, 176.4, 192 kHz
Software Support
Operating systems Mac OS X 10.13 Sierra or above, Windows 7 or above
Drivers No additional drivers required, uses standard USB HID drivers
Plugin formats AAX-native, Audio Units, VST2.4, VST3.64 bit
USB Connection (DT version)
Type USB 2.0, type micro-B
Power (DT version)
Power supply USB bus powered
Power consumption Max. 2.5 W
Physical (DT version)
Dimensions (HxWxD) 42 x 54 x 135 mm (1.7 x 2.1 x 5.3")
Weight 0.19 kg (0.42 lbs)
Note: Operation Ambient Temperature up to 45°C
FEDERAL COMMUNICATIONS COMMISSION COMPLIANCE INFORMATION
TC Electronic
MASTER X HD DT
Responsible Party Name: Music Tribe Commercial NV Inc.
Address: 901 Grier Drive
Las Vegas, NV 89118 USA
Phone Number: +1 747 237 5033
MASTER X HD DT
This equipment has been tested and found to comply with the limits for a Class B digital device, pursuant to part 15 of the FCC Rules. These limits are designed to provide reasonable protection against harmful interference in a residential installation. This equipment generates, uses and can radiate radio frequency energy and, if not installed and used in accordance with the instructions, may cause harmful interference to radio communications. However, there is no guarantee that interference will not occur in a particular installation. If this equipment does cause harmful interference to radio or television reception, which can be determined by turning the equipment off and on, the user is encouraged to try to correct the interference by one or more of the following measures:
- Reorient or relocate the receiving antenna.
- Increase the separation between the equipment and receiver.
- Connect the equipment into an outlet on a circuit different from that to which the receiver is connected.
- Consult the dealer or an experienced radio/TV technician for help.
This device complies with Part 15 of the FCC rules. Operation is subject to the following two conditions:
(1) this device may not cause harmful interference, and
(2) this device must accept any interference received, including interference that may cause undesired operation.
Important information:
Changes or modifications to the equipment not expressly approved by Music Tribe can void the user's authority to use the equipment.

natural_image
Abstract black geometric shape resembling a stylized letter or symbol (no text or symbols present)TC ICON
SERIES
- MASTER X HD NATIVE / MASTER X HD-DT
- EN
- Table of Contents
- Important Safety Instructions .... 3
- Legal Disclaimer....3
- Limited warranty....3
- Introduction......4
- Plug-in Installation....4
- Activate your MASTER X HD ....
- iLok license 5
- Connection and Setup 6
- User Interface......8
- Navigating the MASTER X HD Desktop Controller (optional)....17
- Dynamics Processing In-Depth ...... 18
- Presets 22
- Software Updates ...... 24
- Specifications....24
- Important Safety Instructions
- Caution
- LEGAL DISCLAIMER
- LIMITED WARRANTY
- Introduction
- Multiband Dynamics Technology
- Three Strikes and you're in!
- Intuitive – yet advanced
- About this manual
- Plug-in Installation
- Installation on a PC
- Installation on a Mac
- Activate your MASTER X HD iLok license
- Activation when you have purchased the NATIVE version
- Step 2: Activation
- Get a Free Demo License
- Step 1: Install iLok
- Step 2: Get your free license
- Step 3: Activation
- Connection and Setup
- Connecting the MASTER X HD-DT Desktop Controller (optional)
- Operating the MASTER X HD
- Insert vs Aux Effect
- Mono/Stereo Operation
- Plug-in and Hardware Controls
- Connection Status to the Hardware Unit
- User Interface
- Overview
- Controls
- Bypass On/Off
- Main Display
- Meters
- Static Response View
- Low, Mid, High Band
- Target Curve And Target Factors
- Target Factor
- Target Curves
- Flat
- Bass
- Air
- Smiley
- Expander
- Threshold
- Ratio
- Release
- Compressor
- Attack
- Limiter
- Crossover Frequencies and Band Gains
- Soft Clip
- Mix
- SoftClip/IO/MIX controls
- Input Gain
- Output Gain
- Balance
- Look-Ahead Delay
- Navigating the MASTER X HD Desktop Controller (optional)
- Block Select Button
- Thres/Ratio Button
- Attack/Release Button
- Curve/Factor Button
- Edit Button
- Band Gain Button
- Preset Button
- Dynamics Processing In-Depth
- Compressor
- Examples of Compressor Threshold, Ratio, Curve, and Factor
- Examples of Attack, Release and Crossover frequencies Let us look into how to set the Attack and Release Times.
- Band Gains
- Limiter
- Gate/Expander
- Modern Mastering, Loudness and True-Peaks
- Loudness
- True Peak
- Beware of The Loudness Wars
- Compress-O-Meter - Master Analyser
- Modern Mastering
- Presets
- Factory Presets
- 50
- User Presets
- \*\*
- Presets and the optional hardware unit
- Favorite Presets
- Browse Favorites Only
- Make Current Preset Default
- Reveal User Preset Folder in Explorer
- Software Updates
- Hardware Unit Software Updates (optional)
- Specifications
- Sound
- Software Support
- USB Connection (DT version)
- Power (DT version)
- Physical (DT version)
- FEDERAL COMMUNICATIONS COMMISSION COMPLIANCE INFORMATION
- TC Electronic
- MASTER X HD DT
- Important information:
- TC ICON
- SERIES
Brand : TC ELECTRONIC
Model : Master X HD Native
Category : Software