
3TDIC-2 - Wood stove JOTUL - Free user manual and instructions
Find the device manual for free 3TDIC-2 JOTUL in PDF.


| Product Type | Wood Stove |
| Brand | Jøtul |
| Model | 3TDIC-2 |
| Fuel Type | Wood logs |
| Material | Cast iron with steel components |
| Heating Capacity | Up to 1,200 sq ft (approx.) |
| Heat Output | 40,000 - 60,000 BTU/h |
| Efficiency | Up to 78% |
| Emissions | EPA certified, low emissions |
| Dimensions (H x W x D) | 29.5 x 24 x 22 inches (approx.) |
| Weight | 250 lbs (approx.) |
| Flue Outlet Diameter | 6 inches |
| Flue Outlet Location | Top or rear |
| Door Type | Cast iron door with glass window |
| Glass Type | Ceramic glass, self-cleaning |
| Ash Pan | Removable ash pan for easy cleaning |
| Firebox Depth | 16 inches (approx.) |
| Maximum Log Length | 18 inches |
| Primary Air Control | Manual slide control |
| Secondary Combustion | Yes, for improved efficiency |
| Safety Certification | UL, ULC, and EPA |
| Warranty | Limited lifetime warranty on cast iron |
Frequently Asked Questions - 3TDIC-2 JOTUL
User questions about 3TDIC-2 JOTUL
0 question about this device. Answer the ones you know or ask your own.
Ask a new question about this device
Download the instructions for your Wood stove in PDF format for free! Find your manual 3TDIC-2 - JOTUL and take your electronic device back in hand. On this page are published all the documents necessary for the use of your device. 3TDIC-2 by JOTUL.
USER MANUAL 3TDIC-2 JOTUL
natural_image
Architectural detail drawing of an arched window with intricate carvings and decorative borders (no text or symbols)MODEL 3TDIC-2 INSTALLATION & OPERATING INSTRUCTIONS
SAFETY NOTICE: IF THIS FIREPLACE STOVE IS NOT PROPERLY INSTALLED, A HOUSE FIRE MAY RESULT. FOR YOUR SAFETY, FOLLOW THE INSTALLATION DIRECTIONS. CONTACT LOCAL BUILDING OR FIRE OFFICIALS ABOUT RESTRICTIONS AND INSTALLATION INSPECTION REQUIREMENTS IN YOUR AREA.
Tested & Listed by: OMNITM, Beaverton, Oregon Tested to, UL1482. Test date April 11, 1990. I.C.B.O.Q.C. No. AA-609

Jotul USA, Inc., P.O.Box 1157, Portland, ME 04104
1. General Information
Jøtul is the world's largest manufacturer of solid fuel burning appliances and has been making cast iron wood and coal stoves since 1853. Your new Jøtul stove has inherited the benefits learned from more than 125 years of producing stoves. With proper care and operation, your new Jøtul stove will last many, many years.
The Owner's Manual describes the installation and operation of the Jetul fireplace #3TDIC-2 catalytic equipped wood heater. This heater meets the U.S. Environmental Protection Agency's emission limits for wood heaters sold after July 1, 1990. Under specific test conditions, this heater has shown heat at rates ranging from 10,900 to 30,600 BTU's per hour.
When installing, operating, and maintaining your Jøtul fireplace stove, follow the guidelines given in these instructions. Save these instructions, and make them available to anyone using the stove.
Several areas of the U.S. require a building permit to install a solid fuel burning appliance. The National Fire Protection Association's Code 211 or similar regulations may apply to the installation of solid fuel burning appliances in your area. Your dealer has been specially selected for his knowledge of your local codes and can provide assistance in making sure your installation is safe and legal. Contact your insurance representative or building or fire officials to determine what regulations apply in your area.
2. Hazards Connected to the use of the Jøtul Wood Stove
Any use of fire in the house represents a certain danger. With intense overfiring, temperatures on the surface of the Jøtul fireplace stove can exceed 1000° F (536° C).
Please comply with the following warnings.
- Never overfire the stove. If any part of the stove or chimney glows, you are overfiring, and a house fire or serious damage to the stove or chimney could result. Immediately close down the draft control if you notice this condition.
- Teach children that the stove is hot and should not be touched.
- Never use gasoline, gasoline-type lantern fuel, kerosene, charcoal lighter fluid or similar liquids to start or "freshen up" a fire in this heater. They can ignite with explosive force, causing bodily injury or death. Keep all such liquids far away from the heater while it is in use.
- Never use the stove if there are combustible gases in the house. The fumes from certain cleaning fluids, adhesives, and paints are a few examples of combustible gases. Remem-
ber, the operating woodstove is a source of "open flame".
- Avoid creating a low pressure condition in the room where the stove is operating. Operating an exhaust fan or a clothes dryer could create a low pressure area, causing poisonous gases to come out of the stove into the room. You can prevent a low pressure condition by providing adequate outside combustion air within 24" of the stove.
- Never operate the Jøtul fireplace stove with cracked or broken glass. Replace damaged glass with ceramic glass 4 mm in thickness (available from your dealer).
- Never burn trash of any kind in the stove.
- Keep combustible materials far away from the stove.
- Never modify the stove in any way which is not in accordance with the manufacturer's specifications.
- Do not dry clothes over the stove, since they could fall and ignite.
- Use only seasoned wood in your stove. Never use fireplace coal or synthetic logs.
• Always wear protective gloves when adding fuel to the fire.
- Never operate this stove without the catalyst in place.
- This stove is not approved for use in mobile homes.
3. Installation
Safety Notice: If this stove is not properly installed a house fire may result. For your safety, follow the installation directions. Contact local building or fire officials about restrictions and installation inspection requirements in your area.
Please read this entire manual before you install and use your new stove. Failure to follow instructions may result in property damage, bodily injury, or even death.
A safe stove installation involves several elements. These elements are: (A) the chimney connector, (B) a thimble between the chimney connector and chimney, (C) the chimney itself, and (D) protection of combustible materials in the vicinity of the stove. Each of these elements are equally important for any safe stove installation.
A. Chimney Connector
This is also known as stove pipe or flue pipe. It is used to connect the stove to the chimney. The chimney connector should be 6" diameter black steel, 24 gauge minimum.
Do not use aluminum or galvanized steel. They cannot properly withstand the extreme temperatures of a wood fire and can give off toxic fumes when heated. Do not use chimney connector pipe as a chimney.
Chimney connector sections must be attached to the stove and to each other with the crimped end toward the stove (Figure 1). This allows creosote to run into the stove and not onto the outside of the pipe. All joints should be secured with three sheet metal screws to ensure that the connector won't vibrate apart in the event of a creosote fire.
For proper operation the chimney connector should be as short as possible. Horizontal lengths of chimney connector should have an upward slope from the stove of 1/4" per foot. Avoid using more than two 90 degree elbows or total runs of pipe greater than 10'.

B. Thimble
This is a masonry or listed prefabricated device installed in combustible walls through which the chimney connector passes to the chimney. It is intended to keep walls from igniting.
Masonry Thimble
Construction of a masonry thimble requires 12" of brick around a fireclay liner. Be sure to locate it so that the top of the chimney connector will be at least 18" below the ceiling. To construct the brick thimble you will need an opening of 32" x 32" It will be necessary to cut wall studs and install headers and a sill frame to maintain proper dimensions and to hold the weight of the brick (Figure 2).
Minimum 3-1/2" (4" nominal) thick solid bricks are to be used. The fireclay liner (ASTM C35 or equivalent), minimum 5/8" wall thickness, must not penetrate into the chimney beyond the inner surface of the chimney flue liner and must be firmly cemented in place. If it is necessary to cut a hole in the chimney liner, use extreme care to keep it from shattering. Refractory mortar must be used at the junction to the chimney liner. After the assembly is complete, insert the chimney connector in the fireclay liner. Do not push it beyond the inside edge of the chimney liner because this will affect the draw of the chimney (Figure 3).

Figure 2

Listed Prefabricated Thimbles
Several manufacturers have developed safe alternatives to the brick thimble just described. In general, these are various types of insulated metal pipes with the necessary hardware to ensure proper clearances. These offer the advantages of being lighter than the brick thimble and requiring less room. These thimbles are "listed". "Listed" means that a laboratory independent of the manufacturer has tested them and certifies that they are safe if installed according to the manufacturer's directions. Be sure if you select a prefabricated thimble system that it is listed for use with woodstoves.
Figure 4 shows a typical installation using a section of insulated pipe for a thimble.

Figure 4
C. Chimneys
There are two types of chimneys suitable for Jøtul wood-burning stoves. These are either an approved masonry chimney or a listed residential type building heating appliance chimney.
When selecting a chimney type and the location for the chimney in the house, keep this in mind: it is the chimney that makes the stove work, not the stove that makes the chimney work. This is very important to remember. If you were able to set your new stove out in the yard and build a fire in it, it would be very difficult to keep the fire going without a chimney drawing air through the stove.
This is because a chimney actually creates a suction, called draft, which pulls air through the stove. There are several factors which influence draft. Some of the major factors are: height of the chimney, cross section area, temperature of the chimney, and the location of surrounding trees or buildings. In general, a short masonry chimney on the exterior of a house will give the poorest performance, and a masonry chimney inside the house will work the best.
The exterior chimney can be very difficult to warm up, and in extreme northern areas may not work at all. On the other hand, not only is an interior chimney easier to keep warm, but its heat loss is inside the house rather than outside.
This guideline gives the necessary chimney requirements based on the national code (NFPA 211). However, many municipalities have their own code which differs from the national code. Local codes can vary because of climate, altitude, or other factors. It is important that you check with your local building officials to find out what codes apply in your area before constructing a chimney.
Masonry Chimneys
Following is a list of the more important minimum requirements for a properly constructed masonry chimney.
• The foundation must be large enough to support the intended chimney without settling.
- The masonry wall of the chimney, if brick or modular block, must be a minimum of 4" nominal thickness. A mountain or rubble stone wall must be at least 12" thick.
- The chimney must have a fireclay flue liner (or equivalent) with a minimum thickness of 5/8" and must be installed with refractory mortar. There must be at least 1/2" air space between the flue liner and chimney wall.
- The fireclay flue liner should measure 8" x 8". If round fireclay liners are used, the inside diameter must be 6". If an existing chimney with larger tiles is used, it should be relined with an appropriate liner.
- No other appliance can be vented into the same flue.
• An airtight cleanout door should be located at the base of the chimney.
- A chimney inside the house must have at least 2" of clearance to the combustible structure. A chimney outside the house must have at least 1" clearance to the combustible structure. Fire stops must be installed at the spaces where the chimney passes through floors and/or ceilings (Figure 5).

FIGURE 10
Caulk

Figure 5
Remember that there must be air space around the chimney, and that insulation must be 2" or more from the chimney (Figure 6).

Figure 6
* A chimney must be the required height above the roof or other obstruction for safety and for proper draft operation. The requirement is that the chimney must be at least 3' higher than the highest point where it passes through the roof and at least 2' higher than the highest part of the roof or structure that is within 10' of the chimney, measured horizontally (Figure 7).
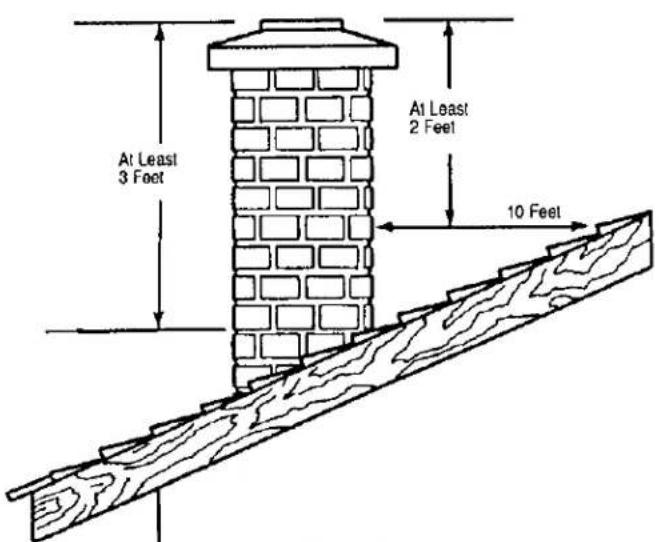
Figure 7
Chimneys shorter than 14' may not provide adequate draft. This could result in smoke spilling into the room from the door or joints in the stove or pipe. In addition, inadequate draft can cause back puffing or catalyst plugging. Too strong a draft, on the other hand, can cause excessive temperatures, damage the catalyst, and shorten burn times. Excessive drafts can be corrected by having your dealer install a barometric damper set at .1" of water column. If you suspect your draft is inadequate, consult your dealer. The minimum draft requirement is .05 inches water column.
Connection to a Metal Prefabricated Chimney
When a metal prefabricated chimney is used, the manufacturer's installation instructions must be followed precisely. You must also purchase (from the same manufacturer) and install the ceiling support package or wall pass through, "T" section package, firestops (when needed), insulation shield, roof flashing, chimney cap, etc. Maintain the proper clearance to the structure as recommended by the manufacturer. This clearance is usually a minimum of 2", although it may vary by manufacturer or for certain components.
There are basically two methods of metal chimney installation. One method is to install the chimney inside the residence through the ceiling and the roof (Figures 8, 9). The other method is to install an exterior chimney that runs up the outside of the residence (Figures 10, 11). The components illustrated may not look exactly like the system you purchase, but they demonstrate the basic components you will need for a proper and safe installation.
The chimney must be the required height above the roof or other obstruction for safety and proper draft operation (Figure 7).
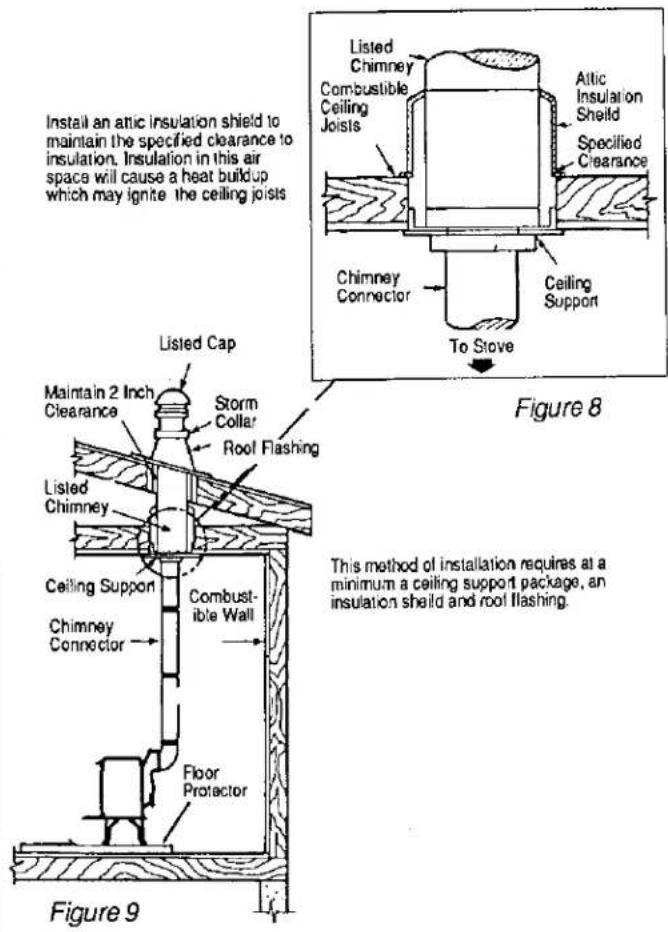

REMEMBER: Follow the manufacturer's installation instructions and maintain the manufacturer's specified clearance distances.
D. Clearances to Combustibles
Good planning for stove placement involves more than just insuring you have adequately protected combustible materials. It should also consider your comfort and convenience.
The radiant heat from your stove will warm its surroundings and, in turn, the air. Will the warm air from the stove freely rise and migrate to other areas of the house? Will the stove and hearth interrupt or disturb traffic patterns in the home? Is it convenient to bring wood to the stove? These are but a few of the questions you will want to ask when choosing a site for your stove.
A simple way to visualize the area required by the stove is to cut out a piece of newspaper the same size as the stove (17" x 22"). Place the newspaper on the floor and select the appropriate dimensions from the following sections on floor and wall protection.
Floor Protection
Your stove must be placed on a non-combustible surface which extends 8" beyond the sides and back of the stove and 18" in the front of the stove. This will result in an overall base which is 38" wide x 43" deep (Figure 12A). This is the minimum floor protector size. Floor protection must also be used under the stove pipe and extend 2" beyond either side of the pipe (12B).

Figure 12A

Figure 12B
During laboratory testing, it was determined that the floor protector should be one layer of 3/8" non-combustible millboard or equivalent. You may decorate the millboard with a variety of ceramic tiles or bricks. All joints should be filled using only non-combustible materials.
A number of pre-manufactured floor protectors are also available. If you choose to use one of these, make sure that it has a safety listing mark on it. Never put any type of floor protection on top of carpeting.
Clearances
Safe distances must be maintained between the stove and combustible materials in its vicinity. A combustible is anything that can burn; and in the case of stove installations, these combustibles may not be visible. If you are not sure of the combustible nature of any material in the vicinity of your planned stove installation, you should check with your local fire officials. Remember that "fire resistant" materials are considered combustible; they are difficult to ignite, but they will burn.
If you have recently purchased a home which has a stove hearth in it that you plan to use, it is extremely important that the entire system is examined for safety. Many older homes have faulty chimneys, or previous owners may have covered combustible walls or studs with brick veneers. Heat is easily conducted through brick and could ignite unseen combustibles behind it.
Standard Installations
The Jøtul 3TDIC-2 can be top or rear vented from the same location by means of its reversible flue outlet. Figure 13 shows the clearances which must be maintained to combustible walls from the stove body.

Figure 13.
* Clearances behind the stove can be reduced from 26" to 17" by using the Jatul heat shield, part #950076, and Type E double wall air insulated chimney connector.
Corner Installations
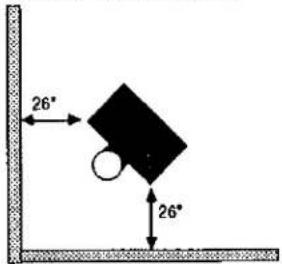
Figure 14. Clearances to unprotected combustible walls.
Installation Accessories
Several manufacturers have developed installation accessories for wood and coal stoves. These accessories are generally intended to reduce the required clearances we have established during testing. If you choose to use any of these accessories, make sure they have been tested by an independent laboratory and carry that laboratory's testing mark. Make sure that the manufacturer's directions are followed.
The National Fire Protection Agency (N. F. P. A.) also publishes guidelines in their code, N.F.P. A. 211, for the construction of clearance reduction systems if you care to make your own floor and wall protectors. Your dealer should be able to explain N.F.P.A. 211 to you.
4. Assembling the stove
In order to prevent shipping damage, several parts of your stove have been removed and packed separately. These parts are:
4 - legs
1 - bottom heat shield
1 - ash/log retainer
1 - ash lip
1 - door handle
Assembly
- Lift the top off of the stove and remove the top baffle and rear burn plate. Lay the stove on its front.
- Attach the bottom heat shield and legs. The heat shield is sandwiched between the stove body and the legs. The channels on the sides of the heat shield are for storing the optional fireplace screen and should face the floor. Attach the legs using the four 6 x 25mm hex heat bolts and square washers.
- Stand the stove up and bolt on the ash lip with the 6 x 16mm bolt.
- Reinstall the rear burn plate and top baffle. The lip on the front edge of the top baffle slopes up.
- Set the ash/log retainer into the groove provided in the front of the stove.
- Place the insulated washer between the wooden knob and the door handle. Insert the long screw through the wooden knob and screw it into the handle.
Selecting Flue Outlets
The Jatul 3TDIC-2 has a reversible flue outlet. To reverse outlet directions reach inside the outlet and unbolt the two bolts which hold the two halves together. This allows access to the two bolts which hold the back half of the outlet to the stove body. Unbolt the back half, remove it and turn it over to change positions. Re-bolt the back half into place and then put the front half back on with the two bolts.
5. Operation
Before building a fire in your new stove, please read the following section carefully.
This stove is designed to burn natural wood only. Higher efficiency and lower emissions generally result when burning air-dried seasoned hardwoods, as compared to softwoods or to green or freshly-cut hardwoods.
Do Not Burn:
' Coal
* Treated or Painted Wood
• Garbage
* Chemical Chimney Cleaners
* Cardboard
* Colored Paper
* Solvents
*Trash
Burning treated wood, garbage solvents, colored paper, chemical chimney cleaners, or trash may result in release of toxic fumes and may poison or render ineffective the catalytic combustor.
Burning coal, cardboard, or loose paper can produce scot or large flakes of char or fly ash that can coat the combustor, causing smoke spillage into the room and rendering the combustor ineffective.
Never use gasoline, gasoline-type lantern fuel, kerosene, charcoal lighter fluid, or similar liquids to start or "freshen up" a fire in this heater. Keep all such liquids far away from the heater while it is in use.
Wood Storage
When storing wood outside, it should be covered and stored off the ground to protect it from the elements. Make certain that the woodpile has good air circulation through it in order to promote drying to aid in the seasoning process.
To obtain the most benefit from the wood you burn, use only seasoned wood which has been cut and split for at least one year. Burning unseasoned or wet wood causes rapid development of creosote, while reducing the heat value of the wood being burned.
Creosote and Soot Formation And The Need For Removal
When wood is burned slowly, it produces tar and other organic vapors which combine with expelled moisture to form creosote. These creosote vapors condense in the relatively cool chimney flue of a slow-burning fire. The creosote that accumulates in the flue is highly flammable and is the fuel of chimney fires. To
prevent a chimney fire, the creosote needs to be removed by sweeping the chimney and flue connector. The frequency of sweeping will depend on how you operate your stove, but it is important to inspect the flue after every two weeks of use. An accumulation of 1/4" or more on the sides of the flue or connector is considered hazardous and should be removed.
In the event that creosote in your chimney or flue connector ignites, the resulting fire is often accompanied by a roaring noise and a crackling sound as flakes of burned creosote break loose. If you suspect you are having a chimney fire, immediately close the draft regulator and make sure the stove door is closed. Call the fire department and get everyone safely out of the house.
Trying to extinguish the fire in the stove will not help. In fact, it can make the matter worse by allowing oxygen through the door, which then supports the fire in the chimney. When the roaring and crackling have stopped, you should resist the temptation to open the door and look at the fire. The fire may have suffocated, but could rekindle when you open the door. After a chimney fire, do not use your stove until the chimney and the flue connector have been cleaned and inspected to ensure that no damage has been sustained.
Breaking In your Stove
A cast iron stove should be "broken in" the same way a new car with a cast iron engine is: gradually. It is mandatory that five consecutive small fires be built in the stove prior to operating the stove continuously. Each fire should be a little larger than the previous one, and the last fire should be a full-sized load. Allow the stove to cool completely between fires. Breaking in your stove this way works much like an athlete limbering up before competing.
Do not start your break-in fires until you have finished reading this entire manual. Save the ashes from your break in fires. The value of those ashes in maintaining a good fire will be pointed out later.
Building a Fire
Building a fire is actually a very good description of what you want to do. Anyone can make a fire, but when you really know what you are doing, you build a fire. Like anything else that is built, the quality of materials and the care exercised is reflected in the final product.
A good fire will efficiently utilize your fuel, keep the glass in the door clean, keep emissions and creosote to an absolute minimum, require less work, and be very predictable.
A Good Foundation
The first step in building a fire -- often overlooked -- is to start the fire on a good 1"-2" bed of ash. We are unable to provide ashes with a new stove, but you can generate ashes with your break in fires, covered earlier. The only time to remove all of the ashes from your stove is at the end of the heating season; the rest of the time you should keep a few inches in the bottom of the stove.
Open the load door and cover the bottom of the stove with tightly crumpled newspaper. Criss-cross a generous double handful of kindling on top of the paper. Don't skimp on the kindling, its role is very important. Split pieces of scrap lumber work very well. If you don't have scrap lumber, split some of your best wood down to 1/2" thick and use that. Place three or four pieces of wood on top of the kindling.
Before lighting the paper, open the draft control, by sliding it to the right, and open the by-pass damper. To open the bypass damper insert the removable handle into the end of the by-pass rod and pull the damper open.
Light the paper evenly across the front and close the door -- but not completely. If you leave the door ajar about 1/2", it causes air to race through the crack and bellow the fire. UNDER NO CIRCUMSTANCES SHOULD YOU LEAVE THE STOVE UNATTENDED WHILE THE DOOR IS AJAR. After three to five minutes the kindling should be forming coals and the small pieces of wood should be blackened over. The wood will have also settled and you should add more wood at this point to even out the load. Try to arrange it so that there is even space between the pieces. Give the fire about another minute with the door ajar to get the new wood caught on.
Close the door, but leave the draft and damper open. You are now at a critical stage. Until now, large amounts of air have been flowing between the glass and the fire, and the glass has stayed clear since the smoke has been prevented from contacting the glass. There may be just a small stain on the lower right hand corner of the glass because of currents created in the stove when the door was cracked.
The air flow between the glass and the fire now comes from the top of the stove and falls all across the glass. The amount of air is greatly reduced and you have to take care to keep the smoke off the glass. Smoke won't deposit on a hot glass, so a lot of your efforts at quickly establishing a hot fire have helped to get the glass hot. Also, the closer you place the wood, which is cold, to the glass, the more problems you will have.
If the fire dies out and the stove fills with smoke when you close the door, you have not allowed the wood to catch on well enough. It could be that you didn't use enough kindling, used pieces that are too large or too green, or simply rushed things. It is perfectly normal for the fire to slow down when you close the door. What is not normal is for the stove to fill with so much smoke that it looks like water flowing over a dam.
After 10 to 15 minutes of operating with the draft wide open, the flue should be sufficiently warmed to allow you to close the by-pass damper. The amount of time it takes before you can close the damper will depend on the strength of your chimney and the nature of your wood.
There are a couple of ways to determine the proper time to close your by-pass. If your wood is very dry and you have a good chimney, it may be possible to heat the stove up too quickly. If the stove and pipe begin to make a rapid series of ticking and pinging noises it's getting hot too fast. Closing the damper will slow the stove down.
The most accurate way of judging your stove's performance is to purchase a stove top thermometer and a catalyst probe thermometer from your dealer. A temperature reading of 400°F on the stove top or catalyst probe thermometer indicates the proper time to close the by-pass damper.
If you've made it to this point, you are well on your way to becoming an expert. You may experience a little more staining on the glass in the next few minutes until the stove gets hot. If the glass gets very dirty, there is a very good chance that your wood is green or that the chimney is not providing a strong enough pull. If you suspect a problem with your chimney, seek the advice of your dealer.
Adjusting the Heat Output
Until now, we've been operating the stove with the draft fully open. Once you have established a good bed of coals and the load of wood in the stove is burning well, you can cut the draft back. The more you move it to the left, the slower and cooler the stove will burn. If you are planning to reduce the combustion significantly, it is best to cut it back in a few increments rather than all at once. At minimum draft setting, the amount of air entering the stove will be so small that it may be difficult to keep the glass clean. As long as there is a good bed of coals in the stove, it is possible to return to a hot fire and stained glass will clean itself.
Re-loading
The stove is ready for re-loading when the wood has burned down to a bed of coals a few inches deep. REMEMBER TO OPEN THE BY-PASS DAMPER BEFORE OPENING THE LOAD DOOR. Stir the coal bed with a poker an move the hottest coals to the front of the stove. Depending on how your wood is split, you will be adding three to five pieces of wood. Select the smaller of these pieces for the bottom layer of wood and space the larger pieces evenly on top of them.
If your wood is well seasoned, you have a good bed of coals, and your chimney is drawing well you can close the door, open the draft wide, and close the by-pass damper. Give the stove 10 to 15 minutes on maximum draft to allow the new load to catch on before decreasing your draft setting.
If any of your conditions are less than ideal, you may need to operate with the door ajar for a few minutes after re-loading. If your coal bed has died way down, add more kindling to it before adding your fuel load.
You'll find as time goes on that the amount of time it takes to get a new load caught on will depend on the weather. It may take twice as long on muggy nights and only half as long on clear, cold nights.
Ash Removal
After several days of burning it will be necessary to remove some ashes from the stove.
Ashes should be placed in a metal container with a tight fitting lid. The closed container of ashes should be placed on a non-combustible floor on the ground well away from all combustible materials or outdoors pending final disposal. If the ashes are disposed of by burial in the soil or otherwise locally dispersed, they should be retained in a closed container until all cinders have thoroughly cooled.
Do not remove all of the ashes from the stove. The stove will perform better if you maintain at least a 1" layer of ashes in the bottom.
6. Catalyst
This wood heater contains a catalytic combustor, which needs periodic inspection and replacement for proper operation. It is against the law to operate this wood heater in a manner inconsistent with the operating instructions in this manual or if the catalytic element is deactivated or removed.
The catalyst in your stove is a Corning Long Life catalytic combustor, which helps the stove achieve its high efficiency rating. A separate warranty and information card is supplied by Corning with this stove. Please be sure to read the card and submit the catalyst warranty information to Corning.
A catalyst is defined as a substance which promotes or initiates a reaction at a much lower energy level than would normally be required for the same reaction if the catalyst were not present. Furthermore, the catalyst is not used up in the reaction. It is helpful when trying to understand catalytic reactions to think of the catalyst as a bridge. How much energy would it take to jump all the way across a river versus walking across a bridge? When you walk across the bridge, you use much less energy, and when you get to the other side, the bridge is still there. It hasn't been used up, and it continues to provide the same service.
Chances are, you have a catalyst in your home already, although you may not be aware of it. Self-cleaning ovens have catalysts very similar to the one in your stove. On the self-cleaning cycle, your oven gets very hot to burn off the spilled food. Normally, this would produce a lot of smoke, but, by putting the smoke through a catalyst, the smoke is also burned up. Usually, this combustion is so complete you don't even realize that it has happened at all.
Directly under the flue outlet is a ceramic honeycomb which is coated with a catalyst. This catalyst reduces the temperatures necessary to ignite the gases and smoke given off as the wood is burning. Normally, these gases require a temperature of 1,100-1,200°F to burn, but the catalyst allows these gases to burn at a much lower temperature of 500-700°F.
The burning of gases in the honeycomb releases a lot of energy which would normally be lost up the chimney. Tars and resins in the smoke are also burned, which helps keep your chimney and the environment clean. In general, catalytic combustion is pretty straightforward. Once the stove and gases have been warmed to the 500-700°F range, any gases reaching the catalyst will ignite. Following the start up procedures outlined in "Building a Fire" should ensure that the catalyst and stove are adequately warmed. Once the catalytic combustor starts working, heat generated in it by burning the smoke will keep it working, even when temperatures on the stove fall below 500°F. The
most important thing, then, is to get the stove and catalyst up to operating temperatures before setting the output back.
Several things could cause the catalyst to fall below its operating temperature, however. The most likely time for this to occur is during refueling. Twenty or more pounds of cold wood plus the room air entering the stove during refueling can dramatically lower the catalyst temperature. It is very important whenever reloading to allow the stove to burn hot for 10 to 15 minutes. This reheats the stove as well as raises the catalyst temperature. Getting your new load of wood burning well also helps keep the glass in the door clean.
At the end of a burn cycle, when all of the wood has been reduced to charcoal, very little gas is being generated, and the catalyst can also fall below its operating temperature. Try to time your reloading so that there are enough coals left to get your new load going hot to relight the catalyst.
Catalyst Monitoring
It is important to periodically monitor the operation of the catalytic combustor to ensure that it is functioning properly, and to determine if it needs to be replaced. A non-functioning combustor will result in a loss of heating efficiency and an increase in creosote and emissions. To monitor the catalyst's performance, you can obtain a probe thermometer from your dealer, or you can observe the amount of smoke coming from your chimney.
If you have followed the start up procedures correctly and have sufficiently warmed the stove and catalyst, you should notice very little, if any, smoke coming from your chimney. Be sure not to confuse condensing steam from wet wood with smoke. Smoke gradually becomes thinner as it leaves the chimney, whereas steam travels a few feet and then vanishes.
If you purchased a probe thermometer from your Jøtul dealer, follow the directions supplied with it. With a probe thermometer you should be able to make the following observations: temperatures should be in excess of 500°F and will often exceed 1,000°F. Temperatures will drop sharply when new fuel is added, but should return to normal once the wood is burning well.
Brief periods of high temperatures are not harmful to the catalyst, but you should avoid operating the catalyst above 1,800°F. Temperatures of this magnitude can reduce the life of the catalyst and are the result of too much smoke reaching the catalyst. Finely split wood, pitchy pine, or tightly packed loads can overwork the catalyst. It is best to use wood that is 4"-7" in diameter and to load the stove frequently with medium-sized loads.
If temperatures are above 1,800°F, they can be reduced by opening the by-pass damper. If you find that you frequently experience these high temperatures, you should adjust your method of operating the stove.
Very high catalyst temperatures are a result of a hot bed of coals, a fresh load of wood, and a minimum draft setting. The hot coals drive volatile gas out of the wood but gas is not quite hot enough to burn in the stove. All of the gases will burn in the catalyst. The way to control this is to open the draft a little wider, allowing some of the gases to burn in the stove, or don't split your wood quite so small.
You should allow your stove to go out and visually inspect the catalyst at least three times a year.
To inspect the catalyst, unbolt the four nuts from the catalyst inspection plate on the rear of the stove. Take care not to disturb the insulating material surrounding the catalyst. Use a flashlight to inspect the catalyst without removing it from the stove.
Combustor Problems

natural_image
Circular patterned surface with grid-like structure, no visible text or symbolsPlugging (Figure 15)
The catalyst cells can be plugged with char, fly ash, or creosote. Burning garbage, cardboard, or wrapping paper produces excessive amounts of char and ash. Creosote plugging occurs when burning wet or pitchy wood or large loads of wood on very low draft settings without allowing the catalyst to properly warm up and initiate burning. In general, creosote will not form on hot surfaces.
If the catalyst is plugged, it could also indicate that creosote has built up in your chimney and needs cleaning.
A plugged catalyst can be cleaned with a good hot fire, much in the same way that a hot fire cleans up creosote stains on the stove window. Under no circumstances should you attempt to burn out a plugged catalyst unless you are sure your chimney is clean.
natural_image
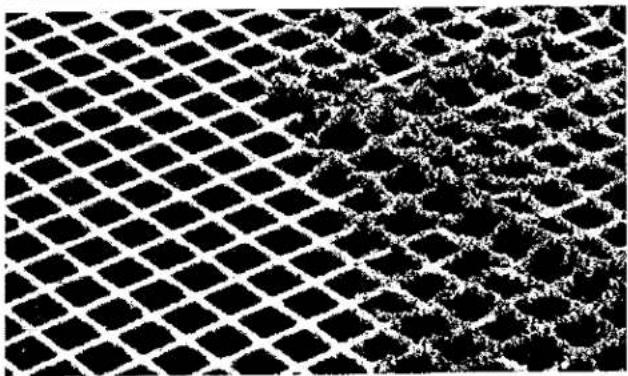
Black and white abstract pattern with diamond grid texture (no text or symbols)Masking (Figure 16)
This is a build-up of a very fine fly ash which coats the surface of the catalyst and prevents it from coming into contact with the smoke. Fly ash can be brushed off with a soft bristled brush or vacuumed away.

natural_image
Close-up of a textured surface with grid-like patterns and a central dark area (no text or symbols visible)Cracking (Figure 17)
Cracks can develop from either thermal stress or mechanical stress. As long as large pieces do not fall out of the combustor, it can still function with a few cracks. Mechanical stress may indicate that some part of the surrounding housing has warped and needs to be replaced.

natural_image
Abstract black-and-white pattern with interlocking shapes (no text or symbols)Peeling (Figure 18)
Temperatures above 1,800°F and prolonged flame impingement can cause the catalyst coating to peel off the ceramic substrate. If the peeling is severe, the catalyst should be replaced.
Deactivation or Poisoning
If the catalyst is intact and is clean, but fails to operate, it has probably become poisoned from chemicals in pressure treated wood or painted lumber or trash. Deactivated catalysts should be replaced.
7. Maintenance
At least once a year, you should perform a routine maintenance check. A good time to do this is when you are cleaning the chimney and the connector. Of course you should clean the chimney and connector whenever accumulations of soot and creosote reach 1/4" thick, which may be several times a year, depending on how the stove is operated.
Thoroughly clean the entire stove. Enameled surfaces can be wiped clean with soap and water. Brush all ash and soot out of the stove. It is better to brush out the ash and soot than to vacuum it out because soot particles are small enough to pass through most vacuum bags.
In a dark room, use a strong light to inspect the stove inside and out for cracks or leaks at corners and joints. Cracked parts should be replaced. Leaks at joints can be patched with stove furnace cement.
Check both door gaskets and window gaskets for tightness. To check the door gaskets put a dollar bill half way into the stove, close the door and try pulling the dollar out. If it can be easily removed, the seal is too loose. Check several spots around the door.
The gasket between the glass and the door receives very little wear. The best indication that it needs to be replaced is streaks on the glass caused by air leaking around the gasket.
To replace the gaskets, lift the door off the stove and lay it flat. Scrape out all old gasket material and gasket cement. The gaskets are made of glass and ceramic fibers and contain no asbestos. Run a bead of stove cement into the gasket channel and press the new gasket into place. The door gasket is 55 inches long by 1/4 inches in diameter. The window gasket is 44 inches long by 3/16 inches in diameter.
The by-pass damper is gasketed and this gasket should also be checked for wear. The gasket is 37" long by 1/4" diameter. To replace the gasket, open the by-pass, remove the flue outlet and work through the outlet opening. Stuff a rag over the top of the catalyst before removing the gasket to prevent debris from falling into the catalyst.
At the end of the heating season, remove all of the ashes from the stove and spray the interior with a light coating of oil to inhibit rust during the summer.

Series 3

| Item No. | Part Number | Description |
| 6' | 102041 | Bottom burn plate, non-ash |
| 7 | 102944 | Mixing grate |
| 8 | 102043 | Side burn plate |
| 9 | 102938 | Inner back plate |
| 10 | 103029 | Air Deflector |
| 12 | 102942 | Bypass damper |
| 13 | 127203 | Damper hinge |
| 14 | 100038 | Gasket, top plate (5'6") 3/8LD |
| 15 | 102943 | Bracket, damper mechanism |
| 16 | 127187 | Damper mechanism |
| 17 | 9904 | Hexbolt, 6x20mm |
| 18 | 9905 | Hexbolt, 6x25mm |
| 19 | 125960 | Hinge pin, door |
| 23 | 126228 | Latch, door |
| 25 | 126164 | Spring, door handle |
| 26 | 117059 | Spring pin, door handle |
| 27 | 126140 | Glass |
| 28 | 126011 | Glass clip |
| 29 | 9963 | Screw, glass clip, 6x8mm |
| 30 | 200025 | Gasket, door (4"8") 1/4 HD |
| 31 | 200026 | Gasket, glass (3'6") 3/16 HD |
| 32 | 200025 | Gasket, inner back (3'4") |
| 33 | 9944 | Screw, flat head 6x30mm |
| 39 | 117588 | Washer, door hinge |
| 40 | 126229 | Spacer, door handle |
| 41 | 124853 | Insulating washer, door |
| 42 | 9984 | Bolt, 6x35mm cheese head |
| 43 | 9941 | Bolt, 6x12mm flat head |
| 44 | 9903 | Hex bolt, 6x16mm |
| 45 | 120004 | Brass washer |
| 45' | 151697 | Bottom heat shield, non-ash |
| 50 | 126321 | Hinge pin, damper |
| 51 | 127189 | Damper rod |
| 52 | 126108 | U-bracket, damper |
| 55 | 200028 | Gasket, outlet 1/2 (3') 1/8 SA |
| 56 | 200026 | Gasket, outlet to back (3') |
| 57 | 117517 | Brass cap nut |
| 58 | 117720 | Set screw, 6x10mm |
| 60 | 126421 | Catalyst |
| 61c | 127194 | Catalyst Insulation |
| 62 | 200028 | Gasket, air manifold (1.5') |
| 64 | 126110 | Pin, damper u-bracket |
| 65 | 170427 | Cotter pin, damper rod |
| 66 | 100038 | Gasket, damper (2') 3/8 LD |
| 67 | 99065 | Hexbolt, 6x35mm |
| 73 | 200027 | Gasket, cat cover (3') 3/16 |
| 74 | 103031 | Back burn plate |
| 75 | 100038 | Gasket, back burn (1.5') |
| 76 | 102963 | Top baffle |
| 77 | 127260 | Lattice, air mixing |
| 78 | 102459 | Log retainer |
| Ash pan version | ||
| 85 | 103244 | Bottom burn plate |
| 87 | 9941 | Screw, 6x12mm flat head |
| 88 | 128213 | Gasket, ash box |
| 89 | 9930 | Nut, 6mm |
| 90 | 128210 | Ash box |
| 91 | 103248 | Hinge |
| 92 | 128211 | Ash drawer |
| 93 | 126321 | Hinge pin, ash door |
| 94 | 110052 | Screw, plate steel |
| 96 | 126436 | Latch |
| 97 | 200025 | Gasket, ash door (3') |
| 99 | 125769 | Spring, ash door latch |
| 100 | 127213 | Handle, ash door |
| 101 | 117720 | Set screw, 6x10mm |
| 102 | 128345 | Stove tool |
| Item No. | Enameled Parts | Description | ||||
| Painted | Blue/Black | Ivory | Indigo | Green | ||
| 1* | 102964 | 102027 | 102244 | 103131 | N/A | Base plate, non-ashpan |
| 2 | 102953 | 102954 | 102955 | 103130 | 10245832 | Front panel |
| 3 | 102966 | 102937 | 102946 | 102945 | 10294532 | Back panel |
| 4 | 102967 | 102033 | 102246 | 103128 | 10203232 | Side panel |
| 5 | 102968 | 102976 | 102977 | 102978 | 10296832 | Top panel |
| 11 | 102532 | 126277 | 126277 | 126277 | 126277 | Draft slider |
| 22 | 102521 | 126243 | 126243 | 126243 | 126243 | Door handle |
| 24 | 117587 | 117548 | 117548 | 117548 | 117548 | Washer, door handle |
| 34* | 152839 | 152840 | 152840 | 152840 | N/A | Stove tool, non-ashpan |
| 35 | 102974 | 101966 | 102251 | 101953 | 10192532 | Leg |
| 36 | 102975 | 102039 | 102250 | 103124 | 10203832 | Ashlip |
| 38 | 126244 | 126244 | 126230 | 126244 | 126244 | Wooden knob, door |
| 53 | 103013 | 103015 | 103014 | 102947 | 10294732 | Smoke outlet, outer half |
| 54 | 102949 | 102940 | 102950 | 102948 | 10294932 | Smoke outlet, inner half |
| 59 | 102999 | 103001 | 103000 | 102951 | 10295132 | Catalyst cover |
| 63 | 126948 | 127213 | 127213 | 127213 | 127213 | Damper handle |
| 80 | 102983 | 102535 | 102533 | 103129 | 10245632 | Door |
| 86 | 103261 | 103243 | 103260 | N/A | 10324332 | Base plate, ash version |
| 95 | 128347 | 128347 | 128208 | N/A | 128347 | Bottom heat sheild, ash |
| 98 | 103259 | 103247 | 103258 | N/A | 10324732 | Ash door |
Real H/S 950076 Hardware 154358
Ash Pan Version
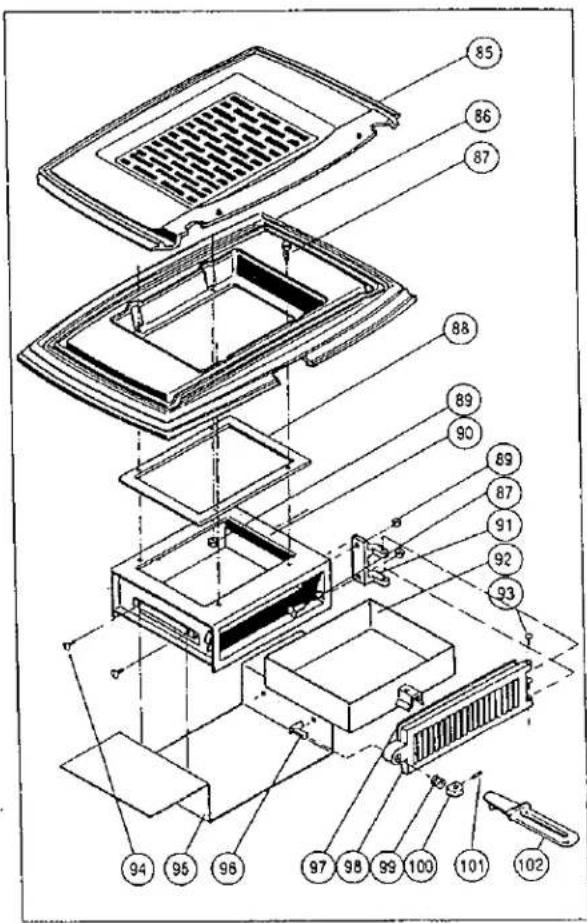
* These parts apply to the non-ashpan version only
- MODEL 3TDIC-2 INSTALLATION & OPERATING INSTRUCTIONS
- General Information
- Hazards Connected to the use of the Jøtul Wood Stove
- Installation
- Chimney Connector
- Thimble
- Masonry Thimble
- Listed Prefabricated Thimbles
- Chimneys
- Masonry Chimneys
- Connection to a Metal Prefabricated Chimney
- Clearances to Combustibles
- Floor Protection
- Clearances
- Standard Installations
- Installation Accessories
- Assembling the stove
- - legs
- Assembly
- Selecting Flue Outlets
- Operation
- Wood Storage
- Creosote and Soot Formation And The Need For Removal
- Breaking In your Stove
- Building a Fire
- A Good Foundation
- Adjusting the Heat Output
- Re-loading
- Ash Removal
- Catalyst
- Catalyst Monitoring
- Plugging (Figure 15)
- Deactivation or Poisoning
- Maintenance
- Series 3
Brand : JOTUL
Model : 3TDIC-2
Category : Wood stove