
HT25S - Thermostat GENERAL Life - Free user manual and instructions
Find the device manual for free HT25S GENERAL Life in PDF.


| Product Type | Smart Room Thermostat |
| Brand | GENERAL Life |
| Model | HT25S |
| Room Thermostat Dimensions (H/W/L) | 85.7 mm / 85.7 mm / 33.5 mm |
| Receiver Dimensions (H/W/L) | 90 mm / 90 mm / 25 mm |
| Operating Current (Thermostat) | 3V DC (2 x AAA Alkaline Battery) |
| Receiver Operating Current | 230V AC |
| Relay NO Switching Current | 7A (240VAC) / 10A (120VAC) Resistive Load |
| Temperature Measurement Accuracy | 0.1°C |
| Operating Temperature Range | 5°C to 40°C |
| Battery Life | 1 Year (2 x AAA) |
| Wireless Connectivity | 2.4 GHz WiFi, Bluetooth for pairing |
| Mobile App Control | Yes (iOS and Android) |
| Scheduling | Daily and weekly schedules via app |
| Open Window Detection | Yes, adjustable sensitivity and shut-off time |
| Heating/Cooling Modes | Yes, switchable via menu |
| Hysteresis Adjustment | Positive and negative, adjustable 0.1°C to 2.0°C |
| Temperature Calibration | Yes, adjustable -8°C to +8°C |
| Low Battery Warning | Yes, "Lb" icon on display |
| Warranty Period | 2 Years |
| Storage Temperature | -20°C to +60°C |
| Operating Temperature (Thermostat) | -10°C to +50°C |
| Pairing Range | Up to 20 meters (open space) |
| Safety Features | Automatic shut-off if signal lost for 22 min; overvoltage protection |
| Repair and Maintenance | Only by authorized service; do not disassemble |
| Included Components | Room thermostat, receiver, user manual, batteries |
Frequently Asked Questions - HT25S GENERAL Life
User questions about HT25S GENERAL Life
0 question about this device. Answer the ones you know or ask your own.
Ask a new question about this device
Download the instructions for your Thermostat in PDF format for free! Find your manual HT25S - GENERAL Life and take your electronic device back in hand. On this page are published all the documents necessary for the use of your device. HT25S by GENERAL Life.
USER MANUAL HT25S GENERAL Life
SMART ROOM THERMOSTAT
generallife.com.tr
SERIES:
MITRA, ADEN, ARUNA, CERES, GAIA, ILLONA, NORA, SENNA, TERRA, THERMA
HT25 SMART/HT25S SMART USER MANUAL
WHAT IS A SMART ROOM THERMOSTAT?
A smart room thermostat is a device that allows you to control your heating equipment via APP with the internet even when you are not at home.
HOW DOES HT25 SMART/HT25S SMART WORK?
HT25 SMART/HT25S SMART is a smart wireless room thermostat. You can control it with the mobile application after you pair your room thermostat with the receiver, and complete the installation of the smart receiver.
WHAT ARE THE ADVANTAGES OF THE HT25 SMART/HT25S SMART?
- You can control your home's temperature via its mobile application, no matter
where you are in the world.
- You can easily create daily and weekly schedules via mobile application.
- You can place one room their coat, anywhere in your home, thanks to ice use with better way.
- It ensures that your living space stays at the desired temperature at any time. In this way, you can save up to 30% on your bills by preventing your heating unit from working unnecessarily.
RULES THAT NEED TO BE OBSERVED FOR SAFETY
1- Be sure to read the user manual before using the device and its equipment. 2- Opening, disassembly, or use of plastic parts of the product and equipment other than the intended purpose are out of warranty.
3-Please make sure that the sockets to which you connect your devices and equipment are at the recommended voltage value in the user manual.
4- Keep away and protect your product and its equipment from all kinds of external substances such as liquid, dust, heat, etc.
6- Do not expose the device cables to any jamming and pressure. Take care to connect the devices' energy connection to the sockets you can always reach 6- Turn off the electrical power to prevent damage to your device and apparatus in case of lighting and thunderstems.
- Turn off the electrical power when your device is not used for a long time.
-
Your devices and equipment should be used by paying attention to the matters stated in the user manual. In case of damage and malfunctions, arising from improper use (contact with liquid falling to the ground etc.) definitely ask for the installar's help.
-
Call our service for maintenance and repair of HT25 SMART/HT25S SMART and its equipment. Maintenance and repair of the device and equipment should be carried out only by the technical service of ISIPARK A.S. and its authorized services, services, and accessories specified by the company should be used.
HT25 SMART/HT268 SMART and EQUIPMENT

TECHNICAL DATA
Boom thermostat
| Dimensions (1VL/W) | 85.7mm / 85.7mm / 33.5mm |
| Operating Current | 3V DC (2 x AAA Alkaline Battery) |
| Temperature Measurement Accuracy | 0.1°C |
| Operating Sensitivity | (120°C) - (120°C) |
| Operating Temperature Range | (5°C) - (40°C) |
| Battery Life | 1 Year (2 x AAA) |
| Operating Temperature | (-10°C) - (+50°C) |
| Storage Temperature | (-20°C) - (+60°C) |
Пескин
| Dimensions (H/L/W) | 90mm / 90mm / 25mm |
| Operating Current | 230V AC |
| Relay NO Switching Current | 7A (240VAC - Resistive Load)10A (120VAC - Resistive Load) |
| Storage Temperature | (20°C) - (+60°C) |

ROOM THERMOSTAT

| 1 | 2 | Room Temperature |
| 2 | 3 | Open Window Detection Feature |
| 3 | 4 | Bedgery Indicator |
| 4 | Set Temperature | |
| 5 | 6 | Heating IndicatorIf the Heating Indicator is blinking, the heating unit is working.If the Heating Indicator is steady, the heating unit is not waiting. |
| 6 | 7 | Cooling IndicatorIf the Cooling Indicator is blinking, if the cooling unit is working.If the Cooling Indicator is already, the cooling unit is not working. |
| 7 | 8 | ON/OFF and Temperature Setting Button |
Note: During active use of the room thermostat, the symbols indicated by 4.0 and 6 will not appear on the screen.
RECEIVER

1-Manual Operation Button: Deactivates the receiver and allows users to normally use the heating/cooling unit. 2-WI-FI Pairing Button: Makes the receiver ready for smart installation. 3-Receiver LED Light 4-Receiver Power Cable Input 5-Heating/Cooling Unit Connection Cable Input
RECEIVER LED DESCRIPTIONS
| Blinking Red | The receiver did not get any signal from the heating/cooling unit for 22 minutes or longer and the heating/cooling unit has shut down. |
| Fast Blinking Red | Wanting for a waving signal from the room to the next time. |
| Steacy Red | The sensor was connected to the thermostat, but there have been paired. Smart installation has not been completed. |
| Blinking Green | The receiver is in Bluetooth steering mode. |
| Steacy Green | Smart installation has been completed. The heating/cooling unit is not working. |
| Steacy Turquoise | The heating/cooling unit is running. |
| 3 Short Red Blinking | Shot the heating/cooling unit down signal has reached the receiver. |
| 3 Short Green Blinking | Operate the heating/cooling unit signal has reached the receiver. |
| Blinking Red and Green | The heating/cooling unit is warning in manual mode. |
ROOM THERMOSTAT PLACEMENT
The room thermostial needs to be placed in the room which is used most frequently. For instance, the living room or lounge. Placing the room thermostat in a spot that has air circulation like the entrance of a room or the side of the window should be avoided. Also anywhere close to heating/crooping units such as a radiator, stove, and spoils that get direct sun lights would not be suitable. The room thermostial needs to be located above the floor 150 cm in height. Few trials may be made to find the most recent room.

BATTERY PLACEMENT

Remove the battery cover located on the back of your Room Thermostat. Insert 2 new AA adalve batteries into the battery housing with the correct battery direction and close the battery cover. Replace both batteries at the same time. Low Battery Warning: When the "Lfd" iron appears on the screen, it means "low battery warning". It is recommended to replace the batteries when this warning applies.
Warning: When the product is not used for a long period (more than 15 days), remove the batteries. Otherwise, malfunctions that may occur would be cut of warranty. Please throw your dead batteries into the waste bin for batteries.
RECEIVER PLACEMENT

The devices should be placed to minimize the damage to the received and transmitted signals by paying attention to the following points:
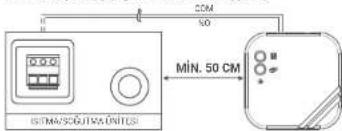
• The devices should not be mounted on metal surfaces
- The devices should not be installed close to electrical cables and electronic equipment such as computers and television units.
- The devices should not be installed near large metal structures or other building
- Distance between the room thermostat and the Receiver should not exceed 20 meters or 2 inches
- The receiver must be installed at least 50 cm away from the heating/cooling unit.
RECEIVER INSTALLATION
- First, shut down your heating/cooling unit and your heating/cooling unit's power source with all electrical current (fuse, socket, etc.)
- As shown in the connection diagram, connect one end of the heating/cooling unit connecting node to the 1000 and the other to the 1000 and the remaining
- Connect the other ends of the route, which you connected to the receiver to the room thermostat connection terminal as shown in your heating/cooling unit's user manual.
- You must first connect the receive power cable to the receive and then to the fuse to which the heating/cooling unit is connected.
- After completing the cable connection process, first turn on your laser seed then your hostice/c Turkey unit.
- Finish the installation of the rear thermostat to pair the receiver with the corner thermostat.
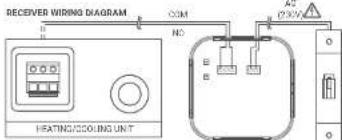
Operations within the heating/cooling unit or the electrical installation must be carried out by professionally qualified persons.
PAIRING THE ROOM THERMOSTAT WITH THE RECEIVER
• To put the room thermostat with the receiver press the 'Manual Operation Button' and 'WiFi Pairing Button' together at the same time and see the receiver's fast sinking red LED.
- Press the button for 3 seconds while your device is turned off.
- Press the button until Rd, "the pairing menu appears.
- Turn your room thermostat's button while the LED is leaf blinking red.
- If the pairing is successful, the fast red flashing LED on the receiver will be steady.
- The receiver and room thermostat have been paired with each other
SMART RECEIVER SETUP
- For smart receiver setup, download the application from App Store or Google Play or soon the QR code below with your smartphone. In this way, you will be able to download the mobile application from App Store or Google Play to your smartphone. (You may be required to have a QR code reader application depending on the brand and model of your phone for this process.)
Click to download.

- Complete the user registration process by opening the mobile application that you downloaded.
- Open the Bluetooth from your mobile phone's settings.
- After you completed the user registration process, press the "+" button in the top-right corner of the main screen of the application. Press the receiver's Wi-Fi gaining button for 8 seconds.
- The LED on the receiver will start to break green.
- Setup will begin with Buancethin the application. When the device is found, please the "Add" button.
- Press the "1" button near the W Modern device and press the "next" button after making sure that you entered the connect W □ information.
- Wait until the setup process is completed. When you saw the green approval symbol on the W Modern, press the "Dome" button in the top-right corner.
ROOM THERMOSTAT TEMPERATURE CALIBRATION
Temperature sensors which are used in room thermostats are highly sensitive. You may need to calculate your room thermostat if you would like to get the same temperature values as other thermosteters in your living space
+ While your device is turned off, press the button for 3 seconds
- Press the button until the "H" menu appears. To see the desired temperature, set the temperature difference by turning the button right or left. This value can be arranged between "B" and "+B"C".
• To save the settings and exit press the button until the device turns off.
• Note: Recommended temperature calibration is 0.0°C.
ROOM THERMOSTAT HEATING / COOLING MODES
Your Room Thermostat has heating and cooling modes. In order to switch easily
(2) MEX: HESO, C and CuOH, C moths.
- While your device is turned off, press and hold the button for a second.
• 1.25 a. m. c. d. e. f. g. h. i. j. k. l. m. n. o. p. q. r. s. t. u. v. w. x. y. z. a. b. c. d. e. f. g. h. i. j. k. l. m. n. o. p. q. r. s. t. u. v. w. x. y. z. a. b. c. d. e. f. g. h. i. j. k. l. m. n. o. p. q. r. s. t. u. v. w. x. y. \
- You can switch between ME and heating and call - [cooling] modes by turning the button to right left in charge.
- The group of waiting and wait, www.thebut
- The settings you have made how been scored. Once you turned on your device, it will operate with the changed settings.
ROOM THERMOSTAT HYSTERESIS POSITIVE MENU
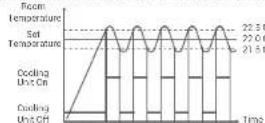
The hysteresis positive factory setting of your room the thermostat is 0.5°C. This voice may be adjusted between '0.1°C' and '2.0°C'. While the hysteresis positive value is 0.5°C, if the room temperature goes above 0.5°C of the set temperature, your room thermostat will seek a signed to your heating/cooling unit. But instance when your set your room the thermostat to 22.0°C, if the room temperature goes above 22.5°C, on the heating mode your heating unit will stop working on the cooling mode your
(2019) 10 will start working. To change the physician's positive setting
• Pour the bullcrum of the US \$*
- Adjust the operating sensitivity by turning the button right or left in the "H5F" hysteresis positive element. To save the settings and exit press the button until the device turns off.
- Changes have been saved. Your room thermostat will be working with set operating sensitivity when you open your device.
ROOM THERMOSTAT HYSTERESIS NEGATIVE MENU
The hysteresis negative factory setting of your room thermostat is -0.5°C. This value may be adjusted between "0.1°C" and "-2.0°C". While the hysteresis negative value is -0.5°C, if the room temperature goes below 0.5°C of the set temperature, your room
thermostat will send a signal to your heating/cooling unit. For instance, when you set your room thermostat to 22°C, if the room temperature goes below 21.5°C, on the heating mode your heating unit will start working; on the cooling mode your cooling unit will stop working. To change the hysteresis negative setting.
+ While your devices are turned off, prices and build the best run for Science
• Press the button until the menu appears
+ Adjust the operating sensitivity by turning the button right or left in the "HS" - hysteresic negative room. To solve the settings and add, please the button until the device runs off.
- Changes have been saved. Your room the maximum will be working with an operating sensitivity when you save your device
OPEN WINDOW DETECTION FEATURE
If a window is left open, cold air will enter and the temperature in the room will drop rapidly. In cooling systems, hot air will enter and the temperature in the room will rise rapidly. The Room Thermostat, which detects this situation tries to keep the room temperature at the desired level by operating the heating or cooling system more. The open window detection feature allows the Room Thermostat to operate the heating/cooling system more efficiently in case the temperature in the room drops or rises rapidly.
This feature is used to save energy and to ensure more efficient operation of heating and cooling systems. Thanks to the open window detection feature, unnecessary energy expenditure is prevented and allows the use to save energy costs. The system can be used to achieve the efficiency of the main function in a solution for the detection feature in active. If it detects a sudden drop in room temperature up to the degree adjusted in the Set menu (factory, sorting 30 g within 15 minutes, it switches to alarm status, the open window loon flashes on the display of the Room). The most important features are: (1) the system has been done with a single device, (2) the system has been done with a time adjusted in the Hun Muno. If the Room Thermostat detects that the window is closed or a manual intervention is made on the Room Thermostat, the detection is decolorated and heating/oxygen air continues to arrive from where it left off. If the Room Thermostat temperature is decreased again, the Room Thermostat gees into alarm status.
If the Room Thermostat is operated in cooling mode, the sudden temperature falls in taken to consideration
This feature is active in factory setting.
It can be deactivated from the room Thermostat settings.
To deactivate the open windows detection feature
- Press the "ON/OFF" button for 3 seconds while your device is turned off.
- Press the "ON/OFF" button until the? - "mero appears
- While in the 6" menu turn the button to left. The "option will appear."
- To save the settings and soft, press the ON/OFF button until the device turns off. - The settings you have much enough. Your device will work with the setting any
- The settings you have made it a save! You can get all with the setting you have made when you open it.

OPEN WINDOW DETECTION OPERATION SETTINGS
- SET MENU
Set Menu allows you to set the value of the sudden temperature change (calculated) required for your Room Thermostat to activate the open window direction feature. The factory setting of the required sudden temperature change value is 5°C. This value can be adjusted between 2°C and 10°C.
To change the open window operating membership.
• 1. Break and form the button in a sensibility while the device is sometimes open, from the button until the ^2 mark.
• Press the button until these. Hero appears.
- In the "less" menu that appears to adjust the operating temperature by turning the button to the right or left.
In order to the right for
- To save the buttons and exit, press the button until the device matches it.
- The benefits you have made have been saved. Once you call on your device, it will approve with the changed settings.
- RUN MENU
Run Menu allows you to set the off time of the heating/cooling unit while the open window detection feature of your Room Thermostat is active. The factory setting for off time is 10 minutes.
To set the off time:
- Press and hold the button for 3 seconds while your device is switched off!
- Press the button until the "UN" menu appears.
- Set the operating time of the open window detection feature by turning the button
to the right or left in the" □□ " menu
- To save the settings and exit, press the button until the device switches off.
- The settings you have made home saved, check you turn on your device, it will operate with the changed settings.
FACTORY SETTINGS RESET
You can reset your Room Thermostat to its default factory settings. This operation reacts the calibration setting, heating/cooling modes and systematics settings to factory setting. To reset your Room Thermostat to factory setting:
- While your device is turned off, once and hold the button for 3 seconds.
- Break the buffer until the ^5 L - every economy
- This is the 55-week but the button to right or left in order to select * . 85
uniting and press the button.
- Your choice will be turned off and beat to last on everything
ROOM THERMOSTAT WORKING LOGIC
Hesting Mode
Your room Thermostat takes the average room temperature of last 40 seconds as basis, if the room temperature goes above the hysteresis positive temperature value your out, your Room Thermostat will stop the heating unit. If it goes below the hysteresis negative temperature value, your Room Thermostat will start the heating unit. Thus, it ensures that the room temperature remains within a certain range

Cooling Mode
Your Room Thermostat takes the average room temperature of last 40 seconds as basic, if the room temperature goes above the hysteresis positive temperature value you set, your Room Thermostat will start the cooling unit. If it goes below the hysteresis negative temperature value, your Room Thermostat will stop the cooling unit. Thus, it ensures that the room temperature remains within a certain range.
Your Room Thermostat sends the last status signal to the Receiver every 3 minutes. Think your Room Thermostat and Receiver work synchronously. If the signal cannot reach to the Receiver from the Room Thermostat for 22 minutes, it perceives that the connection is broken and stops the heating/coating operation for safety reasons. Likewise, in cases where the electricity comes back after a power failure, the Receiver do not operate the heating/cooling unit until 'operate' signal reaches from the Room Thermostat.
However, in this case, if the Room Thermostat continues to operate normally, it will continue to work properly without any need for intervention since it sends a status signal to the Receiver every 2 minutes.
FREQUENTLY ASKED QUESTIONS
- Is my Room Thermostat compatible with my heating/cooling unit?
If your heating / cooling unit has on-off connections, your Room Thermostat is standalone. You can find information about your heating / cooling unit from your heating / cooling unit operating manual or from your heating / cooling unit service. How will I connect my heating/cooling unit with my decision?
We recommend that the connection between the Recasvar and heating/cooling unit should be made by professionally qualified persons.
2x0.75 mm cable is sufficient for the Receiver - heating/cooling unit connection. Connect one end of the cable pair to the room thermostat connection terminers stated in the user manual of your heating/cooling unit.
Connect the other end of the cable pair to COM and NO inputs of the terminal inside the Receiver as shown in the "RECEIVED MINING DIAGRAM" section.
The direction of the cable ends does not matter.
DECLARATION OF CONFORMITY
IS/PARK IQ VEDIŞ TIC. INŞ, ISITMA SISTEMLERİ DTÖ, SAN.A.S. which Head Office and production site is located on Fath Mah. 1188 Sk.No 13/A Sermig - Gazemir - IZMIR - TÜRKIVEL confirms and declares that the product marked with CE and its specifications below is covered by the provisions of the mentioned directive. Brand :GENERAL Life
Product Name: H125 SMART/H125S SMART
Product Type: Smart Room Thermostat
The product manufactured by SIPARK and mentioned above is connected wirelessly at 2.4 GHz internet and periodically shares the temperature and status information with the server on the internet.
Compatible Diaphtha:
Radio and Telecommunications Terminal Equipment Regulation
2014/55/EU (ETS) EN 301-489.1 V2.2.5 (2019.11).
ETS: EN 301 489-17 V3.2.4 (2020-00), EN 300 220-1 V3.1.
EN 300 220 2 V3.21 (2018.05), FN 62479:2016, EN 62368:2014(A11:2017)
Electromagnetic Compatibility Regulation 2014/30/EU
ETSL EN 301 489-1 V2 2.3, ETSLEN 301 489-3 V2 L
Low Voltage Directive 2014/35/EU JEN 60730-2-9
Supplementary Information: Mentioned product can be used with bomb boilers with on/off output and compatibility with the directive only covers the product. ISiPARK is not responsible for the compliance of the entire system with the directive. This declaration does not apply when there are made to the product without obtaining our consent.


WARRANTY CONDITIONS
1- The warranty period starts from the invoice date and warranted against manufacturing defects for 2 years.
-
Business and apparatus are delivered to the customer in working condition in our company. On-site commissioning is subject to a service fee.
-
The repair of the business and appreciation covered by the authority is carried out in our company factory and should send by contracted transportation company. In un-site services, the transportation and accommodation expenses of the service personnel belong to the customer. The shift fee during transportation is added to the service fee and collected in advance.
-
The maintenance of devices and apparatus is done in our company. For the maintenance of the devices and apparatus, the round travel force belongs to the customer.
5-in case of malfunctioning of the devices and apparatus whose warranty period
continues, it is tested in our company whether the malfunction is caused by a customer or manufacturer fault, and it is reported with a report issued by our company.
-
In case of detection of manufacturer induced errors of devices and apparatus whose warranty served continues, the customer can request a replacement or repair of the devices and apparatus at full separation by the manufacturer, unless it's higher than the product's price
-
In the event that the faults of the decision and superstain cause warranty period continuous are determined as caused by the customer, all expenses would be being in the customer.
-
Customer should be aware of damages (if there is any) of product and warm manufacturer since the day warranty duration starts if customer do not want manufacture with knowledge of damage, customer lose the rights of article 6.
- Mollfunctions resulting from the use of devices and apparatus contrary to the matters stated in the User Manual are not governed by the warranty.
10 Devices and their accessories are out of warranty if they are beaten, broken up
scratched by the customer.
11-Cumages resulting from the use of devices and apparatus belonging to other
brands and models without the approval of the manufacturer are not covered by the warranty.
12-Gattery leakage and errors due to rust, oxidation and liquid contact by working in acidic / humid environments are not covered by the warranty.
13-When the product is not used for a long period (more than 15 days), remove the batteries. Otherwise, malfunctions that will occur are out of warranty.
14 Damages that may occur during the transportation of devices and apparatus are not covered by the warranty. Customers can take a transportation insurance. 15 Damages caused by main voltage / facility electrical installation are not covered by the warranty.
10-Devices and apparatuses are out of warranty for malfunctions caused by force measure such as fire, flood, earthquake etc.
17-All of the devices and apparatuses, including all their parts, are under the warranty of our company
10th state of malfunction of the devices and apparatuses within the warranty period, the time spent during reappointment period is extended in the severity period. The report period of the product cannot exceed 20 working days. This period starts from the date of notification to the service station of the fulfillment reduced to the product or in the absence of a service station, to the seller dealer, agency, representatives, importer or manufacturer of the product. Consumer can report the problem by phone, fax, fax, and mail, registered and copy and letter a or similar way. However, in case of accident, responsibility of prone is listening to the customer, if the fulfillment of the product or not contained within 20 working days, the manufacturer producer or importer has to allocate smaller product with similar features to the use of the consumer until the repair of the product is composed.
19-Although the consumer uses his/her repair rights.
- If the product breaks down for 4 times in a year or 6 times in warranty duration and these problems effects main purpose of the product.
(starting from delivery time during warranty.)
- Exceeding the maximum time required for repair.
- in the event that the service station is not available, if it is determined that the repair of the defect is not possible with the report prepared (in order) by one of the seller, dealer, agency, representative, importer or manufacturer, a refund or a price discount at the rate of defect can be requested.
20 The customer can make complaints and appeals to consumer courts or consumer arbitration committees.
21 The warranty document must be kept by the customer during the warranty period. If the document is lost, a second document will not be issued. In case of loss, repair and replacement of devices and applications will be made for a fee.
WARRANTY CERTIFICATE
Manufacturer
Title: ISIPARK IC DIS TIC.A.S.
Adress: Fatih Mah. 1109 St, No.13/A Sermi Gaziemir Iemir-URKYL
Tel: +901732)457 99 50
Fax: +90 (232) 457 91 22
E-mail: generalife@generalife.com
authorized signature
Company Stampa
Product
Type: Smart Room Thermostat
Brand: GENERAL Life
Model: HT25 SMART/HT25S SMART
Warranty Period: 2 Years
Max. Time to Repair: 20 Days
Bandrel and Serial Number

Vendor
Title:
(1) 2017年1月1日
Across
(1) 本次股东大会的决议有效期
T
Гнг
E Mol
Inspire Data and Number
Delivered Time and Floor
At the original timestamp,
Authorized sign
1.00%
| Product Type: Smart Room Thermostat Brand: GENERAL Life Model: H120 SMART/H1205 SMART | STAMP |
2024
ISIPARK reserves the rights of changing product specifications and user manuals. *For all changes, you may visit personal.com.in
- SMART ROOM THERMOSTAT
- SERIES:
- HT25 SMART/HT25S SMART USER MANUAL
- RULES THAT NEED TO BE OBSERVED FOR SAFETY
- TECHNICAL DATA
- ROOM THERMOSTAT PLACEMENT
- RECEIVER PLACEMENT
- RECEIVER INSTALLATION
- PAIRING THE ROOM THERMOSTAT WITH THE RECEIVER
- SMART RECEIVER SETUP
- ROOM THERMOSTAT TEMPERATURE CALIBRATION
- ROOM THERMOSTAT HEATING / COOLING MODES
- ROOM THERMOSTAT HYSTERESIS POSITIVE MENU
- ROOM THERMOSTAT HYSTERESIS NEGATIVE MENU
- WARRANTY CERTIFICATE
Brand : GENERAL Life
Model : HT25S
Category : Thermostat