Scout - Grill TRAEGER - Free user manual and instructions
Find the device manual for free Scout TRAEGER in PDF.


| Product Type | Wood Pellet Grill |
| Brand | Traeger |
| Model | Scout |
| Category | Grill |
| Grilling Area | 184 in² (0.12 m²) |
| Cooking Power | 16,000 BTU |
| Pellet Hopper Capacity | 3 lb (1.36 kg) |
| Temperature Range | SMOKE (approx 165°F) to HIGH (approx 450°F) |
| Power Supply | 120V AC, 60 Hz, GFCI protected outlet required |
| Materials | Porcelain-coated steel grill grate, steel body, aluminum drip tray |
| Ignition System | Automatic electric hot rod ignition |
| Control Type | Digital Pro Controller with Advanced Grilling Logic (AGL) |
| Auger System | Automatic pellet feed with auger motor |
| Grease Management | Grease drip tray and external grease bucket |
| Safety Features | Low temp alarm (LEr below 125°F), high temp alarm (HEr above 550°F), auto shut down cycle |
| Assembly Required | Yes (lid handle, grease drain pan, grill grate) |
| Warranty | 3-year limited warranty |
| Maintenance | Regular cleaning of grease tray, firepot ash removal, cover when not in use |
| Included Accessories | Meat probe, grease bucket, owner's manual |
| Recommended Pellets | Traeger 100% hardwood pellets (various flavors) |
| Usage | Outdoor use only |
Frequently Asked Questions - Scout TRAEGER
User questions about Scout TRAEGER
0 question about this device. Answer the ones you know or ask your own.
Ask a new question about this device
Download the instructions for your Grill in PDF format for free! Find your manual Scout - TRAEGER and take your electronic device back in hand. On this page are published all the documents necessary for the use of your device. Scout by TRAEGER.
USER MANUAL Scout TRAEGER
S C O U T OWNER'S MANUAL
SMOKE IT FORWARD POST YOUR COOKS WITH #TRAEGERGRILLS
A MAJOR CAUSE OF FIRES IS FAILURE TO MAINTAIN REQUIRED CLEARANCES (AIR SPACES) TO COMBUSTIBLE MATERIALS. IT IS OF UTMOST IMPORTANCE THAT THIS PRODUCT BE INSTALLED ONLY IN ACCORDANCE WITH THESE INSTRUCTIONS. SAVE THESE INSTRUCTIONS
IMPORTANT SAFETY
IMPORTANT: READ CAREFULLY AND RETAIN FOR FUTURE REFERENCE.
If you are assembling this unit for someone else, provide this manual for the owner to read and save for future reference.
READ ALL INSTRUCTIONS BEFORE INSTALLING AND USING THE APPLIANCE
Please read this entire manual before installation and use of this pellet-burning appliance. Failure to follow these instructions could result in property damage, bodily injury, or even death. Contact local building or fire officials about restrictions and installation inspection requirements in your area.
Cooking with a hardwood fire will bring years of enjoyment to you, your family, and those lucky friends you will be cooking for. Your new Traeger Scout Grill is especially designed to make cooking easier, while giving you optimal performance with the most savory-flavored food.
As with all grills and cooking appliances, any time you burn a material—whether it be wood, gas, or charcoal—organic gases are formed during the cooking process. One gas that can be particularly harmful in concentrated quantities is carbon monoxide. In an outdoor, open-air environment, carbon monoxide should naturally dissipate and not harm you.
WARNING! Follow these guidelines to prevent this colorless, odorless gas from poisoning you, your family, or others:
- Know the symptoms of carbon monoxide poisoning: headache, dizziness, weakness, nausea, vomiting, sleepiness, and confusion. Carbon monoxide reduces the blood's ability to carry oxygen. Low blood oxygen levels can result in loss of consciousness and death.
- See a doctor if you or others develop cold- or flu-like symptoms while cooking or in the vicinity of this appliance. Carbon monoxide poisoning, which can easily be mistaken for a cold or flu, is often detected too late.
- Alcohol consumption and drug use increase the effects of carbon monoxide poisoning.
DANGER!
- Plug into an appropriate 3-prong outlet.
- An electrical supply with GFCI protection is required. To protect against shock hazard, locate a grounded 3-prong receptacle in reach of the 1.8m (6') power cord. When installing the receptacle, follow the National Electrical Code and local codes and ordinances.
-
If the supply cord is damaged, it must be replaced by the manufacturer, service agent, or similarly qualified persons in order to avoid a hazard.
-
Carbon monoxide is especially toxic to mother and child during pregnancy, infants, the elderly, smokers, and people with blood or circulatory system problems, such as anemia or heart disease.
- Only use your Traeger outside on a noncombustible floor and away from combustible materials.
- Never use gasoline, gasoline-type lantern fuel, kerosene, charcoal lighter fluid, or flammable liquids to start or "freshen up" a fire in this appliance. Keep all such liquids well away from this appliance when in use.
DANGER!
- Hazardous voltage is present which can shock, burn, or cause death. Disconnect the power cord before servicing the grill unless otherwise noted in these Use & Care Instructions.
- Never use or store flammable liquids near the grill.
- Never use gasoline or lighter fluid to manually light your grill. Use ONLY alcohol gel for this procedure AND according to the instructions in these Use & Care Instructions.
WARNING!
Many parts of the grill will become very hot during operation. Care must be taken to avoid burns, both during operation and afterwards, while the grill is still hot.
- Never leave the grill unattended when young children are present.
- Never move the grill when it is operating.
- Let the grill cool thoroughly before moving or attempting to transport.
WARNING!
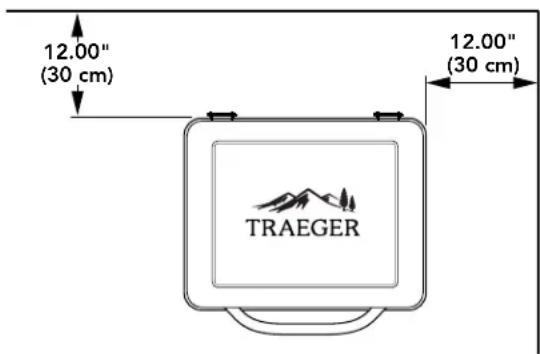
- When operating this grill, maintain a MINIMUM distance of 12 in. / 30.5 cm from the grill to combustibles.
- When operating this grill under overhead combustibles, a MINIMUM of 40 in. / 101.6 cm is required.
WARNING!
- Assemble and operate this grill ONLY per the instructions in the Assembly Guide in these Use & Care Instructions.
• This grill is intended for OUTDOOR USE ONLY. - Never use heating fuel pellets in the grill, due to potential hazardous contaminants and additives that may be present.
- For best results and flavor, use genuine Traeger Hardwood Pellets.
CAUTION!
- Always store wood pellets in a dry location, away from heat-producing appliances and other fuel containers.
- Keep the grill clean – See the cleaning instructions in these Use & Care Instructions.
- Do not use accessories not specified for use with this grill.

SAVE THESE INSTRUCTIONS
natural_image
Close-up of a braised pork belly with visible meat and sauce, garnished with herbs (no text or symbols)WE'VE GOT YOU COVERED
TraegerGrills.com/Shop TraegerGrills.com/Dealers
RUBS
PELLETS


SAUCES

natural_image
Close-up of a cut meat dish with visible marbling and calyx, showing fine texture and charred meat (no text or symbols)TABLE OF CONTENTS
2 Important Safety
6 Adding Flavor to Your Fire
8 Assembling Your Grill
10 Getting to Know Your Grill
12 Initial Firing Instructions
15 Subsequent Start Up
16 Using the Meat Probe
17 Scout Features
18 Operating Tips
22 Maintaining Your Grill
24 Troubleshooting
26 Service and Support
27 Warranty
Register your grill online for a FREE Traeger ebook
Go online at traegergrills.com/register
ADDING FLAVOR TO YOUR FIRE
PELLETS
Creating 100% food-grade hardwood pellets comes naturally to Traeger ^® . Our four U.S. mills process pure hardwood, blended for the perfect balance of smoke to heat and superior quality you can taste every time.
Crafting the highest-quality hardwood pellets on the market starts from the ground up. We built our plants in Oregon, Texas, and Georgia near the hardwood source, and we dedicate our manufacturing to food-grade pellets only, maintaining the purity of our machinery.
Traeger pellets contain two natural ingredients: our signature blend of hardwoods and a simple soybean oil. When manufacturing the premium hardwood pellets that elevate your meal to the next level, less is always more. No additives, no fillers, no binding agents — just simply natural flavor.

SPECIALTY SIZES

HICKORY 10-lb. (4.5-kg) box PEL104
Our most popular pellet flavor now comes in an easy-to-transport 10-lb. box.

BIG GAME BLEND 33-lb. (15-kg) bag PEL320
Traeger and Realtree have teamed up to bring you an exclusive blend of hickory and red and white oak, with woodsy rosemary undertones. This flavor is big enough for big game.
20-LB (9-KG) BAGS
ALDER
20-lb. (9-kg) bag
PEL307
Versatile because of its mild flavor and aroma, alder gives off ample smoke without overwhelming even the most delicate flavors.

MAPLE
20-lb. (9-kg) bag
PEL308
Mild, with a hint of sweetness, maple pellets are great for pork and especially veggies.

APPLE
20-lb. (9-kg) bag
PEL318
Most often used with poultry and pork, apple pellets offer a lightly sweet smoke that helps enhance mild-flavored meats.

MESQUITE
20-lb. (9-kg) bag
PEL305
A favorite of Texas BBQ, mesquite pellets infuse your meat with a robust smoke flavor.

CHERRY
20-lb. (9-kg) bag
PEL309
A very flavorful pellet, cherry wood lends itself to applications where you want to add a hearty smoke flavor.

OAK
20-lb. (9-kg) bag
PEL310
Stronger than cherry or apple and lighter than hickory, oak is great to use with fish and beef.

HICKORY
20-lb. (9-kg) bag
PEL319
The most widely used pellets in grill, hickory pellets release a rich flavor that complements most meats.

PECAN
20-lb. (9-kg) bag
PEL314
Deliciously nutty and even a little spicy, pecan pellets are great with veggies, beef, pork, poultry, or even baked goods.
ASSEMBLING YOUR GRILL
READ ALL INSTRUCTIONS BEFORE INSTALLING AND USING THE APPLIANCE

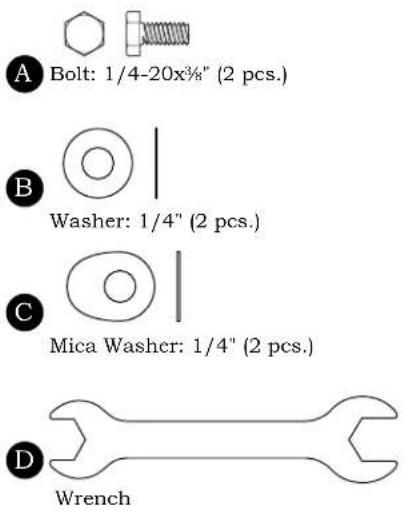
BLISTERPACK PARTS NEEDED
| Part Description | |
| 1 | Grill Lid |
| 2 | Grill Body |
| 3 | Lid Handle |
| 4 | Grill Grate |
| 5 | Grease Drip Tray |
| 6 | Grease Bucket |
| Part Description | |
| A | Bolt: 1/4-20x3⁄8" (2 pcs.) |
| B | Washer: 1/4" (2 pcs.) |
| C | Mica Washer: 1/4" (2 pcs.) |
| D | Wrench |
1 INSTALL LID HANDLE

natural_image
Technical line drawing of a mechanical device with handle and internal compartments (no text or symbols)In this step: 3 A B C D
2 INSTALL GREASE DRAIN PAN AND BUCKET

natural_image
Technical line drawing of a mechanical device with control panel and buttons (no text or symbols)In this step: 5
NOTE: Be sure the grease drain spout on the grease drain pan extends through the opening in the back of the grill.
IMPORTANT: Always be sure to position the grease drain bucket under the spout during use!
1
3 INSTALL PORCELAIN-COATED GRILL GRATE

natural_image
Technical line drawing of a mechanical device with control panel and rack (no text or symbols)In this step: 4
1
GETTING TO KNOW YOUR GRILL
GRILL PARTS AND FEATURES

| Part Description | |
| 1 | Lid Handle |
| 2 | Grill Lid |
| 3 | Pellet Hopper Lid |
| 4 | Pellet Hopper |
| 5 | Digital Pro Controller with AGL |
| 6 | Grease Bucket |
| Part Description | |
| 7 | Grease Drip Tray |
| 8 | Porcelain Coated Grill Grate |
| 9 | Meat Probe |
| 10 | Grease Drain Port |
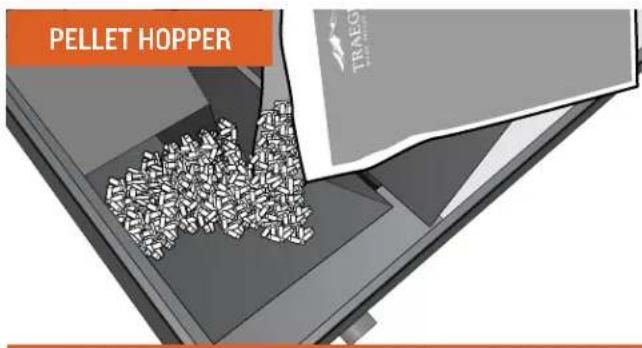
A 3-pound-capacity (2.3 kg) pellet hopper will keep you cooking for hours, getting you away from the grill and back to entertaining friends and family.

Take Traegering on the go! The compact design is perfect for camping or tailgating, allowing you to enjoy that great Traeger flavor, no matter where you go.
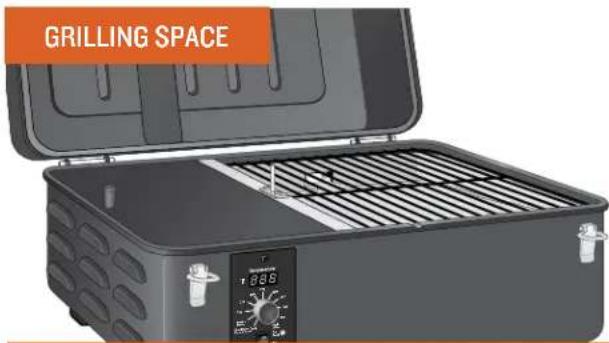
With 184 in. ^2 (0.12 m ^2 ) of grilling space, your Traeger Scout gives you 16,000 BTU of cooking power in a small footprint.

You don't have to worry about drippings flaring up and causing those nasty fireballs that destroy your meal because Traeger Wood Fired Grills are designed to cook by using indirect heat. All drippings are safely channeled into an external grease pan for easy disposal.
INITIAL FIRING INSTRUCTIONS
To be used on initial firing or anytime the grill runs out of pellets. In order to ensure proper operation of the grill, you must first prime the auger by allowing the auger tube to be "charged" with pellets.
natural_image
Illustration of a portable stove with open lid, internal compartments, and a grid-patterned cover (no text or symbols)
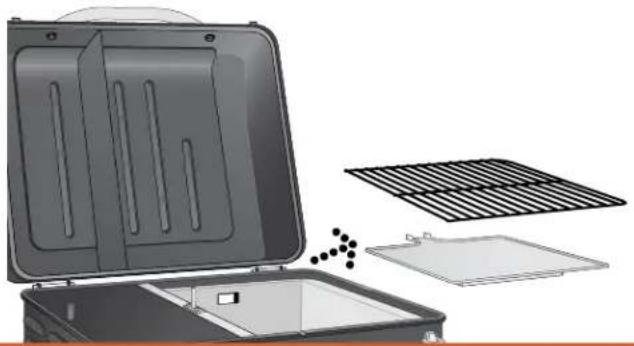
Remove the porcelain-coated grill grate or cast iron griddle and the grease drip tray from the inside of the grill.


With the Main Power switch in the OFF (O) position, plug the power cord into an appropriate grounded/earthed electrical outlet.


Make sure there are no foreign objects in the auger. Turn the switch ON (I) and the temperature dial to SMOKE. Make sure the auger is turning (inside the pellet hopper).


Check that there is air movement from the draft inducer fan by placing your fingers over the firepot. If the hot rod is getting hot, it will turn red. CAUTION! Do not touch the hot rod. Turn the temperature dial to SHUT DOWN CYCLE.

5
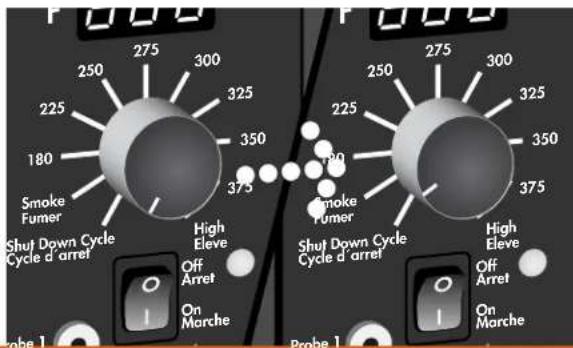
Fill the hopper with Traeger Hardwood Pellets and turn the temperature dial to HIGH.
6
When the pellets begin to fall into the firepot, turn the temperature dial to SHUT DOWN CYCLE to reset the hot rod. Then with pellets still in the firepot, turn the temperature dial back to SMOKE.
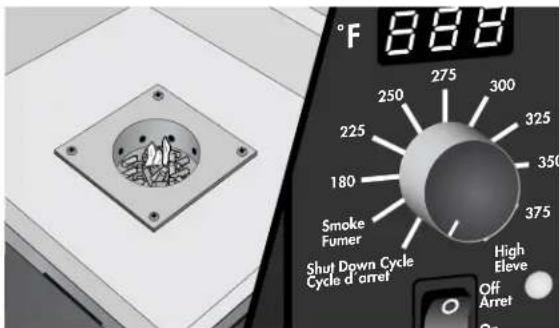
7
When flames start coming out of the firepot, turn the temperature dial to SHUT DOWN CYCLE and switch to OFF. Let the grill cool down.
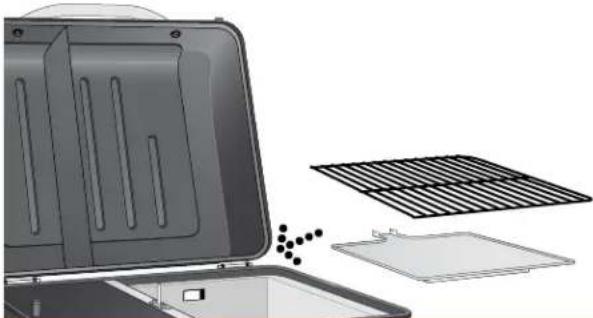
natural_image
Illustration of a laptop with internal components and a grid-patterned cover (no text or symbols)8
Now you're ready to place the grease drip tray, and porcelain-coated grill grate back into the grill.
WARNING!
- When operating this grill, maintain a minimum clearance of 12 inches from grill to combustibles.
- For best results and flavor, always use genuine Traeger® Hardwood Pellets. Never use heating fuel pellets in the grill.
- Clean the grease drip tray frequently to reduce the possibility of a grease fire. Please see page 18 for more details.
INITIAL FIRING INSTRUCTIONS (cont.)


Turn the switch ON (I) and the temperature dial to SMOKE. In about 2 minutes, the pellets will ignite and whitish-gray smoke will come out of the grill. After the pellets have ignited, close the door and turn the temperature dial to any cooking setting desired.


Before using your grill for the first time, it will need to be seasoned. Turn the temperature dial to HIGH and let run for 45 minutes with the door closed.
WARNING!
- Start the grill on SMOKE setting with the door open. Once the pellets are ignited, close the door and set the temperature dial to any desired cooking temperature.
- When operating this grill, maintain a minimum clearance of 12 in / 30.5 cm from grill to combustibles.
- For best results and flavor, always use genuine Traeger Hardwood Pellets. Never use heating fuel pellets in the grill.
- Clean the grease drain pan frequently to reduce the possibility of a grease fire. Please see the “Maintaining Your Grill” section on page 21 for more details.
The controller for this grill comes with an automatic shut down cycle. When finished cooking on your grill, set the temperature dial to the SHUT DOWN CYCLE position. This will leave the draft induction fan running for 10 minutes to burn any excess pellets in the firepot. After 10 minutes, the control will power off and the fan will stop running.
DANGER! The main power switch will shut off power to the control, and the temperature dial switch will shut off power to the grill components only. When servicing the controller or any other parts, ensure that the power supply is disconnected to avoid an electrical shock hazard.
SUBSEQUENT START-UP


Turn the switch ON (I) and the temperature dial to SMOKE. In about 2 minutes, the pellets will ignite and whitish-gray smoke will come out of the grill. After the pellets have ignited, close the door and turn the temperature dial to any cooking setting desired.
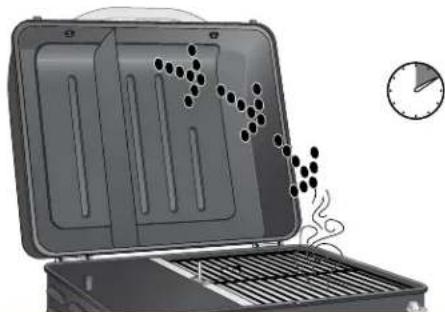
natural_image
Illustration of a portable stove with a tray, smoke plume, and a clock showing time (no text or symbols)
After the pellets have ignited, close the door and turn the temperature dial to any cooking setting desired. Allow the grill to preheat for about 10 minutes before adding food.
NOTE: If the grill hasn't achieved the set temperature after a full 10-minute preheat, turn the dial to SHUT DOWN CYCLE, then back to the originally selected temperature.
If this fails to achieve the selected temperature, please see "Operating Tips" on page 18 for more information.
CONTROLLER SAFETY FEATURES
The controller comes equipped with two safety features that will help you keep the grill operating correctly.
LOW TEMPERATURE ALARM
If the grill stays below 125^ F / 51.7^ C (as read by the RTD temperature sensor) for a period of 10 minutes, the control will go into an alarm state and the display will read “LEr.” This will turn off all power to the internal components of the grill. The display will remain in this state until you turn off the main power switch.
HIGH TEMPERATURE ALARM
If the grill reaches an internal temperature reading of 550^ F / 287.8°C (as read by the RTD temperature sensor), the control will go into alarm state and the display will read “HEr.” This will turn off all power to the internal components of the grill. The display will remain in this state until you turn off the main power switch.
Whenever either of these alarm conditions occurs, you should check to see what caused this condition and fix the problem. Call Traeger's VIP-365 Customer Service (see page 26) if you need help.
USING THE MEAT PROBE

Insert the meat probes into the socket on the lower left corner of the controller, then thread probe through the nothc on the front of the grill.

natural_image
Exterior view of a portable electric stove with open lid and control panel (no visible text or symbols)Insert probe tip into meat, making sure it's not in the fatty portion or touching bone, but is halfway into the thickest part of the meat.
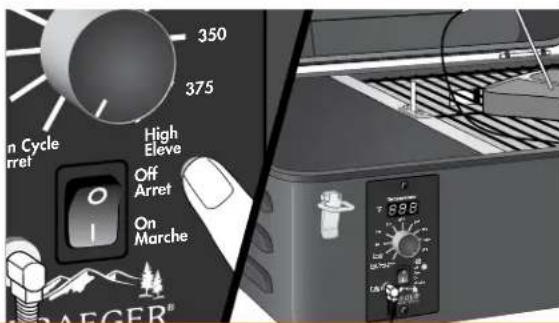
Reading the temperature: Press the Probe selector switch on the control. The probe temperature will display for 5 seconds then revert back to the temperature of the grill.
MEAT TEMPERATURE RECOMMENDATIONS
| Range Beef Lamb Pork Poultry | |||
| Well 170°F / 77°C 160°F / 71°C 170°F | / 77°C 170°F / 77°C | ||
| Medium 160°F / 71°C 155°F / 68°C | 160°F / 71°C | 170°F / 77°C | |
| Medium Rare 145°F / 63°C 145°F / 63°C 170°F / 77°C | |||
| Rare 135°F / 57°C | 170°F / 77°C | ||
SCOUT FEATURES
DRIP TRAY LINERS
Make grill maintenance a breeze with our Drip Tray Liners. Made of heat-proof aluminum, they're lightweight and disposable so you can clean up quickly and Traeger on. Liners should rest fully on the grease pan and not cover any areas outdoor of the grease pan. Doing so will affect the temperature and performance of the grill.

natural_image
Interior view of a portable kitchen appliance with open lid and control panel (no visible text or symbols)OPERATING TIPS
-
You can change the temperature dial at any time during grilling to increase or decrease cooking temperature. The HIGH temperature setting is for grilling. The SMOKE setting is for smoking and adding smoke flavor to foods being cooked. The SMOKE setting can also be used to "hold" foods at about 73.9°C / 165°F.
-
When you change the temperature using the temperature dial, the new temperature will blink 5 times, then revert back to the actual grill temperature, making it easy to know the exact grill setting.
-
WARNING! Your Traeger Grill should never be moved while it is hot. If you are transporting your grill in a vehicle after cooking on it, make sure the fire is completely out and the grill is cold before placing it in any vehicle. Never put water into the firepot; it will jam the auger.
-
Your Traeger Grill is designed to operate with the door closed. Cooking with the door open greatly lengthens your cooking time.
-
CAUTION! Never add pellets by hand to a hot firepot. This is dangerous and you may be seriously burned. If you run out of pellets and lose your fire while cooking, let the grill cool completely and start again with the “INITIAL FIRING INSTRUCTIONS” on page 10.
-
CAUTION! Make sure the grease drain pan. If not seated properly, direct heat and flame could come up out of the firepot and cause a grease fire in the grill.
-
Always take into account the outside temperature when estimating cooking times. If it is hot outside, it will take less time for your grill to reach the set temperature. If it is cold, wet, or windy, it will take longer.
8. Digital Elite Controller Functions:
After selecting your cooking temperature, the auger will operate continuously until the selected temperature is reached. From that point forward, the digital control will cycle the auger off and on to maintain the selected temperature until the temperature dial is changed.
WARNING! If the fire in the firepot goes out while smoking/cooking and there are sufficient pellets still in the pellet hopper, it is important to follow these steps. Failure to do so may cause a hazardous “over-firing” of your grill due to an excess of unburned pellets in the firepot.
a. DANGER! Turn the switch OFF (O) and disconnect the power cord. Allow the grill to cool thoroughly. Open the door and remove all food, the porcelain-coated grill grates, the grease drain pan, and the upper heat baffle.
b. WARNING! Remove all unburned pellets and ash from inside and around the firepot. (See instructions for proper handling and disposal of ash on page 19.)
c. Before replacing the grease drain pan and the porcelain-coated grill grate, plug the power cord into an appropriate grounded electrical outlet and turn the switch ON (I). Pellets should fall into the firepot and the hot rod should begin to heat (it will start to turn red). CAUTION! Do not touch the hot rod.
d. When flames start to come out of the firepot, turn the switch OFF (O). Let the grill cool down. Now you're ready to place the grease drain pan and porcelain-coated grill grate back into the grill. With the door open, turn the switch ON (I) and turn the temperature dial to SMOKE. In about 2 minutes, the pellets will ignite and whitish-gray smoke will come out of the grill. After the pellets have ignited, close the door and turn the temperature dial to any cooking setting desired.
9. CARBON MONOXIDE:
WARNING! Follow these guidelines to prevent this colorless, odorless gas from poisoning you, your family, or others.
- Know the symptoms of carbon monoxide poisoning: headaches, dizziness, weakness, nausea, vomiting, sleepiness, and confusion. Carbon monoxide reduces the blood's ability to carry oxygen. Low blood oxygen levels can result in loss of consciousness and death.
- See a doctor if you or others develop cold-or flu-like symptoms while cooking or in the vicinity of this appliance. Carbon monoxide poisoning, which can easily be mistaken for a cold or flu, is often detected too late.
- Alcohol consumption and drug use increase the effects of carbon monoxide poisoning.
- Carbon monoxide is especially toxic to mother and child during pregnancy, infants, the elderly, smokers, and people with blood or circulatory system problems, such as anemia or heart disease.
- CAUTION! Grease fires are caused by not properly maintaining the grill by failing to clean the grease drain pan, on a consistent basis. (See MAINTAINING YOUR GRILL for instructions.) In the unlikely event of a grease fire while cooking, turn the switch OFF (O) to reduce the amount of oxygen in the cooking chamber and keep the door closed until the fire is completely out. Never keep the door open during a grease fire. If the fire does not go out, lightly sprinkle baking soda on the fire.
CAUTION! Be careful not to burn yourself.
If this does not work, carefully remove the food from the grill and keep the door closed until the fire is completely out. Again, be careful not to burn yourself. When the grill is completely cool, remove the porcelain-coated grill grate and replace the foil on the grease drain pan. Clean any grease accumulation from the grease drain pan. Replace the grease drain pan and the porcelain-coated grill grates in their proper positions, restart the grill, and resume cooking.
REIGNITING YOUR GRILL
WARNING! If at any time the grill fails to light or the fire in the firepot goes out while cooking or smoking and there are sufficient pellets in the pellet hopper, it is important to follow these steps. Failure to do so may cause a hazardous "over-firing" of your grill due to an excess of unburned pellets in the firepot.


DANGER! If the grill failed to light or the fire went out, turn the switch OFF (O) and disconnect the power cord. If the grill is still hot, allow it to cool thoroughly.

natural_image
Illustration of a microwave oven with internal compartments and a grid-patterned cover (no text or symbols)
Open the door and remove all food, the porcelain-coated grill grate and grease drip tray.
natural_image
Illustration of a hand using a tool to cut a circular component on a workbench (no text or symbols visible)
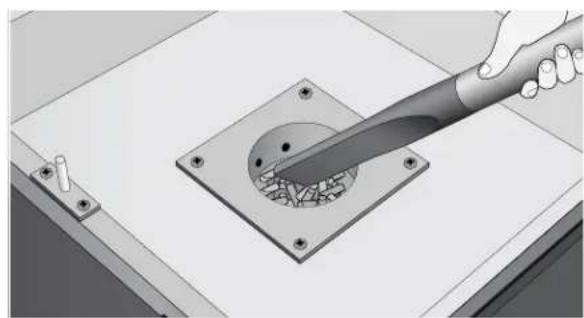
WARNING! Remove all unburned pellets and ash from inside and around the firepot. (See instructions for proper handling and disposal of ash on page 19.)


Plug power cord into an appropriate grounded electrical outlet and restart the grill. Pellets should fall into the firepot and the hot rod should begin to heat (it will start to turn red).
CAUTION! Do not touch the hot rod.

natural_image
Illustration of a closed storage device with internal compartments and external components (no text or symbols)
When flames start to come out of the firepot, turn the switch OFF (O). Let the grill cool down. Now you're ready to place the grease drip tray and porcelain-coated grill grate back into the grill.


With the door open, turn the switch ON (I) and the temperature dial to SMOKE. In about 2 minutes, the pellets will ignite and whitish-gray smoke will come out of the grill. After the pellets have ignited, close the door and turn the temperature dial to any cooking setting desired.
NOTE: If the procedure is not successful, see "FREQUENTLY ASKED QUESTIONS" on page 22 for troubleshooting tips or contact Traeger's VIP-365 Customer Service (see page 26) to help diagnose the problem.
MAINTAINING YOUR GRILL
CREOSOTE AND GREASE FORMATION AND REMOVAL
When wood pellets are burned slowly, they produce tar and other organic vapors that combine with expelled moisture to form creosote. The creosote vapors condense in the relatively cool flue exhaust of a slow-burning fire. As a result, creosote accumulates on the flue lining. When ignited, creosote makes an extremely hot fire. Airborne grease particles will travel through the cooking chamber, and some of this airborne grease will accumulate on the flue lining, similar to creosote, which could be contributory to a fire.
Also, grease drippings from the food will fall onto the grease drip tray and be channeled into the grease drain and then out of the grill. These are the components of the Traeger Grease Management System (TGMS). Grease will accumulate in all of these locations.
All components of the TGMS should be inspected at least twice a year for signs of grease buildup. When creosote or grease has accumulated, it should be removed to reduce the risk of fire.
1. CLEANING OUTSIDE SURFACES:
DANGER! Turn the switch OFF (O) and disconnect the power cord.
CAUTION! Accumulated grease is easier to clean off when the grill is still warm—not hot. Be careful not to burn yourself. Gloves are recommended.
Periodically clean the grease out of the grease drip tray and grease drain. If too much grease is allowed to build up in the grease drip tray or is allowed to plug the grease drain, a grease fire could result. We recommend cleaning these locations regularly.
Remove the porcelain-coated grill grates and the grease drip tray. Scrape the grease accumulation from inside the grease drip tray using a stiff, nonmetallic tool. The drip tray may be washed in hot, soapy water. Wipe up remaining grease residue with paper towels or disposable rags. Paper towels or disposable rags can also be used to wipe some of the grease off of the interior surfaces of the grill.
CREOSOTE AND GREASE FORMATION AND REMOVAL
When wood pellets are burned slowly, they produce tar and other organic vapors that combine with expelled moisture to form creosote. The creosote vapors condense in the relatively cool flue exhaust of a slow-burning fire. As a result, creosote accumulates on the flue lining. When ignited, creosote makes an extremely hot fire. Airborne grease particles will travel through the cooking chamber, and some of this airborne grease will accumulate on the flue lining, similar to creosote, which could be contributory to a fire.
Also, grease drippings from the food will fall onto the grease drip tray and be channeled into the grease drain and then out of the grill. These are the components of the Traeger Grease Management System (TGMS). Grease will accumulate in all of these locations.
All components of the TGMS should be inspected at least twice a year for signs of grease buildup. When creosote or grease has accumulated, it should be removed to reduce the risk of fire.
1. CLEANING OUTSIDE SURFACES:
DANGER! Turn the switch OFF (O) and disconnect the power cord.
CAUTION! Accumulated grease is easier to clean off when the grill is still warm—not hot. Be careful not to burn yourself. Gloves are recommended.
Periodically clean the grease out of the grease drip tray and grease drain. If too much grease is allowed to build up in the grease drip tray or is allowed to plug the grease drain, a grease fire could result. We recommend cleaning these locations regularly.
Remove the porcelain-coated grill grates and the grease drip tray. Scrape the grease accumulation from inside the grease drip tray using a stiff, nonmetallic tool. The drip tray may be washed in hot, soapy water. Wipe up remaining grease residue with paper towels or disposable rags.
Paper towels or disposable rags can also be used to wipe some of the grease off of the interior surfaces of the grill.
2. CLEANING OUTSIDE SURFACES:
DANGER! Turn the Main Power switch OFF (O) and disconnect the power cord.
Use a disposable rag or cloth dampened with warm, soapy water to wipe the grease from the outside of the grill. DO NOT use oven cleaner, abrasive cleansers, or abrasive cleaning pads on the outside grill surfaces.
3. OUTSIDE STORAGE:
CAUTION! If the grill is stored outside during the rainy season, care should be taken to ensure that water does not get into the pellet hopper. Wood pellets expand greatly when wet and will jam your auger. Always cover your grill when not in use with the Traeger Grill Cover. This custom-fit cover can be purchased at traegergrills.com.
4. CLEANING THE GRILL GRATES:
CAUTION! Cleaning the grill grates works best while they are still warm. Be careful not to burn yourself. We recommend keeping a long-handled cleaning brush near the grill. After removing your food, give the grill grate a quick brushing. It takes only a minute and it will be ready the next time you want to use the grill.
5. CLEANING THE ASH FROM INSIDE AND AROUND THE FIREPOT:
WARNING! Make sure that the grill is COLD before cleaning the ash.
WARNING! Disposal of ashes should be done only according to the following instructions.
Excess ash in the firepot may cause your fire to go out. The firepot should be inspected occasionally and cleaned to remove the ash buildup. Again, cleaning the ash from in and around the firepot should be done only when the grill is COLD.
Remove the grill grates, grease drip tray, and heat shield to provide access to the firepot and the interior of the grill. Much of the ash outside of the firepot can be removed from the grill with a small metal fireplace shovel or other similar tool.
WARNING! A vacuum cleaner is the best way to remove ashes from the firepot, but this must be done with extreme care to avoid the risk of fire. Again, cleaning the ash from the firepot should be done only when the grill is COLD.
A utility-type vacuum cleaner having a metal collection canister without a bag would be best for this task. However, almost any vacuum cleaner will work safely if this procedure is properly followed.
After ensuring that the ash in the firepot is COLD, vacuum the ash from the inside of the firepot.
a. If your vacuum cleaner is a bagless model, empty any previously accumulated debris from the collection chamber. Then vacuum the ash from the inside of the firepot. Once the firepot is clean, empty the collection chamber into the metal container described below without delay. Make sure that there is no remaining ash residue left in the collection chamber.
b. If your vacuum cleaner is a model that uses a disposable bag, install an unused bag in the machine. Then vacuum the ash from the inside of the firepot. Once the firepot is clean, remove the bag from the vacuum cleaner and place it in the metal container described below without delay.
6. DISPOSAL OF ASHES:
WARNING! Ashes should be placed in a metal container with a tight-fitting lid. The closed container of ashes should be placed on a noncombustible floor or on the ground, well away from all combustible materials, pending final disposal. When the ashes are disposed of by burial in soil or otherwise locally dispersed, they should be retained in the closed container until all cinders have cooled thoroughly.
FREQUENTLY ASKED QUESTIONS
| Question Answer | ||
| Why won’t my grill ignite? | Verify power at the electrical outlet. | If the power cord is connected to a GFCI (ground fault circuit interrupter), check and reset if necessary. |
| Initiate start-up. If ignition does not occur, proceed to next answer. | ||
| DANGER! Turn the switch OFF (O) and disconnect the power cord. | Remove the control and check the fuse on back. Replace the fuse if blown. Reinstall the control. | |
| Check the draft inducer fan and the auger drive motor for operation. If both are operating, then the hot rod needs to be replaced. If one or both are not operating, contact Traeger’s VIP-365 Customer Service (see page 26) for additional troubleshooting help or to place an order. | ||
| Why are no pellets being delivered into the firepot? | Verify that there are pellets in the pellet hopper. If this is the initial firing or the grill has run out of pellets, allow sufficient time for the pellets to travel from the pellet hopper to the firepot (can take a few minutes). | |
| Initiate start-up.See “Initial Firing Instructions” section on page 10. | If there are still no pellets in the firepot, proceed to next answer. | |
| If the auger drive motor is operating (check the small fan blade on the back of the motor), then the problem is in the digital control, which will need to be replaced. Contact your Traeger dealer or Traeger’s VIP-365 Customer Service (see page 26) to place an order. | ||
| If the auger drive motoris notoperating but the draft inducer fanis operating, then the problem is in the auger system, which will need to be checked. | With the switch OFF (O), locate the small fan blade on the back of the auger drive motor. | |
| CAUTION! While watching the fan blade, turn the switch ON (I). If the fan blade does not turn, turn the switch OFF (O). This indicates a defective auger drive motor, and it will need to be replaced. Contact your Traeger dealer or Traeger’s VIP-365 Customer Service (see page 26) to place an order. | ||
| If the fan blade turns a bit and then stops, continue watching and turn the switch OFF (O). If the fan blade unwinds slightly, this indicates a jam in the auger system which will need to be cleared. | ||
| DANGER! Turn the switch OFF (O) and disconnect the power cord.Remove the pellets from the pellet hopper. Check for foreign objects and wet or decomposed pellets, both of which can cause a jam in the auger system. The auger will need to be removed to clear a jam in the auger system. See “How do I remove the auger if it jams?” | ||
| How do I remove the auger if it jams? | DANGER! Turn the switch OFF (O) and disconnect the power cord. | |
| CAUTION! If the grill is still hot, allow it to cool thoroughly. | ||
| Remove any covers necessary to access the auger drive motor. | ||
| Remove the screw connecting the auger drive motor shaft to the auger shaft and the screw retaining the auger bushing into the auger tube. | ||
| With a small pipe wrench or locking pliers on the auger shaft, turn the auger counterclockwise. It will turn hard until it breaks free; then the auger will turn freely. | ||
| Remove the auger and clean all pellets, ash, or foreign objects from the auger, auger tube, and firepot. (See instructions for proper handling and disposal of ash on page 22.) | ||
| Sand the outside surfaces of the auger with medium grit sandpaper. Check the inside of the auger tube and sand it if needed. Vacuum the sanding grit out of the auger tube and firepot when finished. Check that the auger rotates freely. | ||
| Reattach the auger shaft to the auger drive motor shaft. | ||
| Why does my grill fire go out on SMOKE setting? | There may be excess ash in the firepot which needs to be cleaned. | |
| WARNING! If the fire in the firepot goes out while smoking and there are sufficient pellets in the pellet hopper, it is important to complete the following instructions. Failure to do so may cause a hazardous “over-firing” of your grill due to an excess of unburned pellets in the firepot. | DANGER! Turn the switch OFF (O) and disconnect the power cord. Allow the grill to cool thoroughly. Open the door and remove all food, the porcelain-coated grill grate, the grease drain pan, and the upper heat baffle. | |
| WARNING! Remove all unburned pellets and ash from inside and around the firepot. (See instructions for proper handling and disposal of ash in on page 22.) | ||
| Before replacing the grease drip tray and porcelain-coated grill grate, plug the power cord into the appropriate grounded electrical outlet and turn the switch ON (I). Pellets should fall into the firepot and the hot rod should begin to heat (it will start to turn red). CAUTION! Do not touch the hot rod. | ||
| When flames start to come out of the firepot, turn the switch OFF (O). Let the grill cool down. Now you're ready to place the grease drip tray and porcelain-coated grill grate back into the grill. With the door open, turn the switch ON (I) and turn the temperature dial to SMOKE. In about 2 minutes, the pellets will ignite and whitish-gray smoke will come out of the grill. After the pellets have ignited, close the door and turn the temperature dial to any cooking setting desired. | ||
| If this does not fix the problem, contact Traeger's VIP-365 Customer Service (see page 26) for assistance. | ||
| With the Traeger Digital Pro Controller, what dial setting is recommended for starting the grill? | The auto-start procedure is the same for all grill controls. With the door open, turn the switch ON (I) and turn the temperature dial to SMOKE. In about 2 minutes, the pellets will ignite and whitish-gray smoke will come out of the grill. After the pellets have ignited, close the door and turn the temperature dial to any cooking setting desired. | |
| How do I protect my paint finish? | Use the protective cover on the grill and touch-up paint to repair any scratches. Touch-up paint is available from your Traeger dealer, or log onto our website, traegergrills.com. | |
| Every 90 days, use a high-quality car wax on the outside surfaces of the grill. ONLY APPLY WAX TO A COLD GRILL. | ||
| Where can I get a new part for my grill? | Check with your Traeger dealer. They may have the part in stock or can order the part for you. | In either case, please provide your name, phone number, address, model, and serial number of the grill (located on the label inside the hopper lid), along with the part identification number from the component diagram or parts list. |
| Contact Traeger's VIP-365 Customer Service (see page 26) to place an order. | ||
VIP. 365
I-800-TRAEGER
TRAEGER'S LEGENDARY VIP-365 customer service is the best out there. If you have any questions about your Traeger Scout Grill or need tips on cooking your first Thanksgiving turkey, our seasoned experts have your back. We're here for you 365 days a year including holidays, because we're cooks — not bankers.
For 24/7 assistance with assembly or installation, parts, or customer service (English only, please), you can phone, email, or write us at:
TRAEGER'S VIP-365 CUSTOMER SERVICE
Phone: 1-800-TRAEGER
6:00 AM - 7:30 PM MT, 365 days a year (English)
Email: service@traegergrills.com
TRAEGER PELLET GRILLS LLC
1215 E. Wilmington Ave.
Salt Lake City, UT 84106
TRAEGER
WOOD FIRED GRILLS
3-YEAR WARRANTY
Traeger Pellet Grills LLC warrants this grill grill against defects in material and workmanship under normal use and maintenance for a period of three (3) years from the date of original purchase.
Traeger Pellet Grills LLC will provide a replacement part for any part found to be defective. Original part(s) approved for return by Traeger's Parts Department must be returned prepaid.
This warranty does not include labor charges connected with the determination or replacement of defective parts, or freight charges to ship these parts.
Traeger Pellet Grills LLC shall not be liable under this or any implied warranty for incidental or consequential damages. This warranty gives the retail customer specific legal rights and the customer may have other rights which vary from state to state.
This warranty shall be void if the unit is not assembled or operated in accordance with the operation instructions provided with this unit; the unit is resold or traded to another owner; components, or accessories not compatible with the unit have been used; the unit has been used in a commercial or food service application; or the user has abused or otherwise failed to maintain the unit.
To process a warranty claim, Traeger Pellet Grills LLC may require proof of your date of purchase. You should retain your sales slip or invoice along with this certificate with your valuable documents.

LIVE FLAVOR FULL
FOLLOW US @TRAEGERGRILLS


Traeger Pellet Grills LLC
1215 E. Wilmington Ave
Salt Lake City, UT 84106
traegergrills.com
- S C O U T OWNER'S MANUAL
- SMOKE IT FORWARD POST YOUR COOKS WITH #TRAEGERGRILLS
- IMPORTANT SAFETY
- IMPORTANT: READ CAREFULLY AND RETAIN FOR FUTURE REFERENCE.
- READ ALL INSTRUCTIONS BEFORE INSTALLING AND USING THE APPLIANCE
- DANGER!
- WARNING!
- CAUTION!
- SAVE THESE INSTRUCTIONS
- WE'VE GOT YOU COVERED
- TABLE OF CONTENTS
- Register your grill online for a FREE Traeger ebook
- ADDING FLAVOR TO YOUR FIRE
- PELLETS
- SPECIALTY SIZES
- 20-LB (9-KG) BAGS
- ALDER
- MAPLE
- APPLE
- MESQUITE
- CHERRY
- OAK
- HICKORY
- PECAN
- ASSEMBLING YOUR GRILL
- INSTALL LID HANDLE
- INSTALL GREASE DRAIN PAN AND BUCKET
- INSTALL PORCELAIN-COATED GRILL GRATE
- GETTING TO KNOW YOUR GRILL
- INITIAL FIRING INSTRUCTIONS
- INITIAL FIRING INSTRUCTIONS (cont.)
- SUBSEQUENT START-UP
- CONTROLLER SAFETY FEATURES
- LOW TEMPERATURE ALARM
- HIGH TEMPERATURE ALARM
- USING THE MEAT PROBE
- MEAT TEMPERATURE RECOMMENDATIONS
- SCOUT FEATURES
- DRIP TRAY LINERS
- OPERATING TIPS
- Digital Elite Controller Functions:
- CARBON MONOXIDE:
- REIGNITING YOUR GRILL
- MAINTAINING YOUR GRILL
- CREOSOTE AND GREASE FORMATION AND REMOVAL
- CLEANING OUTSIDE SURFACES:
- CLEANING OUTSIDE SURFACES:
- OUTSIDE STORAGE:
- CLEANING THE GRILL GRATES:
- CLEANING THE ASH FROM INSIDE AND AROUND THE FIREPOT:
- DISPOSAL OF ASHES:
- FREQUENTLY ASKED QUESTIONS
- 365
- I-800-TRAEGER
- TRAEGER'S VIP-365 CUSTOMER SERVICE
- TRAEGER PELLET GRILLS LLC
- TRAEGER
- 3-YEAR WARRANTY
- LIVE FLAVOR FULL
Brand : TRAEGER
Model : Scout
Category : Grill