SR117 - Microphone Earthworks - Free user manual and instructions
Find the device manual for free SR117 Earthworks in PDF.


| Product Type | Condenser Microphone |
| Polar Pattern | Cardioid |
| Frequency Response | 20 Hz - 20 kHz |
| Impedance | 60 Ω |
| Maximum SPL | 140 dB SPL |
| Power Requirement | 48V Phantom Power |
| Output Connector | 3-pin XLR |
| Dimensions (Length x Diameter) | 6.5 in x 0.75 in (165 mm x 19 mm) |
| Weight | 7.5 oz (213 g) |
| Housing Material | Machined Brass with Black Finish |
| Self Noise | 19 dB SPL (A-weighted) |
| Sensitivity | 15 mV/Pa |
| Low Frequency Roll-off | Integrated high-pass filter at 100 Hz |
| Application | Live sound, broadcast, studio |
| Accessories Included | Mic clip, windscreen, carrying case |
Frequently Asked Questions - SR117 Earthworks
User questions about SR117 Earthworks
0 question about this device. Answer the ones you know or ask your own.
Ask a new question about this device
Download the instructions for your Microphone in PDF format for free! Find your manual SR117 - Earthworks and take your electronic device back in hand. On this page are published all the documents necessary for the use of your device. SR117 by Earthworks.
USER MANUAL SR117 Earthworks
natural_image
Close-up of a black microphone against a purple background, with a white circular logo in the top-left corner (no text or symbols on the microphone itself)SR117
SUPERCARDIOID CONDENSER
VOCAL MICROPHONE
Follow us on social media @EarthworksAudio
For more information, please visit
earthworksaudio.com or call 1-603-654-2433.
Version 3.0, Last Updated 3/31/23
Thank you for purchasing the Earthworks SR117 Handheld Vocal Microphone
YOUR PURCHASE INCLUDES
1 SR117 Microphone
1 Microphone Clip
1 Protective Fabric Bag
GETTING STARTED
The SR117 is a condenser microphone with active electronics. This means:
- Its output level will be naturally higher than many of the dynamic microphones that it may be replacing. It is not uncommon to need to reduce gain if you were previously using a dynamic microphone.
- You will need to engage phantom power on your interface or preamp. Pro Tip: It's always a good idea to plug in a condenser microphone while phantom power is off and the channel is muted. After engaging phantom power, give the microphone a short time to settle before unmuting.
PROPER MAINTENANCE
To guarantee your microphone provides years of performance, follow these guidelines:
- Never attempt to disassemble the lower half of the microphone.
- Avoid extreme heat and condensing humidity. Allow the microphone to warm up when bringing it in from the cold.
- Rough handling may damage the microphone even if no markings are visible.
GENERAL TIPS FOR USING THE SR117
Because of its active electronics, the SR117 may behave differently than your last microphone, especially if your last microphone was a dynamic. When you're using the SR117, your voice is pulled into the mic, rather than you having to push your voice. Compared to your last mic, the SR117 will likely require less preamp gain, and different EQ, gate and compression settings.
Whenever you use the SR117, set yourself up for success by following these steps. If you don't follow these steps, you run the risk of creating very loud feedback, loud pops, and other unwanted noises.
Before connecting the mic:
- Mute the channel you'll be plugging it into
• Make sure phantom power is switched OFF - Reduce preamp gain to minimum
- Reset EQ to flat and disengage the channel gate and compressor (where applicable)
Then connect the SR117 to one end of an XLR cable, with the other end plugged into your mixing board or interface.
After connecting the mic:
- Switch phantom power ON
- Wait at least 10 seconds for the microphone to fully power up
- Un-mute the channel
- Then adjust preamp gain, EQ and other settings as desired
Before disconnecting the mic:
- Mute the channel
- Switch phantom power OFF
ADDITIONAL TIPS
- Aim the SR117 toward the intended vocalist and away from unwanted sources.
• (Maximum rejection is found at the 135-degree point of the polar pattern.)
- Place the SR117 1-2 inches away from the vocalist's mouth for best results.
- Get closer to the SR117 for extra bass response.
- Place the SR117 as far as possible from reflective surfaces.
- Even though the SR117 is treated to minimize handling noise, the best position for it is mounted onto a microphone stand.
- Do not cover any part of the microphone grille with your hand, as this will adversely affect microphone performance.
- Do not aim directly at your speaker or PA.
TROUBLESHOOTING
If you encounter issues while using your Earthworks Audio microphone, please make sure that:
- Your microphone is connected to an active power supply.
- Phantom power is being supplied to the microphone.
- Your microphone and XLR cable are well connected.
- The microphone is positioned at an appropriate distance from the sound source.
- External noise in your recording environment is kept to a minimum.
- Your recording space is at room temperature and free of dust.
If your issue persists after checking, please contact us via our website.
The windscreen can be removed if it requires cleaning. See details below.
CLEANING THE SR117's WINDSCREEN
- First unscrew the windscreen portion of the microphone.
- Carefully remove the inner mesh pop filter from the windscreen.
- Use isopropyl alcohol wipes to wipe down the SR117's body and outer windscreen.
a. Make sure not to saturate the pop filter or the mesh of the mic tip.
- If the inner pop filter needs cleaning, wash it with a mild detergent and let it sit until it's dry.
- Put the inner pop filter back inside the windscreen.
- Screw the full windscreen onto the SR117's body.
A NOTE ABOUT THE SR117'S INNER WINDSCREEN
The internal fine mesh pop filter is self aligning, and it stays in place because of the interference fit. Be careful when unscrewing the outer windscreen, as the inner pop filter may fall out.
When putting it all back together, make sure that it is properly aligned and then simply screw the outer sleeve back in pace.
SPECIFICATIONS
Frequency Response
20Hz - 20kHz
Minimum Output Load
1kΩ
Polar Pattern
Supercardioid
Noise
20 dBSPL-A
Sensitivity
5 mV/Pa (-46 dBV/Pa)
Dimensions
7" × 1.93"
Power Requirements
48V Phantom Power (P48), 10mA
Weight
0.85 lbs (0.38 Kg)
Peak Acoustic Input
140 dBSPL
Output
XLR-3

line
| Frequency (Hz) | Temperature (°C) | | -------------- | ---------------- | | 0 | 0 | | 10 | 0 | | 20 | 0 | | 30 | 0 | | 40 | 0 | | 50 | 0 | | 60 | 0 | | 70 | 0 | | 80 | 0 | | 90 | 0 | | 100 | 0 | | 110 | 0 | | 120 | 0 | | 130 | 0 | | 140 | 0 | | 150 | 0 | | 160 | 0 | | 170 | 0 | | 180 | 0 | | 190 | 0 | | 200 | -15 |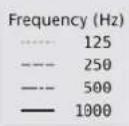
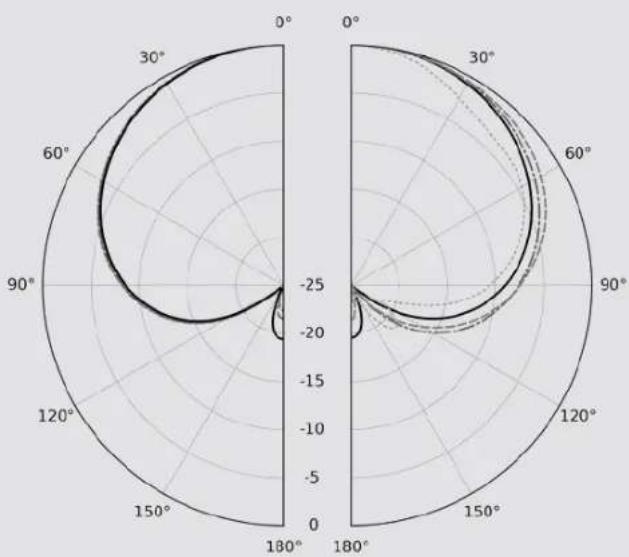
radar
| Angle | Value | |-------|-------| | 0° | -25 | | 30° | -20 | | 60° | -15 | | 90° | -20 | | 120° | -25 | | 150° | -20 | | 180° | -15 |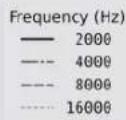
COMPLIANCE REQUIREMENTS
Hereby, Earthworks Inc. declares that this product has been determined to be in compliance with UKCA requirements.
The full text of the UK declaration of conformity is available at the following site:
https://earthworksaudio.com/support/documents/uk
Hereby, Earthworks Inc. declares that this product has been determined to be in compliance with European Union requirements.
The full text of the EU declaration of conformity is available at the following site:
https://earthworksaudio.com/support/documents/eu
WARRANTY
All Earthworks® products carry a limited warranty (parts and labor). Please register your warranty at: earthworksaudio.com/register. If you have any problems with your Earthworks products, please contact our warranty/repair department by email at: service@earthworksaudio.com.
NOTE
This warranty only applies to Earthworks microphones purchased brand new. For microphones purchased/received second-hand, please contact us via our website.
Version 3.0, Last Updated 3/31/23
37 Wilton Rd. Milford, NH 03055
info@earthworksaudio.com
© 2023 Earthworks, Inc
- SR117
- SUPERCARDIOID CONDENSER
- Thank you for purchasing the Earthworks SR117 Handheld Vocal Microphone
- YOUR PURCHASE INCLUDES
- GETTING STARTED
- PROPER MAINTENANCE
- GENERAL TIPS FOR USING THE SR117
- ADDITIONAL TIPS
- TROUBLESHOOTING
- CLEANING THE SR117's WINDSCREEN
- a. Make sure not to saturate the pop filter or the mesh of the mic tip.
- A NOTE ABOUT THE SR117'S INNER WINDSCREEN
- SPECIFICATIONS
- Frequency Response
- Minimum Output Load
- Polar Pattern
- Noise
- Sensitivity
- Dimensions
- Power Requirements
- Weight
- Peak Acoustic Input
- Output
- COMPLIANCE REQUIREMENTS
- WARRANTY
- NOTE
Brand : Earthworks
Model : SR117
Category : Microphone