
WF-PAC - Controller MITSUBISHI - Free user manual and instructions
Find the device manual for free WF-PAC MITSUBISHI in PDF.


| Product Type | Smartphone Application (Controller) for Air Conditioner |
| Compatible Devices | iOS and Android smartphones |
| Compatible Air Conditioners | Mitsubishi Heavy Industries air conditioners with wireless LAN interface |
| Functions | Remote operation, weekly timer, calendar timer, electricity bill graph, shut-off reminder alert, error notification, high/low temperature alert, watching function, home leave mode, cooling specific mode, favourite settings, firmware update |
| Operation Modes | Remote operation mode, home restricted mode, demo mode |
| Language Support | Multiple languages (selectable in settings) |
| Time Zone Support | Selectable time zone for air conditioner location |
| Temperature Unit | Celsius or Fahrenheit (selectable) |
| Password Requirements | 8 to 16 characters, at least one alphabet and one digit |
| Maximum Number of Air Conditioners | Unlimited (as many as can be registered) |
| Maximum Timers per Day | Up to 6 timers per day of the week |
| Wireless Setup | WPS or manual AP mode configuration |
| Firmware Update | Via app, requires air conditioner to be in same LAN and turned off |
| Data Communication | Internet required for remote operation mode; local Wi-Fi only for home restricted mode |
| Push Notifications | For shut-off reminder, high/low temperature alerts, error notifications |
| Email Notifications | For AC error, watching function (when air conditioner is controlled by others) |
| Security | User account with password, personal information handling, terms of service |
| Maintenance | Application initialization resets all data; firmware update for wireless LAN interface |
| Spare Parts / Reparability | Not applicable (software application) |
| User Manual | Available within the app and for download in PDF |
Frequently Asked Questions - WF-PAC MITSUBISHI
User questions about WF-PAC MITSUBISHI
0 question about this device. Answer the ones you know or ask your own.
Ask a new question about this device
Download the instructions for your Controller in PDF format for free! Find your manual WF-PAC - MITSUBISHI and take your electronic device back in hand. On this page are published all the documents necessary for the use of your device. WF-PAC by MITSUBISHI.
USER MANUAL WF-PAC MITSUBISHI
- Application Features 4
- Manipulation modes 6
Remote operation mode 6
Home restricted mode 6
Demo mode 6
- Preparation for Use 7
Smartphone setting 7
Application initial setting 7
Creating user account 9
Registering air conditioner 12
Wireless LAN settings of air conditioner 13
Naming air conditioner 15
- Basic Usage 17
Starting / Stopping air conditioner operation 17
Switching operation mode 17
Changing temperature 18
Changing fan speed and airflow direction 19
Switching Vacant Property Mode 20
-
Using Favourites ...... 21
-
Using Options 25
Shut-off reminder alert 26
Air conditioner error notification 27
Hi temp/low temp alert 28
Watching function 29
Home leave mode 29
Cooling specific 31
LED ON 31
Number of smartphones 31
- Setting Weekly Timer 32
- Setting Timer by Specifying Date via Calendar....34
Clear the timer set from the calendar 35
- Displaying Electricity Bill Graph 37
- Updating Firmware 38
11.Main Menu 40
Canceling demo mode 41
- Checking Alerts 42
- Changing Application Settings 44
Switch Operation Modes 45
Switching to "Remote operation mode" 45
Switching to "Home restricted mode" 46
Reset Password 48
Language/Time Zone Settings 50
Application Initialization 51
Application Version Display 53
- Troubleshooting 54
When the air conditioner that you want to register does not appear in the air conditioner list screen 54
How to delete a registered air conditioner 55
When an abnormality notification appears in the air conditioner list 56
When you forget your password and cannot log in 56
When operation is performed by another account 57
When "Shut-off reminder alert" does not turn on (For Android OS) 57
1. Application Features
You can operate the air conditioner in each room at home or from outside.
- Setting operation reservation of every day of the week for each air conditioner
- Checking the power consumption of an air conditioner
- Setting the shut-off reminder alert
- Alerting if an air conditioner is abnormal

Figure 1-1
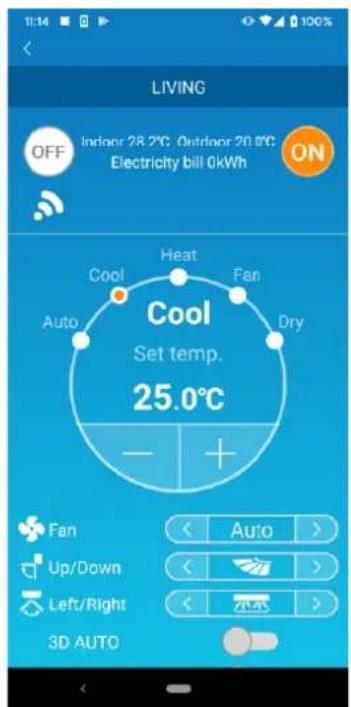
Figure 1-2
Note
Depending on the function of the connected air conditioner, the following operation will not be reflected in the operation of the air conditioner.
- Left/Right, 3D AUTO, Home leave mode, Electricity Bill Graph, Hi temp/low temp alert, Cooling specific
Depending on the function of the connected air conditioner, the following operation will not appear on the screen:
• Home leave mode setting, LED ON
When the wireless LAN interface is connected, the timer setting is disabled on your home remote control depending on your air conditioner.
Please use the timer function of the application to set the timer.
2. Manipulation modes
- Remote operation mode
This mode allows you to operate the registered air conditioner via the smartphone application when you are out of the office.
Also, you can register and operate the air conditioner at home through a smartphone application.
• Home restricted mode
This mode allows you to register and operate the air conditioner at home via the smartphone application.
You can operate without data communication to the server.
Operation is not available when you are out.
- Demo mode
If you don't have an air conditioner compatible with a smartphone app, This mode allows you to experience the operation feel of remote operation mode.
3. Preparation for Use
- Smartphone setting
Turn on Wi-Fi of your smartphone.

Figure 3-1
- Application initial setting
Tap the Smart M-Air icon.

Figure 3-2

Figure 3-3
The application starts.

Figure 3-4
After startup, the "Language/Time Zone Settings" screen appears.
Select a language to use in the application.
Select a time zone. Select the time zone in which the air conditioner to operate via the application exists.
Choose the unit of temperature.
Finally, tap √ on the top right to complete the setting.
The "Terms of Service" screen appears.
Read the text to the bottom and check the description.
If you agree it and use the application, tap [Agree].
When you tap [I don't agree], the application exits.
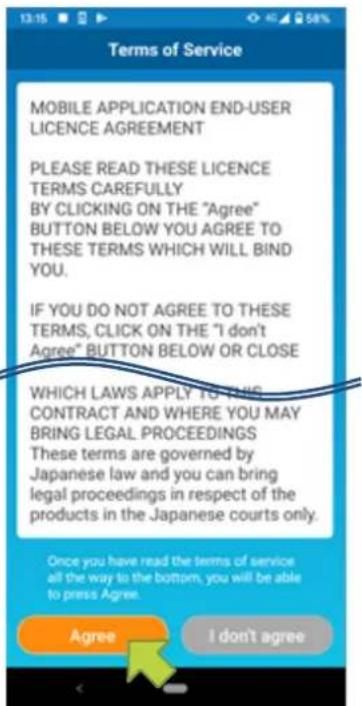
Android iOS

Figure 3-5
On the startup screen, select a mode to use.

Figure 3-6
■ Operate Air Conditioner (Remote operation mode)
Tap "Operate Air conditioner" for remote control or to use optional functions such as weekly timer.
→ To "Creating user account"
■ Home Use Only (Home restricted mode)
Tap "Home Use Only" to operate only at home. Some functions are restricted, but you can change to remote operation mode at any time.
→ To "Registering air conditioner"
Switching operation mode
→ To "Changing Application Settings"
■ Try a Demo (Demo Mode)
Tap "Try a Demo" to try out the app's features. (Some features only)
→ To "4. Basic Usage"
- Creating user account
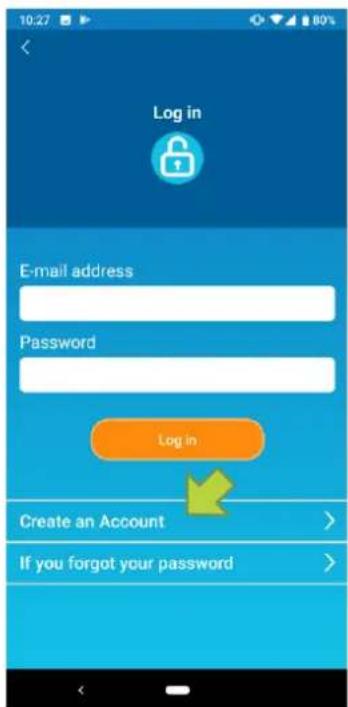
Figure 3-7
Tap [Create an Account].

Figure 3-8
Read the text of Handling of Personal Information to the bottom and check the description.
If you agree it and use the application, tap [Agree].

Figure 3-9
The "Create an Account" screen appears. Enter your e-mail address and password and tap the [Create an Account] button.
Note
- A password must be between 8 to 16 characters including at least one alphabetic character and one numeric character.

Figure 3-10
When the pop-up message "Create an Account" appears, tap [OK].
The email containing the URL of the authentication screen will be sent to the email address you entered, so please click the URL within 24 hours to complete the account creation.
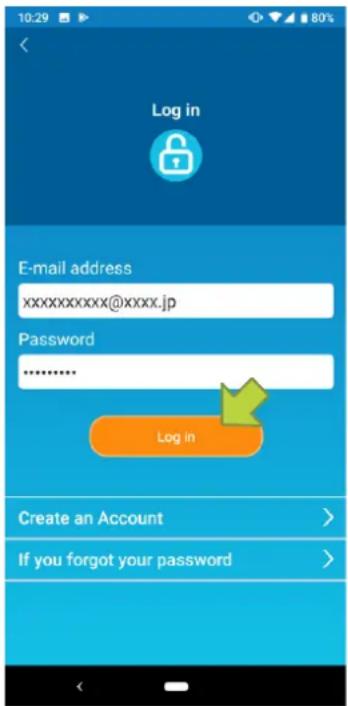
Figure 3-11
After the account is created, the "Log in" Screen appears on the application.
Click the URL written in the e-mail, enter the registered e-mail address and password, and tap the [Log in] button.
If you forget your password and cannot log it tap "If you forgot your password" and set a new password.
→ To "Reset Password"
- Registering air conditioner

Figure 3-12
Use the "Air Conditioner List" screen to register an air conditioner to operate.
Tap the "Find unregistered Air Conditioners" button to display air conditioners that are not registered on your smartphone.
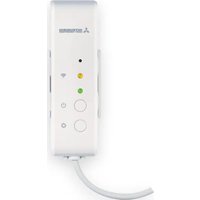
The air conditioner name ( ○ locations) displays the last 6 digits of the SSID on the label of the wireless LAN interface.
Tap the [Enter] button.
- When the air conditioner is not displayed on the list screen To "When the air conditioner that you want to register does not appear in the air conditioner list screen"
- To delete a registered air conditioner → To "How to delete a registered air conditioner"

Figure 3-13
To register the air conditioner, tap [YES] on the pop-up message displayed.

Figure 3-14
- Wireless LAN settings of air conditioner
If your wireless LAN router does not support WPS, manually make wireless LAN settings of your air conditioner.
Set the wireless LAN interface to the AP mode, and then change the Wi-Fi connection
destination of your smartphone to "Smart-M-Air-XXXX".
“XXXX” is the last 4 alphanumeric characters of the MAC address of the wireless LAN interface.

Figure 3-15
On the “Air Conditioner List” screen, tap the [Find unregistered Air Conditioners] button. The target air conditioner appears.
Tap the [Settings] button.
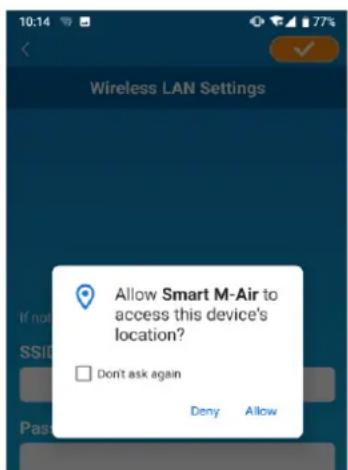
Figure 3-16
If you are prompted to permit access to location information, tap [Allow].
When you tap the network you want to set from the displayed list, the SSID appears in the "SSID" entry field at the bottom of the screen, enter "Your home Wi-Fi password" below it, and tap √ in the top right.
If the network you want to set is not displayed in the list, enter "SSID" and "Your home Wi-Fi password" directly, then tap √ on the top right to set.


Figure 3-17

Figure 3-18
After the wireless LAN settings is completed, the air conditioner is registered.
- Naming air conditioner

Figure 3-19
If you want to change the name of the air conditioner displayed in the application such as the air conditioner list screen, tap "Details" to display the detailed screen of the air conditioner.

Figure 3-20
Press and hold down (1 second) an air conditioner name. The “Edit Air Conditioner name” dialog appears. Use this to change the name.

Figure 3-21

Figure 3-22
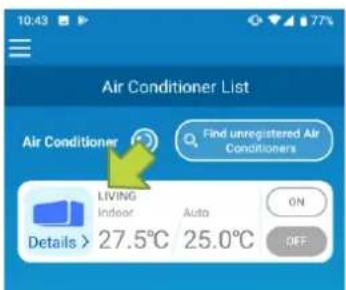
Figure 3-23
Enter a new air conditioner name and tap [YES].
4. Basic Usage
- Starting / Stopping air conditioner operation

Figure 4-1
To start or stop the operation, tap the [ON] / [OFF] button of the air conditioner that you want to operate on the "Air Conditioner List" screen.
When the button color changes, switching is complete. (Grayed out when off)
To update to the latest information, tap 📋.
Note
- When operating an air conditioner from an external location, it may take up to one minute to complete the air conditioner operation.
- Switching operation mode

Figure 4-2
Tap an air conditioner that you want to switch the operation mode on the “Air Conditioner List” screen.

Figure 4-3
To change the “Operation mode”, tap each mode from “Auto” to “Dry”.
appears when the air conditioner is in clean mode. To cancel clean mode, tap OFF.
appears when the weekly timer is set by this application.
appears when the application is used at home where the air conditioner is set and connected to the application.
- Changing temperature

Figure 4-4
To set a desired temperature, tap - / + . The current set temperature appears in the circle.

Figure 4-5
When the operation mode is Fan, Set temp. shows "-".
- Changing fan speed and airflow direction

Figure 4-6
Tap < / > to change settings.
- Switching Vacant Property Mode

Figure 4-7
When Vacant Property Mode is ON, operation mode and Set temp. can be set as follows.
■ Cool : Set temp. 31°C to 33°C (at 1°C intervals)
■ Heat : Set temp. 10°C to 17°C (at 1°C intervals)
Only "Cool" or "Heat" can be set as an operation mode.
5. Using Favourites
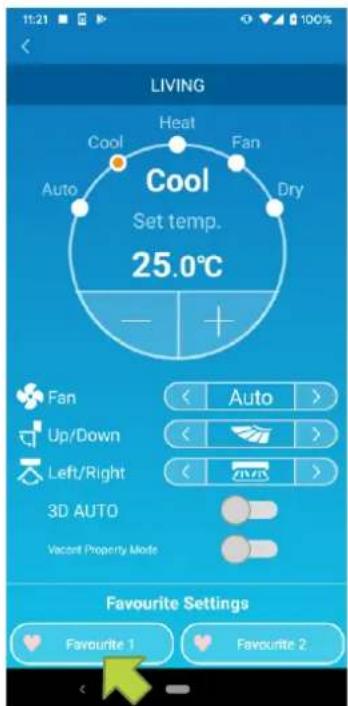
Figure 5-1
Register your desired settings of "Set temp", "Operation mode", "Fan", "Up / Down" and "Left / Right" with Favourite. Tapping the [Favourite] button changes the current settings to the registered settings.
On the air conditioner details screen, press and hold down (1 sec) the [Favourite 1] or [Favourite 2] button. The “Favourite” screen appears.

Figure 5-2
Change each item to your favourite setting, and tap √ on the top right to add it to Favourites.
Press < in the upper left of the screen to return to the operation screen.

When you tap the [Favourite 1] or [Favourite 2] button, the current settings are changed to the favourite settings you tapped.
Figure 5-3

Figure 5-4
To change the name of the "Favourite" button, press and hold down the "Favourite" button for approximately 1 second. "Edit Favourite name" dialog appears to change the name.
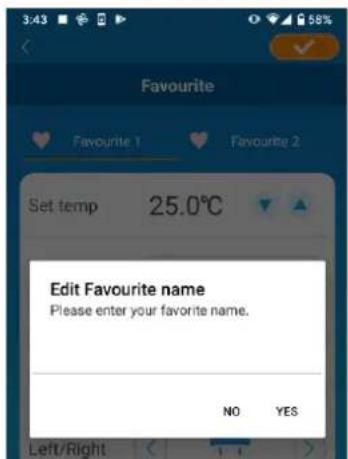
Figure 5-5

Figure 5-6
Enter the new favourite name and tap [YES].

Figure 5-7
6. Using Options
You can make various option settings such as alerts and LED lighting, and check the number of accounts registered with an air conditioner.
Home restricted mode : Only "Home Leave Mode", "Cooling specific" and "LED ON" are operable.
Demo mode : Options are not operable.
You can switch to remote operation mode using "Changing Application Settings" in the main menu.
→ To "Changing Application Settings"

Figure 6-1
Tap [Options] on the lower part of the air conditioner details screen. The "Options" screen appears.
Only "LED ON" is ON by default.

Figure 6-2
Switch between [ON] and [OFF], and tap on the top right of the screen to save the settings you changed.
Note
- Shut-off reminder alert, AC error notification, Hi temp/low temp alert, Watching function can be used with "Remote operation mode".
- Shut-off reminder alert
If you are more than 1 km away from the air conditioner you are driving, you can receive a push notification to the smartphone application.
■ To receive alerts, tap [ON].

Figure 6-3
When the pop-up message appears, tap [YES] and then tap √ on the top right.
■ To not to receive alerts, tap [OFF].

When the pop-up message "If your external location is disabled, it cannot be retrieved.
Do you want to disable the external location?" appears, tap [YES] and then tap √ on the top right.
Figure 6-4
Note
• Acquisition of location information is performed by using the location of your smartphone as the location of the air conditioner. Perform location information acquisition near your air conditioner.
- AC error notification (Air conditioner error notification)
If any abnormality is detected in your air conditioner, an e-mail is sent to the registered e-mail address.
→ To “ When an abnormality notification appears in the air conditioner list”
■ To receive notifications, tap [ON] and then tap √ on the top right.
■ To not to receive notifications, tap [OFF] and then tap √ on the top right.
• Hi temp/low temp alert
When the air conditioner reaches the specified high/low temperature condition, a push notification is sent to the smartphone application.
■ To receive alerts, tap [ON] and enter the high and low temperatures and then tap √ on the top right.
■ To display the high and low temperatures input area, tap To hide it, tap

Note
- When the room temperature is higher / lower than the temperature specified here, alerts are sent.
If you set the high temperature at 31^ C, an alert is sent when the room temperature exceeds 31^ C. No alert is sent at 31^ C. - Setting only either of high or low temperature receives alerts only for high or low temperature.
Figure 6-5
■ To not to receive alerts, tap [OFF] and then tap √ on the top right.
- Watching function
When the air conditioner is controlled other than your smartphone, an e-mail is sent to the registered e-mail address.
Note Note
- The notification also applies to the operation with the timer of the air conditioner itself and the end of internal clean operation.
■ To receive alerts, tap [ON] and then tap √ on the top right.
■ To not to receive alerts, tap [OFF] and then tap √ on the top right.
- Home leave mode
When the room temperature is lower than a setting temperature, heating is turned on automatically.
When the room temperature is higher than a setting temperature, cooling is turned on automatically.
■ To use "Home leave mode", tap [ON].

Figure 6-6
When the pop-up message “It may not be Possible to use the Home leave mode even if it is turned ON.” appears, tap [OK] and then tap √ on the top right.
Note
- There is no "Home leave mode" depending on the air conditioner connected. In this case, "ON" has no effect.
■ To not to use “Home leave mode”, tap [OFF] and then tap on the top right.
■ To change the setting of home leave mode, tap ▼. To hide them, tap ▲. The following settings can be changed.
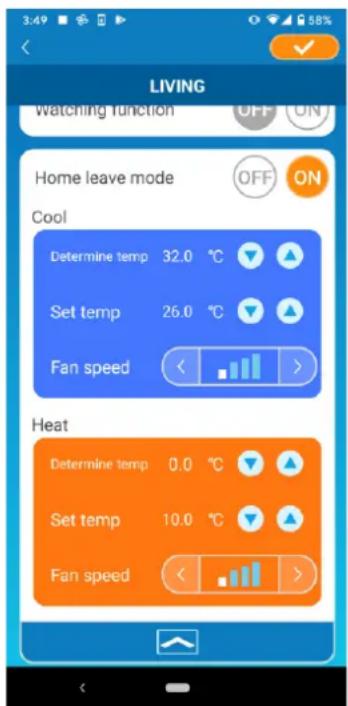
Figure 6-7
- Determine temp : Set the preferred outside temperature to start the operation of the air conditioner in cooling/heating mode.
Allowable setting range in cooling : 26°C to 35°C (at 3°C intervals) Allowable setting range in heating : 0°C to 15°C (at 5°C intervals)
- Set temp : Set the preferred indoor temperature to operate in cooling/heating mode.
Allowable setting range in cooling : 26°C to 33°C (at 1°C intervals) Allowable setting range in heating : 10°C to 18°C (at 1°C intervals)
- Fan speed : Set the fan speed in cooling/heating mode.
[example] Cooling → When you input the determine temp. as 32^ C, set temp. as 26^ C and the fan speed at the slowest, the air conditioner will start operating at 26^ C with the slowest fan speed when the outside temperature reaches to 32^ C.
- Cooling specific
If you set it as an air conditioner for cooling only, you won't be able to use the heating in the smartphone application.
■ To use “Cooling specific”, tap [ON] and then tap on the top right.

- When “ON” is set or “Heat” is set to favourites, the pop-up message asking whether to initialize favourites appears.
If you tap [YES] on the pop-up message, the "Cooling specific" setting is turned "ON" to initialize the favourite with heating set.
Figure 6-8
■ To not to use “Cooling specific”, tap [OFF] and then tap √ on the top right.
- LED ON
Lights up the LED of the wireless LAN interface.
■ To use LED lighting, tap [ON] and then tap √ on the top right.
■ To not to use LED lighting, tap [OFF] and then tap √ on the top right.
• Number of smartphones
Displays the number of smartphones registered with the air conditioner.
7. Setting Weekly Timer
Makes the timer setting for every day of the week.

Tap [Weekly Timer] on the lower part of the air conditioner details screen.
The "Weekly Timer" screen appears.
Figure 7-1
Tap √ on the top right of the screen to save the settings you changed.

Tap the day of the week you want to set to display the timer list for that day of the week.
You can set up to six timers for each day of the week, but you cannot set the same time for the same day.
Figure 7-2

Figure 7-3
A disabled timer shows the time and operation mode only.
Tap the switch at ○ to enable and edit.
Edit each item and tap √ on the top right to set the timer on the target day.

Figure 7-4
When at least one timer setting is ON, the timer icon appears on the air conditioner detail screen.
The timer you set here is applied to every week on that day.
To turn off the timer only on a certain day, or to apply the timer of another day, set individually from the “Calendar” screen.
8. Setting Timer by Specifying Date via Calendar
When you set the weekly timer, the same timer is applied to the same day every week. To turn off the timer or set the timer of a different day on a certain day, set individually from the “Calendar” screen.
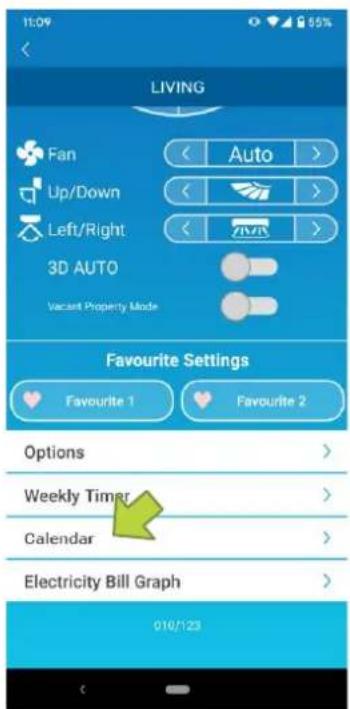
Tap [Calendar] on the lower part of the air conditioner details screen.
The [Calendar] screen appears.
Figure 8-1

Figure 8-2
Tap the date of the calendar. Select the timer of the day of the week that you want to apply from "Weekly Timer Settings" and tap √ on the top right of the screen.
If you select "OFF" from "Weekly Timer Settings", the weekly timer is not applied.
When the timer of a different day of the week is applied or the timer is turned off, the date appears in green.
- Clear the timer set from the calendar
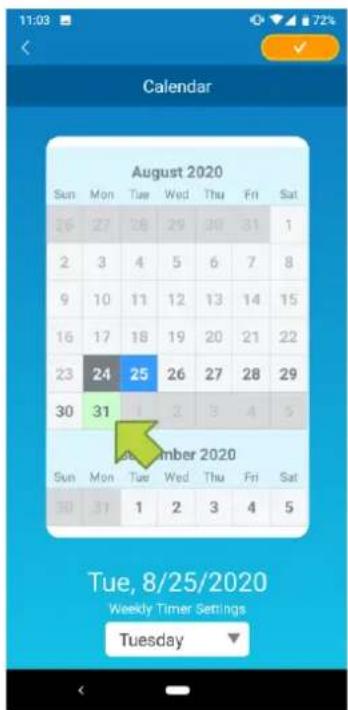
Figure 8-3
Tap the date whose timer you want to clear.

Figure 8-4
From "Weekly Timer Settings", select the same day of the week as the date to clear and tap


Figure 8-5
When cleared, the background of the date is displayed in white.
9. Displaying Electricity Bill Graph
Displays an electricity bill by month on a graph. You can also set the electricity unit cost.

Figure 9-1
Note
Depending on the type of air conditioner you connect, the function may be disabled.
Tap [Electricity Bill Graph] on the lower part of the air conditioner details screen.
The "Electricity Bill Graph" screen appears.

Figure 9-2 Figure 9-3

If you change the electricity bill unit cost settings, you can enter a unit price by changing the unit of measure.
After editing, tap √ to save the setting.
10. Updating Firmware
If the firmware of your wireless LAN interface is not up to date, an exclamation mark ⚠️ appears on the “Air Conditioner List” screen.

Figure 10-1
Tap [Details] to display the air conditioner details screen.

Figure 10-2
Tap the [Firmware update] button.
Note
- Perform the firmware update in the same wireless LAN area as the air conditioner.
- Please turn off the air conditioner in advance.
- If firmware update is disabled, the button is not enabled.
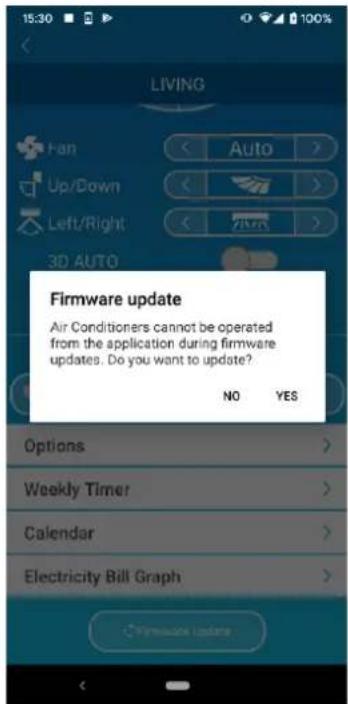
Figure 10-3
Tap [YES] to update the firmware to the latest one.
The firmware update takes 10 minutes (Max). The operation from the application is not accepted during that period.
If after 10 minutes (Max) the "Firmware update" button appears, retry the firmware update.

Figure 10-4
When the firmware becomes up to date, the firmware version appears instead of the [Firmware update] button.
11. Main Menu
Tap the menu button (☐) that appears on the top left in the screen such as “Air Conditioner List”, to display the main menu.

Figure 11-1
■ Air Conditioner List : Operates or sets an Air conditioner.
■ Alerts : Checks alerts.
■ App Settings : Switches the operation mode or sets the password.
■ User's Manual : Displays the user's manual.
■ Handling of Personal Information : Displays the handling of personal information.
■ Terms of Service : Displays the terms of service.
■ FAQ : Displays the FAQ.
- Canceling demo mode

In the demo mode
Cancel demo : Exits the demo mode.
Figure 11-2
12. Checking Alerts

Figure 12-1
Open the main menu and tap [Alerts].

Figure 12-2
A list of alerts appears.
Tap each alert to display the alert details screen and check it.
! appears to the alert that is not checked in the alert details screen.

Figure 12-3
13. Changing Application Settings
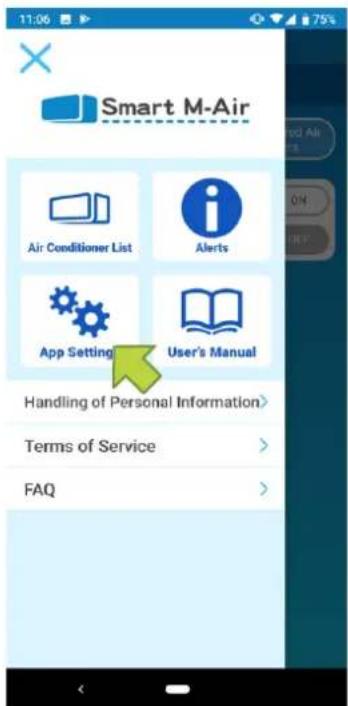
Figure 13-1
Open the main menu and tap [App Settings].

Figure 13-2
The "Application Settings" screen appears.
■ Switch Operation Modes: Switches between the remote operation mode and home restricted mode.
→ To "Switch Operation Modes"
■ Password Settings: Sets a password.
→ To "Reset Password"
■ Language/Time Zone Settings: Sets a language to use in the smartphone application and a time zone for an air conditioner.
→ To "Language/Time Zone Settings"
■ Application Initialization: Initializes the smartphone application.
→ To "Application Initialization"
■ Application Version Display: Displays the version of your smartphone application.
→ To "Application Version Display"
Note
- In "Home restricted mode", you cannot operate "Password Settings". In "Try a Demo", only "Language/Time Zone Settings" and "Application Version Display" can be operated.
Functions that cannot be operated are displayed in gray, and nothing is displayed even if you tap them.
- Switch Operation Modes
You can see the current operation mode.
To switch the operation mode, select the desired mode and tap √.
- Switching to "Remote operation mode"

Figure 13-3
Tap [Remote operation mode] → Tap on the top right to switch the mode.

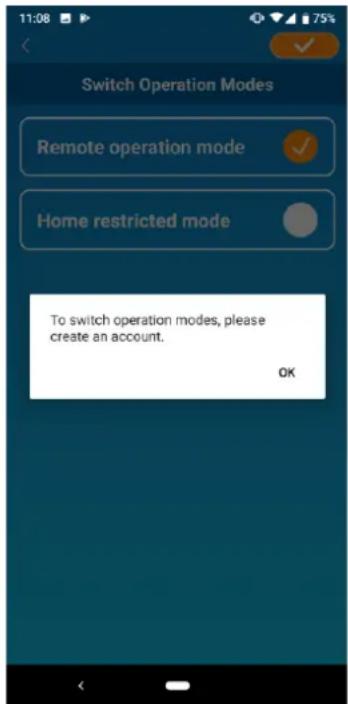
Figure 13-4
When the account creation pop-up message appears, tap [OK], agree with the handling of personal information, and create an account.
→ To "Creating user account"
- Switching to "Home restricted mode"

Figure 13-5
Tap [Home restricted mode] → Tap √ on the top right to switch the mode.
Note
- Note that if you switch the mode to “Home restricted mode”, the account information used in “Remote operation mode” is deleted.
The popup for remote control disabled and the popup for deleting server data will appear, so tap [YES].


Figure 13-6 Figure 13-7
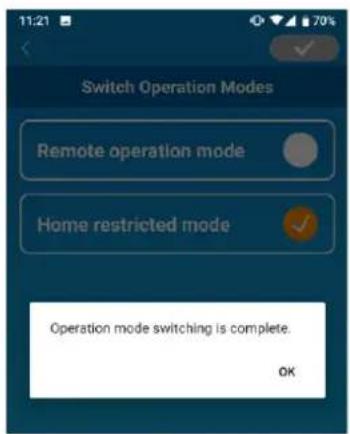
When the operation mode switching completion pop-up message appears, tap [OK].
Figure 13-8
- Reset Password
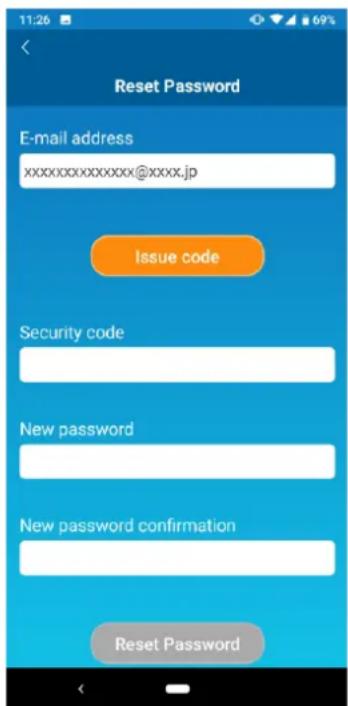
Figure 13-9
Enter the registered e-mail address and tap the [Issue code] button.
Note
- After tapping the [Issue code] button, keep this screen displayed until the password resetting is completed.
If you tap < and return to the previous screen, these operations are canceled.

Figure 13-10
When the e-mail sending pop-up message appears, tap [OK].

Figure 13-11
An e-mail with a security code will be sent to the e-mail address you entered. Enter “Security code” and “New password” and tap [Reset Password] to update your password.
Note
- A password must be between 8 to 16 characters including at least one alphabetic character and one numeric character.
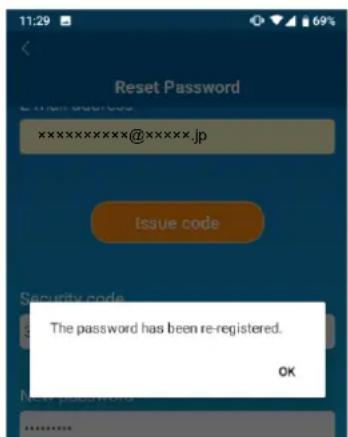
Figure 13-12
• Language/Time Zone Settings

Figure 13-13
The “Language/Time Zone Settings” screen appears.
Select a language to use in the application.
Select a time zone. Select the time zone in which the air conditioner to operate via the application exists.
Choose the unit of temperature.
Finally, tap √ on the top right to complete the setting.
- Application Initialization
Initializes the smartphone application.
Note
- Note that if you initialize the application in “Remote operation mode”, the information of the account logged in is deleted.

Figure 13-14
Tap [Initialize the application].

Figure 13-15
When the pop-up message "Your account information will be deleted. Do you want to initialize the application?" appears, tap [YES].

Figure 13-16
When the pop-up message "Initialization is complete. Close the application." appears, tap [OK] to close the application.
- Application Version Display

Displays the version of your smartphone application.
Figure 13-17
14. Troubleshooting
- When the air conditioner that you want to register does not appear in the air conditioner list screen

Tap the [Find unregistered Air Conditioners] Button to search unregistered air conditioners and update the “Air Conditioner List” screen.
Figure 14-1

Figure 14-2
When asked for "search your local network" or iOS, tap the "OK" button.
If you accidentally tap the "Don't Allow" button, change the Smart M-Air's "local network" in the iOS app permission settings to "ON", then tap the "Find unregistered Air Conditioner" button again.
- How to delete a registered air conditioner
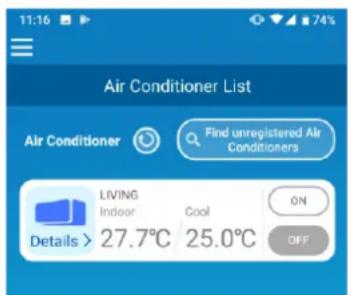
To delete a registered air conditioner, press and hold down (2 seconds) the icon of the target air conditioner.
Figure 14-3

When the deleting air conditioner pop-up Message appears, tap [YES].
Figure 14-4
- When an abnormality notification appears in the air conditioner list
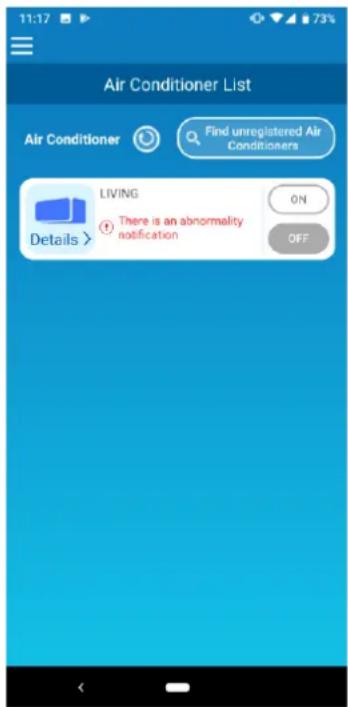
Figure 14-5
When an abnormality notification appears, air conditioner abnormality has been detected. Contact your dealer.
When “AC error notification” of the option settings is enabled, an e-mail is sent to the registered e-mail address.
- When you forget your password and cannot log in
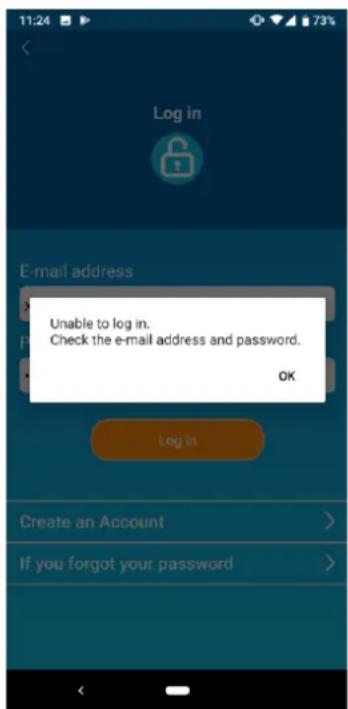
Figure 14-6
If you forgot your password and failed to log in, tap [OK] on the pop-up message, tap [If you forgot your password] to display the "Reset Password" screen, and set a new password.
→ To "Reset Password"
- When operation is performed by another account
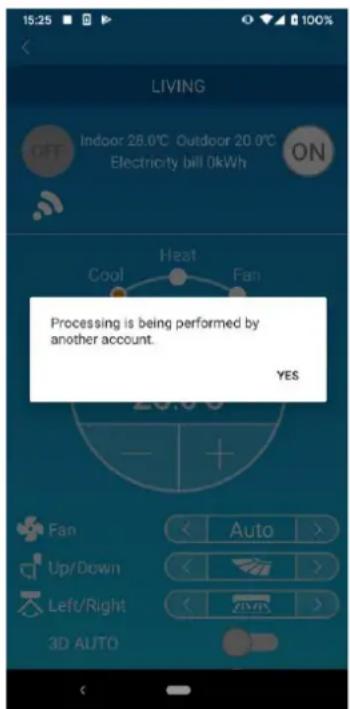
Figure 14-7
The message shows in the following cases:
- When the application is operated from other smartphones at the same time
- When the air conditioner is changing its operation status by its set control
The equipment is not malfunctioning, so please try again after a while.
(Approximately 1 minute)
- When "Shut-off reminder alert" does not turn on (For Android OS)

Figure 14-8
You must select "While using the app" when there is a request to allow access to your device information for this application.
If you accidentally tap other buttons such as "Only this time" or "Deny", you can change it to "While using the app" in Android OS Setting Screen.
2-3, Marunouchi 3-chome, Chiyoda-ku, Tokyo, 100-8332, Japan
http://www.mhi-mth.co.jp/en/
MITSUBISHI HEAVY INDUSTRIES AIR-CONDITIONING EUROPE, LTD.
5 The Square, Stockley Park, Uxbridge, Middlesex, UB11 1ET, United Kingdom
Tel: +44-333-207-4072
Fax: +44-333-207-4089
http://www.mhiae.com/
MHIAE SERVICES B.V.
(Wholly-owned subsidiary of MITSUBISHI HEAVY INDUSTRIES AIR-CONDITIONING EUROPE, LTD.)
Herikerbergweg 238, Luna ArenA, 1101 CM Amsterdam, Netherlands
P.O.Box 23393 1100 DW Amsterdam, Netherlands
Tel : +31-20-406-4535
http://www.mhiaeservices.com/
MITSUBISHI HEAVY INDUSTRIES AIR-CONDITIONERS AUSTRALIA, PTY. LTD.
Block E, 391 Park Road, Regents Park, NSW, 2143 PO BOX 3167, Regents Park, NSW, 2143
Tel: +61-2-8774-7500
Fax: +61-2-8774-7501
https://www.mhiaa.com.au
- Application Features
- Note
- Manipulation modes
- Preparation for Use
- - Registering air conditioner
- - Naming air conditioner
- Basic Usage
- - Changing temperature
- - Switching Vacant Property Mode
- Using Favourites
- Using Options
- - Shut-off reminder alert
- ■ To receive alerts, tap [ON].
- • Hi temp/low temp alert
- - Watching function
- Note Note
- - Home leave mode
- - Cooling specific
- - LED ON
- • Number of smartphones
- Setting Weekly Timer
- Setting Timer by Specifying Date via Calendar
- Displaying Electricity Bill Graph
- Updating Firmware
- Main Menu
- - Canceling demo mode
- Checking Alerts
- Changing Application Settings
- - Reset Password
- • Language/Time Zone Settings
- - Application Version Display
- Troubleshooting
Brand : MITSUBISHI
Model : WF-PAC
Category : Controller