FF3S - Headphones FiiO - Free user manual and instructions
Find the device manual for free FF3S FiiO in PDF.


| Product Type | In-Ear Monitors (IEMs) |
| Driver Type | 10mm Dynamic Driver |
| Impedance | 32Ω at 1kHz |
| Sensitivity | 112dB/mW at 1kHz |
| Frequency Response | 20Hz – 20kHz |
| Max Input Power | 100mW |
| Cable | Detachable, 1.2m, 3.5mm gold-plated plug |
| Connector | MMCX (Removable) |
| Ear Tips | 3 pairs of silicone tips (S/M/L) |
| Carrying Case | Included hard case |
| Weight | Approx. 10g per earpiece |
| Dimensions | 12mm diameter, 23mm length per earpiece |
| Color | Black / Silver |
| Power Source | Passive (no battery) |
| Main Functions | High-fidelity audio reproduction, noise isolation, comfortable fit |
| Cleaning & Maintenance | Wipe with dry cloth; clean ear tips with mild soap and water |
| Safety | Do not expose to moisture or high volume levels for extended periods |
| Spare Parts & Repairability | Replacement cables, ear tips, and filters available from FiiO |
| General Information | Model: FF3S, Brand: FiiO, Warranty: 1 year |
Frequently Asked Questions - FF3S FiiO
User questions about FF3S FiiO
0 question about this device. Answer the ones you know or ask your own.
Ask a new question about this device
Download the instructions for your Headphones in PDF format for free! Find your manual FF3S - FiiO and take your electronic device back in hand. On this page are published all the documents necessary for the use of your device. FF3S by FiiO.
USER MANUAL FF3S FiiO
Operation Instruction To Replace Headphone Cable
natural_image
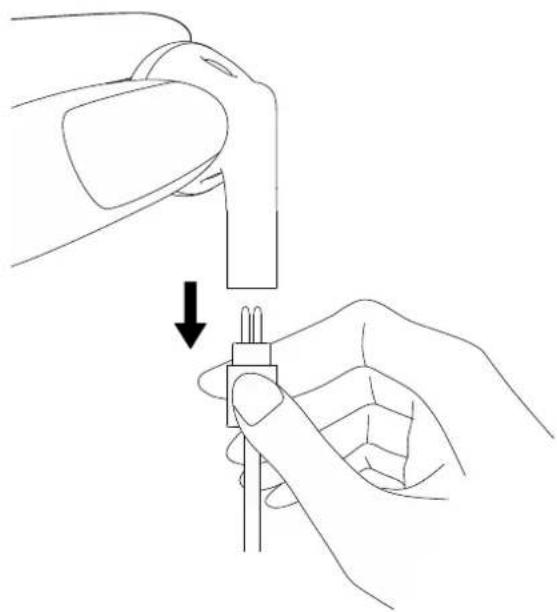
Line drawing of hands assembling a small electronic component with a downward arrow indicating assembly (no text or symbols)① Hold the earbud unit and the pin end with your hands, and pull the pin end downwards vertically to detach them (Objects that can generate greater friction like tissues or a strip of cloth can be used to help to detach).
natural_image
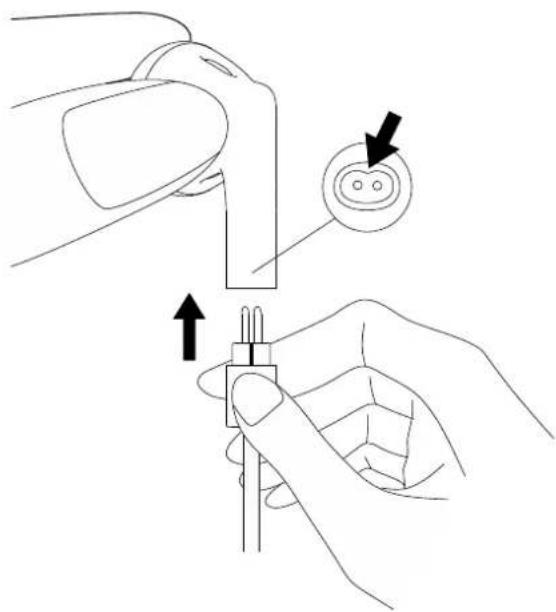
Illustration of hands holding a connector with an arrow indicating direction (no text or symbols present)② Align the earbud unit and the pin end, ensuring the two pins are aligned with the pin points on the earbud. Plug the two pins upwards to the pin points vertically until it is in an appropriate position.
Note: Pictures are for reference only. The actual product may vary.
How to Attach and Detach the Interchangeable Connector How to change the headphone plug?
natural_image
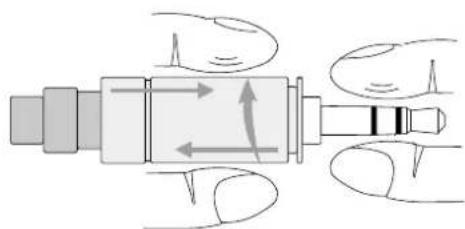
Diagram of a mechanical or fluidic device with directional arrows and internal components, no text or symbols present.① Rotate the female end in a clockwise manner until the female end can be pushed front and back to unlock them.
natural_image
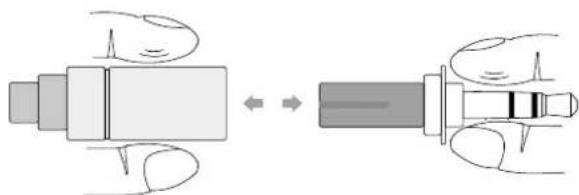
Diagram showing a hand holding a cylindrical object before and after assembly, with no visible text or symbols② Pull the male end to detach the two connectors. (Objects that can generate greater friction like tissues or a strip of cloth can be used to help to detach.)
natural_image
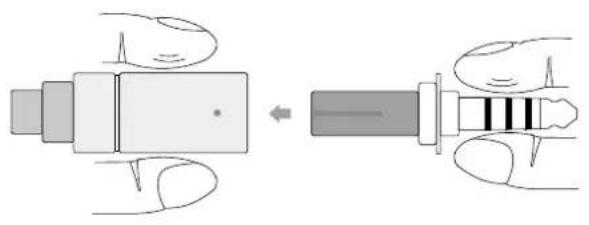
Diagram showing a hand holding a device before and after assembly, with no visible text or symbols③ Align the male and female end of the connector, ensuring the notch of the male end is in parallel with the raised dot that's inside the female end. Plug the male end until it is in an appropriate position.
natural_image
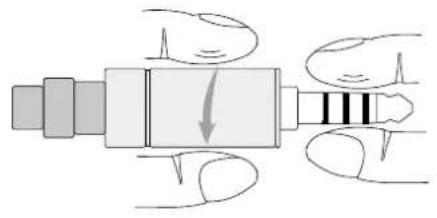
Diagram of a mechanical or electrical component with hand gestures and internal structure (no text or symbols)④ Rotate the female end in an anticlockwise manner until it is tight to lock them.
Note:
- Whether the accessory is included or the function is supported is subject to the actual product. The final interpretation and amendment are reserved by Guangzhou FiiO Electronics Technology Co., Ltd.
- Pictures are for reference only. The actual product may vary.
To Attach Shark Fin Ear Tips
natural_image
Illustration of hands holding a small object with a tool, no text or symbols present① Attach one side of the ear tip to the earbud first, stretch the rest and attach it to the earbud. Adjust the ear tip to an appropriate position where it can cover the whole earbud.
natural_image
Line drawing of an ear with a medical device inserted, showing ear anatomy and needle insertion (no text or symbols)② Put the earbud with the ear tip attached on the ear appropriately.
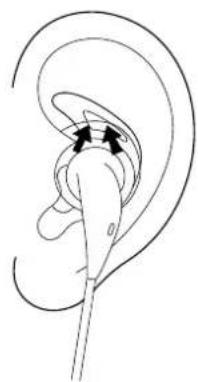
natural_image
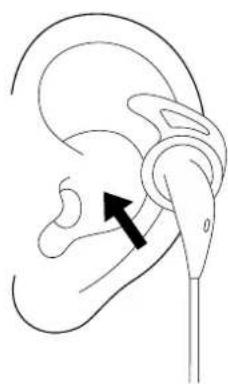
Anatomical line drawing of a human ear with a needle inserted, showing the ear canal and surrounding structures (no text or labels)③ Adjust the ear tip to where it can latch onto the ear pinna until it is comfortable to wear.
Note: Pictures are for reference only. The actual product may vary.
To Attach Foam Ear Tips
Here is the graphical instruction for attaching ear tips.
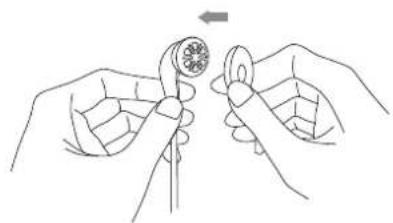
natural_image
Line drawing of two hands holding a small object with a magnified inset showing internal details (no text or symbols)① Ensure the ear tip and the earbud are in parallel with each other. Position the opening of the ear tip and the nozzle of the earbud in the same direction.
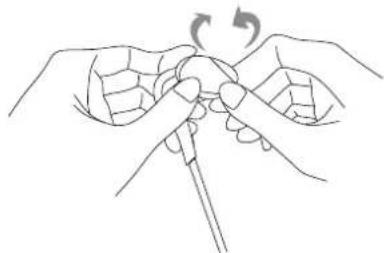
natural_image
Line drawing of hands performing a circular motion exercise with a stick (no text or symbols)② Gently flip one side of the ear tip back and then press to keep it stable.
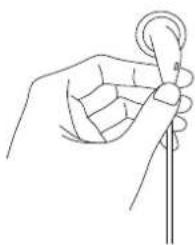
natural_image
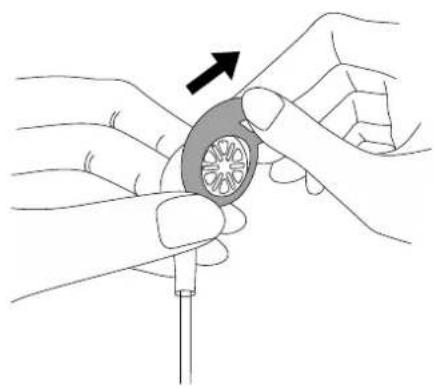
Line drawing of a hand holding a string with a circular head (no text or symbols)③ Flip the rest of the ear tip back until the entire ear tip fits around the earbud, adjusting to make it secure and comfortable.
Note: Pictures are for reference only. The actual product may vary.
Notes and Precautions
① For your safety, please avoid using headphones in dangerous environments.
② Please adjust the volume to a suitable level to protect your hearing.
③ Please do not place the device in humid or strong-magnetic environments for a long time.
4 If the headphones are to be left unused for a long time, please unplug it from the playing device.
⑤ Please do not disassemble the headphones on your own.
Authenticity Checking
① Scratch off the coating on the product package to get a 20-bit security code.
② Go to FiiO official website at www.fiio.com. Click the 'Check Authenticity' icon in the upper-right corner, and then enter the 20-bit security code and 4-bit verification code. You will get the checking result after clicking the 'query' icon.
③ Checking results:
A. The security code entered proves the product is authentic.
The product you purchased is an authentic product from Guangzhou FiiO Electronics Technology Co., Ltd. Thanks for your support!
B. The security code entered proves the product is not authentic.
The product you purchased is not an authentic product from Guangzhou FiiO Electronics Technology Co., Ltd.
Warranty Terms and Conditions
| Product Types | Term of service | |
| Headphone units | One month of guarantee for replacement; one year of free maintenance | |
| Accessories except for the headphone units (subject to the official list) | Accessories | N/A |
| Package materials (fragile parts like the packing box) | N/A | |
| Notes:The above guarantees start from the issue date of the invoice/receipt.These warranty terms are for reference only. For specific details, please refer to the warranty terms of our local sales agents. | ||
Guangzhou FiiO Electronics Technology Co., Ltd. reserves the final interpretation and amendment for the above warranty terms and conditions.
The warranty is null and void under the following circumstances.
--Defects or damage caused by improper operations such as vibrating, bumping, falling to the ground, buckling, tearing, excessive pulling.
--Defects or damage caused by disassembly of the product by user or unauthorized repair personnel.
--Defects or damage for being put in humid environments, high-intensity magnetic fields or soaked into water.
--Defects or damage caused by natural disasters.
--Unable to provide valid proofs of purchase.
Note: Man-made damage is determined by the judge of FiiO's maintenance personnel.
Procedures of Getting After-Sales Service
① Please contact the local dealer first once you find problems with the device. If they refuse to give related after-sales services, please give feedback to FiiO Support by sending an email to support@fiio.com. We would handle it properly to ensure customers' satisfaction.
② For repair service, you are supposed to send the defective product to FiiO with freight paid. After it has been repaired, we will send the product back to you with freight paid by FiiO.
③ It is highly suggested to buy from local authorized sales agents to get better, faster before- and after-sales services.
④ Please do not maintain or dismantle the product on your own and please keep it away from water.
⑤ For abnormal working issues or any further questions, please visit our official website->Support to get related information or send an email to support@fiio.com for consultation.
Note: Due to continuous improvement, every specification and design is subject to change at any time without further notice.
Contact Information for After-Sales Service
E-mail: support@fiio.com
Web: https://www.fiio.com
Facebook: https://www.facebook.com/FIIOAUDIO
Hereby, Guangzhou FiiO Electronics Technology Co., Ltd declares that this device is in compliance with Directive 2014/30/EU. The full text of the EU declaration of conformity is available at: www.fiio.com/doc
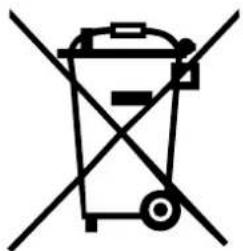
WEEE Directive & Product Disposal
natural_image
Symbol of a trash bin crossed with no text or numbers, representing waste sorting or disposal (no text present)At the end of its serviceable life, this product should not be handed as household or general waste. It should be handed over to the applicable collection point for the recycling of electrical and electronic equipment, or returned to the supplier for disposal.
Internal/Supplied Batteries
This symbol on the battery indicates that the battery is to be collected separately. This battery is designed for separate collection at an appropriate collection point.
This equipment has been tested and found to comply with the limits for a Class B digital device, pursuant to part 15 of the FCC Rules. These limits are designed to provide reasonable protection against harmful interference in a residential installation. This equipment generates, uses and can radiate radio frequency energy and, if not installed and used in accordance with the instructions, may cause harmful interference to radio communications.
However, there is no guarantee that interference will not occur in a particular installation. If this equipment does cause harmful interference to radio or television reception, which can be determined by turning the equipment off and on, the user is encouraged to try to correct the interference by one or more of the following measures:
—Reorient or relocate the receiving antenna.
—Increase the separation between the equipment and receiver.
—Connect the equipment into an outlet on a circuit different from that to which the receiver is connected.
—Consult the dealer or an experienced radio/TV technician for help.
This device complies with part 15 of the FCC Rules. Operation is subject to the following two conditions: (1) This device may not cause harmful interference, and (2) this device must accept any interference received, including interference that may cause undesired operation.
- Operation Instruction To Replace Headphone Cable
- How to Attach and Detach the Interchangeable Connector How to change the headphone plug?
- Note:
- To Attach Shark Fin Ear Tips
- To Attach Foam Ear Tips
- Notes and Precautions
- Authenticity Checking
- Procedures of Getting After-Sales Service
- Contact Information for After-Sales Service
- WEEE Directive & Product Disposal
- Internal/Supplied Batteries
Brand : FiiO
Model : FF3S
Category : Headphones