
AVS1403 - DVD player DAEWOO - Free user manual and instructions
Find the device manual for free AVS1403 DAEWOO in PDF.


| Type | DVD player |
| Brand | Daewoo |
| Model | AVS1403 |
| Dimensions (W x D x H) | 430 x 250 x 35 mm |
| Weight | 1.5 kg |
| Power Supply | AC 100-240V, 50/60 Hz |
| Power Consumption | 15 W (standby: <1 W) |
| Disc Compatibility | DVD, DVD±R/RW, CD, CD-R/RW, MP3, JPEG |
| Video Output | HDMI, Composite (RCA), Component (YUV) |
| Audio Output | Stereo RCA, Coaxial digital audio |
| Region Code | Region 2 (European) or multi-region capable |
| Playback Features | Progressive scan, zoom, repeat, subtitle/soundtrack selection |
| Remote Control | Included with batteries |
| Additional Functions | USB port for media playback, parental lock, sleep timer |
| Package Contents | Player, remote control, batteries, audio/video cable, user manual |
| Maintenance | Clean with soft dry cloth; no liquids; periodic laser lens cleaning |
| Safety Features | Overheat protection, child lock, auto power-off |
| Repairability | Replaceable laser lens, power supply; consult service manual |
| Energy Class | Not rated (typical DVD player) |
| Operating Temperature | 5°C to 35°C |
Frequently Asked Questions - AVS1403 DAEWOO
User questions about AVS1403 DAEWOO
0 question about this device. Answer the ones you know or ask your own.
Ask a new question about this device
Download the instructions for your DVD player in PDF format for free! Find your manual AVS1403 - DAEWOO and take your electronic device back in hand. On this page are published all the documents necessary for the use of your device. AVS1403 by DAEWOO.
USER MANUAL AVS1403 DAEWOO
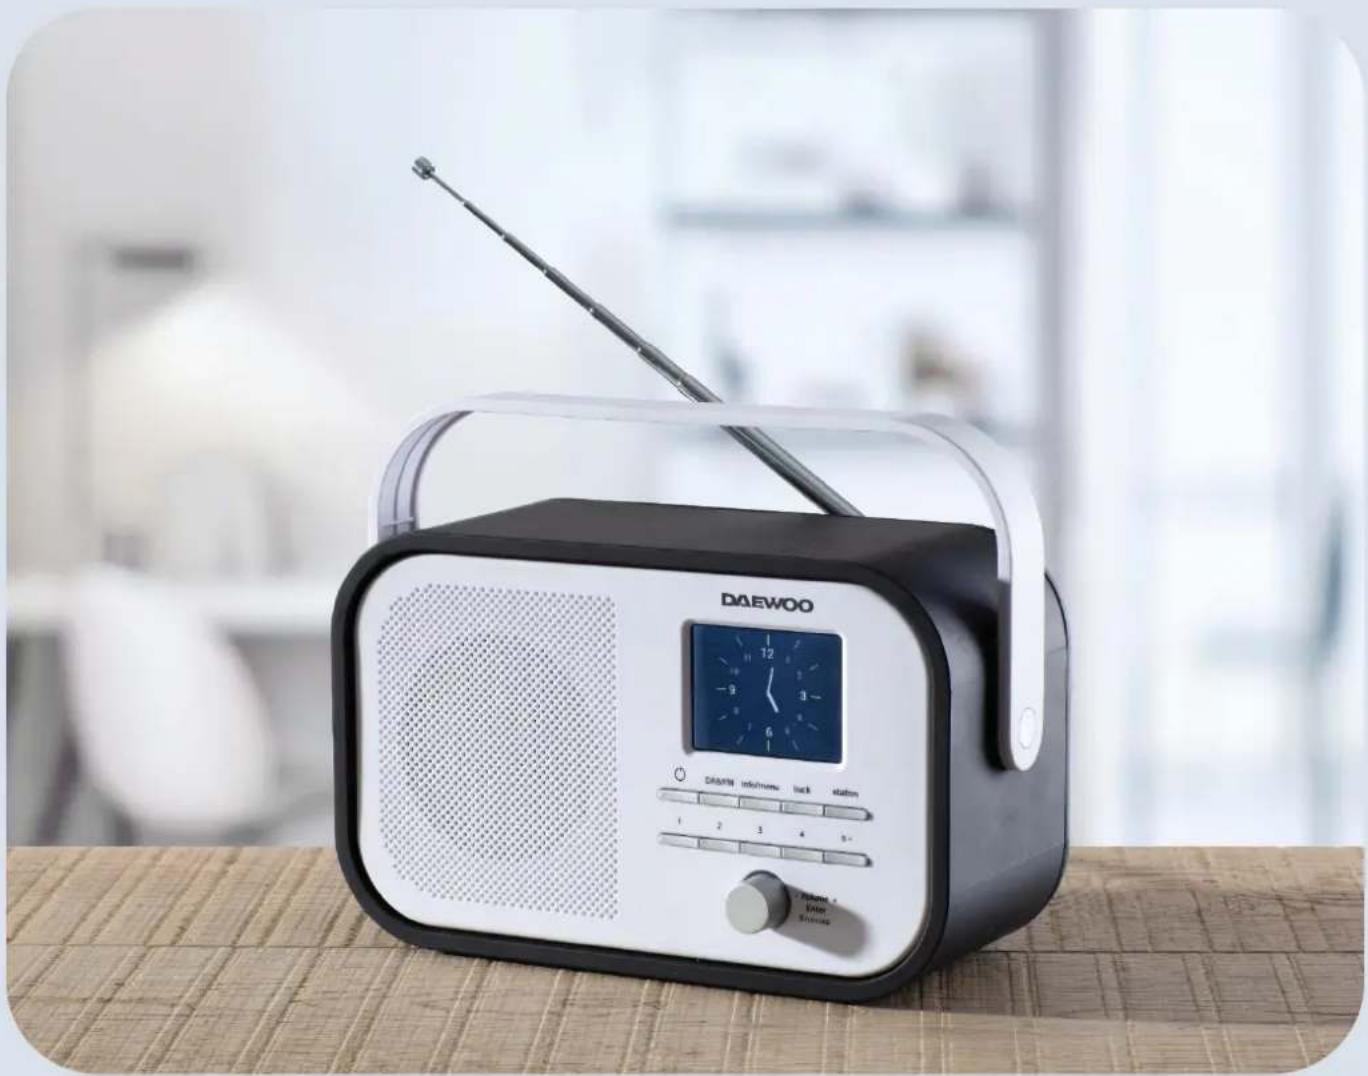
DAB/FM Radio with Colour Screen
User Manual

IMPORTANT SAFEGUARDS
When using electrical appliances, basic safety precautions should always be followed. These instructions should be saved for future reference:
- Read and familiarise yourself with all operating instructions before using this DAB Radio.
- Before plugging your unit into the mains, visually check that the unit is intact and has not suffered any transit damage.
- Check that the voltage indicated on the data plate corresponds with that of the local network before connecting the appliance to the mains power supply.
- Always use this appliance on a solid, level, non-flammable surface.
- Ensure that there is clearance of at least 100mm (4 Inches) minimum around the Radio for sufficient ventilation.
- Ensure that the ventilation openings are not covered with items, such as newspapers, table-cloths, curtains, etc.
- No naked flame sources, such as lighted candles, should be placed on the Radio.
- Do not position the Radio close to sources of heat such as radiators, heaters, other electronic equipment, etc.
- The Radio shall not be exposed to dripping or splashing and that no objects filled with liquids, such as vases, shall be placed on the apparatus.
- Do not immerse this appliance or its supply in water or any other liquids.
- Do not leave the appliance unattended during use.
- Do not leave the appliance unattended whilst connected to the mains supply.
- Always remove the mains supply from the mains socket when the Radio is not in use, the mains supply must be accessible at all times.
- Close supervision is required when using this appliance near children.
- Never leave this appliance within reach of children.
- This appliance can be used by children aged from 8 years and above
and persons with reduced physical, sensory or mental capabilities or lack of experience and knowledge if they have been given supervision or instruction concerning use of the appliance in a safe way and understand the hazards involved. Children shall not play with the appliance. Cleaning and user maintenance shall not be made by children without supervision.
- Children of less than 3 years should be kept away unless continuously supervised.
- Do not use this appliance outdoors.
- It is imperative to unplug the power supply after the appliance has been used, before it is cleaned and whilst being repaired.
- Unplug after each use. Grasp the supply, not the cord.
- Repairs to electrical appliances should only be performed by qualified personnel. Improper repairs may place the user at serious risk.
- Do not operate this appliance with a damaged plug or cord, after a malfunction or after being dropped or damaged in any way.
- Regular, periodic checks should be carried out on the mains supply to ensure no damage is evident. Should there be any signs of damage the product should not be used.
- If the power cable is damaged, it should only be replaced by the manufacturer or a suitable qualified after-sales-service in order to avoid a hazard
- Do not allow the power cable to hang over sharp edges or come in contact with hot surfaces.
- Do not run the power cable under carpets, rugs, etc.
- This product is intended for household use only and should not be used for industrial purposes.
- Do not use any accessories or attachments with this appliance other than those supplied or recommended by supplier.
- Do not use this product for anything other than its intended use.
- Do not push objects into any openings as damage to the product and/or electric shock may occur.
Description of Parts – Front Panel
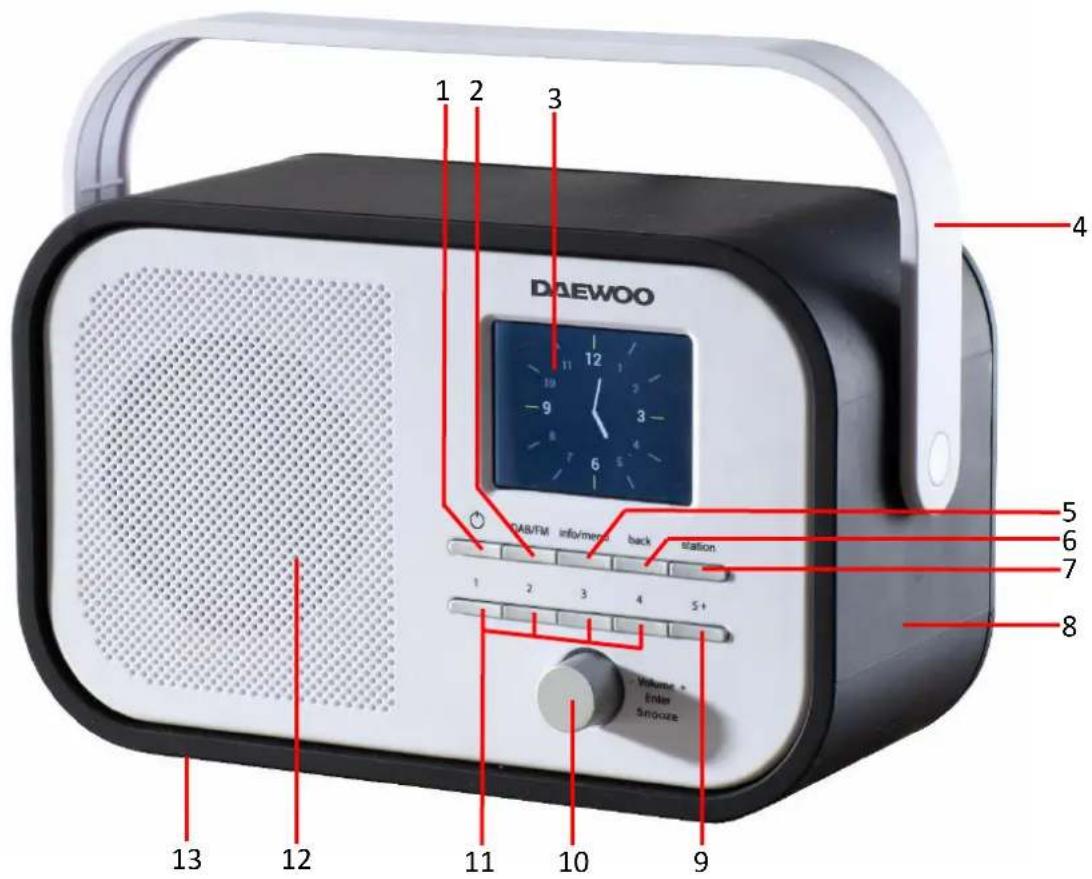
- On/Standby – Press to power up the radio. Press again to put the radio into standby.
- DAB/FM – Press to switch between the DAB and FM radio bands.
- LCD Display.
- Handle.
- info/menu – Press to select the radio information on the display. Press and hold to enter the Menu.
- Back - Press to step back to the previous screen.
- station – Press to show the radio station list in DAB mode.
- Outer case.
- 5+ - Briefly press to recall up to 80 radio stations (40 DAB and 40 FM). Press and hold for 2 seconds to store up to 80 radio stations (40 DAB and 40 FM).
- Volume/Enter/Snooze – rotate the clockwise to increase the volume level and anticlockwise to decrease the volume. Press the control for entering stations, menu options, etc. and Snooze.
- Favourite Preset buttons – Instantly access four favourite radio stations using these buttons.
- Loudspeaker.
- Feet.
Description of Parts – Rear Panel
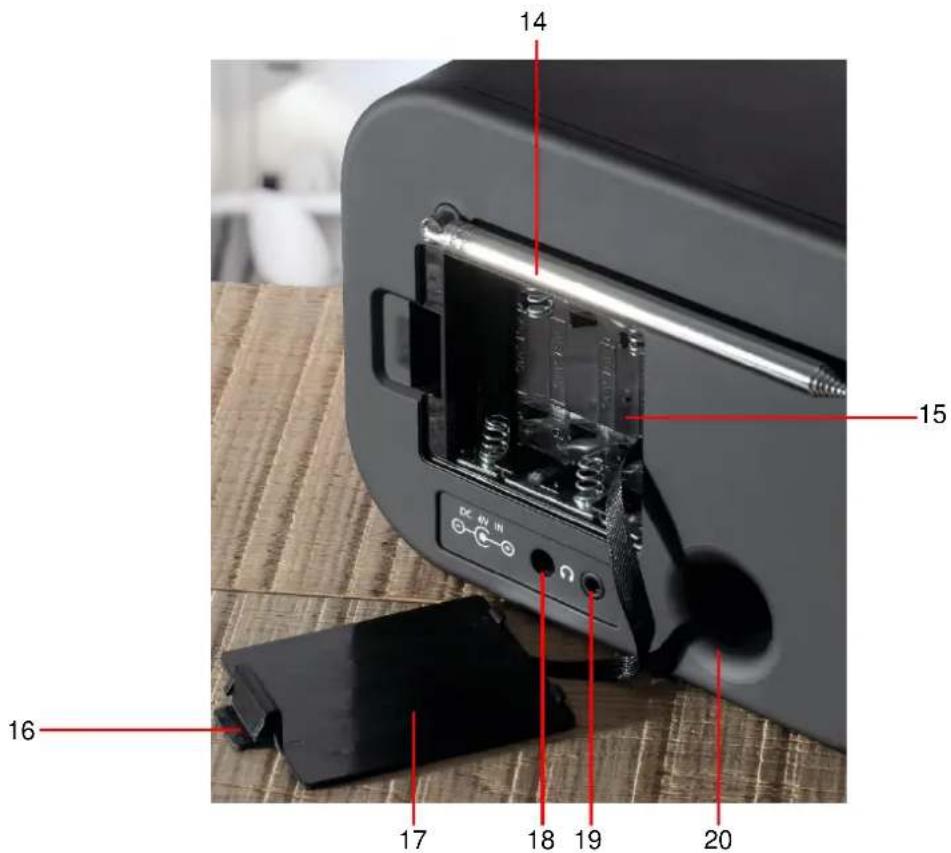
- Telescopic Aerial – Extend before use.
- Battery Compartment
- Battery Compartment Cover Locking Tab
- Battery Compartment Cover
- DC Power Socket
- Headphone Jack Socket
- Bass Port
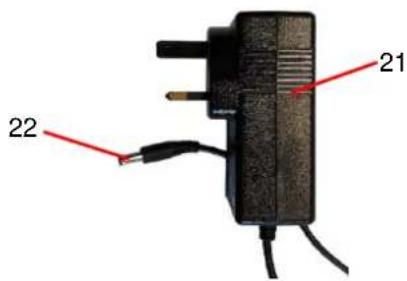
- Mains Adaptor
- Small DC Power Plug
Description of Parts – LCD Display
DAB Radio
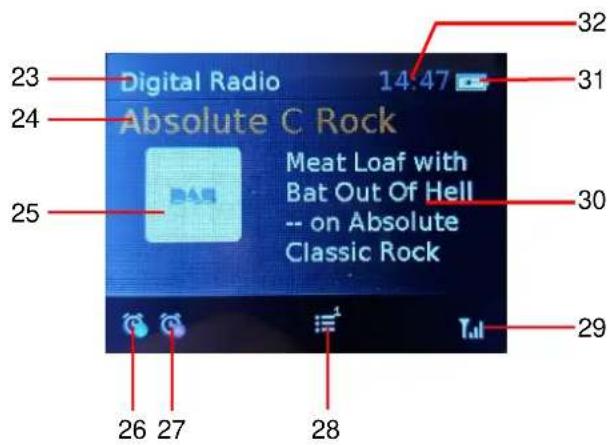
- Radio Band (DAB)
- Radio Station Name
- DAB Logo
- Alarm 1 Set*
- Alarm 2 Set*
- Stored Preset Number Selected
- Signal Strength
- Station Information
- Mains Adaptor Connected#
- Current Time
Description of Parts – LCD Display
FM Radio
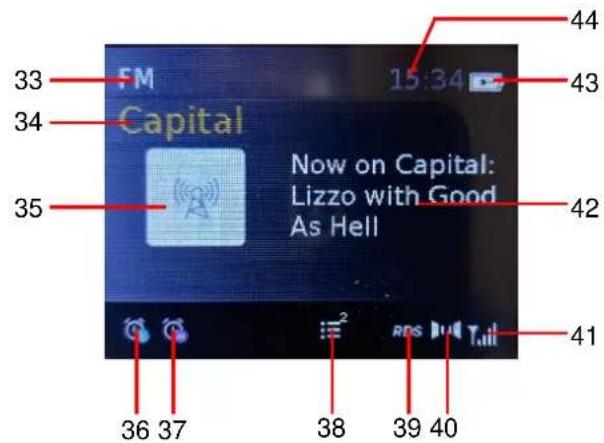
- Radio Band
- Radio Station Name
- FM Logo
- Alarm 1 Set*
- Alarm 2 Set*
- Stored Preset Number Selected
- Radio Data Service (RDS) Enabled
- Stereo icon (shows when reception is in stereo)
- Signal Strength
- Station Information
- Mains Adaptor Connected icon#
- Current Time
*These icons show only when the alarm(s) are set. #When using batteries, the Mains Adaptor icon (43) will not show on the LCD Display (3).
Before the first time you use your DAB/FM Radio
Please read these operating instructions thoroughly and keep them in a safe place for future reference. Remove all packing materials and discard responsibly.
Using the Radio with Batteries
- Open the Battery Compartment (15) by pushing the Locking Tab (16) on the Battery Compartment Cover (17) to the right and remove (arrowed below)
- Insert four 1.5V AA Batteries (not supplied) into the battery compartment being careful to observe the polarity markings inside:
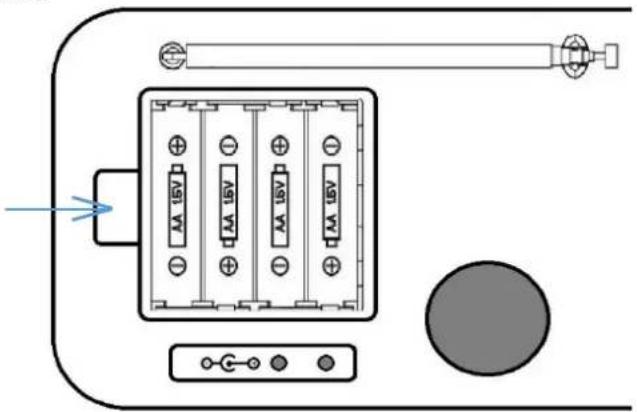
- Replace the Battery Compartment Cover (17).
Battery Warnings
- Do not mix old and new batteries together.
- It is recommended that batteries are removed from the radio if it is not to be used for a long period of time.
- CAUTION: There is a danger of explosion if the batteries are incorrectly fitted.
- Replace only with the same or equivalent battery type.
- Do not expose the radio to sunshine, fire, heat or similar.
WARNING
- Keep new and used batteries away from children.
- If the battery compartment does not latch securely, stop using the product and keep it away from children.
Using the Radio with the Mains Adaptor
- Insert the Small DC Power Plug (22) of the Mains Adaptor (21) into DC Power Socket (18) on the rear panel of the Radio.
- Insert the Mains Adaptor (21) into the nearest mains socket.
NB if the mains adaptor is being used rather than batteries, it is recommended that the batteries (if fitted) are removed.
Operating Instructions – Using the DAB Radio
- Ensure that the Telescopic Aerial (14) is fully extended.
- Ensure the radio has batteries inserted or has the Mains Adaptor (21) connected as described above.
- The Time will automatically update on the LCD Display (3).
- Briefly press the On/Standby button ⏻ (1) on the front panel to power the radio up.
NB The radio will automatically scan the airwaves for DAB stations if it is being used for the first time. The LCD Display (3) will show 'Scanning' and a bar to indicate the progress of the scan, and the total number of stations found so far. Once the scan has finished the radio will play the first alphanumerically found station.
- Press the station button (7) to show the available radio stations on the LCD Display (3) as below:
Right: List of available radio stations shown after pressing the 'station' button.
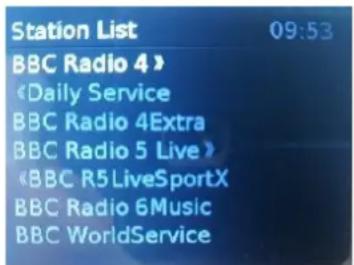
- Rotate the Volume/Enter/Snooze control (10) to scroll through the station list. Once the desired station has been found press the Volume/Enter/Snooze control (10) to select the station.
- Adjust the volume by rotating the Volume/Enter/Snooze control (10).
NB the radio will exit the station list after a short delay and return to the normal display, pressing the back button (6) will return to the normal display instantly.
Saving up to 40 DAB radio stations using the save to preset function
- First tune the radio to the desired station as described above.
- Press and hold the 5+ button (9) for two seconds to enter the 'Save to Preset' menu.
- Rotate the Volume/Enter/Snooze control (10) to scroll through the preset list, select the preset number you wish to save the station under by pressing the Volume/Enter/Snooze control (10):
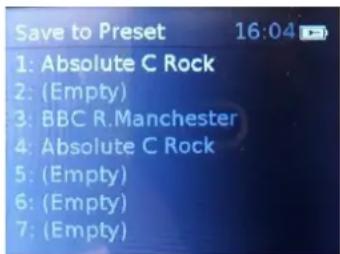
Left: The 'Save to Preset' menu. Right: the LCD Display will show confirmation that a station has been saved in a preset – preset 4 saved in the example shown here.
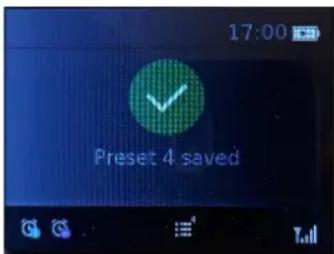
NB if a preset is empty and there is no station saved the preset will show as 'X: (Empty)'. X = preset number. However, you can save a station over an existing preset station rather than an empty one.
- Repeat the above steps to save more stations in the presets.
- The preset number of the station (28) is shown at the bottom centre of the DAB main screen on the LCD Display (3).
Note: The first four radio station presets can be instantly accessed via the four 'Favourite' buttons (11) on the front of the radio.
Recalling a saved preset DAB radio station using the preset recall function
- To recall a preset DAB Radio Station, briefly press the 5+ Preset button (9) to enter 'Preset Recall' menu as below:

NB if a preset is empty and there is no station saved, the preset will show as 'X: (Empty)'. X = preset number.
- Rotate the Volume/Enter/Snooze control (10) to scroll through the preset recall list, select the preset station desired by pressing the Volume/Enter/Snooze control (10).
- The preset number of the station (28) is shown at the bottom of the DAB main screen on the LCD Display (3).
Note: The first four radio station presets can be instantly accessed via the four 'Favourite' buttons (11) on the front of the radio.
Selecting DAB Radio Information on the LCD Display
Briefly press the info/menu (5) button to select the DAB radio station information such as:
- Dynamic Label Segment (DLS) - Displays scrolling text information supplied by the broadcaster.
- Music type – Pop Music, Rock Music, Talk, Arts, Jazz & Blues, etc.
- Station location – Displays the town, city or national from where the station is broadcast.
- Frequency – Displays the radio station transmission frequency.
- Signal Strength - Displays a signal bar with the current station strength and signal error count.
- Audio Bit Rate – Displays the audio bit rate of the transmission.
- Day and Date - Displays the day and date information provided by the broadcaster.
DAB Radio Menu
Whilst listening to the DAB radio press and hold the info/menu button (5) to enter the DAB radio menu.
Rotate the Volume/Enter/Snooze control (10) to scroll through the various menu options, press the Volume/Enter/Snooze control (10) to select the desired option:

a. Station List – shows a full list of DAB stations available.
b. Full Scan – Scans the DAB band for stations, press the Volume/Enter/Snooze control (10) to select full scan.
NB It may be necessary to retune your DAB radio in order to receive new stations being broadcast in your area or if a broadcaster has made any changes to an existing station and you can no longer receive it. To update your DAB radio stations, select Full Scan from the menu and the DAB radio band
will be updated. Any stations saved in the presets may need to be re-programmed after re-scanning. Also, a Full Scan may be required if the radio is moved to a new location i.e. after moving house.
c. Manual Tune – Enables manual DAB radio tuning. Rotate the Volume/Enter/Snooze control (10) to scroll through the frequencies, press the Volume/Enter/Snooze control (10) to select the desired frequency.
d. Prune Invalid – This removes unavailable stations or stations no longer broadcasting from the radio. Rotate the Volume/Enter/Snooze control (10) to select 'Yes' or 'No', press the Volume/Enter/Snooze control (10) to confirm the selection.
e. DRC – Dynamic Range Control. Rotate the Volume/Enter/Snooze control (10) to select 'High', 'Low' or 'Off', press the Volume/Enter/Snooze control (10) to confirm the DRC mode.
f. System Settings – press and rotate the Volume/Select control (9) to select:
- Sleep – press the Volume/Enter/Snooze control (10) to enter the Sleep option, this allows the radio to play for a preset time before switching off, this function allows you to fall asleep to the radio. Rotate the Volume/Enter/Snooze control (10) to select from: Sleep Timer Off, 15, 30, 45, 60, or 90 minutes, press the control to confirm selection.
- Alarm – press the Volume/Enter/Snooze control (10) to enter the Alarm option, this option allows setting of the two wake up alarm times. Rotate the Volume/Enter/Snooze control (10) to select setting alarm 1 or alarm 2, press the control to confirm selection. After selecting alarm 1 or 2, use the Volume/Enter control to set:
i. Alarm On or Off – press the Volume/Enter/Snooze control (10) to select Alarm On or Off.
ii. Frequency – press the Volume/Enter/Snooze control (10) to enter the options. Rotate the Volume/Enter/Snooze control (9) to select when the alarm goes off – Daily, Once, Weekends or Weekdays. Press to confirm option.
iii. Wakeup time – press the Volume/Enter/Snooze control (10) to set the time of day the alarm is required to go off in hours and minutes. Rotate the Volume/Enter/Snooze control (10) to set the time in hours and minutes. Press to confirm the wakeup time setting.
iv. Source – press the Volume/Enter/Snooze control (10) to set the alarm source to wake up to. Rotate the Volume/Enter/Snooze control (10) to select the source as: Buzzer, Digital Radio or FM Radio. (If Digital Radio or FM Radio are selected as a wake-up source the Preset option will appear on the menu select from Last Listened or a saved preset station). Press to confirm the desired option.
v. Duration – press the Volume/Enter/Snooze control (10) to set the length of time the alarm will sound. Rotate the Volume/Enter/Snooze control (10) to select from 15, 30, 45, 60, 90 or 120 minutes. Press to confirm option.
vi. Volume – press the Volume/Enter/Snooze control (10) to set the volume level the alarm will sound at. Rotate the Volume/Enter/Snooze control (10) to select from 4 to 16 on the volume scale. Press to confirm option. NB The alarm volume (buzzer & radio modes) will steadily increase from low to the high.
vii. Once the alarm(s) are set, the alarm icon(s) (26 & 27) at the bottom left of the LCD Display (3) will be highlighted.
viii. Repeat the above process for setting alarm 2 except select 'Alarm 2' at the beginning of the process at point i.
ix. Once the alarm(s) are set, press the On/Standby button (1) to turn off the radio.
- Time/Date – press and rotate the Volume/Enter/Snooze control (10) to set: Time and Date, Auto Update, 12/24hr, Date Format, Clock Style.
- Backlight – press and rotate the Volume/Enter/Snooze control (10) to set the LCD display backlight: Timeout, On Level, Dim Level.
- Language – press and rotate the Volume/Enter/Snooze control (10) to select the following languages your radio will operate in: English, Français, Deutsch, Italiano, Suomi, Dansk, Svenska, Nederlands, Norsk, Polski, Español, Português.
- Factory Reset – press and rotate the Volume/Enter/Snooze control (10) to select 'Yes' or 'No' to restore the radio to factory settings.
- Software Version – select to show current internal software version.
Cancelling the Alarm
After the alarm has gone off, press the On/Standby button ⏻ (1) once to cancel the alarm.
Snoozing the Alarm
Press the Volume/Enter/Snooze control (10) to enter into a 5-minute snooze period. The snooze time will be shown counting down on the LCD Display (3).
Operating Instructions – Using the FM Radio
Listening to the FM Radio
- Ensure the Telescopic Aerial (14) is fully extended.
- Ensure the radio has batteries inserted or has the Mains Adaptor (21) connected as described above.
- Press the On/Standby button ⏻ (1) on the front panel until the radio powers up.
- Briefly press the DAB/FM button (2) to enter the FM radio mode.
- Press the station button (7) to enable FM tuning – the LCD Display (3) will show 'FM Tuning', rotate the Volume/Enter/Snooze control (10) to tune along the FM band. NB the radio tunes in 0.05MHz steps.
- Adjust the volume using the Volume/Enter/Snooze control (10).
Saving up to 40 FM radio stations using the save to preset function
- First tune the radio to the desired station as described above.
- Press and hold the 5+ button (9) for two seconds to enter the 'Save to Preset' menu.
- Rotate the Volume/Enter/Snooze control (10) to scroll through the preset list, select the preset you wish to save the station under by pressing the Volume/Enter/Snooze control (10):
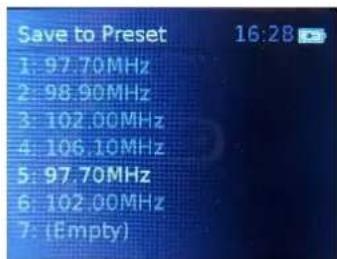
Left: The 'Save to Preset' menu. Right: the LCD Display will show confirmation that a station has been saved in a preset – preset 4 saved in the example shown here.

NB if a preset is empty and there is no station saved the preset will show as 'X: (Empty)'. X = preset number. However, you can save a station over an existing preset station rather than an empty one.
- Repeat the above steps to save more stations in the presets.
- The preset number of the station (38) is shown at the bottom centre of the FM main screen on the LCD Display (3).
Note: The first four radio station presets can be instantly accessed via the four 'Favourite' buttons (11) on the front of the radio.
Recalling a preset FM radio station using the preset recall function
- To recall a saved preset Radio Station, briefly press the 5+ Preset button (9) to enter 'Preset Recall'
menu as below:
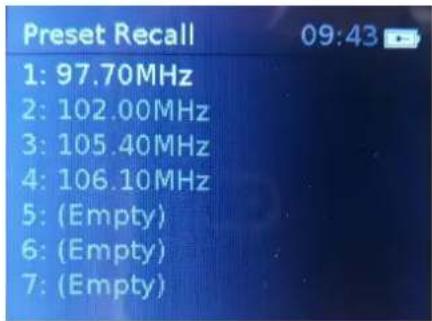
NB if a preset is empty and there is no station saved, the preset will show as 'X: (Empty)'. X = preset number.
- Rotate the Volume/Enter/Snooze control (10) to scroll through the preset recall list, select the preset station desired by pressing the Volume/Enter/Snooze control (10).
- The preset number of the station (38) is shown at the bottom of the FM main screen on the LCD Display (3).
Note: The first four radio station presets can be instantly accessed via the four 'Favourite' buttons (11) on the front of the radio.
Selecting FM Radio Information on the LCD Display
Briefly press the info/menu (5) button to select the FM radio station information such as:
- Radio text - Displays scrolling text information supplied by the broadcaster.
- Program type – Pop Music, Rock Music, Talk, Arts, Jazz & Blues, Sport, etc.
- Frequency – Displays the radio station transmission frequency in MHz.
- Audio Mode – Displays whether the audio is in Mono or Stereo*.
- Day and Date - Displays the day and date information provided by the broadcaster.
*The Headphone output (18) produces stereo audio.
FM Radio Menu
Whilst listening to the FM radio press and hold the info/menu button (5) to enter the FM radio menu.
Rotate the Volume/Enter/Snooze control (10) to scroll through the various menu options, press the Volume/Enter/Snooze control (10) to select the desired option:
a. FM Auto Scan – scans the FM waveband and stores stations automatically in the presets.
b. Scan Setting – press and rotate the Volume/Select/Snooze control (10) to select:
- Strong Stations Only – the FM radio will only scan and playback strong signal radio stations only. Or:
- All Stations – the FM radio will scan and playback all radio stations received.
c. Audio Setting – press and rotate the Volume/Select/Snooze control (10) to select:
- Stereo Allowed – All received stations will be in stereo regardless of signal strength.
Or: - Forced Mono – weak FM radio stations will be reproduced in mono to reduce noise and improve sound quality
d. System Settings
- Sleep – press the Volume/Enter/Snooze control (10) to enter the Sleep option, this allows the radio to play for a preset time before switching off allowing you to fall asleep to the radio. Rotate the Volume/Enter/Snooze control (10) to select from: Sleep Timer Off, 15, 30, 45, 60, or 90 minutes, press the control to confirm selection.
- Alarm – press the Volume/Enter/Snooze control (10) to enter the Alarm option, this option allows setting of the two wake up alarm times. Rotate the Volume/Enter/Snooze control (10) to select setting alarm 1 or alarm 2, press the control to confirm selection. After selecting alarm 1 or 2, use the Volume/Enter/Snooze control (10) to set:
i. Alarm On or Off.
ii. Frequency – how often the alarm goes off – Daily, Once, Weekends or Weekdays.
iii. Wakeup time – the time of day the alarm is required to go off in hours and minutes.
iv. Source – set the alarm source to wake up to as: Buzzer, Digital Radio or FM Radio. (If Digital Radio or FM Radio are selected as a wake up source the Preset option will appear on the menu select from Last Listened or a saved preset station).
v. Duration – set the length of time the alarm will sound, select from 15, 30, 45, 60, 90 or 120 minutes.
vi. Volume – set the volume level the alarm will sound at, select from 4 to 16 on the volume scale. NB The alarm volume (buzzer & radio modes) will steadily increase from low to the high.
vii. Once the alarm(s) are set, the alarm icon (s) (36 & 37) at the bottom left of the display will be highlighted.
viii. Repeat the above process for setting alarm 2 except select 'Alarm 2' at the beginning of the process at point i.
ix. Once the alarm(s) are set, press the On/Standby button (1) to turn off the radio.
- Time/Date – press and rotate the Volume/Enter/Snooze control (10) to set: Time/Date, Auto Update, 12/24hr, Date Format & Clock Style.
- Backlight – press and rotate the Volume/Enter/Snooze control (10) to set the LCD display backlight: Timeout, On Level, Dim Level.
- Language – press and rotate the Volume/Enter/Snooze control (10) to change the operating language, select from: English, Français, Deutsch, Italiano, Suomi, Dansk, Svenska, Nederlands, Norsk, Polski, Español, Português.
- Factory Reset – press and rotate the Volume/Enter/Snooze control (10) to select 'Yes' or 'No' to restore the radio to factory settings.
- Software Version – select to show current internal software version.
Cancelling the Alarm
After the alarm has gone off, press the On/Standby button ⏻ (1) once to cancel the alarm.
Snoozing the Alarm
Press the Volume/Enter/Snooze control (10) to enter into a 5 minute snooze period.
Operating Instructions – Using the Headphone Output
Insert Headphones with a 3.5mm jack plug into the Headphone Jack Socket (19) on the rear panel.
Adjust the volume level as desired using the Volume/Enter/Snooze control (10).
NB the headphones will produce stereo audio.
Care and Use of your DAB/FM Radio
- Always disconnect the Radio from the mains power supply before cleaning.
- Clean outside of the Radio with a clean damp cloth. Never clean with harsh or abrasive cleaners.
- Do not submerge the Radio or its Power Supply in water or any other liquids.
Technical Specification
| Model Number | AVS1403 |
| Power Supply | 4x 1.5V AA Batteries or DC 6V @1A |
| Mains Adaptor | Input: AC 100-240V ~ 50-60HzOutput: DC 6V @1A |
| Audio Output Power | 1W RMS |
| No of Speaker Units | 1 |
| Unpacked Weight | Approx. 630g |
| Dimensions (Approx.) | Approx. 210 (w) x 90 (d) x 130 (h) mm |
| Operating Temperature Range | 0°C to + 40°C |
| FM Frequency Range | 87.5 - 108MHz |
| DAB Frequency Range | 174.928 - 239.2MHZ |
| This product conforms to Radio Equipment Directive 2014/53/EU | |
DAEWOO
ELECTRICALS

GUARANTEE
This product is guaranteed for twenty-four months from the date of original purchase. If any defect should occur due to faulty materials or workmanship, please return it to the store it was purchased from.
You will need to have your receipt of purchase to hand. The guarantee is subject to the following provisions:
- It is only valid within the boundaries of the country of purchase.
- The product must be correctly installed and operated in accordance with the instructions contained in the User Manual.
- The product must be used solely for domestic purposes.
- The guarantee will be rendered invalid if the product is re-sold or has been damaged by inexpert repair.
- The manufacturer disclaims any liability for incidental or consequential damages.
- The guarantee is in addition to, and does not diminish, your statutory or legal rights.
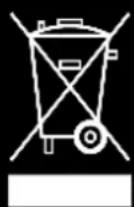

Waste electrical products should not be disposed of with household waste. Please
recycle where facilities exist. Check with your Local Authority or retailer for recycling advice

- IMPORTANT SAFEGUARDS
- DESCRIPTION OF PARTS – FRONT PANEL
- DESCRIPTION OF PARTS – LCD DISPLAY
- BEFORE THE FIRST TIME YOU USE YOUR DAB/FM RADIO
- USING THE RADIO WITH BATTERIES
- BATTERY WARNINGS
- WARNING
- USING THE RADIO WITH THE MAINS ADAPTOR
- OPERATING INSTRUCTIONS – USING THE DAB RADIO
- DAB RADIO MENU
- CANCELLING THE ALARM
- SNOOZING THE ALARM
- OPERATING INSTRUCTIONS – USING THE FM RADIO
- LISTENING TO THE FM RADIO
- RECALLING A PRESET FM RADIO STATION USING THE PRESET RECALL FUNCTION
- SELECTING FM RADIO INFORMATION ON THE LCD DISPLAY
- FM RADIO MENU
- OPERATING INSTRUCTIONS – USING THE HEADPHONE OUTPUT
- CARE AND USE OF YOUR DAB/FM RADIO
- DAEWOO
- ELECTRICALS
- GUARANTEE
Brand : DAEWOO
Model : AVS1403
Category : DVD player