
KRAKEN-MK3 - Loudspeaker BASSBOSS - Free user manual and instructions
Find the device manual for free KRAKEN-MK3 BASSBOSS in PDF.


| Product Type | Powered Subwoofer |
| Model | KRAKEN-MK3 |
| Woofer Configuration | Quad 21-inch (4 x 21") |
| Amplifier Power | 10,000 Watts (4 x 2500W Class D) |
| Frequency Response (±3 dB) | 25 Hz - 90 Hz |
| Maximum Sustained SPL | 145 dB @ 1 m (half-space) |
| Peak SPL | 148 dB |
| Enclosure Type | Vented, short-horn hybrid (bandpass) |
| Cabinet Material | 18mm, 13-ply birch plywood with extensive bracing |
| Finish | Weatherproof black polyurea coating |
| Grille | Perforated, powder-coated steel |
| Dimensions (H x W x D) | 48 x 48 x 36 in (121.9 x 121.9 x 91.4 cm) |
| Height with Feet | 48.5 in (124 cm) |
| Net Weight | 460 lbs (209 kg) |
| Shipping Weight | 550 lbs (249 kg) |
| Power Requirements | 100-240 VAC, 45-65 Hz (auto-sensing) |
| Current Draw (Nominal) | 14A @ 120V, 7A @ 240V |
| Audio Input | XLR-F (balanced) |
| Audio Output | XLR-M (pass-through) |
| Power Connector | Neutrik PowerCON TOP (waterproof) |
| Data Connectivity | 2 x EtherCON RJ45 (with switch) |
| Onboard Presets | 8 presets via button, up to 100 via software |
| Cardioid Mode | Yes (Preset 8) |
| DSP Features | HPF, LPF, EQ, alignment, limiting, crossover |
| Warranty (Cabinet) | 6 years |
| Warranty (Electronics) | 3 years |
| Warranty (Transducers) | 2 years |
Frequently Asked Questions - KRAKEN-MK3 BASSBOSS
User questions about KRAKEN-MK3 BASSBOSS
0 question about this device. Answer the ones you know or ask your own.
Ask a new question about this device
Download the instructions for your Loudspeaker in PDF format for free! Find your manual KRAKEN-MK3 - BASSBOSS and take your electronic device back in hand. On this page are published all the documents necessary for the use of your device. KRAKEN-MK3 by BASSBOSS.
USER MANUAL KRAKEN-MK3 BASSBOSS
natural_image
Exterior view of a black industrial machine housing with mesh ventilation and internal panel cutouts (no visible text or symbols)KRAKEN-MK3
Quad 21"
Powered Subwoofer
KRAKEN-MK3
Quad 21"
Powered Subwoofer
Table of Contents
Overview 2
Quick Start Guide 4
Outboard Processor Warning 5
Setup Procedure 5
Operation and Controls 6
Indicator LEDs 6
How to Use the Presets 7
Pre-Installed Onboard Presets 8
Power Distribution 9
Troubleshooting 9
Cardioid Mode 10
Specifications 11
Warranty 12
Safety Information 13
Important Notes 14
FCC Compliance Notice 14
The Kraken embrace is a monstrously beautiful thing. It's crushing, it's inescapable, and it fills any space with excitement and wonder... You'll love every minute of it! Capable of almost brutal force, every time there's a Kraken on site, the energy level goes up. When your events need to be intense... release the Kraken!
How does the Kraken pack the output of at least four double-18" subwoofers into the size of just two? While it's possible to tune a small cabinet to a very low frequency using very long ports, those ports would tend to take up more than half of the cabinet volume, requiring bigger cabinets or higher tuning.
2 Kraken-MK3 User Manual
On the other hand, tuning a very large cabinet to a very low frequency is possible using shorter ports. The bigger the cabinet volume, the shorter the ports need to be to tune it to a low frequency. The shorter the ports are, the smaller the percentage of interior cabinet volume they occupy, effectively leaving more room for more woofers. Sure, the Kraken is big for a single speaker, but the point is not the size of the cabinet, it's the scale of the output. Think of it as a subwoofer with the economy of scale: The Kraken delivers the highest SPL relative to subwoofer size, bar none.
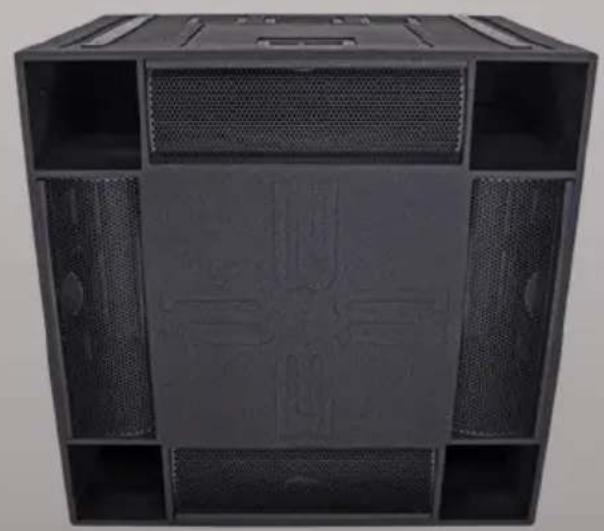
Technically, the Kraken is a vented, short-horn, quad 21" bandpass subwoofer. The four drivers are loaded into a large acoustical volume that is tuned to a low frequency, and the front of each driver is loaded into a short horn. The vented enclosure section provides extended deep bass performance and the foreshortened horn sections provide increased upper frequency sensitivity, which results in improved transient response, aka "punch".
To bring the whole thing to life, each woofer is powered by a discrete 2500W amplifier, making the total power per cabinet an impressive 10,000 Watts. This ensures the amps aren't the limiting factor in the output of low frequencies. Providing abundant power prevents overheating issues and virtually eliminates the damage that clipping a too-small amp can cause.
The big beast is kept under your control by an integrated, comprehensive DSP. The DSP provides high-pass filters, low-pass filters, equalization, alignment filters and limiting. A variety of different filter settings are available in presets. Eight presets are available at the touch of a button on the amplifier, and the DSP can store up to 100 presets on-board, all of which can be accessed via software and a LAN connection.
To take further advantage of the Krakens' output density, aligned arrays are facilitated by interlocking sliders. Block arrays, side-by-side arrays and front/back cardioid configurations can be deployed with the cabinets interlocked. The optional transport carts can support two cabinets, allowing unparalleled truck-pack density. The carts feature recesses into which the sliders fit.
There are two interesting advantages to the dual-opposed, force-canceling nature of the Kraken design. One is the absence of front-to-back rocking motion, which both reduces the amount of lateral energy transmitted into floors, and makes the cabinets less prone to “walking”. The other is relatively little secondary radiation from the rear of the cabinet. This, along with the directivity associated with its size, makes the area behind a Kraken fairly quiet compared to an array of conventional cabinets capable of similar output. Ultimately, cardioid configurations of Krakens tend to require fewer rearward-facing cabinets to achieve effective cancellation behind the array.
The cabinet itself is made from 18mm, 13-ply Birch plywood and is extensively braced. It is coated in high-temperature bonded polyurea and features powder-coated, perforated steel grilles. The cabinets are axially symmetrical, featuring UHMW Polyethylene sliders and steel bar handles on 4 sides.
The Kraken Powered Subwoofer was designed to provide body-and-face-melting bass on a massive scale for festival systems, touring systems, high-intensity nightclubs, art cars, carnival floats and, not to be forgotten, BASSHEADS, who need a little bit more than they have ever had before...
- Ensure the cabinet is secure and stable, on level ground.
- Connect signal via the XLR-F input.
- Connect the XLR-M connector to additional subs or tops.
- Connect the mains power and verify the "Ready" LED is lit.
BASSBOSS systems are easy to set up quickly. The best possible results are achieved consistently because of the integrated nature of the designs. All BASSBOSS loudspeakers are complete, integrated systems, featuring the cabinet, transducer, amplifier and a comprehensive suite of processing. Setup is particularly easy because the products integrate with each other.
Provided the cabinets are physically aligned, any BASSBOSS sub can be combined with any BASSBOSS top and their outputs will be phase-coherent. This means no cancellations and no gaps in the response at the crossover frequency, regardless of which preset is selected.
The on-board BASSBOSS processing allows for the following:
Any BASSBOSS powered subwoofer can be combined with any other BASSBOSS Powered subwoofer and their outputs will sum coherently. (i.e.: in phase with each other.)
Any BASSBOSS powered subwoofer or combination of BASSBOSS powered subwoofers can be combined with any BASSBOSS powered top and their outputs will sum coherently through the crossover region.
HOWEVER only one model of top should be used at a time. An assortment of different tops cannot be stacked together and still achieve coherence and clarity.
The following tops should be used individually, i.e. should NOT be arrayed:
AT312 (Co-axial point-source Main)
DiaMon (Co-axial point-source satellite)
SV9 (2-way monitor with Satellite mode)
The following tops can be used in arrays:
MFLA (Medium Format Line Array, up to 20 cabinets can be arrayed)
AT212 (Horizontally arrayable when necessary)
DV12 (Arrayable in PAIRS ONLY with the upper box of the pair inverted.)
Outboard Processing Warning
Third-party outboard processing (Drive Racks, etc.) are not recommended and are not necessary with BASSBOSS MK3 series powered loudspeakers. Outboard processing will not improve, and will very likely degrade the sound quality, reliability and output capacity. Using external processing inappropriately can cause driver damage that is not covered by warranty.
The internal processing can accomplish everything an external processor could accomplish, but without degrading the sound quality and without putting components at risk. Before considering using an outboard processor, contact BASSBOSS customer service with your use-case scenario for assistance in setting up the internal processing to achieve your goals.
Setup Procedure
Once the cabinet is in the desired location, signal cables should be connected via the XLR-F input. It's recommended to run balanced signal cables to minimize the chance of noise and ground-loop hum. The incoming signal should be unprocessed because all the necessary processing is done in the built-in DSP. The signal should be run directly from the outputs of a mixer or controller.
The XLR-M connector provides a full-range, unprocessed, pass-through connection to additional cabinets. This output can be connected to additional subs or tops. Up to 12 cabinets can be connected on a single output from a mixer or controller.
Connecting the mains power. The power connector is a Neutrik PowerCON TOP waterproof type. The power connector inserts with the silver tab rotated counter clockwise from vertical, at about the 10:00 position, and once inserted, rotates clockwise to the 12:00 position to lock in place. Once locked, this connector is waterproof.
This connector also serves as the power switch. To disconnect and remove the connector, pull back on the silver tab to unlock it and rotate it counter clockwise. Once rotated to the insertion angle, the connector can be removed.
When connecting and disconnecting, no force should need to be applied. If the connector doesn't insert and rotate smoothly, either it's in the wrong position or it's damaged and should be replaced.
Always use a grounded outlet. The supplied power cord includes a standard grounding NEMA 5-15 (Edison) 120-Volt US wall plug. In unfamiliar locations it's recommended to verify the correct wiring of outlets before powering your system.
It's highly recommended to connect all signal and power cords to the speakers before plugging the power cords into mains outlets. When your speaker is powered on, you'll see all the indicator lights turn on and then show the system's current status.
Operation & Controls
There are 2 controls on the amplifier.
1: Input
This knob adjusts the input level from -72dB to -0dB. To avoid distortion and clipping, make sure the input signal doesn't exceed +22dB and the incoming signal doesn't reach clipping before you achieve the desired sound level.
While the amplifier has built-in limiters and safety features to protect itself and the speaker, it can't protect the speaker from distorted incoming signals. The amplifier will simply amplify the clipped signal, which can do the same damage as clipping an amplifier. Since it's essentially impossible for these amplifiers to clip, signal-level clipping is the most common cause of damage to these speakers.
If you hear distortion, lower the signal level right away.
2: Preset Select
Pressing the Preset Select button cycles through presets 1-8, and pressing it again after preset 8 returns to preset 1. Each preset includes all necessary low-pass and high-pass filters at the selected frequencies, and all the necessary alignments to maintain phase coherence in the crossover range when used with other BASSBOSS powered speakers.
Presets help you fine-tune the balance between the subwoofers and top speakers. More details on the different combinations are on page 7.
Indicator LEDs
Indicator LEDs - Left side, bottom to top:
Ready: Indicates that power is on and the system is ready to play.
Signal: Indicates the presence of input signal.
-12dB: Indicates there is 12dB of headroom remaining before reaching maximum output.
-6dB: Indicates there is 6dB of headroom remaining before reaching maximum output.
Limiting: Indicates one of the channels is reducing the incoming signal level to prevent overdrive.
Overheat: Indicates the amplifier is reducing output to prevent shut-down from overheating.
Protect: Indicates the amplifier is shut down due to a condition that could cause further damage.
The Protect LED also is engaged when the system has been muted via the software.
Comm Link: Indicates communication is active on the LAN connection(s).
Indicator LEDs, Right Side, Bottom to top:
Presets 1-8 - The illuminated LED indicates the corresponding preset is loaded.
How to Use the Presets
Setting the low-pass filter frequency on the subwoofer to match the top cabinet's high-pass filter frequency and matching their sound levels will achieve the smoothest sound across the frequency range.
There are no incompatible combinations.
Selecting high numbered presets on subs with low-numbered presets on tops will result in increased system output in the overlap range, which can be helpful in some situations but can also result in a "boomy" sound.
When the subwoofer levels are to be run higher than tops levels, (which is almost always) the effective crossover moves higher in frequency. If you intend to run your system "bass-heavy" it's recommended to run lower-numbered presets on the subs and higher-numbered presets on the tops to avoid an excessively "boomy" sound.
Selecting low-numbered presets on subs with high-numbered presets on tops may result in a lack of "punch" in certain combinations. This is most likely when not enough level is available from the subwoofer(s).
When not enough output is available from the sub(s), using a preset combination with overlap can help provide a little more bass level but it does limit the maximum level of the tops due to the added demand for low-frequencies from the tops.
It's recommended that you try several, if not all, combinations when first setting up to determine which combination works best in each environment. You will likely choose different combinations for wood floors, concrete floors and outdoors.
Experiment with different combinations to dial in your preferred combination in different environments.
High-pass and low-pass filters with included phase compensation.
Preset 1: 23 Hz - 60 Hz
Preset 2: 23 Hz - 70 Hz
Preset 3: 23 Hz - 85 Hz
Preset 4: 23 Hz - 80 Hz
Preset 5: 23 Hz - 85 Hz
Preset 6: 23 Hz - 90 Hz
Preset 7: 23 Hz - 95 Hz
Preset 8: Cardioid Mode (Use only what cabinet is facing away from the audience.)
**Preset 8 is the Cardioid mode setting. More information on using Cardioid Mode can be found on page 10.
Additional presets are accessible through software. See "How to Use the Presets" section for more information.
New presets will be available for download at bassboss.com/software as they are developed.
To be notified when new presets are released register your gear at: www.bassboss.com/support
Instructions on linking to your computer for remote monitoring and control: www.bassboss.com/software
Information and setup tips about how to get the best and most out of your system:
bassboss.com/edu
Connect no more than one Kraken to a single 120V, 20A circuit. When connecting to 120V mains, provide each Kraken with a dedicated 20A circuit.
Although amplifiers for tops and subs may be specified to have the same "power" capacity, in practice, amplifiers used for tops applications tend to draw significantly less current. Subwoofers draw far more current than tops due to the demands for bass level and the duration of the notes.
All MK3 amplifiers can operate on mains supply from 100 to 250VAC. Amplifiers connected to higher voltage mains supplies draw less current. To connect to voltages other than 120V, a different mains connector plug must be used. Contact your salesperson for information about purchasing cables for alternate voltages.
Do not connect Krakens through linking power connectors.
Troubleshooting
If, after following the previous instructions for setup, (see page 5,) you have no output from the loudspeaker:
Verify that the green Ready LED is lit. If NOT lit, check the following:
- Is the power cord plugged into a live outlet?
- Is the Neutrik powerCON connector rotated into the locked position?
If the green Ready LED is lit, check the following:
- Is the red Protect LED illuminated? The unit may be in protect mode or set into mute via software.
- Is the signal cable connected to the input?
- Is the signal cable connected to an operating output at the other end?
- Is there signal flowing to the input? Check the integrity of the cable against a different cable.
- Is the volume knob turned all the way down or at a very low level?
- Is the signal flowing to the input full-range?
Filters in the signal may remove the operating frequencies of the loudspeaker receiving them. - If you're connected via LAN, check the level and filter settings in the software.
Cardioid Mode
Preset 8: Cardioid Mode
To achieve cardioid operation, you need at least one subwoofer facing the audience and one cabinet in cardioid mode placed facing away from the audience. Ideally, you should have two cabinets facing the audience and one facing away from the audience. The cabinets facing the audience should have the same preset loaded in them. The cabinet facing away from the audience should be set to the Cardioid preset - Preset 8. The Cardioid Mode cabinet should be placed between the audience-facing cabinets for cancellation directly behind the array.
The main subwoofer cabinets face the audience and use one of the first 7 presets, while the cardioid cabinet faces away from the audience with Preset 8 selected. When two cabinets are facing forward and one is facing backward in cardioid mode, set the input levels the same for all cabinets, with the same signal going to all. When one cabinet is facing forward and one is facing backward in cardioid mode, set the cardioid cabinet's level 6dB lower than the forward-facing cabinet, with both cabinets receiving the same signal.
If there's only one cabinet facing forward and another one facing backward in cardioid mode, you can place the cardioid cabinet on top of the forward-facing cabinet. If you place the cardioid cabinet next to the forward-facing cabinet, position the forward-facing cabinets further away from the stage or the area where you want to reduce sound levels. The most significant sound reduction happens along an imaginary line drawn from the center of the forward-facing cabinet's woofer back through the center of the cardioid cabinet's woofer.
How and When to Use Cardioid Mode
Cardioid mode doesn't make the sound louder for the audience. Instead, it reduces the bass level behind the subwoofer stacks. When you have two subwoofers facing the audience and add a third one in cardioid mode, the sound level in front of the two subwoofers won't change much. However, the sound level behind them will decrease.
In some situations a wall or structure may reflect the sound radiating from the rear of the subwoofers back towards the audience. That reflected sound can cause phase cancellations leading to a loss of impact and uneven frequency response. Cardioid mode can help eliminate those cancellations before they happen, leading to better sound quality and impact for the audience.
Area of Reduced Bass Level

Audience Area
Acoustical
Loudspeaker Description: High-output Quad-21 inch Subwoofer
Frequency Response (±3 dB): 25 - 90 Hz
Maximum Sustained Output: 145 dB SPL, 1 meter, half-space (ground plane)
Max SPL (Peak): 148 dB
Nominal Dispersion (°H x °V): 360 x 360 - Cardioid mode available with multiple boxes
Electrical
Amplification: 10,000 Watts - 4 x 2500 Watt discrete Class D amplifiers
Processing: Integrated comprehensive DSP provides high pass, low pass, equalization, phase alignment, cardioid processing and limiting
Electrical Connectors, Amp: 1 x Neutrik powerCON True 1 TOP Input
Electrical Connector, Mains: 1 x Standard US 3-pin 120V electrical plug: NEMA 5-15 (Edison)
Voltage Operating Range: 100-240V AC, 45-65Hz (Auto-sensing, auto switching universal supply)
Current Draw, Nominal: 14A @ 120 volts - 7A @ 240V (typical with music program)
Signal Input Connectors: XLR-F
Signal Output Connectors: XLR-M pass-through only
Data Connectors: 2 x EtherCON RJ45
LAN Connectors: EtherCON RJ45 (x2) with 2-port Ethernet switch
Physical
Enclosure Type: Vented, short horn hybrid
Transducer: 4 x 21 inch diameter (540 mm) neodymium motor woofers with 4.5" diameter (115mm) CCAW split-wound voice-coils. Waterproof fiber composite cones
Cabinet Construction: CNC machined 18mm Birch plywood, extensive bracing, dado joints, steel hardware
Dimensions (HxWxD): 48" x 48" x 36" (121.92 cm x 121.92 cm x 91.44 cm) - 48.5" (124 cm) high with feet Net Weight: 460 lbs. (209 kg)
Shipping Weight: 550 lbs. (249 kg) with pallet
Exterior Finish: Weatherproof, black, textured, bonded, high-pressure polyurea coating
Grilles: Perforated, powder-coated steel
Feet: 8 x UHMWPE strips. 2 on each of 4 sides
Handles: 8 x Steel bar handles. 2 on each of 4 sides
Fly Points: None. Ground-stack only.
Optional
Transport Dollies: 18mm Birch Dolly cart with 4 locking casters and recesses to accept interlocking cabinet sliders
Online Information: bassboss.com/kraken
Our proactive philosophy causes specifications to be subject to change whenever improvements are made.
WARRANTY INFORMATION | Our fully-transferable warranty covers all BASSBOSS products.
STANDARD CABINET WARRANTY
BASSBOSS loudspeaker cabinet integrity, including all joinery, fasteners, handles and wood, is warranted against defects in materials and workmanship for a period of six (6) years from the date of purchase. This warranty does not cover items that are intended to wear and can be replaced if worn or damaged. Examples of items not covered by this warranty are cabinet feet, grilles and the finish or coating applied to the cabinet.
ENHANCED COMPONENT WARRANTY
BASSBOSS amplifiers and electronic components are covered against failures due to defects in materials and/or workmanship for a period of three (3) years from the date of purchase.
TRANSDUCER WARRANTY
Transducers are covered against failures due to defects in materials and/or workmanship for two (2) years from the date of purchase.
WARRANTY SUPPORT
Warranty support is a service, and part of that service includes helping you prevent failures and minimize repair and shipping costs. Please contact BASSBOSS immediately if you observe an issue.
Please do not ship products without obtaining a return authorization number (RMA) by contacting BASSBOSS at bassboss.com/support. If you need to ship your speaker for service, BASSBOSS technicians will provide assistance on shipping and packaging requirements specific to your service needs.
WARRANTY LIMITATIONS
During the warranty period, if your loudspeaker malfunctions or fails due to any defect in components or manufacturing, the failed parts will be repaired or replaced. This warranty does not extend to damage resulting from improper installation, misuse, neglect or abuse. Warranty coverage and eligibility will be determined upon inspection by BASSBOSS personnel. This warranty does not cover labor other than that authorized and performed by BASSBOSS personnel. Service will be performed upon the return of the failed unit, together with its original sales receipt or other proof of purchase, to BASSBOSS or an Authorized Service Facility. Purchaser is responsible for all costs of shipping and handling. Cosmetic damage is specifically excluded from this warranty. This warranty is rendered void if service, repairs and/or modifications are attempted or made by anyone not specifically authorized by BASSBOSS to perform said services. Please contact BASSBOSS or your local BASSBOSS dealer before attempting any repairs and before shipping parts in for service. This warranty gives you specific legal rights, and you may also have other rights, which vary from state to state.
Safety Information
Important information regarding safety and the use of your loudspeakers:
To prevent potentially dangerous exposure to high levels of acoustic pressure, never stand in the immediate vicinity of loudspeakers driven at a high level without hearing protection. Professional loudspeaker systems are capable of causing sound pressure levels detrimental to human health. When a transducer capable of producing high sound levels is being used, it is necessary to wear ear plugs or protective earphones to prevent hearing damage.
Even seemingly non-critical sound levels (from approximately 95 dB SPL) can cause hearing damage if people are exposed to it over a long period. Anyone exposed to these levels should use appropriate hearing protection devices. System and venue owners and operators are encouraged to make hearing protection devices available to all customers and staff members.
In order to prevent accidents when setting up the loudspeakers or loudspeaker stands, make sure they are standing on a firm surface. Ensure that all additional hardware, fixings and fasteners used for installation or mobile deployment are of an appropriate size and load safety factor.
Only use included, factory installed, internally secured M10 fly points when supporting cabinets. (Not all models include these features.) Only use appropriately load-rated hardware. Never hang loudspeakers from handles. Never drill or screw into cabinets to attach lifting points.
Pay attention to the manufacturers' instructions and to the relevant safety guidelines. Regularly check the loudspeaker housings and accessories for visible signs of wear and tear, and replace them when necessary. Regularly check all load bearing bolts in the mounting devices.
Caution: Loudspeakers produce a static magnetic field even if they are not connected or are not in use. Therefore make sure when erecting and transporting loudspeakers that they are nowhere near equipment and objects which may be impaired or damaged by an external magnetic field. A distance of 3 feet (1m) should be maintained between loudspeakers and sensitive equipment such as CRT monitors or magnetic storage media.
Never attempt to carry out any operations, modifications or repairs that are not expressly described in this manual. Contact your dealer or BASSBOSS support if the product is not functioning properly.
The audio system must comply with current local standards and regulations regarding electrical systems.
For installation purposes, BASSBOSS strongly recommends that this product be installed by a qualified, professional installer who can ensure correct installation and certify that it is installed in compliance with the regulations in force.
Important Notes
Shielded data cables must be used.
To minimize the occurrence of noise and interference, always use shielded signal cables. Avoid routing signal or data cables close to equipment that produces high-intensity electromagnetic fields such as transformers, power cables and loudspeaker wires.
Do not coil excess power cable. Do not coil or wrap power cables and signal or data cables together.

WARNING
This is a class A product. In a domestic environment, this product may cause radio interferences, in which case the user may be required to take corrective measures.
FCC Compliance Notice
Note: This equipment has been tested and found to comply with the limits for a Class A digital device, pursuant to part 15 of the FCC Rules. These limits are designed to provide reasonable protection against harmful interference when the equipment is operated in a commercial environment.
This equipment generates, uses and can radiate radio frequency energy and, if not installed and used in accordance with the instruction manual, may cause harmful interference to radio communications. Operation of this equipment in a residential area is likely to cause harmful interference in which case the user will be required to correct the interference at their own expense.
![914.40 [36.00] 1231.90 [48.50] 1219.20 [48.00] 1219.20 [48.00] 190.50 [7.50] 50.80 [2.00] 152.32 [6.00] 101.65 [4.00] 609.60 [24.00]](/content/2026/05/984101/images/045971b4f74a67e3aff4ff7c90e16eb90de29414ab9975101e26813f3a264174.jpg)
Manufacturer
True Lee Loudspeakers | BASSBOSS 2028 E Ben White Blvd. #240-8220 Austin TX 78741
We declare, under our sole responsibility, that to the best of our knowledge to which this declaration relates, our products are in conformity with the applicable requirements.
Product: DJ18-MK3 Subwoofer Intended use: Professional Audio Loudspeaker
KRAKEN-MK3
Quad 21"
Powered Subwoofer
natural_image
Black rectangular electronic device with ventilation grilles and mounting holes (no visible text or symbols)
natural_image
Exterior view of a black industrial machine casing with mesh panel and cutouts (no visible text or symbols)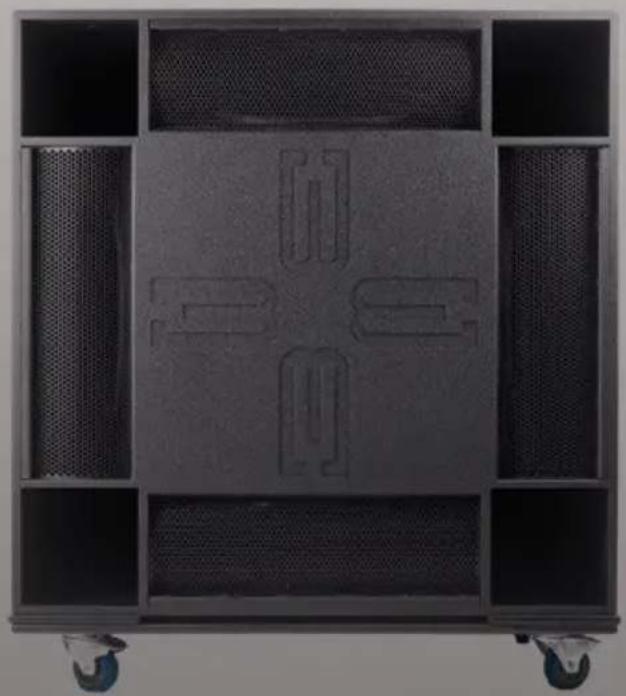
natural_image
Exterior view of a black industrial machine with mesh ventilation and four cutouts (no text or symbols visible)
natural_image
Abstract geometric logo with black and yellow shapes (no text or symbols)Need more assistance?
We're here to help.
bassboss.com/support
- KRAKEN-MK3
- Quad 21"
- Powered Subwoofer
- Table of Contents
- Kraken-MK3 User Manual
- Outboard Processing Warning
- Setup Procedure
- Operation & Controls
- 1: Input
- 2: Preset Select
- Indicator LEDs
- How to Use the Presets
- Troubleshooting
- Verify that the green Ready LED is lit. If NOT lit, check the following:
- If the green Ready LED is lit, check the following:
- Cardioid Mode
- Preset 8: Cardioid Mode
- How and When to Use Cardioid Mode
- Acoustical
- Electrical
- Physical
- Optional
- STANDARD CABINET WARRANTY
- ENHANCED COMPONENT WARRANTY
- TRANSDUCER WARRANTY
- WARRANTY SUPPORT
- WARRANTY LIMITATIONS
- Safety Information
- Important Notes
- WARNING
- FCC Compliance Notice
- Manufacturer
Brand : BASSBOSS
Model : KRAKEN-MK3
Category : Loudspeaker