
GTP34 - Hedge Trimmer Draper - Free user manual and instructions
Find the device manual for free GTP34 Draper in PDF.


| Product Type | Petrol Brush Cutter/Line Trimmer |
| Model | GTP34 (Stock No. 30271) |
| Engine Type | 4-Stroke Air-Cooled |
| Engine Power Output | 0.9 kW |
| Engine Displacement | 35.8 cc |
| Max. Engine Speed (No Load) | 11,000 rpm |
| Fuel Tank Capacity | 650 ml |
| Fuel Type | E5 or E10 unleaded petrol (95 RON) |
| Oil Tank Capacity | 80 ml |
| Oil Grade | 4-Stroke SAE 10W-30 |
| Cutting Width (Line Trimmer) | 440 mm |
| Nylon Line Diameter | 2.4 mm |
| Nylon Line Length | 3 m |
| Blade Diameter (Brush Cutter) | 255 mm |
| Cutting Speed (Both Attachments) | 7,500 rpm |
| Sound Pressure Level | 93 dB(A) |
| Guaranteed Sound Power Level | 110 dB(A) |
| Vibration Level | 7.62 m/s² |
| Net Weight | 7.4 kg |
| Harness | Included with quick release |
| Spool Type | Tap'n'go |
| Maintenance | Clean air filter, check spark plug, change oil every 10 hours |
Frequently Asked Questions - GTP34 Draper
User questions about GTP34 Draper
0 question about this device. Answer the ones you know or ask your own.
Ask a new question about this device
Download the instructions for your Hedge Trimmer in PDF format for free! Find your manual GTP34 - Draper and take your electronic device back in hand. On this page are published all the documents necessary for the use of your device. GTP34 by Draper.
USER MANUAL GTP34 Draper
natural_image
Mechanical tool with a 4-unit head and lever, no visible text or symbols1. Preface
These are the original product instructions. Read the instruction manual in full and retain for future reference.
Please visit drapertools.com/manuals for the latest version of this manual and the associated parts list, if applicable.
1.1 Product Reference
User Manual for: Petrol Brush Cutter/Trimmer
Stock No: 30271
Part No: DTP04
1.2 Revisions
Version 1: November 2025
First release
As our manuals are continually updated, always ensure that the latest version is used.
Please visit drapertools.com/manuals for the latest version of this manual and the associated parts list, if applicable.
1.3 Understanding the Safety Content of This Manual

WARNING! – Situations or actions that may result in personal injury or death.

CAUTION! – Situations or actions that may result in damage to the product or surroundings.
Important: – Information or instructions of particular importance.
1.4 Copyright © Notice
Copyright © Draper Tools Limited.
Permission is granted to reproduce this manual for personal and educational use ONLY. Commercial copying, redistribution, hiring or lending is strictly prohibited.
No part of this manual may be stored in a retrieval system or transmitted in any other form or means without written permission from Draper Tools Limited.
In all cases, this copyright notice must remain intact.
1. Preface 2
1.1 Product Reference 2
1.2 Revisions 2
1.3 Understanding the Safety Content of This Manual 2
1.4 Copyright © Notice 2
2. Contents 3
3. Product Introduction 4-5
3.1 Intended Use 4
3.2 Specification 4
4. Health and Safety Information 5-6
4.1 General Health and Safety Precautions 5
4.2 Additional Health and Safety Instructions for Brush Cutter/Line Trimmer 6
4.3 Transportation, Handling and Storage 7
4.4 Health and Safety Information regarding use of Fuels 7
4.5 Residual Risk 7
5. Identification and Unpacking 8-9
5.1 Product Overview 8
5.2 What's in the Box? 8
5.3 Packaging 9
6. Assembly Instructions 10-13
6.1 Fitting the Handle 10
6.2 Fitting the Attachment Guard 10
6.3 Connecting and Removing the Attachment Shaft 10
6.4 Attaching the Harness 11
6.5 Fitting the Spool Assembly 11
6.6 Fitting the Blades 12
6.7 Fuelling the Brush Cutter/Trimmer 13
6.8 Checking and Topping up the Engine Oil 14
7. Operating the Brush Cutter/Line Trimmer 14
7.1 Starting and Stopping the Engine 14
7.2 Operating the Line Trimmer 15
7.3 Operating the Brush Cutter 16
8. Maintenance and Troubleshooting 17-23
8.1 General Maintenance 17
8.2 Cleaning the Air Filter 17
8.3 Spark Plug Maintenance 18
8.4 Engine Idle Speed Adjustment 19
8.5 Draining the Fuel 19
8.6 Cleaning the Fuel Filter 19
8.7 Changing the Engine Oil 19
8.8 Cutter Blade Care and Replacement 20
8.9 Removing the Complete Spool Assembly 20
8.10 Replacing the Spool Nylon Line 21
8.11 Troubleshooting 22
9. Spares, Returns and Disposal 24
10. Warranty 25
11. Explanation of Symbols 26
3.1 Intended Use
This hand-held petrol brush cutter and line trimmer is designed for cutting grass, weeds, bush and other similar undergrowth.
Any other application beyond the conditions established
for use will be considered misuse. Draper Tools accepts no responsibility for improper use of this product.
Read this manual in full before attempting to assemble, operate or maintain the product, and retain it for later use.
3.2 Specification
Stock No. 30271
Part No. DTP04
Engine:
Type: 4 Stroke air cooled
Power output: 0.9kW
Displacement/capacity: 35.8CC
Max. speed (no load): 11,000rpm
Tank capacity: 650ml
Petrol type: E5 or *E10 (95 RON)
Fuel consumption at max: 460g/hour
Oil
Tank capacity: 80ml
Oil grade: 4 stroke/SAE 10W-30
Noise emissions:
Sound pressure level: 93dB (A)
Uncertainty: 3dB (A)
Sound power level: 105.7dB (A)
Uncertainty (K): 3dB (A)
Guaranteed sound power level: 110dB (A)
Vibration level: 7.62m/s ^4
Uncertainty (K): 1.5m/s ^4
Grass trimmer attachment:
Cutting speed: 7,500rpm
Nylon line cutting width: 440mm
Nylon line diameter: 2.4mm
Nylon line length: 3M
Spool type: Tap'n'go
Brush cutter attachment:
Cutting speed: 7,500rpm
Blade diameter: 255mm
Blade thickness: 1.4mm
Net weight: 7.4kg
Important: The declared vibration total values and noise emissions values have been measured in accordance with a standard test method and may be used for comparing one tool with another. These values may also be used in a preliminary assessment of exposure.
*Draper Tools recommends using an additive or stabiliser with E10 petrol so the fuel can be safely stored in the fuel tank for longer.
4. Health and Safety Information

WARNING! The vibration and noise emissions during actual use of the product can differ from the declared values depending on the type of work and the area upon which it is used. Before each use, estimate the likely exposure resulting from the actual conditions of use. Take into account all parts of the operation cycle in order to identify any safety measures required to protect the operator.


WARNING! THIS BRUSH CUTTER/GRASS TRIMMER CAN CAUSE SERIOUS INJURIES. Read the instructions carefully for the correct handling, preparation, maintenance and starting/ stopping of the tool. Become familiar with all the controls and proper use of the cutter/trimmer.
Save all warnings and instructions for future reference.
4.1 General Health and Safety Precautions
- The tool must ONLY be used by competent persons who have received appropriate training.
• NEVER allow children to use this product. - Keep children, animals and bystanders away while operating this tool. Local regulations may restrict the age of the operator.
- Stay alert, watch what you are doing and use common sense when operating this product.
- DO NOT use this product while you are tired, or under the influence of drugs, alcohol or medication.
- Dress properly! DO NOT wear loose clothing or jewellery, which can be caught in moving parts.
- Prevent unintentional starting. ALWAYS ensure the engine is switched off before picking up or carrying the tool.
- DO NOT overreach and keep proper footing and balance at all times.
- Keep cutting tools clean and sharp.
-
Before every use, inspect the product and all accessories for broken, cracked and loose parts. Ensure that the safety features are present and functioning and that all visible nuts, bolts and screws remain tight. Vibrations during use can cause them to loosen over time.
-
DO NOT use this product if it is damaged in any way. Contact Draper Tools to discuss repair and replacement options.
- Clear the work area before each use. Remove all objects such as rocks, broken glass, nails, wire, or string which can be thrown or become entangled in the cutting line or blade.
- Keep all parts of your body away from the moving parts.
- NEVER operate this tool on the operator's left side.
- NEVER attempt to modify or operate a modified tool. Fully assemble and fit all relevant guards before operating the tool.
- DO NOT operate the tool without being completely familiar with the safety features and how to operate them.
- NEVER operate the tool if the stop switch is faulty or not functioning.
- NEVER operate this tool with defective or missing guards.

WARNING! Use of this product can pose a danger to wildlife. Before using this tool, check the area, particularly long grass and under bushes for signs of wildlife: if necessary relocate.
NOTE: Not all animals will be deterred by the noise of the product alone.
- Check the attachment is correctly fitted to the tool before attempting to start the engine.
- NEVER leave the tool running when not in use or leave it unattended during use.
- DO NOT allow familiarity or experience with this product to allow you to become complacent; always remain alert and adhere to the safety instructions listed in this manual.
Service
- Have the tool serviced ONLY by authorised and suitably qualified personnel, using only identical replacement parts.
4.2 Additional Health and Safety Instructions for Brush Cutter/Line Trimmers

WARNING! During operate the engine gets very hot. DO NOT touch it, especially the exhaust.
ALWAYS Stop the engine before:
- Cleaning or when clearing a blockage.
- Checking or carrying out any maintenance on the tool.
-
Adjusting the working position of the cutting device.
-
DO NOT operate the brush cutter/trimmer with a damaged or excessively worn cutting device.
- To reduce fire hazards, keep the engine free of debris, leaves and excessive lubricant.
- ALWAYS ensure that all handles and guards are fitted when using the tool.
• ALWAYS use two hands to operate the tool. - ALWAYS be aware of your surroundings and stay alert for possible hazards of which you might not be aware of due to the noise of the tool.
- ALWAYS wear appropriate PPE (Personal Protective Equipment). ALWAYS wear suitable eye/face protection. Use of sturdy gloves, non-skid footwear, safety helmet, ear protection and safety glasses are recommended to prevent personal injuries.
- If the cutting mechanism strikes any foreign object or the tool starts making any unusual noises or vibrations. Switch off the engine and allow the tool to stop. Disconnect the spark plug wire from the spark plug and take the following steps:
- Inspect for damage.
- Check for and tighten any loose parts.
- Replace or repair any damaged parts with equivalent specification parts.
Brush Cutter & Blade
- After the engine is switched off, keep the rotating blade in contact with the material being cut until it completely stops.
- DO NOT operate the brush cutter unless the brush cutter guard is firmly secured in place and in good condition.
- Use heavy gloves when operating the brush cutter and when installing or removing blades.
- DO NOT attempt to touch the blade when it is rotating. Maintain proper control until the blade has completely stopped rotating.
- Replace the blade if it has been damaged. ALWAYS ensure the blade is installed correctly and securely fastened before each use. Failure to do so can cause serious injury.
- Only use cutting blades recommended by Draper Tools and suitable for this brush cutter.
- The blade is suited for cutting thicker weeds or pulpy stalks only. NEVER use the blade to cut woody brush.
- Exercise extreme caution when using the cutter blade. If the spinning blade contacts anything it cannot cut, it may cause the blade to stop for an instant, and suddenly "thrust" the unit away from the object that was hit. This reaction can cause the operator to lose control of the unit. Blade thrust can occur without warning if the blade snags, stalls, or binds. This is more likely to occur in areas where it is difficult to see the material being cut. For cutting ease and safety, approach the material being cut from the right to the left.
• NEVER cut any material over 13mm diameter.
- Always wear the shoulder harness when using the brush cutter and adjust to a comfortable operating position.
- Maintain a firm grip on both handles while cutting with a blade. Keep the blade away from your body and below waist level.
Line Trimmer
- Replace line spool if cracked, chipped, or damaged in any way.
- Ensure the spool is properly installed and securely fastened. Failure to do so can cause serious injury.
- Keep the spool line below waist level.
- Only use cutting lines recommended by Draper Tools. DO NOT use any other cutting attachment.
- NEVER operate unit without the trimmer guard in place and in good condition.
- Maintain a firm grip on both handles while trimming.
4.3 Transportation, Handling and Storage
- Switch off the engine when you are crossing roads or gravel paths.
- ALWAYS clean and maintain before storing, pay special attention to the guards and cutting attachments.
- Before transporting the unit in a vehicle stop the engine and allow it to cool. Empty the fuel tank and securely locate the unit.
- When removing the tool from a vehicle or from storage, be careful not to drop the engine on the ground as this may severely damage the fuel tank.
- NEVER drag the tool across the ground, or throw it to the ground this is highly dangerous and will damage the fuel tank, causing the fuel to leak, possibly causing fire.
4.4 Health and Safety Information regarding use of Fuels

WARNING! During use, parts of this product become hot enough to ignite some materials.
- DO NOT touch the engine or exhaust during or immediately after use and allow it to cool before refuelling.
- NEVER remove the fuel cap while the engine is running or immediately after use.
- Take care when opening the fuel cap after use as hot vapour may be released from the opening.
- NEVER place objects on the engine while it is in use and keep all air vents clear of dust, dirt and other obstructions.
• Faulty exhausts must be replaced. - NEVER store the machine with fuel in the tank inside any structure where petrol fumes could reach an open flame or spark.
- To reduce the risk of fire, keep the engine, exhaust and petrol storage area free from vegetation and excessive grease.

WARNING! Petrol is highly flammable:
- Store fuel in containers specifically designed for this purpose.
- NEVER use this product in environments where there is a risk of explosion.
- NEVER smoke in the vicinity of the machine.
- Refuel outdoors only and do not smoke while refuelling.
- Add fuel before starting the engine; never remove the cap of the fuel tank or add petrol while the engine is running or when the engine is hot.
- NEVER start the engine if you can smell petrol vapour in the air.
- If petrol is spilled, do not attempt to start the engine but move the machine away from the area of spillage and avoid creating any source of ignition until petrol vapours have dissipated.
- Replace all fuel tank and container caps securely.

WARNING! Fuels are toxic, they contain substances that have an immediate toxic effect and may cause permanent damage to your health.
- DO NOT inhale fuel fumes.
- NEVER start the engine in a closed or poorly ventilated area.
Important: E10 petrol is hygroscopic and attracts moisture, which may damage the fuel system if stored in the product for more than four weeks. E10 petrol should be used within 30 days of purchase. It is recommended to use an additive or stabiliser with E10 petrol to extend the period that it can be safely stored in the fuel tank. ALWAYS read the label of any additive or stabiliser applied.
4.5 Residual Risk
The safety instructions in this manual cannot account for all possible conditions and situations that may occur. Exercise common sense and caution when using this product and protect against any additional conceivable risks.
5.1 Product Overview
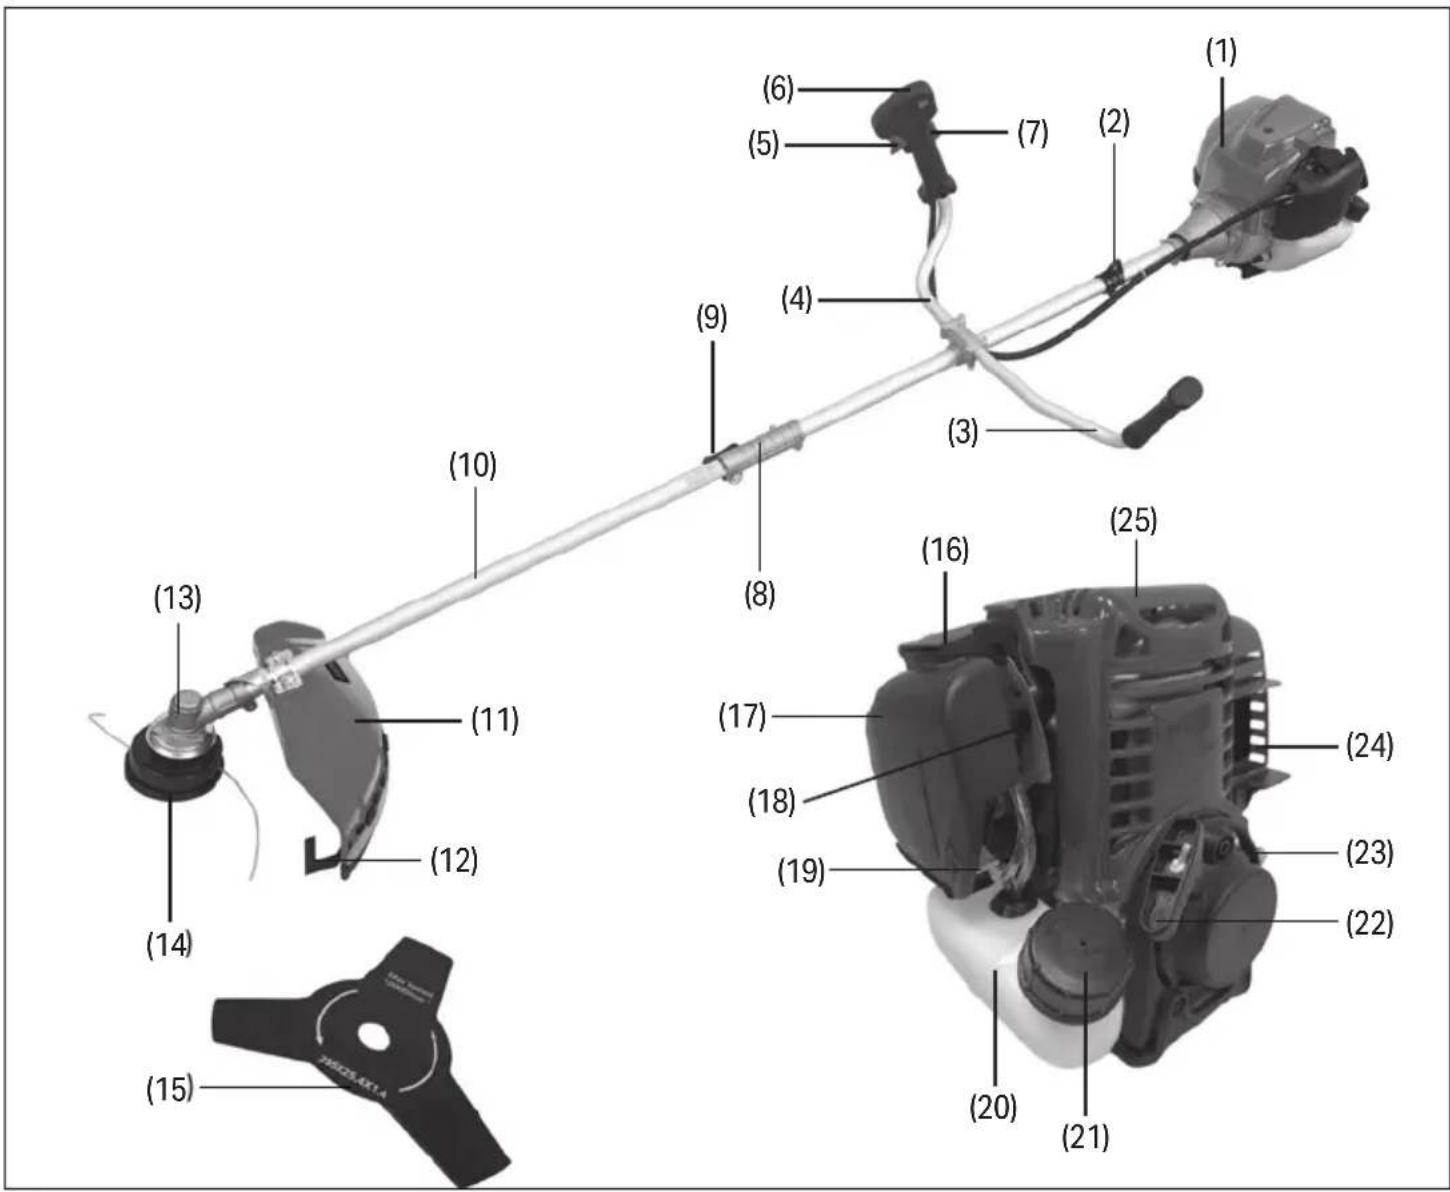
(1) Engine
(2) Harness hook
(3) Left handle
(4) Right handle with controls
(5) Throttle trigger
(6) ON/OFF switch
(7) Safety lever
(8) Split shaft connector
(9) Connector locking knob & nut
(10) Attachment shaft
(11) Attachment guard
(12) Cutting filament trimming blade
(13) Connector head
(14) Spool assembly
(15) Cutter blade
Engine
(16) Air filter lock.
(17) Air filter cover
(18) Choke lever
(19) Fuel primer (behind air filter)
(20) Fuel tank
(21) Fuel cap
(22) Recoil starter handle
(23) Oil filler cap
(24) Exhaust
(25) Spark plug cover (H.T lead) (inside top cover)
5.2 What's in the Box?
Carefully remove the product from the packaging and examine it for any signs of damage that may have occurred during shipment. Before assembling the product, lay the contents out and check them against the parts shown
below. If any part is damaged or missing, do not attempt to use the product. Please contact the Draper Helpline; contact details can be found at the back of this manual.
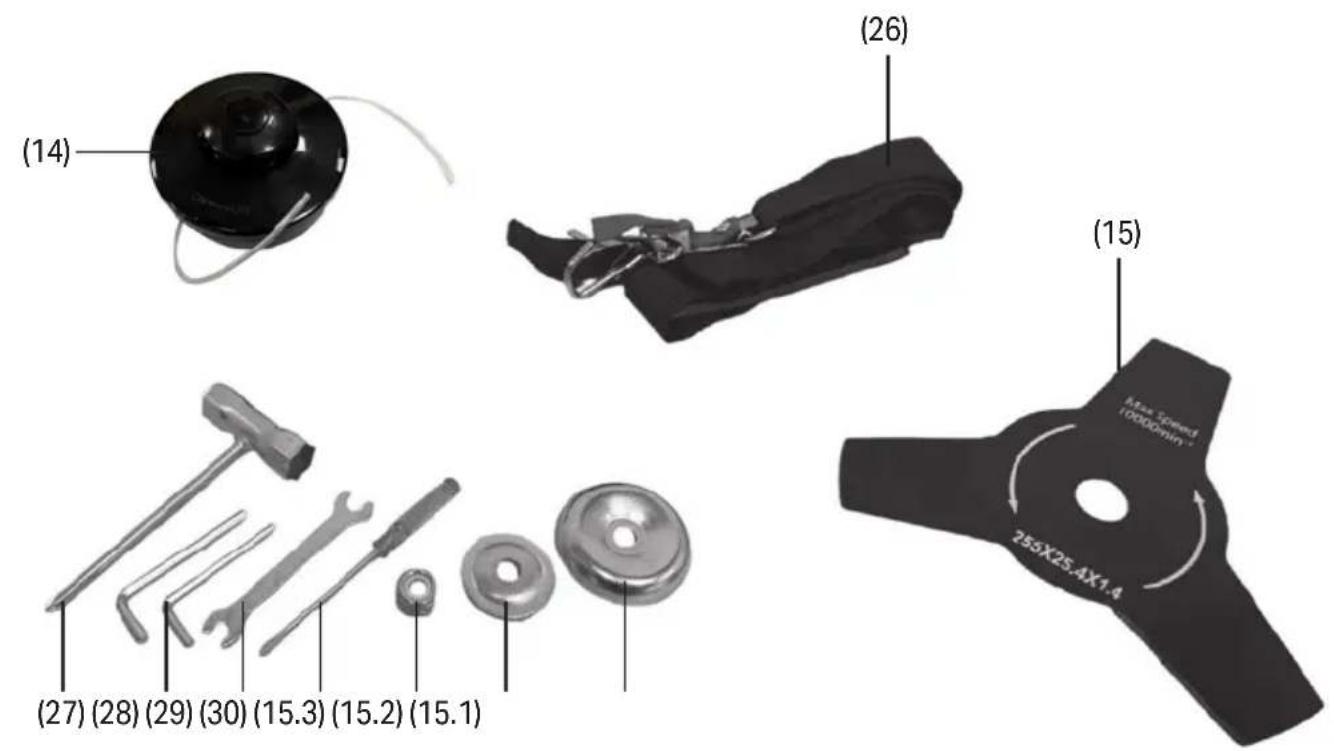
(14) Spool assembly
(15) Cutter blade
(15.1) Floating disc
(15.2) Washer
(15.3) Locknut
(26) Harness strap (with quick release)
(27) Spark plug spanner
(28) 2 X Hex keys (4mm & 5mm)
(29) Opened ended spanner (8 & 10mm)
(30) Flat head screwdriver
5.3 Packaging
Keep the product packaging for the duration of the warranty period in case the product needs to be returned for repair.

WARNING! Keep packaging materials out of reach of children. Dispose of packaging correctly and responsibly and in accordance with local regulations.
Please visit drapertools.com for our full range of accessories and consumables.
6. Assembly Instructions
Important: Before preparing or adjusting this product, read and understand all the safety instructions listed in this manual.
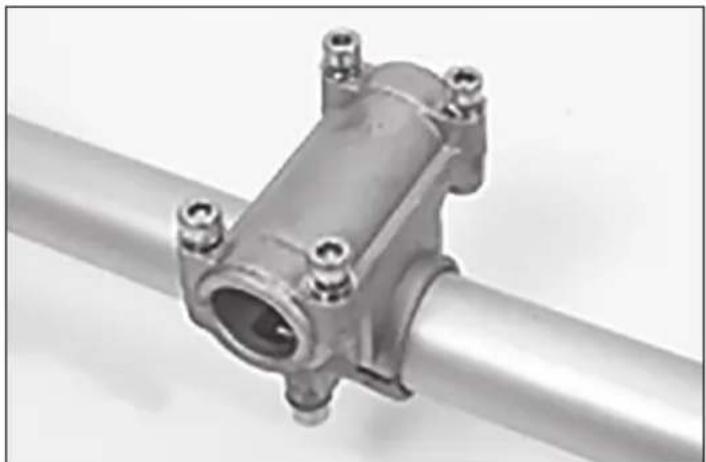
6.1 Fitting the Handle (Fig.1 - Fig.2)
natural_image
Metal pipe fitting with bolted joints and a central opening (no text or symbols visible)Fig.1
- Loosen the four bolts securing the top cover of the mounting bracket using the 4mm hex. key supplied.
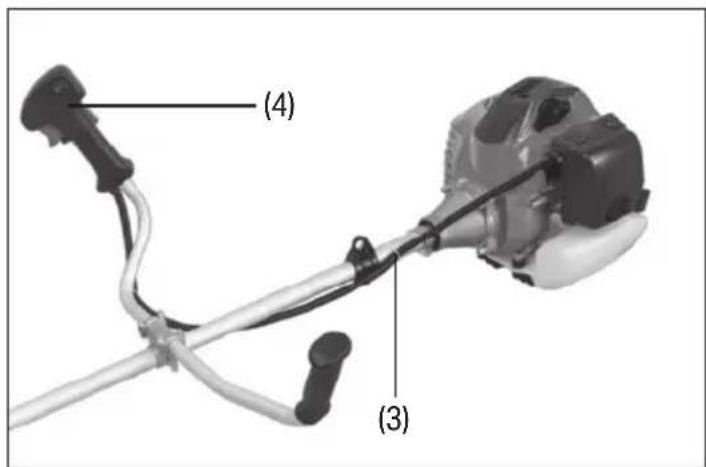
Fig.2
- Remove the top cover of the bracket and install the two handles. Ensure the handle with the controls (4) is positioned for use with your right hand.
6.2 Fitting the Attachment Guard (Fig.3)
The attachment guard (11) must be fitted correctly before using this tool.
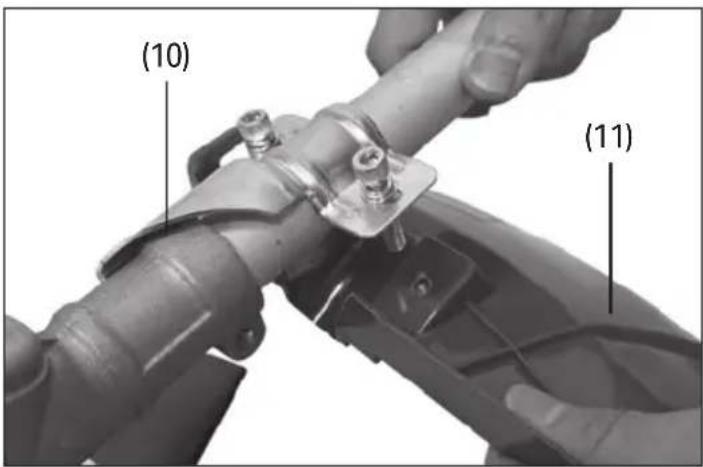
Fig.3
- Align the attachment guard (11) with the lower shaft (10).
- Attach the bracket to the guard with the hex bolts supplied, finger tighten.
- Use the 5mm hex key supplied and tighten the bolts.
6.3 Connecting and Removing the Attachment Shaft (Fig.4)
- Before starting the engine, the required attachment must be correctly fitted to the shaft connector (8).
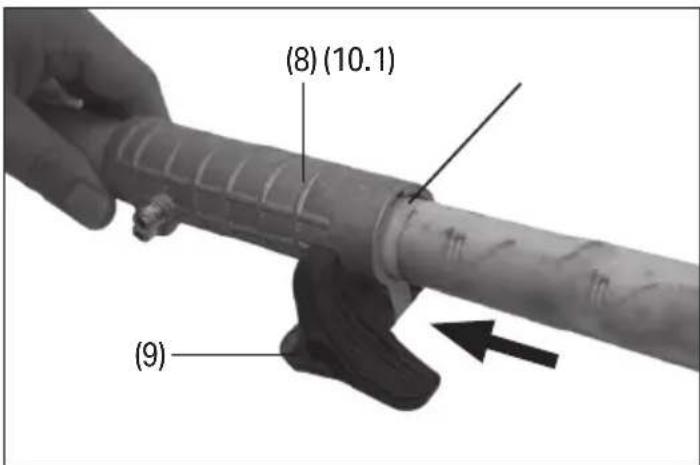
Fig.4
- Ensure the shaft locking knob (9) is loose by turning anticlockwise a few turns.
6. Assembly Instructions
- Align the pin on the lower shaft connector (10.1) with the groove in the top shaft connector (8). Insert the lower shaft until the pin sits in the notch.
- Tighten the handle locking knob (9) to secure in place.
To Disconnect the Attachment Shaft
To remove the attachment – loosen the handle locking knob (9) to separate the top and bottom shafts.
6.4 Attaching the Harness (Fig.5)
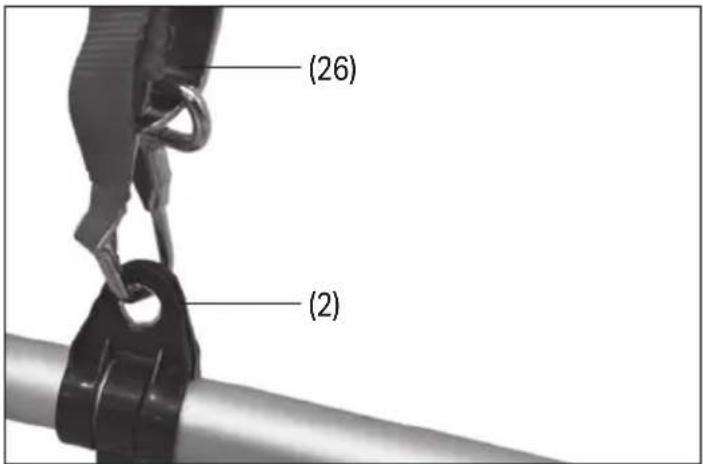
Fig.5
- Attach the Harness (26) latch to the hook (2) on the shaft.
- Adjust the shoulder strap/harness to a comfortable, balanced position where the blade or cutter attachment will suspend between 100 mm to 300 mm above the ground surface.
- To quickly release the product from the shoulder strap, operate the quick release tab.
6.5 Fitting the Spool Assembly (Fig.6 - Fig.7)
- Ensure the engine is switched off and separate the attachment shaft from the connector.
- Place the mounting disc (10.2) on the underside of the connector head.
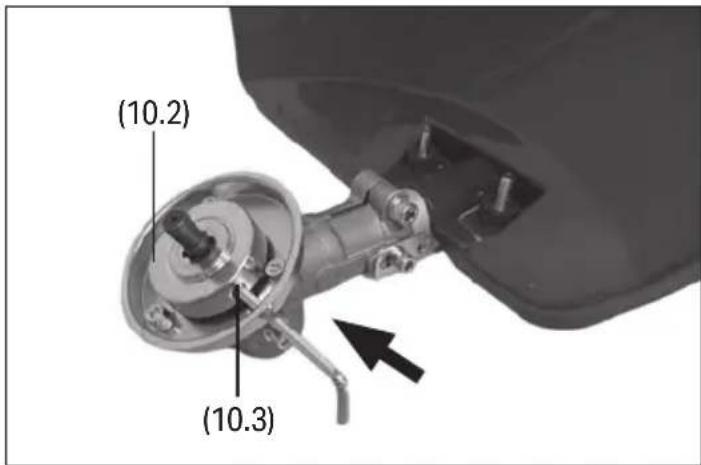
Fig.6
- Align the hole in the mounting disc (10.2) with the hole (10.3) in the side of the connector head (13) and insert the 4mm hex. key.
- Screw the spool assembly (14) directly onto the attachment shaft clockwise by hand.
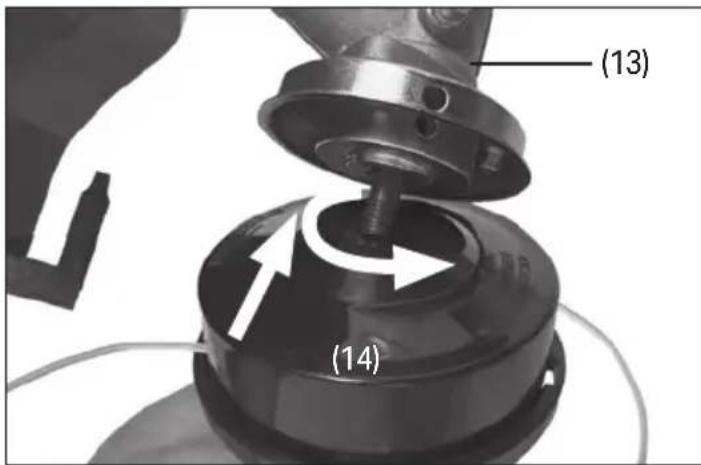
Fig.7
6.6 Fitting the Blades (Fig.8 - Fig.10)
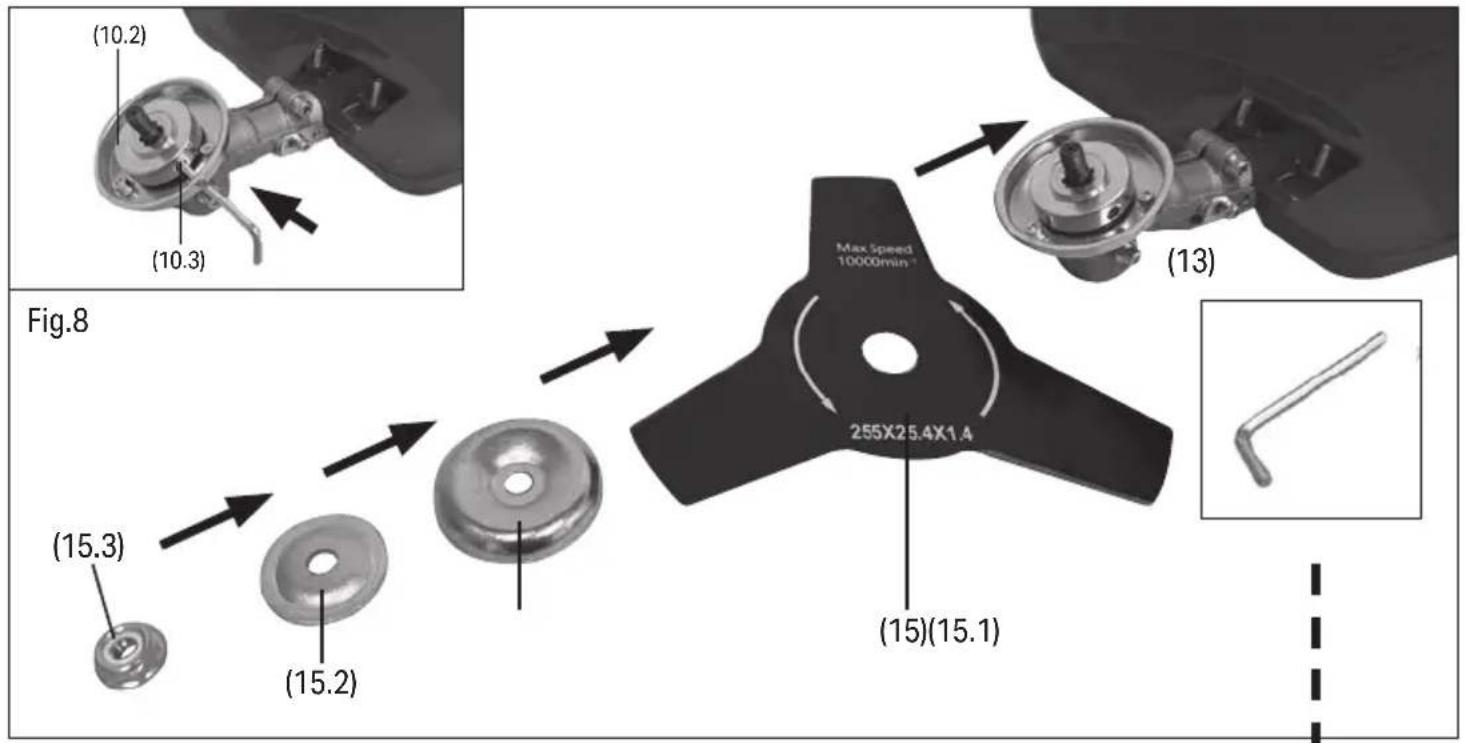
Fig.9

WARNING! To prevent injury, wear thick safety gloves and use the correct tools when fitting the blade.
- Switch off the engine and separate the attachment shaft from the connector and remove the spool assembly if fitted – see Section 8.9.
- Place the mounting disc (10.2) on the underside of the connector head (13).
- Align the hole in the mounting disc (10.2) with the hole (10.3) in the side of the connector head (13). Then insert the 4mm hex.key and hold in position.
- Position the blade (15) with text uppermost, washer (15.2), floating disc (15.3) and locking nut (15.3).
- Tighten the locknut by turning anticlockwise using the spark plug spanner (27) supplied.
- Once secure check the blade moves freely.
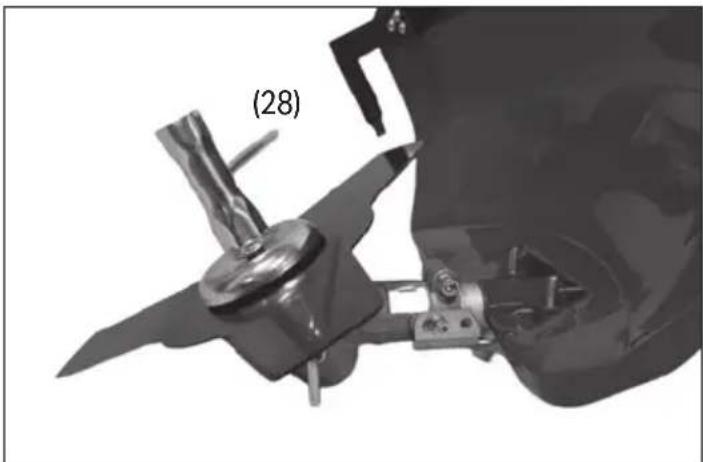
natural_image
Mechanical component with a labeled part (28) showing a pin and lever assembly (no readable text or symbols beyond label)Fig.10
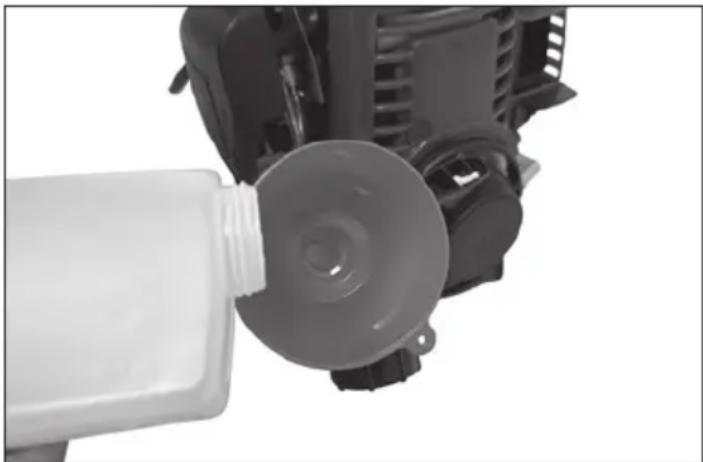
6.7 Fuelling the Brush Cutter/Trimmer (Fig.11)

CAUTION! This machine is shipped WITHOUT fuel. Check the fuel level before EVERY use and top up as appropriate. NEVER attempt to run the engine on an empty fuel tank.
Important: This product must be used with high-quality unleaded fuel ONLY. ALWAYS use automotive petrol suitable for four-stroke engines.
natural_image
Close-up of a mechanical component with a white plastic bottle inserted, showing internal components and a circular housing (no text or symbols visible)Fig.11
- This tool is compatible with E10 fuel. To maintain the fuel performance stated in this manual it is recommended that E5 unleaded fuel is used.
- Fuel quality degrades rapidly. Avoid storing the fuel and use as required. Using fuel that has degraded will cause starting/running problems.
- Ensure the tool is switched off and cooled down before adding fuel.
- Open the fuel cap (21) by turning it anticlockwise.
- Carefully fill the fuel tank (20) to the bottom of the filler neck – taking care not to overfill or spill any of the petrol. Keep a cloth to hand to clean away any residues or spilt fuel.
- Replace the fuel cap ensuring it is seated correctly before tightening. If the threads become crossed it will damage the tank and may result in fuel leaking out during use.
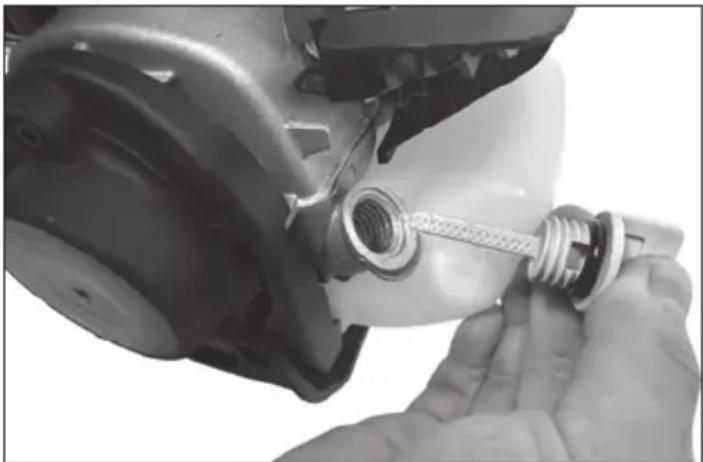
6.8 Checking and Topping up the Engine Oil
(Fig.12)

CAUTION! This machine is NOT supplied with engine oil. Check the engine oil level before every use or every 10 hours if operated continuously. Running the machine with a low oil level oil may cause serious damage to the engine.
- Ensure that the tool is switched off and has completely cooled, then place it on a stable and level surface.
natural_image
Close-up of a hand adjusting a white plastic component with a threaded bolt (no visible text or symbols)Fig.12
- Rotate the oil filler cap (23) anticlockwise to remove it from the reservoir and clean it.
- Insert the oil filler cap/dipstick back into the reservoir and remove it again. Important: DO NOT screw the filler cap into place when checking the oil level; insert the cap into the reservoir and remove it again.
- Inspect the oil level on the oil filler cap against the MIN and MAX level markings: If the oil is below the MIN level marking, top up with SAE 10W-30 until the MAX marking is reached.
- If the oil has become contaminated or discoloured, drain and replace the oil; see 8.7 Draining the Engine Oil.
7. Operating the Brush Cutter/Line Trimmer
Important: Before operating this product, read and understand all the safety instructions listed in this manual. Ensure that the product is fully assembled and correctly prepared for use.
7.1 Starting and Stopping the Engine
(Fig.13 - Fig.15)
- Check that the product is fuelled and required attachment is fitted correctly before starting the engine.
To Start the Engine
- Place the brush cutter/trimmer on a flat bare surface before starting.
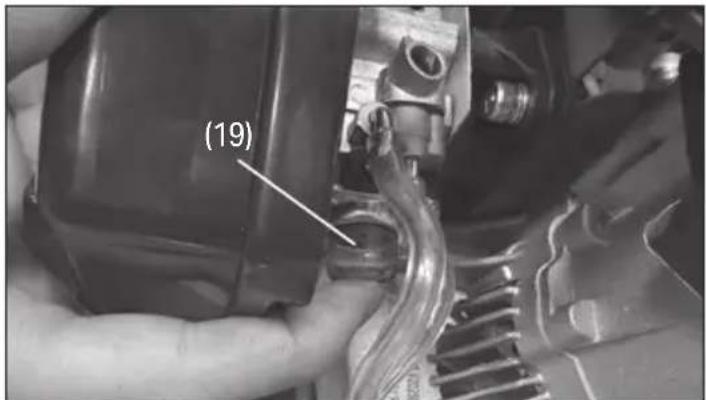
Fig.13
- Prime the engine with fuel by pressing the fuel primer (19) until fuel can be seen in the clear plastic return tube.
- Cold start - move the choke (18) upwards to the 'CLOSED/OFF' position.
- Warm Start – Move the choke (18) downwards to the 'OPEN/ON' position.

ATTENTION! Over priming will cause the engine to flood and stop the engine from starting.
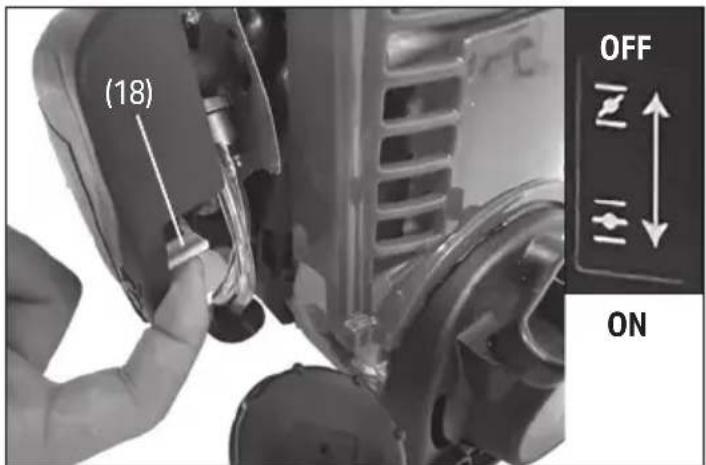
Fig.14
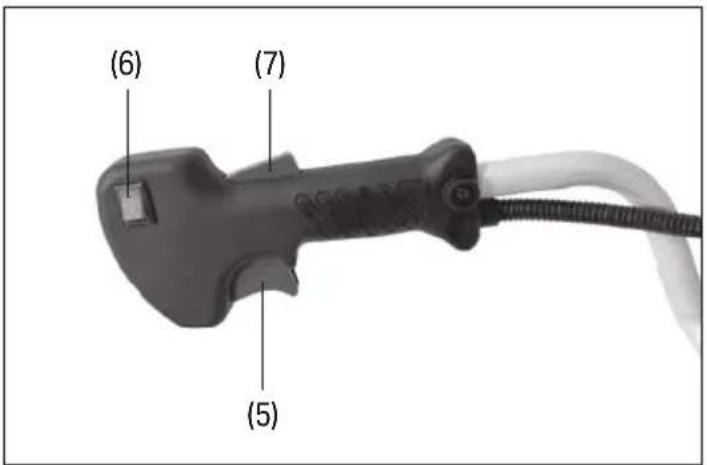
Fig.15
- Move the ON/OFF switch (6) to the 'ON (I)' position.
- Press the safety lever (7) and squeeze the throttle trigger (5) fully.
- Then pull the recoil starter handle (22) three to five times.
- Cold Start - pull the recoil starter no more than four times until the engine attempts to start. Then move the choke (18) down to the 'OPEN/ON' position. Then pull the recoil starter again no more than six times until the engine runs.
- If the engine does not start repeat the previous steps.
To Stop the Engine
- Release the throttle trigger and allow engine to return to idle before shutting off the engine.
- Move the 'ON/OFF' switch (6) to the 'OFF' (0) position.
- Wait for the cutter blade/spool line to stop before putting the cutter/trimmer down.
7. Operating the Brush Cutter/Line Trimmer
7.2 Operating the Line Trimmer
(Fig.16 - Fig.18)

WARNING! Use of this product can pose a danger to wildlife. Before using this tool, check the area, particularly long grass and under bushes for signs of wildlife: if necessary relocate.

WARNING! ALWAYS position the trimmer on the operator's right side and with the engine below waist height. The use of the machine on the operator's left side will expose the operator to hot surfaces and can result in possible burn injury.
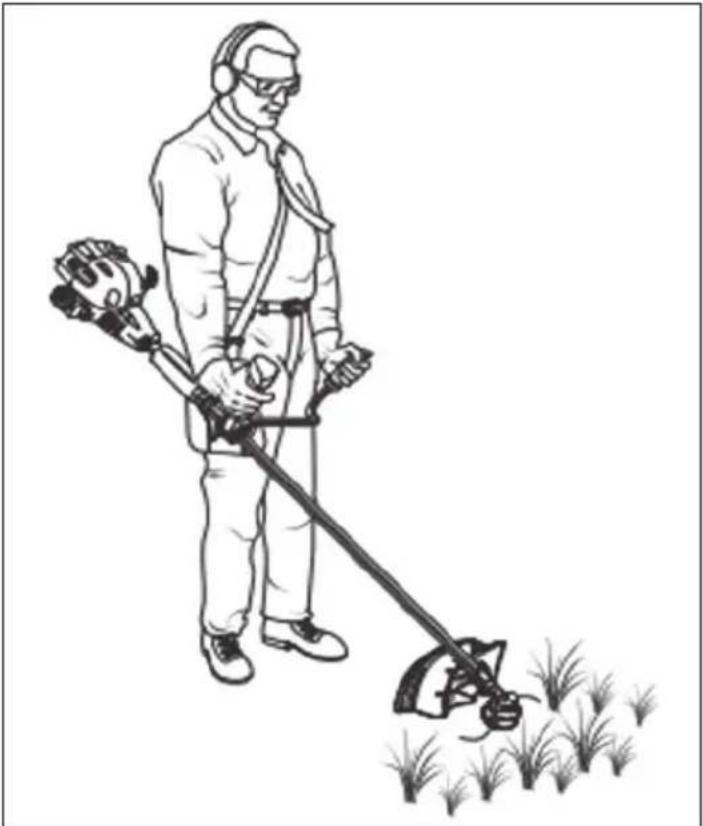
natural_image
Line drawing of a person using a metal detector to spread grass (no text or symbols)Fig.16
A. Straight shaft trimmer
B. Dangerous cutting area
C. Direction of rotation
D. Best cutting area
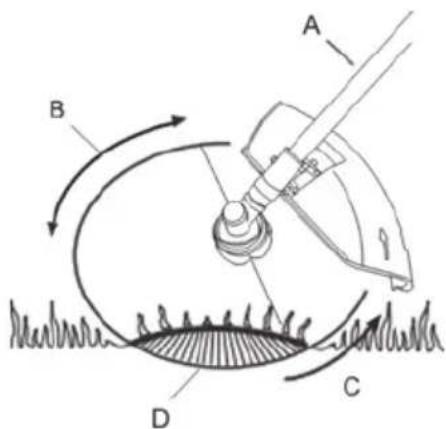
Fig.17
- This trimmer is only suitable for cutting grass. NEVER use for cutting any other hard plants.
- Important: To prolong the life of the nylon line avoid contact with trees, stones, walls, fences and other hard surfaces.
-
Keep a firm grip with both hands while in operation. Trimmer should be held at a comfortable position with the trigger handle about hip height.
-
Hold the trimmer with the right hand on the trigger handle and the left hand on the left handle.
- Begin cutting at full throttle, hovering the spool assembly just off the ground while making arc shaped sweeping actions through the vegetation.
- Keep the nylon line level with the ground to avoid scalping the ground surface.
- When the nylon line is running at speed take care to avoid plastic items such as garden furniture, flowerpots and other similar items to avoid damage.
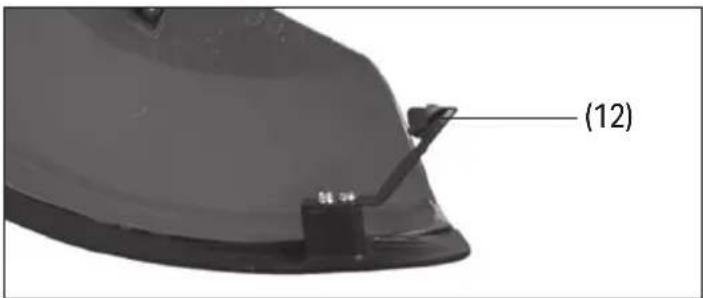
Fig.18
- When cutting vegetation, the cutting distance from the spool head will decrease when the line length is deteriorating. Before the line disappears inside the spool housing, strike the cutting head while it is running at speed onto a piece of suitable ground. This will release a set amount of line from the head. Any excess line is automatically trimmed as it strikes the trimming blade (12) on the underneath of the guard.
- If the line breaks and disappears inside the spool housing it will need to be rewound – refer to section 8.9 & 8.10.
7. Operating the Brush Cutter/Line Trimmer
7.3 Operating the Brush Cutter (Fig.19)

WARNING! Use of this product can pose a danger to wildlife. Before using this tool, check the area, particularly long grass and under bushes for signs of wildlife: if necessary relocate.

WARNING! ALWAYS position the cutter on the operator's right side and with the engine below waist height. The use of the machine on the operator's left side will expose the operator to hot surfaces and can result in possible burn injury.
- This cutter is only suitable for cutting coarse grass, pulpy weeds, brush and similar vegetation.
- DO NOT use on woody stems with a diameter greater than 2cm.
- DO NOT sharpen the blade. Replace if damaged or worn.
- Keep a firm grip with both hands while in operation. The cutter should be held at a comfortable position with the trigger handle about hip height.
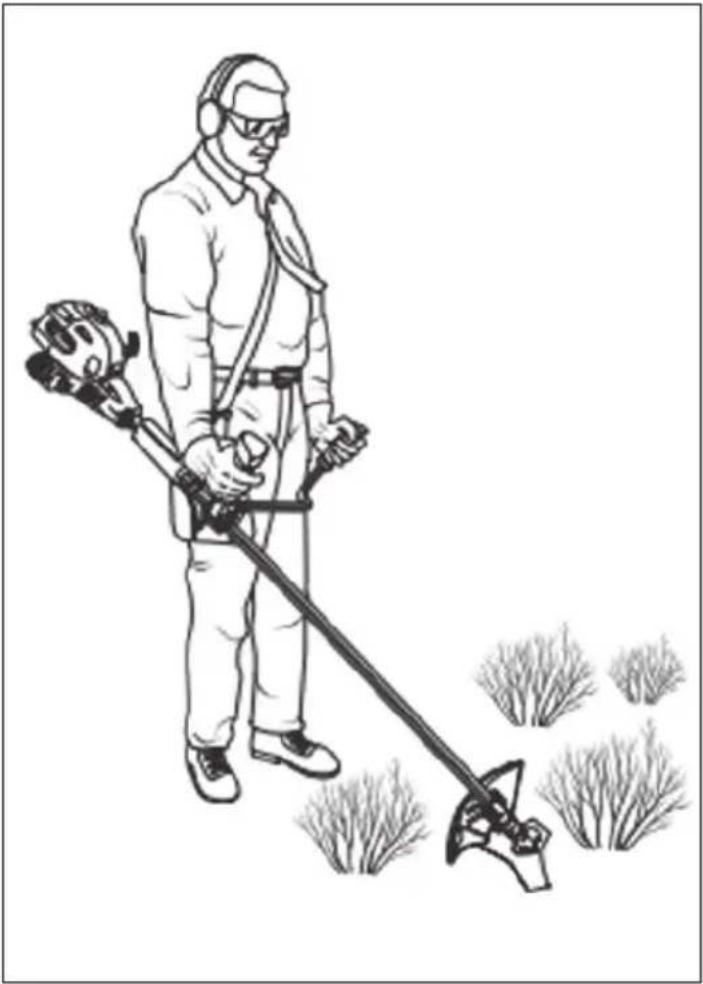
natural_image
Line drawing of a person using a long-handled tool to measure grass, no text or symbols presentFig.19
- Hold the brush cutter with a firm grip on both handles.
- Position yourself so that you will not be drawn off balance by the blade thrust or kick back reaction of the cutting blade. Maintain your grip and balance on both feet.
- Inspect and clear the area of any hidden objects such as glass, stones, concrete, fencing, wire, wood, metal, etc.
- NEVER use blades near footpaths, fencing, posts, buildings or other immovable objects.
- NEVER use a blade after hitting a hard object without first inspecting it for damage. DO NOT use if any damage is evident.
- Start cutting at full throttle.
- The cutter should be used as a scythe, cutting from right to left in a broad sweeping action from side to side.
Blade Thrust
- Blade thrust is a sudden and uncontrolled motion towards the operator that may occur when the rotating blade comes into contact with a solid object that it cannot cut such as a tree, rock or wall. This contact may cause the blade to stop for an instant, and suddenly "thrust" the tool away from the object that was hit. This reaction can be violent enough to cause the operator to lose control of the unit.
- Blade thrust can occur without warning if the blade snags, stalls, or binds. This is more likely to occur in areas where it is difficult to see the material being cut.
- For cutting ease and safety, approach from the right to the left. In the event an unexpected object or woody stock is encountered, this could minimize the blade thrust reaction.
8. Maintenance and Troubleshooting
Important: Maintenance and repairs should be carried out ONLY by authorised and suitably qualified personnel.

WARNING! ALWAYS turn off the engine, allow it to cool and disconnect the spark plug before maintaining or storing this product. If the engine must be run for testing, ensure that this is carried out in a well-ventilated environment that allows carbon monoxide from the exhaust to dissipate quickly.
8.1 General Maintenance
• Regularly inspect the conditions of the product:
- Check all nuts, screws and bolts are correctly tightened for safe operation.
- Check for damaged, loose or missing parts.
- Check condition of attachments. Clean after every use – wipe over with a damp cloth.
Important: DO NOT use solvents as this may damage any plastic or uninsulated parts.
- Use ONLY spare parts recommended by Draper Tools.
- Store the tool in a dry and dust-free environment, out of reach of children.
- Store the tool at temperature between 0–45°C.
- DO NOT store near flammable materials.
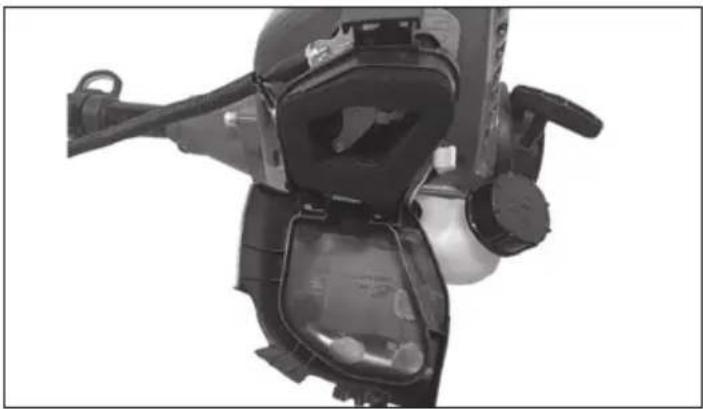
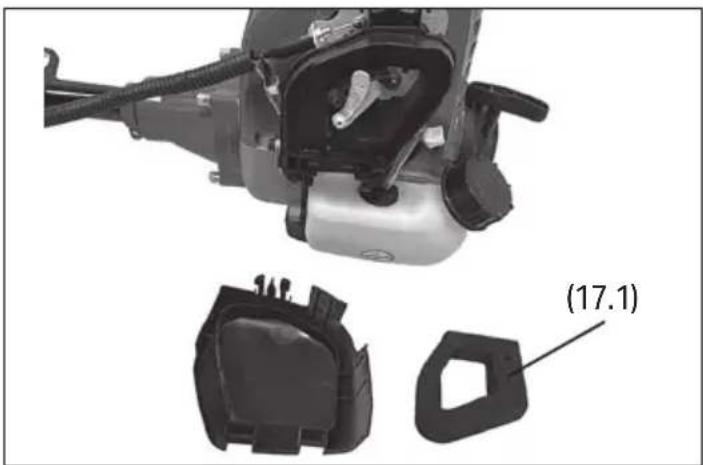
8.2 Cleaning the Air Filter (Fig.20 - Fig.22)
- A dirty clogged air filter will restrict the air flow and cause the engine to run rough. It will also increase fuel consumption and may result in starting issues.
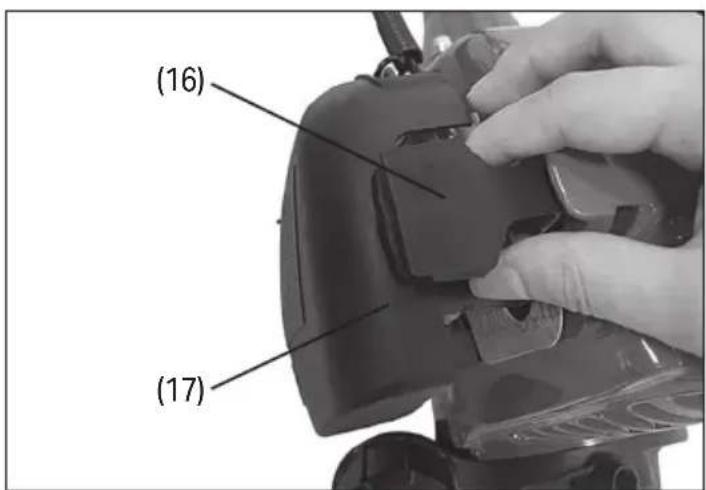
Fig.20
natural_image
Close-up of a mechanical device with visible components and wiring (no text or symbols)Fig.21
natural_image
Close-up of a mechanical component with two labeled parts (17.1) shown in separate views, no readable text or symbols present.Fig.22

ATTENTION! ALWAYS stop the engine before removing the air filter.
- Press the air cover lock (16) to release the air filter cover (17).
- To remove the cover - lift away the bottom first, then lift free from the tab at the top.
- Remove and wash the foam filter (17.1) in warm soapy water, rinse and allow to dry thoroughly.
- DO NOT use solvents.
- Ensure the filter is 100% dry before refitting.
- Dip the filter in clean engine oil and squeeze out any excess oil.
Note: the engine will smoke when start if too much oil left in foam filter. - Check the filter is seated correctly. Then refit the filter cover securely.
- Replace the filter if it appears worn or damaged.
8. Maintenance and Troubleshooting
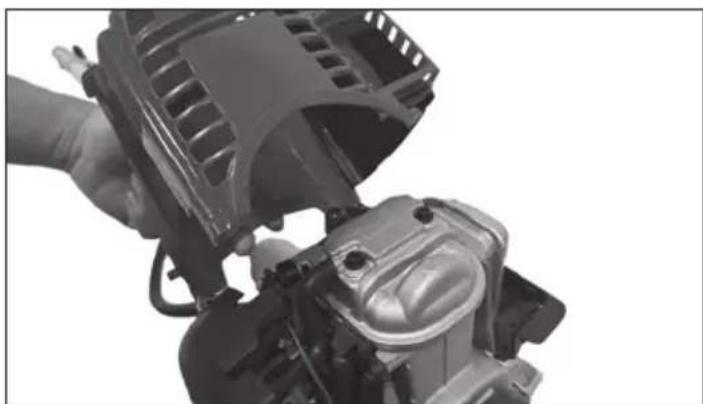
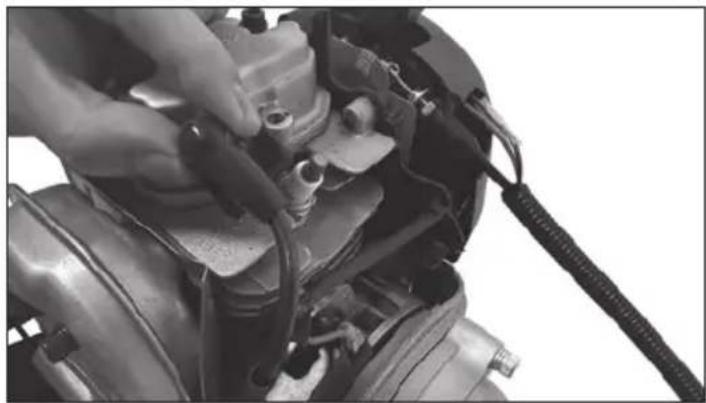
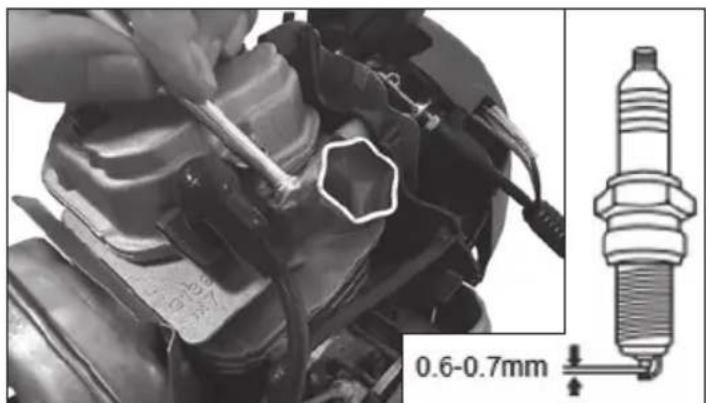
8.3 Spark Plug Maintenance (Fig.23 - Fig.26)
- Over time the spark plug can become contaminated. This can adversely affect the running condition of parts such as the throttle over a prolonged period of time or too much oil in the fuel mix. This contamination can cause the engine to run rough, reduce the fuel consumption and create starting issues.

CAUTION! Risk if injury from moving parts or burns from exhaust.
- DO NOT operate the engine when the top is removed.
- DO NOT pull the recoil stater when the top cover is removed.
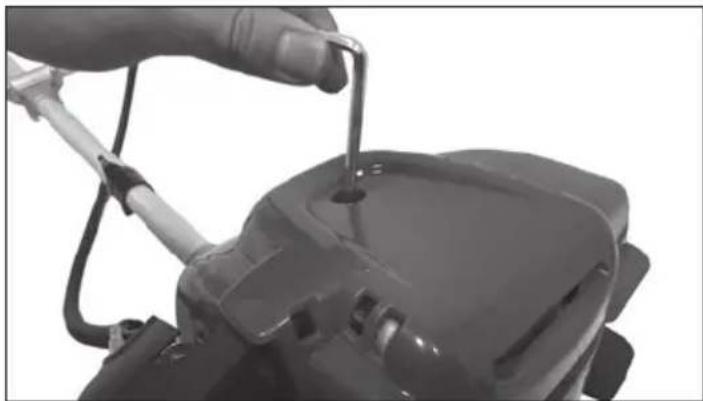
natural_image
Close-up of a hand holding a tool interacting with a mechanical device (no visible text or symbols)Fig.23
- Remove the top cover by unscrewing the bolt on the top using the 4mm hex key supplied.
natural_image
Close-up of a hand operating a mechanical component with no visible text or symbolsFig.24
natural_image
Close-up of hands adjusting a mechanical component with wiring (no visible text or symbols)Fig.25
- Remove the lead cover (25) from the back of the spark plug. To avoid damaging the H.T lead do not use any tools.
natural_image
Close-up of a mechanical component with a 0.6-0.7mm specification detail (no readable text or symbols)Fig.26
- Use the spark plug spanner supplied (28) to remove the spark plug (25.1) by turning anticlockwise.
- Clean the spark plug and check the electrode gap (maintain a gap of 0.6 - 0.7mm).

ATTENTION! The spark plug should be replaced annually during a service or after 60 hours of use. Replace with the same or an alternative compatible resistor type spark plug with the same heat range.
- Ensure the spark plug thread is correctly seated before screwing it clockwise to fit.
- Tighten the spark plug with the spanner supplied before replacing the H.T lead cover.
- The H.T lead cap rubber surround should be tucked inside the plastic housing to ensure a good connection with the spark plug.
- Reconnect the lead cover and secure the top cover.
8.4 Engine Idle Speed Adjustment (Fig.27)
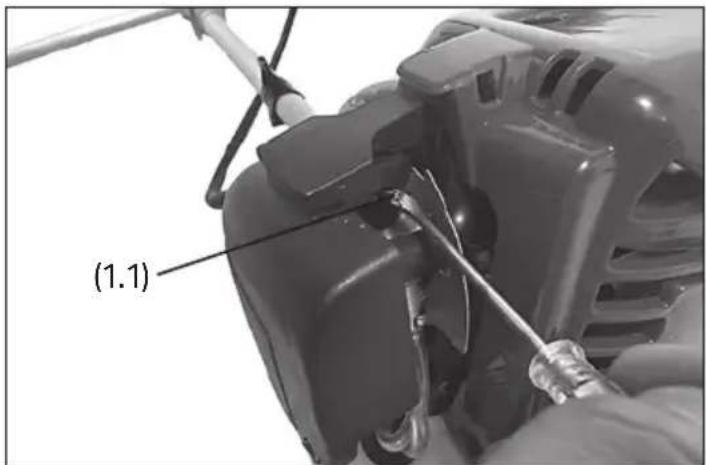
Fig.27
- The attachments must not operate/rotate with the engine running at idle. Adjust as necessary.
- Run the engine until warm.
- If the blade rotates at idling speed, the idle speed is too high. Turn the adjustment screw (1.1) anticlockwise to decrease the idle speed.
- If the engine vibrates too much, the idle speed is too low.. Turn the adjustment screw (1.1) clockwise to increase the idle speed.
8.5 Draining the Fuel
Important: Read all the Health and Safety guidance for the use of fuel before filling or draining this product.
- Ensure that the 'ON/OFF' switch (6) is in the 'OFF' position and the spark plug cover (25) is disconnected.
- Remove the fuel tank cap (21) slowly and tip the engine unit backwards to allow the fuel to drain into a suitable container.

WARNING! If the tool has been recently used, hot steam may vent from the fuel tank outlet. Take care when removing the fuel cap.
- Refit the fuel tank cap securely and wipe up any spillages. Then reconnect the spark plug cover.
8.6 Cleaning the Fuel Filter (Fig.28)
- To ensure the fuel supply remains clean the fuel filter must be checked and cleaned regularly. The fuel filter is attached to the pick-up tube inside the fuel tank.
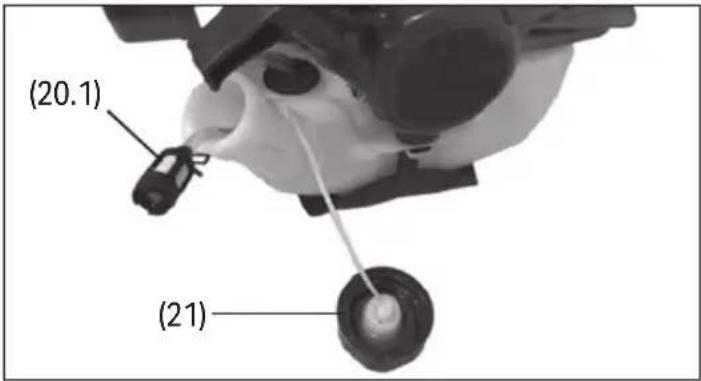
Fig.28
- Remove the fuel tank cap (21) from the fuel tank.
- Drain the fuel tank (20) completely.
- Tilt the engine so that the fuel tank opening is at the lowest point. Then shake the tank to allow the fuel filter (20.1) to be reached.
- Gently pull the filter clear of the tank.
- Hold the pick-up line, then squeeze the hose clip and move it away from the filter.
- While holding the fuel line, pull the clogged filter off and insert a clean filter.
- Reposition the hose clip so that it grips the fuel line onto the filter.
- Push the filter back into the tank.
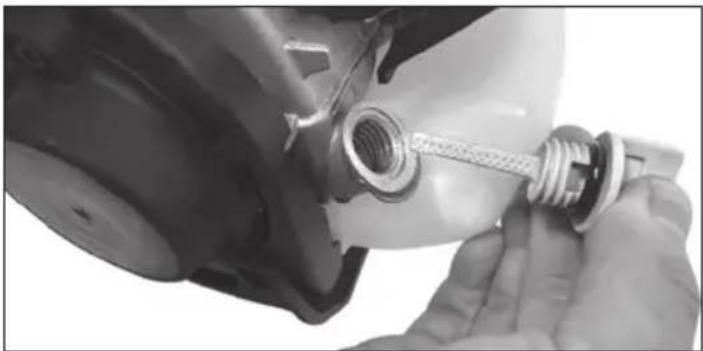
8.7 Changing the Engine Oil (Fig.29)
- Change the oil when the engine is warm as the oil will drain quicker.
- Drain the oil every 10 hours of operation for improved performance and engine life.
natural_image
Close-up of hands adjusting a mechanical component with a threaded bolt (no visible text or symbols)Fig.29
8. Maintenance and Troubleshooting
- Ensure that the tool is switched off and has completely cooled, then place it on a stable and level surface.
- Check that the fuel cap (21) is securely fitted.
- Place a suitable container below the engine to catch the used oil.
- Remove the oil filler cap/dipstick (23) and drain the oil into the container by tipping the engine toward the oil filler neck.
- Top the oil and replace the oil filler cap – see Section 6.8.
Important: ALWAYS dispose of waste oil responsibly and in accordance with local regulations.
8.8 Cutter Blade Care and Replacement
(Fig.30)
- After use clean the cutting blade (15) thoroughly and remove any debris or moisture.
- Brush the blades to remove any debris.
- Spray the blade with a moisture dispersant lubricating oil.
- Regularly check for wear or damage and replace as necessary. DO NOT sharpen.
To replace the blade
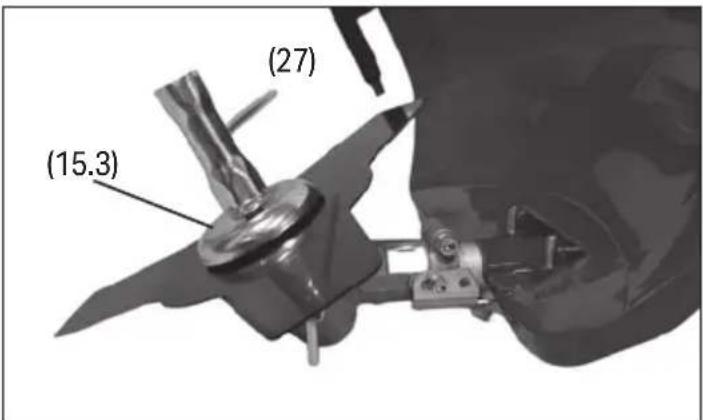
Fig.30

WARNING! To prevent injury, wear thick safety gloves and use the correct tools when fitting the blade.
- Switch off the engine and separate the attachment shaft from the connector before changing the blade.
-
Align the hole in the mounting disc (10.2) with the hole (10.3) in the side of the connector head (13). Then insert the 4mm hex.key and hold in position.
-
Unlock the locking nut (15.3) using the spark plug spanner (28). Turn clockwise to loosen.
- Remove the floating disc (15.1), washer (15.2) and then the blade.
- Fit the new blade - refer to section 6.6 fitting the cutter blade.
8.9 Removing the Complete Spool Assembly (Fig.31)
- The spool requires regular maintenance including refilling or replacing the spool.
To remove the spool from the trimmer shaft
- Ensure the engine is switched off and separate the attachment shaft from the connector.
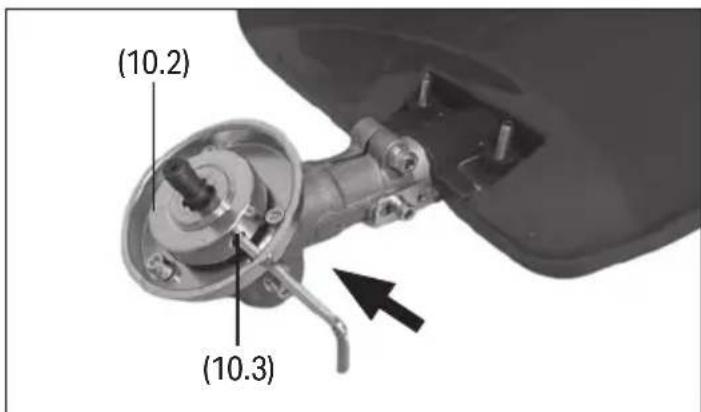
Fig.31
- Align the hole in the mounting disc (10.2) with the hole (10.3) in the side of the connector head (13). Then insert the 4mm hex key and hold in position.
- Then unscrew the spool (14) from the shaft by turning clockwise by hand.
- To refit the spool assembly – see Section 6.5.
8.10 Replacing the Spool Nylon Line
(Fig.32 - Fig.34)
Line replacement required 2.4mm diameter X 3 metres.
- Remove the spool assembly from the shaft before replacing the nylon line.
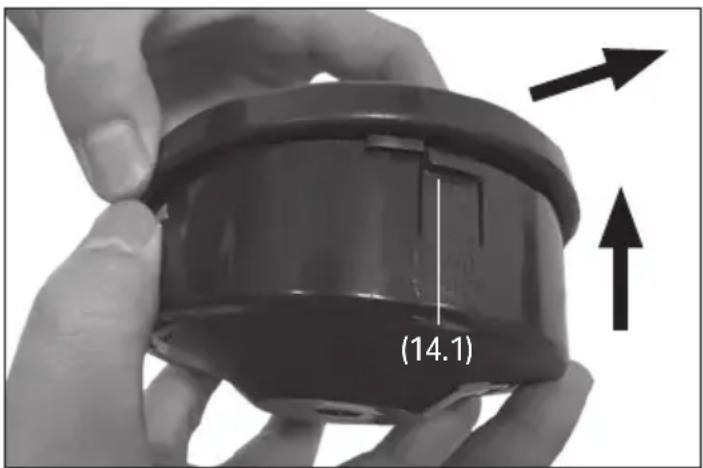
Fig.32
- Hold the spool assembly and squeeze the tab (14.1) on the side of the spool housing and twist anticlockwise (direction of rotation is on the cover) to release the spool cover.
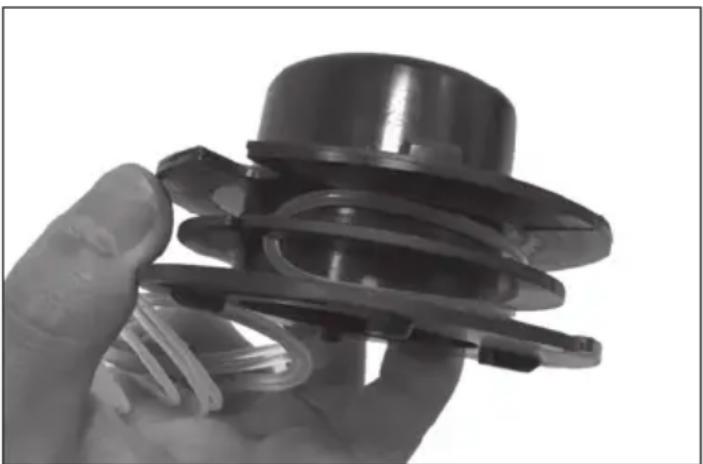
- Remove the empty spool insert from the assembly.
- Underneath the spool insert there is a large spring and a washer, take care when lifting out the insert they do not spring out.
natural_image
Close-up of a hand holding a mechanical component with coiled spring and plastic wrap (no visible text or symbols)Fig.32
-
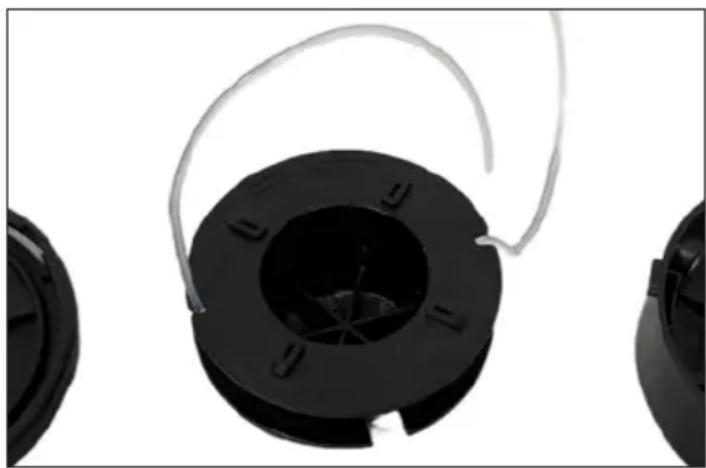
To install the new spool line – find the middle of the replacement line and hook into the insert point.
-
Wind the line neatly in both channels in the indicated direction.
natural_image
Close-up of three black plastic components with a coiled cable or wire, no visible text or symbolsFig.33
- When both the lines are wound evenly, Hook the end through the insert notches to hold them in place.
- Leave a short piece of nylon to feed out through the spool housing.
- Feed the line ends out evenly through the spool housing.
- Lower the spool insert down over the washer and spring while pulling the line end tight.
- When everything is lined up push down on the insert and at the same time pull the line end free from the insert. Check that the line does not become trapped.
- Press down firmly on the insert and then replace the spool cover and clip it back down.
8.11 Troubleshooting
Problem Possible Cause Remedy
| Engine will not start. | ON/OFF switch in 'OFF' position. | Move switch to 'ON' position. |
| Insufficient or no fuel. Refill with a fresh batch of fuel/oil mix. Refer to Section 6.7. | ||
| Old/stagnant fuel. Drain fuel and refill with fresh mix.Refer to Section 6.7. | ||
| Spark plug electrode fouled or gap set incorrectly. | Remove and service/replace spark plug. Refer to Section 8.3. | |
| Spark plug H.T lead not correctly connected | Check H.T lead is pushed on firmly. | |
| Choke set incorrectly for the starting conditions. | Adjust choke. Refer to Section 7.1. | |
| Air filter clogged. Clean/replace air filter. Refer to Section 8.2. | ||
| Engine flooded with fuel/over primed. | Remove spark plug and dry the electrode of fuel. Slowly pull the starter handle 10-15 times without the spark plug fitted.Wait a moment before refitting the spark plug and trying again. | |
| Fuel filter clogged. Clean fuel filter. Refer to Section 8.6. | ||
| Other issues. Contact Draper Tools for advice. | ||
| Engine runs 'rough.' Choke set incorrectly. Adjust choke. Refer to Section 7.1. | ||
| Heavy blue smoke from exhaust. | Incorrect fuel. | Drain fuel tank and add fresh batch of fuel. Refer to Section 6.7. |
8. Maintenance and Troubleshooting
Problem Possible Cause Remedy
| Line Trimmer Attachment | ||
| Line will not advance when using the line tap system. | Line is welded together. Lubricate line with silicone spray. | |
| Insufficient line on spool. Fit new spool line – see Section 8.9 & 8.10. | ||
| Line is too short Remove spool from trimmer and release more line – see Section 7.2. | ||
| Grass wrapping round shaft housing or spool. | Cutting tall grass. Cut tall grass from the top down to prevent wrapping. | |
| Brush Cutter Attachment | ||
| Poor cutting performance. Blade clogged. Stop engine. Clean and lubricate blade assembly | ||
| Blade blunt. Replace blade – see Section 6.6 | ||
| Unusual noise from cutting head. | Insufficient grease in gearbox. | Stop engine. Add grease – contact Draper Tools for advice. |
9. Spares, Returns and Disposal
For spare parts, servicing, and repair and replacement options, please contact the Draper Tools Product Helpline for details of your nearest authorised agent.
Draper Tools will endeavour to hold any spare parts, if applicable, for seven years from the date that it sells the final matching stock item.
Any servicing or repairs carried out by unauthorised personnel or installation of spare parts not supplied by Draper Tools will invalidate your warranty.
Important: For safety, ALWAYS drain and clean the product of any oil, fuel, chemicals or other substances before returning it to Draper Tools or its authorised agent. Store these materials in suitable containers and dispose of them in accordance with local regulations. Draper Tools and its agents cannot be responsible for the disposal of these substances.
At the end of its working life, dispose of the product responsibly and in line with local regulations. Recycle where possible.
- DO NOT Dispose of fuel and oil separately and in accordance with local regulations; DO NOT abandon it in the environment.

This warranty covers parts and labour for 12 months from date of purchase – visit drapertools.com/warranty for more information.. However, if the tools are hired out, the warranty period is 90 days from the date of purchase.
Should the tool develop a fault within the warranty period, return the complete tool to the place of purchase or contact Draper Tools directly. Proof of purchase must be provided.
This warranty does not apply to any consumable parts {, batteries} or normal wear and tear.
It also does not cover any damage caused by misuse, careless or unsafe handling, modifications, or repairs carried out by any personnel other than an authorised Draper Tools repair agent.
Please note that this guarantee is in addition to and does not affect your statutory rights.
Draper Tools

Read the instruction manual
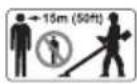
During use, keep a minimum distance of 15m between the machine and third parties.

Wear ear defenders and safety glasses

Attention! Beware of flying debris.

Wear suitable protective footwear.

Protect feet from risk of injury

Do not abandon in the environment

Warning! Machine is still running on idle.

Keep out of the reach of children

Warning!

Mandatory!

Do not incinerate or throw onto fire
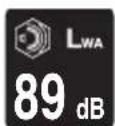
Continuous A-weighted sound power level

European conformity

UK Conformity Assessed
Contact Details
Draper Tools
Draper Tools Limited
Hursley Road
Chandler's Ford
Eastleigh
Hampshire
S053 1YF
UK
Website: drapertools.com
Email: sales@drapertools.com
Product Helpline: +44 (0) 23 8049 4344
Telephone Sales Desk: +44 (0) 23 8049 4333
General Enquiries: +44 (0) 23 8026 6355
Draper Tools Europe B.V.
Oude Graaf 8
6002 NL
Weert
Netherlands
Please contact the Draper Tools Product Helpline for repair and servicing enquiries.
- Preface
- Product Reference
- Revisions
- Understanding the Safety Content of This Manual
- Copyright © Notice
- Preface 2
- Contents 3
- Product Introduction 4-5
- Health and Safety Information 5-6
- Identification and Unpacking 8-9
- Assembly Instructions 10-13
- Operating the Brush Cutter/Line Trimmer 14
- Maintenance and Troubleshooting 17-23
- Spares, Returns and Disposal 24
- Warranty 25
- Explanation of Symbols 26
- Intended Use
- Specification
- Health and Safety Information
- General Health and Safety Precautions
- Service
- Additional Health and Safety Instructions for Brush Cutter/Line Trimmers
- ALWAYS Stop the engine before:
- Brush Cutter & Blade
- Line Trimmer
- Transportation, Handling and Storage
- Health and Safety Information regarding use of Fuels
- WARNING! During use, parts of this product become hot enough to ignite some materials.
- WARNING! Petrol is highly flammable:
- WARNING! Fuels are toxic, they contain substances that have an immediate toxic effect and may cause permanent damage to your health.
- Residual Risk
- Product Overview
- Engine
- What's in the Box?
- Packaging
- Assembly Instructions
- Fitting the Attachment Guard (Fig.3)
- Connecting and Removing the Attachment Shaft (Fig.4)
- To Disconnect the Attachment Shaft
- Attaching the Harness (Fig.5)
- Fitting the Spool Assembly (Fig.6 - Fig.7)
- Fitting the Blades (Fig.8 - Fig.10)
- Fuelling the Brush Cutter/Trimmer (Fig.11)
- Checking and Topping up the Engine Oil
- Operating the Brush Cutter/Line Trimmer
- Starting and Stopping the Engine
- To Start the Engine
- To Stop the Engine
- Operating the Line Trimmer
- Operating the Brush Cutter (Fig.19)
- Blade Thrust
- Maintenance and Troubleshooting
- General Maintenance
- Cleaning the Air Filter (Fig.20 - Fig.22)
- ATTENTION! ALWAYS stop the engine before removing the air filter.
- Spark Plug Maintenance (Fig.23 - Fig.26)
- CAUTION! Risk if injury from moving parts or burns from exhaust.
- ATTENTION! The spark plug should be replaced annually during a service or after 60 hours of use. Replace with the same or an alternative compatible resistor type spark plug with the same heat range.
- Engine Idle Speed Adjustment (Fig.27)
- Draining the Fuel
- Cleaning the Fuel Filter (Fig.28)
- Changing the Engine Oil (Fig.29)
- Cutter Blade Care and Replacement
- (Fig.30)
- WARNING! To prevent injury, wear thick safety gloves and use the correct tools when fitting the blade.
- Removing the Complete Spool Assembly (Fig.31)
- To remove the spool from the trimmer shaft
- Replacing the Spool Nylon Line
- Line replacement required 2.4mm diameter X 3 metres.
- Troubleshooting
- Spares, Returns and Disposal
- Contact Details
- Draper Tools
- Draper Tools Europe B.V.
Brand : Draper
Model : GTP34
Category : Hedge Trimmer