Sines - Audio software Cherry Audio - Free user manual and instructions
Find the device manual for free Sines Cherry Audio in PDF.


| Brand | Cherry Audio |
| Model | Sines |
| Product Type | Audio software (virtual synthesizer) |
| Category | Software synthesizer |
| Synthesis Type | Additive, subtractive, phase modulation (FM-style) |
| Oscillators | 4 main oscillators, each with sub and super oscillator (12 sine sources total) |
| Waveshaping Controls | Feedback, Phase, Width, Shape, Wavefold, Drive |
| Filter | Multimode: LP4, LP3, LP2, LP1, HP, BP, Notch; with resonance, envelope amount, tracking |
| LFOs | 4 LFOs with sync, one-shot mode, multiple waveforms (sine, triangle, saw, ramp, square, random) |
| Envelope Generators | 4: dedicated filter and amp envelopes, plus 2 aux envelopes with delay stage |
| Arpeggiator | With sync, pattern (up, down, up-down, key order, random), range, hold |
| Effects | Distortion (tube, grunge, fuzz, sample crush), Mod FX (chorus, flanger, phaser, rotary), Delay (stereo, ping-pong, tape), Reverb (spring, room, plate, hall, galactic), Graphic EQ (8-band) |
| Modulation Matrix | 4 slots, with source, via, and amount; extensive destinations |
| MIDI Support | MIDI learn, MPE (MIDI Polyphonic Expression), CC, aftertouch |
| Preset Management | Built-in browser with collections, categories, keywords, favorites; drag-and-drop import |
| User Interface | All controls visible, zoom (50-150%), focus mode, oscilloscope per oscillator |
| Platform | Standalone (VST, AU, AAX) for Windows and macOS |
| Demo Mode | Full functionality but occasional inharmonic tones until purchased |
| System Requirements | Not specified in manual; typical modern computer with DAW or standalone |
| Maintenance | Software updates via automatic or manual check; no physical maintenance |
| Safety | No specific safety warnings; normal computer usage |
Frequently Asked Questions - Sines Cherry Audio
User questions about Sines Cherry Audio
0 question about this device. Answer the ones you know or ask your own.
Ask a new question about this device
Download the instructions for your Audio software in PDF format for free! Find your manual Sines - Cherry Audio and take your electronic device back in hand. On this page are published all the documents necessary for the use of your device. Sines by Cherry Audio.
USER MANUAL Sines Cherry Audio
Sines is a totally unique polyphonic synthesizer experience that isn't based on an existing vintage instrument. A quick glance at its controls indicates that its synthesis architecture is unlike most instruments you'll encounter. Its voicing has more in common with "West Coast"-style Buchla and Serge modular synthesizers of the 70s. Generally speaking, these eschew the subtractive concept seen in typical analog synthesizers (i.e. simple analog waveforms are mixed and timbrally modified using a filter). Instead, the oscillators are mostly used in an additive fashion where complex tones are formed by modifying basic sine waves via various waveshaping methods to create highly complex waves. FM synthesis is also used to create complex tones, in the same manner as the legendary Yamaha DX synths of the 80s (don't worry, we made it easy to use!). Though Sines includes a powerful multimode filter, its super-deep and highly modulatable oscillators allow a vast array of complex analog and digital-style tones. And as its name implies, all of these incredible tones originate from basic sine waves!
Sines may appear daunting at first glance, but if you're familiar with Cherry Audio's other instruments, you'll know that we're not fans of concealing sound parameter controls in tabs or hidden menus - we believe in instantaneous hands-on access to all sound parameters, and Sines is no exception. As a result, Sines has a lot of controls due to its "four of everything" LFO, oscillator, and envelope generator implementation.
We're aware that a number of the oscillator controls may be unfamiliar to users. We'll explain the under-the-hood functionality of all these controls, but the good news is that it isn't necessarily important to understand exactly what they do - when creating sounds, the Feedback, Phase, Width, Shape, Wavefold, and Drive waveshaping controls can very much be used in a creative and exploratory fashion. With this in mind, each oscillator includes a mini oscilloscope for instant visual feedback of the effects of all oscillator controls.
There are a few different ways to approach programming sounds with Sines, which are relatively easy to understand. In this guide, not only will we explain all of Sines' parameters, we'll also explain a few different programming methodologies. We hope you enjoy this crazy, singularly individualistic synthesizer as much as we do!
Pre-Purchase Demo Mode

If you haven't purchased the full version of Sines, it will run in demo mode. All functions will work, but inharmonic tones will occasionally sound (the LED next to Demo in the top toolbar will illuminate when the ugly tones are sounding). We've also added a handy button to make purchasing easy, so you've got no excuse! As you might expect, all this demo nonsense disappears once Sines is purchased.
Technical Assistance
Cherry Audio's online store and automatic updating should make operation a smooth experience, but if you run into any issues or have questions, you can discuss issues online at the Cherry Audio forums at:
https://forums.cherryaudio.com/viewforum.php?
f=37&sid=c41abae7a2bbca5797b3c4ad96f2add8
... or you can communicate directly with our swell tech support staff at:
https://cherryaudio.kayako.com/
Top Toolbar and Preset Browser

The purple strip at the top of Sines' interface is where you'll load, save, and create sound presets. It also contains utility functions such as undo/redo, UI zoom and Focus controls, under-the-hood settings, and more. Let's go over them:
New- Opens a new blank patch preset. If an unsaved patch is currently open or you've modified an existing saved patch, a dialog asks if you'd like to save the patch in its current state. This greatly reduces the possibility of losing an edited unsaved patch.
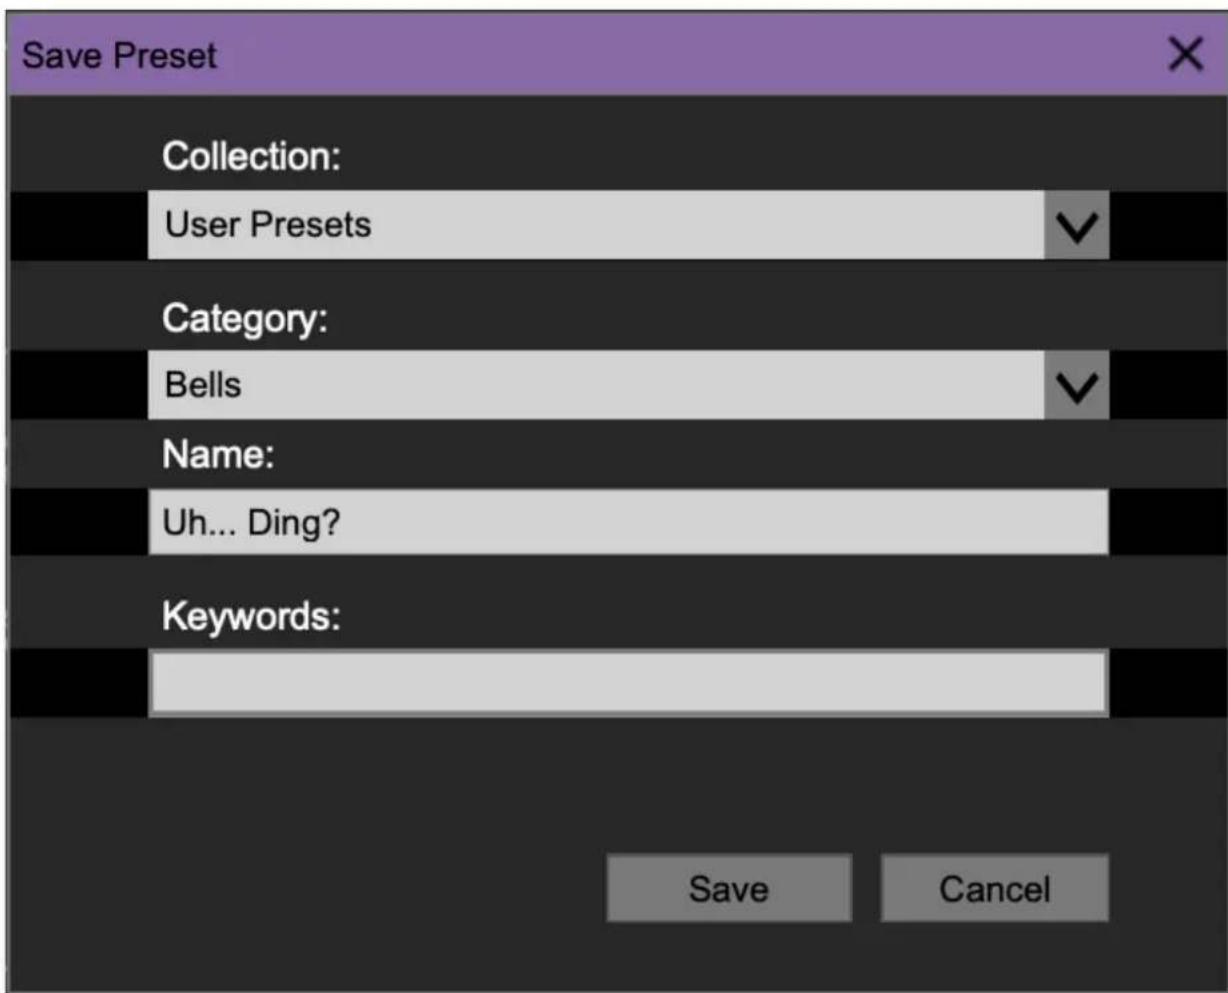
Save- Use this to save patches. There are a couple of levels of hierarchy:
- Collection- This is the top level of organization, and contains entire “sets” of presets. The Sines Presets are the main included collection. We also include a User Presets Collection for storing your own presets, but you’re free to create your own collections. To create a new collection, click in the Collection text field (where it says User Presets above) and type a name. User-created sounds can be freely saved to any collection; we like to keep ‘em separated for organizational purposes.
- Categories- Within each Collection are a number of sound categories. As with collections, you're free to create as many categories as you like. To create a category, click in the Category text field of the Save dialog window and type a new category name.
- Patch- A patch is an individual sound. To save a patch, simply type the name in the Name field and click Save.
- Keywords- You can add descriptive words such as "stacks," "noisy," "stringy," etc., to patches to make them appear when terms are typed in the Search field. Use commas to separate multiple keywords entries.
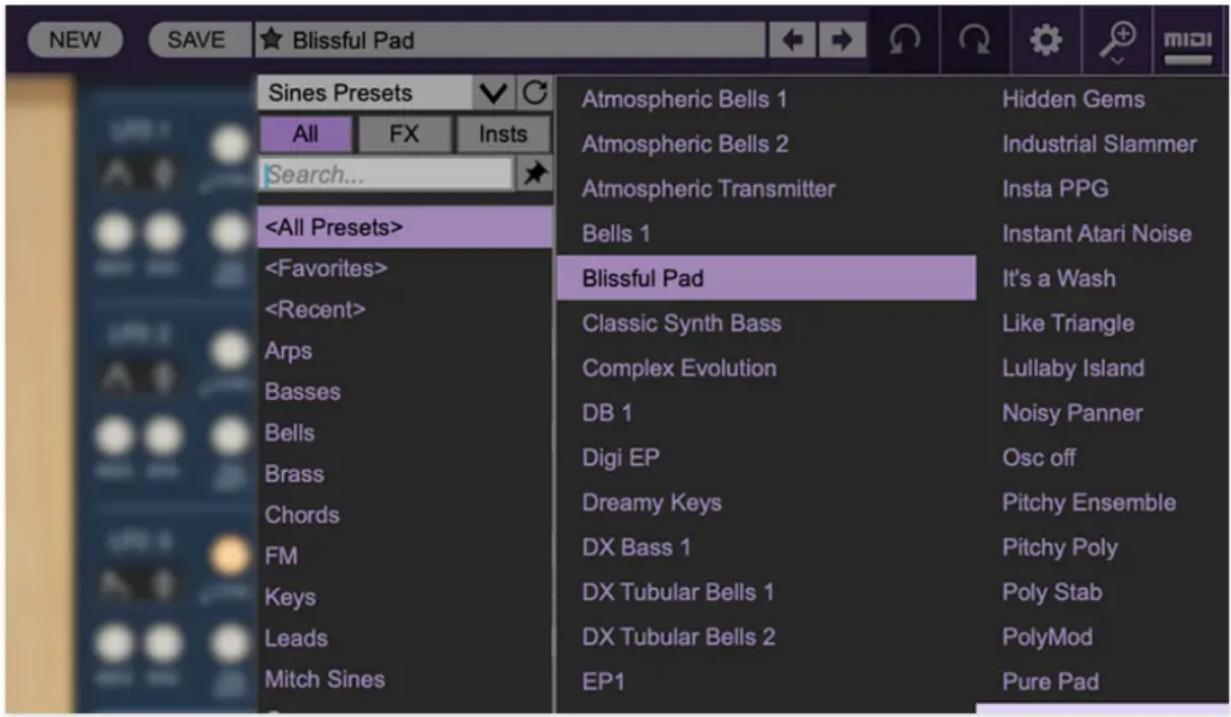
Browsing Patches- Patches can be browsed by clicking the
Clicking on the left-side categories narrows down which patches are displayed.
will show presets from all collections and categories. displays recently used presets. - Refresh- This is the circular arrow button to the right of the downward arrow; clicking this checks the Cherry Audio server for new or updated presets.
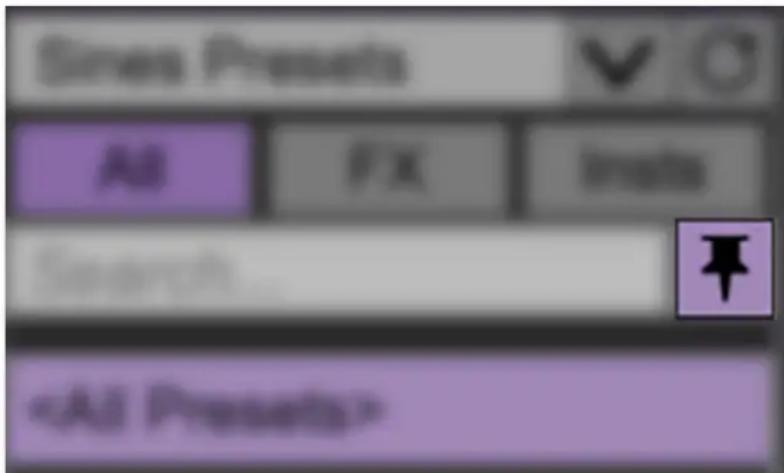
Pin- Clicking the push-pin icon locks the patch selection list open, allowing fast and easy browsing and auditioning of patches. Click the icon again to disable pin mode. when in pin mode, the up and down arrow keys can be used to select patches.
Preset- Step Back/Forward Arrows- These step to the previous or next preset. macOS [⌘+left/right arrow key] or Windows [CTRL+left/right arrow key] will navigate through presets back and forth in the currently selected collection/category.
Undo/Redo- These circular arrows will undo or redo the last action. It remembers many steps, so if you really loused something up, keep on clickin'...
Settings- This is where user preferences for user interface, audio interfaces, user account, and more are configured. See the Settings section for full information.
| Current Zoom: 150% |
| Zoom To Normal (0) |
| Zoom In (%=) |
| Zoom Out (%-) |
| 50% |
| 60% |
| 70% |
| 80% |
| 90% |
| 100% |
| 110% |
| 120% |
| 130% |
| 140% |
| √ 150% |
Importing Presets with drag-and-drop
Presets can be imported singly or en masse (as a single compressed ZIP file) simply by dragging and dropping from the desktop anywhere on the user interface.
If a single .*preset file is dragged and dropped, the sound is immediately loaded and the standard Save Preset dialog appears; this lets you save the sound to the instrument's preset browser. Note that you don't have to save the sound to preset browser; if you just want to hear and play the sound, click the Cancel button in the Save Preset dialog - the sound will still be loaded.
Compressed zip files containing multiple sounds can also be drag and dropped onto the UI. This works the same as with single sounds, but instead of the Save Preset dialog, you'll see the Import Preset Collection dialog. The
presets will be added as a new collection and available in the categories for which they were tagged.
Zoom Magnifying Glass- Click to resize the Sines interface. Selecting 100% returns the user interface to native size.
MIDI Tab- Opens the MIDI controllers tab for configuring internal and hardware MIDI controls. See the MIDI Controllers Setup and MIDI Tab section for full information.
! (MIDI Panic) - Click to send an all-notes-off message in case of, "why won't this thing stop making noise?!?" stuck-note incidents.
Tempo (Standalone Version Only)- Displays Sines' current internal tempo setting. Quadra's internal tempo affects the LFO, Echo, and Arpeggiator sections when their corresponding Sync switches are enabled. The tempo setting can be changed by moving the mouse up and down anywhere in the tempo section, or by double-clicking the number and entering the desired BPM value.
The tempo display only appears in the standalone version of Sines. VST, AU, and AAX plug-in versions receive tempo data from their host DAW app.
natural_image
Abstract geometric pattern with vertical stripes inside a circle on a dark purple background (no text or symbols)QWERTY Musical Typing Keyboard- Opens an onscreen keyboard allowing a standard QWERTY computer keyboard to be used for playing music notes. For more information, see QWERTY Musical Typing Keyboard (MTK) section.
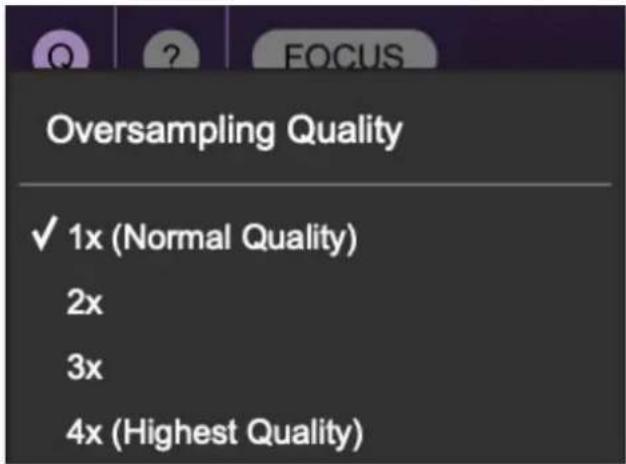
Oversampling Quality (Q)- The Q button sets Sines' internal oversampling rate; the higher the setting, the better audio fidelity will be, with the caveat that more computer processing power will be required.
Internal processing can be set to 1x (same rate as the current sample rate of the host DAW or in the Settings>Audio/MIDI window for the standalone version) or to 2x, 3x, or 4x the current sample rate. The sample rate is downsampled at the instrument output stage to match the current host sample rate.
For example, if the current DAW/instrument sample rate setting is 48 kHz, and oversampling is set to 2x, Sines' internal processing runs at 96 kHz, and is then reduced back to 48kHz at the output stage.
If the current DAW/instrument sample rate setting is 192 kHz and oversampling is set to 4x, Sines' internal processing will run at 768 kHz, and you will very briefly hear the most incredible synthesizer sound quality ever before your computer explodes (not really).

natural_image
Simple graphic icon with a yellow circle containing the letter 'Q' and a downward arrow, on a dark purple background (no text or symbols beyond the icon itself)When oversampling is set to any multiple greater than 1x, the Q button glows yellow.
Dependent on a number of factors (audio system D/A converter quality, monitor speakers, the nature of the current Sines patch, etc.), you may not hear a big difference with higher settings.

Help- Clicking this launches your web browser and opens the help document you're currently reading, which is a really meta concept.
Cherry Sines logo (right side of panel)- Clicking this displays "about" information, and shows the version number and current registered user ID.
Focus Button
If you're using a tiny laptop, the user interface can potentially be hard to see. With this in mind, the Focus button conveniently blows up Sines' view to roughly twice its normal size within the current window size. Unlike the Zoom "magnifying glass" function, Focus doesn't affect the current window size. By default, the patch panel section fills the current window, but the view can be scrolled vertically and horizontally with a mouse wheel, track pad, or Apple Mighty Mouse finger-scrolling. Or if you're still using a single-button mouse, scroll bars will appear at the window edges when in Focus mode. (Drop us a line from your AOL account and check out our Myspace page, umkay?)
Using Focus mode couldn't be easier - just click the Focus button the top menu bar. To return to standard view, clickReset. There's also a superfast key shortcut - on Mac, hold the Ⓧ [COMMAND] key and click the mouse; in Windows, hold the [OPTION] key and click the mouse. Focus can be reset with the same key shortcuts.
Preset List Right-Click Functions
| Complex Evolution | |
| DB 1 | Show File |
| Digi EP | Show In Original Category |
| Dreamy Keys | Favorite |
| DX Bass 1 | Delete |
| DX Tubular Bells 1 | Restore Factory Preset |
| DX Tubular Bells 2 | Restore All Factory Presets From Collection 'Sines Presets' |
| EP1 | Restore All From Factory |
Show File- This displays the selected preset in the Mac or Windows folder containing it. This is useful for backing up or sending a preset file to another user.
Show In Original Category- Selects the preset within its category, i.e. the category will highlight in the left preset menu. The Show In Original Category command only displays if the preset was selected within the
Favorites- Favorited presets will show in when the
Delete- Deletes the selected preset.
Restore Factory Preset- If one of the factory (i.e. not user) patches is edited and saved, selecting this command restores the patch to its unaltered "factory" setting. This menu will be grayed-out for user bank patches.
Restore All Factory Presets From 'Sines Presets'- If any patches from the "factory" Sines bank are edited and saved, selecting this command restores all of them to their unaltered "factory" setting.
Restore All From Factory- If any patches from the "factory" banks are edited and saved, selecting this command restores all of them to their unaltered "factory" setting. At the time of writing, the Sines bank mentioned above is the only factory bank, so this function and the Restore All Factory Presets From 'Sines Presets'above have the same effect.
LFO 1/2/3/4
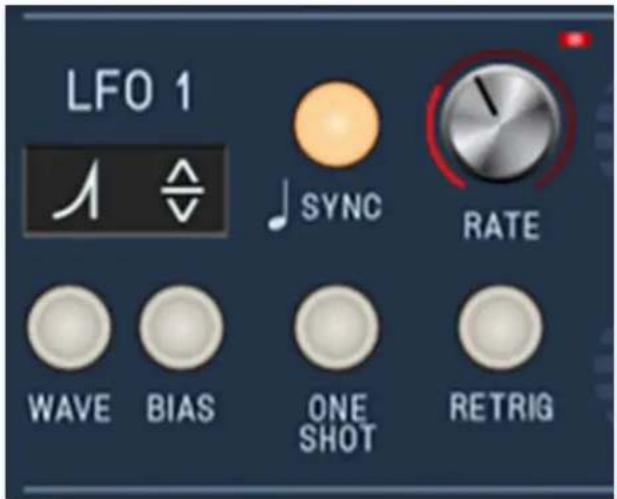
LFO is short for "low-frequency oscillator." The four onboard LFOs generate sub-audio range signals for modulation purposes. The functionality of all four LFOs is identical.
Sync button and Rate knob- The Rate knob defines the speed of the LFO, from 0.01 to 30 Hz (with Sync button off) or from 8 beats up to 1/64th note triplets (Sync button enabled). The Sync button locks the LFO to host tempo when using Sines within DAW software, or to the current tempo in the top menu bar when using the standalone version. The LED at top right flashes to indicate the current rate, and if you look real close, you'll notice that its illumination follows the shape of the current LFO waveform. (See how cool we are?)
Wave button and display- clicking the Wave button or the display above it opens a popup menu where the following waves are available:
- Sine
- Triangle
- Sawtooth
- Sawtooth Exponential - a sawtooth biased to have more voltage as it reaches its peak. This is useful as a drum envelope in one-shot mode.
- Sawtooth Logarithmic- a sawtooth biased to have less voltage as it reaches its peak
-
Sawtooth Three-Step - a stepped wave, good for triplet feel synced modulation. Also a failed 1979 Charlie Daniels Band single.
-
Sawtooth Four-Step - a stepped wave, good for 4/4, sixteenth-note feel synced modulation.
- Ramp Exponential - a sawtooth biased to have more voltage as it reaches its peak. This is useful as a drum envelope in one-shot mode.
- Ramp Logarithmic- a sawtooth biased to have less voltage as it reaches its peak
- Ramp Three-Step - a stepped wave, good for triplet feel synced modulation.
- Ramp Four-Step - a stepped wave, good for 4/4, sixteenth-note feel synced modulation.
- Square
- Random
line
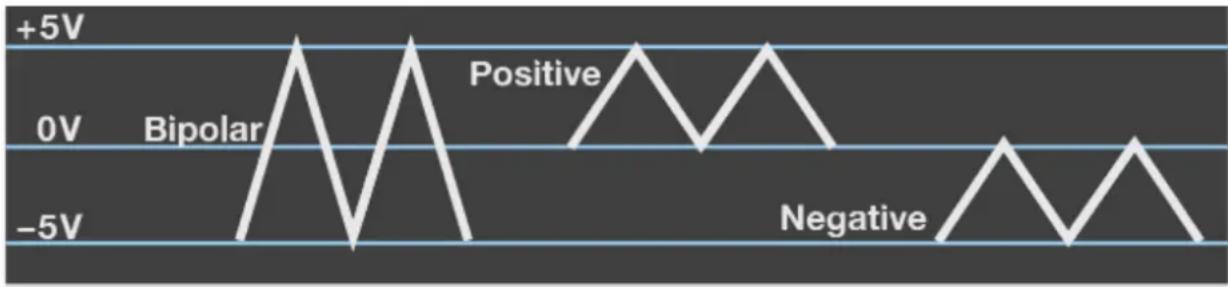
| State | Voltage Level | | --------- | ------------- | | Bipolar | +5V | | Bipolar | 0V | | Bipolar | -5V | | Positive | +5V | | Positive | 0V | | Positive | -5V | | Negative | +5V | | Negative | 0V | | Negative | -5V |Bias button and display- Bias defines the range of the LFO wave's swing as follows:
- Positive- CV swings from 0V to +5V back to 0V, etc.
- Bipolar- CV swings from -5V through 0V to +5V back through 0V to -5V, etc.
- Negative- CV swings from 0V to -5V back to 0V, etc.
Click the Bias button or display above to cycle through its three settings.
One Shot- LFOs typically are cycling constantly (that's why they call 'em "oscillators"), but the engaging the One Shot button causes the LFO to move through its cycle a single time when a key is struck. For all intents and purposes, this converts the LFO to a simple envelope generator (particularly when the sine, triangle, ramp, sawtooth, expo saw, or expo ramp waves are selected). Note that the Rate control defines the duration of the single LFO cycle (and that the Sync button still works, which can be useful).
Because One Shot mode uses a section of a wave that would normally be endlessly repeating, in order for them to be most useful, the individual waves are programmed to have slightly different behaviors. We'll do our best to explain how each of them function when in One Shot mode, with Bias set to Bipolar.
- Sine- CV begins at 0V, up to 5V, falls to -5V, returns to 0V and holds.
- Triangle- CV begins at -5V, up to 5V, falls to -5V and holds.
- Sawtooth waves- CV begins at +5V, falls to -5V and holds.
- Ramp waves- CV begins at -5V, rises to +5V and holds.
- Square- CV begins at +5V, instantaneously falls to -5V and holds.
- Random- CV lands on a random voltage and holds until note retrigger.
If you're like to experiment with them to gain a better understanding, the best way is to create a simple one-oscillator patch and modulate oscillator pitch using the LFO with the One Shot button enabled. Make sure to try each at positive, bipolar, and negative bias.
Retrig- Defines LFO restart behavior when keys are struck.
In normal cycling mode (One Shot disabled), enabling Retrig restarts the LFO cycle monophonically, that is, if no notes are currently on and a new note is struck, the LFO cycle restarts. If additional keys are played, the LFO won't restart until all keys are released. This may seem counterintuitive, but it makes sense - imagine a polyphonic patch with square wave modulation applied to oscillator amplitude (i.e. modulating the horizontal Level/slider). If you played a chord, with each note struck at a (slightly) different time, the "on/off" mod of each note would be occurring at a different time, resulting in a sloppy-sounding mess. Having the modulation "synchronize" in this way generally has far more musical results.
Conversely, if both One Shot and Retrig are enabled, the LFO sweep restarts with every note played, regardless of previously held notes. This makes sense if you're using a One Shot mode LFO as a simple envelope generator controlling amplitude, pitch, filter cutoff, etc.
Oscillators

Without a doubt, Sines oscillators are its magic mojo, and its "raison d'etre" for sounding so unique. Though many of the controls will be familiar to analog synth users, some are unique, and more importantly, on a conceptual level, Sines' oscillators function a bit differently than run-of-the-mill analog oscillators, dig? Don't panic, they're pretty friendly, there's no math involved, and you won't be tested on this.
Oscillator Concept
A sine wave is the most basic sound waveform - it contains only the root tone and no other harmonics. You've likely heard a sine wave in the guise of a test signal or perhaps bleeping the profanity of lackey actors on those objectionable reality shows my girlfriend watches.
Believe it or not, each of Sines' super-duper amazing oscillators creates exactly one of these boring sine waves (ok, actually each of them can create up to 16 of them depending on how many notes you're playing, but stick with us). This is why you don't see knobs or switches for sawtooth or pulse waves, etc. in the oscillator controls. Instead, the basic sine wave is "waveshaped" or otherwise modified to create tones ranging from slightly-altered sine waves to radically complex waves, by combining the Feedback, Phase, Width, Shapes, Wavefold, and Drive controls. Did we mention each oscillator includes a sub (octave-down sine wave) oscillator and a super oscillator (octave-up sine wave)? Did we mention that Sines includes four of these crazy oscillators? It should be clear that these awesome oscillators (awesomillators?) are capable of powerful and unique waveforms, all continuously variable, and excessively modulatable via Sines super-deep mod matrix.
Unlike a typical analog synth, the Sines oscillators offer such a wide timbral range that you may not need to apply any filtering in order to create dark and mellow sounds (we actually contemplated leaving the filter out altogether, but ultimately decided if would offer greater sound-shaping capabilities). That said, as with our Dreamsynth instrument, we added Filter
Bypass buttons for each oscillator in order to simplify combining bright digital tones with mellow filtered ones.
As they say on TV, "But wait, there's still more!"... though it doesn't look like a DX-something-or-other, Sines phase modulation capabilities and Ratio oscillator tuning mode allow it to function exactly like an 80s four-op Yamaha DX-style FM synthesizer, further expanding its tonal palette. And Sines actually goes way further than a classic DX synth, because the carrier and operator waves can range from basic sine waves to super-mangled, waveshaped Sines oscillator madness. Presets replicating all eight "standard" Yamaha four-op FM algorithms are included as starting points for those familiar with FM synth programming,
Now that you're good and sick of reading, let's go through the oscillator controls!
Oscillator Controls
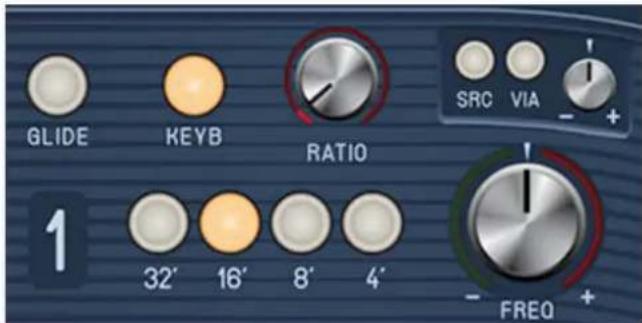
Glide- Also known as portamento, glide causes notes to slide smoothly from one pitch to the next. The Glide toggle buttons enable glide individually for each oscillator; glide rate is set globally using the Glide Amount knob next to the keyboard.
Keyboard- Enables keyboard control of oscillator pitch. Generally these will always be on, but disabling keyboard control is useful in two situations:
- drone sounds where oscillator pitch stays the same regardless of notes played.
- if you're using an oscillator as a modulation source and you want its speed to remain constant regardless of keyboard notes played. (Remember to turn the oscillator Level slider down.)
Ratio- Changes oscillator tuning in precise multiples. This is intended for situations where oscillators are used in a modulator/carrier arrangement, i.e.,
one oscillator is modulating the Phase control of another at audio-range frequencies for DX/FM-style synthesis, but the Ratio setting can be freely combined with the octave range buttons.
We'll explain the DX/FM angle a whole lot more in the Programming Sines - Three Different Approaches section.
32' / 16' / 8' / 4' range buttons- Sets the coarse pitch range for each oscillator in standard organ footage settings of 32', 16', 8', and 4'. Only one footage may be selected.
Frequency knob and mod controls- Fine-tune knob with tuning range of just over an octave up or down. The mod controls above the Freq knob allow modulation as follows:
- Src (Source)- The Src selector button opens a popup menu where the modulation source can be chosen. The button will illuminate when any mod source is selected.
- Via- The Via selector button opens a popup menu where a modifier can be assigned to regulate the amount of modulation applied. For example, if the mod source is an LFO, setting Via to Mod Wheel allows the amount of modulation applied to be varied using a MIDI/USB controller mod wheel.
- +/- attenuator knob- Sets a positive or inverted control amount for the mod source. If Via is used, it sets the maximum mod amount.
Adding Vibrato to all Oscillators at once
Having individual modulation controls for each oscillator allows tremendous flexibility, but adding a constant or mod wheel-controlled vibrato that's the same for all oscillators at once entails a lot of set up. The easy way to mod pitch (or any other parameter) for all four oscillators at once is to use the Mod Matrix section. Click the Dest button, choose the All Oscillators category, then the desired parameter (Frequency, in this case). If you'd like to control the depth with the mod wheel, click the Via button in the Mod Matrix slot and select Keyboard>Mod Wheel.
Waveshaping Controls
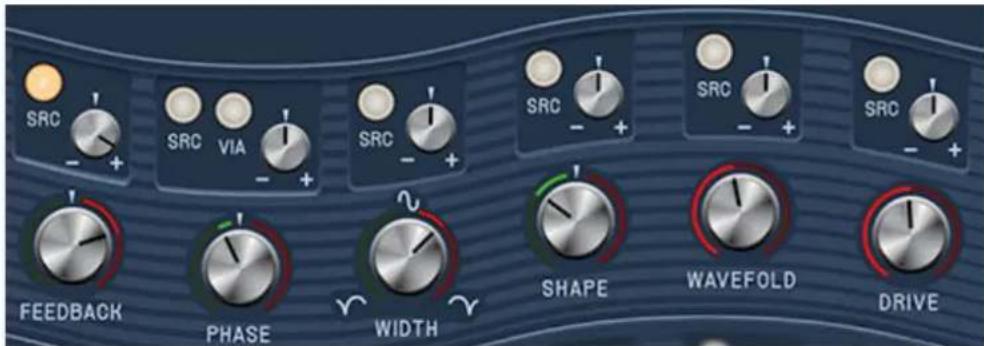
The Feedback, Phase, Width, Shape, Wavefold, and Drive controls are all different types of "waveshapers." This isn't a new concept per se; waveshaping of various types exists to some degree in just about all analog synthesizers, but very few actually allow you to control it from the front panel. These controls are the key to Sines' unique sound palette, and even if the parameter names don't look familiar, it's fun and easy to just play with them until you hear something you like. And because each oscillator includes a real-time mini oscilloscope, it's pretty easy to understand how each of these controls affects the resulting sound wave.
Feedback- Sets the amount of oscillator signal sent back to the oscillators wave modulation path. When applied to a basic sine wave, cranking up the Feedback knob is a simple way to create a sawtooth or ramp wave shape.
Phase- Offsets the oscillator wave start point in relationship to the other oscillators. This generally won't sound particularly useful on its own, but the phase knob is really useful when modulated. It allows the creation of classic synced oscillator tones, and more importantly, phase modulation is the key to creating classic Yamaha DX FM-style sounds. This is fully explained in the Programming Sines - Three Different Approaches section.
Width- This is very similar to the pulse width control you've likely seen on classic analog synths, but unlike a standard pulse width control , the Sines Width knob isn't limited to pulse waves - it affects the current waveform regardless of other parameters choices. Like a pulse width knob, it responds well to external modulation via an LFO, envelope generator, or an audio-rate oscillator, if you want to go really nuts.
Shape- Applies a logarithmic (knob turned left from center position) or exponential (knob turned right from center position) curve to sine wave values. It can bend waves in a number of ways, but it's especially useful for transforming a basic sine wave into triangle wave when set to positive values around 20% .
Wavefold- The Wavefold control sets a threshold at some point in the wave, and "flips" that portion of the wave for dramatic changes in tonality and harmonics. The best way to illustrate the effect of the Wavefold knob is to start with an initial patch (one oscillator with no modifiers, i.e. basic sine wave) and watch the oscilloscope wave while increasing the knob amount. You'll see the top curves of the wave "fold" over increasingly and hear harmonic content grow more intense. Like the Width control, Wavefold is fabulous destination for subtle or not-so-subtle modulation, and can really mangle things in a cool way.
Drive- As the Drive knob is increased, it pushes the overall waveshape toward a square wave. This is typically what happens in a distortion/fuzz box, but unlike a typical distortion device, Drive waveshaping occurs independently for each note, so you won't hear the typical stomp box intermodulation between notes; instead, the waveshape of each note played is individually altered. The Drive knob has many applications, but it's especially useful for creating analog synth-style square and pulse-width modulation sounds, particularly in combination with the Width control.
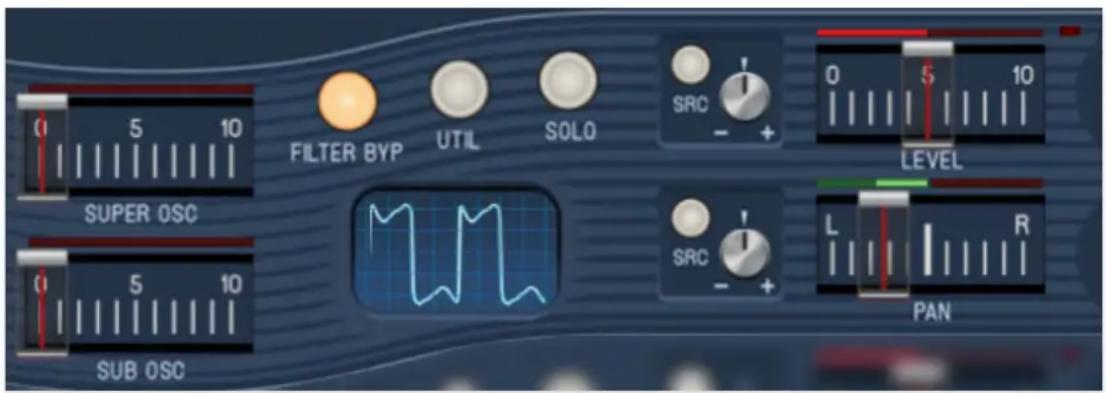
Super / Sub Oscillator- The Super Osc and Sub Osc sliders add a sine wave one octave above and one octave below, respectively. The Super and Sub Oscillators are not affected by the preceding waveshaping controls, that is, they remain pure sine waves regardless of the shape of the main oscillator waveform. The Super and Sub sine waves are really useful for beefing up DX FM-style phase-modulation patches.
Filter Bypass- Toggling this button bypasses the filter section for the oscillator. This is useful for combining a bright oscillator sound with a filtered one from another oscillator(s).
Utility- Opens a popup menu with the following handy functions:
- Copy Oscillator- This allows copying of all current oscillator parameters to any other oscillator. Copied parameters include everything from Glide on over to the Level and Pan sliders, including all modulation settings - basically everything in the wavy stripey sections.
At its most basic, oscillator copying is really useful for copying parameters to a second oscillator, using the Freq knob to detune a hair, then hard panning left and right with Pan sliders for a fat stereo sound.
Copy Oscillator Super Pro Tip: Be aware of mod routings when copying oscillators, because in many situations, you'll want to use different mod sources (particularly when oscillators are modulating other oscillators). This applies to Mod Matrix mod routings as well, because Copy Oscillator has no effect on the Mod Matrix.
We've found the best practice is to click the copy destination oscillator's Solo button immediately after copying, in order to A/B with the source oscillator. In this way, you'll be able to quickly tell if something doesn't sound right, and if there are any discrepancies, the culprit will always be a mod routing, either at the oscillator mod level, or in the Mod Matrix.
- Randomize Oscillator- This applies random parameter settings to all controls that affect the audio waveform for the current oscillator:
Feedback, Phase, Width, Power, Wavefold Drive, Super Osc, and Sub Osc. Because Randomize Sound only affects waveshape settings, it won't make nutty madness, it's just a fast way to automatically create interesting audio waves. Note that Randomize Sound has no effect on modulation routings, nor will it undo any currently configured mod routings.
- Reset Sound- Resets all current oscillator parameters to nominal values, from Glide over to the Level and Pan sliders, including all modulation settings - everything in the wavy stripey sections.
Solo- Click to solo one more oscillators for simplified editing. The Solo buttons flash to show that they're active (to help circumvent "WHY WON'T THIS OSCILLATOR MAKE NOISE?!?" incidents).
Oscilloscope- Displays the oscillator wave in real time. Specifically, the oscilloscope shows the effects of all controls to its left with the exception of the range button and tuning knob. As its panel position indicates, the oscilloscope is before the filter and VCA sections in the signal chain, so its waveform display isn't affected by filter settings, and the scope is always "on" regardless of whether a note is being played. The oscilloscope only
displays one voice at a time (because showing multiple polyphonic voices would just make a mess and not be very useful). Similarly, wave display width is unaffected by pitches played - we intentionally optimized the scope display to be the most useful for visualizing oscillator audio waves (but mark my words, someone on a forum someplace will complain about it).
Level and LED indicator- Sets the oscillator volume level. The bar meter shows current level, including modulation, and the LED above the slider shows when the oscillator is currently sounding.
Pan- Sets the panning of the oscillator in the stereo field. Panning is retained through the rest of the signal chain - the filter and VCA sections are actually true stereo "under the hood." The bar meter shows current stereo field position, including modulation.
Modulation Controls
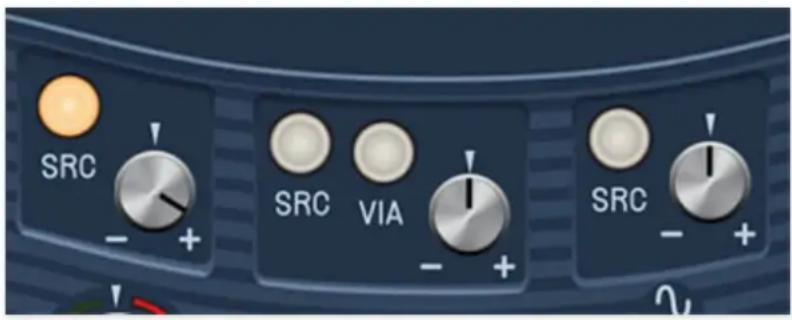
Parameter modulation controls are above or adjacent to many of the oscillator controls. These allow modulation of a control from numerous mod sources. The mod controls are as follows:
- Src (Source)- Clicking this opens a popup menu and submenu where the mod source can be selected. The Src button will illuminate when a mod source other than None is selected.
-
Via- The Via button lets you select a mod source to control how much mod is applied to the parameter. It's only present for the Pitch Mod and Phase mod sections and in the Mod Matrix. It has number of uses, but the most typical applications would be:
-
Assign an LFO in the Source menu and a mod wheel in the Via menu to Pitch Mod for mod wheel-controlled vibrato.
- Assign an audio-rate oscillator in the Source menu and an envelope generator in the Via menu for DX-style FM synthesis. You'll find more
info on this in the Programming Sines - Three Different Approaches section.
The Mod Matrix section can be used to apply a Via mod source to parameters that don't have one. Check out the Mod Matrix and Modulation Routings section for more info.
Filter
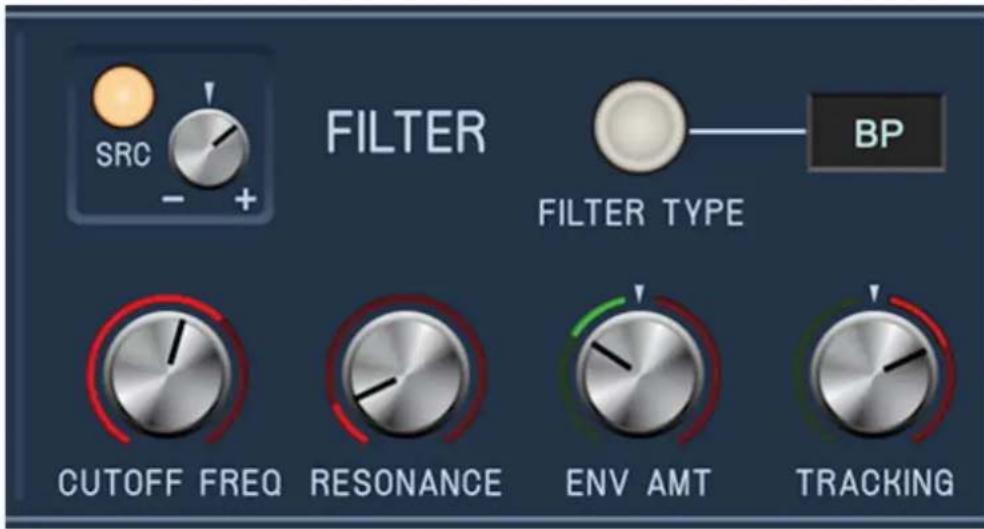
Sines features a resonant multimode filter, including four lowpass modes, highpass, bandpass, and notch modes for all manner of sound sculpting.
Controls
Cutoff Frequency and modulation- Sets the frequency where frequency attenuation begins, i.e. which frequencies are allowed to pass, dependent on the current Filter Modes setting. The modulation controls above include a mod source button (Src) that allows selection of a mod source, plus an attenuverter to set the amount of positive or negative modulation.
Filter Type- These select the overall filter curves. The popup menu can be opened by clicking on the button or display window:
- LP4 (Lowpass)- Allows frequencies below the cutoff frequency to pass, but blocks frequencies above the cutoff frequency with a 24 dB/oct slope. The "4" refers to the number of filter poles and because of its steep cutoff, this the "darkest" of the filters. It also has the most pronounced resonance effect.
- LP3 (Lowpass)- Allows frequencies below the cutoff frequency to pass, but blocks frequencies above the cutoff frequency with an 18 dB/oct slope. The "3" refers to the number of filter poles
-
LP2 (Lowpass)- Allows frequencies below the cutoff frequency to pass, but blocks frequencies above the cutoff frequency with a 12 dB/oct slope. The "2" refers to the number of filter poles
-
LP1 (Lowpass)- Allows frequencies below the cutoff frequency to pass, but blocks frequencies above the cutoff frequency with a 6 dB/oct slope. The "1" refers to the number of filter poles and because of its shallow cutoff, this the brightestof the filters with the least pronounced resonance effect.
- HP (Highpass)- Allows frequencies above the cutoff frequency to pass, but blocks frequencies below the cutoff frequency with a 12 dB/oct slope. Because they dramatically remove low frequencies, the highpass setting is useful for nasally tones with exaggerated high frequencies.
- BP (Bandpass)- Allows a band of frequencies in the vicinity of the cutoff frequency to pass, with a 12 dB/oct slope.
- Notch- Removes a band of frequencies close to the cutoff frequency and allows all other frequencies to pass. Notch filters are useful for pseudophaser effects when their cutoff frequency is swept, but that's notch-yer-problem. (See what we did there? Come for the synths, stay for the dad jokes...)
Resonance- Resonance emphasizes sound energy at and around the current cutoff frequency by adding feedback from the filter's output back to its input. At lower settings, this can be used to create mild resonances such as those heard in acoustic instruments. At extreme settings, it can be used as a sine wave generator, but be careful as high resonance settings can result in loud, screamy, dog-spooking (and speaker blowing) occurrences.
Envelope Amount- The Env Amt control applies modulation from the Filter Envelope to the cutoff frequency. This allows familiar auto filter sweeps. When raising the Envelope control, you'll generally want to lower the Cutoff control, as these controls sum. Please see the Envelope Generators section for more info about the Filter Envelope.
Tracking- This causes the cutoff frequency to increase as ascending notes are played on a keyboard. The idea behind this is that when set to positive values, the Tracking control applies a rising CV to the cutoff frequency in order to maintain the brightness of notes as higher pitches are played (because actual note frequencies rise as higher pitches are played). When turned counterclockwise from center, the Tracking control causes the cutoff frequency to get lower as higher keys are played.
Envelope Generators
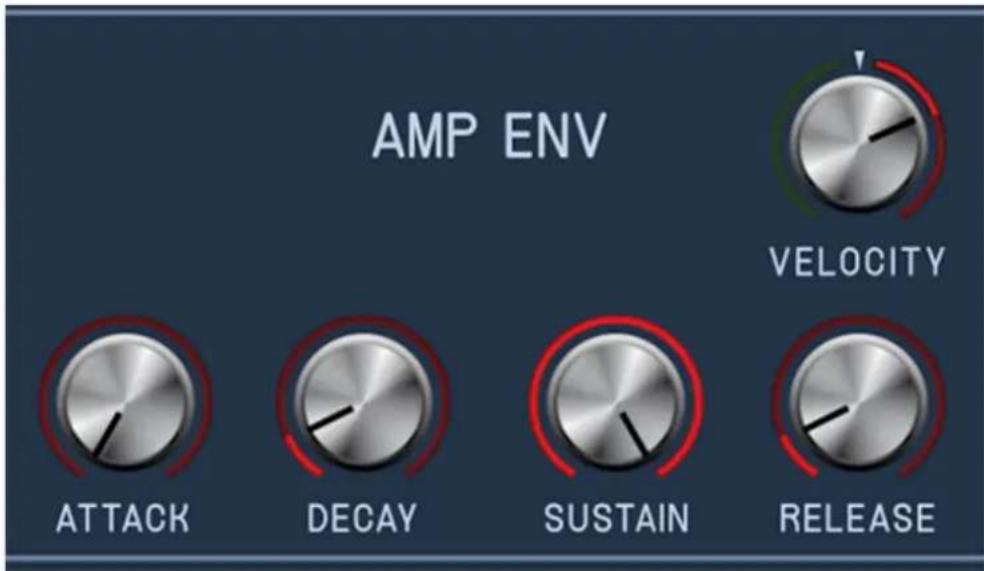
Sines includes four almost-identical envelope generators: dedicated envelopes for the Filter and Amplifier, and two auxiliary envelope generators (Envelope 3 and 4) usable as mod sources for many Sines mod destinations. The dedicated Filter envelope generator is hardwired to the filter Cutoff control, and the Amp Env is hardwired to Sines' onboard VCA for overall amplitude shaping.
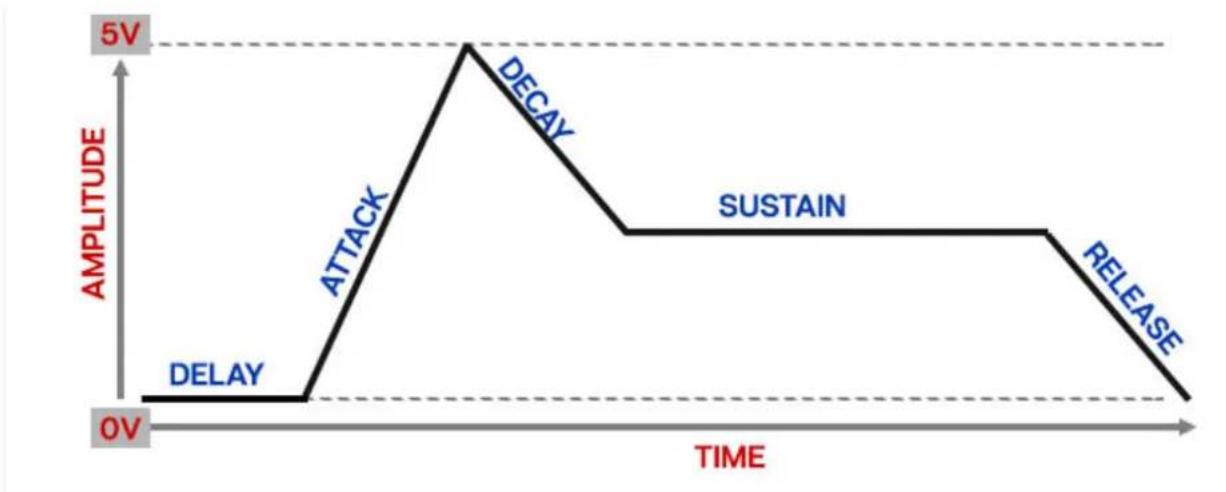
Here's an overview of how Sines' envelope generators works:
line
| Time | Amplitude | |------|---------| | 0V | 0V | | | 5V | | | 0V | | | SUSTAIN | | | 5V | | | 0V |When a note is played, the envelope generator outputs a dynamically changing voltage, according to the settings of its four stages. The delay stages waits for the set duration, then the attack stage defines how long it
takes for the output voltage to rise to maximum. Once the attack stage reaches maximum amount, it moves to the decay phase, which defines how long it takes to fall from maximum to the setting of the sustain phase. Unlike the delay, attack, decay, and release phases, which define times, sustain simply sets the held voltage following the attack and decay phases - this equates to the envelope output level while holding down a key. Finally, the release slider defines the length of time it takes for amplitude to fall back to zero when the gate input voltage is removed, i.e. when the key is released.
Delay- Defines the length of time prior to the start of the attack phase.
Velocity- Defines how much the envelope affects the filter cutoff frequency via keyboard velocity. When set to zero, keyboard velocity has no effect on cutoff frequency. Setting the knob clockwise from center increases the envelope output voltage as keys are struck harder, setting the knob counterclockwise from center decreases the envelope output voltage as keys are struck harder.
Attack- Defines the length of time for voltage to rise from silence to max amplitude when a key is played.
Decay- Defines the length of time for voltage to fall from the attack stage maximum to sustain stage setting.
Sustain- Sets the amplitude of held notes level following attack and decay phases.
Release- Defines the length of time for amplitude to fall from sustain level to silence when a key is released.
You may have notice that Sines' Filter, and auxiliary envelopes 3 and 4 include a Delay stage for "pausing" the onset of the envelope generator, but the Amp Env does not. Since the Amp Env acts upon the entire sound, a delay control would delay the entire sound from playing, potentially making Sines feel broken. We couldn't figure out a practical reason why anyone would want this, so we left it out. (That said, given Sines' immense Mod Matrix, there are a number of ways you could make this happen if you really wanted to!)
Modulation Routings
Sines allows a huge amount of modulation possibilities, configured with "mod boxes" adjacent to controls or using its super-flexible four-slot Mod Matrix section. Like other Cherry instruments, all controls are on the front panel and instantly viewable with no hidden pages or tabs.
Parameter Mod boxes
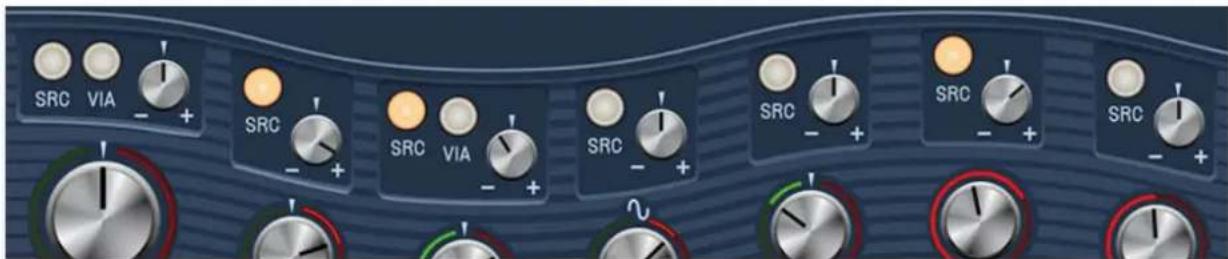
Many of Sines' parameters include a dedicated adjacent mod source button and attenuverter.
Source (Src) button- Click to open a popup menu that selects the modulation source. If the button is dim (gray), no modulation source is currently selected. The button illuminates when a mod source is selected. (The attenuator still needs to be increased or decreased from its center position to apply mod.)
Via button- The Via button is only found in the Pitch Mod, Phase, and Mod Matrix sections. It allows a mod source to dynamically control how much modulation is occurring. When using a Via mod source, the Mod Attenuverter sets the maximum mod amount.
Via is typically used for mod wheel-controlled vibrato (set Pitch Mod section Src to LFO, and Via to Mod Wheel), or when creating FM synthesis-style patches (set Phase section Src to an oscillator, and Via to an envelope generator).
Pitch Mod and Phase are the only Parameter Mod boxes that include Via routings, but just about any Sines parameter can have its mod depth set up with a via control in the Mod Matrix section. Keep on reading!
Mod attenuverter knob- Sets the amount of mod applied to the parameter for the currently chosen mod routing. The Mod attenuverter knobs are bipolar, so center position is off; turning the knob to the right applies positive modulation, and turning to the left applies negative modulation.
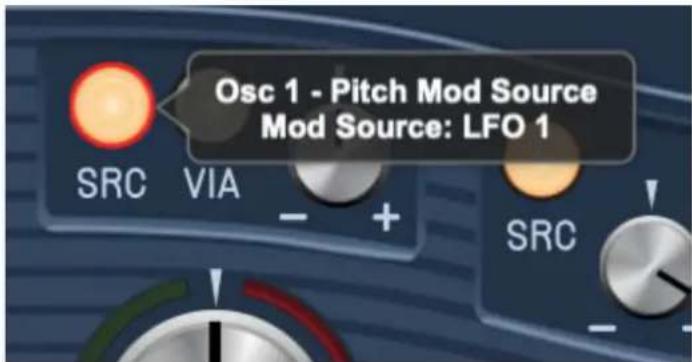
The current mod source is visible in the popup tooltip flag when the mouse is hovered over the Src button (You can set how quickly the tooltips display after mouse hover by clicking Settings gear icon>Interface>Tooltip Delay in the top purple tool bar). Note that modulation only occurs within the existing control range; that is, a given control cannot be modulated past its minimum or maximum knob和社会 setting.
Mod Matrix
flowchart
graph TD
    A["src"] --> B["LFO 1"]
    B --> C["VIA"]
    C --> D["AMT + DEST"]
    D --> E["VCA LEVEL"]
    F["src"] --> G["OSC 2"]
    G --> H["ENV 3"]
    H --> I["AMT + DEST"]
    I --> J["OSC1 PHASE"]
    K["src"] --> L["OSC 3"]
    L --> M["ENV 4"]
    M --> N["AMT + DEST"]
    N --> O["OSC1 PHASE"]
    P["src"] --> Q["OSC 4"]
    Q --> R["ENV 4"]
    R --> S["AMT + DEST"]
    S --> T["OSC2 PHASE"]
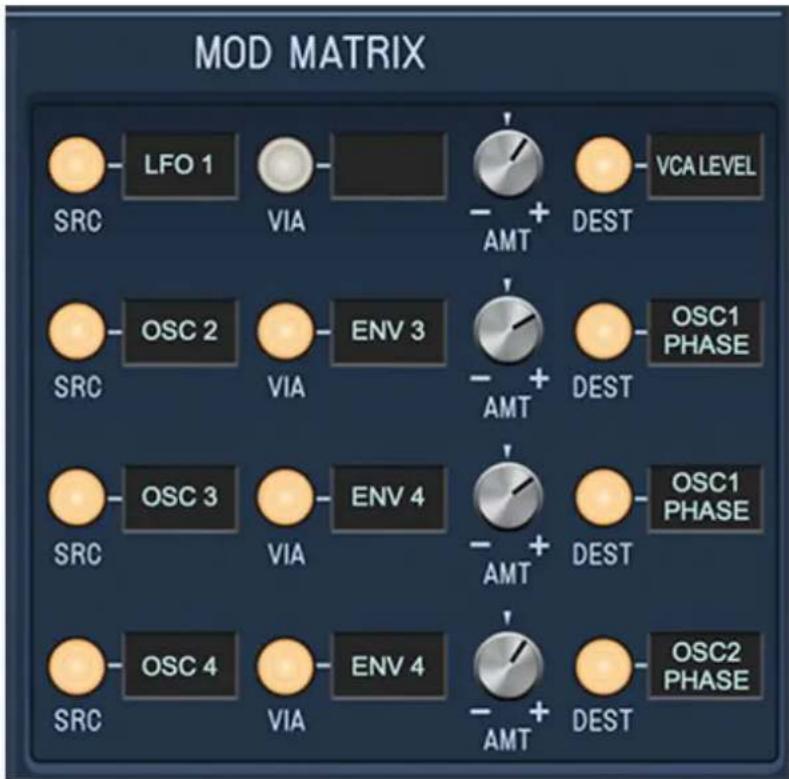
Here's where things get heavy. Sines includes a four-slot mod matrix that allows modulation of almost every single Sines parameter. It works exactly like the individual Parameter Mod boxes explained above, but instead of
being tied to the parameter of an adjacent control, each Mod Matrix slot includes a destination parameter.
Source (Src) button- Click to open a popup menu that selects the modulation source. If the button is dim (gray), no modulation source is currently selected. The button illuminates when a mod source is selected. (The attenuator still needs to be increased or decreased from its center position to apply mod.)
Via button- The Via button allows a mod source to dynamically control how much modulation is occurring. When using a Via mod source, the Amt attenuverter sets the maximum mod amount.
Via is typically used for mod wheel-controlled vibrato (set Pitch Mod section Src to LFO, and Via to Mod Wheel), or when creating FM synthesis-style patches (set Phase section Src to an oscillator, and Via to an envelope generator).
Pitch Mod and Phase are the only Parameter Mod boxes that include Via routing controls, but just about any Sines parameter can have its mod depth set up with a Via control in the Mod Matrix section.
Amount (Amt) attenuverter knob- Sets the amount of mod applied to the parameter for the currently chosen mod routing. The Amt knobs are bipolar, so center position is off; turning the knob to the right applies positive modulation, and turning to the left applies negative modulation.
Modulation from two or more sources can be routed to the same parameter by combining the Parameter Mod boxes and Mod Matrix (or multiple Mod Matrix slots). All modulation will be additively summed.
Sines Controls and Knob Rings/Bars
Almost all of Sines' knobs and sliders include an illuminated knob ring, or in the case of sliders, an illuminated "amount bar." These indicate the current control value, including any incoming modulation, either from hardwired mod sources, the dedicated parameter knob boxes adjacent to controls, or from mod routings configured with the Mod Matrix. Because they clearly display modulation, they're really helpful when setting initial control amount, optimal modulation depth, and mod median point. Plus they look real cool!
Mod and Via Sources
Following is a list of mod sources. The Mod Sources list is identical for Parameter Mod boxes and the Mod Matrix. The Via sources list is also identical. Read these very carefully, because they took ages to type !!\$#%!
MOD SOURCE CATEGORY MOD SOURCE
| LFOs LFO 1 |
| LFOs LFO 2 |
| LFOs LFO 3 |
| LFOs LFO 4 |
| ENVELOPES FILTER ENVELOPE |
| ENVELOPES AMP ENVELOPE |
| ENVELOPES ENVELOPE 3 |
| ENVELOPES ENVELOPE 4 |
| OSCILLATORS OSC 1 |
| OSCILLATORS OSC 2 |
| OSCILLATORS OSC 3 |
| OSCILLATORS OSC 4 |
| KEYBOARD MOD WHEEL |
| KEYBOARD PITCH BEND |
| KEYBOARD KEYBOARD CV |
| MOD SOURCE CATEGORY MOD SOURCE KEYBOARD VELOCITY |
KEYBOARD CHANNEL PRESSURE
KEYBOARD POLY AFTERTOUCH
KEYBOARD ARPEGGIATOR
SIGNALS WHITE NOISE
SIGNALS PINK NOISE
SIGNALS MONO RANDOM DC
SIGNALS POLY RANDOM DC
SIGNALS +10V DC
Mod Destinations
DESTINATION CATEGORY DESTINATION
ALL OSCILLATORS, OSC 1, OSC 2, OSC 3, OSC 4 RATIO
ALL OSCILLATORS, OSC 1, OSC 2, OSC 3, OSC 4 FREQUENCY
ALL OSCILLATORS, OSC 1, OSC 2, OSC 3, OSC 4 FEEDBACK
ALL OSCILLATORS, OSC 1, OSC 2, OSC 3, OSC 4 PULSE WIDTH
ALL OSCILLATORS, OSC 1, OSC 2, OSC 3, OSC 4 SHAPE
ALL OSCILLATORS, OSC 1, OSC 2, OSC 3, OSC 4 WAVEFOLD
ALL OSCILLATORS, OSC 1, OSC 2, OSC 3, OSC 4 DRIVE
DESTINATION CATEGORY DESTINATION ALL OSCILLATORS, OSC 1, OSC 2, OSC 3, OSC 4 SUPER OSCILLATOR
ALL OSCILLATORS, OSC 1, OSC 2, OSC 3, OSC 4 SUB OSCILLATOR
ALL OSCILLATORS, OSC 1, OSC 2, OSC 3, OSC 4 LEVEL
ALL OSCILLATORS, OSC 1, OSC 2, OSC 3, OSC 4 PAN
LFO 1, LFO 2, LFO 3, LFO 4 RATE
LFO 1, LFO 2, LFO 3, LFO 4 LEVEL
FILTER ENVELOPE ATTACK
FILTER ENVELOPE DECAY
FILTER ENVELOPE SUSTAIN
FILTER ENVELOPE RELEASE
FILTER ENVELOPE DELAY
FILTER ENVELOPE VELOCITY
AMP ENVELOPE ATTACK
AMP ENVELOPE DECAY
AMP ENVELOPE SUSTAIN
AMP ENVELOPE RELEASE
AMP ENVELOPE VELOCITY
ENV 3, ENV 4 ATTACK
ENV 3, ENV 4 DECAY
DESTINATION CATEGORY DESTINATION
ENV 3, ENV 4 SUSTAIN
ENV 3, ENV 4 RELEASE
ENV 3, ENV 4 DELAY
ENV 3, ENV 4 VELOCITY
FILTER CUTOFF
FILTER RESONANCE
FILTER ENV AMOUNT
FILTER TRACKING
VCA LEVEL
ARPEGGIATOR RATE
GLOBAL/KEYBOARD UNISON DETUNE
GLOBAL/KEYBOARD GLIDE AMOUNT
GLOBAL/KEYBOARD BEND DEPTH
DISTORTION DRIVE
DISTORTION TONE
DISTORTION LEVEL
MOD FX RATE
MOD FX DEPTH
DESTINATION CATEGORY DESTINATION
MOD FY FEEFDRACK
MOD FX FEEDBACK
DELAY TIME
DELAY FEEDBACK
DELAY DAMP
DELAY SPREAD
DELAY MIX
REVERB DECAY
REVERB DAMP
REVERB MIX
EQ 100 Hz
EQ 200 Hz
EQ 400 Hz
EQ 800 Hz
EQ 1.6 k
EQ 3.2 k
EQ 6.4 k
EQ 12.8 k
Arpeggio
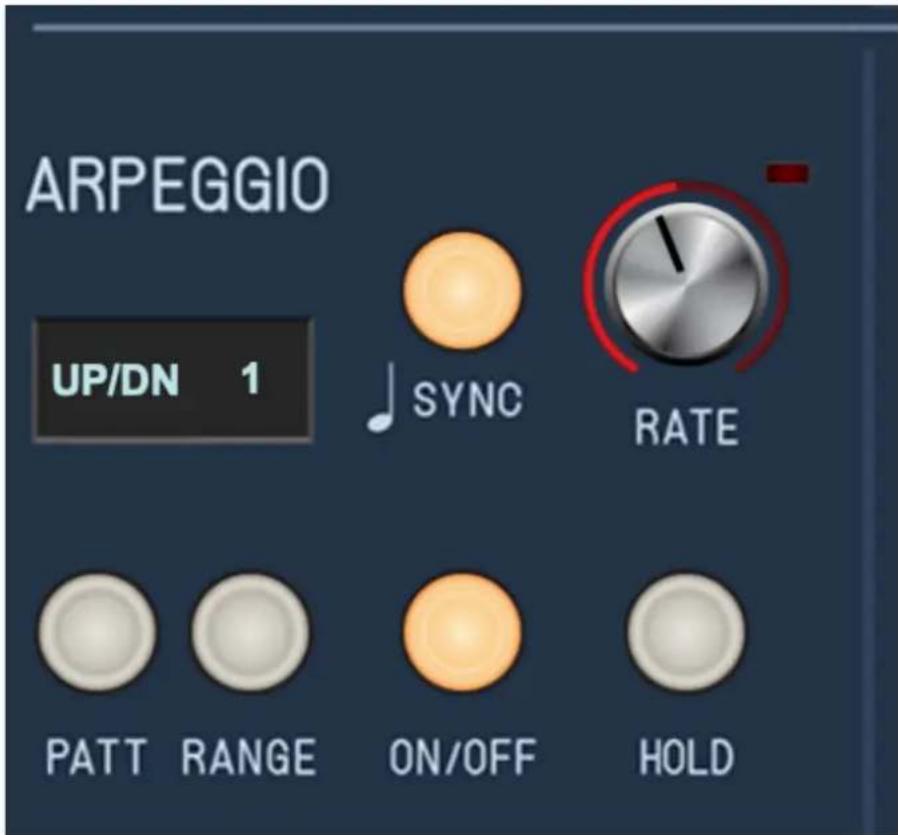
An arpeggiator is basically a step sequencer that plays each note of a chord individually in a pattern across one or more octaves.
Sync- Engaging the Sync button locks arpeggio timing to master tempo. When engaged, the Rate knob snaps to note values ranging from 1/64th note triplet to 8 beats. Sync mode locks to the tempo in the top toolbar when using the Sines standalone version or the current project tempo when the plug-in version is used in a DAW.
Rate- Sets the rate of the arpeggiator, from 0.25 to 30 Hz (with Sync disabled).
Pattern and display- Click to open a popup menu defining note play order:
- Up- Plays notes in order from lowest to highest.
- Down- Plays notes in order from highest to lowest.
- Up-Down- Plays notes from lowest to highest then back to lowest again (the highest and lowest note will be play twice in a row)
• Key Order- Plays notes in the order they are struck.
- Random- Randomly plays notes within the current range.
Range and display- Selects the number of octaves the pattern will play before repeating.
On/Off- Enables and disables the Arpeggio section. Seriously, why do I type this stuff?
Hold- When engaged, arpeggios continue to run without having to continuously hold down keys. This allows you to play a series of chords without the arpeggiator stopping as keys are released. Be aware that it will not stop until you disengage the button again. Mapping Hold to a sustain pedal or button on a MIDI controller can be useful for conveniently toggling the arpeggiator on and off, plus you can wave your arms around fruitily, like it was 1982 and you're in Duran Duran. (Just think, someone actually hired me to write this crap and miraculously I remain employed.)
Keyboard Assign
flowchart
graph TD
    A["POLY 1"] --> C["CHORD MEMORY"]
    B["POLY 2"] --> C
    D["SNGL"] --> E["NOTE PRIORITY"]
    F["UNI"] --> E
    G["MAX VOICES"] --> C
    H["LAST"] --> E
    I["LOW"] --> E
    J["HIGH"] --> E
    K["MULTI TRIGGER"] --> E
    L["UNISON DETUNE"] --> M["Note Priority"]
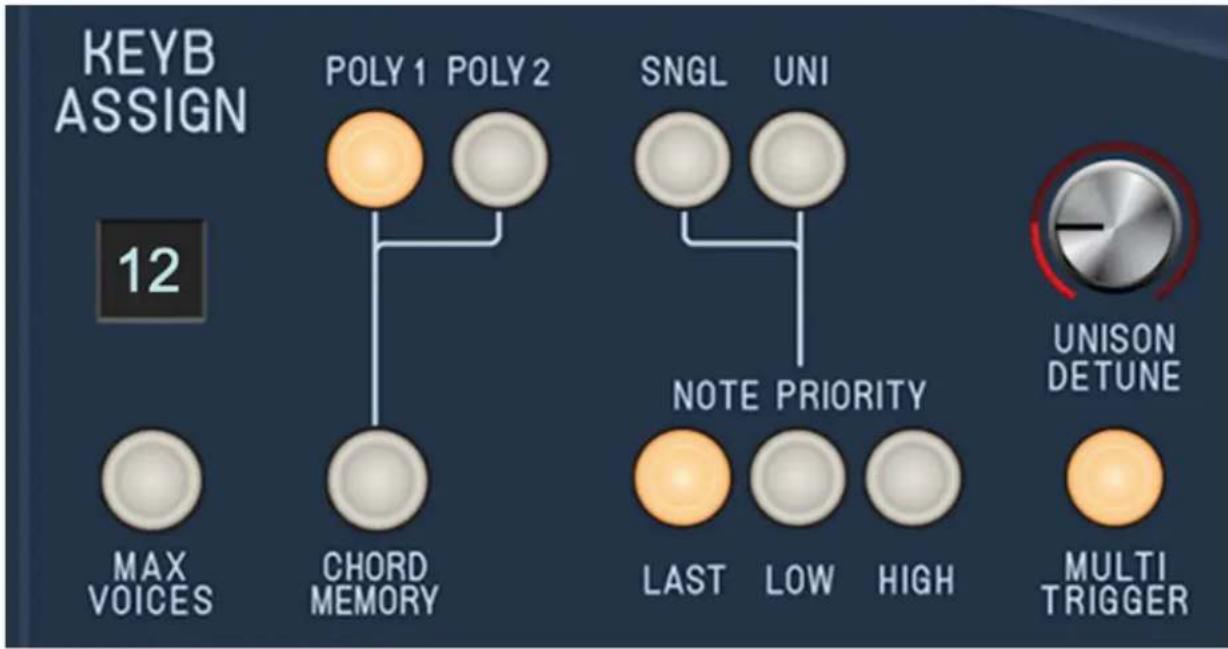
The Keyboard Assign section determines how notes are assigned to synthesizer voices.
Max Voices- Sets the maximum number of notes that can sound simultaneously, from 2 to 16. You may want to reduce the max voices if you're using an older computer.
Poly 1- This is the standard polyphonic mode. If the number of notes played exceeds the current maximum setting, it uses a sophisticated allocation scheme to steal the most recently played notes. In use, this means if you're holding a bass note with your left hand, it won't disappear while playing chords and melodies with your right hand.
Poly 2- Poly 2's allocation is optimized for use with Sines' glide function. Generally speaking, implementing polyphonic glide can be a tricky proposition (because we don't know whatcher gonna play next), but Poly 2 mode does a pretty swell job of "knowing" which notes to glide from and to when holding notes while playing melodies, regardless of whether notes are played legato or separately. If the number of simultaneous notes you'll be playing in a passage, we recommend setting the Max Voices control accordingly. For example, if you're consistently playing triads, set Max Voices to 3.
Chord Memory- Allows chords to be memorized and played with a single key. To memorize a chord, click theChord Memory button. The button flashes
to indicate that it's in learn mode. Play a chord up to 16 notes (hey, we don't know how many fingers you have); when the last note is released, the button illumination turns solid and the chord is memorized. The Max Voices number display will show how many notes are in the memorized chord. To disable Chord Memory mode, click the button again.
Chord Memory only works in Poly 1 and Poly 2 modes; its button goes dim if one of the mono modes is selected.
Note that Chord Memory isn't just for "chords" per se; it can be used for octaves, fifths, or any desired combination of notes.
Single- One note can be played a time with one voice sounding. The Max Voices display changes to 1 and its button is disabled when Mono Single is selected.
Uni and Unison Detune knob- One note sounds at a time. Multiple voices will "stack" according to the current Max Voices setting. The Uni button should be used in conjunction with the Unison Detune knob which "spreads" the tuning of the oscillators for fat sounds. Note that the setting of the Master section Analog Drift knob will add to the overall amount of oscillator detune.
Note that the Detune knob has no effect in Poly 1 and Poly 2 modes. Use the Master section Analog Drift knob if you'd like to add some global detuning/analog vibe.
Note Priority (Single and Unison modes only)- These three buttons define how voices responds to incoming note data when Mono Single or Mono Uni modes are selected.
- Last- The most recently played note takes priority.
- Low- The lowest note played takes priority.
• Hi- The highest note played takes priority.
Multi Trigger (Mono modes only)- Defines triggering behavior for the Filter Envelope and Amplitude envelope generators. When Multi Trigger is enabled in any of the mono assign modes, the envelopes retrigger from the beginning every time a new key is pressed. When Multi Trigger is disabled, the envelopes will only retrigger if no other notes are currently held; this is known as "single trigger" or legato mode. Single trigger mode is useful for emulating the sounds of some acoustic instruments - for example, the sound of plucking a note on a guitar, then sliding on the string to different notes without plucking again. Multi Triggermode generally feels more responsive
to play and is useful for more aggressive passages - in guitar lingo, something like picking every single note.
Effects

Sines features studio-quality effects including distortion, mod effects, delay (including our nifty Stardust tape delay algorithm), and reverb (with our awesomely huge Galactic algorithm.) Best of all, effects parameters are fully modulatable using the Mod Matrix section.
Distortion
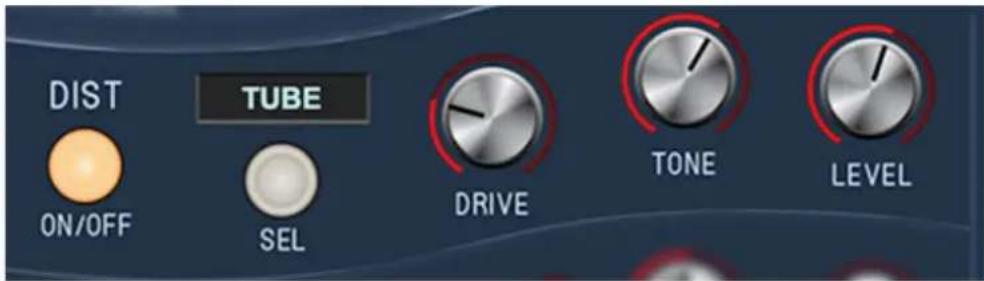
Sines distortion effect operates in dual-mono mode; that is, it doesn't stereoize incoming mono signals, but incoming stereo imaging is maintained - the stereo image isn't summed to mono. You can hear this for yourself by setting up a patch with two or more oscillators and moving the Pan sliders.
On/Off- Enables and disables distortion effect.
Select (Sel) button- Selects effect mode.
- Tube- This is the mellowest distortion mode. Use it to add just little bit of vintage hair to sounds.
- Grunge- Loud, aggressive, and raunchy, like Soundgarden.
- Fuzz- Also aggressive and raunchy, but more fizzy and vintage, like uh... In-A-Gadda-Da-Vidda (baby).
- Sample Crush- This actually changes the sample playback rate - going all the way down to 500 Hz (not kHz, but Hz!), so it can make a real mess.
- Tone & Level- Not a distortion effect at all - in fact the Drive knob is disabled in this mode, but the Tone knob is usable as a flexible pre-other-
effects one-knob tone control.
Drive- Amount of distortion.
Tone- Relative brightness of tone.
Level- Overall volume; this doesn't affect the amount of distortion.
Increasing drive will cause an overall volume increase, Level can used to balance things out.
Mod FX
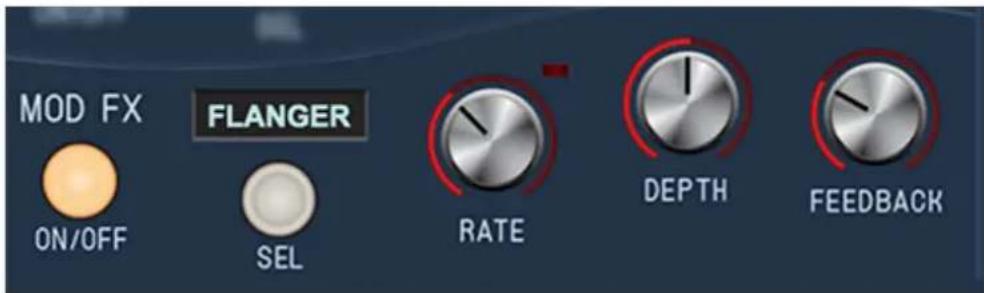
Mod FX features chorus, flanger, and rotary speaker modes. Mod Effects operate in stereo, that is, incoming mono audio will be stereoized, but dry panned audio will maintain its pan position.
On/Off- Enables and disables distortion effect.
Select (Sel) button- Selects effect mode.
- Chorus
- Flanger
- Phaser
- Rotary Speaker
Chorus and Flanger are very closely related, with the general difference being that Flangers use a shorter time range and some amount of feedback (which intensifies the "jet-flyby" effect), whereas choruses utilize a comparatively longer delay, and no feedback.
Rate- Sets the modulation speed from 0.01- 8 Hz. The LED light will flash to show the current rate. When in Rotary Speaker mode, the Rate knob acts as a two-position slow/fast switch. Settings from 0-50% will be slow, and 50% to 100% will be fast. When the rate is changed, the rotary effect accelerates
and decelerates just like a real rotary speaker. The mod wheel or other mod sources can be assigned to alternate the speed setting using the Mod Matrix.
Depth- Sets effect depth, i.e. the amount of modulation. The Depth is disabled in Rotary Speaker Mode.
Feedback- Sets the amount of internal feedback when in Flanger mode. Because chorusing and rotary speakers doesn't make use of feedback, the Feedback control is disabled when in Chorus or Rotary Speaker modes.
Delay
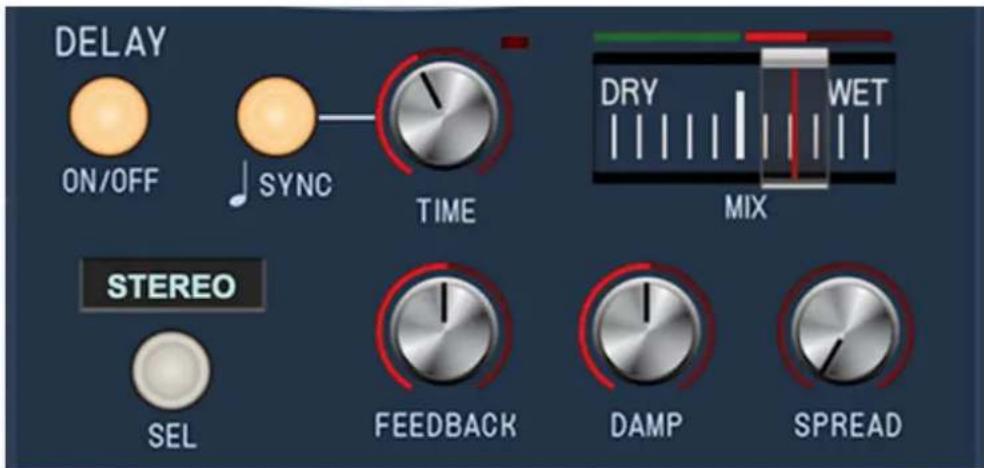
A handy and DAW sync-able delay with multiple effect modes.
The delay operates in dual mono so incoming stereo imaging (i.e. panning oscillators) is maintained - the stereo image is not summed to mono. It can widen the stereo image of incoming mono or stereo signals by using the Spread knob described below.
On/Off- Enables and disables delay effect.
Sync- Enabling the Sync switch locks the delays time to master tempo. When engaged, the Time knob snaps to note values ranging from 1/64th note triplet to 8 beats. Sync mode locks to the tempo in the top toolbar when using the standalone version or the current project tempo when using the plug-in version in a DAW.
Time - Sets delay time, from 1 to 2000 ms. If the Sync button is enabled, time settings snap to synchronized note values (see preceding Sync switch). The ms display always shows the exact delay time in milliseconds.
Mix- Balances the level of dry and wet signal.
Select (Sel) button- Selects effect mode.
- Stereo Delay- A standard, clean sounding delay.
- Ping Pong Delay- Echoes alternate between audio channels.
- Tape Delay- Reproduces the effect of a vintage "space echo" tape delay.
Feedback- Routes the output to the input for additional repeats.
Damp- Attenuates high frequencies as the knob amount is increased. Not only does this create more natural sounding decays, it also reduces the "stacking" effect that occurs with high feedback levels.
Spread- This subtracts delay time from the left channel and adds time to the right channel, creating a wide stereo effect, as well as preventing echoes from "piling up" in the center of the image. Note that the subtracted and added delay effectively offsets the overall delay time setting with each repeat, so long delays combined with high feedback settings can become off time (just back off the Spread knob a bit to fix).
Reverb
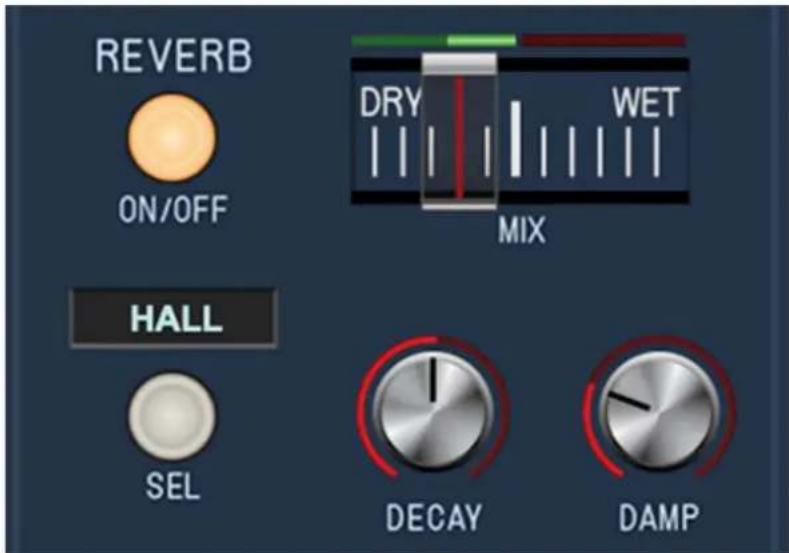
A smooth, studio-quality stereo reverb. The stereo implementation allows it to be used to stereoize mono (i.e. centered) sounds, but panning positions are retained.
On/Off- Enables and disables reverb effect.
Mix- Balances the level of wet/dry reverb signal.
Reverb Type- Allows selection of Spring, Room, Plate, Hall, and Galactic reverb algorithms. In case you're wondering, Galactic mode is a mega large,
super vibey, super-spacey algorithm that you'll dig.
Decay- Sets the length of reverb release time/size of room.
Damp- Attenuates high frequencies as the knob amount is increased.
Graphic EQ
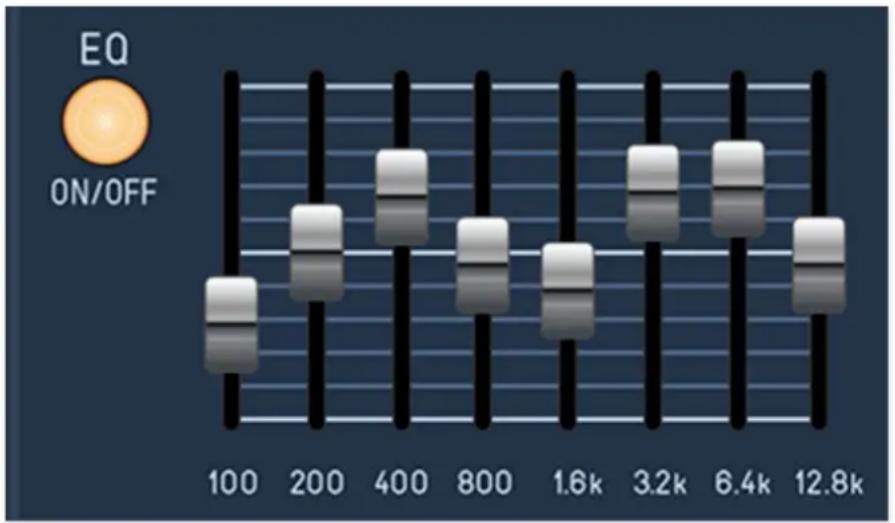
bar
| Time | EQ Value | |------|----------| | 100 | Low | | 200 | Medium | | 400 | High | | 800 | Medium | | 1.6k | Low | | 3.2k | High | | 6.4k | High | | 12.8k| Medium |Ok, who else gives you a cool graphic EQ on a synth? This is an eight-band EQ with 12 dB of cut or boost for each band, across the master output of the entire synth.
If you've created a patch by stacking a ton bunch of pure sine waves in different octaves and tunings (such as the Templates>Harmonic Series factory preset), the bass can get pretty large - the graphic is nice for getting that under control.
On/Off- Enables and disables EQ effect.
Band Sliders- Cuts or boost up to 12 dB at 100, 200, 400, 800, 1600, 3200, 6400, and 12,800 Hz. (Try modulating these with an LFO in the Mod Matrix!)
Remember that all effects parameters can be modulated via the Mod Matrix, so you can get all crazy and Hainbach-y.
Master
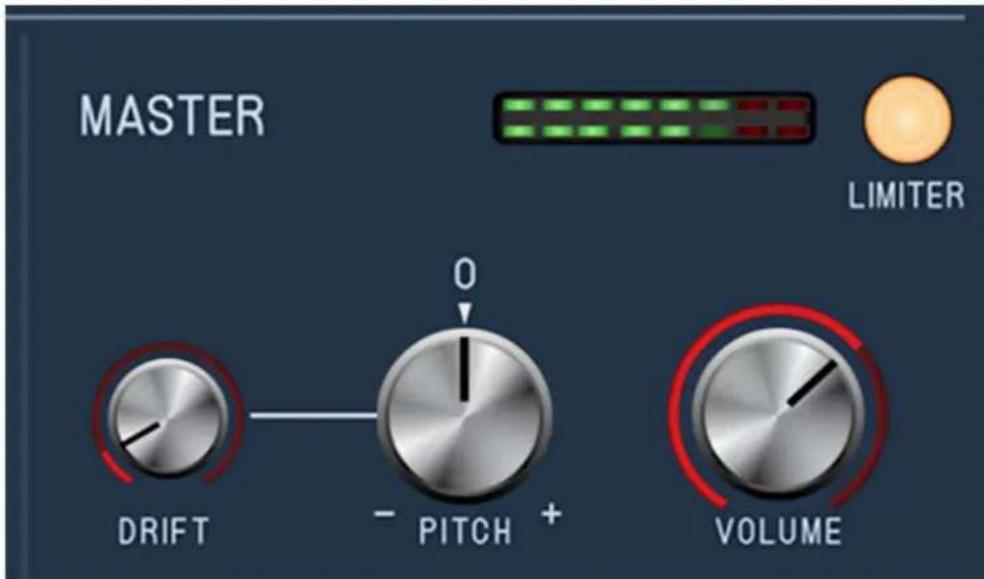
The Master section controls affect the entire instrument globally. All Master settings are saved with individual patches.
Drift- Applies a random amount of independent tuning drift to the synth oscillators and filter frequencies for a more authentic analog character. We generally recommend always leaving it turned up a bit, with one exception. If you're recreating DX FM synthesis sounds, you may want to turn it all the way down, for vintage-correct, exactly-perfect modulator/carrier interaction.
Pitch- Sets the overall tuning for the entire instrument up or down by one semitone.
Limiter- This is a switch that applies a transparent limiting effect to help prevent overloading and clipping.
Volume and output meters- Controls the overall instrument volume. You'll want to optimize the output to avoid clipping using the Master Volume knob as well as the oscillator Level sliders. Try to keep these out of the red or you may experience ugly digital clipping.
Left-Hand Controls
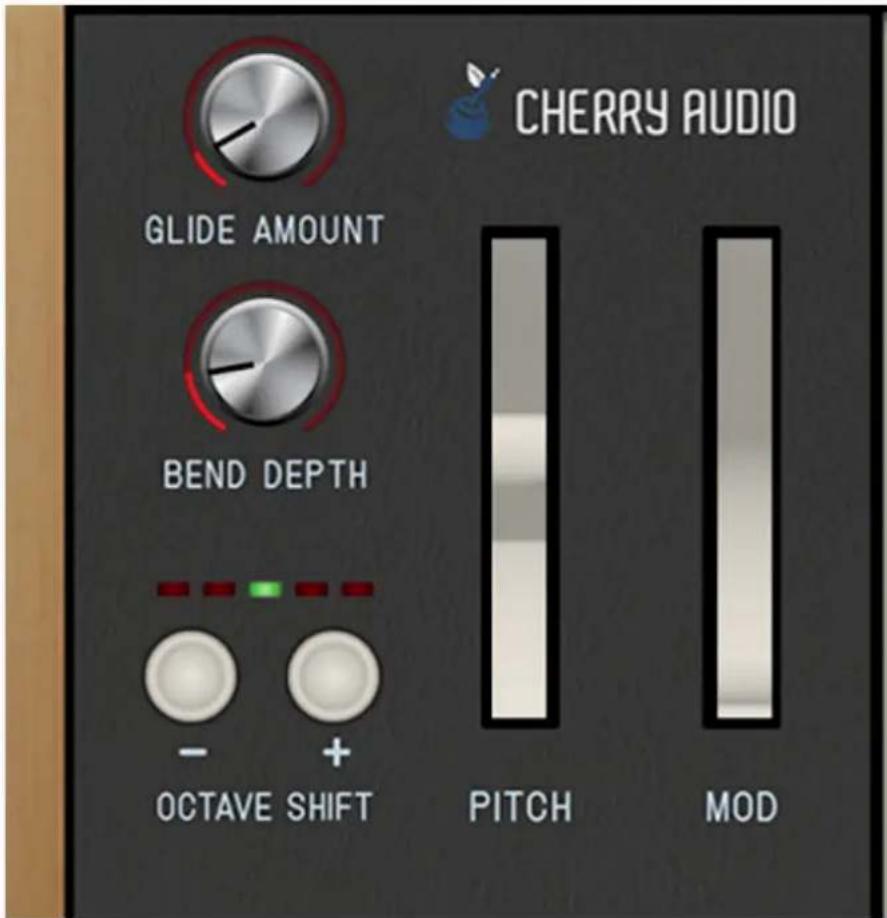
The Left-Hand Controls section includes standard "performance" controls as follows:
Glide Amount- Also known as "portamento," glide delays the voltage change between pitches for a sliding effect. Glide is individually enabled or disabled using the Glide buttons in each oscillator section; the Keyboard Assign Glide knob sets the glide speed globally. Lower values = faster glide times, higher values = slower glide times. Glide works in all voice modes. If you'd like to use glide polyphonically, it works best (i.e., most predictably) in Poly 2 mode.
Bend Depth- Sets the maximum amount of bend via a USB/MIDI controller pitch bend wheel. Maximum bend depth is an octave.
Octave Shift +/-- Transposes the overall tuning for the entire instrument up or down in octave increments. The green center LED is the nominal setting.
Pitch wheel- Standard pitch bender with a range specified by the adjacent Bend Depth knob. The pitch wheel can be moved onscreen with a mouse or
with a MIDI/USB pitch bend wheel or joystick.
Mod wheel- The mod wheel can be moved onscreen or with a MIDI/USB mod wheel or joystick. It outputs a constant control signal that can be used by selecting Keyboard>Mod Wheel with any of the mod Src button menus.
Programming Sines - Three Different Approaches
By its nature, Sines is a unique combination of traditional synthesis parameters combined with some unusual oscillator parameters and ways of making the oscillators interact that might not be obvious at a glance. After using Sines for a while, it became clear that there are a few different ways a user might approach programming sounds. The good news is that with its all-controls-visible-at-once user interface and oscillator oscilloscopes, it's easy to get your head around and quickly make all manner of nifty (and dynamically variable) racket!
Approach #1 - Stacking Sine Waves
Generally known as "additive synthesis," the concept is that much like prime numbers, any audible sound can be synthesized by combining sine waves at different pitches and amplitudes. Over the years a few commercial synthesizers have utilized additive synthesis (notably the Digital Keyboards Synergy and the Kawai K5), but additive never really took off, because it can take a lot of sine waves (and thus a lot of programming) to create complex sounds. With that said, there's one VERY popular synth that exclusively used additive sine waves: the venerable Hammond B3/C3 tone wheel organ, which generated a whole bunch of sine waves via mechanical tone wheels spinning in a magnetic field, and allowed control of their levels via drawbars.
Thus you might not guess by looking at it, but Sines is capable of making bang-up organ sounds. It might not seem as if four oscillators creating sine waves would offer many tonal options, but remember that each oscillator includes an adjustable sub sine wave (one octave down) and super sine wave (one octave up), so it's really like having 12 individual sine wave oscillators. Although each of these waves isn't individually tunable, this isn't a big limitation in use, because you'll typically want the sine waves tuned to standard even harmonic series intervals, such as octaves, fifths, major thirds, or minor sevenths. The Templates>Harmonic Seriesfactory preset is an excellent starting point - oscillator 1 contains root notes, oscillator 2 contains fifth intervals, oscillator 3 contains higher root notes, and oscillator 4 contains dominant seventh intervals. Many tonal colors can be achieved with different combinations of the main oscillator Level sliders along with the Sub Osc and Super Osc level sliders. (For those of you using Cherry Audio's
Voltage Modular, the Harmonic Series patch is essentially a recreation of the Buchla-inspired Additive Oscillator module.)
The Filter section can also be used, but if you're using pure sine waves, there isn't much content to filter, so the filter will behave largely as a volume control for harmonics.
Finally, there's nothing stopping you from using the oscillator waveshaping controls to alter and enrich timbral content, but remember that the waveshaping controls only affect an oscillator's primary waveshape; the Sub Osc and Super Osc waves are always going to be pure sine waves.
Approach #2 - Standard Subtractive Synthesis (With Mondo Oscillators)
If you've already begun creating sounds, you're probably already using Sines this way, that is, as a four-oscillator synth running through an analog-style filter. The good news is that if you're familiar with standard analog synths, you don't need to know much more - just twist the Feedback, Phase, Width, Shape, Wavefold, and Drive knobs until you land on something you like and treat it like any other analog synth. Because Sines oscillators don't have controls for directly creating analog-style waves, here are some tips for nailing classic analog oscillator tones:
- Sawtooth/Ramp waves- To "bend" a sine wave into a saw or ramp wave, simply crank up the Feedback knob in either direction. If you'd like a little more high-frequency "hair," rotate the Width knob clockwise from center, or add some Drive (or hey, do both, we're all in show business here!). The waveform won't necessarily look correct on the oscilloscope, but it will sound authentic (and remember that the waveforms from some of the classic analog synths look pretty funky when you actually view them on a scope!).
- Square and Pulse waves- Spot-on square and pulse waves can be created by turning the Shape knob fully to the left and the Drive knob fully to the right. The Width knob will function just like a standard analog synth pulse width control, and pulse-width modulation can be created by modulating the Width knob using an LFO (click Src>LFOs>LFO 1), and turn up the small mod amount knob to around 25%.
- Triangle waves- Starting with a pure sine wave and turning the Shape knob up to around 12-15% results in a waveform very close to a traditional triangle wave.
- Oscillator Sync- Like a lot of other Sines sounds, we accidentally discovered a great way to nail analog sync sweep-type tones. Any combination of oscillators can be used, but for this example we'll use Oscillators 1 and 2:
- Set Oscillator 1 coarse pitch to 4'.
- Set Oscillator 1 Phase mod Src to Oscillator 2 (click Src>Oscillators>Oscillator 2)
- Set Oscillator 1 Phase mod Via (click Via>Envelopes>Envelope 3)
- Set Oscillator 1 Phase mod amount around -6%
- Turn Oscillator 1 Drive knob all the way up.
- Set Oscillator 1 horizontal Level slider almost full up and Oscillator 2 Level slider to zero.
- Set Oscillator 2 coarse pitch to 16'.
- Set Oscillator 2 Feedback knob all the way up.
- Set Envelope 3 Attack at zero, Decay around 4000 ms, Sustain at zero and Release at zero.
- White Noise- A very pure white noise tone can be achieved by modulating oscillator phase using the output of the same oscillator. Suffice to say, the nice thing about this is that you don't have to burn up multiple oscillators. For this example, we'll use Oscillator 1:
- Set Oscillator 1 Phase mod Src to Oscillator 1 (click Src>Oscillators>Oscillator 1)
- Set Oscillator 1 Phase section mod amount knob all the way up or down
Approach #3 - Phase Modulation / DX-type FM Synthesis
With its four oscillators, phase modulation between oscillators, and ratio tuning increments, Sines absolutely nails classic Yamaha DX-style "frequency modulation" synthesis. We know a lot of folks get stomach cramps, clammy hands, and other non-specific symptoms when the topic of FM synthesis arises, but trust us, it's relatively easy with Sines (and SO much easier than an 80s synth with up/down buttons and a tiny numeric LED display). Before we go any further, allow us to clarify perhaps the largest nomenclature foul-up in the history of synthesis...
FM synthesis is short for "frequency modulation synthesis." On the most basic level, FM synthesis uses one oscillator running at an audio frequency
("modulator") to modulate another oscillator ("carrier"). If you've ever used a low-frequency oscillator to modulate the pitch of another oscillator for vibrato effects, it's exactly the same thing, except that the modulation oscillator is running at a much higher frequency. Because it's running at such high speed, the resulting audio isn't heard as vibrato, but as a change in overall timbre.
The Boring and (Sort Of) Important History of Frequency Modulation vs. Phase Modulation Synthesis
Using an oscillator running at audio rates to modulate another oscillator makes some nifty sounds but the result is somewhat inharmonic in nature; that is, it inherently sounds a bit sour and out of tune. Great for space lasers, not so great for "Saving All My Love For You." The big spoiler is that Yamaha FM synths don't generate sound via true FM synthesis - they actually use phase modulation instead. Phase modulation is roughly similar, but instead using an audio-rate sine wave to modulate an oscillator's pitch, phase modulation modulates the carrier oscillator's phase relationship to the modulating oscillator.
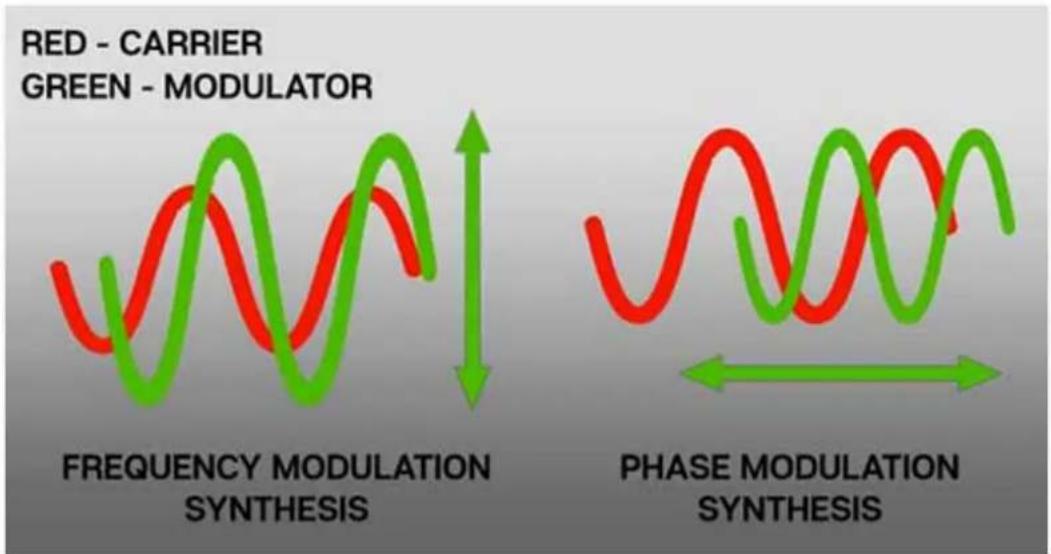
The best analogy would be to think of frequency modulation as moving the carrier oscillator up and down, whereas phase modulation moves the carrier oscillator from side-to-side, shown in the diagram above. The important takeaway is that phase modulation sounds much more in tune and musical, and offers a wider timbral range.
Why Yamaha didn't refer to their revolutionary synthesis as phase modulation (or PM) remains a mystery of the ages, but Sines is capable of both true frequency modulation synthesis and phase modulation, so you can try each for yourself and see what we're talking about.
From here on out, we'll refer to this DX synthesis thing as "phase modulation synthesis."
Phase Modulation Basics
Generally speaking, there were two "levels" of Yamaha FM synths - "four operator," and "six operator," often abbreviated to "four-op" and "six-op." An "operator" is just another word for an oscillator, so a four-op synth contained four oscillators, and a six-op synth contained six oscillators. Naturally, a six-op synth (i.e. DX7) was capable of more elaborate sounds than a four-op instrument, but in reality, the two extra oscillators usually didn't make that much difference.
These oscillators were arranged into various configurations where some would be modulators (like a real fast LFO) and others would be carriers (sound sources). These configurations are called "algorithms." In some algorithms, most of the oscillators would be carriers, in others, modulators were stacked with other modulators, etc. If you've ever seen a DX instrument, the little icon diagrams across the top was a "cheat sheet" showing the configuration of all available algorithms; four-op instruments had eight algorithm choices and most six-op instruments had 32. As you may have guessed, certain algorithms lend themselves to different types of sounds, but the good news is that you can get a lot of mileage out of just a couple of algorithms - in fact, you can get a heck of a lot of different sounds by just modulating one oscillator with another.
Phase Modulation Synthesis with Sines
"Are these clowns ever gonna tell us any useful information!?!?" Stay with us, we're getting there! We'll take this in two steps: first we'll show how to create a knucklehead-simple one-oscillator-mods-another-oscillator "two-op" phase modulation synthesis, and then we'll haphazardly toss you into the digitally abyss of all eight standard four-op algorithms.
In our basic phase modulation patch, we're going to set up Oscillator 2 (modulator) to modulate the phase of Oscillator 1 (carrier).
Click the New button in the upper-left corner to initialize Sines Click the Src button above Osc 1's Phase section, and select Oscillator 2
(Src>Oscillators>Oscillator 2)
At this point, if you hold a note and turn the little Phase mod amount attenuator, you'll hear something that sounds very much like a DX7. Instead of manually twirling the knob to and fro, let's modulate the amount of Oscillator 2 phase mod with an envelope generator:
Click the Via button above Osc 1's Phase section, and select Envelope 3 (clickVia>Envelopes>Envelope 3)
Set Oscillator 1 small Phase mod amount knob around 12%
Set Envelope 3 Attack at zero, Decay around 2400 ms, Sustain at zero and Release at zero
Aaannnd it's 1983 all over again... we told you DX synthesis was easy! Now try playing around with both oscillators' Ratio controls - a cavalcade of classic DX goodness awaits. If you find something you like, use the Utility button above the oscilloscope to copy Oscillator 1 to Oscillator 3, and Oscillator 2 to Oscillator 4, pan Oscillator 1 hard left and Oscillator 3 hard right, and dial in the Drift knob (in the bottom right Master section) to taste. Instant stereo FM fwangery.
flowchart
graph TD
    A["3"] --> B["2"]
    C["4"] --> D["1"]
flowchart
graph TD
    A["1"] --> B["2"]
    B --> C["3"]
    C --> D["4"]
flowchart
graph TD
    A["4"] --> B["1"]
    A --> C["2"]
    A --> D["3"]
flowchart
graph TD
    A["1"] --> B["2"]
    B --> C["3"]
    C --> D["4"]
    style A fill:#99ccff
    style D fill:#99ccff
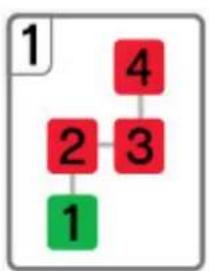
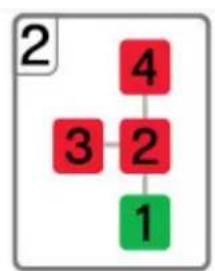
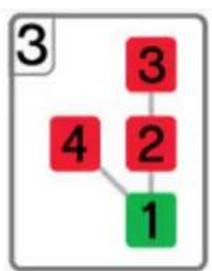
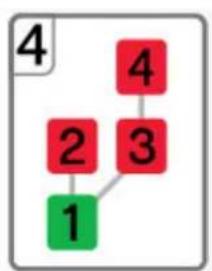
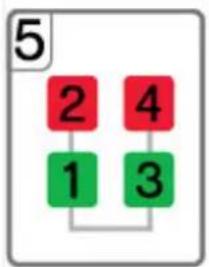
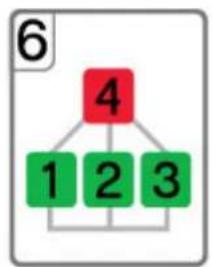
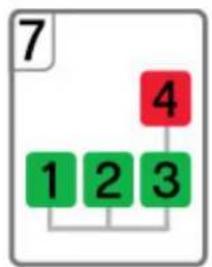
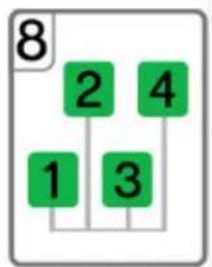
Shown above are the eight algorithms available in vintage four-op DX synths. Each colored box represents an operator (i.e. an oscillator). The green operators boxes on the bottom are carriers (sound generators), and the red boxes on top are modulators (mod oscillators affecting the timbre of carrier oscillators).
You'll find patch templates for all eight algorithms in the Templates preset folder. These are strictly intended as starting points. Instead of using the Phase knob mod controls, all of the oscillator phase mod routings have been
configured in the Mod Matrix. This is because algorithms 2, 3, 4, and 6 route a single modulator to multiple carriers, which isn't possible using the mod boxes above the panel knobs.
The important controls you'll want to play with are the Ratio knobs, and the Mod Matrix Amount knobs, which determine how much modulation signal gets to the carrier oscillators. We've set the mod Amount knobs to 10% in the templates, but you'll most likely want to modulate their depth by configuring envelope generators in the Via slots. If you run out of envelope generators, remember that LFOs set to One Shot mode can be used to create simple envelope generators (particularly the various permutations of saw and ramp waves).
As you're checking out the various algorithm templates, also notice that the oscillator Level sliders in each template correspond to the green carrier oscillators in each template: green=audio source (Level slider turned up), red=mod source (Level slider turned down).
MIDI Controllers Setup and the MIDI Tab
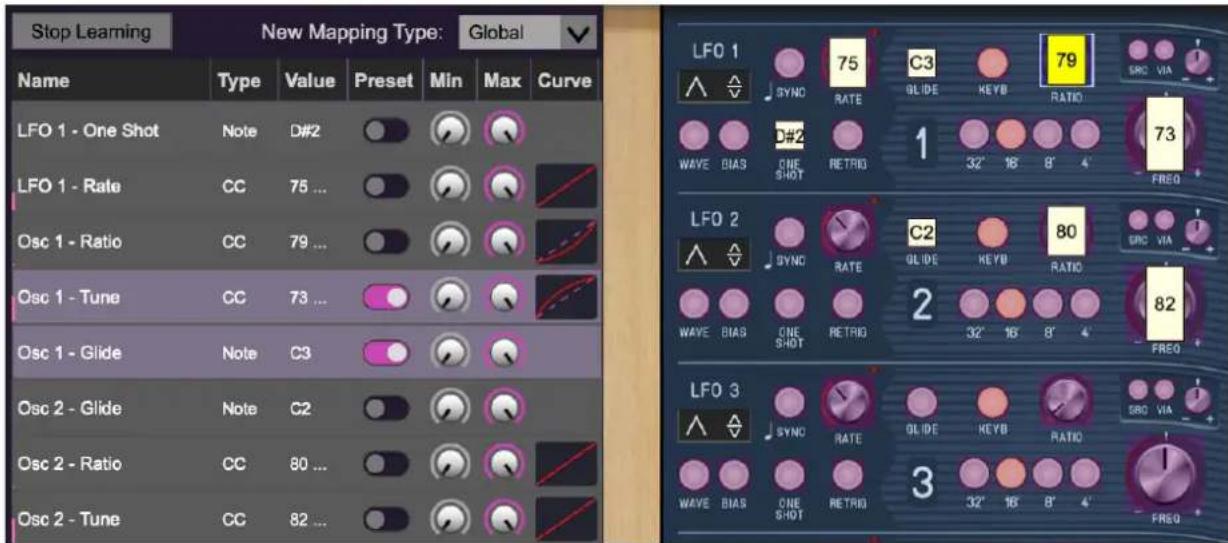
Assigning internal and external hardware controls adds a whole new dimension of control and musicality to patches, and it's really easy to do. The MIDI Tab is where all controller assignments can be viewed and tweaked. First we'll show how to assign an external hardware controller to a Sines control, then we'll go over all parameters in the MIDI Tab.
Basic External Hardware Control Assignment
This is the quick, "I just want to assign a hardware control right now!," section. We recommend reading this whole section to best take advantage of Sines' cool MIDI control assignments.
In this example, we'll assign a hardware slider control to the Filter section Cutoff Freq knob.
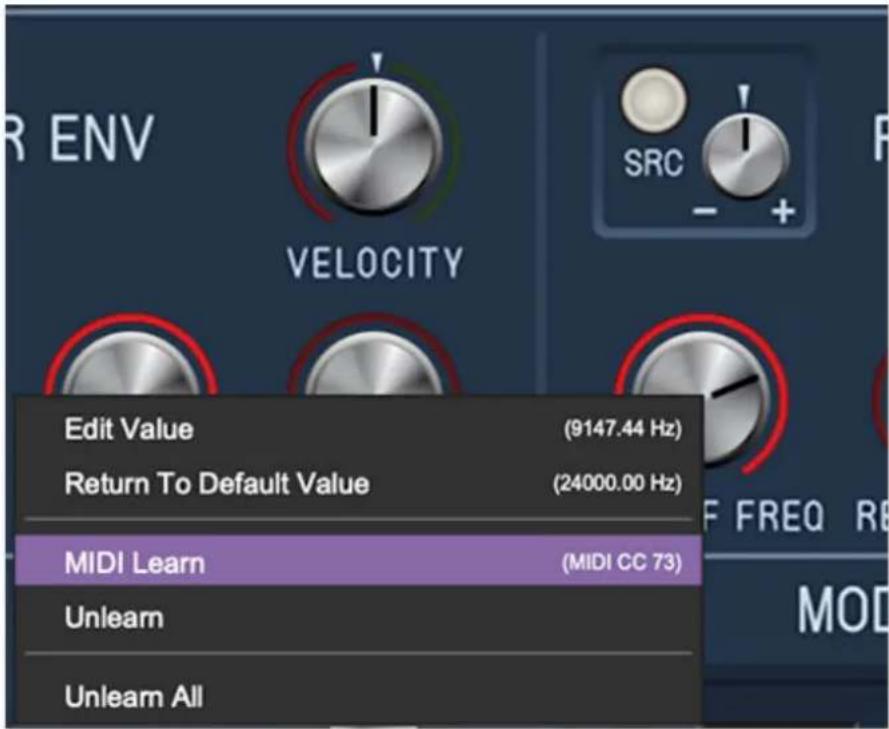
Begin by right-clicking on the Cutoff Freq knob in the Filter section and selecting MIDI Learn. A transparent purple overlay appears over the knob indicating that it's in learn mode. Now move the desired hardware control device. The purple overlay disappears and the hardware control will move the onscreen knob. If you get cold feet (or accidentally put the wrong control into learn mode), learn mode can be aborted by right-clicking and selecting Stop Learning.
This is the basic procedure for assigning hardware controllers to almost any Sines control.
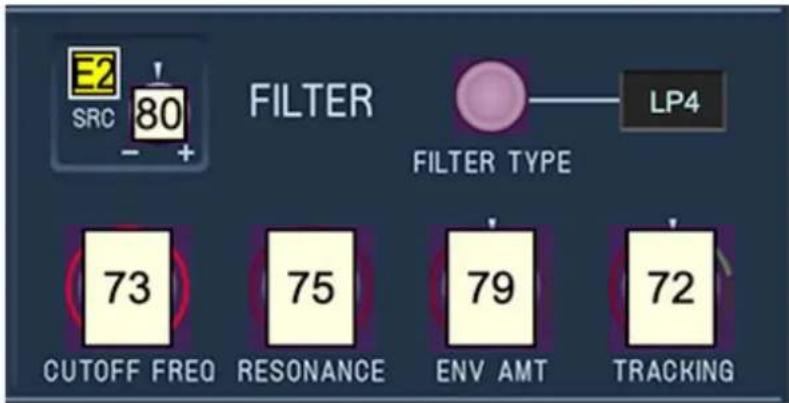
When in MIDI learn mode, any previously assigned controller numbers will show in squares. These indicate the MIDI continuous controller number of the
assigned hardware control (these are also displayed in the MIDI library tab at left).
Once a MIDI controller has been assigned, in addition to real-time control of a Sines parameter, you'll also be able to record and play back controller data from a DAW.
The MIDI Tab
This is command central for all MIDI controller assignments. Here you'll be able to see information about all currently assigned controllers and adjust control ranges.
To view or hide the MIDI Tab, click the MIDI button in the top toolbar.
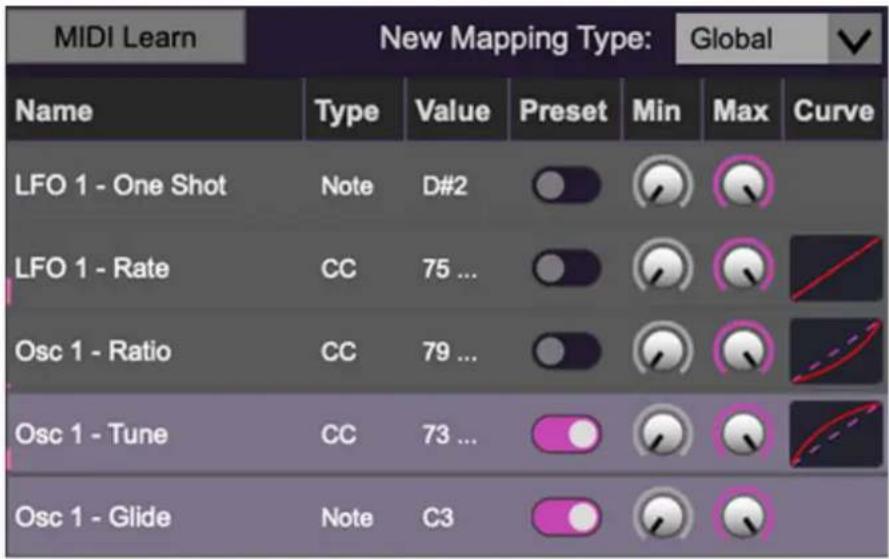
MIDI Learn button- This is almost exactly the same as enabling MIDI learn mode by right-clicking a control. Click the MIDI Learn button to enter learn mode (all controls turn purple). Unlike right-clicking on specific knobs, where Sines automatically exits controller assignment mode, clicking the MIDI Learn knob "stays on" to enable assignment of multiple hardware controls. This is handy for quickly assigning a bunch of continuous controls or the buttons of a grid-style controller.
To assign multiple controls, click MIDI Learn, click an on-screen control, move the desired hardware knob or slider, continue clicking and assigning on-screen controllers until all desired controls are assigned, then click Stop Learning to exit learn mode.
Remember that a single hardware knob和社会/orator knob is not limited to controlling just one parameter - a single hardware controller can simultaneously operate as many controls as you'd like.
New Mapping Type- This popup menu selects whether newly assigned MIDI mappings will be global (affects all sounds and doesn't change when different presets are selected) or saved with individual presets.
MIDI Tab Columns
Name- Displays the name of the parameter being controlled.
Type- There are five possible types of controller automation in Sines:
- Note- Notes played on a MIDI keyboard controller, expressed as C-1 to G9
- CC (MIDI Continuous Controller)- The standard 128 MIDI controller numbers as defined in the MIDI spec. More specifically, these are the controllers transmitted by hardware knob and slider controls. MIDI CC's can be used to control parameters in real-time or recorded and played back within DAW software.
- MMC (MIDI Machine Control)- The MIDI control protocol for tape machine-style transport controls. Back in the dark ages, this was used to control wonky old Tascam and Fostex reel-to-reel monsters, but it's useful if your MIDI controller has tape-style transport control buttons.
- Pressure- Some keyboard controllers transmit controller data when keys are pressed and released as they're held down; this is known as a "pressure" or "aftertouch." The vast majority of keyboard controllers with aftertouch transmit "mono" aftertouch only; in other words, aftertouch data is the sum of all keys to one single data stream.
The Touch Sensor section allows super fast assignment of aftertouch control to basic Poly Synthesizer and Lead Synthesizer controls, but this can be used to control any Sines parameter.
- Key- This allows keys of the computer QWERTY keyboard to at as button controls for Sines' onscreen controls.
Value- Displays the specific automation controller. In the case of a Note this would show a MIDI note number (C-1 to G9, for a MIDI CC, this would be the
MIDI CC controller number, etc. Clicking on the value opens a pop-up menu where all values are displayed and can be selected.
Preset- This slider works in conjunction with the New Mapping Typemenu. In the left position (gray background), the MIDI mapping is global (affects all sounds and doesn't change when different presets are selected), in the right position (lavender background), the MIDI mapping is saved with, and only affects the current sound preset.
The Preset switch is super nifty, because it means MIDI mappings can easily be changed to global or per-preset status at any time. (A lot of folks asked us for this feature.)
Min- Sets a limit on the lowest value any automation control can set a mapped controller to. This actually recalibrates the range of the automation controller to the remaining parameter range.
Max- Sets a limit on the highest value any automation control can set a mapped controller to. This actually recalibrates the range of the automation controller to the remaining parameter range.
- Super Tricky Min-Max Tricks Not only can parameter ranges be limited via the Min and Max knobs, mapped control destinations can be completely inverted by setting the Min knob all the way up and the Max knob all the way down (or anywhere in between).
Limiting and inverting parameter ranges with the Min/Max controls is particularly useful when multiplexing a single hardware control to operate multiple parameters. Along with the Curve control, the customization possibilities are super flexible.
Curve- These allow the customization of how incoming MIDI CC controls affect the movement of Sines' onscreen controls, ranging from exponential to linear to logarithmic curves.
MIDI Tab Column Configuration Right-Click Menus
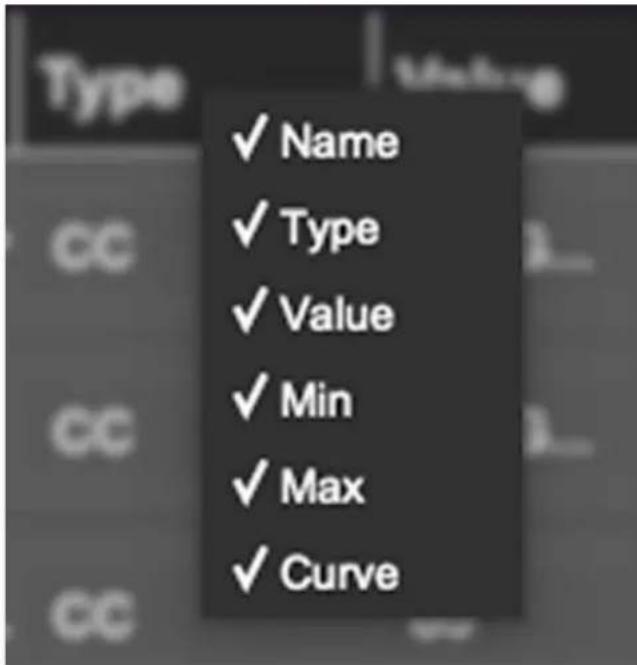
Right-clicking anywhere in the top row (Name, Type, Value, etc.) displays the column configuration menu. Checking/unchecking these allows hiding and display of each column. This has no effect on assignments.
MIDI Tab Parameters Right-Click
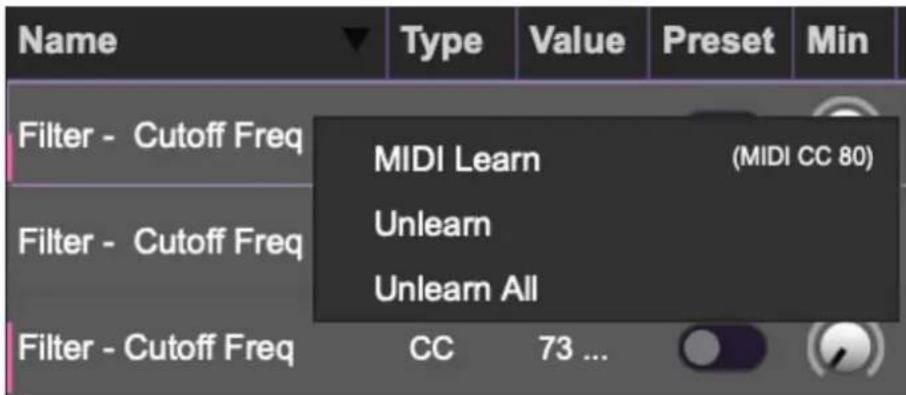
Right-clicking on an assigned parameter opens the menu above.
MIDI Learn- This is used to change the controller assigned to a particular parameter.
Unlearn- Deletes the selected automation parameter.
Unlearn All- Deletes all controller assignments for the patch. Sines will display a warning dialog prior to deletion in order to thwart potential unlearn-related disasters.
Using MIDI Polyphonic Expression (MPE)
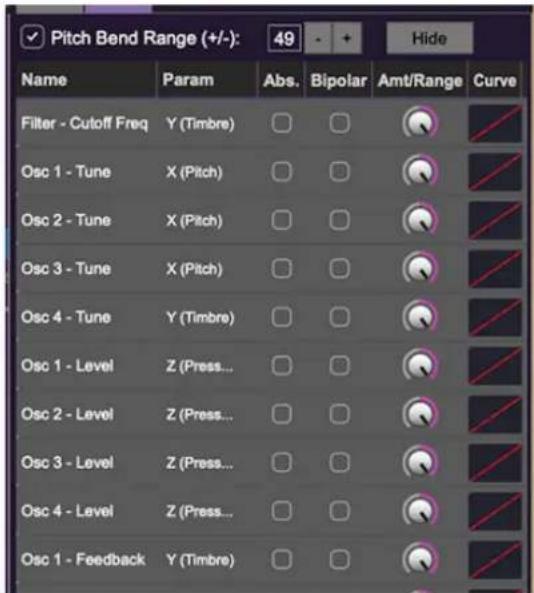
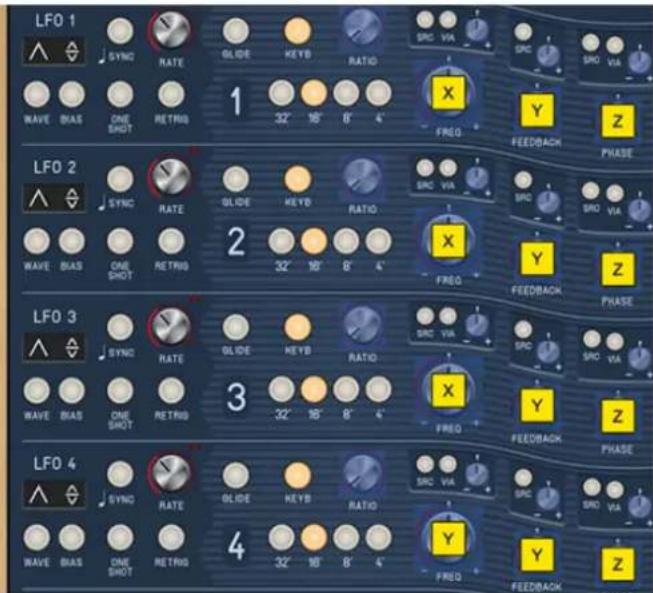
Sines supports MPE, short for "MIDI Polyphonic Expression." It's a specialized MIDI protocol enabling multidimensional controllers for controlling multiple parameters of individual notes. MPE specifies the MIDI messages used for three dimensions of control, regardless of how a particular controller physically expresses them. MIDI channel 1 is used as a master channel for global pitch bend, aftertouch, etc.; MPE utilizes MIDI channels 2-15 for the remaining controller data.
To enable MPE mode, MPE needs to be enabled in the Settings menu. Click the Settings gear icon in the top purple toolbar, then the Interface tab, then check the Enable MPE mode box. Exit out of the Settings window and click the MPE icon in the top tool bar.
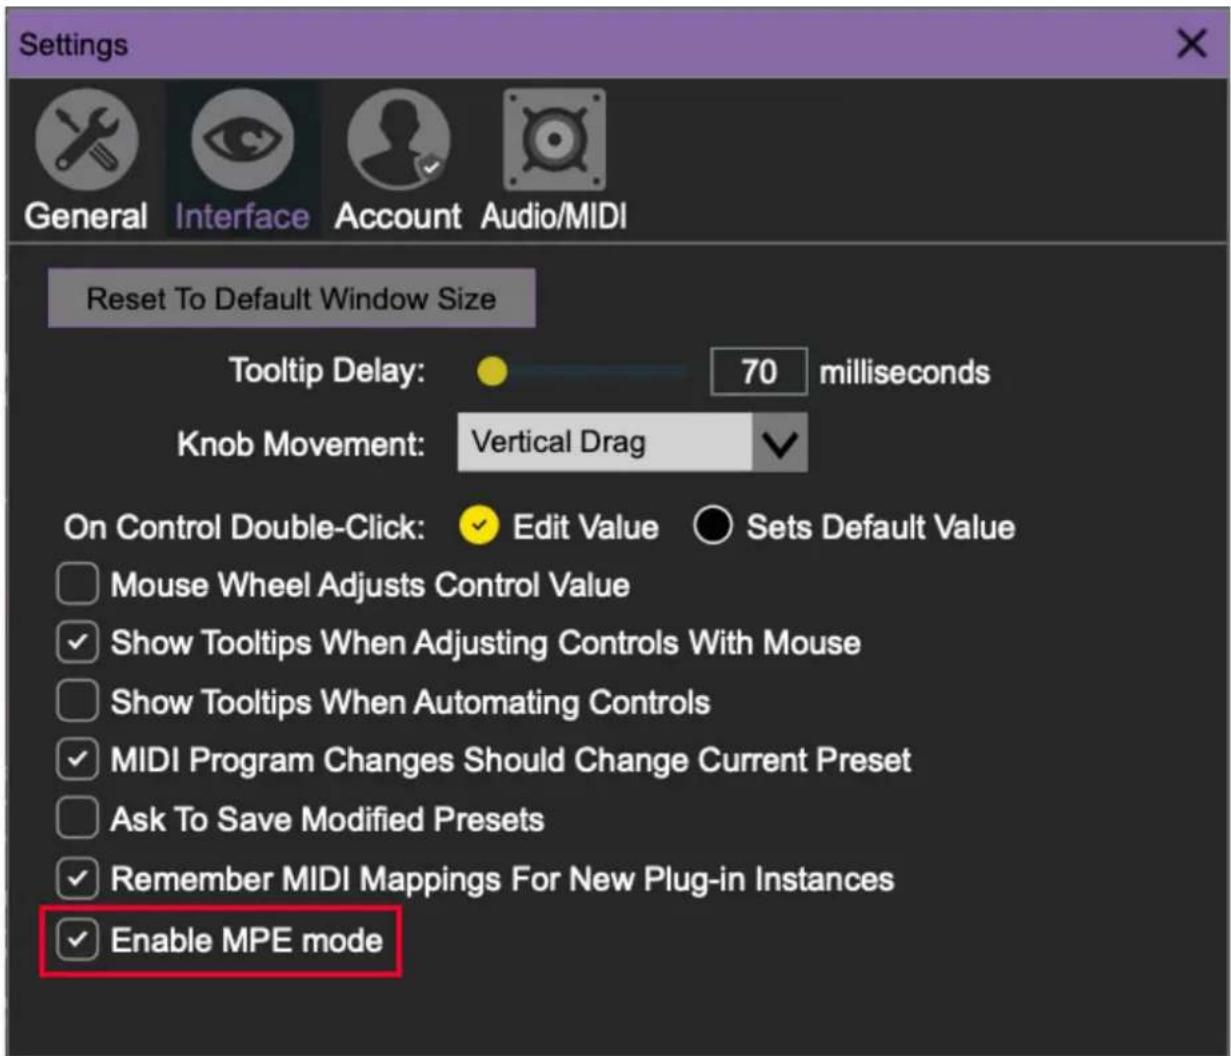
Sines displays this fanciful graphic in the Synth Voice Assign section when MPE is enabled:
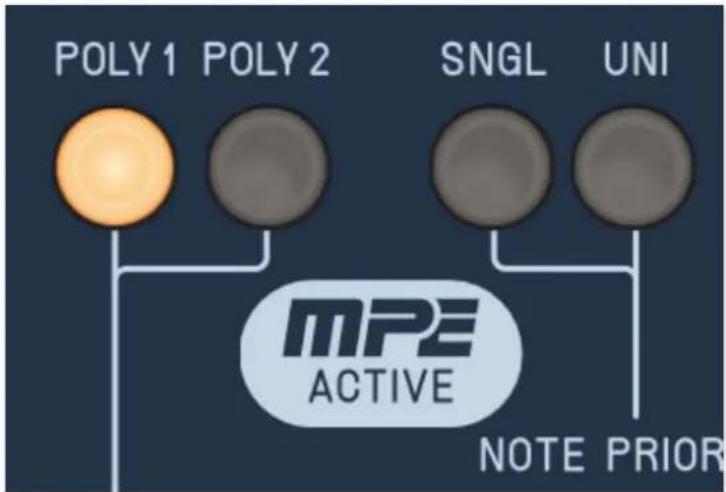
flowchart
graph TD
    A["POLY 1"] --> D["MPE ACTIVE"]
    B["POLY 2"] --> D
    C["SNGL"] --> D
    E["UNI"] --> D
    D --> F["NOTE PRIOR"]
Do not enable MPE mode if you're not using an appropriate MPE controller. Sines will not play correctly with a standard USB MIDI controller. Do not taunt happy fun ball!
MPE Control Tab
| MIDI | MPE | ||||
| ✓ Pitch Bend Range (+/-): 48 - + Hide | |||||
| Name | Param | Abs. | Bipolar | Amt/Range | Curve |
| Osc 1 - Tune | X (Pitch) | ☐ | ☐ | ||
| Osc 2 - Tune | X (Pitch) | ☐ | ☐ | ||
| Osc 1 - Feedback | Y (Timbre) | ☐ | ☐ | ||
| Osc 2 - Feedback | Y (Timbre) | ☐ | ☐ | ||
| Osc 1 - Phase | Z (Press... | ☐ | ☐ | ||
| Osc 2 - Phase | Z (Press... | ☐ | ☐ | ||
Pitch Bend check box and Range controls- At the top of the tab is a checkbox which enables pitch bend; to its right is the pitch bend range control. Its default setting is 48 semitones (four octaves). For best results you will need to match this number with your MPE controller's pitch bend setting (most MPE controllers default to 48 semitones).
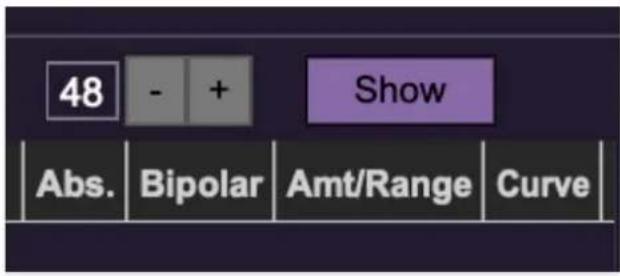
Show/Hide Button - Clicking the Show button in the MPE panel highlights all of the available MPE mappable control sliders for the Sines with blue overlays atop panel controls. Click the Hide button to hide them.
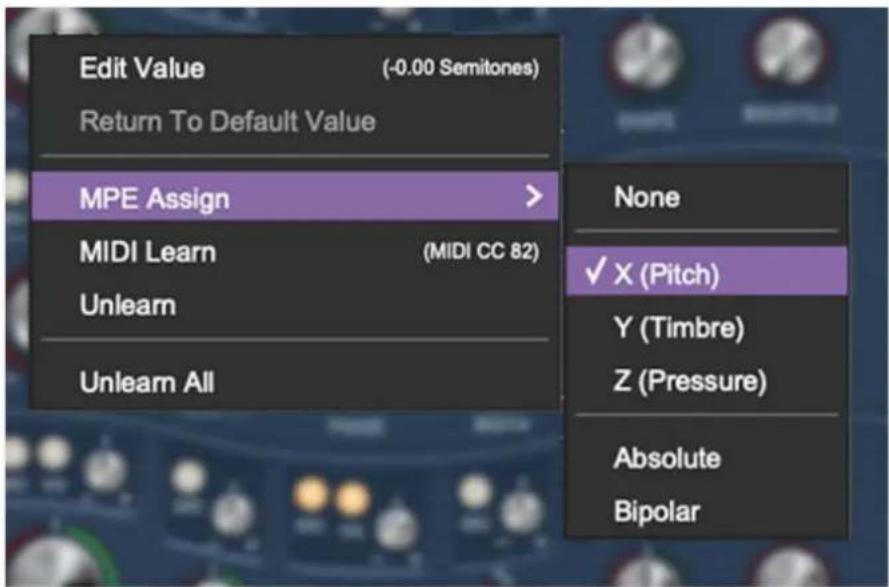
To map a control slider, right-click or [OPTION]+click (Windows) / [CONT]+click (Mac) the slider you wish to map. This reveals the controller mapping menu. Select MPE Assign.
Options are:
X (Pitch)
Y (Timbre)
Z (Pressure)
Note: Some MPE controllers such as the Roli Seaboard may have as many as five dimensions of expression. Sines utilizes the three standard dimensions: Pitch, Channel Pressure, and Timbre. Also, not all MPE controllers are equipped with a master/global pitch bender.
Once mapped, the Name and Parameter will be visible in the MPE tab. A yellow square indicator (X,Y,Z) also appears atop each of the mapped controls.
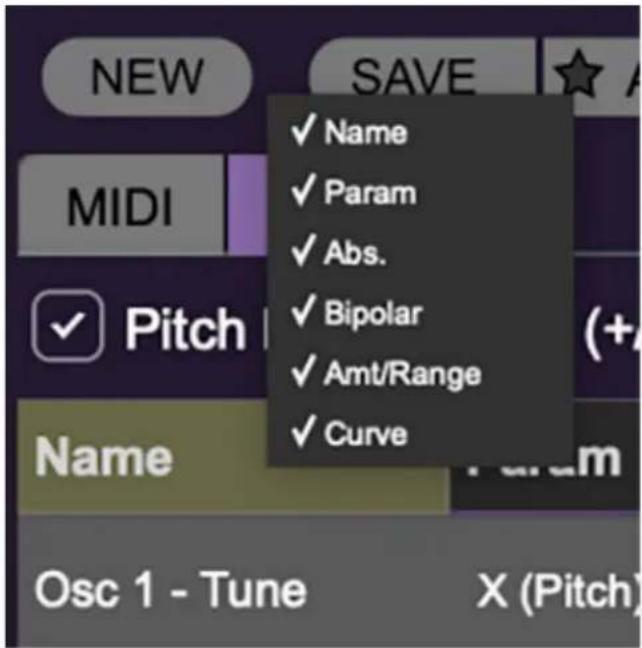
Right-clicking any of the column headers opens a popup menu allowing each header to be shown or hidden.
Name- Displays the name of the parameter being controlled.
Parameter- Displays and allows selection of the three controller types: X (Pitch), Y (Timbre), and Z (Pressure).
Absolute- Sets the Amt/Range of the controller to absolute or relative control.
Bipolar- Enables bipolar controller, i.e. the ability to add and subtract the parameter amount, as opposed to positive only.
Amount/Range- Sets the intensity of control range. If set to Absolute mode, two knobs appear for min/max settings.
Curve- These allow the customization of how controller data affect the movement of Sines' onscreen controls, ranging from exponential to linear to logarithmic curves. Click and drag on the red line and pull up or down to adjust the curve.
MPE Tab Parameters Right-Click
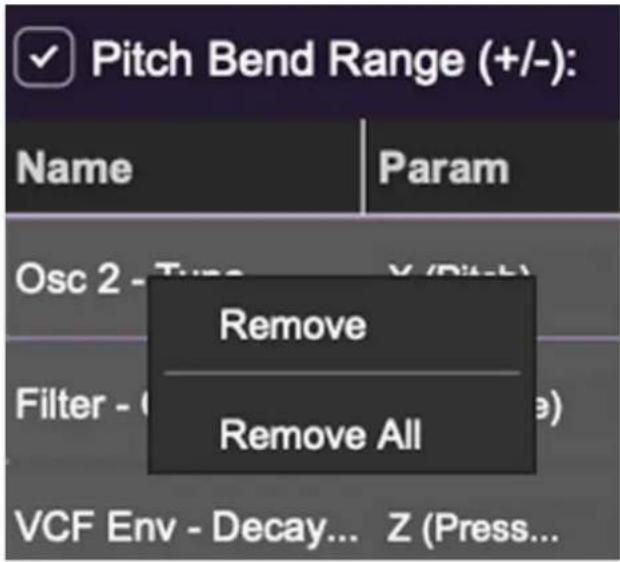
Right-clicking on an assigned parameter opens the menu above.
Remove- Deletes the selected MPE controller parameter.
Remove All- Deletes all MPE controller assignments for the patch. Sines displays a warning dialog prior to deletion in order to thwart potential disasters.
Below are all mappable Sines MPE parameters. Only polyphonic parameters (i.e. parameters that independently affect individual notes) can be mapped with MPE.
SECTION PARAMETER
OSC 1/2/3/4 RATIO
OSC 1/2/3/4 FREQUENCY MOD DEPTH
OSC 1/2/3/4 FREQUENCY
OSC 1/2/3/4 FEEDBACK MOD DEPTH
OSC 1/2/3/4 FEEDBACK
OSC 1/2/3/4 RHASE MOD DEPTH SECTION PARAMETER
OSC 1/2/3/4 PHASE
OSC 1/2/3/4 WIDTH MOD DEPTH
OSC 1/2/3/4 WIDTH
OSC 1/2/3/4 SHAPE MOD DEPTH
OSC 1/2/3/4 SHAPE
OSC 1/2/3/4 WAVEFOLD MOD DEPTH
OSC 1/2/3/4 DRIVE MOD DEPTH
OSC 1/2/3/4 DRIVE
OSC 1/2/3/4 LEVEL MOD DEPTH
OSC 1/2/3/4 LEVEL
OSC 1/2/3/4 PAN MOD DEPTH
OSC 1/2/3/4 PAN
FILTER ENV, ENV 3/4 DELAY
FILTER ENV, ENV 3/4 VELOCITY
FILTER ENV, ENV 3/4 ATTACK
FILTER ENV, ENV 3/4 DECAY
FILTER ENV, ENV 3/4 SUSTAIN
SECTIONPARAMETER
| FILTER ENV, ENV 3/4 RELEASE |
| AMP ENV VELOCITY |
| AMP ENV ATTACK |
| AMP ENV DECAY |
| AMP ENV SUSTAIN |
| AMP ENV RELEASE |
| FILTER CUTOFF FREQ MOD DEPTH |
| FILTER CUTOFF FREQ |
| FILTER RESONANCE |
| FILTER ENV AMT |
| FILTER TRACKING |
| MOD MATRIX MOD SLOT 1 MOD DEPTH AMOUNT |
| MOD MATRIX MOD SLOT 2 MOD DEPTH AMOUNT |
| MOD MATRIX MOD SLOT 3 MOD DEPTH AMOUNT |
| MOD MATRIX MOD SLOT4 MOD DEPTH AMOUNT |
Popular MPE Controller Devices
Following is a list of popular MPE controllers as of 2022. We're sure your Sweetwater rep is just dying to sell you one (and follow up that sale with endless phone calls: "Hi, this is Tad! How are those velcro cable wraps workin' out for ya?")
Roli - Seaboard
Sensel - Morph
Expressive E - Osmose
Keith McMillen Instruments - K-Board Pro 4, QuNexus Red
Haken Audio - Continuum Fingerboard
Roger Linn Designs - Linnstrument
Artiphon - Instrument 1
QWERTY Musical Typing Keyboard (MTK)
![QWERTY Keyboard VELOCITY: 90 BEND - / + MOD [0-9] SUSTAIN RESET C4 C5 OCT- STEP- A S D F G H J K L :](/content/2026/05/983809/images/026eaa930b20d89c941e60c3bb58401627a512734cbe0f0dfb5c832a88a6334b.jpg)
If you don't have a MIDI keyboard attached to your computer, the standard QWERTY computer keyboard can be used to play notes - we're pretty sure you've got one of those! We'll refer to this as the "MTK." Following is a list of MTK keyboard modifiers and functions:
natural_image
Abstract geometric logo with vertical stripes inside a circular frame (no text or symbols)Opening and Closing the MTK - click the circular keyboard icon in the top toolbar. To close the MTK, click the keyboard icon in the top toolbar, or click the X in the top right corner.
Play Notes- To trigger notes, simply press the corresponding computer keyboard key or mouse click the onscreen keys.
Adjust Currently Visible MTK Range- Slide the purple scroll bar horizontally to adjust the currently visible keyboard range.
Adjust Overall Visible Keyboard Range- Clicking and dragging the right edge of the MTL window allows the overall size of the window to be adjusted. This lets you view more or less of the onscreen keyboard. Note that the MTK window's borders cannot exceed the overall outside dimensions of the Sines window.
Shift Range Up/Down Octave- Click the Oct- and Oct+ buttons at the top left and right of the onscreen MTK. The current range is displayed above the keyboard.
Shift Range Up/Down Semitone- Click the Step- and Step+ buttons at the bottom left and right of the onscreen MTK. The current range is displayed above the keyboard.
Hide/View Controllers- Clicking Control at the far left hides and displays velocity, bender, mod, and sustain control parameters. Hiding the control view makes more space available for the keyboard.
Set Note Velocity- Move the purple Velocity bar to adjust the output velocity of notes.
Pitch Bend- To pitch a note or notes, press the + or - computer keyboard keys while playing a note. Notes will bend up to an octave. Notes can also be pitchbent by clicking the mouse in the Bend area.
Mod Wheel- To add mod wheel modulation, press the number keys from 0-9 (above the character keys) while playing a note. The modulation amount will vary from none (0) to full modulation (9). Note that modulation will "stick" at the selected number; to disable modulation, click the 0 key. Mod can also be engaged by clicking the mouse in the mod bar area.
Sustain- The Sustain button mimics the functionality of a standard sustain pedal. Click the [TAB] key to engage sustain, or [SHIFT]+[TAB] to lock it. The Sustain button can also be engaged by mouse clicking it.
Reset- Initializes all MTK parameters including keyboard range and control parameters.
Settings
Clicking the settings gear opens a window with multiple tabs for configuring various "under-the-hood" settings. These are mostly set-and-forget kind of parameters - all the stuff you'll want to tweak is on the front panel, as it should be.
General
- Add Undo For Control Changes With The Mouse- Enabling this allows undo of knob和社会/or slider/button adjustments. You'll want this on if you want the ability to undo all aspects of patch editing and programming.
- Create A Log File For Usage- This creates a text doc of all of Sines' internal and routines during use. It is mainly intended for our tech staff should you experience any issues. Clicking Show Log Folder opens the folder containing Sines log file docs.
- Load Last Preset On Startup (Standalone Only)- Automatically loads the last preset used when Sines standalone version is started.
- Preset Folder- Displays the current location of Sines' sound presets. This can be changed by clicking and typing in the field.
- Browse... - Displays the current location of preset folder in the file manager.
- Set Default- Sets the current displayed Preset Folder path as the default location
- Clear Cache Files- Deletes all log files, temporary sounds, and the image cache.
Interface
Allows customization of Sines' user interface settings.
- Reset To Default Window Size- Resets the Sines workspace to 100%. Use this to reset the window size if Sines' workspace somehow becomes too large for your display and can't be resized.
- Tooltip Delay- Tooltips are those informative bits of text that pop up when hovering over a control (go ahead and try it, we'll wait...). The Tooltip Delaysetting defines how long you must hover before the tooltip pops up.
- Knob Movement- Defines which how mouse movements related to turning onscreen knobs. It defaults to Vertical Drag, but can be changed to Horizontal Drag, or Rotary Drag if you're one those folks that cut their teeth on the Steinberg Model E VST back in 2000.
- On Control Double-Click- Defines what happens when the mouse is double-clicked on a control. If Edit Value is selected, an exact number can be entered by typing the number and hitting [ENTER] or [RETURN]. If Sets Default Value is selected, double-clicking a control resets it to its default value.
- Mouse Wheel Adjusts Control Value- Enabling this lets you adjust knob, slider, and switch values by moving the mouse wheel. This works great with a standard mouse wheel, but you'll want to disable it if you're using an Apple Magic Mouse (which will move the control AND scroll the window).
- Show Tooltips When Adjusting Controls With Mouse- Displays parameter tooltips/values when the mouse is hovered over a control or as a control is moved with mouse button down.
- Show Tooltips When Automating Controls- Displays parameter tooltips/values next to controls a if a control is moved via an assigned MIDI controller or automation.
- MIDI Program Changes Should Change Current Preset- Allows MIDI program change messages to change Sines patches.
- Ask To Save Modified Presets- This opens a dialog window asking if you'd like to save changes if a patch has been edited and a new patch is selected. If you're the type that likes to click through presets and tweak a control here and there, it can be annoying to have a window pop-up
asking if you'd like to save every time you switch presets - if you're that person, keep this off.
- Remember MIDI Mappings For New Plug-in Instances- When enabled, Sines remembers all MIDI Tab controller settings.

Account
Settings for your personal login information and account.
- Email- Displays the email address of the current login.
- Update Login Info- Clicking this opens the same email and password login screen you'll see when initially launching Sines. Click here for information about soft rock superstars, Loggins and Messina.
- View Account Settings- This opens your personal account page on the Cherry Audio Store website containing information about modules purchased and more.
Software Update
- We often fix bugs and make improvements; below are options defining how Sines handles updates.
- Check For Update- Click this to see if an updated version of Sines is available.
Status:
- Automatically Install Updates- Updates are automatically downloaded and installed.
- Ask Before Installing Updates- By default, Sines automatically downloads new versions of modules when available. Checking this box defeats automatic updates and will ask if you'd like to install updates when they become available.
We'll never make changes that can potentially "break" existing patches
but we recommend enabling Ask Before Installing Updates if you're using Sines for live performances or other mission-critical situations.
- Never Install Updates- Sines never automatically installs updates.
- Show Updates On Toolbar- Checking this will display an icon in the toolbar next to the logo letting you know there's an update available.
Show Notifications From Cherry Audio- We occasionally will fire off in-app advertisements; disabling this checkbox will hide them. We hate repetitive, annoying ads as much as you do, so we won't use this feature too often. When we do, it'll be for something super cool (like a killer sale), so we recommend leaving it on.
Audio/MIDI
Settings for audio and MIDI hardware input and output.
This tab is only visible in the standalone version of Sines.
- Output- Use this drop-down menu to choose a physical audio output source. This defaults to Built-In Line Output, i.e. your computer's onboard system audio, but you'll get better fidelity with an external professional audio interface. The biggest audible difference is usually reduced background noise or hum, but external audio hardware also offers greater flexibility in terms of number of inputs and outputs and built-in mic or low-level instruments pres (i.e. electric guitars). These are especially useful if you're using Sines' external inputs to process sound. The Test button will produce a brief sine wave when clicked; this will help with troubleshooting, aka, "WHY THE HECK ISN'T THIS MAKING ANY NOISE?!?"
- Sample Rate- This sets Sines' global sample rate. Lower sample rates offer better performance, but if you have a fast computer, high sample rates may offer slightly improved fidelity.
- Audio Buffer Size- As with any digital audio app, this defines performance vs. note latency, and will largely depend upon computer CPU speed. A professional external audio interface will almost always exhibit
better performance than “built-in” system audio. Lower settings will result in less latency (in the form of faster response to notes played), but will increase the chances of audio gapping or crackling noise.
- Active MIDI Inputs- Displays all available MIDI input sources, i.e. keyboards, pad controls, MIDI knob/fader control surfaces, etc. Check boxes to enable one or more devices. If notes aren't playing when using Sines in standalone mode check to make sure your USB/MIDI controller is checked in this area.
- Pre-Purchase Demo Mode
- Technical Assistance
- Top Toolbar and Preset Browser
- Importing Presets with drag-and-drop
- Focus Button
- Preset List Right-Click Functions
- LFO 1/2/3/4
- Oscillators
- Oscillator Concept
- Oscillator Controls
- Adding Vibrato to all Oscillators at once
- Waveshaping Controls
- Modulation Controls
- Filter
- Controls
- Envelope Generators
- Modulation Routings
- Parameter Mod boxes
- Mod Matrix
- Sines Controls and Knob Rings/Bars
- Mod and Via Sources
- Mod Destinations
- DESTINATION CATEGORY DESTINATION
- Arpeggio
- Keyboard Assign
- Effects
- Distortion
- Mod FX
- Delay
- Reverb
- Graphic EQ
- Master
- Left-Hand Controls
- Programming Sines - Three Different Approaches
- Approach #1 - Stacking Sine Waves
- Approach #2 - Standard Subtractive Synthesis (With Mondo Oscillators)
- Approach #3 - Phase Modulation / DX-type FM Synthesis
- The Boring and (Sort Of) Important History of Frequency Modulation vs. Phase Modulation Synthesis
- Phase Modulation Basics
- Phase Modulation Synthesis with Sines
- MIDI Controllers Setup and the MIDI Tab
- Basic External Hardware Control Assignment
- The MIDI Tab
- MIDI Tab Columns
- MIDI Tab Column Configuration Right-Click Menus
- MIDI Tab Parameters Right-Click
- Using MIDI Polyphonic Expression (MPE)
- Do not enable MPE mode if you're not using an appropriate MPE controller. Sines will not play correctly with a standard USB MIDI controller. Do not taunt happy fun ball!
- MPE Control Tab
- MPE Tab Parameters Right-Click
- SECTION PARAMETER
- Popular MPE Controller Devices
- QWERTY Musical Typing Keyboard (MTK)
- Settings
- General
- Interface
- Account
- Software Update
- Status:
- Audio/MIDI
- This tab is only visible in the standalone version of Sines.
Brand : Cherry Audio
Model : Sines
Category : Audio software